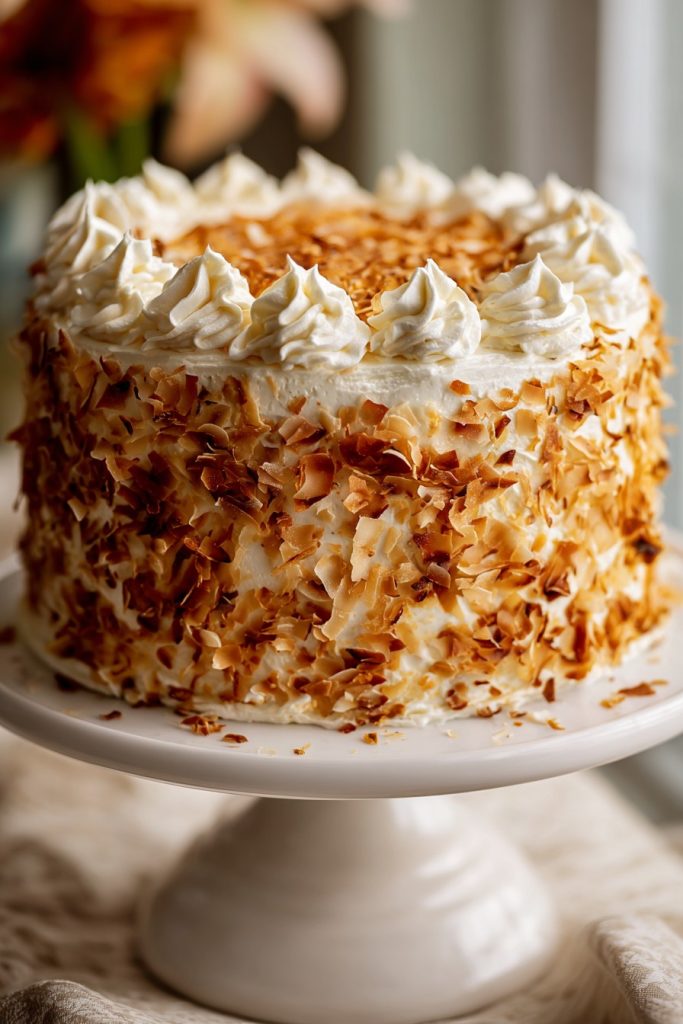
Yieldingly moist and exquisitely textured, this coconut cake represents the pinnacle of tropical dessert engineering. Your journey toward mastering this classic American confection begins with understanding the precise emulsion techniques that guarantee structural integrity while delivering unparalleled flavor complexity.
Why This Recipe Works
- The reverse creaming method ensures exceptionally fine crumb structure by coating flour particles with fat before liquid incorporation, preventing gluten overdevelopment and resulting in supremely tender texture that withstands generous frosting applications without structural compromise.
- Triple coconut integration—through coconut milk, shredded coconut, and coconut extract—creates multidimensional flavor layering where each component contributes distinct aromatic compounds and textural elements that harmonize rather than compete on the palate.
- Temperature-controlled butter emulsion maintains optimal air cell distribution throughout the batter, creating microscopic pockets that expand uniformly during baking to produce consistent rise without tunneling or uneven grain patterns.
- Acidic buttermilk tenderization works synergistically with baking soda’s alkaline properties to create controlled leavening reactions that continue through the entire baking process rather than exhausting prematurely in the mixing bowl.
- Swiss meringue buttercream formulation provides superior stability and silkiness compared to American buttercreams, with the added benefit of being less cloyingly sweet, allowing the nuanced coconut flavors to shine through without sugar masking.
Ingredients
- 3 cups (360g) cake flour, sifted twice
- 2 1/2 teaspoons baking powder
- 1/2 teaspoon baking soda
- 1 teaspoon fine sea salt
- 1 cup (226g) unsalted butter, softened to 65°F
- 2 cups (400g) granulated sugar
- 4 large eggs, brought to room temperature
- 1 tablespoon pure vanilla extract
- 2 teaspoons coconut extract
- 1 1/2 cups (360ml) full-fat coconut milk, shaken well
- 1/2 cup (120ml) buttermilk
- 2 cups (170g) sweetened shredded coconut
- 6 large egg whites
- 1 1/2 cups (300g) granulated sugar
- 1 1/2 cups (339g) unsalted butter, cubed and chilled
- 1 teaspoon vanilla extract
- 1/2 teaspoon coconut extract
- 2 cups (170g) toasted coconut flakes for decoration
Equipment Needed
- Stand mixer with paddle and whisk attachments
- Three 8-inch round cake pans
- Parchment paper rounds
- Digital kitchen scale
- Instant-read thermometer
- Cooling racks
- Offset spatula
- Cake turntable
- Double boiler or heatproof bowl
- Sifter or fine-mesh strainer
Instructions
Prepare Cake Components and Pan Configuration
Begin by preparing your baking environment to ensure optimal results. Preheat your oven to precisely 350°F and position racks in the upper and lower thirds to facilitate even heat distribution. Prepare three 8-inch round cake pans by brushing with melted butter and lining with parchment rounds, then dust with flour, tapping out excess. Sift together 3 cups cake flour, 2 1/2 teaspoons baking powder, 1/2 teaspoon baking soda, and 1 teaspoon fine sea salt into a large bowl, repeating the sifting process to guarantee absolute homogeneity. In your stand mixer fitted with the paddle attachment, combine 1 cup softened butter with 2 cups granulated sugar, mixing on medium-low speed until the mixture appears pale and fluffy, approximately 3-4 minutes. Incorporate 4 room-temperature eggs one at a time, allowing each to fully emulsify before adding the next, then blend in 1 tablespoon vanilla extract and 2 teaspoons coconut extract until thoroughly incorporated. Pro Tip: Temperature control is critical—butter at 65°F creates optimal emulsion while preventing greasy separation.
Execute Reverse Creaming Methodology
Implement the reverse creaming technique by adding your sifted dry ingredients to the butter-egg mixture in three additions, alternating with 1 1/2 cups coconut milk and 1/2 cup buttermilk, beginning and ending with dry ingredients. Mix on low speed just until combined after each addition, taking care not to overwork the batter. The mixture should appear smooth and homogeneous with no dry pockets but still retain some viscosity. Fold in 2 cups shredded coconut using a flexible spatula, employing a gentle folding motion to distribute evenly without deflating the incorporated air. Divide the batter equally among the three prepared pans, using a digital scale to ensure precise 600-gram portions for uniform baking. Smooth the surfaces with an offset spatula and gently tap pans on the countertop to release any large air bubbles that could create tunneling during the baking process.
Precision Baking and Doneness Verification
Place the filled cake pans in your preheated 350°F oven, staggering them to allow for optimal air circulation. Bake for 25-30 minutes, rotating pans halfway through the baking time to ensure even browning. The cakes are properly baked when the centers spring back when lightly pressed, the edges begin pulling away from the pan sides, and an instant-read thermometer inserted into the center registers 205-210°F. Remove from oven and cool in pans on wire racks for exactly 15 minutes before inverting onto racks to cool completely. Pro Tip: The internal temperature test is more reliable than visual cues alone, as coconut cakes can appear set before achieving proper structural development.
Construct Swiss Meringue Buttercream Foundation
While cakes cool, prepare the Swiss meringue buttercream by combining 6 egg whites and 1 1/2 cups granulated sugar in a heatproof bowl set over a pan of simmering water. Whisk constantly until the sugar completely dissolves and the mixture reaches 160°F on an instant-read thermometer, ensuring all potential bacteria are eliminated. Transfer to a stand mixer with the whisk attachment and whip on high speed until the meringue forms stiff, glossy peaks and the bowl feels cool to the touch, approximately 8-10 minutes. Switch to the paddle attachment and gradually add 1 1/2 cups cubed chilled butter, one piece at a time, waiting until each piece is fully incorporated before adding the next. The mixture may appear curdled initially but will emulsify into a smooth, spreadable consistency once all butter is incorporated. Blend in 1 teaspoon vanilla extract and 1/2 teaspoon coconut extract until homogeneous.
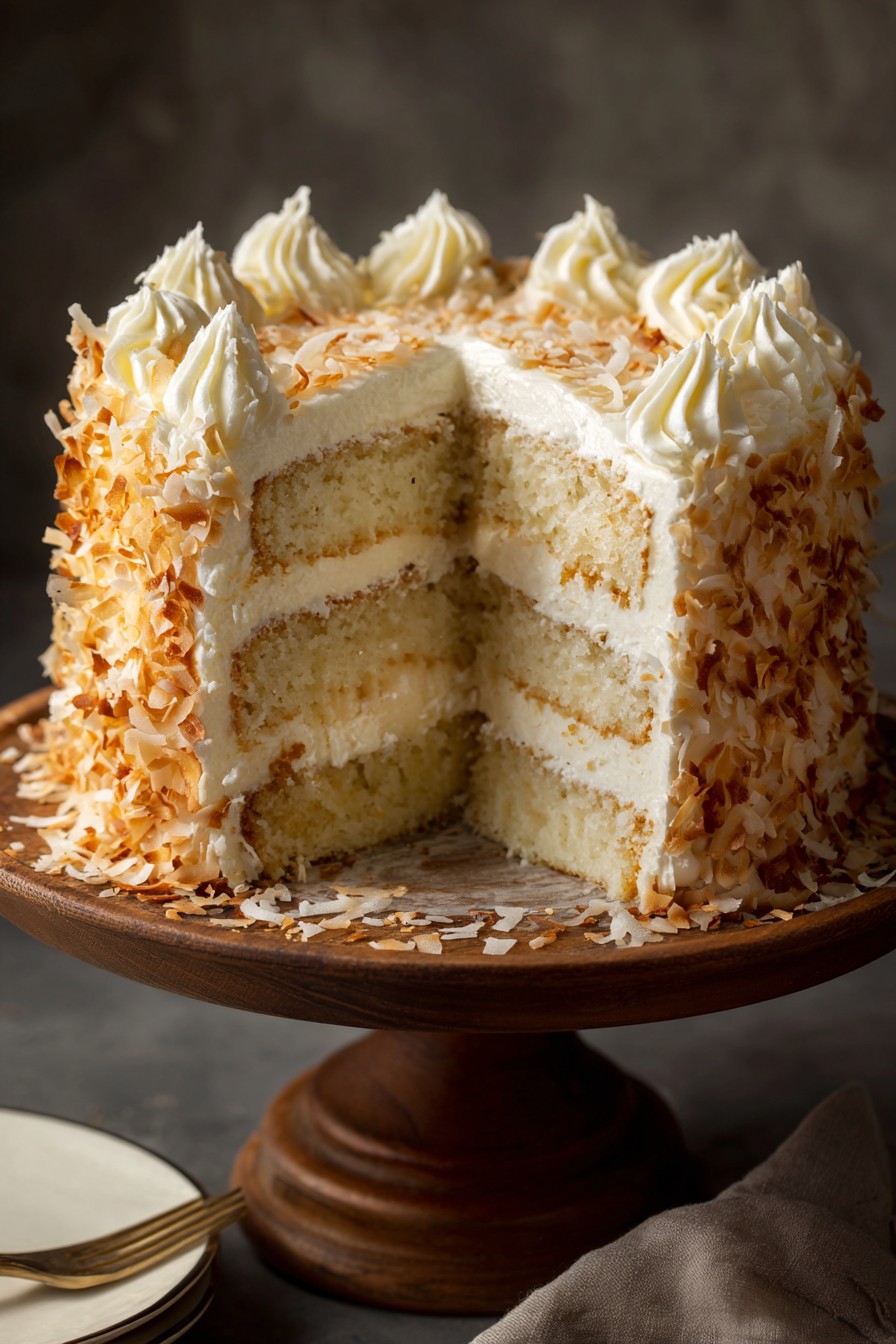
Assemble and Finish Layered Structure
Level your completely cooled cake layers using a serrated knife if necessary to create flat, even surfaces. Place one layer on a cake board or serving plate atop a turntable. Spread approximately 3/4 cup buttercream evenly over the first layer using an offset spatula, extending just to the edges. Position the second layer and repeat the process, then place the final layer bottom-side up to create a perfectly flat top surface. Apply a thin crumb coat of buttercream over the entire cake, refrigerating for 20 minutes to set the foundation. Apply the final coat of remaining buttercream, using a bench scraper for smooth sides and creating decorative swirls on top if desired. Press 2 cups toasted coconut flakes onto the sides and sprinkle additional flakes over the top for visual appeal and textural contrast. Pro Tip: Chilling between crumb coat and final frosting prevents crumbs from migrating into your finished surface.
Tips and Tricks
For professional-grade results beyond the basic instructions, consider these advanced techniques. When measuring coconut milk, always shake the can vigorously before opening to redistribute the separated cream, then stir thoroughly before measuring. For enhanced coconut flavor complexity, consider toasting your shredded coconut at 325°F for 8-10 minutes before incorporating into the batter, watching carefully as it can burn quickly—the Maillard reaction will develop deeper, nuttier flavor notes. If your kitchen environment is particularly warm, chill your mixing bowl and paddle attachment before beginning the buttercream to maintain emulsion stability. For exceptionally smooth buttercream application, dip your offset spatula in hot water and wipe dry between strokes—the slight warmth will help create glass-like surfaces. When storing leftovers, press plastic wrap directly against cut surfaces to prevent drying, as coconut cake’s high moisture content makes it particularly susceptible to staling. For make-ahead convenience, the unfrosted cake layers can be wrapped tightly in plastic and frozen for up to three months—thaw overnight in refrigerator before assembling. If your buttercream appears too soft after mixing, refrigerate for 15-minute intervals, re-whipping between chill sessions until it reaches proper spreading consistency. For decorative piping, reserve about one cup of buttercream before adding the coconut extract to maintain pure white color for intricate designs. When toasting coconut for garnish, spread in a single layer on a parchment-lined baking sheet and check every 2 minutes after the 5-minute mark, as the transition from perfectly golden to burnt happens rapidly.
Recipe Variations
- For a tropical twist, incorporate 1 cup finely diced pineapple that has been thoroughly drained and patted dry into the batter along with the shredded coconut. The pineapple’s natural enzymes will tenderize the crumb further while adding bright acidity that cuts through the richness. Reduce coconut milk to 1 1/4 cups to account for the additional moisture from the fruit.
- Create a chocolate-coconut fusion by replacing 3/4 cup of cake flour with Dutch-process cocoa powder and adding 4 ounces melted and cooled bittersweet chocolate to the butter-sugar mixture. The deep chocolate notes provide beautiful contrast to the coconut’s tropical character, creating a sophisticated flavor profile reminiscent of classic candy bar combinations.
- For a layered texture experience, prepare a coconut pastry cream by whisking 2 cups coconut milk, 1/2 cup sugar, 4 egg yolks, 3 tablespoons cornstarch, and 1/4 teaspoon salt over medium heat until thickened, then stirring in 2 tablespoons butter and 1 cup toasted coconut. Spread between cake layers instead of buttercream for a surprise interior element.
- Transform into individual portions by baking in standard muffin tins lined with parchment squares, reducing baking time to 18-22 minutes. These miniature cakes can be frosted individually and make elegant plated desserts, or served unfrosted as breakfast pastries with a simple dusting of powdered sugar.
- Develop an adult-oriented version by brushing cooled cake layers with 1/2 cup coconut rum or Malibu liqueur before assembling. The alcohol will not fully bake out but will integrate into the crumb, adding complexity and moisture while complementing the coconut flavors with subtle caramel notes.
Frequently Asked Questions
Can I substitute all-purpose flour for cake flour in this recipe?
While substitution is possible, it will significantly alter the final texture. Cake flour contains less protein (approximately 8%) compared to all-purpose flour (10-12%), resulting in more delicate gluten formation and tender crumb structure. To approximate cake flour, measure 1 cup all-purpose flour, remove 2 tablespoons, and replace with 2 tablespoons cornstarch for each cup required. Sift this mixture three times to ensure even distribution. However, even with this modification, the texture will be slightly denser than with true cake flour, as the starch composition and milling process differ. For optimal results, I strongly recommend sourcing proper cake flour, which is widely available in the baking aisle of most grocery stores.
Why did my buttercream appear curdled during preparation?
Curdling in Swiss meringue buttercream typically occurs due to temperature imbalance between the meringue and butter components. The meringue must be completely cool (below 70°F) before adding butter, and the butter should be chilled but pliable (around 65°F). If your kitchen is particularly warm, the butter may become too soft, causing separation. To rescue curdled buttercream, continue mixing on medium speed—it will often come together given time. If persistent, remove approximately one-quarter of the mixture, microwave for 10 seconds until melted, then slowly stream back into the mixing bowl while beating on low speed. The emulsifiers in the melted portion will help rebind the mixture.
How can I prevent my coconut from sinking in the batter?
Coconut sinking results from density disparity between the batter and add-ins. To prevent this, toss your shredded coconut with 1-2 tablespoons of the measured cake flour before folding into the batter—this light coating helps suspend the particles throughout the mixture. Additionally, ensure your batter has proper viscosity; if it appears too thin, the coconut will sink regardless of coating. Proper creaming that incorporates adequate air cells also creates buoyancy that supports add-ins. Finally, avoid overmixing after adding coconut, as this deflates the air pockets that provide necessary lift during baking.
Can I make this recipe as a sheet cake instead of layers?
Absolutely—this recipe adapts beautifully to a 9×13-inch sheet pan. Prepare the pan by greasing and flouring or lining with parchment paper. The baking time will increase to approximately 35-40 minutes at the same 350°F temperature. Test for doneness using the same internal temperature guideline of 205-210°F. Sheet cake preparation simplifies serving for large gatherings and allows for creative presentation options like creating a “naked cake” effect with minimal frosting, or topping with a simple glaze instead of buttercream. The sturdier structure of sheet cakes also makes them ideal for shipping or transporting to events.
Summary
This meticulously engineered coconut cake achieves perfection through reverse creaming methodology, triple coconut integration, and Swiss meringue buttercream application. The result is an exceptionally moist, finely-textured layer cake with professional structural integrity and nuanced tropical flavor complexity that distinguishes it from ordinary coconut cakes.
Coconut Cake
4
servings45
minutes30
minutesIngredients
Instructions
- 1 Preheat oven to 350°F. Prepare three 8-inch round cake pans with butter, parchment, and flour.
- 2 Sift together cake flour, baking powder, baking soda, and salt.
- 3 Cream butter and sugar until pale and fluffy. Add eggs one at a time, then extracts.
- 4 Alternate adding dry ingredients with coconut milk and buttermilk, beginning and ending with dry ingredients. Fold in shredded coconut.
- 5 Divide batter evenly among pans and bake 25-30 minutes until internal temperature reaches 205-210°F.
- 6 Cool in pans 15 minutes, then invert onto racks to cool completely.
- 7 For buttercream, whisk egg whites and sugar over simmering water until 160°F. Whip to stiff peaks, then gradually add butter. Blend in extracts.
- 8 Assemble cake with buttercream between layers. Frost entire cake and press toasted coconut onto sides and top.