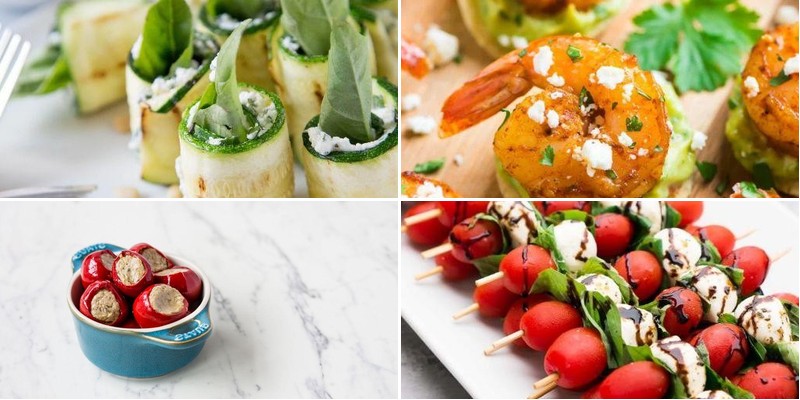
Zesty, vibrant, and perfect for sharing, cicchetti are Italy’s answer to tapas—bite-sized delights that turn any gathering into a celebration. Whether you’re hosting a casual get-together or a festive party, these 29 recipes bring the charm of Venetian canals right to your table. Ready to impress your guests with minimal fuss? Dive into our roundup and discover your new favorite appetizers!
Creamy Polenta Bites with Sausage and Sage

Ready to elevate your appetizer game with these sophisticated yet approachable polenta bites? These golden morsels combine creamy polenta with savory sausage and aromatic sage, creating the perfect balance of textures and flavors that will impress any guest. Let’s walk through each step methodically to ensure your culinary success.
12
bites35
minutes45
minutesIngredients
- 1 cup stone-ground polenta
- 4 cups whole milk
- 1/2 cup freshly grated Parmigiano-Reggiano
- 8 ounces sweet Italian sausage, casings removed
- 2 tablespoons clarified butter
- 12 fresh sage leaves
- 1/4 cup extra virgin olive oil
- 1/2 teaspoon freshly cracked black pepper
- 1 teaspoon fine sea salt
Instructions
- Combine 1 cup stone-ground polenta and 4 cups whole milk in a heavy-bottomed saucepan over medium heat.
- Whisk continuously for 25-30 minutes until the polenta thickens and pulls away from the sides of the pan.
- Remove from heat and stir in 1/2 cup freshly grated Parmigiano-Reggiano until fully incorporated.
- Spread the polenta mixture evenly into a parchment-lined 9×13-inch baking dish to a 1/2-inch thickness.
- Refrigerate uncovered for exactly 2 hours until firm to the touch.
- While polenta chills, brown 8 ounces sweet Italian sausage in a skillet over medium-high heat for 6-8 minutes, breaking it into small crumbles.
- Cut the chilled polenta into 1-inch squares using a sharp knife dipped in warm water.
- Heat 2 tablespoons clarified butter in a large non-stick skillet over medium heat until shimmering.
- Pan-fry polenta squares in batches for 3-4 minutes per side until golden brown and crisp-edged.
- In a separate small saucepan, heat 1/4 cup extra virgin olive oil to 350°F and fry 12 fresh sage leaves for 15-20 seconds until crisp.
- Season the fried polenta bites with 1 teaspoon fine sea salt and 1/2 teaspoon freshly cracked black pepper.
- Top each polenta square with sausage crumbles and one crisp sage leaf.
Here’s what makes these bites exceptional: the contrast between the creamy interior and crisp exterior creates textural magic, while the sage’s earthy notes beautifully complement the rich sausage. Consider serving them atop a swipe of roasted garlic puree for an extra layer of flavor complexity, or arrange them on a wooden board with lemon wedges for a stunning presentation.
Prosciutto-Wrapped Asparagus Spears
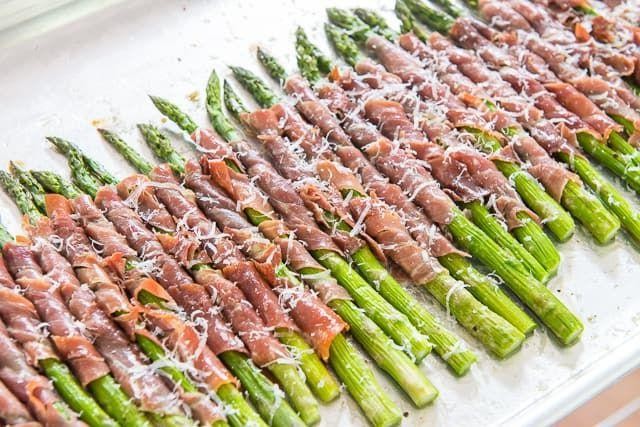
Baking prosciutto-wrapped asparagus spears transforms simple ingredients into an elegant appetizer that balances savory, salty, and earthy flavors. This methodical approach ensures each spear emerges with crisp-tender asparagus encased in perfectly rendered, salty prosciutto. Follow these precise steps to achieve consistent, restaurant-quality results every time.
8
spears10
minutes15
minutesIngredients
– 1 pound fresh asparagus spears, trimmed
– 8 thin slices prosciutto di Parma
– 2 tablespoons extra-virgin olive oil
– 1/2 teaspoon freshly cracked black pepper
– 1/4 teaspoon fine sea salt
Instructions
1. Preheat your oven to 400°F and position one rack in the upper third of the oven.
2. Line a heavy-gauge baking sheet with parchment paper to prevent sticking and ensure even browning.
3. Hold each asparagus spear at both ends and gently bend until it snaps at its natural breaking point, discarding the woody ends.
4. Arrange the trimmed asparagus spears in a single layer on the prepared baking sheet.
5. Drizzle the extra-virgin olive oil evenly over the asparagus spears, using a pastry brush to coat each spear thoroughly.
6. Sprinkle the fine sea salt and freshly cracked black pepper uniformly over the oiled asparagus.
7. Lay one prosciutto slice flat on your work surface and place 3-4 asparagus spears perpendicular across the bottom edge.
8. Roll the prosciutto snugly around the asparagus bundle, overlapping the ends slightly to secure.
9. Transfer the wrapped bundle to the baking sheet, seam-side down, and repeat with remaining ingredients.
10. Space the bundles 1 inch apart on the baking sheet to allow for proper air circulation and even cooking.
11. Bake for 12-15 minutes until the prosciutto is crisp and lightly browned at the edges.
12. Rotate the baking sheet 180 degrees at the 8-minute mark to ensure even browning.
13. Remove from oven when the asparagus tips are slightly crispy and the spears yield gently to pressure.
Just out of the oven, these spears offer a satisfying contrast between the shatteringly crisp prosciutto and the tender-crisp asparagus interior. The rendered prosciutto fat creates a savory glaze that enhances the asparagus’s natural sweetness. For an elegant presentation, arrange them standing upright in a narrow glass or serve alongside a lemon aioli for dipping.
Caprese Salad Skewers with Balsamic Glaze
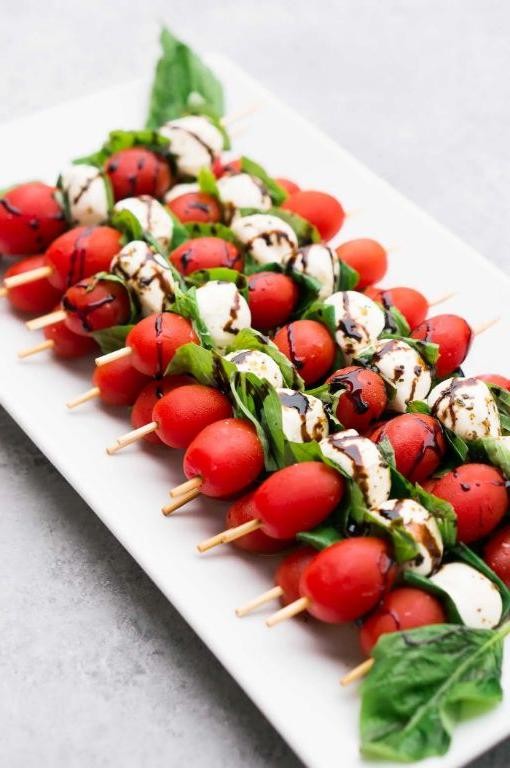
Holding the essence of summer in your hands has never been simpler than with these elegant skewers. Here’s how to create these beautiful appetizers that capture the classic Caprese flavors in a perfectly portable form. This method ensures each component shines while coming together harmoniously.
16
skewers15
minutes15
minutesIngredients
– 16 fresh cherry tomatoes, preferably heirloom varieties
– 16 small fresh mozzarella balls (bocconcini), drained
– 32 fresh basil leaves, preferably Genovese basil
– 1/2 cup high-quality balsamic vinegar
– 2 tablespoons extra virgin olive oil
– 1/4 teaspoon fine sea salt
– 1/8 teaspoon freshly cracked black pepper
– 16 (6-inch) wooden skewers, soaked in water for 30 minutes
Instructions
1. Arrange all ingredients in an organized mise en place on your work surface.
2. Thread one cherry tomato onto the pointed end of a soaked wooden skewer.
3. Fold one fresh basil leaf into a compact bundle and slide it directly against the tomato.
4. Add one small fresh mozzarella ball immediately following the basil bundle.
5. Repeat the basil folding and threading process with a second leaf.
6. Complete the skewer by adding a final cherry tomato at the base.
7. Repeat this threading pattern with all remaining ingredients to create 16 complete skewers.
8. Arrange the finished skewers in a single layer on a serving platter.
9. Drizzle 2 tablespoons of extra virgin olive oil evenly over all skewers.
10. Sprinkle 1/4 teaspoon of fine sea salt uniformly across the assembled skewers.
11. Distribute 1/8 teaspoon of freshly cracked black pepper over the entire arrangement.
12. Pour 1/2 cup of high-quality balsamic vinegar into a small saucepan.
13. Bring the balsamic vinegar to a simmer over medium heat, watching for tiny bubbles forming around the edges.
14. Reduce the heat to medium-low and maintain a gentle simmer for 8-10 minutes, stirring occasionally with a silicone spatula.
15. Cook until the vinegar reduces by half and coats the back of a spoon thickly.
16. Remove the reduced balsamic glaze from heat and let it cool for 5 minutes until slightly thickened.
17. Drizzle the warm balsamic glaze in a zigzag pattern across the arranged skewers.
Delightfully balanced between creamy, fresh, and tangy, these skewers offer a satisfying textural contrast with each bite. The reduced balsamic glaze provides a sweet-tart counterpoint to the rich mozzarella, while the basil releases its aromatic oils when pierced. For an elegant presentation, arrange them in a circular pattern on a large platter with additional basil sprigs scattered between the skewers.
Grilled Zucchini Rolls with Ricotta and Mint
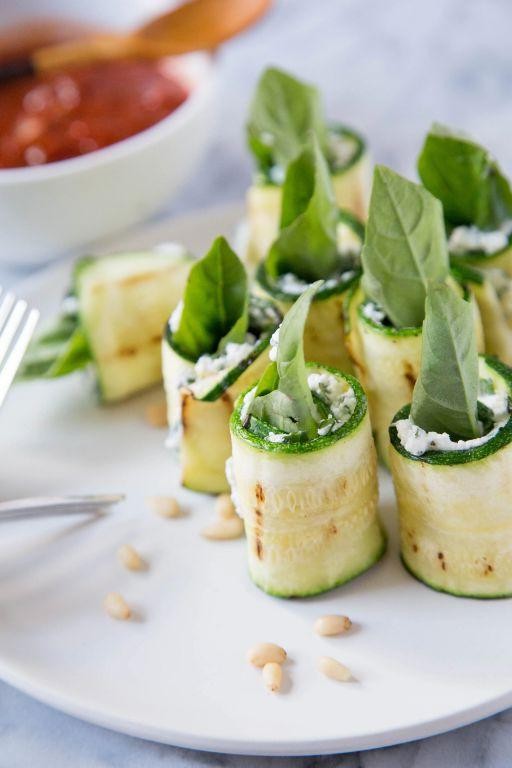
Using summer’s bounty at its peak, these elegant grilled zucchini rolls transform simple vegetables into an impressive appetizer that balances creamy richness with fresh herbal notes. The technique requires careful preparation but yields restaurant-quality results perfect for entertaining or elevating weeknight meals.
12
rolls20
minutes12
minutesIngredients
- 3 medium zucchini, sliced lengthwise into 1/4-inch thick planks
- 2 tablespoons extra-virgin olive oil
- 1 cup whole-milk ricotta cheese, drained
- 1/4 cup fresh mint leaves, finely chiffonaded
- 1 lemon, zested and juiced
- 1/4 teaspoon fine sea salt
- 1/8 teaspoon freshly cracked black pepper
- 2 tablespoons pine nuts, lightly toasted
Instructions
- Preheat a gas or charcoal grill to medium-high heat (400°F), ensuring grates are clean and lightly oiled.
- Brush zucchini planks evenly with extra-virgin olive oil on both sides, using approximately 1 tablespoon total.
- Place zucchini planks perpendicular to grill grates and grill for 2-3 minutes per side until tender with distinct char marks but still pliable.
- Transfer grilled zucchini to a baking sheet in a single layer and cool completely to room temperature, about 15 minutes.
- While zucchini cools, combine drained whole-milk ricotta, chiffonaded mint leaves, lemon zest, 1 teaspoon lemon juice, fine sea salt, and freshly cracked black pepper in a medium bowl.
- Fold ingredients together gently until fully incorporated, being careful not to overmix and break down the ricotta’s texture.
- Lay cooled zucchini planks flat on a work surface and spoon 1 heaping tablespoon of ricotta mixture along one short end of each plank.
- Roll zucchini firmly but gently around the filling, creating tight cylinders that hold their shape without squeezing out filling.
- Arrange completed rolls seam-side down on a serving platter and drizzle with remaining 1 tablespoon of extra-virgin olive oil.
- Sprinkle toasted pine nuts over the assembled rolls just before serving to maintain their crisp texture.
Just out of the grill, these rolls offer a delightful contrast between the smoky, tender zucchini and the cool, creamy ricotta filling. The bright mint and lemon cut through the richness beautifully, while the toasted pine nuts provide essential crunch. For an elegant presentation, arrange them on a platter with a drizzle of high-quality olive oil and serve alongside grilled bread to soak up any remaining filling.
Artichoke and Parmesan Crostini
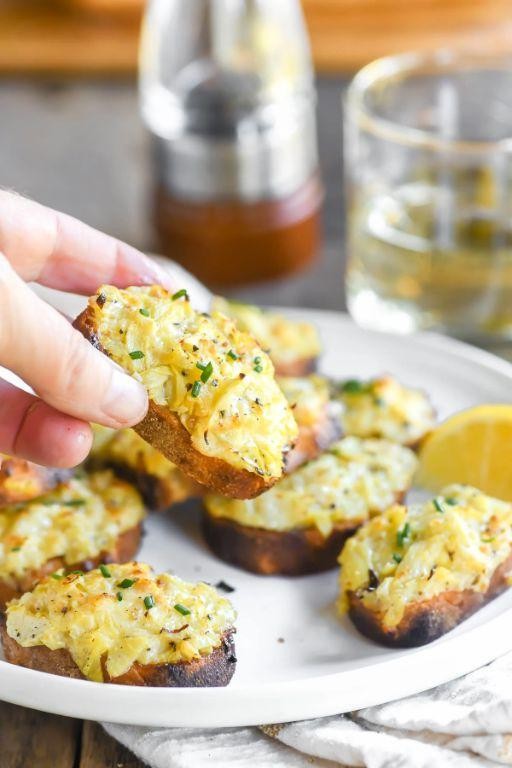
Whether you’re hosting an elegant gathering or simply craving a sophisticated snack, these artichoke and Parmesan crostini deliver restaurant-quality flavors with approachable techniques. We’ll build these elegant bites layer by layer, starting with perfectly toasted bread and finishing with a golden, bubbly cheese crust. Each component plays a crucial role in creating the final harmonious texture and flavor profile.
1
baguette15
minutes25
minutesIngredients
– 1 French baguette, sliced into ½-inch thick rounds
– 3 tablespoons extra-virgin olive oil
– 1 cup marinated artichoke hearts, finely chopped
– 2 cloves garlic, minced
– ¼ cup full-fat mayonnaise
– ½ cup freshly grated Parmigiano-Reggiano cheese
– 1 tablespoon fresh lemon juice
– 2 tablespoons finely chopped fresh parsley
– ¼ teaspoon freshly ground black pepper
Instructions
1. Preheat your oven to 375°F and arrange the baguette slices in a single layer on a baking sheet.
2. Brush both sides of each baguette slice lightly with olive oil using a pastry brush.
3. Toast the bread in the preheated oven for 8-10 minutes until golden brown and crisp around the edges.
4. Combine the chopped artichoke hearts, minced garlic, mayonnaise, grated Parmigiano-Reggiano, lemon juice, parsley, and black pepper in a medium mixing bowl.
5. Stir the artichoke mixture thoroughly until all ingredients are fully incorporated and the texture is uniform.
6. Spoon approximately 1 tablespoon of the artichoke mixture onto each toasted baguette slice, spreading it evenly to cover the surface.
7. Return the topped crostini to the oven and bake for 12-15 minutes until the cheese is melted and the edges are bubbling.
8. Switch your oven to broil setting and broil the crostini for 1-2 minutes until the tops develop golden-brown spots.
9. Remove the baking sheet from the oven and transfer the crostini to a wire rack using a spatula.
10. Allow the crostini to cool for 3-5 minutes before serving to let the flavors meld and prevent burning your mouth.
Every bite offers a satisfying contrast between the crisp, olive oil-toasted bread and the creamy, tangy artichoke topping that melts in your mouth. The Parmigiano-Reggiano creates delicate, lacy edges while the lemon juice cuts through the richness beautifully. For an elegant presentation, arrange these on a slate board garnished with extra parsley sprigs and serve alongside a crisp Sauvignon Blanc to complement the bright, savory flavors.
Stuffed Cherry Peppers with Tuna and Capers
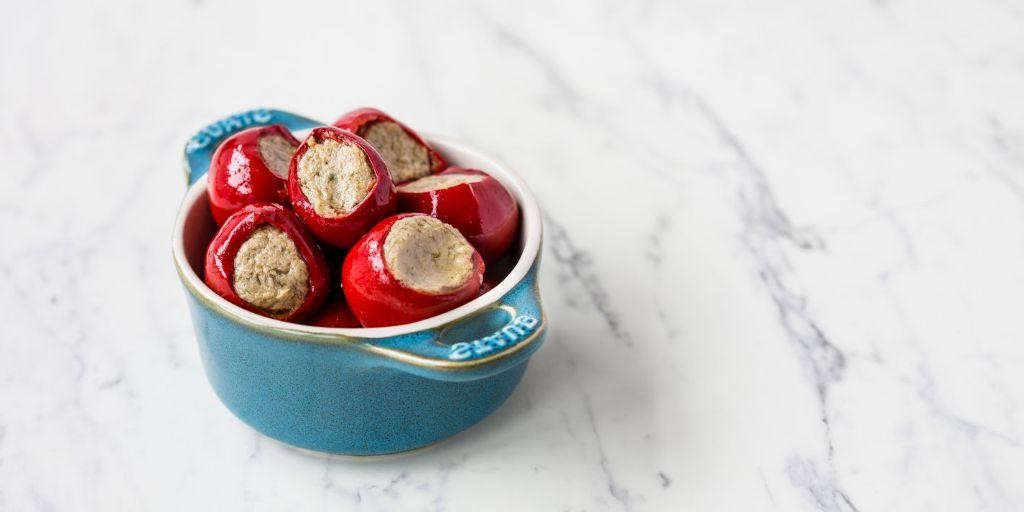
Keeping your appetizer game elevated doesn’t require complex techniques—just quality ingredients and careful preparation. These stuffed cherry peppers deliver sophisticated flavor through simple assembly, making them perfect for entertaining or a special snack. Let’s walk through creating these vibrant bites that balance heat, brine, and richness beautifully.
12
portions15
minutes20
minutesIngredients
– 12 fresh cherry peppers, tops removed and seeded
– 1 (5-ounce) can oil-packed tuna, thoroughly drained
– 2 tablespoons brined capers, rinsed and chopped
– ¼ cup whole-milk ricotta cheese
– 1 tablespoon fresh lemon juice
– 1 teaspoon finely grated lemon zest
– 2 tablespoons extra-virgin olive oil, divided
– ½ teaspoon freshly ground black pepper
– ¼ teaspoon fine sea salt
Instructions
1. Preheat your oven to 375°F and line a baking sheet with parchment paper.
2. Carefully slice the tops off 12 cherry peppers and remove all seeds and membranes using a small paring knife.
3. In a medium mixing bowl, combine the drained oil-packed tuna, chopped capers, ricotta cheese, lemon juice, and lemon zest.
4. Gently fold in 1 tablespoon of extra-virgin olive oil until the mixture is cohesive but not overworked.
5. Season the filling with ½ teaspoon freshly ground black pepper and ¼ teaspoon fine sea salt, mixing just to incorporate.
6. Using a small spoon, carefully fill each prepared cherry pepper with the tuna mixture, mounding it slightly at the top.
7. Arrange the stuffed peppers in a single layer on your prepared baking sheet.
8. Drizzle the remaining 1 tablespoon of extra-virgin olive oil evenly over the stuffed peppers.
9. Bake at 375°F for 18-22 minutes, until the peppers are tender and the filling is lightly golden at the edges.
10. Transfer the peppers to a wire rack and let them cool for 8-10 minutes before serving.
These peppers offer a delightful contrast between the tender-crisp vegetable shell and the creamy, savory filling. The briny capers cut through the richness of the tuna and ricotta, while the lemon zest provides bright top notes. Try serving them alongside marinated olives and crusty bread for a complete antipasto presentation that showcases their Mediterranean-inspired flavors.
Smoked Salmon and Dill Crostini
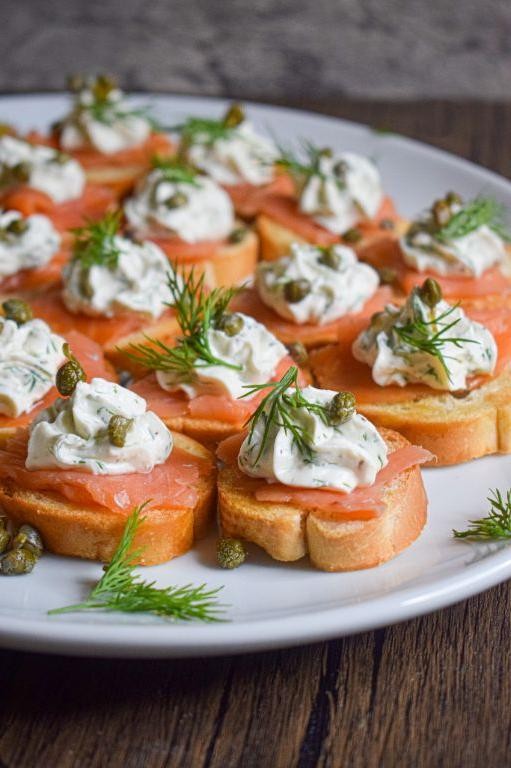
Keeping your appetizer game elevated doesn’t require complicated techniques—just quality ingredients and precise execution. These smoked salmon and dill crostini deliver sophisticated flavor with methodical preparation that ensures perfect results every time.
1
baguette15
minutes10
minutesIngredients
– 1 French baguette, sliced into ½-inch thick rounds
– 2 tablespoons extra virgin olive oil
– 8 ounces cold-smoked salmon, thinly sliced
– ½ cup crème fraîche
– 2 tablespoons fresh dill fronds, finely chopped
– 1 tablespoon capers, drained
– 1 small shallot, minced
– 1 teaspoon lemon zest
– Freshly cracked black pepper
– Flaky sea salt
Instructions
1. Preheat your oven to 375°F and arrange the baguette slices in a single layer on a baking sheet.
2. Brush each slice lightly with extra virgin olive oil using a pastry brush, ensuring even coverage to the edges.
3. Bake for 8-10 minutes until the edges turn golden brown and the centers become crisp but not hard.
4. Remove the crostini from the oven and transfer to a wire rack to cool completely, which prevents sogginess.
5. In a small mixing bowl, combine crème fraîche, finely chopped dill fronds, minced shallot, and lemon zest.
6. Stir the mixture gently with a rubber spatula until fully incorporated, being careful not to overmix.
7. Spread approximately 1 tablespoon of the dill crème fraîche mixture onto each cooled crostini base.
8. Drape one slice of cold-smoked salmon over each crostini, allowing it to fold naturally for visual appeal.
9. Garnish each crostini with 3-4 capers and a light sprinkle of flaky sea salt.
10. Finish with a generous twist of freshly cracked black pepper over the entire arrangement.
Each bite delivers a satisfying crunch from the perfectly toasted bread, followed by the silky texture of smoked salmon and the bright, herbal notes of fresh dill. The capers provide briny bursts that cut through the richness, while the lemon zest adds subtle citrus undertones. For an elegant presentation, arrange these on a slate board with extra dill sprigs and lemon wedges for guests to customize their experience.
Marinated Olives with Orange and Fennel
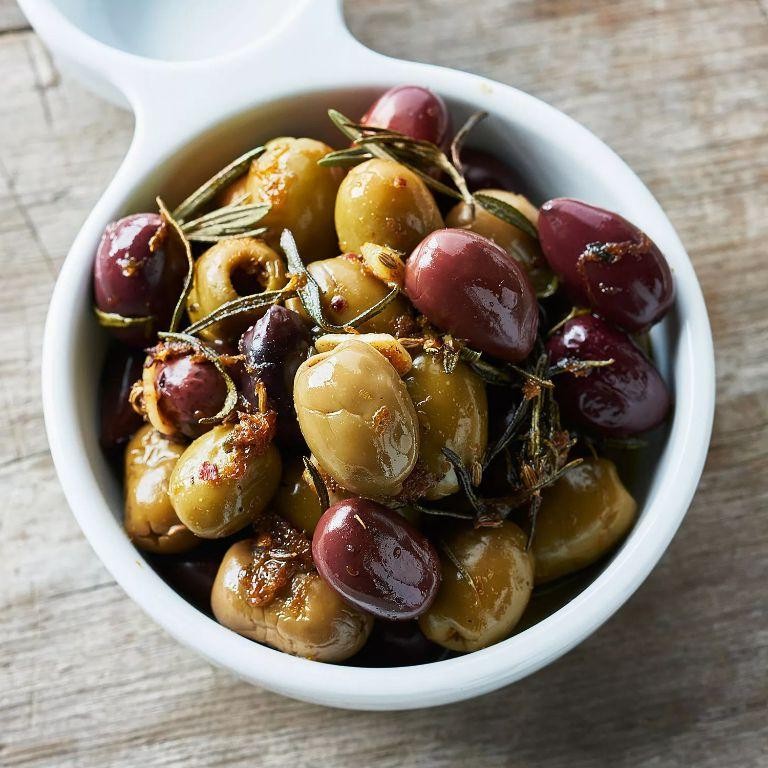
Every home cook needs a reliable appetizer that impresses with minimal effort, and these marinated olives deliver exactly that. Elevating simple ingredients through thoughtful preparation creates a sophisticated starter perfect for any gathering.
5
servings20
minutesIngredients
– 2 cups mixed Castelvetrano and Kalamata olives, drained
– 1 medium navel orange, zested and thinly sliced
– 1 small fennel bulb, fronds reserved and bulb thinly sliced
– 3 sprigs fresh thyme
– 2 cloves garlic, thinly sliced
– 1 teaspoon fennel seeds, lightly crushed
– ½ teaspoon crushed red pepper flakes
– ¾ cup extra-virgin olive oil
– 2 tablespoons fresh orange juice
– 1 teaspoon high-quality sea salt
Instructions
1. Combine the drained olives, orange zest, sliced orange, sliced fennel bulb, thyme sprigs, sliced garlic, crushed fennel seeds, and crushed red pepper flakes in a medium glass bowl.
2. Pour the extra-virgin olive oil and fresh orange juice over the olive mixture.
3. Gently stir all ingredients until thoroughly coated with the oil and juice mixture.
4. Cover the bowl tightly with plastic wrap and refrigerate for exactly 8 hours to allow flavors to meld properly.
5. Remove the marinated olives from the refrigerator and let stand at room temperature for 30 minutes before serving.
6. Stir in the reserved fennel fronds and high-quality sea salt just before serving.
7. Transfer the marinated olives to a serving dish using a slotted spoon to drain excess oil.
Carefully balanced between briny, citrusy, and aromatic notes, these olives develop a wonderfully tender texture while maintaining their structural integrity. The fennel provides a subtle licorice undertone that complements the bright orange essence beautifully. Serve them alongside crusty artisan bread for dipping into the flavorful marinade oil, or as an elegant accompaniment to cheese boards and charcuterie platters.
Ricotta and Sun-Dried Tomato Bruschetta

Venturing into appetizer territory requires reliable recipes that deliver both flavor and elegance with minimal fuss. This ricotta and sun-dried tomato bruschetta offers precisely that—a harmonious blend of creamy, tangy, and savory notes perfect for entertaining or a sophisticated snack. Let’s walk through the process methodically to ensure perfect results every time.
1
baguette15
minutes10
minutesIngredients
– 1 rustic Italian baguette, sliced into ½-inch thick rounds
– 3 tablespoons extra-virgin olive oil, divided
– 1 cup whole-milk ricotta cheese
– ⅓ cup oil-packed sun-dried tomatoes, finely julienned
– 2 tablespoons fresh basil leaves, chiffonaded
– 1 small garlic clove, minced
– ½ teaspoon flaky sea salt
– ¼ teaspoon freshly cracked black pepper
Instructions
1. Preheat your oven to 375°F and position a rack in the center.
2. Arrange the baguette slices in a single layer on a parchment-lined baking sheet.
3. Brush each slice evenly with 2 tablespoons of extra-virgin olive oil using a pastry brush.
4. Toast the bread in the oven for 8–10 minutes, or until the edges are golden-brown and the centers are crisp.
5. Remove the baking sheet from the oven and let the toasts cool completely on a wire rack to prevent sogginess.
6. In a medium mixing bowl, combine the ricotta, sun-dried tomatoes, basil, garlic, salt, and pepper.
7. Fold the ingredients together gently with a rubber spatula until just incorporated to maintain texture.
8. Drizzle the remaining 1 tablespoon of olive oil over the ricotta mixture and stir once more to emulsify.
9. Spoon approximately 1 tablespoon of the ricotta mixture onto each cooled baguette toast, spreading it evenly to the edges.
10. Garnish each bruschetta with an additional basil leaf or a light sprinkle of flaky salt for visual appeal.
Perfectly balanced, this bruschetta delights with its contrast of creamy ricotta against the chewy, intense sun-dried tomatoes. The crisp baguette provides a sturdy base that holds up to the rich toppings, making it ideal for passing at gatherings. For a twist, try drizzling with a balsamic reduction or serving alongside marinated olives to elevate the antipasto spread.
Shrimp and Avocado Bites with Garlic Aioli

Zesty yet sophisticated, these shrimp and avocado bites offer the perfect balance of creamy texture and bright seafood flavor. Let’s methodically build these elegant appetizers together, ensuring each component reaches its full potential before assembly. Follow these precise steps for restaurant-quality results in your own kitchen.
48
bites20
minutes10
minutesIngredients
– 1 pound wild-caught jumbo shrimp, peeled and deveined
– 2 ripe Hass avocados
– 1 cup all-purpose flour
– 2 large pasture-raised eggs, lightly beaten
– 1 cup panko breadcrumbs
– 1/2 cup clarified butter
– 1/2 cup high-quality mayonnaise
– 3 garlic cloves, microplaned
– 1 tbsp freshly squeezed lemon juice
– 1/4 tsp smoked paprika
– 48 miniature toast rounds
– 2 tbsp minced fresh chives
Instructions
1. Pat the wild-caught jumbo shrimp completely dry using paper towels.
2. Dredge each shrimp in all-purpose flour, shaking off excess.
3. Dip floured shrimp into lightly beaten pasture-raised eggs.
4. Coat shrimp evenly with panko breadcrumbs, pressing gently to adhere.
5. Heat clarified butter in a large skillet over medium-high heat until it reaches 375°F.
6. Fry shrimp for 2 minutes per side until golden brown and internal temperature reaches 145°F.
7. Transfer cooked shrimp to a wire rack to maintain crispness.
8. Halve Hass avocados and remove pits using a sharp knife.
9. Scoop avocado flesh into a medium bowl, discarding skins.
10. Mash avocados with a fork until slightly chunky.
11. Fold in high-quality mayonnaise until fully incorporated.
12. Add microplaned garlic cloves to the avocado mixture.
13. Stir in freshly squeezed lemon juice.
14. Sprinkle smoked paprika into the mixture and combine thoroughly.
15. Arrange miniature toast rounds on a serving platter.
16. Spoon 1 tablespoon of avocado mixture onto each toast round.
17. Place one fried shrimp atop each prepared toast round.
18. Garnish each bite with minced fresh chives using tweezers for precision.
Velvety avocado creates a smooth base that contrasts beautifully with the crisp, golden shrimp. The garlic aioli adds a pungent creaminess that balances the dish’s richness. For an elegant presentation, arrange these bites on a slate board with lemon wedges and serve immediately while the shrimp remains warm and crunchy.
Goat Cheese Stuffed Dates Wrapped in Bacon

Baking these elegant appetizers transforms simple ingredients into a sophisticated bite that balances sweet, salty, and creamy flavors perfectly. Begin by selecting plump Medjool dates and high-quality bacon for the best texture contrast. This methodical approach ensures even cooking and professional results every time.
12
portions15
minutes22
minutesIngredients
– 12 large Medjool dates, pitted
– 4 ounces artisanal goat cheese, softened
– 1 tablespoon fresh thyme leaves, finely chopped
– 6 slices thick-cut applewood smoked bacon, cold
– 1 tablespoon pure maple syrup
– Freshly cracked black pepper
Instructions
1. Preheat your oven to 375°F and position a rack in the center of the oven.
2. Line a rimmed baking sheet with parchment paper to prevent sticking and facilitate cleanup.
3. Using a small paring knife, make a lengthwise incision in each date and carefully remove the pit.
4. In a small mixing bowl, combine the softened goat cheese with fresh thyme leaves until fully incorporated.
5. Using a small spoon or piping bag, fill each date cavity with approximately 1 teaspoon of the goat cheese mixture.
6. Gently press the dates closed around the filling, ensuring no cheese is exposed.
7. Cut each bacon slice in half crosswise to create 12 shorter strips.
8. Wrap one bacon strip tightly around each stuffed date, securing the ends with toothpicks.
9. Arrange the wrapped dates seam-side down on the prepared baking sheet, spacing them 1 inch apart.
10. Brush each date lightly with pure maple syrup using a pastry brush for even coating.
11. Season generously with freshly cracked black pepper over the entire surface.
12. Bake for 18-22 minutes until the bacon is crisp and deeply golden brown.
13. Carefully flip each date using tongs at the 10-minute mark to ensure even cooking on all sides.
14. Transfer the dates to a wire rack using a spatula and let rest for 5 minutes before serving.
Kitchen wisdom: The contrast between the crisp bacon exterior and the molten cheese center creates an irresistible texture experience. Drizzle with aged balsamic reduction for an acidic counterpoint that cuts through the richness, or serve alongside bitter greens for a composed appetizer plate. The caramelized date sweetness perfectly harmonizes with the tangy goat cheese and smoky bacon notes.
Pesto and Burrata Mini Pizzas
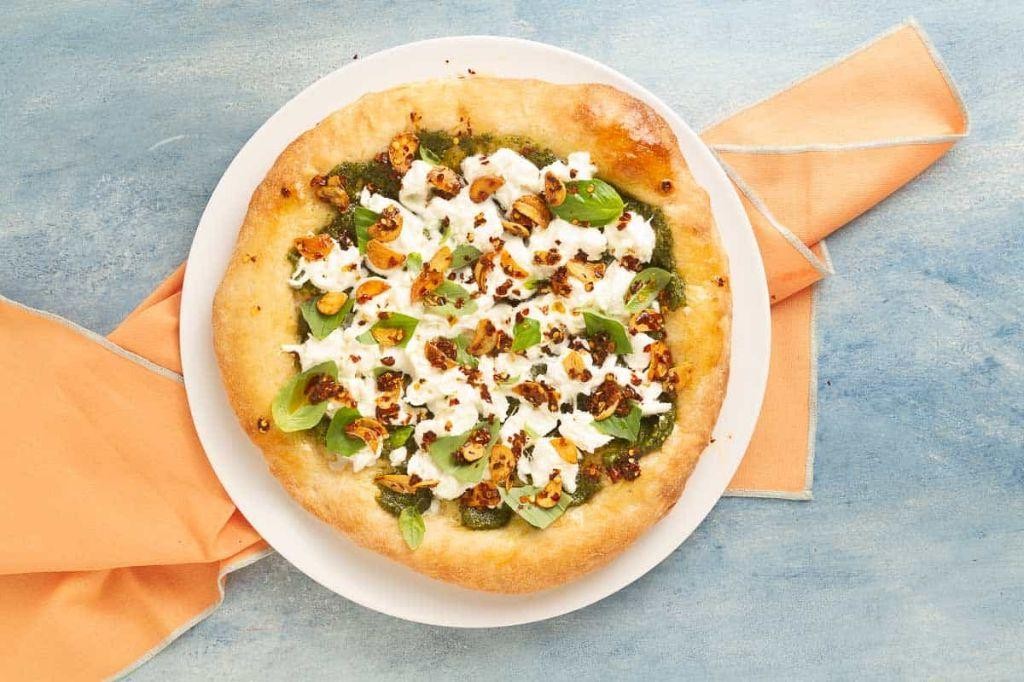
Pesto and burrata mini pizzas offer an elegant twist on traditional pizza night, combining vibrant basil pesto with creamy burrata cheese atop perfectly crisp individual crusts. Preparing these gourmet mini pizzas requires just a few quality ingredients and simple techniques that yield impressive results every time. Follow these methodical steps to create restaurant-worthy appetizers or light meals that will delight your guests with their sophisticated flavors and textures.
3
portions10
minutes14
minutesIngredients
- 4 mini pizza crusts (6-inch diameter)
- 1/2 cup high-quality basil pesto
- 8 ounces fresh burrata cheese, drained
- 1/4 cup extra virgin olive oil
- 1/4 teaspoon flaky sea salt
- 1/8 teaspoon freshly cracked black pepper
- 2 tablespoons toasted pine nuts
- 1/4 cup fresh basil leaves, chiffonade-cut
Instructions
- Preheat your oven to 425°F and position one rack in the center position.
- Arrange the mini pizza crusts on a parchment-lined baking sheet, spacing them 2 inches apart.
- Brush each crust evenly with 1 tablespoon of extra virgin olive oil using a pastry brush.
- Spread 2 tablespoons of basil pesto over each oiled crust, leaving a 1/2-inch border around the edges.
- Bake the prepared crusts for 8-10 minutes until the edges turn golden brown and the pesto bubbles slightly.
- Remove the baking sheet from the oven using oven mitts and transfer to a heat-safe surface.
- Carefully tear the burrata cheese into 1-inch pieces and distribute evenly among the four pizzas.
- Return the pizzas to the oven and bake for an additional 3-4 minutes until the cheese just begins to melt.
- Remove from the oven and immediately sprinkle each pizza with flaky sea salt and freshly cracked black pepper.
- Garnish with toasted pine nuts and chiffonade-cut basil leaves arranged in a circular pattern.
- Allow the pizzas to rest for 2 minutes before slicing to let the cheese set properly.
- Cut each mini pizza into four equal wedges using a sharp pizza wheel or chef’s knife.
Amazingly creamy burrata melts into the aromatic pesto base, creating a luxurious texture contrast with the crisp crust. The toasted pine nuts add delightful crunch while the fresh basil provides bright, herbaceous notes that balance the rich cheese. Arrange these elegant mini pizzas on a wooden board for entertaining, or serve alongside a simple arugula salad dressed with lemon vinaigrette for a complete meal.
Wild Mushroom and Taleggio Tartlets
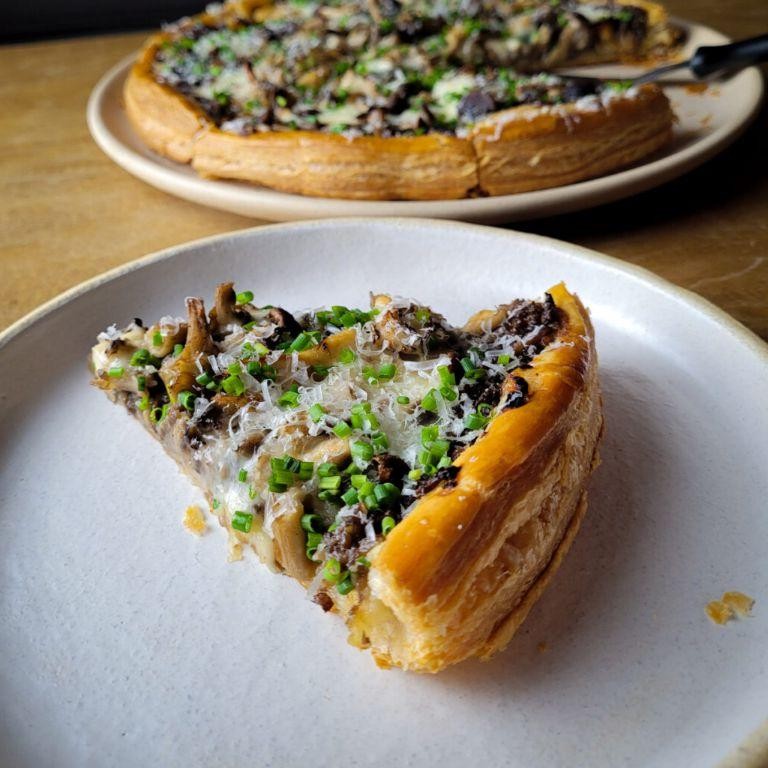
Savor the earthy elegance of these individual tartlets, where wild mushrooms meet creamy Taleggio cheese in a buttery pastry shell. These sophisticated yet approachable bites guide you through essential pastry techniques while delivering restaurant-quality results. Perfect for autumn entertaining, they showcase how simple ingredients transform into something truly special.
12
tartlets25
minutes39
minutesIngredients
- 1 package frozen puff pastry sheets, thawed according to package directions
- 2 tablespoons extra virgin olive oil
- 1 pound mixed wild mushrooms (such as chanterelle, oyster, and cremini), cleaned and roughly chopped
- 2 medium shallots, finely minced
- 2 cloves garlic, finely minced
- 1/4 cup dry white wine
- 1/2 cup heavy cream
- 1 teaspoon fresh thyme leaves
- 6 ounces Taleggio cheese, rind removed and cut into 1/2-inch cubes
- 1 large pasture-raised egg, lightly beaten with 1 tablespoon water for egg wash
- Flaky sea salt and freshly cracked black pepper to finish
Instructions
- Preheat your oven to 400°F and line two baking sheets with parchment paper.
- Roll out the thawed puff pastry to 1/8-inch thickness on a lightly floured surface.
- Cut the pastry into twelve 4-inch rounds using a biscuit cutter or inverted bowl.
- Transfer the pastry rounds to the prepared baking sheets, spacing them 1 inch apart.
- Use a sharp knife to score a 1/2-inch border around the edge of each round, being careful not to cut all the way through.
- Brush the borders lightly with the egg wash using a pastry brush.
- Prick the centers of the tartlets multiple times with a fork to prevent excessive rising.
- Heat the olive oil in a large skillet over medium-high heat until shimmering.
- Add the wild mushrooms and cook for 6-8 minutes, stirring occasionally, until they release their liquid and begin to brown.
- Add the minced shallots and cook for 2 minutes until translucent.
- Add the minced garlic and cook for 30 seconds until fragrant.
- Pour in the white wine and cook for 2 minutes, scraping up any browned bits from the pan bottom.
- Stir in the heavy cream and fresh thyme leaves, then simmer for 3 minutes until the mixture thickens slightly.
- Season the mushroom mixture generously with salt and pepper, then remove from heat.
- Divide the mushroom mixture evenly among the pastry centers, staying within the scored borders.
- Arrange the Taleggio cubes evenly over the mushroom filling.
- Bake for 18-22 minutes until the pastry is golden brown and puffed, and the cheese is melted and bubbly.
- Remove from the oven and immediately sprinkle with flaky sea salt and cracked black pepper.
- Let the tartlets rest on the baking sheets for 5 minutes before serving.
Versatile enough for both casual gatherings and formal occasions, these tartlets offer a delightful contrast of textures—flaky, buttery pastry gives way to a rich, creamy filling with the distinct earthiness of wild mushrooms. The Taleggio melts into luxurious pools that complement the savory mushroom mixture perfectly. Consider serving them alongside a bitter greens salad dressed with lemon vinaigrette to cut through the richness, or present them as elegant passed hors d’oeuvres at your next dinner party.
Conclusion
Gathering friends and family becomes extra special with these 29 delightful cicchetti recipes! From savory bites to sweet treats, there’s something for every taste. We’d love to hear which recipes become your favorites—drop us a comment below and share your culinary creations on Pinterest. Happy cooking and even happier gathering!


