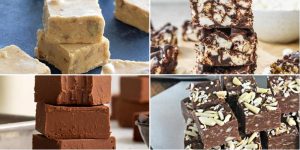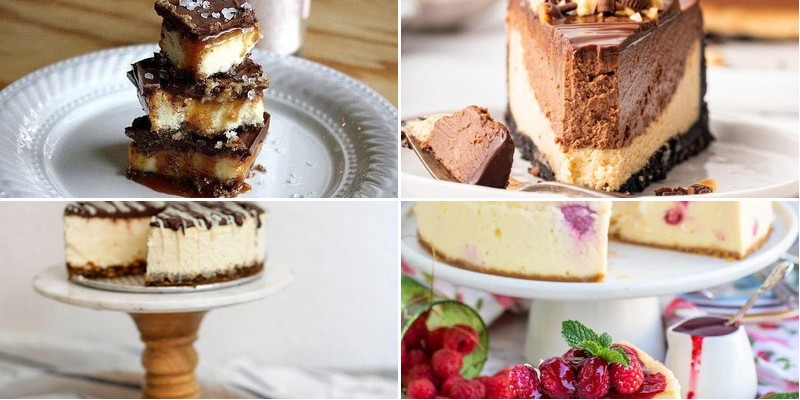
Who says you have to choose between chocolate and cheesecake? We’ve gathered 19 decadent dessert creations that beautifully marry these two indulgences into spectacular treats perfect for any occasion. From no-bake wonders to show-stopping layered masterpieces, these recipes will satisfy your sweetest cravings and impress everyone at your table. Get ready to discover your new favorite dessert—your taste buds are in for a delicious adventure!
Classic Chocolate Cheesecake with Ganache Topping
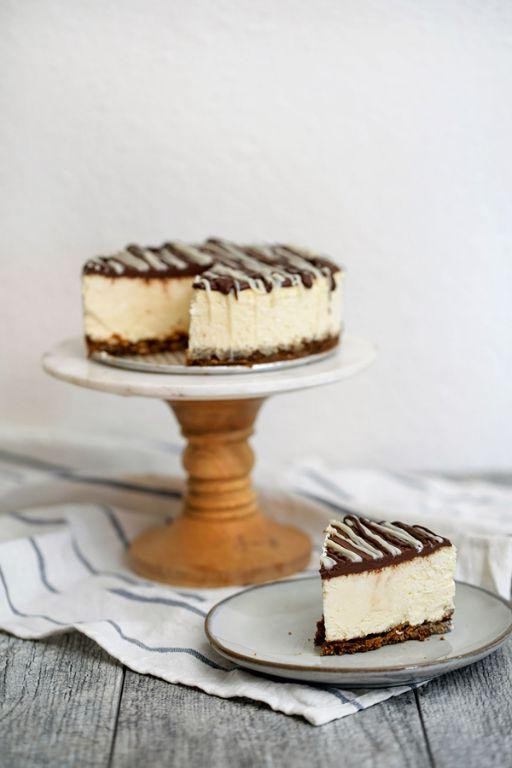
Forget your diet, forget your resolutions, and forget that you ever thought you could resist chocolate—this classic chocolate cheesecake with ganache topping is about to become your new best friend (and worst enemy, but mostly best friend). It’s rich, decadent, and guaranteed to make you the hero of any gathering, or just a very happy solo dessert enthusiast.
1
cheesecake30
minutes70
minutesIngredients
– 2 cups of graham cracker crumbs (because who has time to crush them? Buy ’em pre-crushed!)
– 1/2 cup of melted butter (salted, because life’s too short for unsalted)
– 3 blocks of cream cheese, softened to room temp (don’t even think about skipping the softening!)
– 1 cup of granulated sugar (sweetness is non-negotiable here)
– 3 large eggs (the more the merrier)
– 1 tsp of vanilla extract (a splash of liquid gold)
– 1/2 cup of sour cream (for that tangy twist)
– 1 cup of semi-sweet chocolate chips (melted, because melted chocolate is always the answer)
– 1/2 cup of heavy cream (for the ganache glory)
Instructions
1. Preheat your oven to 325°F—no guessing, just set it and forget it (well, don’t actually forget it).
2. Mix the graham cracker crumbs and melted butter in a bowl until it feels like wet sand (tip: press it firmly into a 9-inch springform pan to avoid a crumbly disaster).
3. Bake the crust for 10 minutes at 325°F until it’s lightly golden and smells like buttery heaven.
4. Beat the softened cream cheese and granulated sugar in a large bowl until it’s smooth and lump-free (seriously, no lumps allowed—they’re the enemy of creamy cheesecake).
5. Add the eggs one at a time, mixing well after each addition to keep things silky.
6. Stir in the vanilla extract and sour cream until just combined—overmixing is the devil here.
7. Melt the semi-sweet chocolate chips in a microwave-safe bowl in 30-second bursts, stirring between each, until it’s glossy and smooth (tip: no scorching—patience is a virtue).
8. Fold the melted chocolate into the cream cheese mixture until it’s fully incorporated and looks like a chocolate dream.
9. Pour the filling over the baked crust and smooth the top with a spatula.
10. Bake at 325°F for 50-60 minutes until the edges are set but the center still has a slight jiggle (not a wobble—think Jell-O, not water bed).
11. Turn off the oven, crack the door open, and let the cheesecake cool inside for 1 hour to prevent cracking (tip: this slow cool-down is your secret weapon against cheesecake tears).
12. Remove from the oven and cool completely at room temperature, then refrigerate for at least 4 hours (overnight is even better—if you can wait that long).
13. Heat the heavy cream in a saucepan until it’s just simmering, then pour it over the reserved chocolate chips, stirring until smooth and pourable.
14. Spread the ganache over the chilled cheesecake, letting it drip seductively down the sides.
Just imagine slicing into that velvety, dense cheesecake—it’s so smooth it practically melts on your tongue, with a deep chocolate flavor that’s balanced by the tangy cream cheese. Serve it chilled with a sprinkle of sea salt or fresh berries for a fancy touch, or just grab a fork and dive in face-first—no judgment here.
Triple Chocolate Cheesecake with Oreo Crust
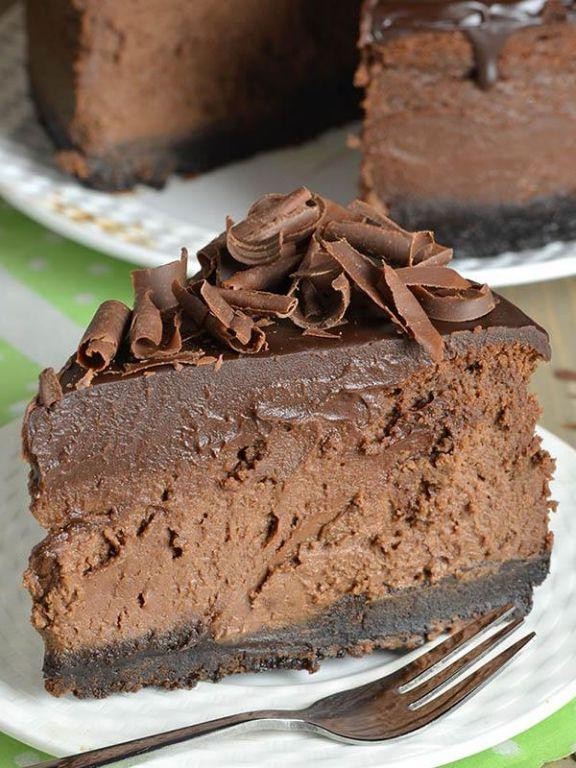
Whoever said you can’t have it all clearly never met this triple chocolate cheesecake with an Oreo crust. We’re talking about a dessert that basically gives your taste buds a standing ovation—rich, creamy, and unapologetically decadent.
8
servings25
minutes75
minutesIngredients
- About 20 Oreo cookies (the whole shebang, cream filling included)
- A good 5 tablespoons of melted butter
- Two 8-ounce blocks of cream cheese, softened to room temp
- A generous ¾ cup of granulated sugar
- A couple of large eggs
- A splash of vanilla extract
- ½ cup of sour cream
- ⅓ cup of cocoa powder
- 4 ounces of semi-sweet chocolate, melted and slightly cooled
- 4 ounces of white chocolate, melted and slightly cooled
- A handful of chocolate chips for that extra oomph
Instructions
- Preheat your oven to 325°F and grab a 9-inch springform pan.
- Crush those Oreos into fine crumbs using a food processor or a zip-top bag and rolling pin.
- Mix the Oreo crumbs with the melted butter until it looks like wet sand.
- Press the mixture firmly into the bottom of the pan—tip: use a flat-bottomed cup to get it even and compact.
- Bake the crust for 10 minutes at 325°F, then let it cool on a wire rack.
- Beat the softened cream cheese and sugar in a large bowl on medium speed until it’s totally smooth, about 2-3 minutes.
- Add the eggs one at a time, mixing just until each is incorporated—don’t overmix here to avoid cracks.
- Stir in the vanilla extract and sour cream until combined.
- Divide the batter evenly into three separate bowls.
- Mix cocoa powder into one bowl for the chocolate layer.
- Fold the melted semi-sweet chocolate into the second bowl.
- Fold the melted white chocolate into the third bowl.
- Drop spoonfuls of each batter randomly over the cooled crust.
- Use a knife to gently swirl the batters together—tip: don’t over-swirl or you’ll lose the marbled effect.
- Sprinkle chocolate chips evenly over the top.
- Place the springform pan into a larger baking dish and fill the outer dish with hot water until it reaches halfway up the sides of the springform pan.
- Bake for 55-65 minutes at 325°F until the edges are set but the center still has a slight jiggle.
- Turn off the oven, crack the door open, and let the cheesecake cool inside for 1 hour—this gradual cooling helps prevent sinking.
- Remove from the oven, run a knife around the edge to loosen, and refrigerate for at least 4 hours or overnight before serving.
Keep this beauty chilled until you’re ready to slice—each bite delivers a creamy, velvety texture with deep chocolate notes and that crunchy Oreo surprise at the bottom. Try serving it with a drizzle of salted caramel or a scoop of vanilla ice cream to really send it over the top.
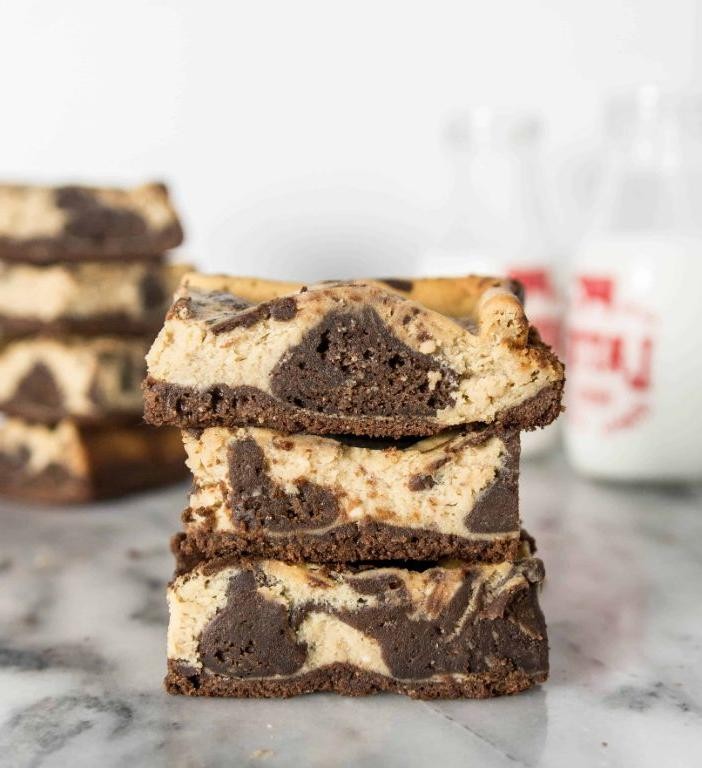
Salted Caramel Chocolate Cheesecake Bars
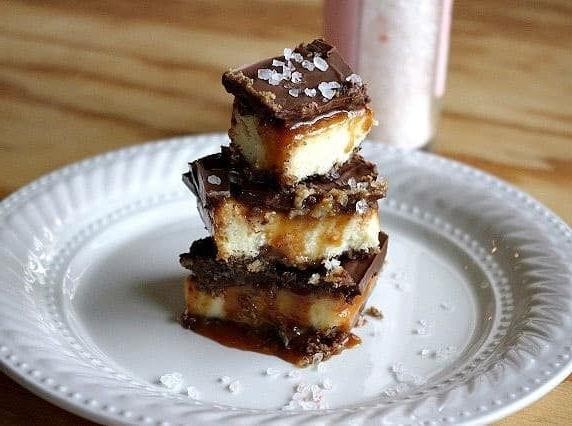
Whoever said you can’t have it all clearly never tried these salted caramel chocolate cheesecake bars—they’re the dessert equivalent of finding money in last winter’s coat pocket, only way more delicious and guaranteed to make you the hero of any gathering.
16
bars20
minutes40
minutesIngredients
- About 2 cups of chocolate cookie crumbs (because graham crackers are so last season)
- A good ½ cup of melted butter (the unsalted kind, unless you’re feeling rebellious)
- A couple of 8-ounce blocks of cream cheese, softened to room temp (no one likes a cold shoulder)
- ¾ cup of granulated sugar (for that sweet life)
- 2 large eggs, ready to bind the magic
- A teaspoon of vanilla extract (the good stuff)
- ½ cup of salted caramel sauce (store-bought is totally fine—we don’t judge)
- A generous handful of chocolate chips for sprinkling (because more chocolate is always the answer)
Instructions
- Preheat your oven to 350°F and line an 8×8-inch baking pan with parchment paper, letting the edges hang over for easy removal later.
- In a medium bowl, mix the chocolate cookie crumbs with the melted butter until it resembles wet sand, then press it firmly into the bottom of the prepared pan to form an even crust.
- Bake the crust for 10 minutes at 350°F until it’s lightly set and fragrant, then let it cool on a wire rack while you prepare the filling. Tip: Pressing the crust down with the bottom of a measuring cup helps prevent crumbling later.
- In a large bowl, beat the softened cream cheese and granulated sugar with an electric mixer on medium speed for 2–3 minutes until smooth and no lumps remain.
- Add the eggs one at a time, beating well after each addition until fully incorporated, then mix in the vanilla extract until just combined.
- Pour the cream cheese filling over the cooled crust and spread it evenly with a spatula.
- Drizzle the salted caramel sauce over the filling in a zigzag pattern, then use a knife to gently swirl it into the top layer for a marbled effect. Tip: Don’t over-swirl or you’ll lose that beautiful contrast—just a few gentle passes will do.
- Sprinkle the chocolate chips evenly over the top, then bake at 350°F for 25–30 minutes until the edges are set but the center still has a slight jiggle.
- Remove from the oven and let cool completely in the pan on a wire rack for about 1 hour, then refrigerate for at least 4 hours or overnight until fully firm. Tip: Chilling overnight gives the bars the perfect dense, creamy texture—patience is a virtue, especially with dessert.
- Use the parchment paper overhang to lift the bars out of the pan, slice into squares with a sharp knife wiped clean between cuts for neat edges, and serve chilled.
Velvety smooth cheesecake meets gooey caramel and rich chocolate in every bite—these bars are so decadent, they might just ruin all other desserts for you. Try serving them slightly chilled with a drizzle of extra caramel and a pinch of sea salt for that sweet-salty kick that’ll have everyone begging for the recipe.
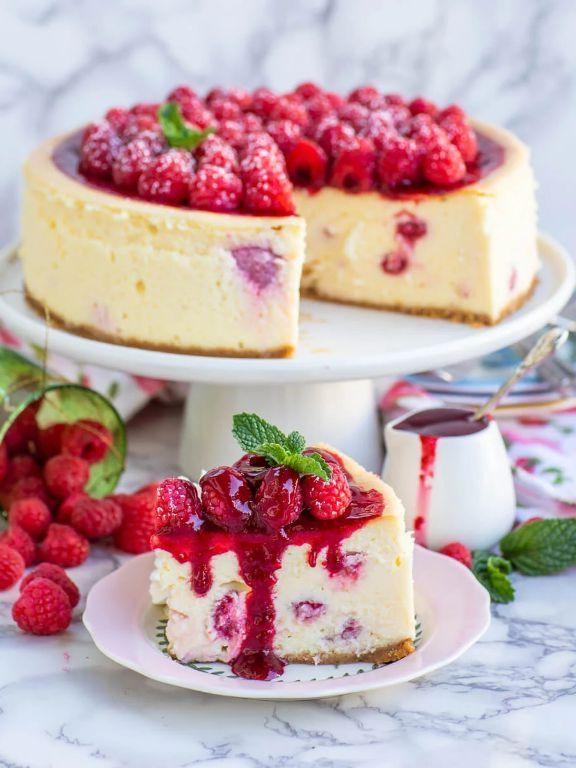
Chocolate Raspberry Swirl Cheesecake
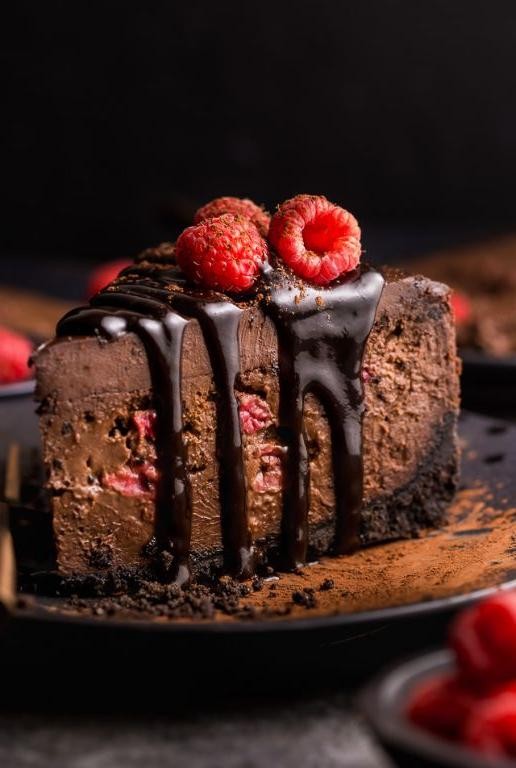
Ever had one of those days where only something decadent, dramatic, and downright delicious will do? Enter this showstopper, a creamy dream swirled with fruity ribbons that’s basically a black-tie event for your taste buds. It’s the dessert equivalent of a standing ovation, guaranteed to make you the star of any potluck or Tuesday night.
1
cheesecake30
minutes75
minutesIngredients
- A couple of sleeves of graham crackers, crushed into fine crumbs
- A good half-cup of melted butter
- A generous pinch of salt
- A couple of bricks (24 ounces total) of full-fat cream cheese, at room temperature
- A full cup of granulated sugar
- A big splash (1 teaspoon) of pure vanilla extract
- Three large eggs, also at room temperature
- A half-cup of sour cream
- A 6-ounce basket of fresh raspberries
- About 4 ounces of semi-sweet chocolate, chopped up
Instructions
- Preheat your oven to 325°F (163°C).
- Mix the graham cracker crumbs, melted butter, and that pinch of salt in a medium bowl until the mixture resembles wet sand. Tip: Using the bottom of a measuring cup to press the crust firmly into the pan is the secret to a base that doesn’t crumble.
- Press this crumb mixture firmly and evenly into the bottom of a 9-inch springform pan.
- Bake the crust alone for 10 minutes, then remove it and let it cool on a wire rack. Leave the oven on.
- In a large bowl, beat the room-temperature cream cheese with an electric mixer on medium speed until it’s completely smooth and lump-free, about 2 minutes.
- Gradually beat in the granulated sugar until the mixture is light and fluffy.
- Beat in the vanilla extract and then the eggs, one at a time, mixing just until each egg is incorporated before adding the next. Tip: Over-beating the eggs can incorporate too much air and cause the cheesecake to crack, so stop mixing as soon as the yolk disappears.
- Gently fold in the sour cream until the batter is uniform.
- Pour about two-thirds of this plain cheesecake batter over the cooled crust.
- In a separate microwave-safe bowl, melt the chopped chocolate in 30-second bursts, stirring between each, until smooth.
- Stir the melted chocolate into the remaining one-third of the cheesecake batter.
- Mash the fresh raspberries with a fork until they form a rough puree.
- Dollop the chocolate batter randomly over the top of the plain batter in the pan.
- Dollop the raspberry puree in the spaces between the chocolate dollops.
- Use a knife or a skewer to gently swirl the chocolate and raspberry dollops through the plain batter, creating a marbled effect. Tip: Don’t over-swirl, or you’ll mix the colors into a muddy brown—just 4 or 5 figure-eight motions will do the trick.
- Place the springform pan on a baking sheet and bake for 55-65 minutes. The edges should look set, but the center should still have a slight jiggle when you gently shake the pan.
- Turn the oven off, crack the oven door open with a wooden spoon, and let the cheesecake cool slowly inside the oven for 1 hour.
- Remove the cheesecake from the oven and run a thin knife around the inside edge of the pan to loosen it, which helps prevent major cracking as it cools.
- Let the cheesecake cool completely to room temperature on a wire rack, then refrigerate it for at least 4 hours, or ideally overnight, before serving.
Zesty raspberry puree cuts through the rich, velvety chocolate and tangy cream cheese in the most spectacular way. The resulting texture is impossibly smooth and dense, like the cheesecake version of silk. Serve a slice with a dusting of cocoa powder and a single perfect raspberry on top for a seriously Insta-worthy moment.
Mint Chocolate Chip Cheesecake
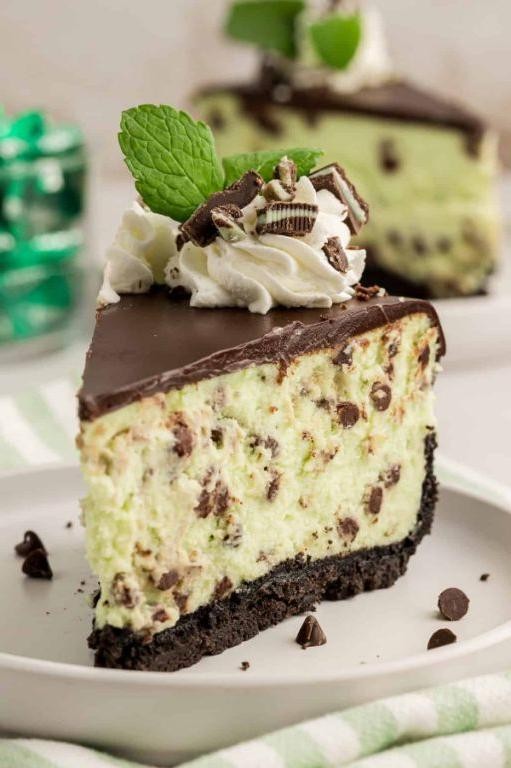
Just when you thought cheesecake couldn’t get any more magical, along comes this minty fresh wonder that’ll make your taste buds do a happy dance. Juggling creamy indulgence with that nostalgic ice cream flavor we all secretly crave, this dessert is basically a party in your mouth where everyone’s invited (except maybe your diet).
8
servings25
minutes60
minutesIngredients
– 2 cups of crushed chocolate sandwich cookies (because life’s too short for plain crust)
– 1/2 cup of melted butter (the good stuff, obviously)
– 3 blocks of cream cheese at room temperature (don’t even think about cold cream cheese)
– 1 cup of granulated sugar (sweetness is non-negotiable)
– 3 large eggs (the fluffy-makers)
– 1 cup of sour cream (for that tangy twist)
– 1 teaspoon of peppermint extract (the minty magic)
– A generous handful of mini chocolate chips (because more chocolate is always the answer)
– A few drops of green food coloring (for that iconic minty look)
Instructions
1. Preheat your oven to 325°F and grab a 9-inch springform pan.
2. Mix the crushed cookies with melted butter until it resembles wet sand.
3. Press the cookie mixture firmly into the bottom of the pan using a flat-bottomed cup—this creates an even crust that won’t crumble.
4. Beat the room-temperature cream cheese with sugar on medium speed for exactly 3 minutes until completely smooth.
5. Add eggs one at a time, mixing just until combined after each addition—overmixing incorporates too much air and causes cracking.
6. Stir in sour cream, peppermint extract, and green food coloring until uniformly minty green.
7. Gently fold in mini chocolate chips with a spatula to distribute evenly.
8. Pour the filling over the crust and smooth the top with an offset spatula.
9. Place the pan on a baking sheet and bake for 55-60 minutes until the edges are set but the center still jiggles slightly.
10. Turn off the oven, crack the door open, and let the cheesecake cool inside for 1 hour to prevent dramatic temperature shock.
11. Refrigerate for at least 6 hours, though overnight is ideal for perfect slicing.
Cool, creamy, and packed with that classic mint-chocolate combo, this cheesecake delivers a texture so smooth it practically melts on your tongue. Consider topping with extra chocolate chips and a drizzle of chocolate sauce for maximum indulgence, or serve alongside a scoop of vanilla ice cream for the ultimate dessert duo that’ll have everyone asking for seconds.
Peanut Butter Chocolate Cheesecake Delight
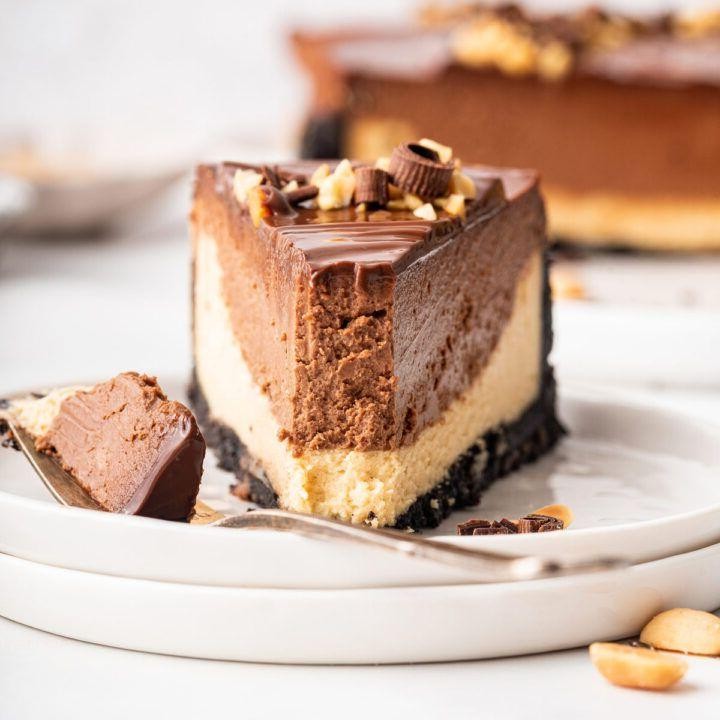
Unbelievably decadent and dangerously delicious, this peanut butter chocolate cheesecake delight is what dessert dreams are made of—if your dreams involve creamy, nutty perfection with a chocolatey kick that’ll make you forget all your problems (at least until the last bite). Seriously, this isn’t just dessert; it’s an edible hug that somehow combines the best parts of cheesecake, peanut butter cups, and pure joy into one glorious pan.
1
cheesecake30
minutes70
minutesIngredients
– A sleeve and a half of chocolate graham crackers (about 12 crackers, crushed)
– 6 tablespoons of melted unsalted butter
– 2 cups of creamy peanut butter (the kind you’d eat straight from the jar)
– 16 ounces of softened cream cheese (leave it out for 30 minutes—no cheating!)
– 1 cup of granulated sugar
– 1 cup of heavy cream
– A generous splash of vanilla extract
– A couple of large eggs
– 1 cup of semi-sweet chocolate chips
Instructions
1. Preheat your oven to 325°F and grab a 9-inch springform pan.
2. Crush the chocolate graham crackers into fine crumbs using a food processor or by placing them in a zip-top bag and rolling with a rolling pin (tip: no big chunks—this is your crust foundation!).
3. Mix the crushed crackers with the melted unsalted butter until it resembles wet sand.
4. Press the mixture firmly into the bottom of the springform pan, using the bottom of a measuring cup to create an even layer.
5. Bake the crust for 10 minutes at 325°F, then let it cool completely on a wire rack.
6. In a large bowl, beat the softened cream cheese with an electric mixer on medium speed until smooth and lump-free, about 2 minutes.
7. Add the creamy peanut butter and granulated sugar, beating until fully combined and fluffy.
8. Pour in the heavy cream and vanilla extract, mixing on low until incorporated.
9. Crack in the eggs one at a time, mixing just until each is blended—don’t overmix! (tip: overbeating can cause cracks, so gentle does it).
10. Pour the filling over the cooled crust and smooth the top with a spatula.
11. Place the springform pan into a larger baking dish and create a water bath by pouring hot water into the outer dish until it reaches halfway up the sides of the springform pan (tip: this keeps the cheesecake creamy and prevents drying).
12. Bake at 325°F for 55–60 minutes, until the edges are set but the center still jiggles slightly when shaken.
13. Turn off the oven, crack the door open, and let the cheesecake cool inside for 1 hour to prevent sinking.
14. Remove from the oven, run a knife around the edge to loosen, and refrigerate for at least 4 hours or overnight.
15. Melt the semi-sweet chocolate chips in a microwave-safe bowl in 30-second intervals, stirring between each, until smooth.
16. Drizzle the melted chocolate over the chilled cheesecake before serving.
But brace yourself—this beauty boasts a velvety, no-bake-esque texture with a rich peanut butter core that melds seamlessly with the chocolate crust and drizzle. Serve it chilled with a cold glass of milk or crumble extra graham crackers on top for a playful crunch that’ll have everyone begging for the recipe.
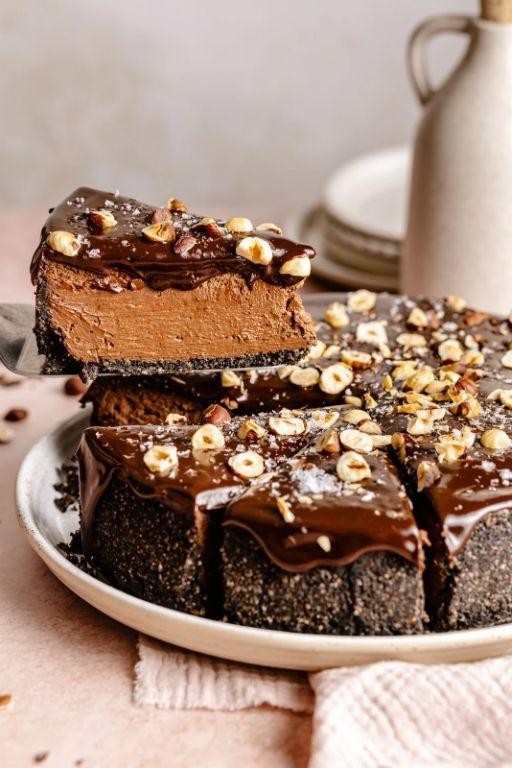
Crunchy Chocolate Hazelnut Cheesecake Bites
Kick your dessert game up a notch with these irresistible Crunchy Chocolate Hazelnut Cheesecake Bites! They’re the perfect little treats that deliver maximum flavor with minimal effort—because who has time for complicated baking when there’s deliciousness to be devoured? Get ready to impress your friends (and yourself) with these bite-sized wonders that combine creamy cheesecake, crunchy nuts, and rich chocolate in one glorious package.
24
bites25
minutesIngredients
– 1 package (8 oz) of cream cheese, softened to room temperature
– 1/2 cup of powdered sugar
– 1 teaspoon of pure vanilla extract
– 1 cup of chocolate hazelnut spread
– 1 1/2 cups of crushed graham crackers
– 1/2 cup of finely chopped hazelnuts
– A splash of milk (about 2 tablespoons) if needed for consistency
– A couple of tablespoons of melted butter for binding
Instructions
1. In a large mixing bowl, beat the softened cream cheese with an electric mixer on medium speed for 1–2 minutes until smooth and fluffy.
2. Add the powdered sugar and vanilla extract to the cream cheese, then mix on low speed for 1 minute until fully combined and no lumps remain.
3. Gently fold in the chocolate hazelnut spread using a spatula until the mixture is uniformly chocolatey and creamy.
4. Tip: If the mixture feels too thick, add a splash of milk and stir to reach a scoopable consistency.
5. In a separate medium bowl, combine the crushed graham crackers, chopped hazelnuts, and melted butter, mixing with a fork until the crumbs are evenly moistened.
6. Line a baking sheet with parchment paper and scoop tablespoon-sized portions of the cheesecake mixture, rolling them into smooth balls between your palms.
7. Roll each cheesecake ball in the graham cracker-hazelnut mixture, pressing gently to ensure an even coating on all sides.
8. Tip: For extra crunch, toast the hazelnuts at 350°F for 5–7 minutes before chopping and adding to the coating.
9. Place the coated bites on the prepared baking sheet and refrigerate for at least 30 minutes to firm up.
10. Tip: For a firmer texture, freeze the bites for 15 minutes before serving—they’ll hold their shape better at parties.
11. Once chilled, serve immediately or store in an airtight container in the refrigerator for up to 5 days.
Decadently creamy meets satisfyingly crunchy in every bite, with the rich chocolate hazelnut flavor shining through the smooth cheesecake center. These little gems are perfect for popping straight from the fridge or rolling in extra crushed nuts for added texture. Serve them on a platter with coffee at brunch or pack them for a picnic—they’re guaranteed to disappear faster than you can say “more please!”
White Chocolate and Berry Cheesecake
Now, let’s talk about the dessert that’ll make your taste buds do a happy dance – a white chocolate and berry cheesecake that’s so dreamy, it might just replace your favorite pillow. This creamy, fruity masterpiece is basically a hug for your soul, with a crust that crunches just right and a filling so smooth, you’ll want to swim in it. Trust me, your future self will thank present-you for making this happen.
8
servings30
minutes60
minutesIngredients
For the crust: a couple of cups of graham cracker crumbs, half a cup of melted butter, and a quarter cup of granulated sugar. For the filling: two 8-ounce blocks of cream cheese (room temp, please!), three-quarters cup of granulated sugar, two large eggs, a teaspoon of vanilla extract, and a cup of melted white chocolate chips. For the topping: two cups of mixed fresh berries and a quarter cup of berry jam.
Instructions
1. Preheat your oven to 325°F and grab a 9-inch springform pan. 2. In a medium bowl, mix the graham cracker crumbs, melted butter, and sugar until it looks like wet sand. 3. Press this mixture firmly into the bottom of the pan using the back of a measuring cup—this helps create an even crust that won’t fall apart. 4. Bake the crust for 10 minutes until it’s lightly golden, then let it cool completely on a wire rack. 5. In a large bowl, beat the cream cheese and sugar with an electric mixer on medium speed for 2 minutes until smooth and fluffy. 6. Add the eggs one at a time, mixing just until combined after each to avoid overbeating and cracking. 7. Stir in the vanilla extract and melted white chocolate until everything is well blended. 8. Pour the filling over the cooled crust and smooth the top with a spatula. 9. Bake at 325°F for 45-50 minutes—the center should still jiggle slightly when you gently shake the pan, which means it’s perfectly set. 10. Turn off the oven, crack the door open, and let the cheesecake cool inside for 1 hour to prevent sudden temperature changes. 11. Remove it from the oven, run a knife around the edge to loosen it, and refrigerate for at least 4 hours or overnight. 12. Before serving, arrange the fresh berries on top and brush with warmed berry jam for a glossy finish. Every slice of this cheesecake is a creamy, tangy-sweet delight with a buttery crust that crumbles just enough. Serve it chilled with extra berries on the side, or get fancy by drizzling leftover melted white chocolate over each portion for an extra indulgent touch.
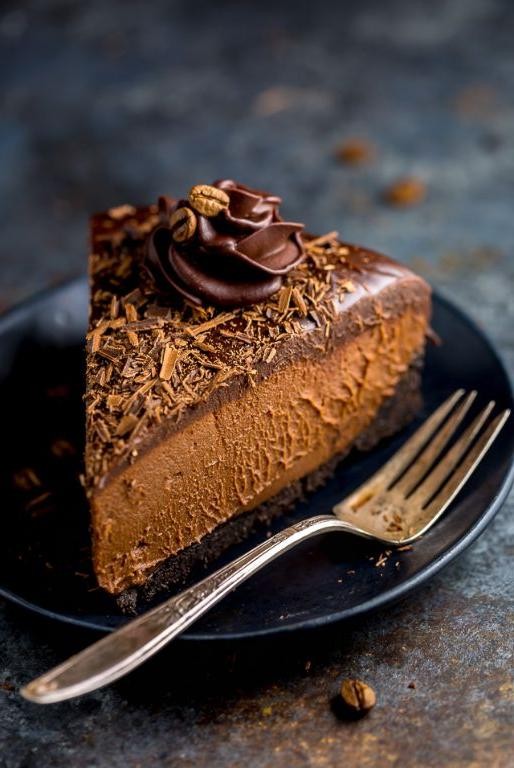
Mocha Chocolate Cheesecake with Espresso Drizzle
Tired of boring desserts that don’t give you that caffeine kick? This mocha chocolate cheesecake is basically dessert and your afternoon pick-me-up in one glorious slice—because who says you can’t have your cake and drink it too?
8
slices25
minutes70
minutesIngredients
– 2 cups of chocolate cookie crumbs (the kind that makes you want to eat them straight from the box)
– 1/2 cup of melted butter (because everything’s better with butter)
– 3 blocks of cream cheese, softened to room temp (no one likes lumpy cheesecake)
– 1 cup of granulated sugar (sweetness is non-negotiable)
– 3 large eggs (the binding superstars)
– 1 cup of sour cream (for that tangy twist)
– 1/2 cup of heavy cream (go big or go home)
– 8 ounces of semi-sweet chocolate, melted and slightly cooled (chocolate therapy)
– 2 tablespoons of instant espresso powder (your wake-up call)
– 1 teaspoon of vanilla extract (the flavor enhancer)
– A pinch of salt (to balance the sweet chaos)
– For the drizzle: 1/4 cup of heavy cream and 1/2 cup of semi-sweet chocolate chips
Instructions
1. Preheat your oven to 325°F—no guessing, just set it and forget it.
2. Mix the chocolate cookie crumbs with the melted butter until it resembles wet sand. Tip: Press the crust firmly into a 9-inch springform pan to avoid crumbly disasters.
3. Bake the crust for 10 minutes at 325°F until it’s lightly firm—this pre-bake step ensures it won’t turn soggy later.
4. In a large bowl, beat the softened cream cheese and sugar on medium speed until smooth and fluffy, about 2–3 minutes.
5. Add the eggs one at a time, mixing just until combined after each addition to keep the batter airy.
6. Stir in the sour cream, heavy cream, melted chocolate, espresso powder, vanilla extract, and salt until everything is happily unified.
7. Pour the filling over the baked crust and smooth the top with a spatula.
8. Bake at 325°F for 50–60 minutes—the center should jiggle slightly when shaken, but the edges will be set. Tip: Place a pan of water on the oven rack below to prevent cracking.
9. Turn off the oven, crack the door open, and let the cheesecake cool inside for 1 hour to avoid sudden temperature shocks.
10. Remove from the oven and cool completely at room temperature, then refrigerate for at least 4 hours or overnight.
11. For the drizzle, heat 1/4 cup of heavy cream until steaming, pour over the chocolate chips, wait 1 minute, then stir until smooth. Tip: Drizzle artistically over the chilled cheesecake for that coffee-shop flair.
Velvety and rich, this cheesecake boasts a creamy texture that melts with each bite, layered with deep chocolate and a bold espresso kick. Serve it chilled with a dusting of cocoa or alongside a scoop of vanilla ice cream for a contrast that’ll make your taste buds dance.
Rich Nutella Chocolate Cheesecake
Mmm, let’s be real—when life gives you lemons, you make lemonade, but when life gives you Nutella, you make this ridiculously indulgent chocolate cheesecake that’ll have your taste buds doing cartwheels. This isn’t just dessert; it’s a happiness intervention in cake form, perfect for when you need to bribe friends, celebrate surviving Monday, or just treat yo’self like the royalty you are.
8
servings25
minutes70
minutesIngredients
– 2 cups of chocolate cookie crumbs (because graham crackers are so last season)
– 1/2 cup of melted butter (the unsalted kind, unless you’re feeling rebellious)
– 2 blocks of cream cheese, softened to room temp (don’t even think about skipping this)
– 1 cup of granulated sugar (for that sweet, sweet joy)
– 3 large eggs, at room temp (cold eggs are the enemy of smooth filling)
– 1 cup of Nutella (obviously—this is the star of the show)
– 1 tsp of vanilla extract (a splash of liquid gold)
– A pinch of salt (to balance all that sweetness, you fancy chef, you)
Instructions
1. Preheat your oven to 325°F—no guessing, use that oven thermometer if you have one.
2. Mix the chocolate cookie crumbs and melted butter in a bowl until it looks like damp sand.
3. Press the crumb mixture firmly into the bottom of a 9-inch springform pan, using the back of a spoon to make it even.
4. Bake the crust for 10 minutes at 325°F, then let it cool completely on a wire rack.
5. Beat the softened cream cheese and sugar in a large bowl with an electric mixer on medium speed for 2 minutes until smooth and no lumps remain.
6. Add the eggs one at a time, mixing on low speed just until each is incorporated—overmixing introduces air and can cause cracks.
7. Stir in the Nutella, vanilla extract, and pinch of salt with a spatula until fully blended and gloriously chocolatey.
8. Pour the filling over the cooled crust and smooth the top with your spatula.
9. Wrap the bottom of the springform pan tightly with aluminum foil to prevent water seepage during baking.
10. Place the pan in a larger roasting pan and fill the roasting pan with hot water until it reaches halfway up the sides of the springform pan for a water bath.
11. Bake at 325°F for 55-60 minutes—the edges should be set, but the center will still jiggle slightly when gently shaken.
12. Turn off the oven, crack the door open, and let the cheesecake cool inside for 1 hour to prevent sudden temperature shocks.
13. Remove from the oven, cool completely at room temperature, then refrigerate for at least 4 hours or overnight before serving.
Oh, the creamy, dreamy texture of this cheesecake is so smooth it could slide into your DMs unnoticed, with a deep chocolate hazelnut flavor that’s basically a hug for your soul. Serve it chilled with a drizzle of extra Nutella and fresh berries for a fancy touch, or just grab a fork and dive in straight from the pan—no judgment here.
Vegan Chocolate Avocado Cheesecake
A dessert that’s so decadent, your non-vegan friends will demand the recipe—and then question reality when you reveal the secret ingredient. This vegan chocolate avocado cheesecake swaps dairy for creamy avocados and cashews, creating a silky, rich filling that’s downright magical. Trust me, your blender is about to become your new best friend.
8
servings25
minutes10
minutesIngredients
– For the crust: 1 ½ cups of crushed graham crackers, ½ cup of melted coconut oil, and a generous drizzle of maple syrup
– For the filling: 2 ripe avocados (pitted and scooped), 1 cup of soaked raw cashews, ½ cup of cocoa powder, ⅓ cup of maple syrup, a splash of vanilla extract, and the juice of 1 lemon
– For topping: a handful of fresh berries or a sprinkle of sea salt, if you’re feeling fancy
Instructions
1. Preheat your oven to 350°F and grab a 9-inch springform pan.
2. In a medium bowl, combine the crushed graham crackers, melted coconut oil, and maple syrup until the mixture resembles wet sand.
3. Press the crust mixture firmly into the bottom of the pan, using the back of a spoon to create an even layer.
4. Bake the crust for 10 minutes, or until it’s lightly golden and fragrant, then let it cool completely on a wire rack.
5. While the crust cools, add the avocados, soaked cashews, cocoa powder, maple syrup, vanilla extract, and lemon juice to a high-speed blender.
6. Blend on high for 2–3 minutes, scraping down the sides as needed, until the filling is completely smooth and no avocado bits remain. Tip: Soak the cashews in hot water for at least 30 minutes beforehand for the creamiest texture.
7. Pour the filling over the cooled crust and spread it evenly with a spatula.
8. Tap the pan gently on the counter to release any air bubbles, which helps prevent cracks.
9. Cover the pan with plastic wrap and refrigerate for at least 6 hours, or until the filling is firm to the touch. Tip: For a faster set, pop it in the freezer for 2–3 hours, but let it thaw slightly before serving.
10. Once chilled, run a knife around the edges of the pan before releasing the springform. Tip: Dip the knife in hot water for cleaner slices.
11. Top with fresh berries or a sprinkle of sea salt, if using, then slice and serve. The texture is luxuriously smooth and fudgy, with a hint of brightness from the lemon that balances the rich chocolate. Try serving it with a dollop of coconut whipped cream or crumbled over dairy-free ice cream for an extra-indulgent treat.
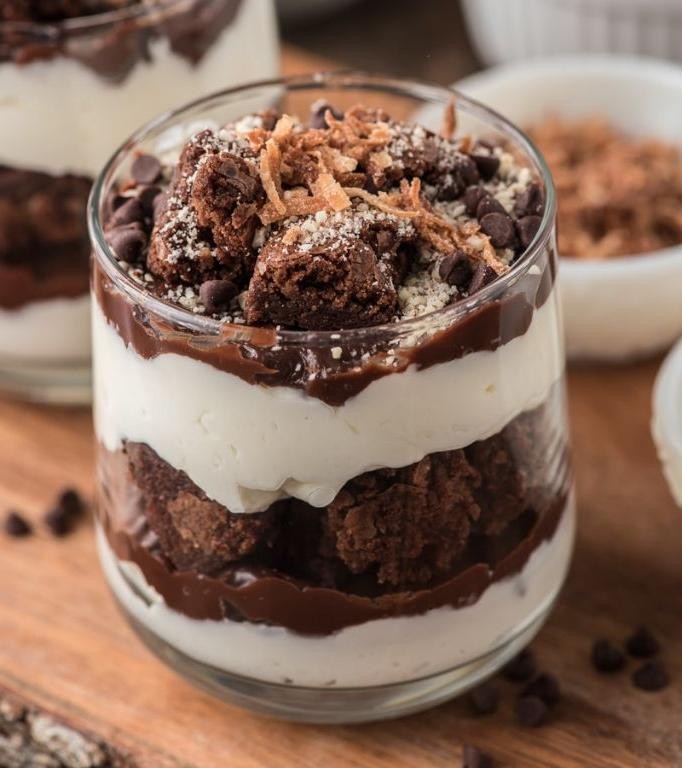
No-Bake Chocolate Cheesecake Parfait
Who says you need an oven to create dessert magic? This no-bake chocolate cheesecake parfait is basically dessert cheating—in the best way possible. We’re talking layers of creamy, dreamy chocolate cheesecake goodness that comes together faster than you can say “I deserve this.”
2
portions20
minutesIngredients
– About 8 ounces of cream cheese that’s been hanging out at room temperature
– A generous half-cup of powdered sugar
– A splash of vanilla extract (the good stuff)
– One cup of heavy cream, cold as your ex’s heart
– A couple of tablespoons of cocoa powder
– A sleeve of chocolate graham crackers for crushing
– A handful of chocolate chips for that extra chocolatey punch
Instructions
1. Grab a large mixing bowl and beat the room-temperature cream cheese with an electric mixer on medium speed until it’s completely smooth and fluffy, about 2 minutes.
2. Add the powdered sugar and vanilla extract to the cream cheese, then beat everything together until well combined and no sugar lumps remain.
3. In a separate chilled bowl, whip the cold heavy cream using the whisk attachment on high speed until stiff peaks form, which should take about 3-4 minutes.
4. Gently fold the whipped cream into the cream cheese mixture using a rubber spatula, being careful not to deflate the air you just whipped in.
5. Divide the mixture evenly between two bowls, then sift the cocoa powder into one bowl and fold it in until you have a uniform chocolate mixture.
6. Place chocolate graham crackers in a zip-top bag and crush them with a rolling pin until you have coarse crumbs with some bigger pieces for texture.
7. Melt the chocolate chips in a microwave-safe bowl using 30-second intervals, stirring between each until completely smooth.
8. Begin assembling parfaits by spooning a layer of the plain cheesecake mixture into the bottom of your serving glasses.
9. Sprinkle a layer of crushed graham crackers over the plain cheesecake layer, pressing down lightly with the back of a spoon.
10. Add a layer of the chocolate cheesecake mixture on top of the graham cracker layer.
11. Drizzle the melted chocolate over the chocolate cheesecake layer in a zigzag pattern.
12. Repeat the layers once more, ending with a final drizzle of melted chocolate on top.
13. Refrigerate the completed parfaits for at least 2 hours to allow the flavors to meld and the texture to set properly.
My goodness, the texture is pure bliss—creamy cheesecake layers alternating with crunchy chocolate bits and that silky melted chocolate drizzle. The beauty of these parfaits is how they balance rich chocolate intensity with the light, airy texture of no-bake magic. Try serving them in clear mason jars to show off those gorgeous layers, or top with fresh berries for a pop of color that cuts through the chocolate richness.
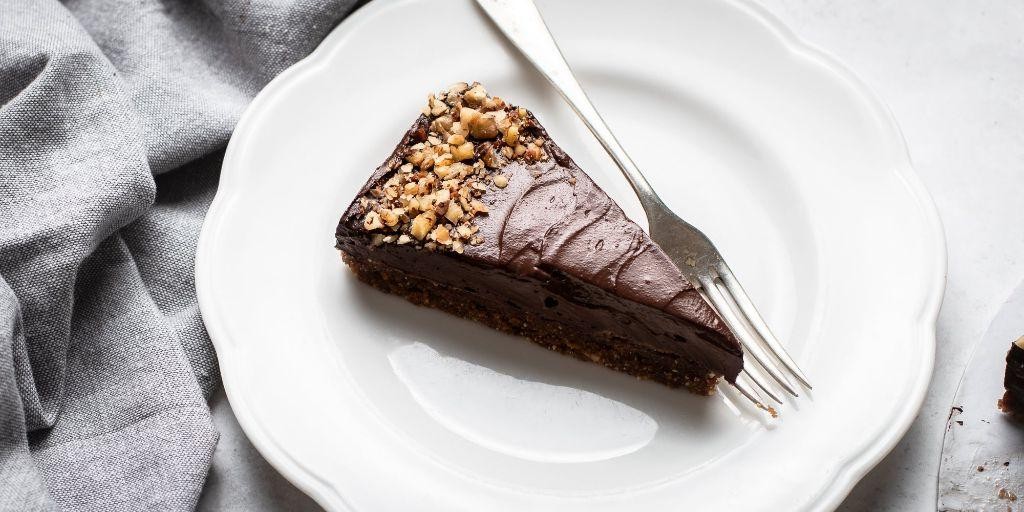
Dark Chocolate Espresso Brownie Cheesecake
Dark chocolate and espresso decided to crash a cheesecake party, and honestly? We should let them host more often. This decadent dessert is what happens when your two favorite indulgences get together and create something truly magical—a rich, fudgy brownie base topped with a creamy, coffee-kissed cheesecake layer that’s basically a hug for your taste buds.
8
servings20
minutes50
minutesIngredients
- For the brownie layer: a cup and a half of all-purpose flour, a cup of unsweetened cocoa powder, a couple of cups of granulated sugar, a big pinch of salt, a couple of sticks of melted unsalted butter, three large eggs, a good glug of vanilla extract
- For the cheesecake layer: two blocks of softened cream cheese, about half a cup of granulated sugar, a couple of large eggs, a splash of vanilla extract, a tablespoon of instant espresso powder dissolved in a tablespoon of hot water
Instructions
- Preheat your oven to 350°F and grab a 9-inch springform pan—grease it lightly so nothing sticks.
- In a big bowl, whisk together the flour, cocoa powder, sugar, and salt until they’re all buddy-buddy.
- Pour in the melted butter, crack in the eggs, and add the vanilla, then mix until the batter is smooth and no dry spots remain. Tip: Don’t overmix here—just until combined to keep the brownies tender.
- Spread this fudgy goodness evenly into the bottom of your prepared pan, using a spatula to smooth it out.
- In another bowl, beat the softened cream cheese and sugar together until it’s creamy and lump-free, about 2 minutes on medium speed.
- Add the eggs one at a time, mixing well after each, then stir in the vanilla and that espresso mixture until everything is silky smooth. Tip: Make sure the cream cheese is room temp to avoid a lumpy filling—patience pays off!
- Gently pour the cheesecake layer over the brownie base, spreading it evenly without disturbing the bottom.
- Bake for 45–50 minutes, until the edges are set but the center still has a slight jiggle when you tap the pan. Tip: Avoid overbaking—that jiggle means it’ll firm up perfectly as it cools.
- Let it cool completely in the pan on a wire rack, then chill in the fridge for at least 4 hours (or overnight, if you can wait that long).
Rich, velvety cheesecake melds with that deep, dark chocolate base for a texture that’s both dense and dreamy. Serve it chilled with a dusting of cocoa or a dollop of whipped cream, or heck, crumble it over ice cream for a next-level sundae—because why should boundaries limit deliciousness?
Conclusion
These 19 decadent chocolate cheesecake creations prove there’s a perfect dessert for every occasion. Whether you’re craving something rich, creamy, or elegantly simple, this collection has you covered. We’d love to hear which recipe catches your eye—drop a comment with your favorite! Don’t forget to share these irresistible treats with fellow dessert lovers by pinning this article on Pinterest.