
Unlock the vibrant potential of chives with these 23 mouthwatering recipes that transform everyday meals into extraordinary culinary experiences. Whether you’re whipping up quick weeknight dinners, creating impressive appetizers, or adding fresh flair to seasonal favorites, these versatile green gems will elevate your cooking game. Get ready to discover delicious ways to incorporate this humble herb into dishes that will have everyone asking for seconds!
Chive and Cheddar Biscuits

Fling open your pantry—these chive and cheddar biscuits are about to become your new brunch obsession. Flaky, cheesy, and ready in under 30 minutes, they’re the upgrade your breakfast table desperately needs. Forget boring biscuits; these pack a savory punch that’ll have everyone begging for the recipe.
8
biscuits15
minutes15
minutesIngredients
– 2 cups of all-purpose flour
– 1 tablespoon of baking powder
– 1 teaspoon of salt
– ½ cup of cold unsalted butter, cubed
– 1 cup of shredded sharp cheddar cheese
– ¼ cup of freshly chopped chives
– ¾ cup of cold buttermilk
– A splash of melted butter for brushing
Instructions
1. Preheat your oven to 425°F and line a baking sheet with parchment paper.
2. Whisk together the flour, baking powder, and salt in a large bowl.
3. Cut in the cold butter using a pastry cutter until the mixture resembles coarse crumbs.
4. Stir in the shredded cheddar cheese and chopped chives until evenly distributed.
5. Pour in the cold buttermilk and mix just until the dough comes together—don’t overwork it.
6. Turn the dough onto a lightly floured surface and pat it into a 1-inch thick rectangle.
7. Fold the dough in half, then pat it out again to create flaky layers.
8. Use a 2.5-inch round cutter to stamp out biscuits, pressing straight down without twisting.
9. Place the biscuits on the prepared baking sheet, spacing them about 1 inch apart.
10. Brush the tops with melted butter for a golden finish.
11. Bake for 12–15 minutes, until the tops are golden brown and the bottoms are crisp.
12. Transfer to a wire rack to cool slightly before serving.
Zesty and utterly irresistible, these biscuits boast a tender crumb with pockets of melted cheddar and fresh chives in every bite. Serve them warm with a pat of butter, split for breakfast sandwiches, or alongside a bowl of soup for the ultimate comfort meal.
Creamy Chive and Garlic Mashed Potatoes

Jazz up your potato game with these next-level creamy mashed potatoes. Get ready for garlicky goodness and fresh chive vibes that’ll make your taste buds dance. This is the side dish that steals the show every single time.
6
servings15
minutes20
minutesIngredients
– 3 pounds of russet potatoes
– 1 cup of heavy cream
– 1/2 cup of unsalted butter
– 4 cloves of garlic, minced
– 1/4 cup of fresh chives, chopped
– 1 teaspoon of salt
– A good pinch of black pepper
Instructions
1. Peel all 3 pounds of russet potatoes and cut them into 1-inch cubes.
2. Place the potato cubes in a large pot and cover with cold water by 2 inches.
3. Add 1 teaspoon of salt to the water and bring to a boil over high heat.
4. Reduce heat to medium and simmer potatoes for 15-18 minutes until fork-tender.
5. While potatoes cook, melt 1/2 cup butter in a small saucepan over medium heat.
6. Add minced garlic to the butter and cook for 1-2 minutes until fragrant but not browned.
7. Pour 1 cup heavy cream into the garlic butter mixture and heat until warm, about 2 minutes.
8. Drain the cooked potatoes thoroughly in a colander.
9. Return hot potatoes to the dry pot and mash with a potato masher until smooth.
10. Gradually pour the warm cream mixture into the potatoes while stirring constantly.
11. Fold in chopped fresh chives and a good pinch of black pepper.
12. Taste and adjust seasoning if needed, then serve immediately.
Whip up this creamy dream and watch it become your new holiday staple. The texture stays velvety smooth while the garlic and chives create a flavor bomb that pairs perfectly with roasted meats or stands strong on its own. Try topping with extra chives and a drizzle of melted butter for that restaurant-worthy finish.
Lemon and Chive Grilled Salmon
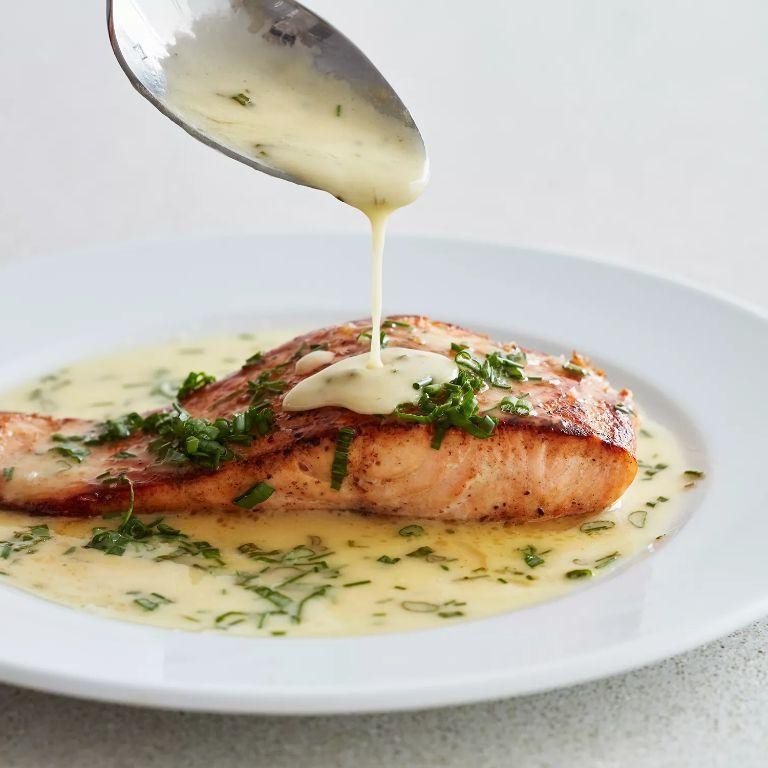
Need a dinner that slays in under 20 minutes? This lemon and chive grilled salmon delivers big flavor with minimal effort. Grab your ingredients and let’s fire up that grill.
2
servings5
minutes10
minutesIngredients
- 2 salmon fillets (about 6 oz each)
- A couple of tablespoons of olive oil
- Juice from half a lemon
- A generous sprinkle of fresh chives
- A pinch of salt
- A crack of black pepper
Instructions
- Preheat your grill to medium-high heat, around 400°F.
- Pat the salmon fillets completely dry with paper towels—this helps get that perfect sear without steaming.
- Drizzle both sides of the salmon with olive oil and rub it in evenly.
- Squeeze fresh lemon juice over the top of each fillet.
- Season generously with salt and black pepper on both sides.
- Place salmon skin-side up on the hot grill and cook for 4-5 minutes until you see grill marks forming.
- Flip the salmon carefully using a spatula and cook for another 4-5 minutes until the internal temperature reaches 145°F.
- Remove salmon from grill and let rest for 2 minutes—this keeps all those delicious juices locked in.
- Chop fresh chives and sprinkle them over the hot salmon right before serving.
Here’s why this works: the high heat creates a crispy exterior while keeping the inside moist and flaky. The lemon brightens everything up while the chives add that fresh oniony punch. Try serving it over a bed of quinoa or with grilled asparagus for a complete meal that looks restaurant-worthy.
Savory Chive Pancakes with Sour Cream

Every time you crave something crispy, savory, and ridiculously easy, these chive pancakes deliver. Elevate your snack game with minimal effort and maximum flavor—perfect for busy weeknights or lazy weekends.
2
pancakes5
minutes16
minutesIngredients
- 1 cup all-purpose flour
- 1/2 cup water
- a big handful of fresh chives, chopped
- a pinch of salt
- 2 tablespoons vegetable oil
- a generous dollop of sour cream for serving
Instructions
- Whisk together 1 cup all-purpose flour, 1/2 cup water, and a pinch of salt in a medium bowl until smooth.
- Fold in a big handful of chopped fresh chives until evenly distributed throughout the batter.
- Heat 1 tablespoon of vegetable oil in a non-stick skillet over medium heat until shimmering.
- Pour half the batter into the skillet, spreading it into a thin, even circle about 1/4-inch thick.
- Cook for 3–4 minutes until the edges look set and the bottom is golden brown with crispy spots.
- Flip the pancake carefully using a spatula and cook for another 3–4 minutes until the second side is equally golden and crisp.
- Transfer the cooked pancake to a plate and repeat steps 3–6 with the remaining batter and 1 tablespoon of oil.
- Cut each pancake into wedges and serve immediately with a generous dollop of sour cream on the side.
Hearty and satisfying, these pancakes boast a crispy exterior with a soft, chewy center and the fresh bite of chives in every bite. Try stacking them with a fried egg on top for a complete meal, or tear them apart and dip generously into cool, tangy sour cream for the ultimate savory treat.
Chive and Feta Stuffed Chicken Breasts
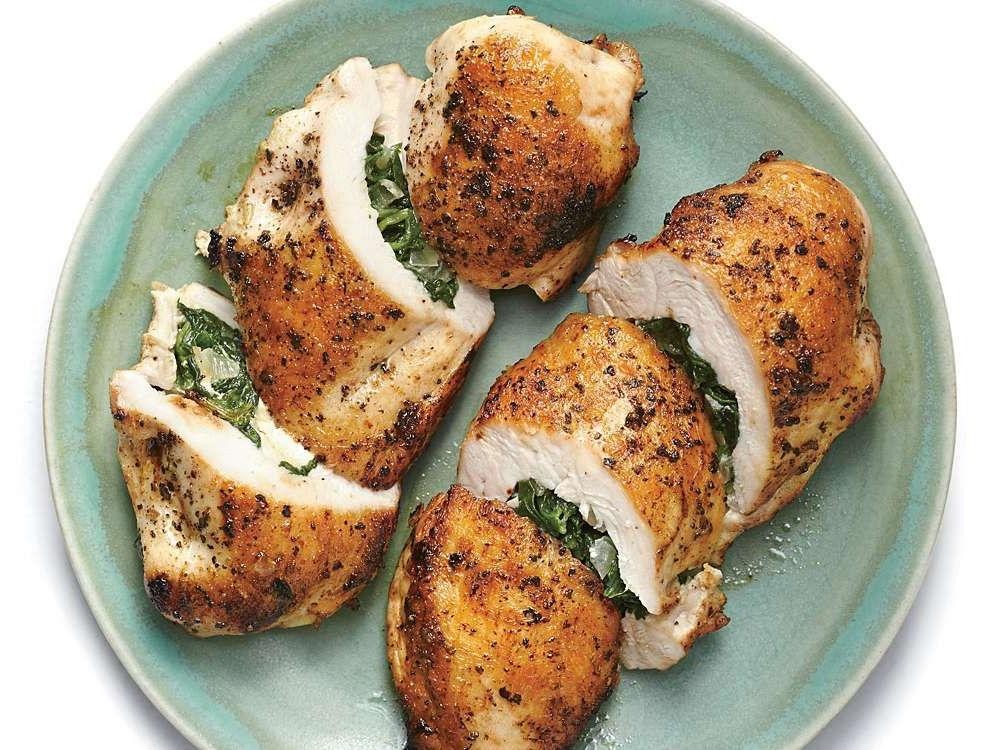
Overwhelmed by boring chicken dinners? Over it. These chive and feta stuffed chicken breasts are your weeknight hero—juicy, flavorful, and ready to impress without the stress.
2
portions15
minutes30
minutesIngredients
- 2 large chicken breasts
- A generous 1/2 cup of crumbled feta cheese
- A big handful of fresh chives, chopped
- 2 cloves of garlic, minced
- A couple of tablespoons of olive oil
- A pinch of salt and a few cracks of black pepper
Instructions
- Preheat your oven to 375°F.
- Slice a deep pocket into the side of each chicken breast, being careful not to cut all the way through.
- In a small bowl, mix the crumbled feta, chopped chives, and minced garlic until combined.
- Stuff the feta mixture evenly into the pockets of each chicken breast.
- Secure the openings with toothpicks to prevent the filling from leaking out during cooking.
- Brush both sides of the chicken breasts with olive oil.
- Season the outside of the chicken generously with salt and pepper.
- Heat an oven-safe skillet over medium-high heat for 2 minutes until hot.
- Sear the chicken for 3-4 minutes per side until golden brown.
- Transfer the skillet to the preheated oven and bake for 18-20 minutes, or until the internal temperature reaches 165°F.
- Let the chicken rest for 5 minutes before slicing to keep the juices locked in.
- Remove the toothpicks and serve immediately.
Look at that golden, cheesy goodness! The chicken stays incredibly moist, while the feta melts into a tangy, herby pocket that bursts with flavor in every bite. Slice it over a bed of lemony orzo or alongside roasted veggies for a meal that feels fancy but comes together in a flash.
Herbed Chive Omelet

Craving breakfast that feels fancy but takes minutes? This herbed chive omelet delivers fluffy, restaurant-quality eggs right at home—perfect for busy mornings or lazy weekends.
1
servings5
minutes5
minutesIngredients
– 3 large eggs
– A splash of whole milk (about 2 tablespoons)
– A couple tablespoons of fresh chopped chives
– A pinch of salt and black pepper
– A pat of butter (about 1 tablespoon)
Instructions
1. Crack 3 large eggs into a medium bowl.
2. Pour in a splash of whole milk.
3. Whisk eggs and milk vigorously for 30 seconds until fully combined and slightly frothy. (Tip: Whisking well creates a fluffier omelet!)
4. Stir in a couple tablespoons of fresh chopped chives, a pinch of salt, and black pepper.
5. Melt a pat of butter in a nonstick skillet over medium heat, swirling to coat the pan.
6. Pour the egg mixture into the hot skillet.
7. Let the eggs cook undisturbed for 1 minute until edges set.
8. Gently push cooked edges toward the center with a spatula, tilting the pan to let uncooked egg flow underneath.
9. Continue cooking for 2–3 minutes until the top is mostly set but still slightly wet. (Tip: Don’t overcook—the residual heat will finish it!)
10. Fold one half of the omelet over the other with your spatula.
11. Slide the omelet onto a plate immediately. (Tip: Serve right away for the best texture.)
Keep it simple or get creative—the tender, herby folds pair beautifully with avocado slices or a dash of hot sauce. Its delicate, fluffy interior and subtle oniony kick make even Tuesday breakfast feel special.
Crusty Bread with Chive Butter

Knead your way to crusty perfection with this no-fuss bread. Grab that Dutch oven and transform four simple ingredients into golden, crackly magic. Slather with chive butter that’ll make you forget store-bought exists.
1
loaf30
minutes45
minutesIngredients
– 3 cups of bread flour
– 1 ½ cups of warm water (around 110°F)
– 2 teaspoons of instant yeast
– 1 ½ teaspoons of kosher salt
– 1 stick of unsalted butter, softened
– a big handful of fresh chives, finely chopped
– a good pinch of flaky sea salt
Instructions
1. Whisk together 3 cups bread flour, 2 teaspoons instant yeast, and 1 ½ teaspoons kosher salt in a large bowl.
2. Pour in 1 ½ cups warm water (110°F) and mix until no dry flour remains.
3. Cover the bowl tightly with plastic wrap and let rise at room temperature for 12-18 hours until bubbly and doubled.
4. Preheat your oven to 450°F with a Dutch oven inside for 30 minutes.
5. Turn the dough onto a floured surface and shape into a tight ball without kneading.
6. Carefully place the dough ball into the preheated Dutch oven and slash the top with a sharp knife.
7. Bake covered at 450°F for 30 minutes until puffed and lightly golden.
8. Remove the lid and bake uncovered for 15 more minutes until deeply golden and crusty.
9. Transfer the bread to a wire rack and let cool completely for 2 hours.
10. Mix 1 stick softened butter with chopped chives and a pinch of flaky salt while bread cools.
11. Slice the cooled bread and spread generously with chive butter.
Get ready for that satisfying crackle when you break into the crust. The interior stays miraculously soft and chewy while the chive butter melts into every nook. Try it toasted with scrambled eggs or alongside a hearty soup for the ultimate comfort combo.
Chive and Potato Soup
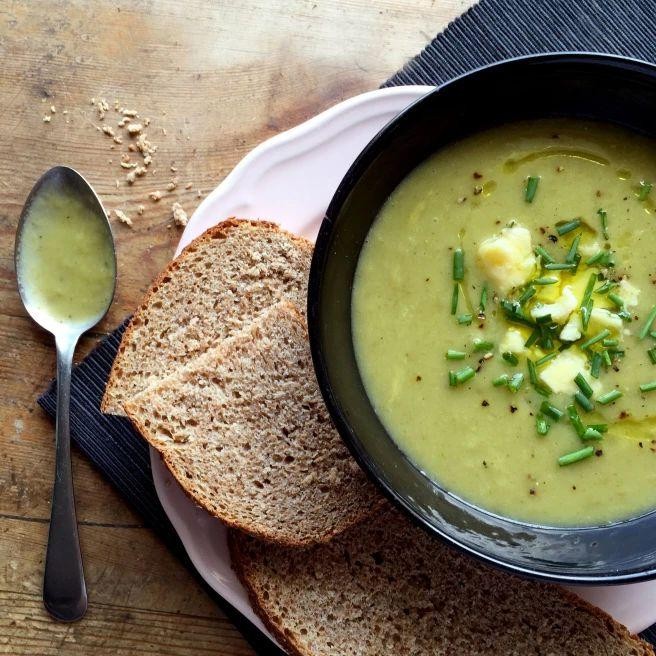
Grab your favorite pot because this chive and potato soup is about to become your new comfort food obsession. Get ready for creamy, savory goodness that comes together in under 30 minutes. Trust me, your taste buds will thank you.
2
servings15
minutes30
minutesIngredients
– 4 medium russet potatoes, peeled and chopped
– 1 large yellow onion, diced
– 3 cloves garlic, minced
– 1/2 cup fresh chives, chopped
– 4 cups vegetable broth
– 1 cup heavy cream
– 3 tablespoons butter
– A generous pinch of salt
– A couple cracks of black pepper
– A splash of olive oil
Instructions
1. Melt 3 tablespoons of butter with a splash of olive oil in a large pot over medium heat.
2. Add your diced onion and cook for 5-7 minutes until translucent and fragrant.
3. Toss in the minced garlic and cook for exactly 1 minute until aromatic but not browned.
4. Add the chopped potatoes and stir to coat them in the butter mixture.
5. Pour in 4 cups of vegetable broth and bring to a rolling boil.
6. Reduce heat to low, cover the pot, and simmer for 15-20 minutes until potatoes are fork-tender.
7. Carefully blend the soup until completely smooth using an immersion blender.
8. Stir in 1 cup of heavy cream and heat through for 2-3 minutes without boiling.
9. Mix in 1/2 cup of chopped chives, reserving 2 tablespoons for garnish.
10. Season with a generous pinch of salt and several cracks of black pepper.
Make this soup your canvas—the velvety texture pairs perfectly with crusty bread for dipping, while the fresh chives add a subtle onion flavor that’s both comforting and sophisticated. Try topping with extra chives and a drizzle of cream for that restaurant-worthy presentation.
Spring Pea and Chive Risotto
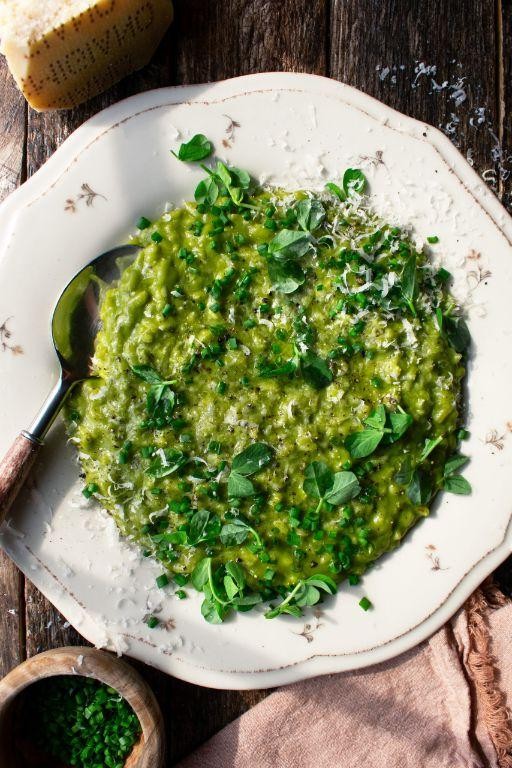
Rethink everything you know about risotto. This spring version swaps heavy for bright, creamy for fresh, and delivers restaurant-quality results in your own kitchen. Grab your spoon—this one’s a game-changer.
3
servings15
minutes40
minutesIngredients
– 1 ½ cups Arborio rice
– 4 cups chicken or vegetable broth
– 1 cup fresh or frozen peas
– ½ cup chopped fresh chives
– 1 small yellow onion, finely diced
– 2 cloves garlic, minced
– ½ cup dry white wine
– 3 tbsp unsalted butter
– ½ cup grated Parmesan cheese
– A splash of olive oil
– A couple of pinches of salt and black pepper
Instructions
1. Pour broth into a saucepan and heat over medium until simmering, then reduce to low to keep warm.
2. Heat a splash of olive oil in a large, heavy-bottomed pot over medium heat.
3. Add diced onion and cook for 4–5 minutes until translucent and soft.
4. Stir in minced garlic and cook for 1 minute until fragrant.
5. Add Arborio rice and toast for 2 minutes, stirring constantly until grains look slightly translucent at the edges.
6. Pour in white wine and stir continuously until fully absorbed—this should take about 2 minutes.
7. Ladle in 1 cup of warm broth and stir until the liquid is almost completely absorbed, about 4–5 minutes.
8. Repeat adding broth ½ cup at a time, stirring after each addition until absorbed before adding the next—this process takes about 20–25 minutes total.
9. Stir in peas during the last 5 minutes of cooking to heat through and brighten in color.
10. Remove the pot from heat and stir in butter, Parmesan, and chives until creamy and combined.
11. Season with salt and pepper, then let rest for 2 minutes off the heat before serving.
Zesty, creamy, and packed with spring flavor, this risotto is all about that perfect al dente bite. Serve it topped with extra chives and a drizzle of olive oil, or alongside grilled shrimp for a full meal that feels fancy without the fuss.
Chive Deviled Eggs

Perfect for parties or just because—these chive deviled eggs upgrade the classic with fresh, oniony flavor. They’re creamy, tangy, and disappear fast.
12
portions25
minutes12
minutesIngredients
– 6 large eggs
– 1/4 cup of mayonnaise
– 1 tablespoon of Dijon mustard
– a splash of white vinegar
– a pinch of salt
– a couple of tablespoons of finely chopped fresh chives
– a sprinkle of paprika for dusting
Instructions
1. Place 6 large eggs in a single layer in a saucepan and cover with cold water by 1 inch.
2. Bring the water to a rolling boil over high heat, then immediately remove the pan from heat, cover it, and let the eggs sit for 12 minutes exactly.
3. Tip: Letting eggs sit off the heat prevents rubbery whites and makes peeling easier.
4. Transfer the eggs to a bowl of ice water and let them cool completely for about 10 minutes.
5. Gently tap each egg on the counter and roll it to crack the shell, then peel under cool running water.
6. Slice each peeled egg in half lengthwise and pop the yolks into a medium bowl.
7. Mash the yolks thoroughly with a fork until no large lumps remain.
8. Add 1/4 cup of mayonnaise, 1 tablespoon of Dijon mustard, a splash of white vinegar, and a pinch of salt to the yolks.
9. Tip: Mixing the yolk base until perfectly smooth ensures a velvety filling.
10. Stir in a couple of tablespoons of finely chopped fresh chives until well combined.
11. Spoon or pipe the yolk mixture evenly back into the egg white halves.
12. Tip: Use a zip-top bag with a corner snipped for easy, mess-free piping.
13. Lightly dust the filled eggs with a sprinkle of paprika for color and a hint of smokiness.
14. Arrange the deviled eggs on a serving plate and refrigerate for at least 30 minutes to let the flavors meld.
15. Serve chilled. A creamy, tangy filling pairs with the firm egg white for a satisfying bite. Garnish with extra chives for a pop of green, or serve alongside crisp veggies for a fresh crunch.
Roasted Carrots with Honey and Chives

Just when you thought carrots couldn’t get more addictive. Jazz up those humble roots with honey’s golden sweetness and chives’ fresh kick. Your side dish game is about to level up hard.
4
servings15
minutes35
minutesIngredients
– 2 pounds of fresh carrots, peeled
– 3 tablespoons of olive oil
– 2 tablespoons of honey
– A big handful of fresh chives
– 1 teaspoon of salt
– Half a teaspoon of black pepper
Instructions
1. Preheat your oven to 425°F—this high heat creates perfect caramelization.
2. Slice carrots into uniform ½-inch thick coins so they cook evenly.
3. Toss carrot coins with olive oil, salt, and pepper in a large bowl until fully coated.
4. Spread carrots in a single layer on a parchment-lined baking sheet—don’t crowd them!
5. Roast for 20 minutes until carrots begin to soften and edges brown slightly.
6. Drizzle honey evenly over carrots and toss gently with a spatula.
7. Return to oven for another 10-15 minutes until glossy and caramelized at the edges.
8. While carrots roast, finely chop your fresh chives.
9. Remove carrots from oven when tender but still slightly firm to the bite.
10. Sprinkle chopped chives over hot carrots right before serving—the heat releases their flavor.
Unbelievably glossy and tender with crispy caramelized edges, these carrots deliver sweet-savory perfection. The chives add a fresh oniony crunch that cuts through the honey’s richness. Serve them piled high over creamy polenta or alongside roasted chicken for a showstopping weeknight meal.
Chive and Lemon linguine
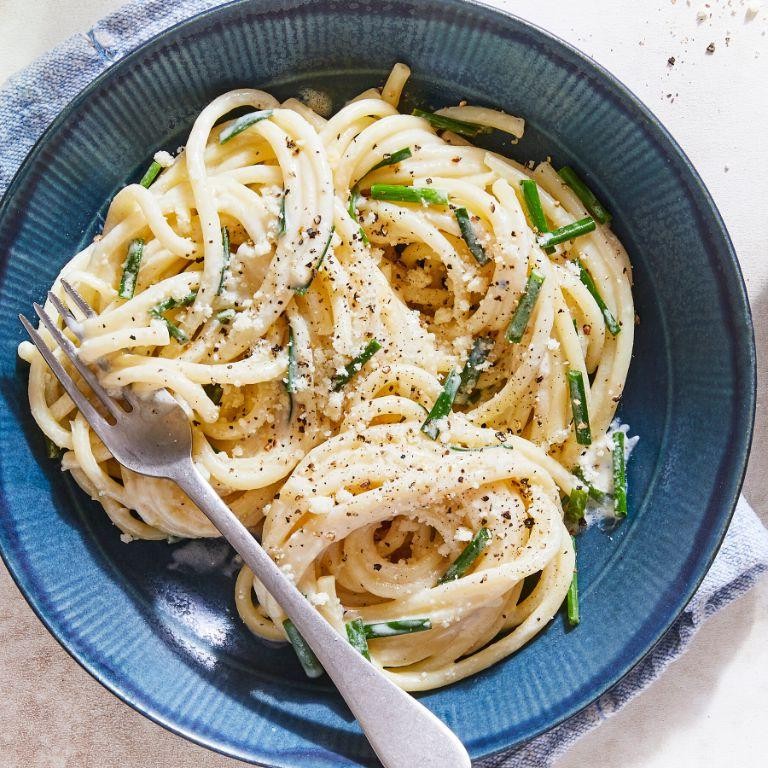
Jazz up your pasta night with this vibrant chive and lemon linguine. Just toss fresh ingredients together for a restaurant-worthy dish in minutes. Get ready to impress your taste buds with bright, herby flavors that scream freshness.
4
servings10
minutes15
minutesIngredients
– 8 ounces of linguine pasta
– 3 tablespoons of olive oil
– 4 cloves of garlic, minced
– A big handful of fresh chives, chopped
– Zest and juice from 1 large lemon
– 1/2 cup of grated Parmesan cheese
– A splash of pasta water (about 1/4 cup)
– A couple of pinches of red pepper flakes
– Salt for the pasta water
Instructions
1. Bring a large pot of salted water to a rolling boil over high heat.
2. Add the linguine and cook for 9-11 minutes until al dente, stirring occasionally to prevent sticking.
3. While pasta cooks, heat olive oil in a large skillet over medium heat for 2 minutes.
4. Add minced garlic and cook for 1 minute until fragrant but not browned.
5. Reserve 1/4 cup of starchy pasta water before draining the linguine.
6. Transfer drained pasta directly into the skillet with garlic oil.
7. Add lemon zest, lemon juice, and chopped chives to the skillet.
8. Toss everything together using tongs for 30 seconds to coat evenly.
9. Sprinkle in grated Parmesan cheese while continuing to toss.
10. Gradually add splashes of reserved pasta water until the sauce clings to the pasta.
11. Finish with red pepper flakes and toss one final time to combine.
Delightfully fresh and zesty, this linguine boasts a creamy texture without any cream. The chives add a subtle onion kick that pairs perfectly with the bright lemon notes. Serve it alongside grilled chicken or with extra Parmesan for an elegant weeknight dinner that feels anything but ordinary.
Mushroom and Chive Tart

Whip up this savory mushroom and chive tart that’s perfect for brunch or a fancy snack. It’s flaky, creamy, and packed with earthy flavors that’ll disappear fast. Seriously, your friends will beg for the recipe.
6
servings20
minutes40
minutesIngredients
- 1 sheet of frozen puff pastry, thawed
- 2 cups of sliced cremini mushrooms
- 1/2 cup of chopped fresh chives
- 1/2 cup of heavy cream
- 2 large eggs
- 1/2 cup of grated Parmesan cheese
- 2 tablespoons of olive oil
- 1 minced garlic clove
- 1/4 teaspoon of salt
- 1/4 teaspoon of black pepper
Instructions
- Preheat your oven to 400°F.
- Unfold the puff pastry sheet and press it into a 9-inch tart pan, trimming any excess.
- Prick the bottom all over with a fork to prevent puffing.
- Heat olive oil in a skillet over medium heat.
- Add the sliced mushrooms and cook for 8-10 minutes, stirring occasionally, until they’re browned and have released their liquid.
- Stir in the minced garlic and cook for 1 more minute until fragrant.
- In a medium bowl, whisk together the heavy cream, eggs, Parmesan, salt, and pepper until smooth.
- Fold in the cooked mushrooms and chopped chives.
- Pour the filling into the prepared tart shell.
- Bake for 25-30 minutes, or until the crust is golden and the center is set.
- Let the tart cool in the pan for 10 minutes before slicing.
Golden and crisp, this tart boasts a buttery crust with a rich, savory filling. Serve it warm with a simple arugula salad for a balanced meal, or slice it into squares for easy entertaining.
Chive-Crusted Lamb Chops
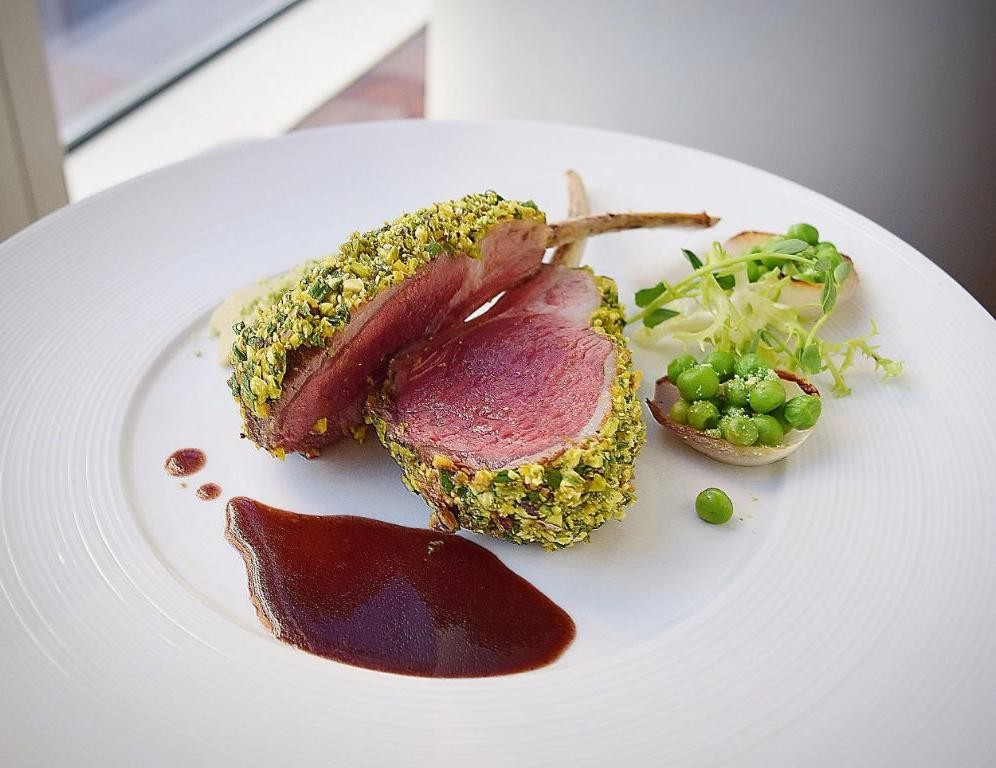
Fancy lamb chops that’ll make you feel like a gourmet chef without the fuss. These chive-crusted beauties sear up in minutes but deliver restaurant-worthy flavor. Get ready to impress everyone at your table.
3
servings10
minutes9
minutesIngredients
– 8 lamb chops (about 1½ pounds total)
– ½ cup fresh chives, finely chopped
– 2 cloves garlic, minced
– ¼ cup panko breadcrumbs
– 2 tablespoons Dijon mustard
– 2 tablespoons olive oil
– 1 tablespoon butter
– A generous pinch of kosher salt
– A few cracks of black pepper
Instructions
1. Pat the lamb chops completely dry with paper towels.
2. Season both sides of the lamb chops generously with kosher salt and black pepper.
3. Heat olive oil in a large skillet over medium-high heat until it shimmers, about 2 minutes.
4. Sear the lamb chops for 3 minutes on the first side until a golden-brown crust forms.
5. Flip the chops and cook for another 2 minutes on the second side.
6. Remove the lamb chops from the skillet and let them rest on a plate for 5 minutes.
7. Mix the chopped chives, minced garlic, and panko breadcrumbs in a small bowl.
8. Brush the top of each lamb chop with a thin layer of Dijon mustard.
9. Press the chive-breadcrumb mixture firmly onto the mustard-coated tops of each chop.
10. Melt butter in the same skillet over medium heat.
11. Return the lamb chops to the skillet, crust-side up, and cook for 2 minutes to crisp the topping.
12. Check that the internal temperature reaches 145°F for medium-rare using an instant-read thermometer.
13. Transfer the lamb chops to a clean serving platter.
The crispy chive crust provides fantastic texture contrast against the juicy, tender lamb. Serve these over creamy mashed potatoes to catch every bit of the savory pan juices, or slice them for an elegant appetizer that disappears fast.
Chive and Cucumber Salad
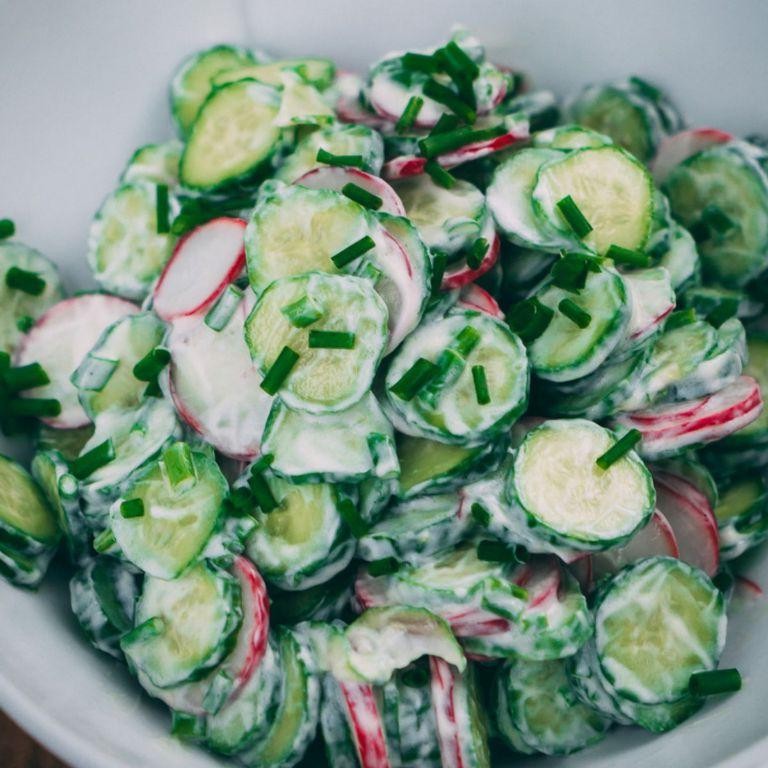
Ditch the boring greens—this chive and cucumber salad brings the crunch with zero fuss. Grab your sharpest knife and let’s build layers of crisp, herby freshness that’ll have you craving seconds.
3
servings25
minutesIngredients
– 2 medium cucumbers, thinly sliced
– A big handful of fresh chives, chopped
– ¼ cup rice vinegar
– 1 tablespoon olive oil
– A pinch of salt
– A couple of ice cubes
Instructions
1. Slice 2 medium cucumbers into thin rounds, about ⅛-inch thick, using a mandoline for even cuts if you have one.
2. Place the cucumber slices in a colander and toss them with a pinch of salt to draw out excess moisture.
3. Let the cucumbers sit for 10 minutes while you prep the other ingredients—this prevents a watery salad.
4. Rinse the cucumbers briefly under cold water to remove excess salt, then pat them completely dry with paper towels.
5. Chop a big handful of fresh chives into ¼-inch pieces, using kitchen shears for quick, uniform cuts.
6. Whisk together ¼ cup rice vinegar and 1 tablespoon olive oil in your serving bowl until emulsified.
7. Add the dried cucumber slices and chopped chives to the dressing in the bowl.
8. Toss everything together gently but thoroughly until every piece is coated.
9. Drop a couple of ice cubes into the salad and let it chill in the refrigerator for 15 minutes to crisp up.
10. Remove the ice cubes before serving—they’ve done their job keeping things extra crunchy.
Get ready for a texture party—each bite delivers a cool, crisp crunch from the cucumbers, balanced by the gentle oniony kick of chives. Serve it alongside grilled chicken or stuff it into pita pockets for a refreshing lunch twist.
Conclusion
Zesty, versatile, and oh-so-flavorful—these 23 chives recipes prove how a simple herb can transform your everyday cooking. From creamy dips to savory mains, there’s something here for every home cook. We’d love to hear which recipes you try! Share your favorites in the comments below, and don’t forget to pin this article to your Pinterest boards for easy reference. Happy cooking!


