You won’t believe how these crispy, juicy chicken drumsticks will become your new game day obsession! Your kitchen is about to smell like heaven, and your taste buds are in for the treat of their lives. Get ready to become the hero of every party with these irresistible wings that’ll have everyone begging for your secret recipe.
Why This Recipe Works
- The double cooking method ensures maximum crispiness while keeping the meat incredibly juicy and tender inside
- Our secret spice blend creates the perfect balance of savory, spicy, and slightly sweet flavors that penetrate deep into the meat
- The high-temperature finishing technique gives you that restaurant-quality crunch without any greasy aftertaste
- Simple ingredients come together to create complex flavors that will have your guests thinking you’re a professional chef
- The recipe is incredibly versatile and can be customized to suit any taste preference or dietary need
Ingredients
- 3 pounds chicken drumsticks, patted completely dry with paper towels
- 2 tablespoons baking powder (aluminum-free for best results)
- 1 tablespoon kosher salt
- 2 teaspoons garlic powder
- 2 teaspoons smoked paprika
- 1 teaspoon black pepper, freshly ground
- 1 teaspoon onion powder
- 1/2 teaspoon cayenne pepper (adjust to your spice preference)
- 2 tablespoons olive oil or avocado oil
- 1/4 cup hot sauce (such as Frank’s RedHot) for tossing after baking
- 2 tablespoons unsalted butter, melted for the final sauce
Equipment Needed
- Large mixing bowl
- Rimmed baking sheet
- Wire rack that fits inside baking sheet
- Paper towels
- Tongs
- Measuring spoons
- Small saucepan for melting butter
- Instant-read thermometer
Instructions
Prepare and Season the Drumsticks
Start by thoroughly patting each drumstick dry with paper towels – this is crucial for achieving that perfect crispy skin. In a large mixing bowl, combine the baking powder, kosher salt, garlic powder, smoked paprika, black pepper, onion powder, and cayenne pepper. Whisk these dry ingredients together until they’re completely uniform in color and texture. Add the completely dry drumsticks to the bowl and drizzle with the olive oil. Using your hands (or tongs if you prefer), toss the drumsticks until every surface is evenly coated with the spice mixture. Make sure to get under the skin and into all the nooks and crannies. Arrange the seasoned drumsticks in a single layer on a wire rack set over a rimmed baking sheet, making sure they’re not touching each other. Let them sit at room temperature for 30 minutes while you preheat your oven – this helps the skin dry out even more for extra crispiness.
Initial Low-Temperature Bake
Preheat your oven to 250°F and position one rack in the center. Place the prepared baking sheet with the wire rack and drumsticks into the oven and bake for 30 minutes exactly. This low-temperature phase is where the magic happens – it slowly renders out the fat from under the skin while keeping the meat incredibly moist. The baking powder in our spice mix works its science magic during this stage, creating tiny bubbles on the skin surface that will expand into amazing crispiness later. After 30 minutes, you’ll notice the drumsticks have released some fat and the skin is starting to look slightly opaque but still pale. Don’t worry if they don’t look done yet – we’re building the foundation for perfection here. The internal temperature should read about 120-130°F at this point if you check with a thermometer.
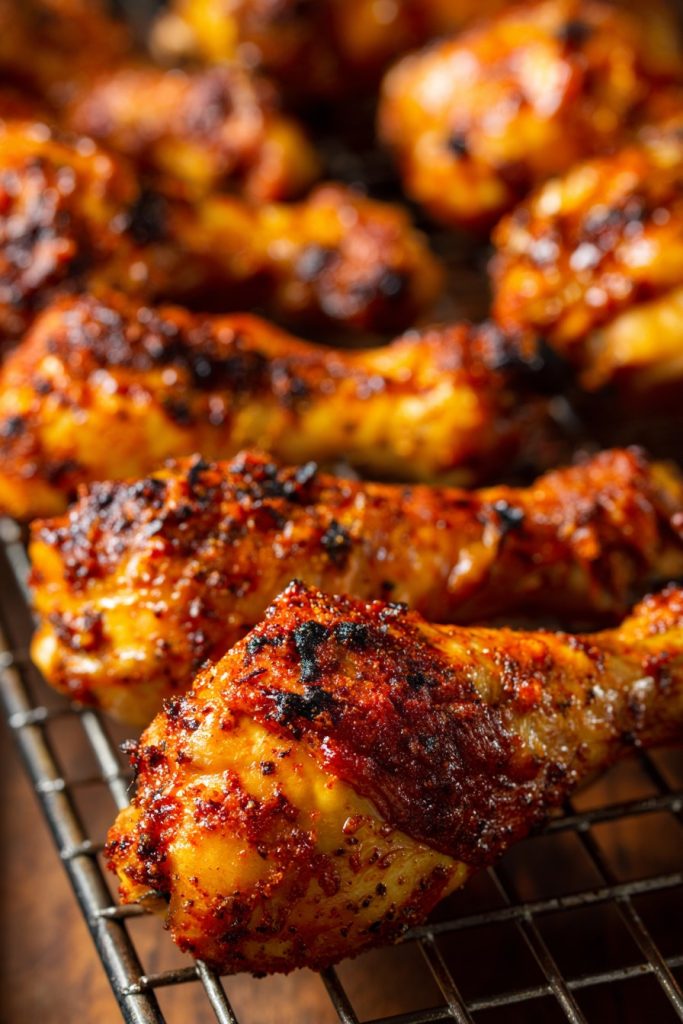
High-Temperature Crisping
Increase your oven temperature to 425°F and continue baking the drumsticks for another 40-45 minutes. This is where the transformation happens! The higher heat will cause the rendered fat to sizzle and crisp up that skin into golden-brown perfection. Rotate the baking sheet halfway through this cooking time to ensure even browning on all sides. Keep a close eye on them during the last 10 minutes – you’re looking for deep golden brown color with some darker spots where the spices have caramelized. The skin should look blistered and crispy, and when you gently shake the baking sheet, the drumsticks should move easily without sticking. The internal temperature should reach 175-180°F for the most tender, fall-off-the-bone texture. If some pieces are browning faster than others, you can move them to different positions on the rack.
Prepare the Signature Sauce
Final Toss and Resting
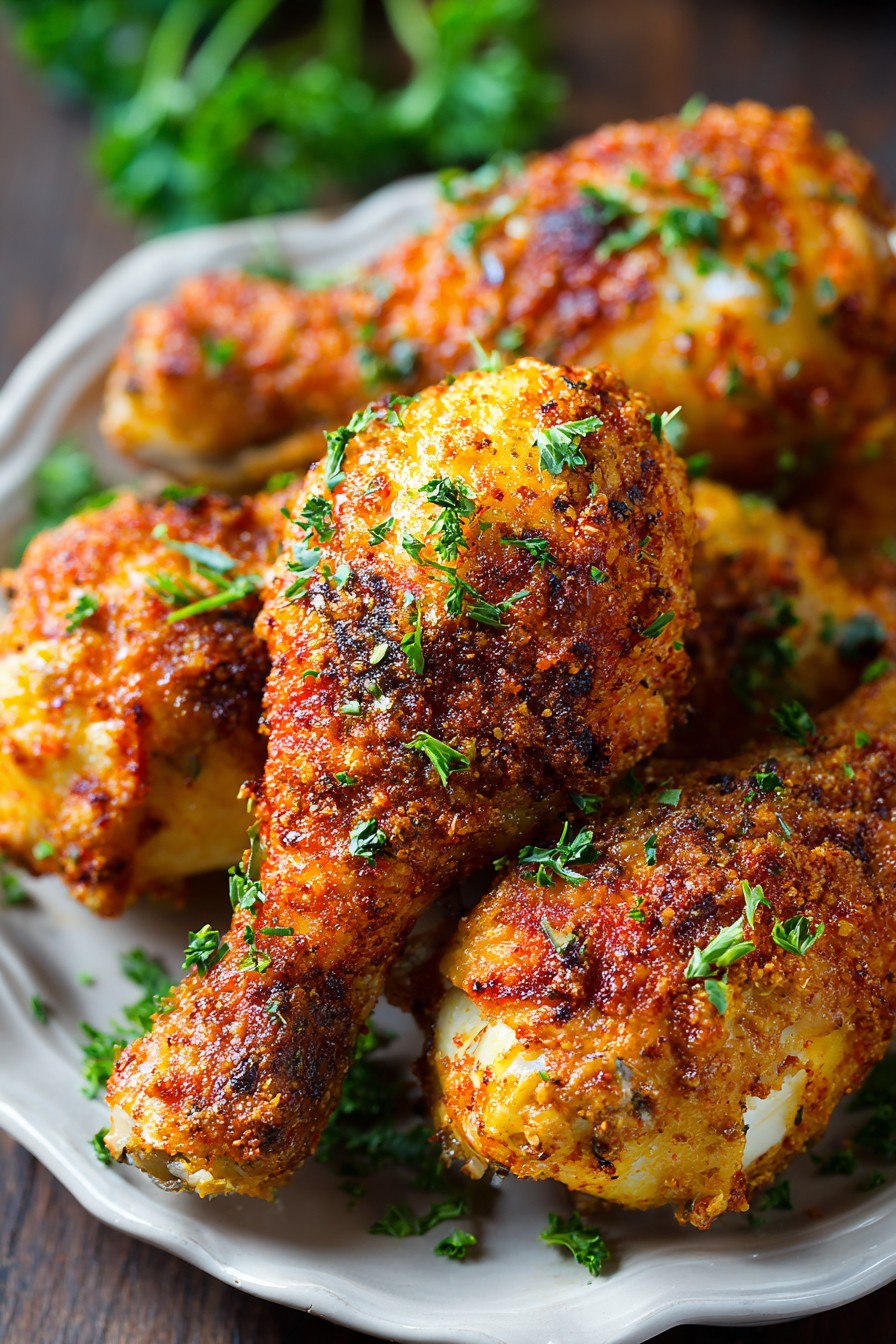
Once the drumsticks have reached that perfect internal temperature of 175-180°F and the skin is gloriously crispy and brown, carefully remove them from the oven. Immediately transfer the hot drumsticks to a large clean bowl – work quickly while they’re still piping hot. Pour the warm sauce over the drumsticks and use tongs to gently toss them until every piece is evenly coated with the glossy, flavorful sauce. Be gentle but thorough – you want that sauce to cling to every crispy ridge and crevice. Let the sauced drumsticks rest for 5-7 minutes before serving – this allows the sauce to set slightly and the juices to redistribute throughout the meat. The resting time is crucial for maximum juiciness and flavor absorption. Serve immediately while still hot and crispy, with plenty of napkins because things are about to get deliciously messy!
Tips and Tricks
For the absolute crispiest skin possible, try leaving the seasoned drumsticks uncovered in the refrigerator overnight instead of just 30 minutes at room temperature. This extended drying time allows even more moisture to evaporate from the skin, resulting in an incredible crackling texture that will have everyone asking for your secret. If you’re cooking for a crowd, you can prepare the drumsticks up to this point 24 hours in advance, then just pop them in the oven when guests arrive.
Invest in an instant-read thermometer – it’s the single most important tool for perfect chicken every time. Chicken safety is no joke, and guessing doneness can lead to either dangerous undercooking or dry, overcooked meat. The thermometer takes all the guesswork out and ensures perfect results every single time. Look for one with a thin probe that won’t leave huge holes in your beautiful crispy skin, and make sure to calibrate it occasionally for accuracy.
If you want to add smoke flavor without a smoker, try adding a teaspoon of liquid smoke to your seasoning rub or finishing sauce. Alternatively, you can use smoked paprika instead of regular paprika for that subtle smoky depth. For outdoor cooking enthusiasts, these drumsticks work beautifully on the grill – use indirect heat at 250°F for the first 30 minutes, then move directly over the coals for crisping. Just watch for flare-ups from the dripping fat!
Don’t overcrowd your baking sheet – leaving space between each drumstick allows hot air to circulate properly, ensuring even cooking and crispiness on all sides. If you need to cook more than fits on one sheet, use two racks and rotate the sheets halfway through cooking. For extra-easy cleanup, line your baking sheet with aluminum foil to catch all the rendered fat – just make sure the foil doesn’t cover the entire surface or it can affect air circulation.
The rendered chicken fat that collects in your baking sheet is liquid gold! Save it for cooking vegetables, making gravy, or even for roasting potatoes – it adds incredible flavor. Just strain it through a fine mesh sieve into a jar and store in the refrigerator for up to a month. Speaking of storage, these drumsticks reheat surprisingly well in an air fryer or toaster oven at 375°F for 5-7 minutes to restore the crispiness.
Recipe Variations
- For a sweet and sticky Asian-inspired version, replace the hot sauce with a mixture of 1/4 cup honey, 2 tablespoons soy sauce, 1 tablespoon rice vinegar, 1 teaspoon grated ginger, and 1 minced garlic clove. Simmer until slightly thickened and toss with the cooked drumsticks. Garnish with sesame seeds and sliced green onions for that restaurant-quality presentation that will impress all your guests.
- Create a buffalo-blue cheese variation by using your favorite buffalo sauce and adding 2 tablespoons of crumbled blue cheese to the finishing sauce. Let the blue cheese melt into the warm sauce for a creamy, tangy coating that’s perfect for game day. Serve with celery sticks and extra blue cheese dressing for dipping – because sometimes more is more when it comes to flavor combinations.
- Try a lemon-herb Mediterranean twist by replacing the spice blend with 2 tablespoons dried oregano, 1 tablespoon lemon zest, 2 teaspoons garlic powder, 1 teaspoon onion powder, and 1/2 teaspoon red pepper flakes. For the finishing sauce, use 3 tablespoons melted butter mixed with the juice of one lemon and 2 tablespoons chopped fresh parsley. The bright, fresh flavors will transport you straight to the Greek islands with every delicious bite.
- For a smoky barbecue version, use 2 tablespoons brown sugar, 1 tablespoon smoked paprika, 2 teaspoons garlic powder, 1 teaspoon mustard powder, and 1/2 teaspoon black pepper in your dry rub. Instead of the hot sauce butter mixture, toss the cooked drumsticks with 1/2 cup of your favorite barbecue sauce thinned with 2 tablespoons apple cider vinegar. Finish under the broiler for 2-3 minutes to caramelize the sauce into a sticky, finger-licking glaze.
- Create a gluten-free and dairy-free option by ensuring your baking powder is gluten-free and using avocado oil instead of butter in the finishing sauce. For the sauce, mix 1/4 cup hot sauce with 2 tablespoons of olive oil or avocado oil and a teaspoon of honey if desired. The result is just as crispy and flavorful while accommodating dietary restrictions without compromising on taste or texture.
Frequently Asked Questions
Can I use chicken wings instead of drumsticks?
Absolutely! The cooking method works beautifully for whole chicken wings or party wings. For whole wings, you might need to increase the initial low-temperature bake to 40 minutes and the high-temperature crisp to 45-50 minutes. Party wings (the separated flats and drumettes) will cook slightly faster – check them at 35 minutes during the high-temperature phase. The key is always checking the internal temperature rather than relying solely on time. Wings will give you more surface area for crispy skin, while drumsticks offer more meat per piece – it’s really about your personal preference for your gathering.
Why use baking powder in the seasoning?
The baking powder is our secret weapon for ultra-crispy skin! It works by raising the pH of the chicken skin, which helps break down proteins and allows moisture to evaporate more efficiently during cooking. This creates millions of tiny bubbles and pockets that expand into incredible crispiness. Make sure you’re using aluminum-free baking powder to avoid any metallic aftertaste. The baking powder doesn’t add flavor – it just works its scientific magic on the texture. This trick is used by professional chefs and serious home cooks alike for achieving that perfect crackling texture without deep frying.
Can I make these ahead of time for a party?
You can absolutely prepare these in advance! Complete the seasoning and drying step up to 24 hours ahead – arrange the seasoned drumsticks on the wire rack set over a baking sheet and refrigerate uncovered. This actually improves the crispiness by allowing even more moisture to evaporate. When ready to cook, let them sit at room temperature for 30 minutes while preheating the oven, then proceed with the recipe as written. You can also fully cook them ahead and reheat in a 375°F oven or air fryer for 8-10 minutes to restore the crispiness. The sauce is best added fresh though, so wait to toss until serving time.
How do I know when the drumsticks are fully cooked?
The safest and most accurate way is to use an instant-read thermometer inserted into the thickest part of the meat without touching the bone. You’re looking for an internal temperature of 175-180°F for drumsticks – this higher temperature helps break down the connective tissues for fall-off-the-bone tenderness. Visually, the juices should run clear when pierced with a knife, and the meat should pull away easily from the bone. The skin should be deep golden brown and very crispy to the touch. Remember that carryover cooking will add another 5-10 degrees during resting, so remove them from the oven when they reach about 170°F if you want to be precise.
What’s the best way to store and reheat leftovers?
Store leftover drumsticks in an airtight container in the refrigerator for up to 4 days. For best results, reheat in an air fryer at 375°F for 5-7 minutes or in a conventional oven at 375°F for 10-12 minutes until heated through and crispy again. The microwave will make them soggy, so avoid that unless you’re desperate! You can also freeze cooked drumsticks for up to 3 months – wrap individually in foil then place in freezer bags. Thaw in the refrigerator overnight before reheating. The sauce might separate slightly upon reheating, but a quick toss will bring it back together.
Summary
These incredibly crispy baked chicken drumsticks deliver restaurant-quality results with a foolproof method that guarantees perfect texture every time. The double-cooking technique creates amazingly crunchy skin while keeping the meat juicy and flavorful inside. With endless customization options and make-ahead convenience, this recipe will become your go-to for any occasion that calls for seriously delicious chicken.
Crispy Baked Chicken Drumsticks
6
servings15
minutes75
minutesIngredients
Instructions
- 1 Pat drumsticks dry and toss with spices and oil
- 2 Arrange on wire rack and let sit 30 minutes
- 3 Bake at 250°F for 30 minutes
- 4 Increase temperature to 425°F and bake 40-45 minutes
- 5 Toss with hot sauce butter mixture and rest 5 minutes


