Kick your weeknight dinner routine up a notch with this incredibly flavorful baked chicken teriyaki! Keeping things light and hands-off, this recipe delivers that signature sticky-sweet glaze without the fuss of stovetop splatters. Get ready for a crowd-pleasing dish that’s as easy as it is delicious.
Why This Recipe Works
- Baking the chicken ensures even cooking and juicy results every time, eliminating the risk of dry or unevenly cooked pieces that can happen with pan-frying.
- The homemade teriyaki sauce strikes the perfect balance between sweet and savory, with soy sauce, ginger, and garlic creating layers of flavor that store-bought versions just can’t match.
- Using a wire rack set over a baking sheet allows hot air to circulate around the chicken, resulting in a beautifully caramelized exterior without the meat sitting in its own juices.
- This method is significantly healthier than traditional frying, cutting down on oil while still delivering that irresistible glossy glaze and tender texture.
- The hands-off baking approach means you can prepare sides or simply relax while your oven does all the work, making it perfect for busy weeknights.
Ingredients
- 2 pounds boneless, skinless chicken thighs (trimmed of excess fat)
- 1/2 cup low-sodium soy sauce
- 1/4 cup honey
- 2 tablespoons brown sugar (packed)
- 3 cloves garlic (minced)
- 1 tablespoon fresh ginger (grated)
- 2 tablespoons rice vinegar
- 1 tablespoon cornstarch
- 2 tablespoons cold water
- 1 tablespoon sesame oil
- 2 green onions (thinly sliced for garnish)
- 1 teaspoon sesame seeds (for garnish)
Equipment Needed
- Medium saucepan
- Whisk
- Measuring cups and spoons
- Mixing bowl
- Rimmed baking sheet
- Wire rack
- Aluminum foil or parchment paper
- Basting brush
- Instant-read thermometer
Instructions

Prepare the Teriyaki Sauce
In a medium saucepan, combine the soy sauce, honey, brown sugar, minced garlic, grated ginger, and rice vinegar. Bring the mixture to a gentle simmer over medium heat, stirring frequently with a whisk to dissolve the sugar completely. Once simmering, reduce heat to low and let it cook for 3-4 minutes until slightly reduced. In a small bowl, create a slurry by mixing the cornstarch with 2 tablespoons of cold water until smooth. Slowly whisk the cornstarch slurry into the simmering sauce, continuing to whisk constantly to prevent lumps. Cook for another 2-3 minutes until the sauce thickens to a glaze-like consistency that coats the back of a spoon. Remove from heat and stir in the sesame oil, then set aside to cool slightly while you prepare the chicken.
Prep the Chicken and Baking Setup
Pat the chicken thighs completely dry with paper towels – this crucial step helps the sauce adhere better and promotes better browning. Arrange a wire rack inside a rimmed baking sheet and line the sheet with aluminum foil or parchment paper for easy cleanup. Lightly spray the wire rack with cooking spray to prevent sticking. Arrange the chicken thighs in a single layer on the prepared wire rack, making sure they aren’t touching each other to allow for proper air circulation. Using a basting brush, lightly brush both sides of each chicken thigh with about one-third of the teriyaki sauce, reserving the rest for later. Let the chicken sit at room temperature for 15-20 minutes while you preheat the oven to 400°F – this helps it cook more evenly.
Initial Baking Phase
Place the prepared baking sheet with chicken on the center rack of your preheated 400°F oven. Bake for 15 minutes, during which time the chicken will begin to cook through and develop light golden color on the surface. After 15 minutes, carefully remove the baking sheet from the oven – the chicken should be partially cooked but still pale in areas. Using tongs, flip each chicken thigh over to ensure even cooking on both sides. Brush the tops generously with more teriyaki sauce, using about half of the remaining sauce. Return the baking sheet to the oven and continue baking for another 10 minutes, allowing the glaze to begin caramelizing on the flipped side.
Final Glazing and Caramelization
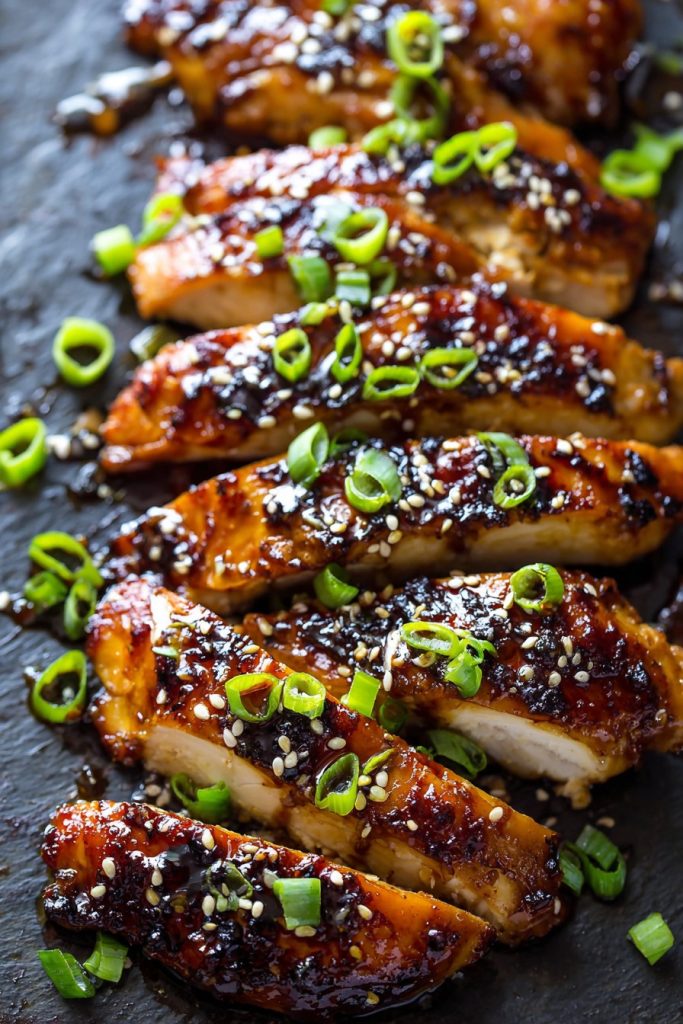
After the second baking period, remove the chicken from the oven – it should be nearly cooked through with an internal temperature of around 155-160°F when checked with an instant-read thermometer. Brush the remaining teriyaki sauce generously over all chicken pieces, making sure to coat every surface evenly. Increase the oven temperature to 425°F and return the baking sheet to the oven for a final 5-7 minutes of baking. Watch closely during this stage as the sugar in the glaze can burn quickly – you’re looking for a deep, glossy caramelization with some bubbling around the edges. The chicken is done when it reaches an internal temperature of 165°F and the glaze is sticky and beautifully bronzed.
Rest and Serve
Carefully remove the baking sheet from the oven and transfer the chicken to a clean serving platter using tongs. Let the chicken rest for 5-7 minutes before serving – this allows the juices to redistribute throughout the meat, ensuring maximum tenderness. While resting, the glaze will continue to set into that perfect sticky consistency that makes teriyaki so irresistible. Garnish with thinly sliced green onions and a sprinkle of sesame seeds for color and extra flavor. Serve immediately with steamed rice and your favorite vegetables, spooning any excess glaze from the baking sheet over the chicken for extra sauciness.
Tips and Tricks
For the ultimate teriyaki experience, consider marinating your chicken thighs in half of the sauce for 30 minutes to 2 hours before baking – this deepens the flavor penetration significantly. If you have time, score the fatty side of the chicken thighs with a sharp knife in a crosshatch pattern before marinating; this helps the sauce penetrate deeper and allows fat to render more effectively during baking. When making the sauce, feel free to adjust the sweetener to your preference – some enjoy equal parts honey and brown sugar, while others prefer all honey or even maple syrup for a different flavor profile. If you want an extra glossy finish, add 1 tablespoon of mirin to the sauce mixture – this Japanese cooking wine adds subtle sweetness and enhances the sheen. For those who enjoy spice, add 1-2 teaspoons of sriracha or red pepper flakes to the teriyaki sauce for a sweet-heat combination that’s absolutely addictive. If you’re meal prepping, this chicken stores beautifully in an airtight container for up to 4 days – simply reheat in a 350°F oven for 10-15 minutes to restore the glaze’s sticky texture. For extra crispy edges, place the chicken under the broiler for the final 1-2 minutes instead of increasing the oven temperature, but watch carefully to prevent burning. If you don’t have a wire rack, you can bake the chicken directly on a parchment-lined baking sheet, but flip halfway through and expect slightly less crispy results. For maximum sauce coverage, use kitchen tweezers to turn the chicken and a silicone basting brush for even application without bristles sticking to the glaze. Always let your sauce cool slightly before brushing onto raw chicken to prevent premature cooking of the exterior, which can create a steamed rather than baked texture.
Recipe Variations
- For a pineapple teriyaki twist, add 1/2 cup crushed pineapple (well-drained) to the sauce mixture and garnish with grilled pineapple rings – the natural sweetness and acidity complement the savory notes perfectly.
- Create a spicy version by adding 1-2 tablespoons of gochujang (Korean chili paste) to the sauce and topping with sliced fresh chili peppers for those who enjoy some heat with their sweet.
- Make it gluten-free by using tamari instead of soy sauce and ensuring your other ingredients are certified gluten-free – the flavor profile remains virtually identical.
- For a citrusy variation, add the zest of one orange and 2 tablespoons of fresh orange juice to the sauce, garnishing with orange slices for a bright, refreshing twist.
- Transform it into teriyaki bowls by serving over cauliflower rice with steamed broccoli, shredded carrots, and edamame for a low-carb, vegetable-packed meal.
Frequently Asked Questions
Can I use chicken breasts instead of thighs?
Absolutely! Chicken breasts work well but require slightly different handling. Use 1.5 pounds of boneless, skinless chicken breasts and pound them to an even 3/4-inch thickness before baking. Reduce the initial baking time to 12 minutes per side since breasts cook faster and can dry out more easily. The internal temperature should still reach 165°F, but check several minutes early to prevent overcooking. Breasts will have a leaner result than the juicier thighs, so consider brining them for 30 minutes in salted water before patting dry and proceeding with the recipe.
How do I prevent the sauce from burning?
The key to preventing burnt teriyaki sauce lies in temperature control and timing. Always bake at 400°F for the majority of the cooking time, only increasing to 425°F for the final few minutes of caramelization. Use an oven thermometer to ensure your oven temperature is accurate, as many home ovens run hot. Position your baking sheet in the center of the oven, not too close to the top heating element. Watch closely during the final glazing stage and remove immediately if you see excessive smoking or blackening. If your oven tends to run hot, consider reducing the final temperature increase to 415°F instead.
Can I make this recipe ahead of time?
This teriyaki chicken is excellent for meal prep! Complete the recipe through baking and cooling, then store in an airtight container in the refrigerator for up to 4 days. The glaze may solidify when chilled but will return to its saucy consistency when reheated. To reheat, place chicken on a baking sheet in a 350°F oven for 10-15 minutes until heated through. Alternatively, microwave individual portions for 1-2 minutes, though the oven method preserves the texture better. You can also prepare the teriyaki sauce up to 5 days in advance and store it separately in the refrigerator.
What’s the best way to get that restaurant-quality glossy glaze?
Achieving that professional-looking glossy glaze requires proper technique with the cornstarch slurry. Always mix cornstarch with cold water first before adding to hot liquid to prevent lumps. Cook the sauce until it thickens sufficiently to coat the back of a spoon without dripping off immediately. Apply the final glaze during the last few minutes of cooking when the chicken is almost done – this allows the sugar to caramelize without burning. For extra shine, add 1 teaspoon of light corn syrup to the sauce (it won’t make it sweeter but enhances glossiness) or finish with a light brush of warm honey after baking.
Can I freeze baked teriyaki chicken?
Yes, this chicken freezes reasonably well for up to 3 months, though the texture may become slightly softer upon thawing. Cool the chicken completely after baking, then place in a single layer on a parchment-lined baking sheet to freeze solid before transferring to freezer bags or containers. This prevents the pieces from sticking together. To serve, thaw overnight in the refrigerator and reheat in a 350°F oven for 15-20 minutes until heated through. The sauce may separate slightly upon freezing and reheating, but a good stir or whisking after thawing will reincorporate it.
Summary
This baked chicken teriyaki delivers restaurant-quality flavor with minimal effort. The perfect balance of sweet and savory, it’s a weeknight hero that will have everyone asking for seconds.
Baked Chicken Teriyaki
6
servings15
minutes30
minutesIngredients
Instructions
- 1 Preheat oven to 400°F and prepare baking sheet with wire rack.
- 2 Make teriyaki sauce by simmering soy sauce, honey, sugar, garlic, ginger, and vinegar.
- 3 Whisk cornstarch with water, add to sauce, and cook until thickened.
- 4 Pat chicken dry, place on rack, brush with sauce, and bake 15 minutes.
- 5 Flip chicken, brush with more sauce, bake 10 minutes.
- 6 Brush with remaining sauce, increase oven to 425°F, bake 5-7 minutes.
- 7 Rest 5 minutes, garnish with green onions and sesame seeds.


