Get ready to revolutionize your taco Tuesday with this epic chicken taco casserole that combines all your favorite Mexican flavors in one glorious baking dish. Gather your friends and family because this crowd-pleaser is about to become your new go-to comfort food masterpiece!
Why This Recipe Works
- Layers of flavor build through perfectly seasoned chicken, creamy beans, and melty cheese that create a symphony of textures in every bite
- The clever use of tortilla chips as both a crunchy base and topping ensures maximum crispiness that holds up beautifully against the saucy filling
- Baking everything together allows the flavors to meld into something greater than the sum of its parts while keeping the prep work surprisingly simple
- Customization options abound from spice levels to additional toppings, making it perfect for picky eaters and adventurous foodies alike
- Leftovers taste even better the next day as the flavors continue to develop and intensify overnight in the refrigerator
Ingredients
- 2 pounds boneless, skinless chicken breasts, diced into 1-inch cubes
- 1 tablespoon olive oil
- 1 large yellow onion, finely chopped
- 3 cloves garlic, minced
- 1 packet (1 ounce) taco seasoning mix
- 1 can (15 ounces) black beans, drained and rinsed
- 1 can (15 ounces) corn kernels, drained
- 1 can (10 ounces) diced tomatoes with green chilies, undrained
- 1 cup chicken broth
- 8 ounces cream cheese, softened
- 1 cup sour cream
- 4 cups tortilla chips, lightly crushed
- 3 cups shredded Mexican blend cheese
- 1/4 cup fresh cilantro, chopped
- 1 jalapeño, thinly sliced (optional)
Equipment Needed
- Large skillet or Dutch oven
- 9×13 inch baking dish
- Mixing bowls
- Cutting board and sharp knife
- Measuring cups and spoons
- Spatula or wooden spoon
- Aluminum foil
Instructions

Prepare the Chicken and Aromatics
Heat olive oil in a large skillet over medium-high heat until shimmering, about 2 minutes. Add diced chicken and cook until no longer pink on the outside, approximately 5-7 minutes, stirring occasionally. Add chopped onion and cook until translucent, about 4 minutes, then add minced garlic and cook for 1 more minute until fragrant. Sprinkle the taco seasoning over the chicken mixture and stir to coat everything evenly, toasting the spices for about 30 seconds to release their full flavor potential. Pro tip: Don’t overcrowd the pan when browning the chicken – work in batches if necessary to ensure proper browning and texture development.
Create the Creamy Sauce Base
Reduce heat to medium and add the softened cream cheese to the skillet, stirring constantly until completely melted and incorporated into the chicken mixture, about 3-4 minutes. Pour in the chicken broth gradually while continuing to stir, creating a smooth sauce that coats the chicken beautifully. Add the sour cream and mix thoroughly until the sauce is creamy and uniform in texture. Stir in the undrained diced tomatoes with green chilies, along with the drained black beans and corn, combining everything until well distributed throughout the mixture. Cook for 5 minutes, stirring occasionally, until the sauce has thickened slightly and the flavors begin to meld together.
Layer the Casserole Components
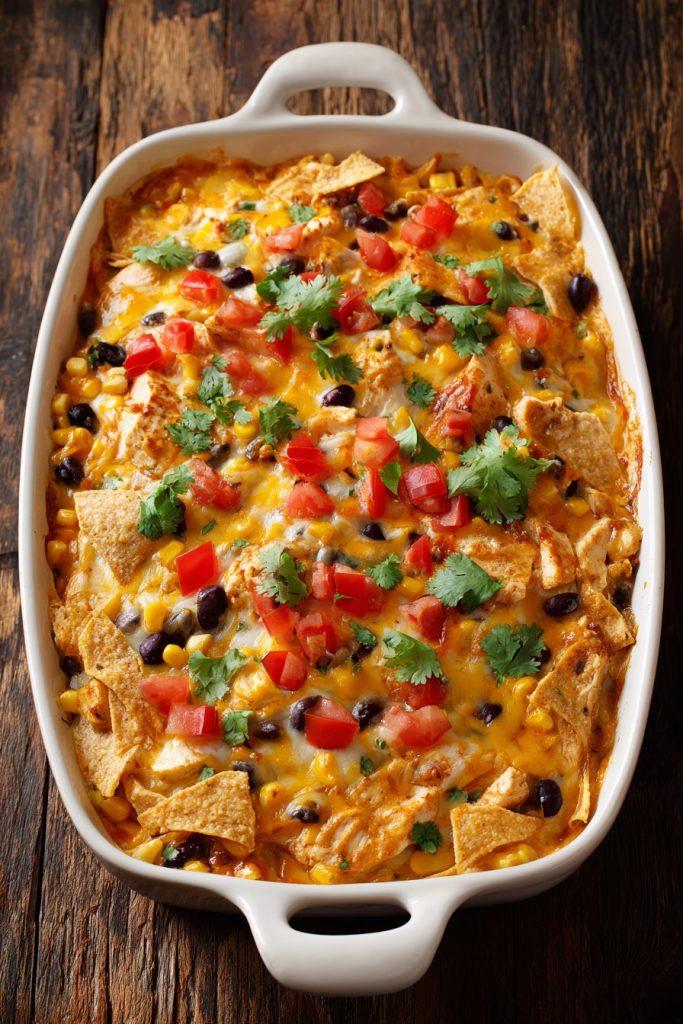
Preheat your oven to 375°F and lightly grease your 9×13 inch baking dish. Spread half of the lightly crushed tortilla chips evenly across the bottom of the dish, creating a crunchy foundation that will absorb some of the sauce while maintaining texture. Carefully spoon the chicken and sauce mixture over the tortilla chips, spreading it into an even layer that covers the entire surface. Sprinkle half of the shredded Mexican blend cheese over the chicken mixture, followed by the remaining tortilla chips arranged in an even layer. Top with the remaining cheese, ensuring complete coverage for that perfect golden-brown melt.
Bake to Perfection
Cover the baking dish tightly with aluminum foil and place in the preheated oven. Bake for 20 minutes to allow the flavors to meld and the cheese to melt completely through the layers. Remove the foil and continue baking uncovered for an additional 15-20 minutes, or until the cheese is bubbly and starting to develop golden brown spots around the edges. The casserole should be heated through to 165°F in the center when tested with an instant-read thermometer. The tortilla chips on top should be crispy while those underneath have softened slightly to create perfect textural contrast.
Finish and Serve
Remove the casserole from the oven and let it rest for 10-15 minutes before serving – this crucial step allows the layers to set properly and makes serving much cleaner. Garnish with freshly chopped cilantro and optional jalapeño slices for added freshness and heat. Serve directly from the baking dish with additional toppings like diced avocado, extra sour cream, or pico de gallo on the side for customization. Pro tip: Use a wide spatula to serve portions that include all the beautiful layers you’ve created, ensuring everyone gets the full experience of textures and flavors in every bite.
Tips and Tricks
For the ultimate flavor development, consider marinating your chicken in half the taco seasoning with a tablespoon of lime juice for 30 minutes before cooking – this deepens the spice penetration and tenderizes the meat beautifully. If you’re watching your sodium intake, make your own taco seasoning blend using chili powder, cumin, garlic powder, onion powder, paprika, and a touch of cornstarch to control the salt content while maintaining that authentic flavor profile. For extra crispy topping texture, reserve some whole tortilla chips to crush over the casserole during the last 5 minutes of baking rather than baking them the entire time. If you prefer a saucier casserole, increase the chicken broth to 1.5 cups and add an extra 4 ounces of cream cheese for a richer, more spoonable consistency that’s perfect for dipping. To make ahead, assemble the casserole completely through the layering step, cover tightly, and refrigerate for up to 24 hours before baking – you may need to add 5-10 minutes to the baking time if starting from cold. For freezing, prepare through the layering step but leave off the final cheese layer, wrap tightly in both plastic wrap and foil, and freeze for up to 3 months – thaw overnight in refrigerator before adding cheese and baking as directed. If your casserole seems too dry after baking, stir in additional warmed chicken broth or enchilada sauce tablespoon by tablespoon until reaching your desired consistency. For extra flavor depth, roast your corn kernels in a dry skillet until slightly charred before adding to the mixture, or use fire-roasted corn from the freezer section for that smoky complexity. Always let your cream cheese come to room temperature completely before using – cold cream cheese will create lumps in your sauce that are difficult to eliminate without overmixing and breaking the emulsion.
Recipe Variations
- Transform this into a beef lover’s delight by substituting ground beef or shredded chuck roast for the chicken, browning the beef thoroughly and draining excess fat before proceeding with the recipe. The richer flavor of beef pairs wonderfully with the creamy sauce and creates a heartier, more robust casserole perfect for cold weather comfort food cravings.
- Create a vegetarian masterpiece by replacing the chicken with two cans of drained and rinsed black beans plus an additional can of pinto beans, and using vegetable broth instead of chicken broth. Add diced zucchini, bell peppers, and mushrooms sautéed with the onions for extra texture and nutrition that will satisfy even the most devoted meat-eaters at your table.
- For a spicy kick that will wake up your taste buds, use pepper jack cheese instead of Mexican blend, add an extra jalapeño (seeds included) to the filling, and incorporate a 4-ounce can of diced green chilies. Top with pickled jalapeño slices before baking for an extra layer of heat and tang that cuts through the richness of the creamy sauce beautifully.
- Try a breakfast version by using scrambled eggs instead of chicken, breakfast sausage instead of taco seasoning, and hash browns instead of tortilla chips. Layer with cheddar cheese and top with crumbled bacon before baking for the ultimate brunch casserole that will have everyone asking for seconds before they’ve finished firsts.
- For a low-carb alternative, replace the tortilla chips with sliced zucchini or yellow squash layers, increasing the baking time by 10-15 minutes to ensure the vegetables cook through properly. Use full-fat dairy products and increase the cheese slightly to maintain richness without the carbohydrates from the chips, creating a keto-friendly version that doesn’t sacrifice flavor.
Frequently Asked Questions
Can I make this casserole ahead of time?
Absolutely! This casserole is fantastic for make-ahead preparation. You can assemble the entire dish through the layering step, cover tightly with plastic wrap and then foil, and refrigerate for up to 24 hours before baking. When ready to serve, remove the plastic wrap, recover with foil, and bake as directed, adding 5-10 minutes to the covered baking time since you’re starting from cold. The flavors actually improve with this resting time as the spices meld and the tortilla chips begin absorbing the sauce flavors. You can also freeze the assembled casserole for up to 3 months – just thaw overnight in the refrigerator before baking.
What’s the best way to reheat leftovers?
For the best texture when reheating, use your oven or toaster oven rather than the microwave. Preheat to 350°F, place individual portions in an oven-safe dish, cover with foil, and heat for 15-20 minutes until warmed through. If the top isn’t crispy enough, remove the foil for the last 5 minutes. The microwave will make the tortilla chips soggy, but if you must use it, place on a microwave-safe plate and heat in 30-second intervals, stirring between each, and consider adding fresh tortilla chips on top after heating to restore some crunch.
Can I use flour tortillas instead of tortilla chips?
Yes, but the texture will be different. Cut flour tortillas into quarters and lightly toast them in a 350°F oven for 5-7 minutes before layering to prevent them from becoming mushy. Corn tortillas work even better – cut into strips, toss with a little oil, and bake until crisp before using. The chips provide structural integrity and crunch that soft tortillas can’t replicate, but if you prefer a softer, more enchilada-like texture, flour tortillas will work with adjusted baking times. Just know that the final result will be more uniform in texture rather than having those delightful crispy elements.
How can I make this recipe healthier?
There are several easy swaps to lighten up this casserole without sacrificing flavor. Use reduced-fat cream cheese and sour cream, low-sodium taco seasoning, and reduced-fat cheese. Increase the vegetables by adding diced bell peppers, zucchini, or mushrooms to the chicken mixture. Replace half the tortilla chips with baked whole grain chips or even cauliflower rice for fewer carbohydrates. Use boneless, skinless chicken thighs instead of breasts for more flavor with less dryness, and consider adding an extra can of beans to increase fiber and plant-based protein content while stretching the recipe further.
What should I serve with this casserole?
This casserole is quite complete on its own, but it pairs beautifully with simple sides that complement the Mexican flavors. A crisp green salad with lime vinaigrette, Mexican street corn, black bean and mango salsa, or cilantro-lime rice all make excellent accompaniments. For lighter options, try sliced avocado with a sprinkle of chili powder, pickled red onions, or a simple cabbage slaw with lime juice. Warm flour tortillas or additional tortilla chips on the side are always welcome for scooping up every last bit of the delicious sauce and melted cheese from your plate.
Summary
This chicken taco casserole combines all your favorite Mexican flavors in one incredible baking dish. With layers of seasoned chicken, creamy sauce, beans, corn, and crispy tortilla chips topped with melted cheese, it’s the ultimate comfort food that feeds a crowd effortlessly. Perfect for busy weeknights or casual entertaining, this versatile recipe will become your new family favorite.
Chicken Taco Casserole
4
servings20
minutes40
minutesIngredients
Instructions
- 1 Preheat oven to 375°F and grease a 9x13 inch baking dish
- 2 Cook chicken in oil until no longer pink, add onion and garlic
- 3 Add taco seasoning, then cream cheese, broth, and sour cream
- 4 Stir in tomatoes, beans, and corn, cook 5 minutes
- 5 Layer half chips, chicken mixture, half cheese, remaining chips, remaining cheese
- 6 Cover and bake 20 minutes, uncover and bake 15-20 minutes more
- 7 Rest 10 minutes, garnish with cilantro and jalapeño before serving


