Craving delicious chicken dinners but short on time? You’re in luck! This collection of 24 freezer-friendly recipes is your secret weapon for easy, satisfying meals. From cozy casseroles to zesty tacos, these dishes are perfect for busy weeknights or stocking your freezer with homemade comfort food. Let’s dive in and discover your new go-to favorites!
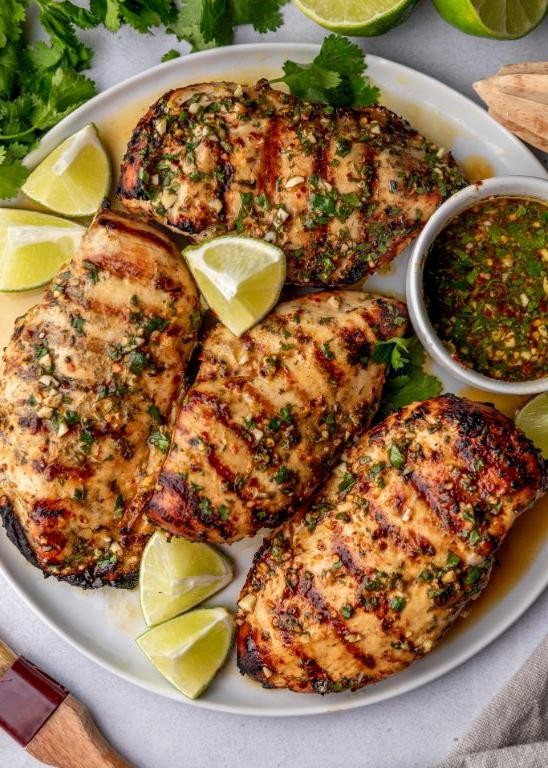
Garlic Herb Chicken Marinade
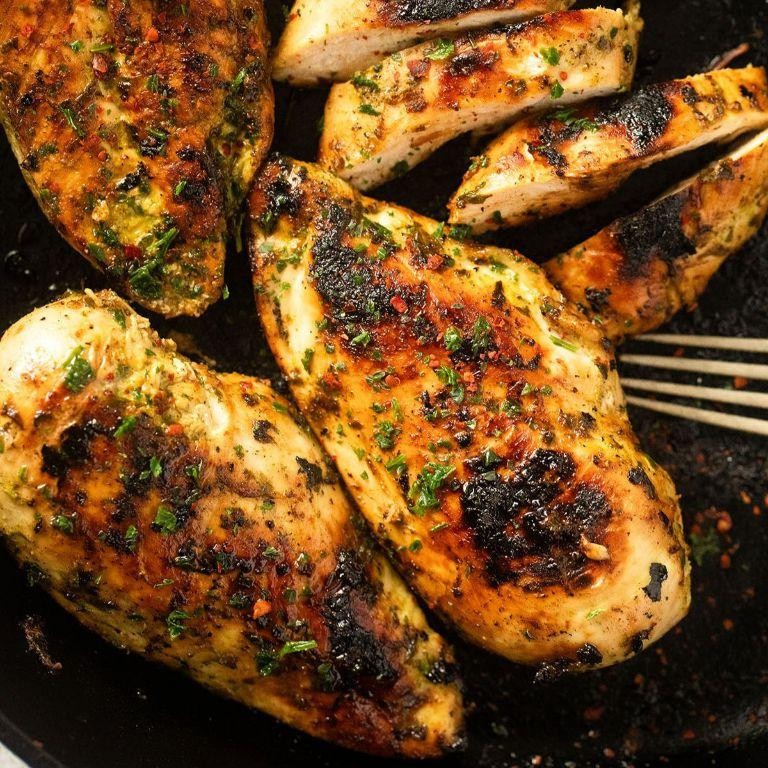
Whip up this garlic herb chicken marinade when you need a quick, flavor-packed dinner. It’s versatile enough for grilling, baking, or pan-searing. You’ll have juicy, aromatic chicken ready in no time.
Serving: 4 | Pre Time: 10 minutes | Cooking Time: 20 minutes
Ingredients
– 1/4 cup extra virgin olive oil—my go-to for its fruity depth.
– 3 tbsp fresh lemon juice, squeezed right before mixing for maximum brightness.
– 4 cloves garlic, minced finely; I always use fresh, not jarred, for the best punch.
– 1 tbsp dried oregano, or use 2 tbsp fresh if you have it on hand.
– 1 tsp kosher salt; I prefer it over table salt for better seasoning control.
– 1/2 tsp black pepper, freshly ground for a sharper bite.
– 1 1/2 lbs boneless, skinless chicken breasts, patted dry with paper towels to help the marinade stick.
Instructions
1. In a medium bowl, whisk together 1/4 cup extra virgin olive oil, 3 tbsp fresh lemon juice, 4 cloves minced garlic, 1 tbsp dried oregano, 1 tsp kosher salt, and 1/2 tsp black pepper until fully combined.
2. Place 1 1/2 lbs boneless, skinless chicken breasts in a large resealable plastic bag or shallow dish.
3. Pour the marinade over the chicken, ensuring all pieces are evenly coated.
4. Seal the bag or cover the dish, then refrigerate for at least 30 minutes—or up to 4 hours for deeper flavor.
5. Tip: For even marination, massage the bag gently halfway through the chilling time.
6. Preheat a grill or skillet to medium-high heat, about 400°F, and lightly oil the surface.
7. Remove the chicken from the marinade, letting excess drip off, and discard the used marinade.
8. Place the chicken on the hot grill or skillet, cooking for 6–7 minutes per side until the internal temperature reaches 165°F.
9. Tip: Avoid moving the chicken too early; let it develop a golden-brown sear before flipping.
10. Transfer the cooked chicken to a clean plate and let it rest for 5 minutes to retain juiciness.
11. Tip: Use a meat thermometer to check doneness; it prevents overcooking and ensures safety.
12. Slice or serve the chicken whole as desired.
Here, the chicken emerges tender with a savory garlic-herb crust that’s lightly tangy from the lemon. Pair it with roasted veggies or slice it over a crisp salad for a fresh twist.
Honey Soy Baked Chicken
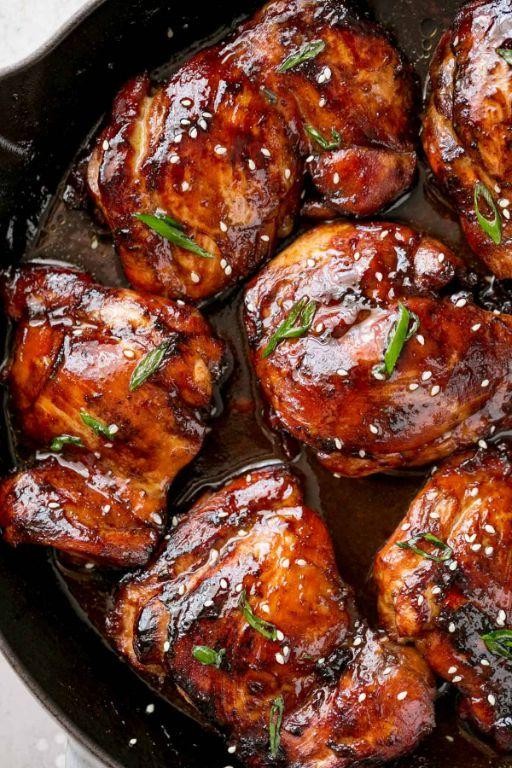
Ready for a weeknight dinner that delivers big flavor with minimal effort? This honey soy baked chicken combines sweet and savory in one simple dish. Just toss everything together and let the oven do the work.
Serving: 4 | Pre Time: 10 minutes | Cooking Time: 35 minutes
Ingredients
– 1.5 lbs boneless, skinless chicken thighs (I find thighs stay juicier than breasts)
– 1/4 cup honey (local raw honey adds great depth)
– 1/4 cup soy sauce (low-sodium works perfectly here)
– 2 tbsp olive oil (extra virgin is my go-to for richness)
– 3 cloves garlic, minced (freshly minced makes all the difference)
– 1 tsp grated fresh ginger (keep the knob in the freezer for easy grating)
– 1/2 tsp black pepper
– 1 tbsp sesame seeds for garnish (toasted beforehand if you have a minute)
– 2 green onions, thinly sliced
Instructions
1. Preheat your oven to 400°F (200°C) and lightly grease a 9×13 inch baking dish.
2. Pat the chicken thighs completely dry with paper towels—this helps the marinade stick better.
3. In a medium bowl, whisk together the honey, soy sauce, olive oil, minced garlic, grated ginger, and black pepper until fully combined.
4. Place the dried chicken thighs in the prepared baking dish in a single layer.
5. Pour the honey-soy mixture evenly over the chicken, turning each piece to coat thoroughly. Tip: Let it marinate at room temperature for 10 minutes while the oven heats for deeper flavor.
6. Bake the chicken uncovered at 400°F for 30-35 minutes. Tip: Baste the chicken with the pan juices halfway through cooking for a glossy finish.
7. Check for doneness—the chicken should reach an internal temperature of 165°F and the sauce will be bubbling and slightly thickened.
8. Remove the baking dish from the oven and let the chicken rest for 5 minutes. Tip: Resting allows the juices to redistribute, keeping the meat tender.
9. Sprinkle the baked chicken with sesame seeds and sliced green onions before serving.
Chicken emerges from the oven with sticky, caramelized edges and a perfectly balanced sweet-salty glaze. The tender meat pairs wonderfully with steamed rice to soak up the extra sauce, or try it shredded over a crisp salad for a lighter twist.
Lemon Dijon Roasted Chicken

Lemon Dijon roasted chicken is a weeknight lifesaver that delivers restaurant-quality flavor with minimal effort. The tangy, savory marinade creates a crispy, golden skin while keeping the meat incredibly juicy. It’s the kind of dish that makes you look forward to leftovers.
Serving: 4 | Pre Time: 15 minutes | Cooking Time: 55 minutes
Ingredients
– 1 whole chicken (about 4 lbs), patted dry—this helps the skin crisp up beautifully.
– 1/4 cup extra virgin olive oil, my go-to for its fruity depth.
– 3 tbsp Dijon mustard, the grainy kind adds wonderful texture.
– 2 lemons, one zested and juiced, the other sliced thin for roasting.
– 4 garlic cloves, minced—fresh is always best here.
– 1 tbsp fresh thyme leaves, stripped from the stems.
– 1 tsp kosher salt, I prefer it for even seasoning.
– 1/2 tsp freshly ground black pepper.
– 1 lb baby potatoes, halved—they soak up all the delicious pan juices.
Instructions
1. Preheat your oven to 425°F (218°C).
2. In a small bowl, whisk together the olive oil, Dijon mustard, lemon zest, lemon juice, minced garlic, thyme, salt, and pepper until fully combined.
3. Place the patted-dry chicken in a large roasting pan or oven-safe skillet.
4. Using your hands or a brush, generously coat the entire chicken, including under the skin, with the marinade. Tip: Gently loosen the skin over the breast to spread marinade directly onto the meat for maximum flavor.
5. Tuck the lemon slices and any remaining thyme sprigs into the chicken cavity.
6. Scatter the halved baby potatoes around the chicken in the pan.
7. Roast the chicken in the preheated oven for 55-65 minutes. Tip: Begin checking at 55 minutes; the chicken is done when a meat thermometer inserted into the thickest part of the thigh reads 165°F (74°C) and the skin is deep golden brown.
8. Remove the pan from the oven and let the chicken rest, uncovered, for 10 minutes before carving. Tip: This resting period allows the juices to redistribute, ensuring every bite is moist.
9. Carve the chicken and serve immediately with the roasted potatoes and any pan juices spooned over the top.
Out of the oven, the chicken boasts crackling-crisp skin giving way to tender, herb-infused meat. The potatoes become creamy inside while soaking up the tangy, garlicky drippings. For a fresh twist, serve slices over a simple arugula salad or shred the leftovers into tacos the next day.
Slow Cooker Chicken Alfredo
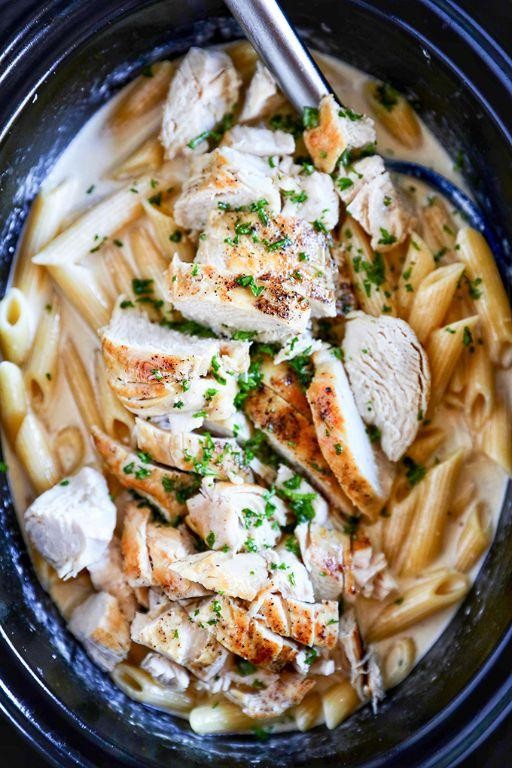
Craving creamy comfort without the fuss? This slow cooker chicken alfredo delivers rich flavor with minimal effort. Just toss everything in and let the magic happen.
Serving: 6 | Pre Time: 15 minutes | Cooking Time: 4 hours
Ingredients
– 2 lbs boneless, skinless chicken breasts (I always trim any visible fat for cleaner flavor)
– 1 (16 oz) jar alfredo sauce (the refrigerated kind works best, not the shelf-stable jars)
– 1 cup chicken broth (low-sodium lets you control the salt)
– 4 cloves garlic, minced (fresh makes all the difference here)
– 1 tsp dried Italian seasoning
– 1/2 tsp black pepper
– 1/2 cup grated Parmesan cheese (the real stuff, not the green can)
– 12 oz fettuccine pasta
– 1 cup heavy cream (room temperature blends in smoothly)
– Fresh parsley for garnish (optional, but adds a nice pop of color)
Instructions
1. Place 2 lbs chicken breasts in the bottom of a 6-quart slow cooker.
2. Pour 1 jar alfredo sauce and 1 cup chicken broth over the chicken.
3. Add 4 cloves minced garlic, 1 tsp Italian seasoning, and 1/2 tsp black pepper to the slow cooker.
4. Stir the ingredients gently to coat the chicken.
5. Cover the slow cooker and cook on LOW for 4 hours. (Tip: Don’t peek—keeping the lid on maintains temperature.)
6. After 4 hours, use two forks to shred the chicken completely in the sauce.
7. Stir in 1/2 cup grated Parmesan cheese until melted.
8. While the cheese melts, cook 12 oz fettuccine in a large pot of salted boiling water according to package directions for al dente, about 10 minutes.
9. Drain the cooked pasta thoroughly. (Tip: Reserve 1/4 cup pasta water to adjust sauce consistency if needed.)
10. Add the drained pasta to the slow cooker with the chicken mixture.
11. Pour in 1 cup room temperature heavy cream and stir everything together until the pasta is fully coated.
12. Let the mixture sit in the warm slow cooker for 5 minutes to allow flavors to meld. (Tip: This resting time helps the sauce cling to the pasta.)
13. Garnish with fresh parsley if desired before serving.
You’ll love the tender, shredded chicken enveloped in that luxuriously creamy sauce. The garlic and Parmesan add a savory depth that makes this feel restaurant-quality. Try it over steamed broccoli for a complete meal, or use the leftovers in a baked pasta casserole the next day.
Spicy Thai Curry Chicken

Bold flavors and fiery heat define this Spicy Thai Curry Chicken. It’s a weeknight lifesaver that comes together in under an hour. You’ll get restaurant-quality depth with minimal fuss.
Serving: 4 | Pre Time: 15 minutes | Cooking Time: 25 minutes
Ingredients
– 1.5 lbs boneless, skinless chicken thighs, cut into 1-inch pieces (thighs stay juicier than breasts, trust me)
– 2 tbsp vegetable oil, for a high smoke point
– 1 (13.5 oz) can full-fat coconut milk, shaken well—the creaminess is key
– 3 tbsp red curry paste, use your favorite brand but check the heat level
– 1 tbsp fish sauce, for that essential umami punch
– 1 tbsp brown sugar, to balance the spice
– 1 red bell pepper, sliced into thin strips
– 1 cup bamboo shoots, drained and rinsed
– 1/2 cup Thai basil leaves, plus more for garnish (regular basil works in a pinch)
– 1 lime, cut into wedges for serving
– Cooked jasmine rice, for serving (I always make extra)
Instructions
1. Heat 2 tbsp vegetable oil in a large skillet or wok over medium-high heat until it shimmers, about 2 minutes.
2. Add 1.5 lbs chicken pieces in a single layer. Sear without moving for 4 minutes until browned on one side. Tip: Don’t crowd the pan—cook in batches if needed for a proper sear.
3. Flip chicken pieces and cook for 3 more minutes until browned all over. Transfer chicken to a clean plate.
4. Reduce heat to medium. Add 3 tbsp red curry paste to the same skillet. Cook for 1 minute, stirring constantly, until fragrant.
5. Pour in the entire can of coconut milk, scraping up any browned bits from the bottom of the pan.
6. Stir in 1 tbsp fish sauce and 1 tbsp brown sugar until fully incorporated.
7. Bring the sauce to a gentle simmer, then add the seared chicken back to the skillet.
8. Add 1 sliced red bell pepper and 1 cup bamboo shoots. Stir to combine.
9. Simmer uncovered for 10 minutes, stirring occasionally, until the chicken is cooked through and the peppers are tender-crisp. Tip: The sauce should thicken slightly—if it gets too thick, add a splash of water.
10. Remove from heat. Stir in 1/2 cup Thai basil leaves until just wilted, about 30 seconds. Tip: Adding basil off the heat preserves its bright flavor.
11. Serve immediately over cooked jasmine rice with lime wedges on the side.
The finished curry boasts a velvety, clinging sauce with tender chicken and crisp-tender vegetables. That perfect balance of spicy, salty, sweet, and sour makes every bite complex. For a fun twist, try it spooned over crispy rice cakes or alongside a cooling cucumber salad.
Teriyaki Chicken Stir-Fry
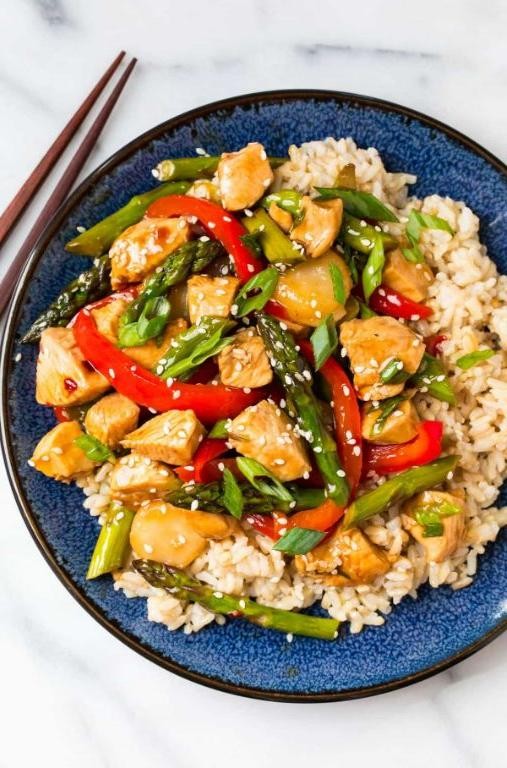
Get ready for a weeknight dinner hero that comes together in minutes. This teriyaki chicken stir-fry delivers sweet-savory satisfaction without the fuss. Grab your wok—let’s cook.
Serving: 4 | Pre Time: 15 minutes | Cooking Time: 15 minutes
Ingredients
– 1.5 lbs boneless, skinless chicken thighs, cut into 1-inch pieces (thighs stay juicier than breasts, trust me)
– 2 tbsp vegetable oil, divided (a neutral oil works best for high heat)
– 1 red bell pepper, thinly sliced
– 1 cup broccoli florets (fresh is crisp, but frozen works in a pinch)
– 1/2 cup sliced carrots, about 1/4-inch thick
– 3 cloves garlic, minced (freshly minced makes all the difference)
– 1 tbsp grated fresh ginger (I keep a knob in the freezer for easy grating)
– 1/3 cup low-sodium soy sauce
– 3 tbsp honey (local honey adds a lovely floral note)
– 1 tbsp rice vinegar
– 1 tsp sesame oil (toasted sesame oil is my secret flavor booster)
– 1 tbsp cornstarch mixed with 2 tbsp cold water (this slurry thickens the sauce perfectly)
– 2 green onions, thinly sliced, for garnish
– Cooked white rice, for serving (I always make extra rice for leftovers)
Instructions
1. Pat the chicken pieces completely dry with paper towels—this ensures a good sear.
2. Heat 1 tablespoon of vegetable oil in a large wok or skillet over medium-high heat until shimmering, about 1 minute.
3. Add the chicken in a single layer, working in batches if needed to avoid crowding. Cook undisturbed for 4–5 minutes until browned on one side.
4. Flip the chicken pieces and cook for another 3–4 minutes until cooked through and no longer pink inside. Transfer to a clean plate.
5. Add the remaining 1 tablespoon of vegetable oil to the same wok.
6. Add the bell pepper, broccoli, and carrots. Stir-fry for 4–5 minutes until the vegetables are crisp-tender and bright in color.
7. Push the vegetables to the sides of the wok, creating a well in the center.
8. Add the minced garlic and grated ginger to the center. Cook for 30 seconds until fragrant, stirring constantly to prevent burning.
9. Pour in the soy sauce, honey, rice vinegar, and sesame oil. Stir to combine with the garlic and ginger.
10. Bring the sauce to a simmer over medium heat, stirring occasionally, for 1 minute.
11. Give the cornstarch slurry a quick stir and slowly pour it into the simmering sauce while stirring constantly.
12. Cook for 1–2 minutes until the sauce thickens and becomes glossy.
13. Return the cooked chicken and any accumulated juices to the wok. Toss everything together until the chicken and vegetables are evenly coated in the sauce, about 1 minute.
14. Remove from heat and garnish with sliced green onions.
15. Serve immediately over cooked white rice.
You’ll love the tender chicken coated in that sticky, glossy sauce with crisp-tender veggies. This dish reheats beautifully for lunch the next day—just add a fresh sprinkle of green onions.
Creamy Tuscan Chicken

Ready for a restaurant-quality meal at home? This creamy Tuscan chicken delivers rich flavor with minimal fuss. It’s perfect for weeknights but impressive enough for guests.
Serving: 4 | Pre Time: 10 minutes | Cooking Time: 25 minutes
Ingredients
– 4 boneless, skinless chicken breasts (I pound them to even thickness for uniform cooking)
– 2 tbsp extra virgin olive oil (my go-to for its fruity notes)
– 1 tsp kosher salt
– ½ tsp black pepper
– 1 tsp garlic powder
– 1 small yellow onion, finely diced
– 3 garlic cloves, minced (fresh is best here)
– 1 cup sun-dried tomatoes in oil, drained and chopped
– 2 cups fresh baby spinach
– 1 cup heavy cream (full-fat for that luxurious texture)
– ½ cup grated Parmesan cheese (I prefer freshly grated)
– 1 tsp dried Italian seasoning
Instructions
1. Pat chicken breasts dry with paper towels to ensure a good sear.
2. Season both sides of chicken with salt, pepper, and garlic powder.
3. Heat olive oil in a large skillet over medium-high heat until shimmering, about 2 minutes.
4. Add chicken to skillet and cook for 6-7 minutes per side until golden brown and internal temperature reaches 165°F.
5. Transfer chicken to a plate and cover loosely with foil to rest.
6. Reduce heat to medium and add diced onion to the same skillet, scraping up any browned bits for extra flavor.
7. Cook onion for 3-4 minutes until softened and translucent.
8. Add minced garlic and cook for 30 seconds until fragrant, being careful not to burn it.
9. Stir in sun-dried tomatoes and cook for 1 minute to warm through.
10. Add baby spinach and cook for 1-2 minutes until just wilted.
11. Pour in heavy cream and bring to a gentle simmer, stirring constantly.
12. Stir in Parmesan cheese and Italian seasoning until sauce is smooth and slightly thickened, about 2-3 minutes.
13. Return chicken to skillet, spooning sauce over each piece.
14. Simmer for 2-3 minutes to reheat chicken and let flavors meld.
For a complete meal, serve this over al dente pasta or creamy polenta to soak up every drop of sauce. The chicken stays juicy while the sauce balances tangy tomatoes with rich creaminess.
Buffalo Chicken Casserole

Perfect for game day or busy weeknights, this Buffalo chicken casserole delivers bold flavor with minimal effort. It combines tender chicken, creamy cheese, and that signature spicy kick everyone loves.
Serving: 6 | Pre Time: 15 minutes | Cooking Time: 30 minutes
Ingredients
- 2 cups cooked shredded chicken (I use rotisserie chicken for convenience)
- 1 cup Frank’s RedHot Buffalo Sauce (the classic choice for authentic flavor)
- 8 oz cream cheese, softened to room temperature (this helps it blend smoothly)
- 1 cup shredded cheddar cheese (sharp cheddar adds a nice bite)
- 1/2 cup ranch dressing (I prefer homemade, but store-bought works fine)
- 1/2 cup panko breadcrumbs (for that essential crispy topping)
- 2 tbsp unsalted butter, melted (extra virgin olive oil can substitute if needed)
- 1/4 cup chopped celery (adds a fresh crunch)
- 1/4 cup chopped green onions (for a mild oniony finish)
Instructions
- Preheat your oven to 375°F (190°C) and grease a 9×13-inch baking dish lightly.
- In a large mixing bowl, combine the shredded chicken and Frank’s RedHot Buffalo Sauce until evenly coated.
- Add the softened cream cheese to the bowl, mixing thoroughly to create a creamy base. Tip: Let the cream cheese sit out for 30 minutes beforehand to avoid lumps.
- Stir in the shredded cheddar cheese, ranch dressing, chopped celery, and green onions until well incorporated.
- Transfer the mixture to the prepared baking dish, spreading it into an even layer with a spatula.
- In a small bowl, mix the panko breadcrumbs with the melted butter until the crumbs are lightly coated.
- Sprinkle the buttered breadcrumbs evenly over the top of the casserole. Tip: For extra crispiness, press the crumbs down gently with your fingers.
- Bake in the preheated oven for 25-30 minutes, or until the top is golden brown and the edges are bubbly. Tip: Check at 25 minutes to prevent over-browning.
- Remove from the oven and let it rest for 5 minutes before serving to allow the flavors to meld.
Creamy and spicy with a satisfying crunch, this casserole is a crowd-pleaser. Serve it over a bed of crisp lettuce for a buffalo chicken salad twist, or scoop it up with celery sticks and extra ranch on the side. The leftovers reheat beautifully for a quick lunch the next day.
Chili Lime Grilled Chicken
Kick off your weeknight dinners with this zesty, protein-packed main that comes together in under 30 minutes. The bold chili-lime marinade infuses the chicken with tangy heat, perfect for grilling or broiling. It’s a versatile base for tacos, salads, or a simple plate with rice.
Serving: 4 | Pre Time: 10 minutes | Cooking Time: 15 minutes
Ingredients
– 1.5 lbs boneless, skinless chicken breasts (I butterfly thicker ones for even cooking)
– 1/4 cup fresh lime juice (about 2 juicy limes, freshly squeezed is non-negotiable)
– 2 tbsp olive oil (extra virgin is my go-to for marinades)
– 2 tsp chili powder (I use a medium-heat blend for balanced flavor)
– 1 tsp ground cumin
– 3 cloves garlic, minced (freshly minced makes all the difference)
– 1 tsp kosher salt
– 1/2 tsp freshly ground black pepper
– 1 tbsp honey (for a touch of sweetness to round out the acidity)
– Fresh cilantro, chopped (for garnish, optional but highly recommended)
Instructions
1. In a medium bowl, whisk together 1/4 cup fresh lime juice, 2 tbsp olive oil, 2 tsp chili powder, 1 tsp ground cumin, 3 cloves minced garlic, 1 tsp kosher salt, 1/2 tsp black pepper, and 1 tbsp honey until fully combined.
2. Place 1.5 lbs of boneless, skinless chicken breasts in a large resealable bag or shallow dish. Tip: If any breasts are over 1-inch thick, butterfly them by slicing horizontally to create an even thickness.
3. Pour the marinade over the chicken, ensuring all pieces are fully coated. Seal the bag or cover the dish.
4. Marinate the chicken in the refrigerator for at least 30 minutes, or up to 4 hours for deeper flavor. Tip: Don’t marinate longer than 4 hours, as the lime juice can start to break down the texture.
5. Preheat your grill to medium-high heat (about 400°F) or set your oven broiler to high with a rack positioned 6 inches from the heat element.
6. Remove the chicken from the marinade, letting any excess drip off. Discard the used marinade.
7. Grill the chicken for 6-7 minutes per side, or broil for 5-6 minutes per side, until the internal temperature reaches 165°F on an instant-read thermometer. Tip: Avoid moving the chicken too much while cooking to get those nice grill marks or a good sear.
8. Transfer the cooked chicken to a clean plate or cutting board and let it rest for 5 minutes.
9. Slice the chicken against the grain into strips or leave whole as desired.
10. Garnish with freshly chopped cilantro if using.
Get ready for juicy, tender chicken with a vibrant charred exterior. The flavor is a bright punch of lime upfront, followed by a warm, smoky chili finish. Serve it over cilantro-lime rice, stuffed into warm tortillas with avocado, or sliced atop a crisp summer salad.
Honey Mustard Chicken Thighs

Kick off your weeknight dinner with these sticky-sweet honey mustard chicken thighs. They’re a crowd-pleaser that comes together in under an hour. I love how the sauce caramelizes into a glossy, finger-licking glaze.
Serving: 4 | Pre Time: 10 minutes | Cooking Time: 35 minutes
Ingredients
– 8 bone-in, skin-on chicken thighs (about 2.5 lbs total; the skin gets wonderfully crispy)
– 1/3 cup honey (I always use local raw honey for a deeper flavor)
– 1/4 cup Dijon mustard (a good quality brand makes a difference here)
– 2 tbsp whole-grain mustard (for that nice texture and pop)
– 2 tbsp extra virgin olive oil (my go-to for high-heat searing)
– 3 cloves garlic, minced (freshly minced, not jarred, please!)
– 1 tsp smoked paprika (adds a subtle smoky depth)
– 1/2 tsp kosher salt (I prefer Diamond Crystal for even seasoning)
– 1/4 tsp freshly ground black pepper
– 1 tbsp chopped fresh parsley (for garnish; it brightens everything up)
Instructions
1. Preheat your oven to 400°F and position a rack in the center.
2. Pat the chicken thighs completely dry with paper towels—this is crucial for crispy skin.
3. In a small bowl, whisk together the honey, Dijon mustard, whole-grain mustard, olive oil, minced garlic, smoked paprika, salt, and pepper until smooth.
4. Heat a large, oven-safe skillet (like cast iron) over medium-high heat for 2 minutes until hot.
5. Place the chicken thighs skin-side down in the dry, hot skillet; cook undisturbed for 6-8 minutes until the skin is deeply golden brown and releases easily.
6. Flip the chicken thighs and cook for 2 more minutes on the other side.
7. Pour the honey mustard sauce over the chicken, using a spoon to coat each piece evenly.
8. Transfer the skillet to the preheated oven and bake for 20-25 minutes, until the internal temperature reaches 165°F when checked with an instant-read thermometer.
9. Remove the skillet from the oven and let the chicken rest for 5 minutes—this keeps the juices locked in.
10. Garnish with chopped fresh parsley before serving.
Serve these thighs straight from the skillet for maximum impact. The skin stays crackling-crisp against the sticky, tangy-sweet glaze. Spoon any extra sauce from the pan over mashed potatoes or roasted veggies.
Classic Chicken Pot Pie

Venturing into comfort food territory, this classic chicken pot pie delivers a flaky crust and creamy filling that’s perfect for chilly evenings. It’s a straightforward recipe that yields a satisfying, homemade meal without fuss.
Serving: 6 | Pre Time: 20 minutes | Cooking Time: 45 minutes
Ingredients
– 1 package (14.1 oz) refrigerated pie crusts, thawed—I keep them cold until ready to roll out for best results.
– 1/4 cup unsalted butter, cubed
– 1 medium onion, diced small
– 2 medium carrots, peeled and diced into 1/2-inch pieces
– 2 celery stalks, diced—I like the crunch they add.
– 1/3 cup all-purpose flour
– 1/2 tsp salt, plus more for seasoning
– 1/4 tsp black pepper
– 1 3/4 cups chicken broth, low-sodium is my preference to control saltiness.
– 1/2 cup whole milk, warmed slightly to prevent curdling.
– 2 1/2 cups cooked chicken, shredded—rotisserie chicken saves time here.
– 1 cup frozen peas, thawed
– 1 large egg, beaten with 1 tbsp water for an egg wash
Instructions
1. Preheat oven to 425°F and place a rack in the middle position.
2. Roll out one pie crust and press it into a 9-inch pie dish; trim excess edges with a knife.
3. In a large skillet over medium heat, melt butter until foamy, about 2 minutes.
4. Add onion, carrots, and celery; cook until softened, 5-7 minutes, stirring occasionally.
5. Sprinkle flour, salt, and pepper over vegetables; cook for 1 minute while stirring to form a roux.
6. Gradually whisk in chicken broth and milk until smooth, scraping up any browned bits from the skillet.
7. Bring mixture to a simmer and cook until thickened, 3-5 minutes, stirring constantly to prevent lumps.
8. Remove skillet from heat; stir in chicken and peas until evenly coated.
9. Pour filling into the prepared pie crust, spreading it evenly with a spatula.
10. Roll out the second pie crust and place it over the filling; crimp edges with a fork to seal.
11. Cut 4-5 slits in the top crust to vent steam during baking.
12. Brush the top crust evenly with the egg wash for a golden finish.
13. Bake at 425°F for 15 minutes, then reduce temperature to 375°F and bake until crust is golden brown and filling is bubbling, 25-30 minutes.
14. Let pie cool on a wire rack for 10 minutes before slicing to set the filling.
Enjoy the flaky, buttery crust that gives way to a creamy, savory filling packed with tender chicken and vegetables. For a twist, serve individual portions in ramekins topped with biscuit dough instead of pie crust.
Mediterranean Chicken Bake
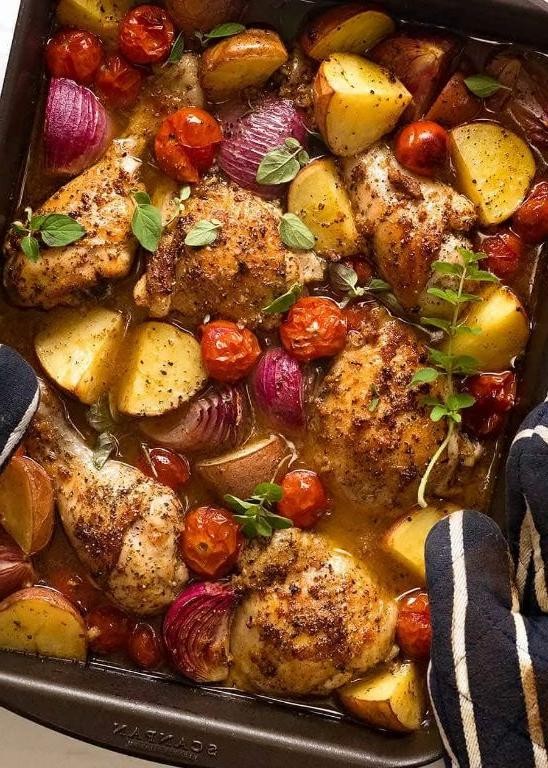
Another hectic weeknight calls for a one-pan wonder that delivers big flavor with minimal cleanup. Assembling this Mediterranean chicken bake takes just minutes, then the oven does the heavy lifting while you tackle other tasks. Expect juicy chicken, tender vegetables, and bright, herby notes in every forkful.
Serving: 4 | Pre Time: 15 minutes | Cooking Time: 35 minutes
Ingredients
- 1.5 lbs boneless, skinless chicken thighs—I find thighs stay juicier than breasts during baking
- 2 tbsp extra virgin olive oil, my go-to for its fruity depth
- 3 cloves garlic, minced—freshly minced makes all the difference
- 1 tsp dried oregano
- 1 tsp smoked paprika
- 1 lemon, zested and juiced separately
- 1 red bell pepper, sliced into 1-inch strips
- 1 yellow onion, cut into ½-inch wedges
- 1 cup cherry tomatoes, left whole—they burst beautifully in the oven
- ½ cup Kalamata olives, pitted
- ¼ cup crumbled feta cheese
- 2 tbsp chopped fresh parsley
Instructions
- Preheat your oven to 400°F and lightly grease a 9×13-inch baking dish with 1 tbsp olive oil.
- Pat the chicken thighs completely dry with paper towels—this helps them brown better.
- In a small bowl, whisk together the remaining 1 tbsp olive oil, minced garlic, oregano, smoked paprika, and lemon zest.
- Rub the spice mixture evenly over all sides of the chicken thighs.
- Arrange the chicken thighs in a single layer in the prepared baking dish.
- Scatter the sliced bell pepper, onion wedges, cherry tomatoes, and Kalamata olives around the chicken.
- Pour the fresh lemon juice evenly over the entire dish.
- Bake uncovered for 30 minutes at 400°F.
- Check for doneness: chicken should reach an internal temperature of 165°F and vegetables should be tender with slight caramelization.
- Remove the dish from the oven and immediately sprinkle with crumbled feta and chopped parsley.
- Let the bake rest for 5 minutes before serving to allow juices to redistribute.
Bright, herby, and satisfyingly savory, this dish features tender chicken that practically melts alongside the softened, sweet vegetables. For a creative twist, shred the baked chicken and toss everything with cooked orzo or spoon it over a bed of creamy hummus. Best served immediately while the feta is still slightly warm and creamy.
Cheesy Chicken Enchiladas

Just imagine pulling a bubbling pan of cheesy chicken enchiladas from the oven. This classic comfort dish delivers bold flavor with minimal fuss. Let’s get cooking.
Serving: 6 | Pre Time: 20 minutes | Cooking Time: 30 minutes
Ingredients
– 1.5 lbs boneless, skinless chicken breasts, shredded (I find poaching them keeps them juicy)
– 12 (6-inch) corn tortillas
– 2 cups shredded Monterey Jack cheese
– 1 (15 oz) can red enchilada sauce
– 1/2 cup sour cream
– 1/4 cup chopped fresh cilantro
– 1 tbsp vegetable oil
– 1/2 tsp ground cumin
– 1/4 tsp garlic powder
Instructions
1. Preheat your oven to 375°F (190°C).
2. Heat the vegetable oil in a large skillet over medium-high heat for 1 minute.
3. Warm the corn tortillas in the skillet for 15 seconds per side to make them pliable. (Tip: Warming prevents cracking when rolling.)
4. In a large bowl, combine the shredded chicken, 1 cup of the Monterey Jack cheese, sour cream, cumin, and garlic powder.
5. Spread 1/2 cup of the enchilada sauce evenly over the bottom of a 9×13-inch baking dish.
6. Place 1/4 cup of the chicken mixture down the center of a warmed tortilla.
7. Roll the tortilla tightly around the filling and place it seam-side down in the baking dish.
8. Repeat steps 6-7 with the remaining tortillas and filling, arranging them snugly in the dish.
9. Pour the remaining enchilada sauce evenly over the top of the rolled enchiladas.
10. Sprinkle the remaining 1 cup of Monterey Jack cheese evenly over the sauce.
11. Cover the dish tightly with aluminum foil and bake for 20 minutes. (Tip: Covering ensures the cheese melts without burning.)
12. Remove the foil and bake for an additional 10 minutes, or until the cheese is bubbly and the edges are lightly browned.
13. Let the enchiladas rest for 5 minutes after removing them from the oven. (Tip: Resting helps the filling set for cleaner slices.)
14. Garnish with the chopped fresh cilantro before serving.
Perfectly baked, these enchiladas offer a satisfying contrast of tender chicken and gooey cheese wrapped in a soft tortilla. The tangy red sauce cuts through the richness beautifully. For a fun twist, serve them with a side of lime crema or pickled red onions.
Coconut Curry Chicken Soup

Let’s make a warming coconut curry chicken soup that’s perfect for chilly evenings. This recipe comes together quickly with bold flavors and minimal fuss. You’ll love how the creamy coconut milk balances the aromatic curry spices.
Serving: 4 | Pre Time: 15 minutes | Cooking Time: 25 minutes
Ingredients
– 1 tbsp coconut oil (my go-to for authentic flavor)
– 1 medium yellow onion, diced small
– 3 garlic cloves, minced (fresh is best here)
– 1 tbsp fresh ginger, grated
– 2 tbsp red curry paste (I prefer Thai brands for heat)
– 1 lb boneless, skinless chicken thighs, cut into 1-inch pieces
– 4 cups chicken broth
– 1 (13.5 oz) can full-fat coconut milk
– 1 red bell pepper, thinly sliced
– 2 tbsp fish sauce
– 1 tbsp lime juice (freshly squeezed makes a difference)
– ¼ cup fresh cilantro, chopped
– Cooked jasmine rice for serving (optional but recommended)
Instructions
1. Heat coconut oil in a large pot over medium heat until shimmering, about 2 minutes.
2. Add diced onion and cook until translucent, stirring occasionally for 5-7 minutes.
3. Stir in minced garlic and grated ginger, cooking until fragrant for 1 minute.
4. Add red curry paste and cook while stirring constantly for 1 minute to bloom the spices.
5. Add chicken pieces in a single layer and cook until lightly browned on all sides, about 5 minutes.
6. Pour in chicken broth and scrape any browned bits from the pot bottom.
7. Bring mixture to a boil, then reduce heat to maintain a gentle simmer.
8. Simmer uncovered for 10 minutes until chicken is cooked through (165°F internal temperature).
9. Stir in coconut milk and sliced bell pepper, simmering for 5 more minutes until peppers soften slightly.
10. Remove from heat and stir in fish sauce and lime juice.
11. Ladle soup into bowls and top with fresh cilantro.
12. Serve immediately with jasmine rice on the side if desired.
The soup has a velvety texture with tender chicken and crisp-tender peppers. The coconut milk creates a rich base that carries the curry’s warmth without overwhelming heat. For a creative twist, try serving it over rice noodles or garnishing with crispy fried shallots.
Barbecue Pulled Chicken
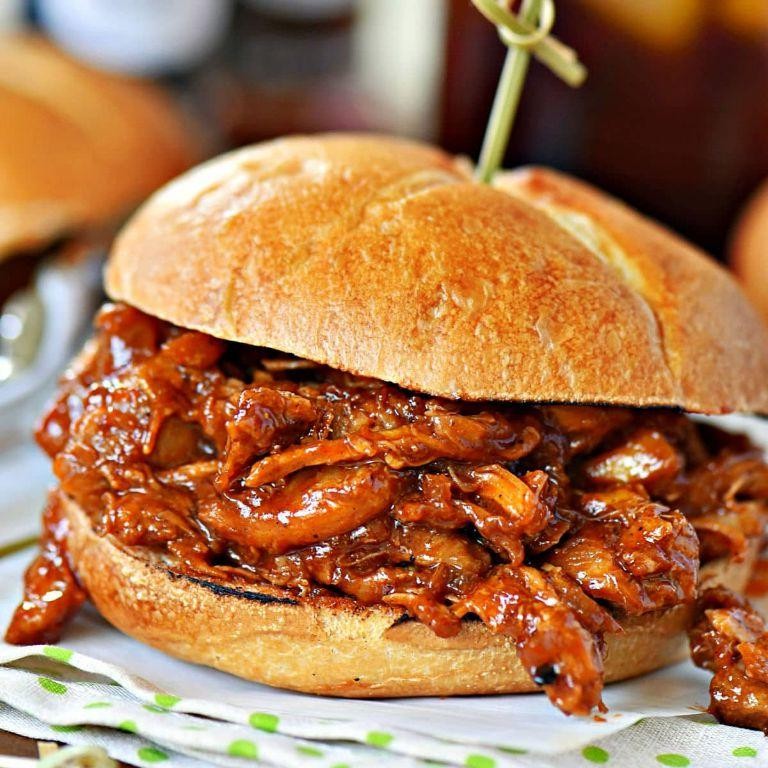
Nothing beats the smoky-sweet simplicity of barbecue pulled chicken. Need a crowd-pleaser that practically cooks itself? This hands-off recipe delivers tender, flavorful shreds every time.
Serving: 6 | Pre Time: 10 minutes | Cooking Time: 4 hours
Ingredients
– 2 lbs boneless, skinless chicken thighs (I find thighs stay juicier than breasts)
– 1 cup ketchup (a good quality brand makes a difference)
– 1/2 cup apple cider vinegar
– 1/4 cup brown sugar, packed
– 2 tbsp Worcestershire sauce
– 1 tbsp smoked paprika (this is the secret for that authentic BBQ flavor)
– 1 tsp garlic powder
– 1 tsp onion powder
– 1/2 tsp cayenne pepper (adjust if you’re sensitive to heat)
– 6 hamburger buns, for serving
– 1 tbsp vegetable oil (my go-to for searing)
Instructions
1. Pat the chicken thighs completely dry with paper towels—this helps them sear properly.
2. Heat 1 tbsp vegetable oil in a large skillet over medium-high heat until shimmering, about 2 minutes.
3. Sear chicken thighs for 3-4 minutes per side until golden brown; don’t crowd the pan.
4. While chicken sears, whisk ketchup, apple cider vinegar, brown sugar, Worcestershire sauce, smoked paprika, garlic powder, onion powder, and cayenne pepper in a medium bowl.
5. Transfer seared chicken to a 4-6 quart slow cooker.
6. Pour the sauce mixture evenly over the chicken.
7. Cover and cook on LOW for 4 hours; the chicken should shred easily with a fork.
8. Using two forks, shred the chicken directly in the slow cooker, mixing it with the sauce.
9. Toast hamburger buns lightly in a toaster or dry skillet for 1-2 minutes until warm.
10. Spoon pulled chicken onto the bottom buns, top with the other half, and serve immediately.
Outcome: The chicken turns out incredibly tender with a perfect balance of tangy, sweet, and smoky flavors. Pile it high on toasted buns, or get creative by serving it over baked potatoes or stuffed into tacos for a fun twist.
Moroccan Spiced Chicken Stew

Zesty Moroccan spices transform humble chicken into a warming stew perfect for chilly evenings. This one-pot wonder balances sweet, savory, and aromatic flavors with minimal fuss. Get ready for a comforting meal that fills your kitchen with incredible fragrance.
Serving: 4 | Pre Time: 15 minutes | Cooking Time: 45 minutes
Ingredients
– 1.5 lbs boneless, skinless chicken thighs, cut into 1-inch chunks (I prefer thighs for their juiciness)
– 2 tbsp extra virgin olive oil, my go-to for rich flavor
– 1 large yellow onion, finely diced
– 3 garlic cloves, minced (fresh is best here)
– 1 tbsp grated fresh ginger
– 1 tsp ground cumin
– 1 tsp ground coriander
– 1/2 tsp ground cinnamon
– 1/4 tsp cayenne pepper, adjust if you’re sensitive to heat
– 1 (14.5 oz) can diced tomatoes, undrained
– 1 cup chicken broth, low-sodium preferred
– 1 (15 oz) can chickpeas, rinsed and drained
– 1/2 cup dried apricots, chopped (they add a lovely sweetness)
– Salt, I use about 1 tsp total
– Fresh cilantro for garnish, chopped
Instructions
1. Pat chicken thighs dry with paper towels to ensure proper browning.
2. Heat olive oil in a large Dutch oven or heavy pot over medium-high heat until shimmering, about 2 minutes.
3. Add chicken in a single layer, working in batches if needed to avoid crowding. Cook until browned on all sides, 5-6 minutes total. Transfer to a plate.
4. Reduce heat to medium. Add onion to the pot and cook, stirring occasionally, until softened and translucent, about 5 minutes.
5. Stir in garlic and ginger; cook until fragrant, 1 minute.
6. Add cumin, coriander, cinnamon, and cayenne. Toast spices, stirring constantly, for 30 seconds to release their oils.
7. Pour in diced tomatoes with their juices and chicken broth, scraping up any browned bits from the bottom of the pot.
8. Return chicken and any accumulated juices to the pot. Bring to a simmer.
9. Reduce heat to low, cover, and simmer gently for 20 minutes to allow flavors to meld.
10. Stir in chickpeas and apricots. Cover and simmer for an additional 10 minutes until chicken is tender and cooked through.
11. Season with salt, starting with 1/2 tsp and adjusting as needed.
12. Remove from heat and stir in half of the chopped cilantro.
The stew should be thick and fragrant, with tender chicken that shreds easily. Serve it over fluffy couscous or with crusty bread to soak up the spiced sauce. Garnish with remaining cilantro for a fresh finish.
Conclusion
Zesty, convenient, and perfect for busy families, these 24 chicken recipes are freezer-friendly lifesavers! I hope you find some new favorites to stash away for easy weeknight dinners. Give them a try, and let me know in the comments which one you love most. If you found this roundup helpful, please share it on Pinterest to help other home cooks!


