
Kindred spirits in the kitchen, gather close. There exists a certain magic in creating these individual chicken pot pies, each one a warm embrace captured in golden pastry. When the evening air turns crisp and you seek solace in each other’s company, these little treasures transform your table into a sanctuary of shared comfort and whispered conversations.
Why This Recipe Works
- The velvety cream sauce, enriched with both heavy cream and whole milk, creates a luxurious base that clings lovingly to every morsel of chicken and vegetable, ensuring each bite is as comforting as the last.
- Using both butter and olive oil to sauté the vegetables builds layers of flavor that dance across your palate, while the fresh thyme and parsley add garden-fresh brightness that cuts through the richness.
- Pre-cooking the chicken separately guarantees tender, juicy pieces rather than rubbery bits, and the flaky, buttery puff pastry crowns each ramekin with a golden blanket that shatters beautifully at the touch of your fork.
- The individual servings create an intimate dining experience where each person receives their own personal vessel of warmth, making the meal feel specially crafted just for the two of you.
Ingredients
- 1.5 pounds boneless, skinless chicken breasts, cut into 1-inch cubes
- 4 tablespoons unsalted butter, divided
- 2 tablespoons olive oil
- 1 large yellow onion, finely diced
- 3 medium carrots, peeled and diced into 1/4-inch pieces
- 2 celery stalks, finely chopped
- 3 cloves garlic, minced
- 1/3 cup all-purpose flour
- 2 cups chicken broth, warmed
- 1 cup heavy cream
- 1/2 cup whole milk
- 1 cup frozen peas
- 2 tablespoons fresh parsley, chopped
- 1 tablespoon fresh thyme leaves
- 1 teaspoon salt
- 1/2 teaspoon black pepper
- 1/4 teaspoon nutmeg, freshly grated
- 1 package (17.3 ounces) frozen puff pastry, thawed
- 1 large egg, beaten with 1 tablespoon water
Equipment Needed
- 4 (16-ounce) oven-safe ramekins
- Large skillet or Dutch oven
- Wooden spoon
- Rolling pin
- Pastry brush
- Baking sheet
- Measuring cups and spoons
- Sharp knife
- Cutting board
Instructions
Preparing the Chicken and Vegetables
Begin by patting your chicken cubes completely dry with paper towels—this crucial step ensures beautiful browning rather than steaming. In your large skillet over medium-high heat, melt 1 tablespoon of butter with the olive oil until they shimmer together like morning sunlight on a quiet pond. Carefully place the chicken in a single layer, listening to that satisfying sizzle that promises flavor to come. Cook for 5-7 minutes, turning occasionally, until each piece develops a golden-brown crust and reaches an internal temperature of 165°F when tested with an instant-read thermometer. Remove the chicken to a plate, covering it gently to keep warm. In that same skillet, now fragrant with the memory of chicken, melt the remaining 3 tablespoons of butter and add your diced onion, carrots, and celery. Cook for 8-10 minutes, stirring occasionally, until the vegetables have softened and the onion turns translucent, filling your kitchen with the sweet aroma of comfort in the making.
Creating the Velvety Sauce
Assembling Your Personal Pies
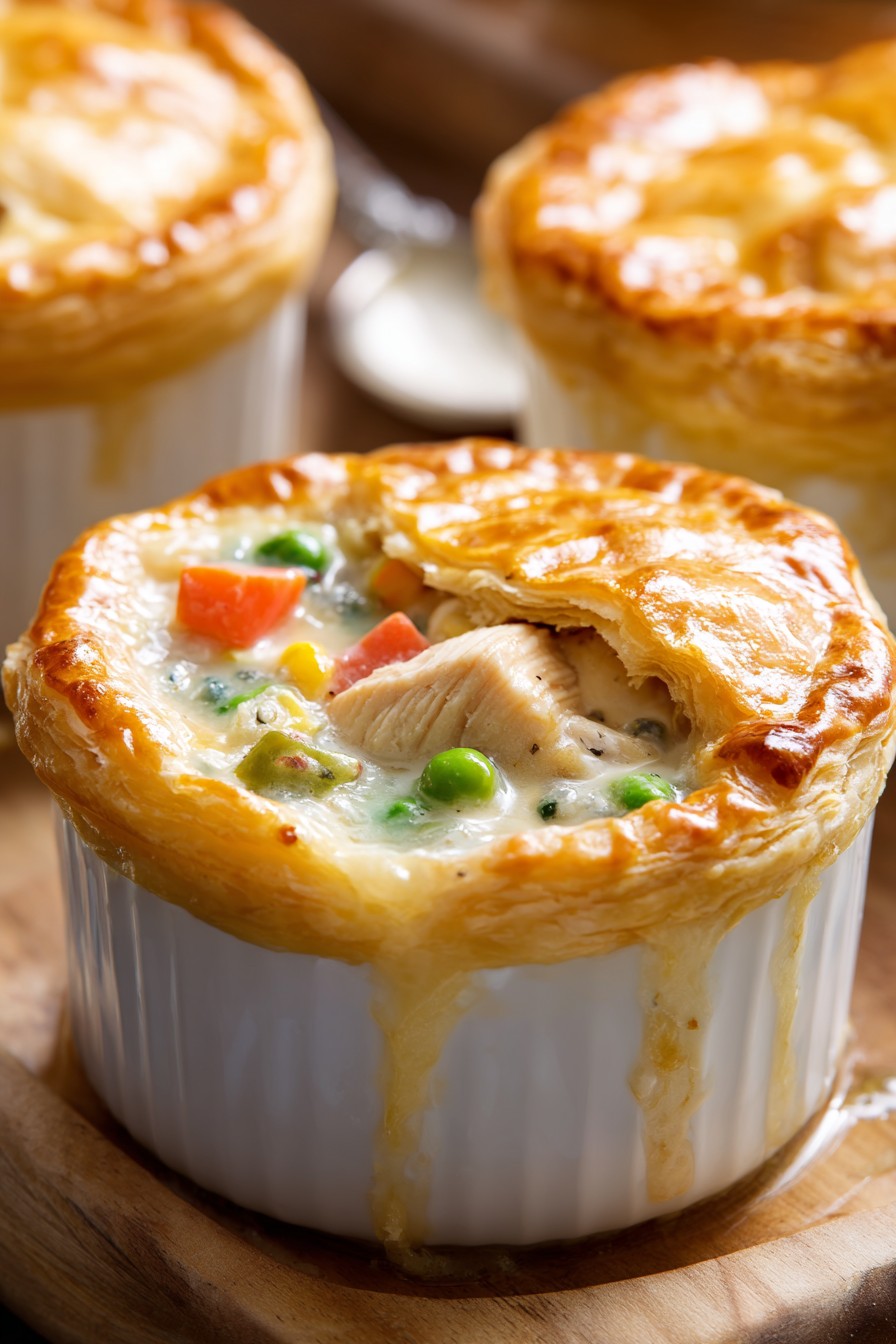
Preheat your oven to 400°F, allowing it to reach the perfect temperature for creating that flaky, golden pastry. Lightly butter your four ramekins, preparing them to cradle your creation. Divide the warm chicken mixture equally among them, filling each about 3/4 full to leave room for the pastry to rise. On a lightly floured surface, roll out your thawed puff pastry to about 1/8-inch thickness, then cut four circles that are about 1 inch larger than your ramekin openings. Drape these pastry circles over the filled ramekins, gently pressing the edges to seal—don’t stretch the pastry, but rather let it rest comfortably over the filling. Use a sharp knife to cut three small slits in the center of each, creating steam vents that will prevent soggy bottoms. Brush each pastry lid generously with the egg wash, which will give them that beautiful golden glow as they bake.
Baking to Golden Perfection
Place your prepared ramekins on a baking sheet—this catches any potential bubbling over and makes transferring them in and out of the oven much safer. Slide them into your preheated 400°F oven and bake for 25-30 minutes. Watch as the magic happens: the pastry will puff and rise, turning a deep golden brown, while the filling bubbles enticingly around the edges. You’ll know they’re ready when the pastry is beautifully browned and flaky, and the filling is bubbling vigorously around the vents. For extra color and shine, you could brush them with additional egg wash halfway through baking. Remove them from the oven and let them rest for 10-15 minutes—this waiting period allows the filling to set properly and prevents burned tongues from overeager tasting.
Serving with Love and Care
Carry these golden-crowned beauties to your table while they’re still warm, the aroma wrapping around you both like a soft blanket. Place each ramekin on a small plate or trivet to protect your table from the heat. The first crack of your fork through that flaky pastry releases a puff of steam carrying all the comforting scents you’ve worked so lovingly to create. Serve them as they are in their rustic charm, or accompany with a simple green salad dressed in lemon vinaigrette to cut through the richness. Light some candles, pour your favorite wine, and settle into an evening where the world outside fades away, leaving only the two of you and these little pots of comfort. Tip: For a special touch, use cookie cutters to create decorative pastry shapes to place on top before baking.
Tips and Tricks
For those seeking to elevate these already wonderful pot pies, consider these additional insights gathered from years of cozy kitchen experiments. When preparing your vegetables, take the extra minute to ensure they’re uniformly diced—this isn’t just about aesthetics, but about ensuring even cooking so every bite contains the perfect balance of textures. If you find yourself without fresh herbs, remember that dried herbs can substitute at a ratio of 1:3 (so 1 teaspoon dried thyme instead of 1 tablespoon fresh), though the flavor will be more concentrated and slightly different in character.
For the most flaky pastry, ensure your puff pastry is properly thawed but still cold to the touch—if it becomes too warm, the butter layers will melt together rather than creating those beautiful, separate flaky layers. If you’re making these ahead of time, you can prepare the filling up to two days in advance and store it covered in the refrigerator, then simply assemble and bake when ready. The filling actually benefits from this resting time as the flavors meld together more completely.
When brushing with egg wash, use a gentle hand—too much pressure can deflate the delicate layers you’ve worked to create. For those who prefer a deeper golden color, you can add a pinch of turmeric to your egg wash, though this will slightly alter the flavor. If your oven tends to have hot spots, rotate your baking sheet halfway through the cooking time to ensure even browning on all your pot pies.
For a truly show-stopping presentation, consider using different shaped cutters to create pastry decorations—hearts for a romantic evening, leaves for autumn, or stars for a magical winter night. These can be attached with a bit of extra egg wash before baking. If you find your filling too thick after refrigeration, thin it with a tablespoon or two of additional broth or cream before assembling. And remember, the most important ingredient is the love and attention you pour into the process—these pot pies respond beautifully to careful, mindful preparation.
Recipe Variations
- For a luxurious twist, substitute the chicken with tender lobster meat and add a splash of sherry to the sauce, creating a special occasion version that feels like dining in a cozy seaside inn. Use about 1.5 pounds of cooked lobster meat and add 2 tablespoons of dry sherry when you add the cream. The rich, sweet lobster pairs beautifully with the creamy sauce and flaky pastry, making this variation perfect for anniversaries or Valentine’s Day celebrations.
- Embrace the forest with a mushroom and leek variation that celebrates earthy flavors. Replace the chicken with 1.5 pounds of mixed wild mushrooms (such as cremini, shiitake, and oyster) sliced and sautéed until golden, and substitute the onion with 2 large leeks, white and light green parts only, thoroughly cleaned and sliced. The mushrooms bring a meaty texture and deep umami flavor that vegetarians and meat-eaters alike will adore, while the leeks add a gentle onion-like sweetness that complements the earthy notes perfectly.
- Create a Thanksgiving-inspired version using leftover turkey and adding traditional holiday flavors. Substitute the chicken with 1.5 pounds of cooked turkey, add 1/2 cup of corn kernels and 1/2 cup of green beans along with the peas, and include 1 teaspoon of sage along with the thyme. This variation turns holiday leftovers into a completely new dining experience that captures the warmth and nostalgia of Thanksgiving in personal portions perfect for a cozy post-holiday evening.
- For a creamy herb and white wine variation that feels distinctly French, add 1/2 cup of dry white wine to the vegetables after they’ve softened, letting it reduce by half before adding the flour. Increase the thyme to 2 tablespoons and add 1 tablespoon of fresh tarragon. The wine adds brightness and complexity to the sauce, while the tarragon brings its distinctive anise-like flavor that pairs beautifully with chicken and cream sauces.
Frequently Asked Questions
Can I make chicken pot pies ahead of time?
Absolutely, and they actually improve with a little planning. You can prepare the filling up to two days in advance and store it covered in the refrigerator—the flavors will meld and deepen beautifully during this time. When ready to bake, simply reheat the filling slightly if it’s very cold, assemble with the pastry, and bake as directed. You can also fully assemble the pot pies (without baking) and freeze them for up to three months. When baking frozen pot pies, add 10-15 minutes to the baking time and cover the pastry loosely with foil if it browns too quickly. This make-ahead quality makes them perfect for busy weeks when you want a special dinner without last-minute fuss.
What can I use instead of puff pastry?
How do I prevent a soggy bottom crust?
The secret to avoiding that disappointing soggy bottom lies in a few careful techniques. First, ensure your filling is piping hot when you add the pastry—a cold filling will take longer to heat through, steaming the pastry from beneath. Second, those steam vents are crucial—don’t skip them or make them too small, as they allow moisture to escape rather than being trapped underneath the pastry. Baking on a preheated baking sheet helps crisp the bottom, and placing your oven rack in the lower third position ensures even heat distribution. Finally, letting the baked pies rest for 10-15 minutes allows the filling to set slightly, creating a barrier between the hot filling and the pastry.
Can I make one large pot pie instead of individuals?
Certainly, and a large pot pie has its own charming, family-style appeal. Use a 9-inch deep-dish pie plate or a 2-quart baking dish instead of ramekins. You’ll need to increase the baking time to 35-45 minutes at 400°F, covering the edges of the pastry with foil if they brown too quickly. The larger pie will take longer to heat through to the center, so check that the filling is bubbling vigorously and the center of the pastry is golden brown. Serving a large pie creates a beautiful centerpiece for your table and that wonderful moment when you cut into it, revealing the steaming filling beneath the golden crust.
How should I store and reheat leftovers?
Leftover pot pies should be cooled completely before covering and refrigerating for up to 3 days. To reheat, place the refrigerated pot pie in a 350°F oven for 15-20 minutes until heated through and the pastry is crisp again. The microwave will work in a pinch but will soften the pastry—if using this method, consider placing the pie under the broiler for a minute afterward to recrisp the top. For frozen baked pot pies, reheat from frozen in a 350°F oven for 25-30 minutes. I don’t recommend freezing assembled but unbaked pot pies with the filling already in them, as the vegetables may become watery upon thawing.
Summary
These individual chicken pot pies transform simple ingredients into edible embraces, each golden-crowned vessel containing tender chicken, vibrant vegetables, and velvety sauce. Perfect for cozy evenings when the world outside fades away, they create intimate moments of shared comfort and connection at your table.
Cozy Chicken Pot Pies
6
servings35
minutes30
minutesIngredients
Instructions
- 1 Pat chicken dry and cook in 1 tablespoon butter and olive oil over medium-high heat until golden and reaches 165°F, about 5-7 minutes. Remove and set aside.
- 2 In same skillet, melt remaining butter and cook onion, carrots, and celery until softened, 8-10 minutes. Add garlic and cook 1 minute more.
- 3 Sprinkle flour over vegetables and cook 2 minutes, stirring constantly. Gradually whisk in warm broth, then cream and milk. Bring to simmer until thickened.
- 4 Season with salt, pepper, and nutmeg. Return chicken to skillet with peas, thyme, and parsley. Remove from heat.
- 5 Preheat oven to 400°F. Divide filling among 4 buttered ramekins. Roll pastry to 1/8-inch thickness and cut circles 1 inch larger than ramekins.
- 6 Drape pastry over filling, press edges to seal, and cut steam vents. Brush with egg wash.
- 7 Bake on baking sheet 25-30 minutes until golden and bubbling. Rest 10-15 minutes before serving.


