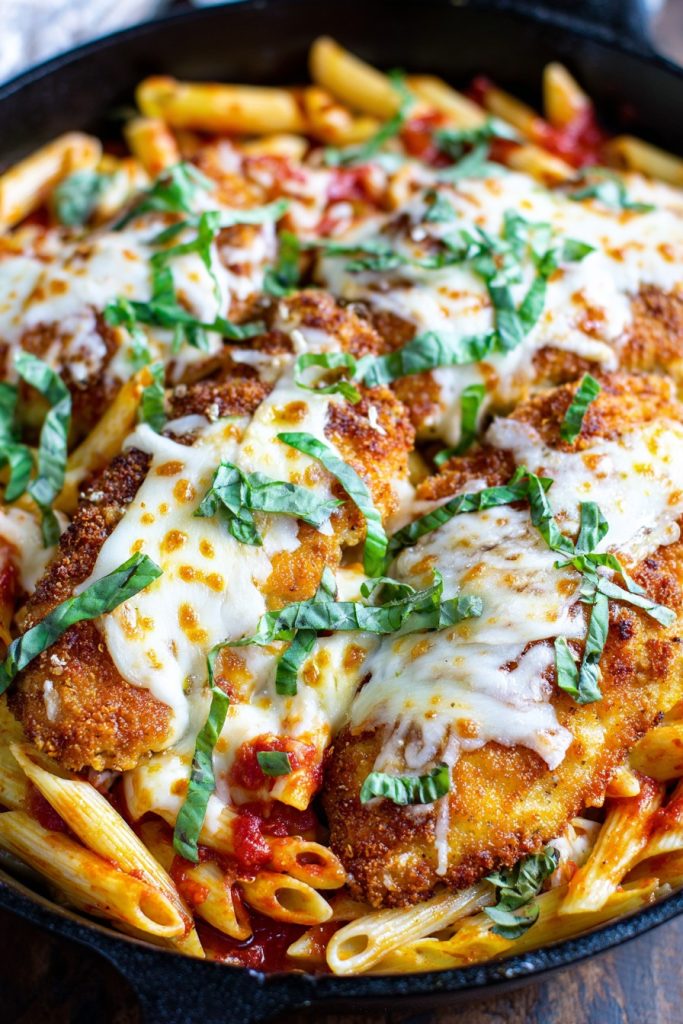
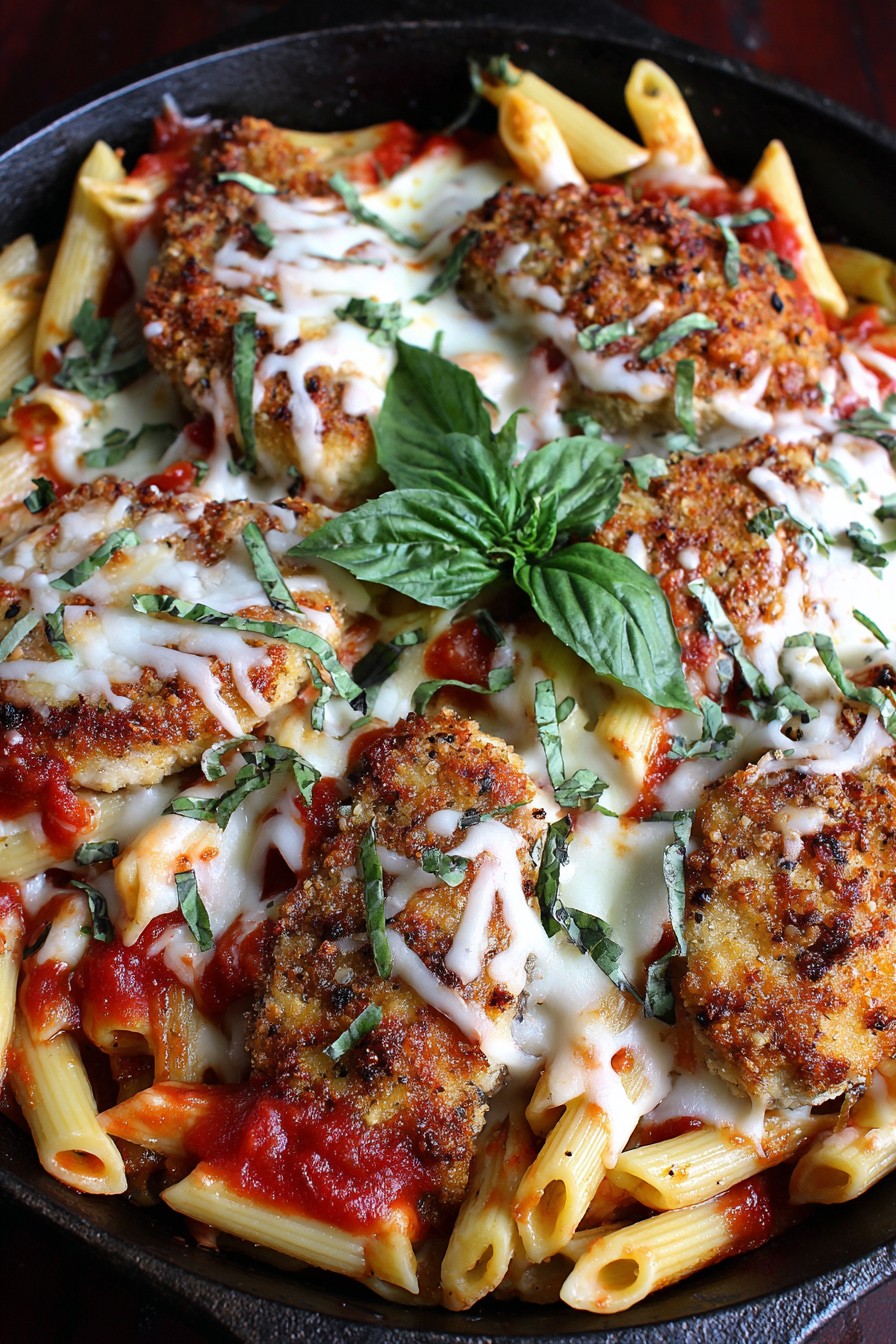
Let’s be real, folks—who doesn’t love a good chicken parm? Now imagine all that cheesy, saucy goodness tossed with pasta for the ultimate weeknight win. Last night, I whipped up this beauty and my family practically licked their plates clean—no judgment here!
Why This Recipe Works
- The crispy, golden-brown chicken cutlets are baked to perfection instead of fried, cutting down on grease without sacrificing that satisfying crunch we all crave.
- Using a combination of mozzarella and Parmesan cheeses creates a gooey, flavorful topping that melts beautifully and gives every bite that classic Italian restaurant quality.
- Simmering the marinara sauce with garlic and fresh basil infuses it with deep, aromatic flavors that coat the pasta and chicken beautifully, making each forkful absolutely irresistible.
- Tossing the cooked pasta directly in the sauce ensures every noodle is perfectly coated and seasoned, preventing any dry or bland bites from sneaking into your bowl.
- The final broil step creates that picture-perfect bubbly, slightly charred cheese topping that makes this dish look as incredible as it tastes—hello, Instagram fame!
Ingredients
- 1 pound boneless, skinless chicken breasts, pounded to ½-inch thickness
- 1 cup all-purpose flour, for dredging
- 2 large eggs, beaten with 2 tablespoons water
- 1½ cups Italian-seasoned breadcrumbs
- ½ cup grated Parmesan cheese, divided
- 2 teaspoons garlic powder
- 1 teaspoon dried oregano
- ½ teaspoon black pepper, freshly ground
- 1 teaspoon kosher salt, plus more to taste
- 3 tablespoons olive oil, divided
- 1 pound penne pasta
- 1 jar (24 ounces) marinara sauce
- 3 cloves garlic, minced
- ¼ cup fresh basil leaves, chopped, plus more for garnish
- 2 cups shredded mozzarella cheese
- ½ teaspoon red pepper flakes, optional
Equipment Needed
- Large pot for boiling pasta
- Large oven-safe skillet or baking dish
- Three shallow bowls for dredging station
- Meat mallet or rolling pin for pounding chicken
- Whisk
- Tongs
- Colander
- Measuring cups and spoons
- Cutting board and chef’s knife
Instructions
Prep the Chicken and Dredging Station
First things first, let’s get our chicken ready for its crispy makeover! Place your chicken breasts between two pieces of plastic wrap and gently pound them with a meat mallet or rolling pin until they’re an even ½-inch thickness—this ensures they cook evenly and stay juicy. Now set up your dredging station with three shallow bowls: one with flour seasoned with a pinch of salt and pepper, another with the eggs beaten with water until frothy, and the third with breadcrumbs mixed with ¼ cup of Parmesan, garlic powder, oregano, and remaining salt and pepper. This assembly line approach makes the process smooth and keeps your hands from becoming a sticky mess—trust me, I’ve learned this the hard way!
Cook the Chicken to Golden Perfection
Heat 2 tablespoons of olive oil in your large oven-safe skillet over medium-high heat until it shimmers—you can test this by flicking a breadcrumb in; if it sizzles immediately, you’re good to go! Working with one piece at a time, dredge each chicken breast in flour (shaking off excess), dip in egg mixture, then press firmly into the breadcrumb mixture to coat completely. Carefully place them in the hot oil and cook for about 4-5 minutes per side until deeply golden brown and crispy. They won’t be fully cooked through yet—that’s perfect because they’ll finish in the oven. Remove them to a plate lined with paper towels to drain any excess oil while you work on the pasta. Pro tip: don’t overcrowd the pan! Cook in batches if needed to maintain that perfect crust.
Cook the Pasta and Prepare the Sauce
While the chicken rests, bring a large pot of generously salted water to a rolling boil—it should taste like the sea! Add the penne and cook according to package directions until al dente, usually about 9-11 minutes. Meanwhile, in the same skillet you used for the chicken (don’t you dare wash those delicious browned bits away!), heat the remaining tablespoon of olive oil over medium heat. Add the minced garlic and cook for just 30 seconds until fragrant—be careful not to burn it! Pour in the marinara sauce, add the chopped basil, red pepper flakes if using, and let it simmer for 5-7 minutes, stirring occasionally. The sauce will thicken slightly and those flavorful chicken bits will incorporate into it, creating an incredible depth of flavor.
Combine Everything and Add the Cheese
Drain the pasta well but don’t rinse it—that starchy surface helps the sauce cling beautifully! Add the hot pasta directly to the skillet with the sauce and toss thoroughly until every piece is coated in that glorious red goodness. Nestle the partially cooked chicken cutlets into the pasta mixture, spooning some sauce over the top of each one. Now for the best part—the cheese! Sprinkle the shredded mozzarella evenly over everything, followed by the remaining ¼ cup of Parmesan. Make sure to get some cheese on both the chicken and the pasta surrounding it for maximum melty coverage. At this point, your kitchen should smell absolutely heavenly and your stomach will be growling—we’re almost there!
Bake and Broil to Bubbly Finish
Preheat your broiler to high while you let the skillet sit for a moment. If your skillet isn’t oven-safe, now’s the time to transfer everything to a baking dish. Place the skillet in the oven about 6 inches from the broiler element and bake for 8-10 minutes until the cheese is completely melted and bubbly. Then switch to broil and cook for an additional 2-3 minutes, watching closely until the cheese develops those beautiful golden-brown spots we all dream about. Remove from oven—careful, that handle is hot!—and let it rest for 5 minutes before serving. This resting time allows the juices to redistribute and prevents everything from falling apart when you scoop it out. Garnish with fresh basil leaves and maybe an extra sprinkle of Parmesan because, well, cheese!
Tips and Tricks
If you want to take this dish to the next level, consider making your own marinara sauce from scratch—it’s easier than you think! Sauté some diced onion with the garlic until softened, then add a can of crushed San Marzano tomatoes, a pinch of sugar to balance acidity, and let it simmer for at least 20 minutes. The flavor difference is remarkable. For an extra crispy chicken coating, try adding a tablespoon of cornstarch to your flour mixture—it creates a lighter, crispier crust that holds up beautifully against the sauce. If you’re short on time, use pre-cooked breaded chicken cutlets from the store, though I highly recommend the homemade version for maximum flavor control.
When pounding your chicken, work from the center outward in even strokes to avoid tearing the meat. If you don’t have a meat mallet, a heavy skillet or rolling pin works just fine. For the cheese, freshly grated mozzarella melts much better than pre-shredded, which contains anti-caking agents that can make it grainy. If you can find it, whole milk mozzarella will give you that stretchy, pizza-parlor quality melt we all love. Don’t have penne? Any short pasta with nooks and crannies works great—rigatoni, ziti, or even fusilli will hold the sauce beautifully.
For make-ahead convenience, you can prepare the breaded chicken cutlets up to the cooking stage and refrigerate them for up to 24 hours before cooking. You can also assemble the entire dish ahead of time, cover tightly, and refrigerate for up to a day—just add an extra 5-10 minutes to the baking time since it’s going in cold. Leftovers reheat surprisingly well in the oven at 350°F for about 15-20 minutes, though the chicken won’t be quite as crispy. If you want to lighten it up, use chicken tenders instead of breasts—they cook faster and are naturally portion-sized!
Recipe Variations
- For a spicy kick, add sliced jalapeños or use a spicy arrabbiata sauce instead of marinara. You can also increase the red pepper flakes to 1 teaspoon or add a dash of hot sauce to the egg wash for the chicken. Top with pepper jack cheese instead of mozzarella for an extra layer of heat that will have your taste buds dancing!
- Make it vegetarian by replacing the chicken with large portobello mushroom caps. Remove the stems and gills, brush with olive oil, and bake at 400°F for 15 minutes before breading and proceeding with the recipe. Eggplant slices work beautifully too—slice them ½-inch thick, salt them to draw out moisture, then bread and bake until crispy before adding to the pasta.
- Create a creamier version by stirring ½ cup of heavy cream or ricotta cheese into the marinara sauce before adding the pasta. For an ultra-indulgent twist, make a bechamel sauce instead of using marinara—layer it with the pasta and chicken like a lasagna before topping with cheese and baking until bubbly and golden brown.
- Try different cheese combinations like adding provolone for extra sharpness, fontina for incredible meltability, or even a sprinkle of asiago for a nutty flavor. For a truly decadent version, place a slice of fresh mozzarella on each chicken cutlet before the final bake—it creates gorgeous cheese pulls that are absolutely worth the extra calories!
Frequently Asked Questions
Can I use a different type of pasta?
Absolutely! While penne works beautifully because its tubes catch the sauce and its ridges help everything cling together, you can certainly use other shapes. Rigatoni is an excellent alternative with its large tubes, or ziti for a slightly smaller option. If you prefer long pasta, linguine or fettuccine work too—just be sure to toss them thoroughly with the sauce to ensure every strand gets coated. Avoid very delicate pastas like angel hair that might become mushy under the weight of the chicken and cheese.
How do I prevent the breading from getting soggy?
The key is making sure your oil is properly hot before adding the chicken—test it with a breadcrumb that should sizzle immediately. Don’t overcrowd the pan, which lowers the temperature and causes steaming instead of frying. Also, ensure your chicken is patted completely dry before dredging, as moisture is the enemy of crispiness. Finally, letting the breaded chicken rest for 5-10 minutes before cooking helps the coating set up better. If you’re still concerned, you can bake the breaded chicken at 400°F for 15-20 minutes instead of pan-frying for a slightly less oily but still crispy result.
Can I make this gluten-free?
Definitely! For the chicken coating, use gluten-free breadcrumbs and all-purpose flour blend—many brands now make excellent Italian-seasoned gluten-free options. For the pasta, choose your favorite gluten-free penne—those made from brown rice or quinoa tend to hold up best in baked dishes. Just be sure to cook it al dente as gluten-free pasta can become mushy if overcooked. Check that your marinara sauce is gluten-free too, as some brands include wheat-based thickeners. With these simple swaps, you can enjoy all the comfort of this dish without the gluten!
What’s the best way to reheat leftovers?
The oven is your best friend for reheating—preheat to 350°F, place portions in an oven-safe dish, cover with foil, and heat for 15-20 minutes until warmed through. For crispier results, remove the foil for the last 5 minutes. The microwave will work in a pinch but may make the breading soft—if you must use it, place on a microwave-safe plate and heat in 30-second intervals, stirring between. Adding a tablespoon of water to the container before microwaving can help prevent drying out. For single servings, an air fryer at 350°F for 5-7 minutes works wonders at reviving the crispy texture!
Summary
This chicken Parmesan pasta combines two classics into one incredible, family-friendly dish with crispy chicken, perfectly cooked pasta, rich marinara, and bubbly cheese—pure comfort food perfection that’s worth every minute!
Chicken Parmesan Pasta
5
servings25
minutes30
minutesIngredients
Instructions
- 1 Pound chicken to ½-inch thickness. Set up dredging station: flour seasoned with salt and pepper in first bowl, egg mixture in second, breadcrumbs mixed with ¼ cup Parmesan, garlic powder, oregano, salt and pepper in third.
- 2 Heat 2 tablespoons oil in large oven-safe skillet over medium-high heat. Dredge chicken in flour, egg, then breadcrumbs. Cook 4-5 minutes per side until golden brown. Remove to paper towel-lined plate.
- 3 Cook pasta in salted boiling water until al dente. In same skillet, heat remaining oil, add garlic cook 30 seconds. Add marinara, basil, red pepper flakes. Simmer 5-7 minutes.
- 4 Drain pasta, add to sauce, toss to coat. Nestle chicken into pasta, spoon sauce over top. Sprinkle with mozzarella and remaining Parmesan.
- 5 Broil on high 6 inches from heat for 8-10 minutes until cheese melted, then 2-3 minutes more until golden brown. Rest 5 minutes before serving.