Ready to take your pizza night to epic new heights? Really, who says you have to choose between crispy chicken fingers and cheesy pizza when you can have both in one glorious creation? This recipe combines everything we love about game day snacks and family-friendly dinners into one unforgettable dish.
Why This Recipe Works
- The crispy chicken fingers provide amazing texture contrast against the soft pizza dough and melted cheese
- Using store-bought pizza dough and pre-cooked chicken fingers makes this recipe incredibly accessible for busy weeknights
- The combination of ranch seasoning and buffalo sauce creates that classic flavor profile everyone craves
- Baking at high heat ensures the crust gets perfectly crisp while the cheese melts into gooey perfection
- Customizable toppings mean every family member can get exactly what they want on their slice
Ingredients
- 1 pound store-bought pizza dough, room temperature
- 12 frozen chicken fingers, partially thawed
- 2 cups shredded mozzarella cheese
- 1 cup shredded cheddar cheese
- 1/2 cup buffalo sauce
- 1/4 cup ranch dressing
- 1 tablespoon olive oil
- 1 teaspoon garlic powder
- 1/2 teaspoon dried oregano
- 1/4 cup chopped fresh parsley for garnish
- Blue cheese crumbles for serving (optional)
- Additional ranch dressing for drizzling
Equipment Needed
- Large baking sheet or pizza stone
- Parchment paper
- Rolling pin
- Pastry brush
- Mixing bowls
- Measuring cups and spoons
- Sharp knife or pizza cutter
- Oven mitts
Instructions
Prepare Your Pizza Base
Begin by preheating your oven to 475°F and lining a large baking sheet with parchment paper. Take your room temperature pizza dough and place it on a lightly floured surface. Using a rolling pin, gently roll the dough into a 14-inch circle or rectangle that fits your baking sheet. If the dough springs back, let it rest for 5 minutes before continuing. Transfer the shaped dough to your prepared baking sheet and use your fingers to create a slight rim around the edges to contain the toppings. Brush the entire surface with olive oil using a pastry brush, paying special attention to the edges to ensure they get golden brown and crispy during baking. This oil layer also helps prevent the crust from getting soggy from the saucy toppings.
Season and Pre-Bake the Crust
Now it’s time to build flavor into your crust before adding the toppings. Sprinkle the garlic powder and dried oregano evenly over the oiled dough surface, making sure to get coverage all the way to the edges. Using a fork, gently poke holes all over the dough surface, spacing them about 2 inches apart – this technique, called docking, prevents large air bubbles from forming during baking. Place the seasoned crust in your preheated oven and bake for exactly 5 minutes until the surface looks dry and matte rather than shiny. This partial baking ensures your crust will be perfectly cooked through without burning the cheese and chicken toppings later. Remove from oven and let cool slightly while you prepare the other components.
Arrange Chicken and Cheese Layers
Take your partially thawed chicken fingers and slice them into 1-inch pieces – they should be firm enough to cut cleanly but not completely frozen. Arrange the chicken pieces evenly over the par-baked crust, leaving about 1/2 inch border around the edges. Drizzle the buffalo sauce over the chicken pieces, using about 1/4 cup to start – you can add more later if you prefer extra spice. In a medium bowl, combine the shredded mozzarella and cheddar cheeses, then sprinkle this mixture evenly over the chicken layer, making sure to cover all the chicken pieces completely. The cheese acts as a protective layer that prevents the chicken from drying out while also helping everything meld together beautifully during the final bake.
Final Baking and Melting
Carefully return the assembled pizza to your 475°F oven and set your timer for 12-15 minutes. Watch closely through the oven window – you’re looking for the cheese to be completely melted and bubbly with golden brown spots appearing on the surface. The edges of the crust should turn a deep golden brown, and if you lift a corner with a spatula, the bottom should be crisp and lightly browned. Rotate the baking sheet halfway through baking if your oven has hot spots to ensure even cooking. The high temperature is crucial here – it gives you that perfect combination of melted cheese, crispy chicken, and golden crust without overcooking any component.
Finish and Serve Immediately
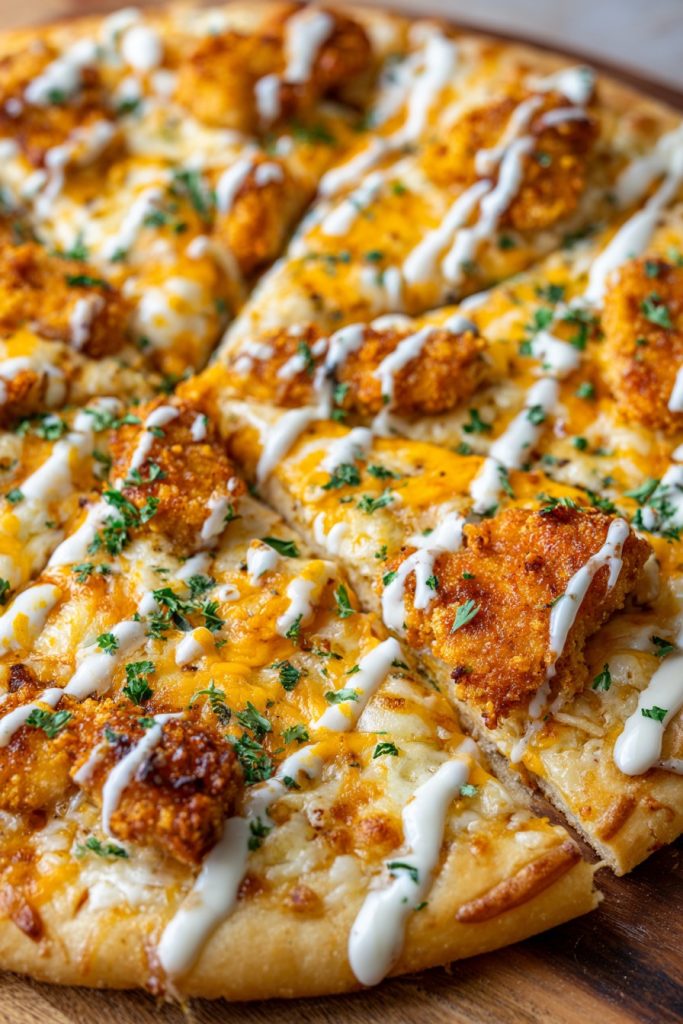
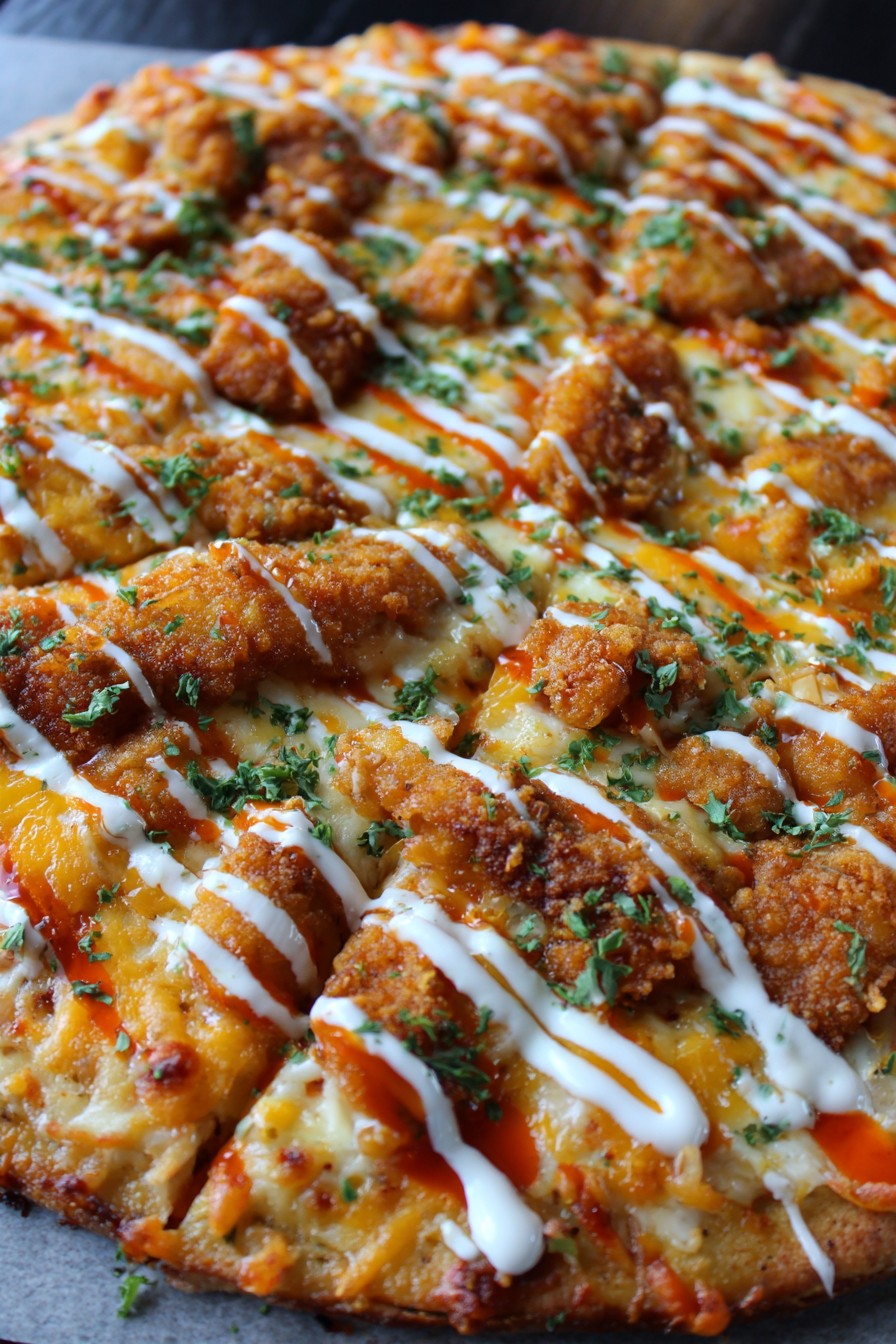
Once your pizza looks perfectly golden and bubbly, carefully remove it from the oven using oven mitts and place it on a heat-safe surface. Immediately drizzle the remaining 1/4 cup of buffalo sauce and the ranch dressing in zigzag patterns across the hot pizza – the heat will help these sauces meld with the cheese beautifully. Sprinkle with chopped fresh parsley for color and freshness, and add blue cheese crumbles if desired. Let the pizza rest for exactly 3 minutes before slicing – this allows the cheese to set slightly so it doesn’t slide off when you cut it. Use a sharp pizza cutter or chef’s knife to slice into 8 portions and serve immediately while everything is hot and crispy.
Tips and Tricks
For the absolute best results, consider these professional tips that will take your chicken finger pizza from good to legendary. First, if you have time, make your own pizza dough – it’s surprisingly simple with just flour, yeast, water, salt, and olive oil, and the flavor difference is remarkable. Homemade dough has better texture and flavor development than most store-bought versions. When working with any pizza dough, always bring it to room temperature for at least 30 minutes before shaping – cold dough is much more difficult to stretch and will spring back constantly. If you’re using a pizza stone instead of a baking sheet, preheat it in the oven for at least 45 minutes before baking for that authentic pizzeria-style crisp crust.
For the chicken component, you have several excellent options beyond frozen chicken fingers. You can use leftover fried chicken from last night’s dinner – just remove the skin and shred the meat. Alternatively, bake or air fry chicken tenders seasoned with your favorite spices specifically for this recipe. If you want to control the sodium content, make your own baked chicken fingers using panko breadcrumbs mixed with Italian seasoning. The cheese blend is another area where you can get creative – try adding some provolone for extra meltiness or pepper jack for additional spice. Always shred your own cheese from blocks rather than using pre-shredded – the anti-caking agents in pre-shredded cheese can affect melting quality.
Don’t overlook the power of sauces and seasonings. If buffalo sauce isn’t your thing, try barbecue sauce, teriyaki glaze, or even honey mustard for different flavor profiles. You can mix the sauce directly with the chicken before assembling, or serve additional sauce on the side for dipping. For extra flavor in every bite, season each layer individually – add a pinch of salt and pepper to the chicken, maybe some onion powder to the cheese mixture. If you’re feeding a crowd, consider making two smaller pizzas with different sauces to please everyone. Leftovers reheat surprisingly well in an air fryer or toaster oven to maintain crispness.
Recipe Variations
- Barbecue Chicken Pizza Version: Swap the buffalo sauce for your favorite barbecue sauce, use a Monterey jack and cheddar cheese blend, and add thin red onion slices and chopped cilantro after baking. The sweet and smoky barbecue flavor pairs perfectly with the crispy chicken and creates a completely different eating experience that’s equally addictive.
- Buffalo Blue Cheese Deluxe: Crumble extra blue cheese over the pizza before baking, add thinly sliced celery for crunch, and use a blue cheese dressing instead of ranch. This variation amplifies the classic buffalo wing flavors and adds wonderful textural contrast with the creamy cheese and crisp celery elements.
- Italian Herb Chicken Pizza: Replace buffalo sauce with marinara, use Italian-seasoned chicken fingers, and top with mozzarella, parmesan, and fresh basil after baking. This Mediterranean twist feels more like traditional pizza while still featuring the satisfying chicken finger component that makes this recipe special.
- Breakfast Pizza Version: Use breakfast sausage-seasoned chicken fingers, swap cheese for a blend of cheddar and Monterey jack, add scrambled eggs before baking, and top with crumbled bacon after baking. This creative morning twist makes for an incredible brunch centerpiece that will have everyone coming back for seconds.
- Spicy Southwest Style: Mix buffalo sauce with chipotle peppers in adobo, use a pepper jack and cotija cheese blend, and top with avocado, corn, and black beans after baking. This variation brings bold Mexican flavors to the party and makes the pizza feel somewhat healthier with all the vegetable additions.
Frequently Asked Questions
Can I use raw chicken instead of pre-cooked chicken fingers?
Absolutely, but you’ll need to adjust the cooking process significantly. If using raw chicken, cut boneless, skinless chicken breasts into 1-inch pieces and toss with olive oil, salt, pepper, and your preferred seasonings. Bake these at 400°F for 15-18 minutes until cooked through before adding to your pizza. Using raw chicken directly on the pizza isn’t recommended because the chicken won’t cook through properly before the crust burns. The pre-cooked chicken finger approach ensures food safety and perfect texture in every bite.
How do I prevent my pizza crust from getting soggy?
Soggy crust is the enemy of good pizza, but easily preventable with a few techniques. The par-baking step is crucial – it creates a protective barrier on the dough surface. Also, make sure your chicken fingers aren’t dripping with oil or sauce when you place them on the crust. If using particularly wet ingredients, consider placing them between layers of cheese rather than directly on the dough. Finally, always let your pizza rest on a cooling rack for a few minutes after baking rather than letting it sit on the hot baking sheet where steam can make the bottom soggy.
Can I make this recipe gluten-free or dairy-free?
Yes to both adaptations! For gluten-free, use your favorite gluten-free pizza dough mix or pre-made crust, and ensure your chicken fingers are certified gluten-free. For dairy-free, use vegan cheese alternatives that melt well – many newer brands work beautifully. You’ll also need to substitute the ranch dressing with a vegan version or simply use extra buffalo sauce. The cooking times may need slight adjustment with alternative ingredients, so keep a close eye on your pizza during the final baking stage.
What’s the best way to reheat leftovers?
While pizza is always best fresh, leftovers can still be delicious if reheated properly. Avoid the microwave unless you enjoy soggy crust – instead, use a toaster oven or conventional oven at 375°F for 8-10 minutes until heated through. For extra crispness, place the slice directly on the oven rack. If you have an air fryer, it works wonders – 3-4 minutes at 370°F will make it taste nearly fresh. Always add fresh garnishes like parsley after reheating to maintain their bright flavor and color.
Can I prepare any components ahead of time?
Definitely! You can prepare the pizza dough up to 2 days in advance and store it wrapped in the refrigerator. The chicken fingers can be cooked and sliced a day ahead – store them separately in an airtight container. You can even mix your cheese blend and have your sauces ready to go. However, assemble the pizza just before baking for best results. If you must assemble ahead, refrigerate for no more than 2 hours before baking, and expect slightly longer baking time since everything will be cold.
Summary
This chicken finger pizza combines crispy comfort food with cheesy pizza perfection. With customizable toppings and easy preparation, it’s sure to become a new family favorite for game days and weeknight dinners alike.
Chicken Finger Pizza Recipe
4
servings15
minutes20
minutesIngredients
Instructions
- 1 Preheat oven to 475°F and line baking sheet with parchment paper
- 2 Roll dough to 14-inch circle, brush with oil, season with garlic powder and oregano
- 3 Par-bake crust for 5 minutes until surface looks dry
- 4 Slice chicken fingers into 1-inch pieces, arrange on crust
- 5 Drizzle with buffalo sauce, top with cheese blend
- 6 Bake 12-15 minutes until cheese is bubbly and golden
- 7 Drizzle with additional sauces, garnish with parsley, rest 3 minutes before slicing


