Unbelievably delicious and ridiculously easy, this chicken enchilada casserole combines all the flavors you love from traditional enchiladas without the tedious rolling! Using simple ingredients you probably already have in your pantry, this dish comes together in minutes and bakes into a bubbly, cheesy masterpiece that will have your family begging for seconds.
Why This Recipe Works
- Layering instead of rolling saves you at least 20 minutes of prep time while delivering the same incredible flavors and textures
- The combination of cream of chicken soup and enchilada sauce creates a rich, creamy base that prevents the casserole from drying out during baking
- Using both Monterey Jack and cheddar cheeses provides the perfect balance of meltiness and sharp flavor that complements the spicy chicken filling
- Corn tortillas absorb the sauces beautifully while maintaining just enough structure to give each bite the perfect enchilada-like texture
- Baking at 375°F for 30 minutes ensures the cheese gets perfectly golden brown while the interior heats through completely without burning the edges
Ingredients
- 2 cups cooked chicken, shredded (rotisserie chicken works perfectly)
- 1 can (10 oz) red enchilada sauce
- 1 can (10.5 oz) cream of chicken soup
- 1 cup sour cream
- 1 small onion, finely diced
- 1 can (4 oz) diced green chilies, undrained
- 2 cups Monterey Jack cheese, shredded
- 2 cups sharp cheddar cheese, shredded
- 12 corn tortillas, cut into quarters
- 1 tablespoon olive oil
- 1 teaspoon ground cumin
- 1/2 teaspoon chili powder
- 1/4 teaspoon garlic powder
- Salt and black pepper to taste
- Fresh cilantro and sliced jalapeños for garnish (optional)
Equipment Needed
- 9×13 inch baking dish
- Large mixing bowl
- Medium skillet
- Cutting board and chef’s knife
- Measuring cups and spoons
- Rubber spatula
- Box grater (if shredding your own cheese)
Instructions

Preheat and Prepare Your Ingredients
Begin by preheating your oven to 375°F and lightly greasing your 9×13 inch baking dish with cooking spray or a thin layer of olive oil. While the oven heats, shred your cooked chicken if using rotisserie or leftover chicken—you’ll need about 2 cups packed. Dice your onion finely, about 1/4 inch pieces, and measure out all your spices. Combine the Monterey Jack and cheddar cheeses in a bowl if you haven’t already done so. Cut your corn tortillas into quarters—this allows them to layer beautifully and absorb the sauces evenly. Having everything prepped and within reach will make the assembly process smooth and efficient.
Create the Flavorful Sauce Base
Heat 1 tablespoon of olive oil in a medium skillet over medium heat until shimmering, about 2 minutes. Add the diced onion and cook until translucent and slightly softened, approximately 4-5 minutes, stirring occasionally to prevent burning. In a large mixing bowl, combine the cream of chicken soup, enchilada sauce, and sour cream, whisking until smooth and fully incorporated. Add the cooked onions, undrained green chilies, ground cumin, chili powder, garlic powder, and a generous pinch of salt and black pepper. Fold in the shredded chicken until every piece is coated in the creamy mixture. The sauce should be thick but pourable—if it seems too thick, you can add a tablespoon or two of milk to loosen it up.
Layer the Casserole with Precision
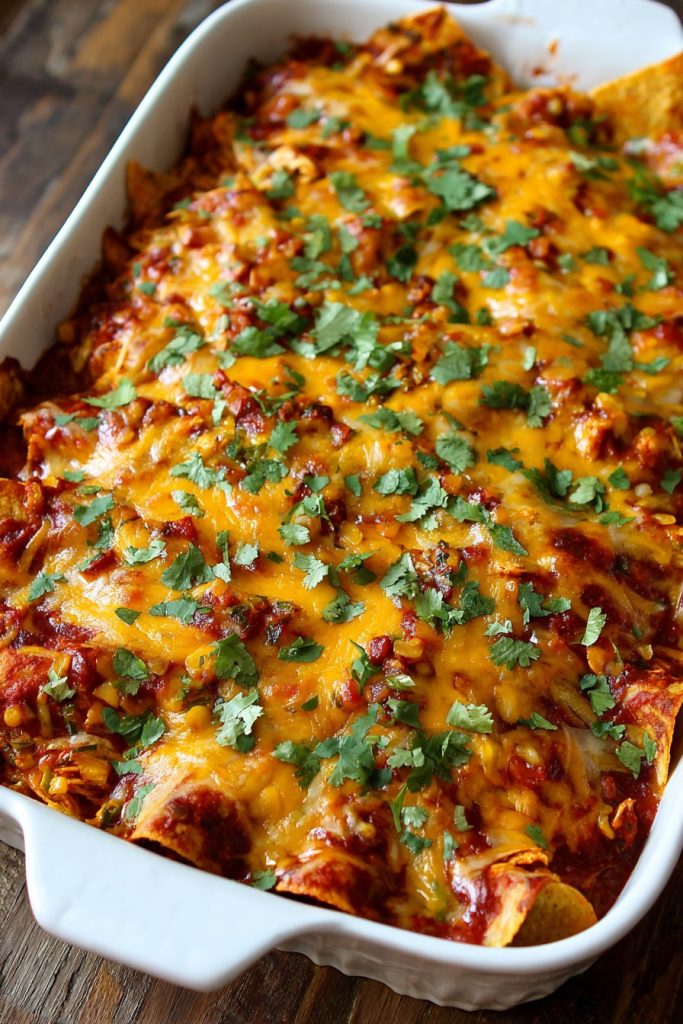
Spread about 1/2 cup of the chicken mixture evenly across the bottom of your prepared baking dish—this prevents the tortillas from sticking and adds extra flavor to every bite. Arrange one-third of your quartered tortillas over the sauce, overlapping slightly to cover the entire surface. Spoon one-third of the remaining chicken mixture over the tortillas, spreading it into an even layer that reaches all corners. Sprinkle one-third of your cheese blend evenly over the chicken layer. Repeat this process two more times, ending with a final layer of cheese that completely covers the surface. Press down gently on the top layer to help everything settle together.
Bake to Perfection
Place the uncovered casserole in your preheated 375°F oven on the center rack. Bake for 25-30 minutes, or until the cheese is completely melted, bubbly around the edges, and developing golden brown spots across the surface. The internal temperature should reach 165°F if checked with an instant-read thermometer. You’ll know it’s done when the edges are actively bubbling and the center is hot throughout. If you prefer a more browned top, you can switch to broil for the final 2-3 minutes, but watch carefully as cheese can burn quickly under the broiler.
Rest and Serve with Flair
Remove the casserole from the oven and let it rest on a wire rack for at least 10-15 minutes before serving. This crucial resting time allows the layers to set up properly, making it much easier to cut clean portions without everything sliding apart. While it rests, the residual heat will continue to cook the tortillas slightly, helping them absorb any remaining liquid and become perfectly tender. Garnish with fresh chopped cilantro and sliced jalapeños if desired. Serve generous squares with a side of Mexican rice, refried beans, or a crisp green salad for a complete meal that will have everyone coming back for more.
Tips and Tricks
For the absolute best flavor and texture, consider making your own enchilada sauce rather than using canned. It’s surprisingly simple: toast 2 tablespoons of flour with 2 tablespoons of oil until golden, then whisk in 2 cups of chicken broth, 2 tablespoons of chili powder, 1 teaspoon each of cumin and garlic powder, and 1/2 teaspoon of oregano. Simmer for 10 minutes until thickened. The depth of flavor is incredible and you can control the spice level perfectly. If you’re short on time, look for high-quality canned sauces without artificial preservatives—the ingredient list should be relatively short and recognizable.
When it comes to cheese, always shred your own from blocks rather than using pre-shredded bags. Pre-shredded cheese contains anti-caking agents like potato starch or cellulose that prevent it from melting as smoothly and can make your sauce slightly grainy. Block cheese melts into beautiful, stretchy pools of goodness that make every bite luxurious. If you want to experiment with cheeses, try adding some pepper jack for extra heat or cotija for a salty, crumbly contrast on top after baking. For the creamiest results, bring your dairy ingredients (sour cream and cream soup) to room temperature before mixing—this helps everything incorporate more smoothly and prevents curdling.
Don’t skip the step of lightly frying your tortillas before assembling! While you can use them straight from the package, giving them a quick 10-15 second fry in hot oil transforms their texture—they become more pliable for layering and absorb the sauces better without turning mushy. If you’re avoiding frying, you can brush them lightly with oil and warm them in the microwave for 30 seconds instead. For make-ahead convenience, you can assemble the entire casserole up to 24 hours in advance, cover tightly with plastic wrap, and refrigerate. When ready to bake, let it sit at room temperature for 30 minutes before putting it in the oven, and add 5-10 minutes to the baking time since it’s starting cold.
Leftovers reheat beautifully—cover with foil and warm in a 350°F oven for 15-20 minutes, or microwave individual portions for 2-3 minutes until heated through. The flavors actually improve overnight as the tortillas continue to absorb the sauces. You can also freeze baked or unbaked casserole for up to 3 months—wrap tightly in plastic and foil, then thaw in the refrigerator overnight before baking or reheating. If freezing unbaked, you may need to add 10-15 minutes to the baking time. For a crispy top on leftovers, remove the foil for the last 5 minutes of reheating.
Recipe Variations
- For a beef version, substitute 1 pound of ground beef browned with taco seasoning for the chicken. Drain excess fat thoroughly before mixing with the sauces. The heartier beef stands up well to the rich sauces and creates a more substantial meal perfect for hungry crowds. You could also use ground turkey or pork for different flavor profiles—just adjust seasonings accordingly.
- Create a vegetarian delight by replacing the chicken with 2 cups of black beans (drained and rinsed) and 1 cup of corn kernels. Add an extra can of green chilies and some diced bell peppers for more texture. The beans provide plenty of protein and make this suitable for meatless Mondays or vegetarian guests without sacrificing satisfaction.
- Try a green chili version using green enchilada sauce and adding 1/2 cup of roasted, chopped poblano peppers. Use pepper jack cheese instead of Monterey Jack for extra heat and garnish with Mexican crema instead of sour cream. This variation offers a brighter, tangier flavor profile that’s especially refreshing in summer months.
- For a breakfast twist, layer cooked breakfast sausage or chorizo with scrambled eggs and potatoes instead of chicken. Use a combination of cheddar and pepper jack cheeses, and serve with salsa and avocado for the ultimate brunch casserole. This version is perfect for holiday mornings or lazy weekends when you want something special without much effort.
- Make it low-carb by replacing tortillas with layers of sliced zucchini or eggplant. Salt the vegetable slices and let them drain for 30 minutes to remove excess moisture before layering. Increase baking time by 10-15 minutes to ensure the vegetables become tender. You’ll get all the flavors with significantly fewer carbs, making it suitable for various dietary preferences.
Frequently Asked Questions
Can I use flour tortillas instead of corn?
Absolutely! Flour tortillas will work beautifully, though they create a slightly different texture experience. Corn tortillas tend to hold their structure better and provide that authentic enchilada flavor, while flour tortillas become softer and more pasta-like when baked. If using flour tortillas, you might want to reduce the sauce slightly as they absorb more liquid. Also consider cutting them into smaller pieces since they’re larger than corn tortillas. Either way, you’ll end up with a delicious casserole—it just comes down to personal preference for texture and tradition.
How can I make this spicier for heat lovers?
There are several easy ways to turn up the heat in this casserole! Start by using hot enchilada sauce instead of mild—many brands offer varying heat levels. Add 1-2 diced jalapeños (seeds included for maximum heat) to the onion when sautéing. Increase the chili powder to 1 teaspoon and add 1/2 teaspoon of cayenne pepper to the sauce mixture. For serving, offer sliced fresh jalapeños, hot sauce, or even pickled habaneros on the side so everyone can customize their spice level. Remember you can always add heat but can’t take it away, so adjust gradually.
Can I prepare this casserole ahead of time?
This is an excellent make-ahead dish! You can assemble the entire casserole up to 24 hours in advance—just cover tightly with plastic wrap and refrigerate. When ready to bake, let it sit at room temperature for about 30 minutes before putting it in the oven, and add 5-10 minutes to the baking time since it’s starting cold. You can also freeze it unbaked for up to 3 months—wrap in both plastic and foil to prevent freezer burn. Thaw in the refrigerator overnight before baking as directed, adding extra time as needed. The flavors actually improve with a little rest time!
What’s the best way to store and reheat leftovers?
Leftovers will keep beautifully in the refrigerator for 3-4 days in an airtight container. For reheating, the oven method yields the best results: place portions in an oven-safe dish, cover with foil, and heat at 350°F for 15-20 minutes until warmed through. For a crispy top, remove the foil for the last 5 minutes. Microwave reheating works too—cover with a damp paper towel and heat in 1-minute intervals, stirring between, until hot throughout. The casserole also freezes well for up to 3 months—thaw overnight in the refrigerator before reheating.
Can I make this recipe dairy-free?
Yes, with a few smart substitutions! Replace the cream of chicken soup with dairy-free cream of mushroom or celery soup. Use vegan sour cream and shreddable vegan cheese alternatives—look for brands that melt well. For the enchilada sauce, check labels as some contain dairy, or make your own using vegetable broth. The result will be slightly different in texture and flavor but still delicious. You could also embrace the dairy-free nature by adding extra layers of flavor with roasted vegetables, olives, or avocado garnish after baking.
Summary
This chicken enchilada casserole delivers all the beloved flavors of traditional enchiladas with minimal effort. Layers of tortillas, creamy chicken filling, and melted cheese bake into comforting perfection that feeds a crowd and reheats beautifully.
Chicken Enchilada Casserole
5
servings20
minutes30
minutesIngredients
Instructions
- 1 Preheat oven to 375°F and grease a 9x13 inch baking dish
- 2 Sauté onion in olive oil until translucent, about 4-5 minutes
- 3 In large bowl, combine soups, sauces, spices, and cooked onion
- 4 Fold in shredded chicken until fully coated
- 5 Layer sauce, tortillas, chicken mixture, and cheese three times
- 6 Bake uncovered for 25-30 minutes until bubbly and golden
- 7 Rest 10-15 minutes before serving garnished with cilantro


