Ready to elevate your weeknight dinner game with something spectacularly delicious? Really, who has time to individually stuff and roll chicken breasts these days when you can get all that incredible cordon bleu flavor in one glorious, bubbling casserole dish? This recipe takes the classic French-inspired dish and transforms it into the ultimate comfort food that’ll have your family begging for seconds.
Why This Recipe Works
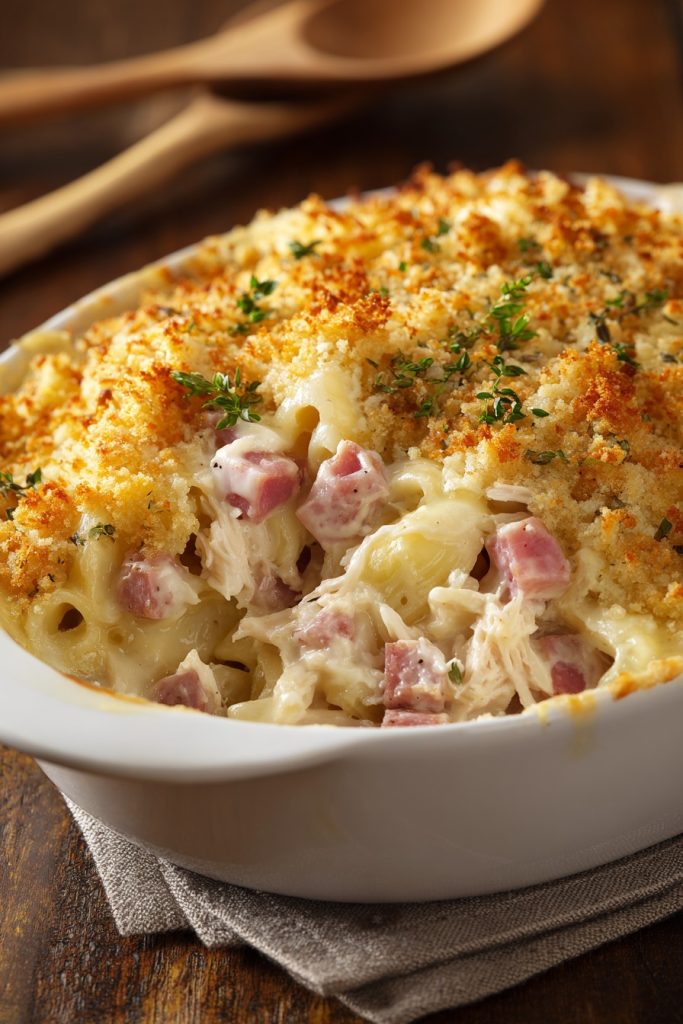
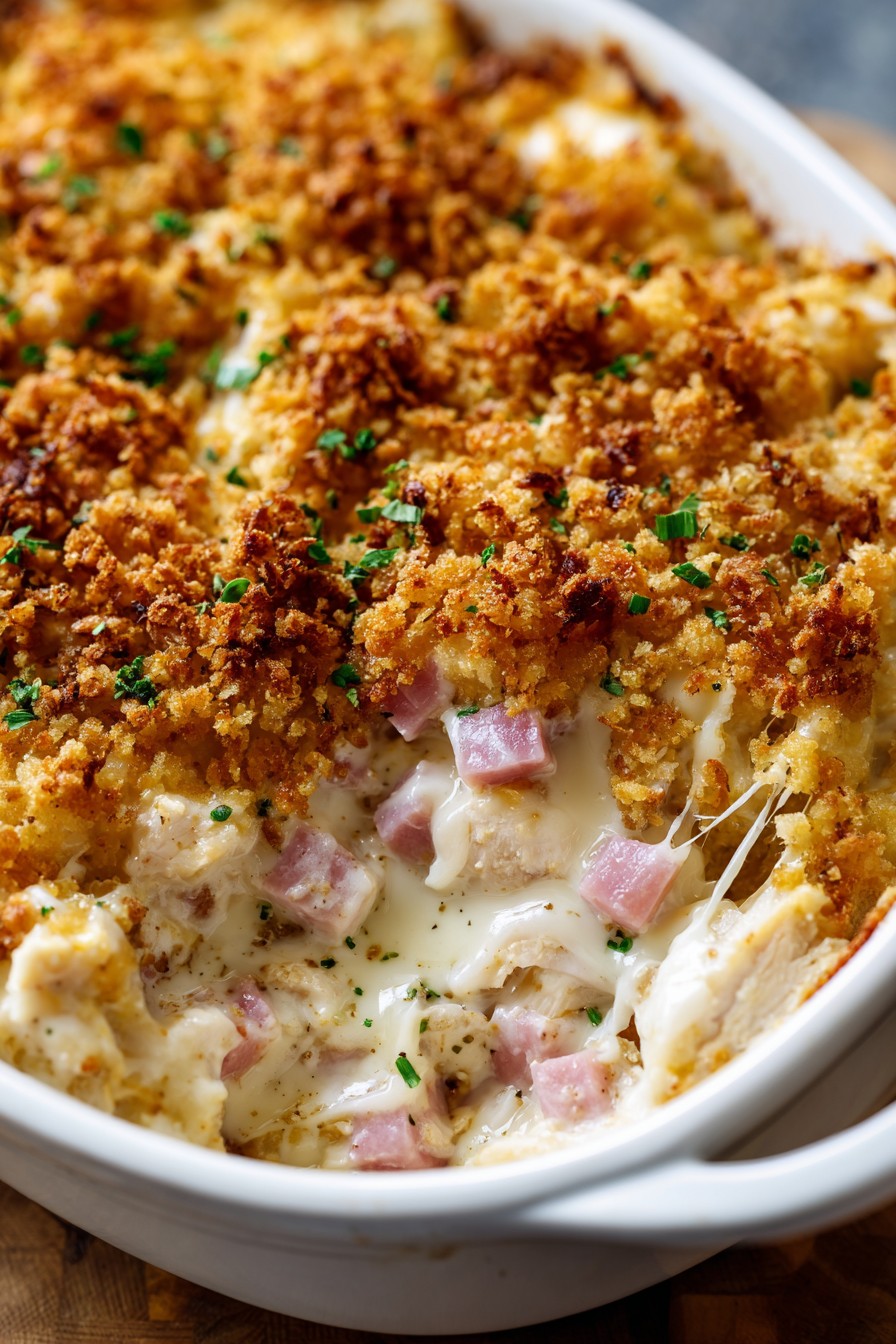
- Layers of tender chicken, savory ham, and melty Swiss cheese create that signature cordon bleu flavor without the fuss of rolling and stuffing individual breasts
- The creamy sauce base made with chicken broth, heavy cream, and Dijon mustard ensures every bite is moist and packed with flavor
- A crispy panko and Parmesan topping provides the perfect textural contrast to the creamy interior
- Using cooked chicken means you can repurpose leftovers or use rotisserie chicken for ultimate convenience
- The casserole format allows all the flavors to meld together beautifully while making serving and cleanup a breeze
Ingredients
- 4 cups cooked chicken breast, shredded or cubed (about 1.5 pounds raw)
- 8 ounces deli ham, diced into 1/2-inch pieces
- 2 cups Swiss cheese, shredded and divided
- 1/2 cup unsalted butter
- 1/2 cup all-purpose flour
- 2 cups chicken broth
- 1 cup heavy cream
- 2 tablespoons Dijon mustard
- 1 teaspoon garlic powder
- 1/2 teaspoon smoked paprika
- 1/2 teaspoon black pepper
- 1/4 teaspoon nutmeg
- 1 cup panko breadcrumbs
- 1/2 cup grated Parmesan cheese
- 2 tablespoons fresh parsley, chopped
- 2 tablespoons melted butter for topping
Equipment Needed
- 9×13 inch baking dish
- Large skillet or saucepan
- Mixing bowls
- Whisk
- Measuring cups and spoons
- Cutting board and knife
- Aluminum foil
Instructions
Prepare Your Baking Dish and Preheat Oven
First things first, let’s get organized! Grab your 9×13 inch baking dish and give it a light coating of non-stick spray or butter—trust me, you’ll thank yourself later when cleanup is a breeze. Now, preheat that oven to 375°F because we want it nice and hot when our casserole is ready to bake. While that’s heating up, take your cooked chicken and either shred it with two forks or chop it into bite-sized pieces if you haven’t already. Dice your ham into lovely little cubes about half an inch big, and shred that Swiss cheese if you didn’t buy it pre-shredded. Having everything prepped and ready to go makes the assembly process smooth sailing, and we all know hungry families don’t like to wait!
Create the Creamy Sauce Base
Now for the magic part—the sauce that brings everything together! Melt your half cup of butter in a large skillet over medium heat. Once it’s bubbling nicely, whisk in the half cup of flour and keep whisking for about 2 minutes until you’ve got a smooth, pale golden paste. This is your roux, and it’s what will thicken our sauce beautifully. Slowly pour in the chicken broth while whisking constantly to avoid lumps—I mean really go for it, whisk like you’re trying to win a cooking competition! Then add the heavy cream, Dijon mustard, garlic powder, smoked paprika, black pepper, and that sneaky bit of nutmeg that adds such depth. Bring the mixture to a gentle simmer, whisking occasionally, and let it cook for 3-4 minutes until it thickens enough to coat the back of a spoon. You’ll know it’s ready when you drag your finger through the sauce on the spoon and it leaves a clean path.
Layer the Casserole Components
Time to build our flavor tower! Spread half of your cooked chicken evenly across the bottom of your prepared baking dish. Follow this with all of your diced ham, scattering it evenly over the chicken layer. Now sprinkle one cup of the shredded Swiss cheese over the ham—this creates that classic cordon bleu cheesy layer. Pour about two-thirds of your beautiful creamy sauce over everything, making sure it seeps into all the nooks and crannies. Top with the remaining chicken, then pour the rest of the sauce over everything, using a spatula to spread it evenly if needed. The key here is making sure every component gets some saucy love, so take your time and distribute everything evenly for consistent flavor in every bite.
Prepare and Add the Crispy Topping
What’s a casserole without that irresistible crunchy top? In a medium bowl, combine your panko breadcrumbs, grated Parmesan cheese, and chopped fresh parsley. Drizzle the two tablespoons of melted butter over the mixture and toss everything together until the breadcrumbs are evenly moistened and the ingredients are well combined. Now sprinkle this glorious mixture evenly over the entire surface of your casserole—don’t be shy, cover every inch! The panko will give you that fantastic crunch while the Parmesan adds savory depth. For extra golden perfection, you can spray the top lightly with cooking spray, which helps the topping brown evenly and become extra crispy during baking.
Bake to Golden Perfection
Cover your casserole dish tightly with aluminum foil and pop it into your preheated 375°F oven. Bake covered for 25 minutes—this allows everything to heat through properly and the flavors to meld together beautifully. After 25 minutes, remove the foil and continue baking uncovered for another 15-20 minutes. Keep an eye on it during these final minutes! You’re looking for the sauce to be bubbling vigorously around the edges and the topping to turn a beautiful golden brown color. If your topping isn’t as brown as you’d like after 20 minutes, you can switch to broil for the last 1-2 minutes, but watch it like a hawk because panko can burn quickly under the broiler! The casserole is done when the internal temperature reaches 165°F on an instant-read thermometer.
Rest and Serve Your Masterpiece
I know it’s tempting to dive right in, but patience, my friend! Remove the casserole from the oven and let it rest for 10-15 minutes before serving. This resting time allows the sauce to thicken up slightly and makes serving much cleaner—nobody wants soupy casserole on their plate! The carryover cooking will also ensure everything is perfectly heated through. While it rests, the flavors continue to develop and marry together, making each bite even more delicious. Serve generous portions with your favorite sides—maybe some roasted vegetables, a crisp green salad, or buttery egg noodles. This is comfort food at its finest, and that resting time is what separates good casseroles from great ones!
Tips and Tricks
If you really want to take this casserole to the next level, consider using a combination of cheeses beyond just Swiss. Gruyère is an excellent choice that melts beautifully and adds a slightly nutty flavor that complements the ham perfectly. You could also add a small amount of sharp white cheddar for extra tang, or even some fontina for its incredible melting properties. When it comes to the chicken, using a combination of white and dark meat can add more depth of flavor and moisture—consider using some thigh meat along with breast meat. For the ham, if you have access to a good quality Black Forest or honey-baked ham, the flavor difference is noticeable and wonderful. If you’re making this ahead of time, you can assemble the entire casserole up to the point of adding the topping, cover it tightly, and refrigerate for up to 24 hours. When ready to bake, let it sit at room temperature for 30 minutes before adding the topping and baking as directed—you may need to add 5-10 minutes to the baking time since it’s starting cold. The panko topping can be made ahead too, but store it separately in an airtight container and add it just before baking to maintain its crunch. If you find your sauce is too thick after refrigeration, you can thin it with a tablespoon or two of additional broth or cream before assembling. For freezing, assemble without the topping, wrap tightly in multiple layers of plastic wrap and foil, and freeze for up to 3 months. Thaw in the refrigerator overnight before adding topping and baking as directed. If you’re watching your sodium intake, use low-sodium chicken broth and ham, and reduce or eliminate the added salt. For a richer sauce, you can substitute half the heavy cream with full-fat sour cream added at the very end off the heat. If you’re serving picky eaters, you can layer the components separately—keep the ham on one side or serve it on the side for those who might not appreciate the classic combination. Finally, don’t overlook the power of fresh herbs—adding some fresh thyme or chives to the sauce or topping can brighten up the entire dish beautifully.
Recipe Variations
- Italian Twist: Swap the ham for diced prosciutto or salami, use mozzarella and Parmesan instead of Swiss, add a teaspoon of Italian seasoning to the sauce, and use garlic breadcrumbs for the topping. You could even add a layer of cooked spinach or sun-dried tomatoes for extra flavor and color.
- Breakfast Version: Use cooked breakfast sausage instead of ham, add a layer of frozen hash browns (thawed and squeezed dry), use cheddar cheese instead of Swiss, and consider adding some sautéed onions and peppers. Serve it for brunch with a fried egg on top!
- Vegetarian Option: Replace the chicken with meaty mushrooms like portobello or cremini (sautéed first), use vegetarian ham substitute or omit it entirely, and add layers of steamed broccoli or asparagus. You might need to adjust baking time slightly if using more vegetables.
- Spicy Southwest: Use pepper jack cheese instead of Swiss, add a can of diced green chiles to the sauce, incorporate some cumin and chili powder, and use crushed tortilla chips mixed with cotija cheese for the topping. Serve with avocado and sour cream on the side.
- Lightened-Up Version: Use Greek yogurt instead of heavy cream, reduce the butter by half and use olive oil for the roux, choose reduced-fat cheese, and increase the chicken-to-sauce ratio. You can also use whole wheat panko for the topping for extra fiber.
Frequently Asked Questions
Can I use raw chicken instead of cooked?
While you technically can use raw chicken, I don’t recommend it for food safety and texture reasons. Raw chicken would release a lot of liquid during cooking, potentially making your sauce watery, and it’s challenging to ensure it cooks through evenly in a casserole format. If you must use raw chicken, cut it into very small pieces (1/2-inch cubes) and increase the initial covered baking time to 35-40 minutes, then check that the internal temperature reaches 165°F before proceeding with the uncovered baking. However, using pre-cooked chicken gives you more control over the final texture and ensures food safety.
How long will leftovers keep in the refrigerator?
Properly stored in an airtight container, your chicken cordon bleu casserole will keep beautifully in the refrigerator for 3-4 days. The flavors actually improve after a day or two as everything continues to meld together! When reheating, I recommend using the oven at 350°F for about 15-20 minutes until heated through, or you can use the microwave in 60-second intervals, stirring between each, though the topping won’t stay as crispy. If the sauce seems too thick upon reheating, you can add a tablespoon of broth or cream to loosen it up. For best results, reheat individual portions rather than the whole casserole if possible.
Can I make this recipe gluten-free?
Absolutely! This recipe adapts wonderfully to gluten-free needs. For the roux, use an equal amount of gluten-free flour blend (one that contains xanthan gum works best for thickening). Make sure your chicken broth is certified gluten-free, as some brands may contain hidden gluten. For the topping, use gluten-free panko-style breadcrumbs, which are available at most well-stocked grocery stores, or make your own by processing gluten-free bread into crumbs and toasting them lightly. Double-check that your ham and cheese are gluten-free, as some processed meats and shredded cheeses may contain gluten-based anti-caking agents. The cooking times and method remain exactly the same.
What’s the best way to shred cooked chicken?
There are several great methods for shredding chicken! For large quantities, I love using my stand mixer with the paddle attachment—just add warm cooked chicken and mix on low for 30-60 seconds until perfectly shredded. You can also use two forks to pull the meat apart, which works well but takes more time. Another method is to place chicken in a large bowl and use a hand mixer on low speed—just pulse it briefly to avoid turning it into mush. If the chicken is warm, it shreds much more easily than cold chicken. You can also place chicken between two pieces of plastic wrap and gently pound with a mallet or rolling pin to break it apart.
Can I freeze this casserole before baking?
Yes, this casserole freezes beautifully for make-ahead meals! Assemble the casserole completely through the saucing step (through step 3), but do not add the panko topping. Wrap the dish tightly in multiple layers of plastic wrap, then foil, and label with the date and contents. Freeze for up to 3 months. When ready to bake, thaw in the refrigerator overnight, then let it sit at room temperature for 30 minutes before adding the topping and baking as directed. You may need to add 10-15 minutes to the baking time since it’s starting cold. The topping should always be added fresh before baking to maintain its crisp texture.
Summary
This chicken cordon bleu casserole delivers all the classic flavors you love without the fuss of individual preparation. Creamy, cheesy, and topped with a satisfying crunch, it’s comfort food perfection that feeds a crowd with minimal effort. Perfect for busy weeknights or special occasions alike!
Chicken Cordon Bleu Casserole
6
servings20
minutes45
minutesIngredients
Instructions
- 1 Preheat oven to 375°F and grease a 9x13 inch baking dish
- 2 Melt butter in skillet, whisk in flour to make roux, then gradually add broth, cream, and seasonings to create sauce
- 3 Layer chicken, ham, 1 cup Swiss cheese, and sauce in baking dish
- 4 Combine panko, Parmesan, parsley, and melted butter for topping
- 5 Sprinkle topping over casserole and bake covered 25 minutes, then uncovered 15-20 minutes until golden and bubbling
- 6 Let rest 10-15 minutes before serving


