Just when you thought comfort food couldn’t get any better, this chicken casserole swoops in to save your dinner plans! Jump into this creamy, cheesy, and utterly delicious dish that will have your family begging for seconds. Juggling busy schedules has never been easier with this one-pan wonder.
Why This Recipe Works
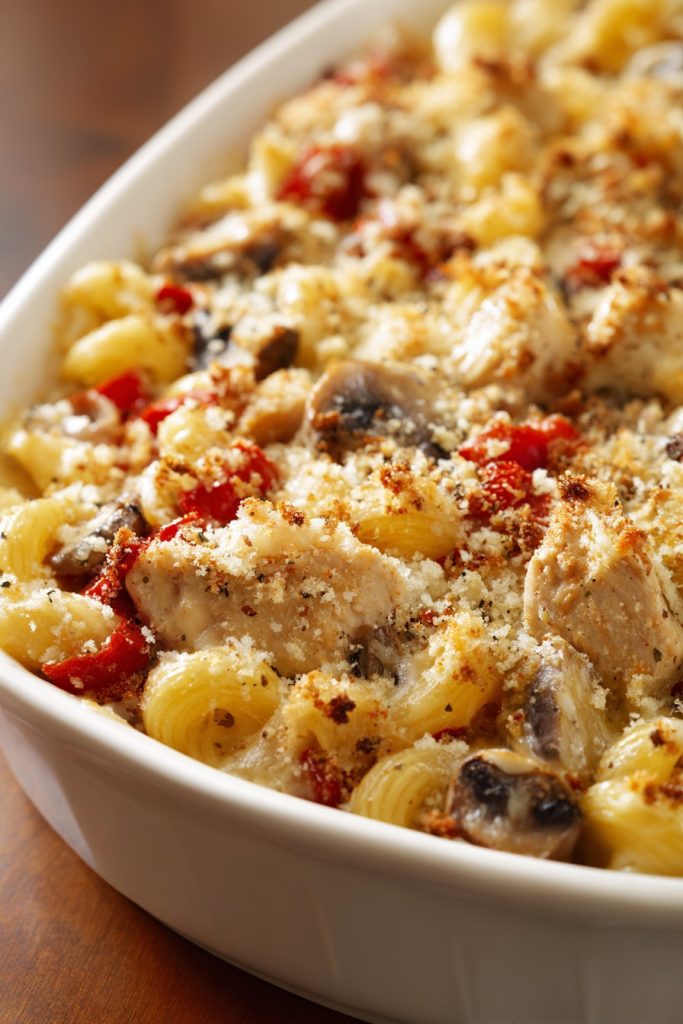
- The combination of tender chicken, creamy sauce, and perfectly cooked pasta creates a harmonious texture that melts in your mouth with every bite
- Using a blend of three cheeses (cheddar, mozzarella, and parmesan) provides layers of flavor that develop beautifully during baking
- The addition of fresh herbs and aromatic vegetables elevates the dish from ordinary to extraordinary without complicated techniques
- Perfect make-ahead option that actually tastes better the next day as the flavors have more time to meld together
- Crispy, golden-brown topping provides the ideal textural contrast to the creamy interior beneath
Ingredients
- 2 pounds boneless, skinless chicken breasts, cut into 1-inch cubes
- 1 tablespoon olive oil
- 1 large yellow onion, finely diced
- 3 cloves garlic, minced
- 8 ounces cremini mushrooms, sliced
- 1 red bell pepper, diced
- 2 cups chicken broth
- 1 cup heavy cream
- 1 cup whole milk
- 2 cups elbow macaroni, uncooked
- 2 cups shredded sharp cheddar cheese
- 1 cup shredded mozzarella cheese
- 1/2 cup grated parmesan cheese
- 1/4 cup all-purpose flour
- 2 tablespoons butter
- 1 teaspoon dried thyme
- 1 teaspoon paprika
- 1/2 teaspoon cayenne pepper (optional)
- Salt and black pepper to taste
- 1/4 cup fresh parsley, chopped
- 1 cup panko breadcrumbs
- 2 tablespoons melted butter for topping
Equipment Needed
- Large oven-safe skillet or Dutch oven (at least 12 inches)
- Cutting board and sharp knife
- Measuring cups and spoons
- Mixing bowls
- Wooden spoon or spatula
- Whisk
- Box grater (if grating cheese yourself)
- Oven mitts
Instructions

Prepare and Brown the Chicken
Begin by patting your chicken cubes completely dry with paper towels – this is crucial for achieving that beautiful golden sear rather than steaming the meat. Season the chicken generously with salt, pepper, and half of the paprika. Heat the olive oil in your large oven-safe skillet over medium-high heat until it shimmers, about 2-3 minutes. Add the chicken in a single layer, making sure not to overcrowd the pan (you might need to work in batches). Cook for 4-5 minutes per side until deeply golden brown and the internal temperature reaches 165°F when checked with an instant-read thermometer. The chicken doesn’t need to be fully cooked through at this stage since it will continue cooking in the casserole. Remove the chicken from the skillet and set aside on a clean plate. Tip: Don’t move the chicken around too much while searing – let it develop that beautiful crust!
Sauté the Vegetables
Reduce the heat to medium and add the butter to the same skillet, scraping up any browned bits from the chicken – that’s pure flavor gold! Add the diced onion and cook for 3-4 minutes until translucent and fragrant. Toss in the minced garlic and cook for another 30 seconds until aromatic but not browned. Add the sliced mushrooms and diced bell pepper, seasoning with a pinch of salt to help them release their moisture. Cook for 6-8 minutes, stirring occasionally, until the vegetables have softened and the mushrooms have released their liquid and started to brown slightly. The vegetables should be tender but still have a bit of texture since they’ll continue cooking in the oven. The aroma at this point should be absolutely heavenly with all those savory notes mingling together in the pan.
Create the Creamy Sauce
Sprinkle the flour over the vegetable mixture and stir constantly for about 1 minute to cook out the raw flour taste – you’ll notice the mixture thickening slightly. Slowly pour in the chicken broth while whisking constantly to prevent lumps from forming. Once the broth is incorporated, add the heavy cream and whole milk, continuing to whisk until smooth. Bring the mixture to a gentle simmer and cook for 3-4 minutes until it thickens enough to coat the back of a spoon. Stir in the dried thyme, remaining paprika, and cayenne pepper if using. The sauce should be velvety smooth and have a rich, creamy consistency – if it seems too thick, you can add a splash more broth or milk. Season generously with salt and pepper, remembering that the cheese will add saltiness later.
Combine and Add Pasta
Stir the uncooked elbow macaroni directly into the creamy sauce mixture – yes, you read that right, no pre-cooking required! The pasta will absorb liquid as it bakes, creating the perfect texture. Return the browned chicken to the skillet along with any accumulated juices. Give everything a good stir to ensure the pasta is fully submerged in the liquid. Bring the mixture to a simmer over medium heat, then immediately remove from the heat. The pasta will look quite soupy at this stage, but trust the process – it will absorb the liquid beautifully during baking. Stir in half of the cheddar cheese and all of the mozzarella until melted and incorporated. Tip: The residual heat from the sauce will melt the cheese perfectly without needing additional cooking.
Top and Bake to Perfection
In a small bowl, combine the panko breadcrumbs, grated parmesan cheese, and the 2 tablespoons of melted butter until the mixture resembles wet sand. Sprinkle this crispy topping evenly over the entire casserole surface. Transfer the skillet to a preheated 375°F oven and bake for 25-30 minutes. You’re looking for the edges to be bubbly, the top to be golden brown, and the pasta to be tender when tested with a fork. If the top is browning too quickly, you can tent it loosely with aluminum foil. The internal temperature should reach at least 165°F when checked with a thermometer. Remove from the oven and let it rest for 10-15 minutes – this allows the sauce to thicken further and makes serving much easier. Garnish with fresh parsley before serving. Tip: The resting time is non-negotiable for the perfect slice!
Tips and Tricks
For the absolute best flavor development, consider browning the chicken in batches rather than crowding the pan – this ensures each piece gets proper caramelization instead of steaming. If you’re short on time, you can use rotisserie chicken instead of raw chicken; simply shred about 4 cups of cooked chicken and add it during the combining stage rather than browning first. When measuring flour for the sauce, use the spoon-and-level method: spoon the flour into your measuring cup and level it off with a knife rather than scooping directly from the bag to avoid packing too much flour. For an extra flavor boost, try using homemade chicken stock instead of store-bought broth – the depth of flavor will be noticeably superior. If you prefer a thicker sauce, you can increase the flour by one tablespoon, but be careful not to make it too pasty. For those who love extra crispy topping, consider adding 1/4 cup of crushed potato chips or fried onions to the breadcrumb mixture. When testing for doneness, remember that pasta continues to cook slightly after removal from the oven, so it’s better to have it slightly al dente than mushy. If making ahead, prepare the casserole through the combining stage, cover tightly, and refrigerate for up to 24 hours – add an extra 5-10 minutes to the baking time if starting from cold. For freezing, assemble completely but leave off the topping, freeze solid, then wrap tightly – add the topping before baking from frozen and increase baking time by 20-25 minutes. Always let your casserole rest after baking – this allows the starches to set and makes serving much cleaner. If your casserole seems dry after baking, you can stir in a splash of warm milk or cream before serving. For extra nutrition, feel free to add spinach, peas, or broccoli florets during the last 10 minutes of baking. When reheating leftovers, add a tablespoon of water or milk to maintain creaminess, and cover with foil to prevent drying out.
Recipe Variations
- Mexican Fiesta Version: Swap the traditional spices for 2 tablespoons of taco seasoning, use pepper jack cheese instead of mozzarella, and add a can of drained black beans and corn. Top with crushed tortilla chips mixed with the breadcrumbs for extra crunch. Serve with fresh cilantro, diced avocado, and a dollop of sour cream for a south-of-the-border twist that will have everyone coming back for more.
- Mediterranean Twist: Use oregano instead of thyme, add 1/2 cup of chopped sun-dried tomatoes and 1/4 cup of sliced kalamata olives. Substitute feta cheese for half of the cheddar and add 1 cup of fresh spinach during the last 5 minutes of baking. The briny, tangy flavors will transport you straight to the Greek islands with every delicious bite.
- Buffalo Chicken Style: Toss the cooked chicken in 1/2 cup of buffalo sauce before adding to the casserole. Use blue cheese crumbles instead of mozzarella and add 1/2 cup of diced celery for that classic buffalo wing experience. Top with a mixture of breadcrumbs and crushed blue cheese tortilla chips for maximum flavor impact.
- Lightened-Up Version: Substitute whole wheat pasta, use 2% milk instead of cream, and reduce the cheese by 25%. Add an extra cup of vegetables like zucchini or carrots, and use Greek yogurt instead of some of the sour cream if desired. You’ll still get all the comfort food satisfaction with fewer calories but maximum flavor.
- Thanksgiving Leftovers Edition: Use turkey instead of chicken, add 1 cup of stuffing cubes and 1/2 cup of dried cranberries. Incorporate sage instead of thyme, and consider adding some mashed potatoes to the sauce for extra creaminess. It’s the perfect way to reinvent your holiday leftovers into something spectacular.
Frequently Asked Questions
Can I make this chicken casserole ahead of time?
Absolutely! This casserole is an excellent make-ahead dish. You can prepare it completely through the combining stage (before adding the topping) up to 24 hours in advance. Store it covered in the refrigerator, then add the breadcrumb topping right before baking. If baking from cold, you may need to add 5-10 minutes to the baking time. The flavors actually improve with time, making it perfect for potlucks or busy weeknights when you want dinner ready to go straight into the oven.
What’s the best way to store and reheat leftovers?
Store leftovers in an airtight container in the refrigerator for up to 4 days. For best results when reheating, place individual portions in an oven-safe dish, add a tablespoon of milk or broth to maintain moisture, cover with foil, and bake at 350°F for 15-20 minutes until heated through. You can also microwave single servings for 2-3 minutes, stirring halfway through, but the oven method will preserve the texture better. The casserole can also be frozen for up to 3 months – thaw overnight in the refrigerator before reheating.
Can I use different types of pasta in this recipe?
You can certainly experiment with different pasta shapes, but choose wisely! Smaller shapes like elbows, rotini, or penne work best because they cook evenly and hold the sauce well. Avoid long pasta like spaghetti or linguine, and be cautious with larger shapes like rigatoni that might require adjustments to liquid ratios. If using whole wheat pasta, you may need to add an extra 1/4 cup of liquid since it absorbs more moisture. Always check the package cooking time and adjust baking time accordingly if using a very different pasta type.
How can I tell when the casserole is done baking?
The casserole is ready when the edges are bubbly, the topping is golden brown, and the pasta is tender when tested with a fork. The internal temperature should reach at least 165°F when checked with an instant-read thermometer inserted into the center. If the top is browning too quickly but the center isn’t done, loosely tent with aluminum foil. Remember that the casserole will continue to cook slightly during the resting period, so it’s better to slightly undercook than overcook the pasta.
Can I make this recipe gluten-free?
Yes, you can easily adapt this recipe for gluten-free diets. Use your favorite gluten-free pasta (those made from brown rice or quinoa work well), and substitute the all-purpose flour with cornstarch or a gluten-free flour blend. For the breadcrumb topping, use gluten-free panko or crushed gluten-free crackers. Be sure to check that all your other ingredients (especially broths and pre-shredded cheeses) are certified gluten-free, as some contain hidden gluten. The baking time might need slight adjustment since gluten-free pasta can behave differently.
Summary
This ultimate chicken casserole combines tender chicken, creamy sauce, and perfect pasta under a crispy golden topping. With make-ahead convenience and endless variations, it’s comfort food perfection that will become a family favorite for years to come.
Chicken Casserole Recipe
8
servings20
minutes30
minutesIngredients
Instructions
- 1 Preheat oven to 375°F. Season chicken with salt, pepper, and half the paprika. Brown in olive oil over medium-high heat, 4-5 minutes per side. Remove and set aside.
- 2 In same skillet, melt butter and sauté onion until translucent. Add garlic, mushrooms, and bell pepper; cook 6-8 minutes until softened.
- 3 Sprinkle flour over vegetables and cook 1 minute. Whisk in chicken broth, then cream and milk. Simmer 3-4 minutes until thickened.
- 4 Stir in uncooked pasta, chicken, half the cheddar, and all mozzarella. Remove from heat.
- 5 Combine panko, parmesan, and melted butter. Sprinkle over casserole. Bake 25-30 minutes until golden and bubbly. Rest 10 minutes before serving.


