Let’s talk about the ultimate comfort food that’s secretly fancy enough for company! Last weekend I decided to reinvent the classic cannelloni by swapping out the traditional fillings for a chicken version that’ll have your taste buds doing a happy dance. This isn’t your nonna’s cannelloni – it’s better, faster, and packed with so much flavor you’ll want to make it every Sunday.
Why This Recipe Works
- The combination of ricotta and Parmesan creates a creamy, cheesy filling that melts beautifully in the oven without becoming greasy or separating
- Using pre-cooked rotisserie chicken saves significant time while adding incredible depth of flavor that raw chicken breasts simply can’t match
- The tomato sauce gets simmered for just the right amount of time to develop rich, concentrated flavor without becoming too thick or losing its bright acidity
- Partially boiling the pasta tubes before filling ensures they cook through evenly in the oven while maintaining perfect al dente texture
- The three-cheese topping combination creates a gorgeous golden-brown crust that provides textural contrast to the creamy interior
Ingredients
- 12 cannelloni pasta tubes (about 8 ounces)
- 2 cups shredded cooked chicken (from rotisserie chicken)
- 15 ounces whole milk ricotta cheese
- 1 cup grated Parmesan cheese, divided
- 1 large egg, lightly beaten
- 2 tablespoons fresh parsley, finely chopped
- 1 teaspoon dried oregano
- 1/2 teaspoon garlic powder
- 1/4 teaspoon nutmeg, freshly grated
- 1/4 teaspoon black pepper
- 1/2 teaspoon salt
- 24 ounces marinara sauce (about 3 cups)
- 1 cup shredded mozzarella cheese
- 1/4 cup heavy cream (for sauce enrichment)
- 2 tablespoons olive oil (for baking dish)
- Fresh basil leaves for garnish
Equipment Needed
- 9×13 inch baking dish
- Large pot for boiling pasta
- Mixing bowls (medium and large)
- Box grater or microplane
- Piping bag or zip-top bag with corner cut off
- Wooden spoon or spatula
- Measuring cups and spoons
- Chef’s knife and cutting board
- Oven mitts
Instructions
Prepare the Pasta Tubes
Bring a large pot of generously salted water to a rolling boil over high heat – you want it to taste like the sea! Carefully add the cannelloni tubes and cook for exactly 6 minutes, stirring occasionally to prevent sticking. The pasta should be pliable but still quite firm since it will continue cooking in the oven. Drain the tubes immediately and arrange them in a single layer on a baking sheet to prevent them from sticking together. Let them cool completely before handling – this usually takes about 15 minutes at room temperature. Pro tip: Lightly oiling the baking sheet helps prevent any sticking if you need to move them around later.
Create the Chicken Filling
In a large mixing bowl, combine the shredded chicken, ricotta cheese, 3/4 cup of the Parmesan cheese, beaten egg, chopped parsley, oregano, garlic powder, nutmeg, black pepper, and salt. Mix thoroughly until all ingredients are evenly distributed – I like to use my hands for this to really incorporate everything properly. The mixture should hold together when pressed but still be light and fluffy. Taste and adjust seasoning if needed – remember the cheeses are salty so be cautious with additional salt. Let the filling rest for 10 minutes to allow the flavors to meld together while you prepare the sauce and baking dish.
Assemble the Cannelloni
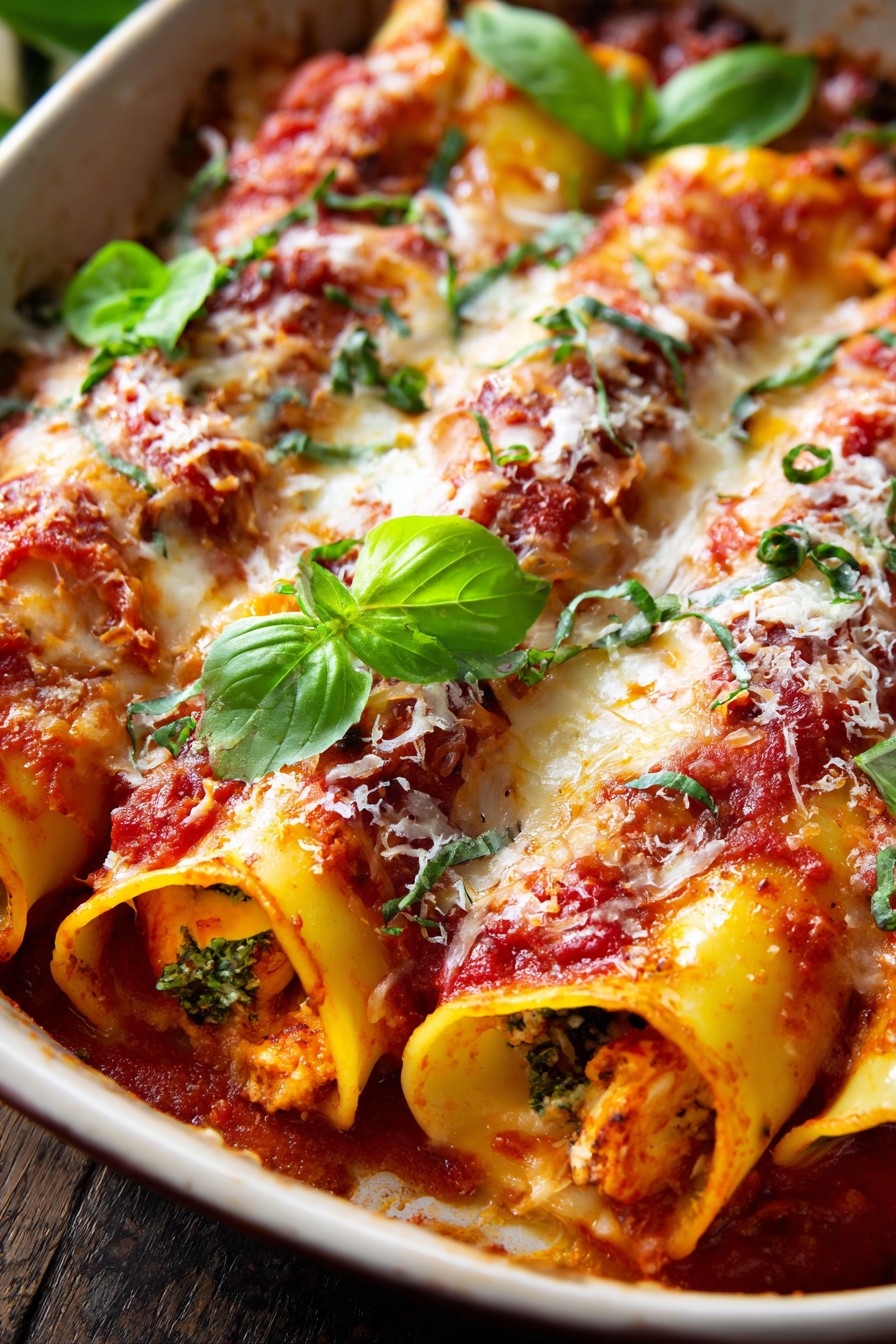
Preheat your oven to 375°F and lightly grease your 9×13 inch baking dish with olive oil. Spread about 1 cup of marinara sauce evenly across the bottom of the dish. Transfer your chicken filling to a piping bag or a large zip-top bag with one corner cut off to create about a 1-inch opening. Gently pipe the filling into each cooled cannelloni tube, working from both ends if needed to ensure they’re evenly filled without air pockets. Arrange the filled tubes in a single layer in the prepared baking dish, leaving a little space between each one for even cooking.
Prepare the Sauce Topping
In a medium bowl, combine the remaining marinara sauce with the heavy cream, stirring until smooth and well incorporated. The cream will lighten the color of the sauce and add richness without making it too heavy. Carefully pour this sauce mixture over the arranged cannelloni tubes, making sure to cover them completely but not submerging them. Sprinkle the shredded mozzarella cheese evenly over the top, followed by the remaining 1/4 cup of Parmesan cheese. Cover the baking dish tightly with aluminum foil, making sure it doesn’t touch the cheese topping.
Bake to Perfection
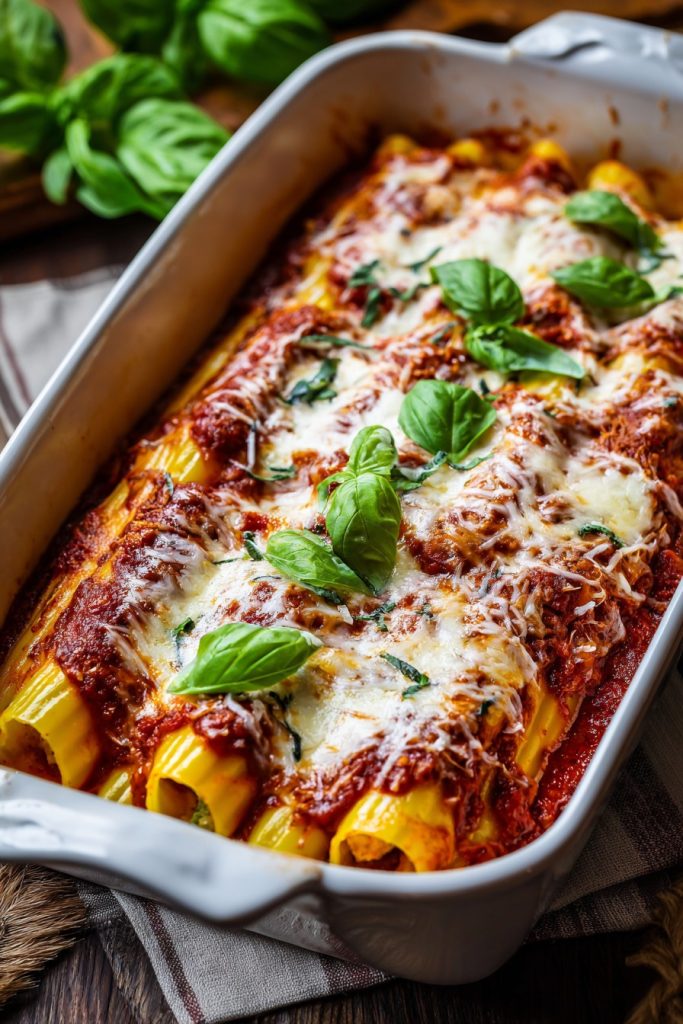
Place the covered baking dish in the preheated oven and bake for 25 minutes. Remove the foil and continue baking for another 15-20 minutes, or until the cheese is golden brown and bubbly and the sauce is bubbling around the edges. To check for doneness, insert a knife into one of the cannelloni – it should slide in easily and feel hot to the touch. Let the cannelloni rest for 10 minutes before serving to allow the filling to set slightly – this makes them much easier to serve neatly. Garnish with fresh basil leaves just before serving for a pop of color and fresh flavor.
Tips and Tricks
If you’re making this for a special occasion or want to get ahead, you can assemble the entire dish up to 24 hours in advance and refrigerate it covered. When ready to bake, add an extra 10-15 minutes to the covered baking time since it will be starting from cold. For freezing, assemble without baking and freeze for up to 3 months – bake directly from frozen, adding about 30 minutes to the covered baking time. When choosing ricotta, opt for whole milk varieties as they have better texture and flavor – low-fat ricotta can make the filling watery. If your filling seems too wet, you can add 1-2 tablespoons of breadcrumbs to help absorb excess moisture. For easier filling, use a small spoon or your fingers to stuff the tubes if you don’t have a piping bag – it’s messier but works just fine. To prevent the pasta from cracking when filling, make sure they’re completely cooled and handle them gently. If you do end up with cracked tubes, don’t worry – they’ll still taste amazing and the sauce will cover any imperfections. For a smoother filling, you can pulse the chicken in a food processor briefly instead of shredding it, but be careful not to turn it into paste. If you’re using homemade marinara, make sure it’s not too thick or the dish can become dry – you want it to be saucy enough to create steam for cooking the pasta. For extra flavor, you can sauté some garlic and onions and add them to the filling mixture, but make sure they’re completely cooled before mixing with the other ingredients. When baking, place the dish on a baking sheet to catch any potential bubble-overs and make handling easier. Letting the dish rest after baking is crucial – it allows the cheeses to set slightly so you get clean slices rather than a cheesy mess. If you want a deeper golden crust, you can broil for the last 2-3 minutes, but watch carefully as it can burn quickly. For serving, use a thin spatula to lift the cannelloni out of the dish to keep them intact. Leftovers reheat beautifully in the oven at 350°F for about 20 minutes or in the microwave for 2-3 minutes, though the microwave will make the pasta softer.
Recipe Variations
- For a vegetarian version, replace the chicken with sautéed mushrooms and spinach – cook 16 ounces of sliced mushrooms until golden brown, wilt in 8 ounces of fresh spinach, squeeze out excess moisture, and use in place of chicken. The earthy mushrooms pair beautifully with the creamy cheese filling.
- Create a Mexican-inspired version by adding 1 tablespoon of taco seasoning to the filling, using pepper jack cheese instead of mozzarella, and topping with enchilada sauce instead of marinara. Serve with avocado slices and a dollop of sour cream for a fun fusion twist.
- For a seafood variation, substitute the chicken with 2 cups of cooked shrimp or crab meat, add 1 teaspoon of Old Bay seasoning, and use a white wine cream sauce instead of tomato sauce. The delicate seafood flavors work wonderfully with the rich cheese filling.
- Make a breakfast cannelloni by filling with scrambled eggs, breakfast sausage, and cheddar cheese, then topping with hollandaise sauce instead of marinara. It’s an impressive brunch dish that will have everyone asking for the recipe.
- For a gluten-free option, use gluten-free cannelloni tubes and ensure all other ingredients are gluten-free certified. The cooking time may need adjustment as gluten-free pasta can behave differently when baked.
Frequently Asked Questions
Can I use no-boil lasagna sheets instead of cannelloni tubes?
Absolutely! If you can’t find cannelloni tubes or prefer using lasagna sheets, you can absolutely make roll-ups instead. Cook the lasagna sheets according to package directions until pliable but still firm, lay them flat, spread the filling evenly, roll them up, and arrange seam-side down in the baking dish. The cooking time remains the same, and you might even prefer this method as it’s often easier to find lasagna sheets than cannelloni tubes in regular grocery stores.
How do I prevent the filling from leaking out during baking?
Can I make this recipe dairy-free?
You can certainly try a dairy-free version, though the character will change significantly. Use dairy-free ricotta alternatives (often made from almonds or tofu), nutritional yeast instead of Parmesan, and vegan mozzarella shreds. For the cream in the sauce, use full-fat coconut milk or cashew cream. Keep in mind that dairy-free cheeses melt differently, so you may need to adjust baking times and temperatures slightly.
How long do leftovers keep in the refrigerator?
Leftovers will keep beautifully in an airtight container in the refrigerator for 3-4 days. The flavors actually improve overnight as they have time to meld together. When reheating, I recommend using the oven at 350°F for about 20 minutes to maintain the best texture, though the microwave works in a pinch if you’re short on time.
Can I freeze the assembled but unbaked cannelloni?
Yes, this recipe freezes exceptionally well! Assemble completely in a freezer-safe baking dish, cover tightly with both plastic wrap and aluminum foil, and freeze for up to 3 months. When ready to bake, you can put it directly in the oven from frozen – just add about 30 minutes to the covered baking time and check for doneness before removing the foil.
Summary
This chicken cannelloni recipe delivers restaurant-quality results with homemade comfort. Creamy cheese filling, tender pasta, and rich tomato sauce create the ultimate baked pasta dish perfect for family dinners or entertaining guests.
Chicken Cannelloni Recipe
5
servings30
minutes45
minutesIngredients
Instructions
- 1 Boil pasta tubes for 6 minutes, drain and cool completely
- 2 Mix chicken, ricotta, 3/4 cup Parmesan, egg, and seasonings
- 3 Pipe filling into cooled tubes and arrange in greased dish
- 4 Combine remaining sauce with cream, pour over tubes
- 5 Sprinkle with cheeses, bake covered 25 min, uncovered 15-20 min
- 6 Rest 10 minutes before serving, garnish with basil


