Hungry after a day of adventure? We’ve gathered 32 mouthwatering camp dinner recipes that are easy to whip up over a campfire or portable stove. From hearty one-pot wonders to quick skillet meals, these dishes are perfect for fueling your outdoor fun. Get ready to savor delicious, fuss-free dinners that’ll make your camping trip even more memorable—let’s dive into the tasty lineup!
Grilled Sausage and Veggie Foil Packets
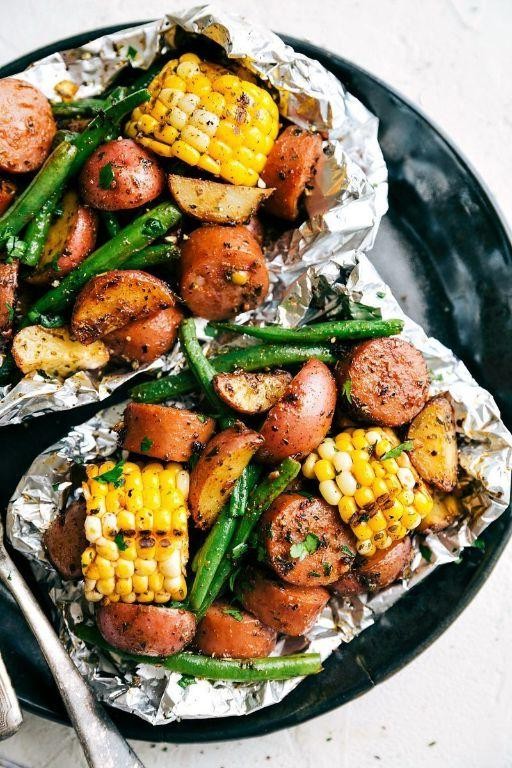
Now, as the afternoon light fades into a gentle amber, I find myself drawn to the simple ritual of preparing a meal that requires little more than a few humble ingredients and a quiet moment of assembly. There’s a certain peace in folding these elements into a neat parcel, knowing that the heat will work its magic while I step away, the aromas slowly building into a promise of comfort. It’s a dish that feels less like cooking and more like a quiet gift to oneself, perfect for those evenings when the world outside feels a bit too loud.
Serving: 4 | Pre Time: 15 minutes | Cooking Time: 25 minutes
Ingredients
– 1 lb sweet Italian sausage links, casings removed
– 2 medium Yukon Gold potatoes, cut into ½-inch cubes
– 1 large red bell pepper, seeded and sliced into ¼-inch strips
– 1 medium yellow onion, thinly sliced
– 2 tbsp extra-virgin olive oil
– 4 large garlic cloves, minced
– 1 tsp dried oregano
– ½ tsp freshly cracked black pepper
– ½ tsp fine sea salt
– ¼ cup dry white wine
– 2 tbsp unsalted butter, cut into small cubes
– 2 tbsp fresh Italian parsley, finely chopped
Instructions
1. Preheat a gas or charcoal grill to medium-high heat, establishing a steady temperature of 400°F.
2. Tear four 12-inch by 18-inch sheets of heavy-duty aluminum foil and lay them flat on a clean work surface.
3. In a large mixing bowl, combine the cubed Yukon Gold potatoes, sliced red bell pepper, and thinly sliced yellow onion.
4. Drizzle the vegetable mixture with 2 tablespoons of extra-virgin olive oil, ensuring all pieces are lightly coated.
5. Add the minced garlic cloves, dried oregano, freshly cracked black pepper, and fine sea salt to the bowl, then toss gently to distribute the seasonings evenly.
6. Divide the seasoned vegetable mixture equally among the four foil sheets, mounding it in the center of each.
7. Pinch the sweet Italian sausage into 1-inch pieces and nestle them evenly among the vegetables on each foil packet.
8. Pour 1 tablespoon of dry white wine over the contents of each packet.
9. Dot the top of each assembly with the small cubes of unsalted butter.
10. Bring the long sides of each foil sheet together and fold them over twice to create a tight seal, then fold the short ends up twice to form a fully enclosed packet. Tip: Ensure the seams are secure to prevent steam from escaping during cooking.
11. Place the foil packets directly onto the preheated grill grates, close the lid, and cook for 20 minutes.
12. Carefully open one packet with tongs to check for doneness; the potatoes should be tender when pierced with a fork, and the sausage should be cooked through with no pink remaining. Tip: If needed, reseal and cook for an additional 3-5 minutes.
13. Using heat-resistant gloves or tongs, transfer the packets to a heatproof tray or serving platter.
14. Open each packet carefully to release the steam, then garnish with the finely chopped fresh Italian parsley. Tip: Let the packets rest open for 2 minutes before serving to allow the flavors to settle.
Momentarily, as you lift the foil, a fragrant cloud of garlic and oregano rises to greet you. The sausages emerge juicy and richly browned, their fat having rendered into the vegetables, which now glisten with a buttery, wine-infused glaze. For a delightful contrast, serve these packets directly on the foil alongside a crusty baguette to soak up the savory juices, or spoon the contents over a bed of creamy polenta for a heartier, comforting meal.
Classic Campfire Chili

Perhaps there’s something about the chill in the air that makes the heart long for a pot of something deeply comforting, a recipe that feels less like cooking and more like a slow, deliberate act of gathering warmth.
Serving: 6 | Prep Time: 20 minutes | Cooking Time: 90 minutes
Ingredients
- 2 tablespoons extra-virgin olive oil
- 1 large yellow onion, finely diced
- 4 cloves garlic, minced
- 1.5 pounds 80/20 ground beef
- 2 tablespoons chili powder
- 1 tablespoon ground cumin
- 1 teaspoon smoked paprika
- 1 (28-ounce) can crushed San Marzano tomatoes
- 2 cups beef stock
- 2 (15.5-ounce) cans dark red kidney beans, drained and rinsed
- 1 tablespoon apple cider vinegar
- Kosher salt, to season
- Freshly cracked black pepper, to season
Instructions
- Place a large Dutch oven over medium heat and add the extra-virgin olive oil, allowing it to shimmer for 30 seconds.
- Add the finely diced yellow onion and cook, stirring occasionally, until translucent and fragrant, about 5-7 minutes.
- Stir in the minced garlic and cook for 1 minute until aromatic, being careful not to let it brown.
- Increase the heat to medium-high and add the ground beef, breaking it apart with a wooden spoon until no pink remains, approximately 8-10 minutes. Tip: For deeper flavor, allow the beef to develop a light brown crust on the bottom of the pot before stirring.
- Reduce the heat to medium and sprinkle the chili powder, ground cumin, and smoked paprika over the meat. Stir constantly for 1 minute to toast the spices.
- Pour in the crushed San Marzano tomatoes and beef stock, using the spoon to scrape any browned bits from the pot’s bottom.
- Bring the mixture to a gentle simmer, then reduce the heat to low. Cover the pot partially, leaving a small gap, and simmer for 60 minutes, stirring every 15 minutes. Tip: A partial lid allows for slight reduction while maintaining a moist cooking environment.
- Stir in the drained kidney beans and apple cider vinegar. Simmer, uncovered, for an additional 20 minutes to allow the flavors to meld and the chili to thicken slightly.
- Season the chili with kosher salt and freshly cracked black pepper. Tip: Season in stages, tasting after the final simmer to adjust accurately.
Kindly ladle this chili into deep bowls, where the rich, tomato-based broth clings to the tender beans and savory beef. The gentle heat from the spices builds slowly, making it perfect for topping with a dollop of cool sour cream or a sprinkle of sharp cheddar. For a creative twist, serve it over a baked potato or alongside a wedge of warm cornbread to soak up every last bit.
BBQ Chicken Skewers with Pineapple
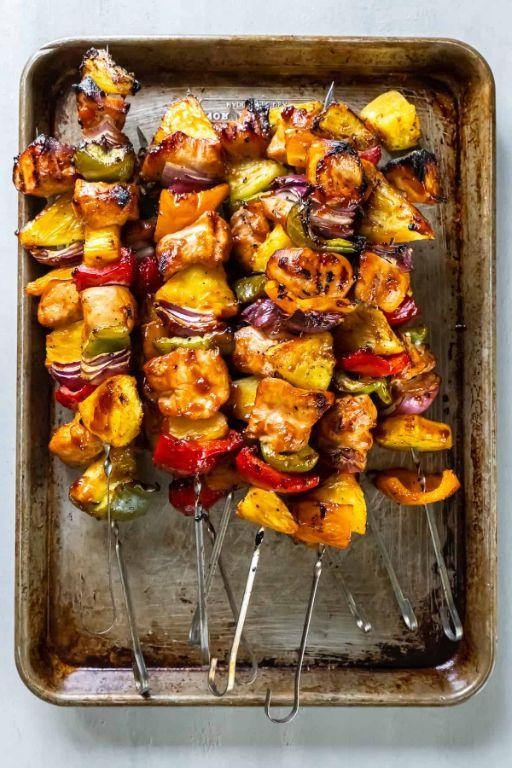
Cradling a wooden skewer in my hands, I feel the weight of summer evenings and backyard gatherings settle into my palms—this simple act of threading chicken and pineapple feels like stitching together memories, each piece a promise of smoky sweetness waiting to unfold over glowing coals.
Serving: 4 | Pre Time: 25 minutes | Cooking Time: 15 minutes
Ingredients
- 1 ½ pounds boneless, skinless chicken thighs, cut into 1-inch cubes
- 2 cups fresh pineapple, cut into 1-inch chunks
- ½ cup barbecue sauce, preferably a smoky, molasses-based variety
- 2 tablespoons extra-virgin olive oil
- 1 tablespoon apple cider vinegar
- 2 cloves garlic, finely minced
- 1 teaspoon smoked paprika
- ½ teaspoon fine sea salt
- ¼ teaspoon freshly cracked black pepper
- 8 wooden skewers, soaked in water for 30 minutes
Instructions
- In a medium mixing bowl, whisk together the barbecue sauce, extra-virgin olive oil, apple cider vinegar, minced garlic, smoked paprika, fine sea salt, and freshly cracked black pepper until fully emulsified.
- Add the cubed chicken thighs to the marinade, ensuring each piece is thoroughly coated, then cover the bowl and refrigerate for at least 2 hours—this allows the flavors to penetrate deeply, tenderizing the meat.
- Preheat an outdoor grill to medium-high heat, approximately 400°F, ensuring the grates are clean and lightly oiled to prevent sticking.
- Thread the marinated chicken cubes and fresh pineapple chunks alternately onto the soaked wooden skewers, leaving a small space between each piece to promote even cooking.
- Place the skewers on the preheated grill, cooking for 6–8 minutes per side, or until the chicken reaches an internal temperature of 165°F and develops visible grill marks.
- Brush the skewers with any remaining marinade during the last 2 minutes of cooking, being careful to avoid cross-contamination by using a clean brush or a separate portion of sauce.
- Remove the skewers from the grill and let them rest for 5 minutes on a clean platter, allowing the juices to redistribute throughout the meat for optimal tenderness.
Zesty and vibrant, these skewers offer a delightful contrast—the caramelized edges of the pineapple melt into the smoky, succulent chicken, creating a harmony of sweet and savory notes. For a creative twist, serve them over a bed of cilantro-lime rice or alongside a crisp jicama slaw, letting the textures play off each other in a symphony of summer flavors.
One-Pot Campfire Mac and Cheese
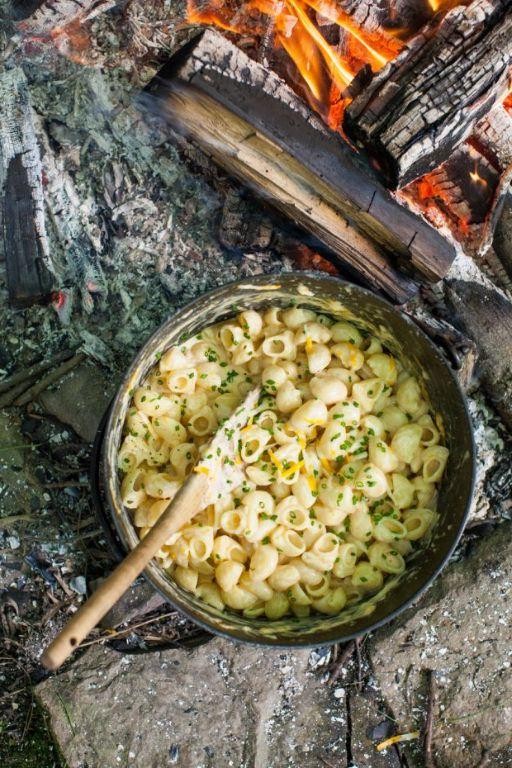
Cradling a warm bowl under a starry sky, this one-pot mac and cheese simplifies campfire cooking into a single, comforting ritual. It’s a dish that transforms basic pantry staples into a creamy, indulgent meal with minimal cleanup, perfect for ending a day spent outdoors. The gentle bubble of the cheese sauce over the fire becomes a quiet, satisfying soundtrack to the evening.
Serving: 4 | Pre Time: 10 minutes | Cooking Time: 20 minutes
Ingredients
– 1 lb elbow macaroni
– 4 cups whole milk
– 2 cups sharp cheddar cheese, freshly grated
– 1 cup Gruyère cheese, freshly grated
– 3 tbsp unsalted butter
– 3 tbsp all-purpose flour
– 1 tsp Dijon mustard
– ½ tsp smoked paprika
– ¼ tsp freshly grated nutmeg
– Kosher salt and freshly ground black pepper
Instructions
1. Place a large, heavy-bottomed Dutch oven over medium campfire heat or a camp stove set to medium.
2. Add 3 tbsp unsalted butter to the pot and let it melt completely, about 1 minute.
3. Sprinkle 3 tbsp all-purpose flour into the melted butter and whisk continuously for 2 minutes to form a pale golden roux, which will prevent a raw flour taste in the sauce.
4. Gradually pour in 4 cups whole milk while whisking constantly to ensure a smooth, lump-free base.
5. Bring the mixture to a gentle simmer, stirring occasionally, and cook for 5 minutes until it thickens slightly to coat the back of a spoon.
6. Stir in 1 tsp Dijon mustard, ½ tsp smoked paprika, and ¼ tsp freshly grated nutmeg until fully incorporated.
7. Add 1 lb elbow macaroni to the pot, submerging it completely in the liquid.
8. Reduce the heat to low, cover the pot, and simmer for 12 minutes, stirring every 3 minutes to prevent sticking and ensure even cooking.
9. Remove the pot from the heat and let it rest, covered, for 2 minutes to allow the pasta to absorb any residual liquid.
10. Uncover the pot and stir in 2 cups sharp cheddar cheese and 1 cup Gruyère cheese until fully melted and creamy, about 1 minute of vigorous stirring.
11. Season generously with kosher salt and freshly ground black pepper, tasting and adjusting once to balance the richness.
12. For a smoother sauce, let the mac and cheese sit off the heat for 3 minutes before serving, as this allows the cheeses to fully integrate without breaking.
Mellow and velvety, this mac and cheese boasts a deep, smoky undertone from the paprika and a subtle sharpness from the aged cheddar. The pasta remains perfectly al dente, cradled in a sauce that clings without being heavy. Serve it straight from the pot, garnished with extra black pepper or a sprinkle of crispy fried onions for added texture against the creamy backdrop.
Campfire Dutch Oven Lasagna
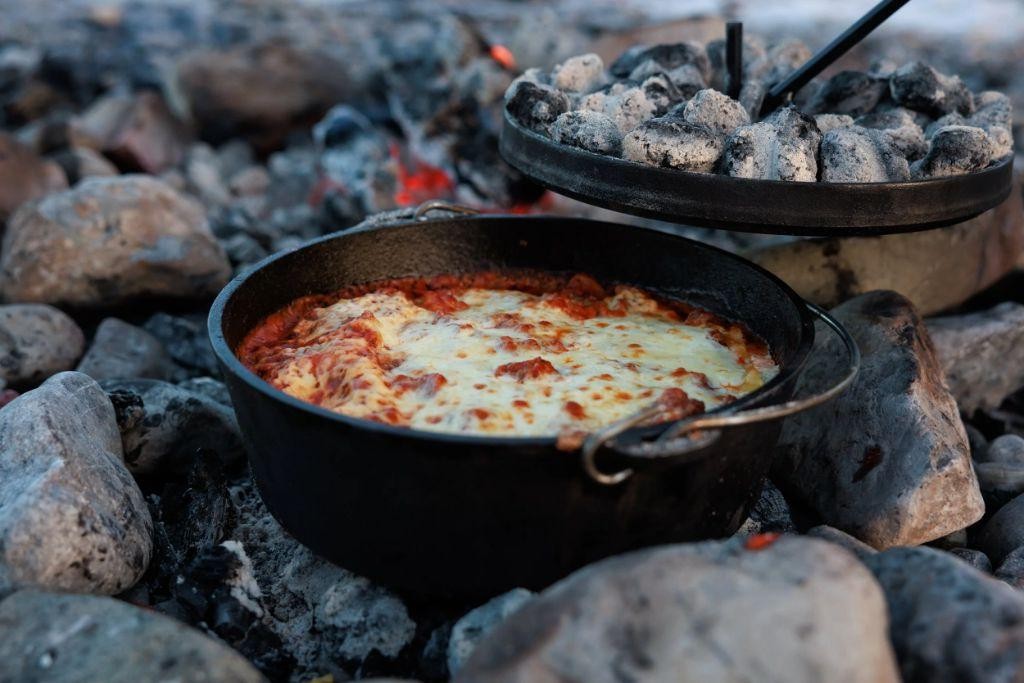
Zigzagging through my memories of campfires past, I find myself drawn to the comforting ritual of layering flavors beneath the open sky, where the crackle of wood and the scent of pine mingle with bubbling cheese and savory sauce. This Dutch oven lasagna, cooked slowly over glowing embers, transforms simple ingredients into a rustic feast that feels both timeless and deeply personal, a reminder that some of the best meals are born not in a kitchen, but under the stars.
Serving: 6 | Pre Time: 25 minutes | Cooking Time: 45 minutes
Ingredients
– 1 pound ground Italian sausage
– 1 yellow onion, finely diced
– 3 garlic cloves, minced
– 28 ounces crushed San Marzano tomatoes
– 2 tablespoons extra-virgin olive oil
– 1 teaspoon dried oregano
– ½ teaspoon crushed red pepper flakes
– 12 no-boil lasagna noodles
– 15 ounces whole-milk ricotta cheese
– 1 large pasture-raised egg, lightly beaten
– ¼ cup finely chopped fresh basil
– 8 ounces low-moisture whole-milk mozzarella cheese, shredded
– 4 ounces Parmigiano-Reggiano cheese, freshly grated
– Kosher salt and freshly ground black pepper
Instructions
1. Place a 12-inch cast-iron Dutch oven over medium-high heat on a campfire grate or stove. Add 2 tablespoons extra-virgin olive oil and heat until shimmering, about 2 minutes.
2. Add 1 pound ground Italian sausage and cook, breaking it into small crumbles with a wooden spoon, until browned and no pink remains, 6–8 minutes.
3. Stir in 1 finely diced yellow onion and cook until translucent and softened, 4–5 minutes, then add 3 minced garlic cloves and cook until fragrant, 1 minute more.
4. Pour in 28 ounces crushed San Marzano tomatoes, 1 teaspoon dried oregano, and ½ teaspoon crushed red pepper flakes. Season with 1 teaspoon kosher salt and ½ teaspoon freshly ground black pepper. Simmer uncovered, stirring occasionally, until the sauce thickens slightly, 10–12 minutes. (Tip: For a deeper flavor, let the sauce simmer a few minutes longer until it coats the back of a spoon.)
5. Remove the Dutch oven from the heat. In a medium bowl, combine 15 ounces whole-milk ricotta cheese, 1 lightly beaten pasture-raised egg, and ¼ cup finely chopped fresh basil until smooth.
6. Spread a thin layer of the meat sauce (about 1 cup) evenly across the bottom of the Dutch oven to prevent sticking.
7. Arrange 4 no-boil lasagna noodles in a single layer over the sauce, breaking them as needed to fit.
8. Spread half of the ricotta mixture evenly over the noodles, then sprinkle with one-third of the shredded mozzarella and grated Parmigiano-Reggiano.
9. Spoon one-third of the remaining meat sauce over the cheese layer. Repeat the layering process: noodles, remaining ricotta mixture, one-third of the cheeses, and one-third of the sauce.
10. Top with a final layer of 4 noodles, the remaining meat sauce, and the remaining cheeses. (Tip: Press down gently on the top layer to compact the lasagna slightly, which helps the noodles absorb moisture evenly during cooking.)
11. Cover the Dutch oven with its lid. Return it to the campfire grate over a bed of medium-hot coals, placing additional coals on the lid to create even heat from above and below. Cook for 45 minutes, rotating the Dutch oven a quarter turn every 15 minutes to ensure uniform cooking. (Tip: Check the coals periodically; you may need to add a few fresh ones to maintain a steady temperature of around 350°F.)
12. Remove from the heat and let rest, covered, for 15 minutes before serving.
Here, the edges become delightfully crisp against the Dutch oven’s walls, while the center remains tender and richly layered, each bite offering a smoky depth from the fire that mingles with the bright tomatoes and creamy cheeses. Serve it straight from the pot with a simple arugula salad dressed in lemon vinaigrette to cut through the richness, or scoop it over toasted crusty bread for a hearty campfire sandwich the next day.
Cheesy Bacon and Potato Campfire Foil Packets
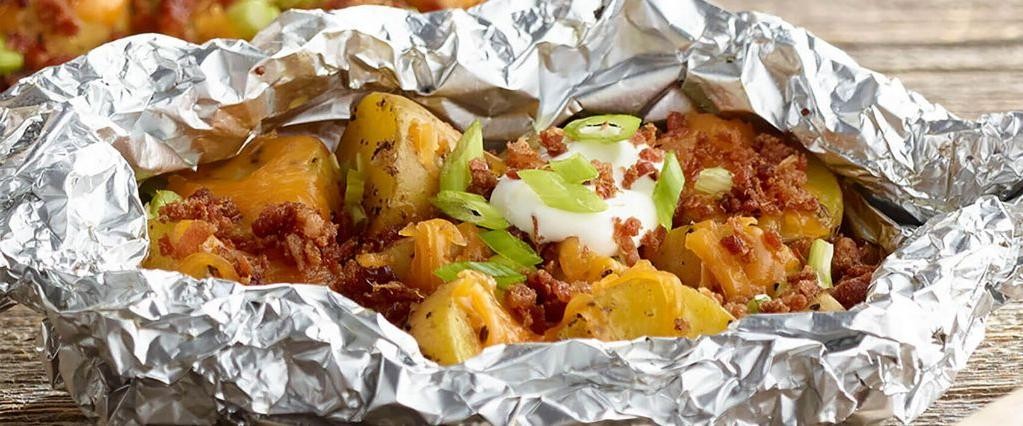
Evenings like this, when the air carries the crisp scent of autumn leaves and woodsmoke, I find myself longing for the simple, hearty comforts of campfire cooking. There’s something profoundly grounding about preparing a meal over an open flame, where the process itself becomes a quiet ritual. Today, I’m sharing a cherished recipe that wraps those smoky, savory flavors into a neat, personal parcel.
Serving: 4 | Pre Time: 15 minutes | Cooking Time: 35 minutes
Ingredients
– 1.5 lbs Yukon Gold potatoes, scrubbed and cut into ½-inch cubes
– 8 oz thick-cut applewood-smoked bacon, cut into ½-inch lardons
– 1 large yellow onion, finely diced
– 2 tbsp clarified butter, melted
– 1 tsp kosher salt
– ½ tsp freshly cracked black pepper
– 1 tsp smoked paprika
– 2 cups sharp white cheddar cheese, freshly grated
– ¼ cup fresh chives, finely chopped
Instructions
1. Prepare four 12×12-inch sheets of heavy-duty aluminum foil by brushing the center of each lightly with a portion of the melted clarified butter to prevent sticking.
2. In a large mixing bowl, combine the cubed Yukon Gold potatoes, bacon lardons, and finely diced yellow onion.
3. Drizzle the remaining clarified butter over the potato mixture, then sprinkle evenly with kosher salt, freshly cracked black pepper, and smoked paprika. Toss thoroughly until all components are uniformly coated.
4. Divide the seasoned mixture equally among the four prepared foil sheets, mounding it in the center of each.
5. Fold the foil over the mixture to create a packet, then crimp and roll the edges tightly to form a secure, sealed parcel, ensuring no steam can escape during cooking. A tight seal is crucial for even steaming and to concentrate the flavors.
6. Place the foil packets directly onto hot campfire coals or a preheated grill set to 400°F. Cook for 25 minutes.
7. Using long tongs, carefully flip each packet over. Continue cooking for an additional 10 minutes, or until the potatoes are fork-tender when tested through the foil.
8. Remove the packets from the heat and let them rest, unopened, for 5 minutes to allow the ingredients to settle and the steam to finish cooking the potatoes perfectly.
9. Carefully open each packet, avoiding the hot steam. Immediately top the hot contents with the freshly grated sharp white cheddar cheese, allowing the residual heat to melt it into a velvety layer.
10. Garnish each serving with a generous sprinkle of finely chopped fresh chives before serving directly from the foil.
Opening these packets releases an aromatic cloud of smoky bacon and caramelized onion. The potatoes achieve a sublime texture—tender and creamy within, with occasional crispy edges from contact with the hot foil. For a delightful contrast, serve alongside a crisp, chilled salad of bitter greens dressed simply with lemon juice and olive oil.
Garlic Butter Shrimp and Vegetable Foil Packs
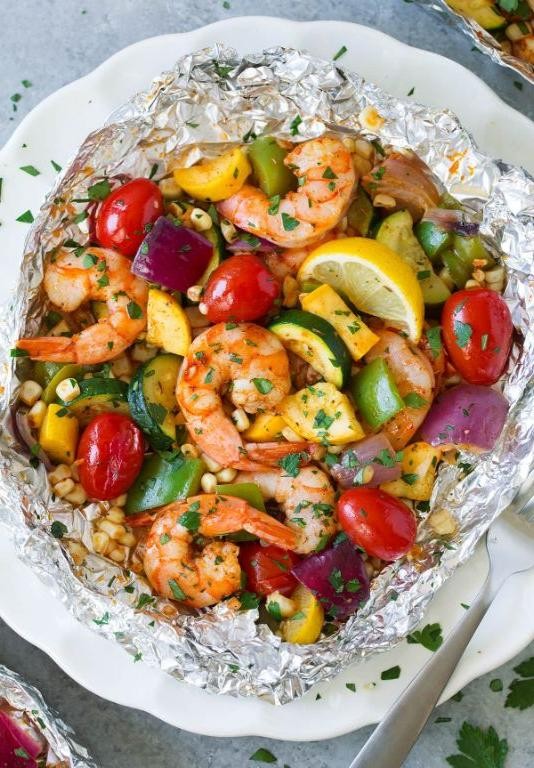
Often, the simplest meals are the ones that feel most like a gift—a quiet, hands-off preparation that yields something deeply satisfying. On a busy evening, there’s a particular comfort in assembling these foil packets, knowing that in less than half an hour, a complete, fragrant dinner will emerge from the oven, steaming and ready.
Serving: 4 | Pre Time: 15 minutes | Cooking Time: 20 minutes
Ingredients
– 1 ½ pounds large wild-caught shrimp, peeled and deveined
– ½ cup unsalted European-style butter, clarified
– 8 large garlic cloves, finely minced
– 1 tablespoon fresh lemon juice, freshly squeezed
– 1 teaspoon kosher salt
– ½ teaspoon freshly cracked black pepper
– 1 pound asparagus spears, woody ends trimmed
– 1 large red bell pepper, julienned
– 1 medium yellow squash, cut into ½-inch half-moons
– 2 tablespoons finely chopped fresh Italian parsley
Instructions
1. Preheat your oven to 425°F (218°C) and arrange a rack in the center position.
2. In a small saucepan over low heat, gently melt the unsalted European-style butter until the milk solids separate and clarify, about 5 minutes; carefully skim off any foam and pour the clear clarified butter into a medium bowl, discarding the solids.
3. To the bowl of clarified butter, add the finely minced garlic cloves, freshly squeezed lemon juice, kosher salt, and freshly cracked black pepper; whisk vigorously until fully emulsified.
4. Pat the peeled and deveined wild-caught shrimp completely dry with paper towels to ensure proper searing and even coating.
5. Add the dried shrimp to the garlic butter marinade, tossing gently to coat each piece thoroughly; set aside to marinate at room temperature for 10 minutes.
6. Tear off four 18-inch sheets of heavy-duty aluminum foil and lay them flat on a clean work surface.
7. Divide the trimmed asparagus spears, julienned red bell pepper, and yellow squash half-moons evenly among the four foil sheets, arranging them in a single layer in the center of each.
8. Evenly distribute the marinated shrimp and any remaining marinade over the arranged vegetables on each foil sheet.
9. Bring the long sides of each foil sheet together over the ingredients and fold them down in a series of ½-inch folds to create a tight seal, then crimp the short ends inward to form fully enclosed packets.
10. Place the sealed foil packets on a large, rimmed baking sheet and transfer to the preheated oven.
11. Bake the packets at 425°F (218°C) for exactly 18–20 minutes, until the shrimp are opaque and firm to the touch and the vegetables are tender-crisp.
12. Carefully open one packet to check for doneness, being mindful of the escaping steam.
13. Using oven mitts, remove the baking sheet from the oven and let the packets rest, unopened, for 3 minutes to allow the flavors to meld and the contents to finish cooking gently.
14. Open each packet and garnish with the finely chopped fresh Italian parsley before serving directly from the foil.
Buttery and tender, the shrimp practically melt against the crisp-tender vegetables, all infused with the deep, aromatic essence of roasted garlic. Serve these fragrant packets straight onto plates with crusty bread to soak up the savory juices, or for a heartier meal, spoon the contents over a bed of steamed jasmine rice or lemony orzo.
Campfire Pizza with Pepperoni and Cheese

Beneath the quiet glow of embers, there’s a simple magic in transforming humble ingredients into a smoky, bubbling delight—a rustic pizza that carries the whisper of the outdoors and the comfort of melted cheese and spice. It’s a dish that invites you to slow down, to savor the process as much as the first warm slice pulled from the fire. This campfire version, with its crisp-edged crust and savory toppings, feels like a small, edible celebration under the open sky.
Serving: 4 | Pre Time: 20 minutes | Cooking Time: 10 minutes
Ingredients
– 1 pound store-bought pizza dough, brought to room temperature
– ½ cup San Marzano tomato sauce, strained
– 8 ounces low-moisture whole-milk mozzarella cheese, freshly grated
– 3 ounces thinly sliced pepperoni
– 2 tablespoons extra-virgin olive oil
– 1 teaspoon fine sea salt
– ½ teaspoon freshly cracked black pepper
– 1 tablespoon semolina flour, for dusting
Instructions
1. Prepare a campfire or grill to medium-high heat, approximately 450°F, ensuring the flames have died down to hot coals with a steady, even heat.
2. Lightly dust a clean work surface with the semolina flour to prevent sticking.
3. Gently stretch the pizza dough by hand into a 12-inch round, about ¼-inch thick, taking care not to tear it; for a more rustic texture, leave the edges slightly thicker.
4. Brush the entire surface of the dough with the extra-virgin olive oil to create a barrier against moisture and promote browning.
5. Evenly spread the strained San Marzano tomato sauce over the dough, leaving a ½-inch border around the edges.
6. Sprinkle the freshly grated low-moisture whole-milk mozzarella cheese uniformly over the sauce.
7. Arrange the thinly sliced pepperoni in a single layer atop the cheese, slightly overlapping for full coverage.
8. Season the entire pizza with the fine sea salt and freshly cracked black pepper.
9. Carefully transfer the assembled pizza onto a preheated cast-iron skillet or pizza stone placed over the hot coals.
10. Cover with a lid or aluminum foil to trap heat, and cook for 8–10 minutes, rotating the skillet halfway through, until the crust is golden-brown and the cheese is fully melted and bubbly.
11. Remove from the heat using heat-resistant gloves, and let rest for 2 minutes to allow the cheese to set slightly.
12. Slice into wedges with a sharp knife or pizza cutter.
Rustic and satisfying, this pizza emerges with a crackly, char-kissed crust that gives way to a tender interior, while the pepperoni crisps at the edges, releasing its savory oils into the molten cheese. For a creative twist, drizzle with a touch of hot honey or scatter fresh arugula over the top just before serving to add a bright, peppery contrast to the smoky richness.
Beer-Braised Bratwursts with Sauerkraut
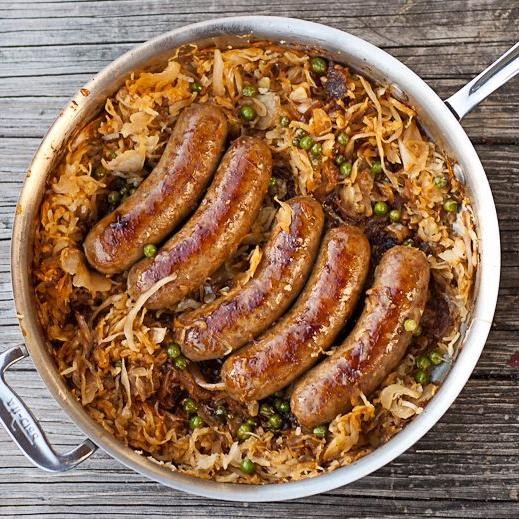
Just now, as the afternoon light slants across the kitchen, I find myself drawn to the quiet ritual of a dish that feels like a warm embrace. It’s a simple, slow-cooked comfort, perfect for a reflective evening when the world outside seems to rush by.
Serving: 4 | Pre Time: 10 minutes | Cooking Time: 55 minutes
Ingredients
– 4 uncooked bratwurst links
– 2 tablespoons clarified butter
– 1 large yellow onion, thinly sliced
– 2 cloves garlic, minced
– 1 (12-ounce) bottle amber ale
– 1 pound sauerkraut, drained
– 1 teaspoon caraway seeds
– 1 teaspoon whole grain mustard
– 1/2 cup low-sodium chicken stock
– 1 tablespoon chopped fresh parsley
– Kosher salt and freshly ground black pepper
Instructions
1. Pat the bratwurst links dry with paper towels to ensure a proper sear.
2. In a large Dutch oven or heavy-bottomed pot, heat the clarified butter over medium-high heat until shimmering, about 2 minutes.
3. Add the bratwurst links and sear until deeply browned on all sides, approximately 8-10 minutes total, then transfer to a plate.
4. Reduce the heat to medium and add the thinly sliced onion to the pot, cooking until softened and lightly caramelized, about 7 minutes.
5. Stir in the minced garlic and cook until fragrant, 30 seconds, being careful not to burn it.
6. Pour in the amber ale, using a wooden spoon to scrape up any browned bits from the bottom of the pot for added flavor.
7. Add the drained sauerkraut, caraway seeds, whole grain mustard, and low-sodium chicken stock, stirring to combine.
8. Nestle the seared bratwurst links back into the pot, submerging them partially in the liquid.
9. Bring the mixture to a gentle simmer, then reduce the heat to low, cover the pot, and braise for 45 minutes, or until the bratwursts are cooked through and tender.
10. Season the braising liquid with kosher salt and freshly ground black pepper to your preference.
11. Remove from heat and stir in the chopped fresh parsley just before serving.
12. Serve the bratwursts hot, spooned over the sauerkraut mixture.
When the dish is ready, the bratwursts emerge succulent and infused with the malty depth of the ale, while the sauerkraut turns mellow and tangy, softened by its long simmer. For a creative twist, spoon it over a bed of creamy mashed potatoes or into a crusty roll, letting the rich juices soak in.
Hearty Beef and Bean Campfire Stew

There’s something quietly grounding about a meal that simmers over an open flame, its aroma mingling with the crisp evening air. This stew, with its deep, savory notes and humble ingredients, feels like a warm embrace after a long day outdoors. It’s a simple, forgiving recipe that invites you to slow down and savor the process.
Serving: 6 | Pre Time: 20 minutes | Cooking Time: 2 hours 30 minutes
Ingredients
– 2 tablespoons rendered beef tallow
– 2 pounds grass-fed beef chuck, cut into 1-inch cubes
– 1 large yellow onion, finely diced
– 3 cloves garlic, minced
– 2 large carrots, peeled and cut into ½-inch rounds
– 2 stalks celery, cut into ½-inch pieces
– 4 cups beef bone broth
– 1 (14.5-ounce) can fire-roasted diced tomatoes, with their juices
– 2 (15-ounce) cans cannellini beans, drained and rinsed
– 2 sprigs fresh rosemary
– 2 bay leaves
– 1 teaspoon fine sea salt
– ½ teaspoon freshly cracked black pepper
Instructions
1. Place a large Dutch oven over medium-high heat and add the rendered beef tallow, allowing it to melt and coat the bottom evenly.
2. Pat the grass-fed beef chuck cubes completely dry with paper towels to ensure a proper sear.
3. Working in batches to avoid overcrowding, sear the beef cubes for 3-4 minutes per side until a deep, caramelized crust forms, then transfer to a plate. Tip: Do not move the cubes for the first 2 minutes to allow the crust to develop.
4. Reduce the heat to medium and add the finely diced yellow onion to the pot, sautéing for 6-8 minutes until translucent and fragrant.
5. Add the minced garlic and sauté for 1 minute until just aromatic, being careful not to let it burn.
6. Stir in the carrot rounds and celery pieces, cooking for 5 minutes to soften slightly.
7. Pour in the beef bone broth, using a wooden spoon to scrape up any browned bits fond from the bottom of the pot.
8. Add the fire-roasted diced tomatoes with their juices, the drained cannellini beans, fresh rosemary sprigs, and bay leaves.
9. Return the seared beef and any accumulated juices to the pot, stirring to combine.
10. Season with the fine sea salt and freshly cracked black pepper.
11. Bring the stew to a gentle boil, then immediately reduce the heat to the lowest setting to maintain a bare simmer.
12. Cover the pot and let the stew simmer slowly for 2 hours, stirring occasionally. Tip: A slow, low simmer is key for tender meat; a rapid boil will make it tough.
13. After 2 hours, uncover the pot and continue to simmer for an additional 30 minutes to allow the broth to reduce and thicken slightly. Tip: The stew is ready when the beef is fork-tender and easily shreds.
14. Carefully remove and discard the rosemary sprigs and bay leaves before serving.
Verdant with the softened carrots and celery, the stew yields a rich, velvety broth that clings to the tender, shredding beef and creamy cannellini beans. For a rustic presentation, serve it directly from the Dutch oven with a chunk of crusty sourdough to soak up every last drop.
Lemon Herb Grilled Salmon Foil Packets
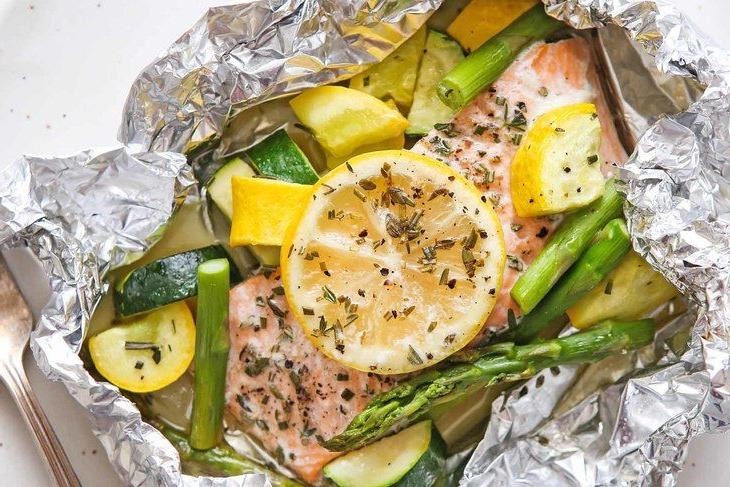
Just as the afternoon light begins to soften, there’s a quiet comfort in preparing a meal that feels both effortless and deeply nourishing. This method, a simple parcel of flavors, transforms a few thoughtful ingredients into something complete, steaming gently from its own little world. It’s a gentle reminder that the most satisfying meals often require the least fuss, a gift of time and taste wrapped up together.
Serving: 4 | Pre Time: 15 minutes | Cooking Time: 18 minutes
Ingredients
– 4 (6-ounce) skin-on wild-caught salmon fillets
– 3 tablespoons extra-virgin olive oil
– 2 tablespoons freshly squeezed lemon juice
– 4 cloves garlic, finely minced
– 1 tablespoon fresh dill, finely chopped
– 1 tablespoon fresh parsley, finely chopped
– 1 teaspoon fresh thyme leaves
– 1 teaspoon kosher salt
– ½ teaspoon freshly cracked black pepper
– 1 medium lemon, thinly sliced into rounds
– 1 pound fresh asparagus spears, woody ends trimmed
Instructions
1. Preheat a gas or charcoal grill to medium-high heat, establishing a stable cooking temperature of 400°F.
2. In a small mixing bowl, whisk together the extra-virgin olive oil, freshly squeezed lemon juice, finely minced garlic, finely chopped dill and parsley, fresh thyme leaves, kosher salt, and freshly cracked black pepper until fully emulsified.
3. Tear four large sheets of heavy-duty aluminum foil, each approximately 12 by 18 inches.
4. Place one portion of the trimmed asparagus spears in the center of each foil sheet, creating a bed for the salmon.
5. Lay one skin-on wild-caught salmon fillet atop each bed of asparagus, skin-side down.
6. Spoon the prepared herb and lemon emulsion evenly over the top of each salmon fillet, ensuring complete coverage.
7. Arrange two to three thin lemon rounds directly on top of each sauced fillet.
8. Carefully bring the long sides of the foil together over the ingredients and fold them down in a series of ½-inch folds to create a tight seal, then fold and crimp the short ends to form a fully enclosed packet. Tip: Ensure the packets are sealed tightly but have a little room for steam to circulate; this prevents steaming from turning to boiling.
9. Place the sealed foil packets directly onto the preheated grill grates.
10. Close the grill lid and cook for 15 to 18 minutes. Tip: Avoid opening the lid frequently, as this causes significant heat loss and extends cooking time.
11. After 15 minutes, carefully open one packet to check for doneness. The salmon should be opaque throughout and flake easily with a fork, and the asparagus should be tender-crisp.
12. Using grill tongs, transfer the packets to a heatproof tray or baking sheet. Tip: Let the packets rest, unopened, for 3 minutes after removing them from the grill; this allows the juices to redistribute, resulting in more succulent fish.
13. Carefully open each packet, being mindful of the hot steam, and serve immediately directly from the foil or transferred to plates.
Steaming within the foil yields salmon of remarkable tenderness, its flesh delicately infused with the bright, aromatic herbs and the subtle, caramelized sweetness of the asparagus. The lemon slices soften, their tartness mellowing into a gentle perfume that ties the dish together. For a beautiful presentation, serve the unopened packets at the table, letting each person discover the fragrant steam and vibrant colors for themselves, perhaps alongside a simple mound of pearl couscous or crusty bread to soak up the exquisite juices.
Spicy Campfire Jambalaya with Shrimp
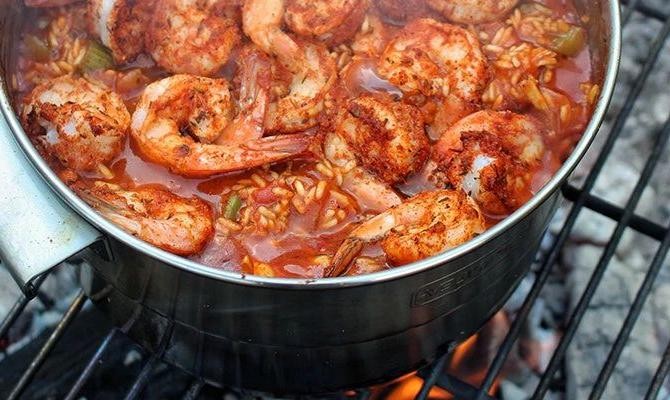
Beneath the quiet glow of the evening, there’s a certain comfort in a pot that simmers with the warmth of shared stories and bold flavors, a one-pot wonder that feels like a gathering in itself.
Serving: 6 | Pre Time: 20 minutes | Cooking Time: 45 minutes
Ingredients
– 1 tablespoon rendered bacon fat
– 1 large yellow onion, finely diced
– 1 large green bell pepper, finely diced
– 3 celery stalks, finely diced
– 4 garlic cloves, minced
– 12 ounces andouille sausage, sliced into ¼-inch rounds
– 1 ½ cups long-grain white rice, such as jasmine
– 1 (28-ounce) can whole peeled tomatoes, crushed by hand
– 4 cups low-sodium chicken stock
– 2 bay leaves
– 1 teaspoon dried thyme
– 1 teaspoon smoked paprika
– ½ teaspoon cayenne pepper
– 1 pound large shrimp (21/25 count), peeled and deveined
– ¼ cup fresh flat-leaf parsley, finely chopped
– Kosher salt and freshly ground black pepper
Instructions
1. Heat the rendered bacon fat in a large Dutch oven over medium heat until shimmering, about 2 minutes.
2. Add the diced onion, bell pepper, and celery, seasoning with a pinch of kosher salt, and sauté until the vegetables are softened and translucent, about 8-10 minutes.
3. Stir in the minced garlic and cook until fragrant, about 30 seconds, being careful not to let it brown.
4. Add the sliced andouille sausage and cook, stirring occasionally, until lightly browned, about 5 minutes.
5. Tip: Toasting the rice here enhances its nutty flavor. Stir in the long-grain white rice and cook for 1 minute until lightly toasted.
6. Add the hand-crushed tomatoes, low-sodium chicken stock, bay leaves, dried thyme, smoked paprika, and cayenne pepper, then season with 1 teaspoon of kosher salt and ½ teaspoon of freshly ground black pepper.
7. Bring the mixture to a boil, then reduce the heat to low, cover the pot, and simmer for 25 minutes until the rice is tender and has absorbed most of the liquid.
8. Tip: For perfectly cooked shrimp, nestle them into the hot rice. Arrange the peeled and deveined shrimp in a single layer on top of the rice mixture.
9. Cover the pot again and cook over low heat for 5-7 minutes, just until the shrimp turn opaque and pink.
10. Remove the pot from the heat, discard the bay leaves, and let it rest, covered, for 5 minutes to allow the flavors to meld.
11. Tip: Adding parsley off the heat preserves its bright color and fresh flavor. Gently fold in the finely chopped flat-leaf parsley.
12. Taste and adjust seasoning with additional kosher salt and freshly ground black pepper if needed.
Yielding a rich tapestry of textures, this jambalaya offers tender grains of rice clinging to plump shrimp and smoky sausage, all enveloped in a deeply spiced, tomato-infused broth. Serve it straight from the Dutch oven for a rustic presentation, perhaps with a side of crusty bread to soak up every last bit of the vibrant sauce.
Southwest Chicken and Rice Foil Packets

Evenings like this, when the light slants golden through the kitchen window, call for something simple yet deeply satisfying—a meal that assembles itself with quiet intention, then emerges from the oven as a complete, fragrant promise. It’s the kind of cooking that feels less like a task and more like a gentle ritual, where a few humble ingredients are transformed into a warm, cohesive whole. This method, a foil-wrapped parcel, captures and steams the essence of the Southwest into every tender bite.
Serving: 4 | Pre Time: 15 minutes | Cooking Time: 25 minutes
Ingredients
– 1.5 pounds boneless, skinless chicken thighs, trimmed of excess fat and cut into 1-inch pieces
– 1 cup long-grain white rice, rinsed until the water runs clear
– 1 ½ cups low-sodium chicken stock, warmed to 120°F
– 1 large red bell pepper, seeded and finely diced
– 1 cup frozen sweet corn kernels, thawed and patted dry
– ½ cup canned black beans, thoroughly rinsed and drained
– ¼ cup finely chopped fresh cilantro leaves
– 2 tablespoons extra-virgin olive oil
– 1 tablespoon smoked paprika
– 2 teaspoons ground cumin
– 1 teaspoon garlic powder
– 1 teaspoon onion powder
– ½ teaspoon fine sea salt
– ¼ teaspoon freshly cracked black pepper
– 4 large 12×18-inch sheets of heavy-duty aluminum foil
Instructions
1. Preheat your oven to 425°F and position a rack in the center.
2. In a large mixing bowl, combine the diced chicken thighs, smoked paprika, ground cumin, garlic powder, onion powder, fine sea salt, and freshly cracked black pepper, tossing until each piece is evenly coated.
3. Lay one sheet of heavy-duty aluminum foil flat on your work surface and lightly brush the center with ½ tablespoon of extra-virgin olive oil to prevent sticking.
4. In the center of the foil, create a flat, even layer using ¼ cup of the rinsed long-grain white rice.
5. Arrange one-quarter of the seasoned chicken pieces in a single layer over the rice.
6. Scatter one-quarter of the diced red bell pepper, thawed sweet corn kernels, and rinsed black beans evenly over the chicken and rice.
7. Carefully pour 6 fluid ounces of the warmed low-sodium chicken stock over the assembled ingredients in the foil packet.
8. Bring the two long sides of the foil together above the ingredients and fold them down in a series of three ½-inch folds to create a tight seal, then fold and crimp the short ends inward to fully enclose the packet. Tip: Ensure the seal is airtight to trap steam, which is crucial for properly cooking the rice and infusing the flavors.
9. Repeat steps 3 through 8 three more times to create four total foil packets.
10. Place the sealed packets on a large, rimmed baking sheet and transfer to the preheated oven.
11. Bake the packets at 425°F for exactly 25 minutes. Tip: Avoid opening the oven during baking, as this releases essential steam and can disrupt the cooking process.
12. Remove the baking sheet from the oven and let the packets rest, undisturbed, for 5 minutes to allow the rice to fully absorb any remaining liquid and the ingredients to settle.
13. Carefully open one end of each packet, watching for escaping steam, and use a fork to fluff the rice and gently combine the ingredients.
14. Garnish each serving with a sprinkle of the finely chopped fresh cilantro leaves. Tip: Adding the cilantro after cooking preserves its bright, herbaceous flavor and vibrant color.
As you open the foil, a fragrant plume of smoked paprika and cumin rises to meet you. The rice emerges perfectly separate and tender, having absorbed the rich, spiced stock, while the chicken remains incredibly juicy. For a delightful contrast, serve these packets directly on the plate with a dollop of cool, full-fat Greek yogurt and a wedge of lime for squeezing, letting the creamy and citrus notes cut through the warmth.
Campfire Nachos with Ground Beef and Beans

Venturing into the kitchen on this quiet afternoon, I find myself drawn to the rustic simplicity of a dish that feels like a warm embrace—a humble yet deeply satisfying creation that transforms ordinary ingredients into something extraordinary. It’s a recipe that whispers of cozy evenings and shared moments, where each layer builds a story of comfort and connection.
Serving: 4 | Pre Time: 15 minutes | Cooking Time: 25 minutes
Ingredients
– 1 lb grass-fed ground beef, 85% lean
– 1 (15-oz) can pinto beans, rinsed and drained
– 1 large yellow onion, finely diced
– 2 cloves garlic, minced
– 1 (12-oz) bag thick-cut tortilla chips
– 2 cups shredded sharp cheddar cheese
– 1 cup shredded Monterey Jack cheese
– 1/2 cup sour cream
– 1/4 cup fresh cilantro, chopped
– 1 jalapeño, thinly sliced (seeds removed for milder heat)
– 1 tbsp extra-virgin olive oil
– 1 tsp ground cumin
– 1/2 tsp smoked paprika
– Kosher salt and freshly ground black pepper, to season
Instructions
1. Preheat your oven to 375°F (190°C) and line a large baking sheet with parchment paper.
2. Heat 1 tbsp extra-virgin olive oil in a large skillet over medium-high heat until shimmering, about 2 minutes.
3. Add 1 large yellow onion, finely diced, and sauté until translucent and lightly golden, approximately 5-7 minutes, stirring occasionally.
4. Stir in 2 cloves garlic, minced, and cook for 1 minute until fragrant, being careful not to burn it.
5. Add 1 lb grass-fed ground beef to the skillet, breaking it apart with a wooden spoon, and cook until no pink remains, about 8-10 minutes, seasoning with 1 tsp ground cumin, 1/2 tsp smoked paprika, kosher salt, and freshly ground black pepper.
6. Tip: For deeper flavor, let the beef develop a slight crust before stirring—this enhances the savory notes.
7. Incorporate 1 (15-oz) can pinto beans, rinsed and drained, into the skillet, stirring gently to combine, and cook for 3 minutes until heated through.
8. Arrange 1 (12-oz) bag thick-cut tortilla chips in a single, slightly overlapping layer on the prepared baking sheet.
9. Evenly spoon the beef and bean mixture over the chips, ensuring coverage without overcrowding.
10. Sprinkle 2 cups shredded sharp cheddar cheese and 1 cup shredded Monterey Jack cheese evenly over the top.
11. Tip: For optimal melting, use freshly shredded cheese rather than pre-shredded varieties, which contain anti-caking agents.
12. Bake in the preheated oven at 375°F (190°C) for 10-12 minutes, or until the cheese is fully melted and bubbly with golden edges.
13. Remove from the oven and let rest for 3 minutes to allow the layers to set slightly.
14. Dollop 1/2 cup sour cream over the nachos in small spoonfuls.
15. Garnish with 1/4 cup fresh cilantro, chopped, and 1 jalapeño, thinly sliced.
16. Tip: For a balanced texture, serve immediately to maintain the chips’ crispness against the warm, gooey toppings.
17. You’ll find the interplay of textures—crispy chips melding with savory beef, creamy beans, and molten cheese—creates a harmonious bite. The subtle smokiness from the paprika and the fresh kick of jalapeño elevate this dish beyond the ordinary, perfect for scooping straight from the pan under soft evening light.
Teriyaki Chicken Pineapple Bowls

Wandering through the kitchen on a quiet afternoon, I find myself drawn to the sweet-savory harmony of teriyaki and pineapple, a combination that feels both comforting and vibrant. It’s a dish that invites you to slow down, to savor each step as the aromas fill the air, transforming simple ingredients into a warm, satisfying meal.
Serving: 4 | Pre Time: 20 minutes | Cooking Time: 25 minutes
Ingredients
– 1.5 lbs boneless, skinless chicken thighs, trimmed of excess fat and cut into 1-inch cubes
– 1 cup low-sodium soy sauce
– ½ cup mirin
– ¼ cup granulated sugar
– 2 tbsp freshly grated ginger root
– 2 garlic cloves, finely minced
– 1 tbsp neutral oil (e.g., avocado oil)
– 1 medium pineapple, peeled, cored, and cut into 1-inch chunks
– 2 cups cooked jasmine rice, kept warm
– 2 scallions, thinly sliced on a bias for garnish
– 1 tbsp toasted sesame seeds
Instructions
1. In a medium saucepan over medium heat, combine the low-sodium soy sauce, mirin, and granulated sugar, stirring constantly until the sugar dissolves completely, about 3 minutes.
2. Add the freshly grated ginger root and finely minced garlic cloves to the saucepan, then reduce the heat to low and simmer uncovered for 10 minutes, stirring occasionally, until the sauce thickens slightly to coat the back of a spoon.
3. While the sauce simmers, pat the chicken cubes dry with paper towels to ensure a proper sear.
4. Heat the neutral oil in a large skillet over medium-high heat until it shimmers, then add the chicken in a single layer, cooking undisturbed for 4 minutes to develop a golden-brown crust.
5. Flip the chicken pieces and cook for an additional 3 minutes, until they are cooked through and reach an internal temperature of 165°F.
6. Pour the prepared teriyaki sauce over the chicken in the skillet, stirring gently to coat, and simmer for 2 minutes to allow the flavors to meld.
7. Add the pineapple chunks to the skillet, cooking for 3 minutes until they are warmed through and slightly caramelized at the edges.
8. Divide the warm jasmine rice among four bowls, then top evenly with the teriyaki chicken and pineapple mixture.
9. Garnish each bowl with thinly sliced scallions and a sprinkle of toasted sesame seeds.
Perfectly balanced, this dish offers tender chicken glazed in a glossy, umami-rich sauce, contrasted by the juicy, caramelized pineapple that adds a bright, tropical sweetness. The fluffy jasmine rice soaks up every drop of flavor, creating a comforting bowl that’s both hearty and refreshing—try serving it with a side of quick-pickled cucumbers for an extra crunch.
Conclusion
Savor these 32 delicious camp dinner recipes, perfect for making your next outdoor adventure even more memorable. We hope you find some new favorites to try around the campfire! Don’t forget to leave a comment telling us which recipe you loved most and share this roundup on Pinterest to help fellow outdoor enthusiasts.