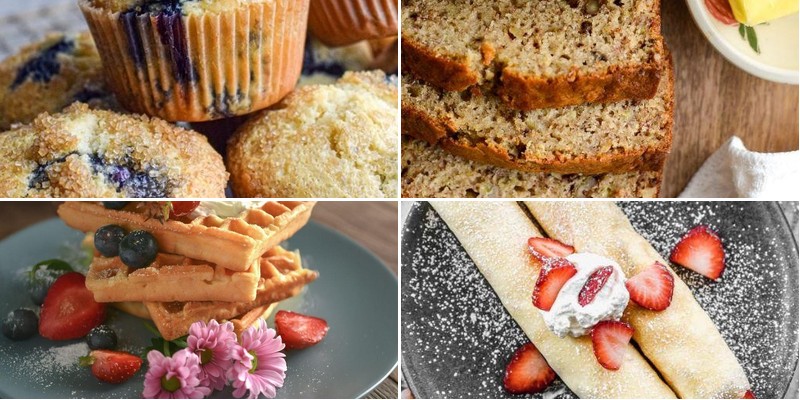
Nothing says “good morning” quite like the tangy richness of buttermilk in your breakfast creations. Whether you’re craving fluffy pancakes, tender biscuits, or moist muffins, this collection of 18 recipes will transform your mornings into something truly special. Let’s dive into these delicious buttermilk breakfast ideas that promise to make every morning feel like a celebration!
Fluffy Buttermilk Pancakes with Maple Syrup
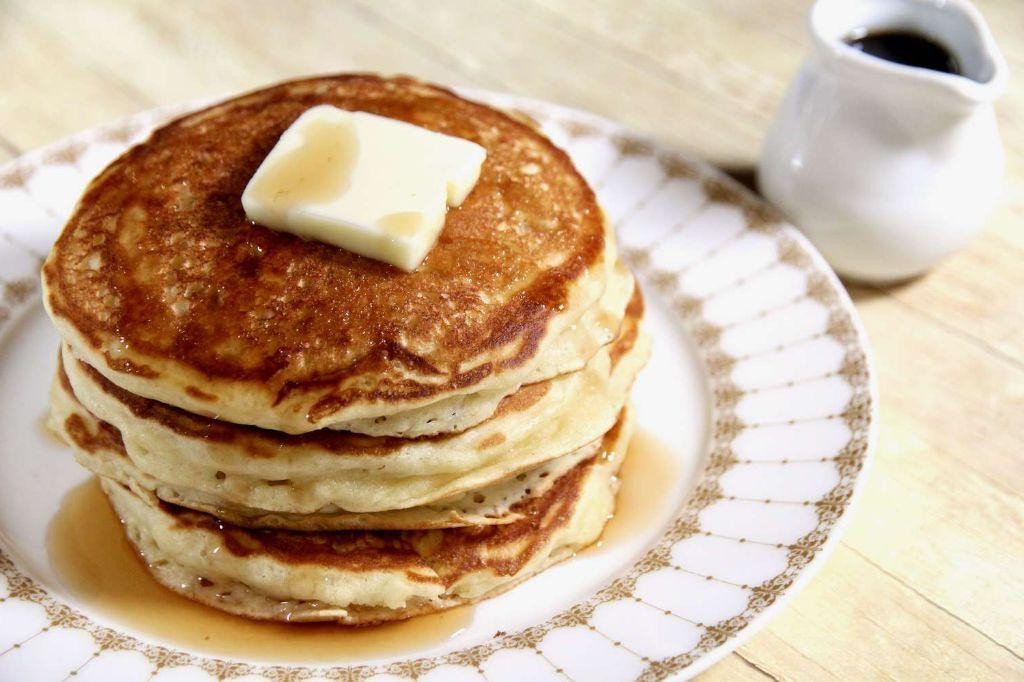
Holding this warm mug of coffee, I find myself thinking about those quiet weekend mornings when the world feels soft around the edges, and nothing sounds quite as comforting as the gentle sizzle of batter meeting a hot griddle.
3
servings10
minutes15
minutesIngredients
– All-purpose flour – 1 ½ cups
– Granulated sugar – 2 tbsp
– Baking powder – 2 tsp
– Baking soda – ½ tsp
– Salt – ½ tsp
– Buttermilk – 1 ¼ cups
– Large egg – 1
– Unsalted butter – 3 tbsp, melted
– Pure maple syrup – for serving
Instructions
1. Whisk together 1 ½ cups all-purpose flour, 2 tbsp granulated sugar, 2 tsp baking powder, ½ tsp baking soda, and ½ tsp salt in a large bowl until fully combined.
2. In a separate medium bowl, whisk 1 ¼ cups buttermilk, 1 large egg, and 3 tbsp melted unsalted butter until smooth.
3. Pour the wet ingredients into the dry ingredients and gently fold with a spatula until just combined—small lumps are fine to avoid overmixing, which keeps pancakes tender.
4. Heat a nonstick skillet or griddle over medium heat (350°F if using an electric griddle) for 2–3 minutes until a drop of water sizzles and evaporates quickly.
5. Lightly grease the skillet with butter or oil, then pour ¼ cup batter per pancake, spacing them 2 inches apart.
6. Cook for 2–3 minutes until bubbles form on the surface and edges look set—this signals it’s time to flip for even browning.
7. Flip pancakes carefully and cook for 1–2 minutes more until golden brown and cooked through.
8. Repeat with remaining batter, adjusting heat if pancakes brown too quickly, and keep finished pancakes warm in a 200°F oven.
9. Serve immediately drizzled with pure maple syrup. Each bite melts into a cloud-like softness, with the tang of buttermilk balancing the rich maple sweetness—try stacking them high with fresh berries for a burst of color and freshness.
Southern Buttermilk Biscuits with Sausage Gravy
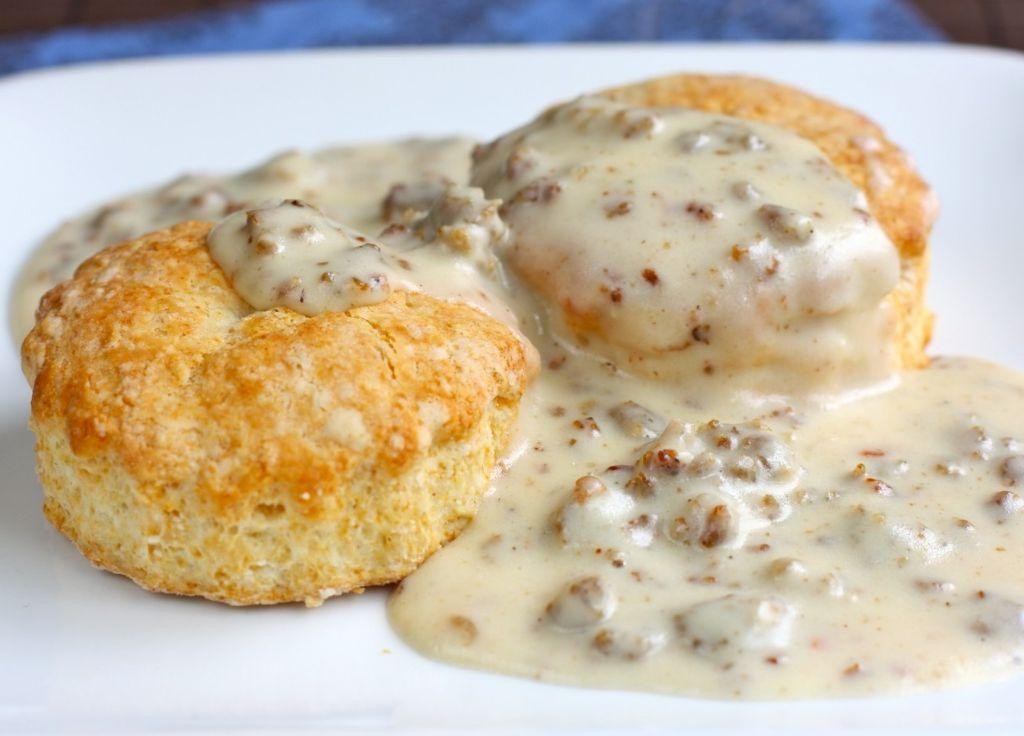
Perhaps there’s something quietly sacred about the way flour dusts a countertop, how cold butter yields beneath fingertips, creating these humble vessels for comfort. Pulling a pan of golden biscuits from the oven feels like uncovering a small, warm secret, one that asks to be shared over a slow morning with those you hold dear.
8
biscuits15
minutes20
minutesIngredients
- Flour – 2 cups
- Baking powder – 1 tbsp
- Salt – 1 tsp
- Cold butter – ½ cup
- Buttermilk – ¾ cup
- Breakfast sausage – ½ lb
- Milk – 2 cups
Instructions
- Preheat your oven to 450°F.
- Whisk together 2 cups flour, 1 tbsp baking powder, and 1 tsp salt in a large bowl.
- Cut ½ cup cold butter into the flour mixture using a pastry cutter until it resembles coarse crumbs with some pea-sized pieces remaining.
- Pour in ¾ cup buttermilk and stir just until a shaggy dough forms, being careful not to overmix.
- Turn the dough onto a lightly floured surface and gently pat it into a 1-inch thick rectangle.
- Fold the dough in half and pat it down again, repeating this folding process two more times to create flaky layers.
- Cut the dough into rounds using a 2½-inch biscuit cutter, pressing straight down without twisting.
- Place the biscuits on an ungreased baking sheet, arranging them so they just touch each other.
- Bake for 12-15 minutes until the tops are golden brown and the biscuits have risen tall.
- While the biscuits bake, brown ½ lb breakfast sausage in a skillet over medium heat, breaking it into small crumbles.
- Sprinkle 2 tbsp of the reserved flour mixture over the cooked sausage and cook for 1 minute while stirring constantly.
- Slowly pour in 2 cups milk while continuously whisking to prevent lumps from forming.
- Bring the gravy to a gentle simmer and cook for 5-7 minutes, stirring frequently, until it thickens to a creamy consistency that coats the back of a spoon.
- Season the gravy with additional salt only if needed after tasting.
Just split one of those warm biscuits open and watch the steam escape from its tender, flaky interior before ladling the creamy sausage gravy over top. The contrast between the crisp golden exterior and soft, buttery layers makes each bite feel like a small revelation, perfect for soaking up every last drop of that savory gravy on a lazy weekend morning.
Buttermilk Waffles with Fresh Berries
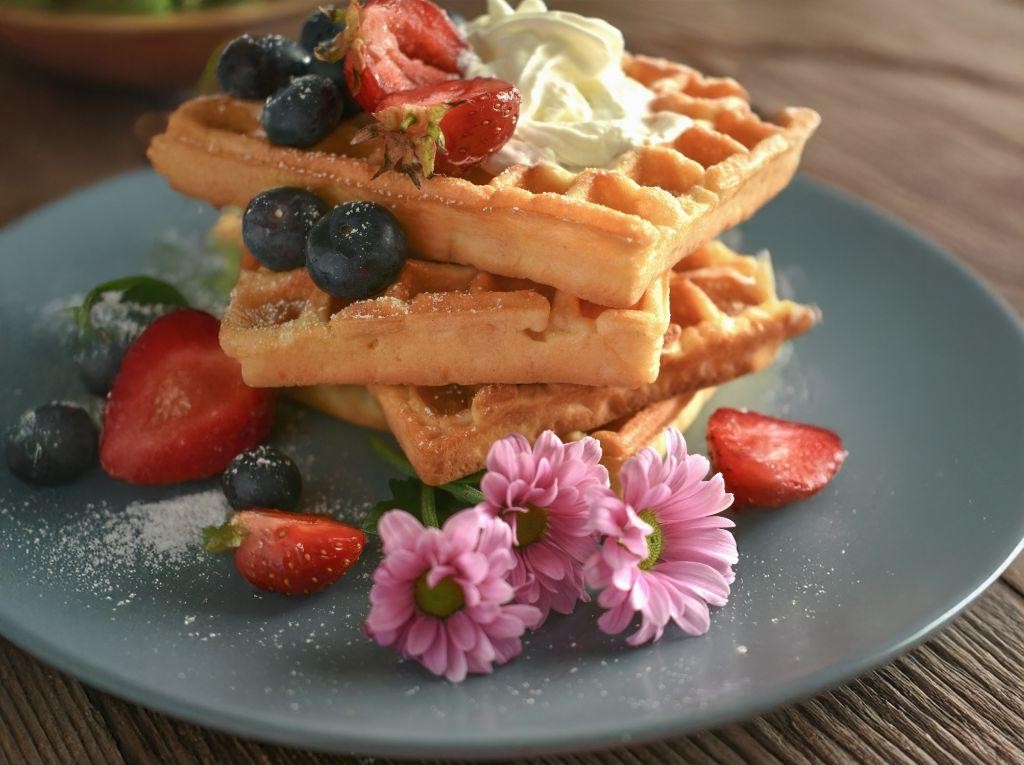
Sometimes the simplest mornings call for the gentlest rituals, when measuring flour and cracking eggs becomes a quiet meditation rather than a hurried task. There’s something deeply comforting about watching batter bubble on a hot iron, knowing these golden waffles will soon cradle sweet berries in their crisp embrace. This recipe feels like a slow exhale, a deliberate pause to create something beautiful for yourself or someone you love.
3
waffles10
minutes20
minutesIngredients
Flour – 1 ½ cups
Baking powder – 2 tsp
Salt – ½ tsp
Sugar – 2 tbsp
Eggs – 2 large
Buttermilk – 1 ¼ cups
Vegetable oil – ⅓ cup
Vanilla extract – 1 tsp
Mixed fresh berries – 2 cups
Maple syrup – for serving
Instructions
1. Preheat your waffle iron to 375°F, placing it on a medium-high heat setting.
2. Whisk together 1 ½ cups flour, 2 tsp baking powder, ½ tsp salt, and 2 tbsp sugar in a large bowl until no streaks remain.
3. In a separate bowl, beat 2 large eggs with a fork until yolks and whites are fully combined.
4. Pour 1 ¼ cups buttermilk, ⅓ cup vegetable oil, and 1 tsp vanilla extract into the egg mixture, stirring gently with a spatula.
5. Tip: For extra fluffy waffles, make a well in the dry ingredients and pour the wet mixture into the center all at once.
6. Fold the batter together with just 10-12 strokes, leaving small lumps visible to prevent overmixing.
7. Lightly brush the preheated waffle iron with oil using a pastry brush.
8. Ladle ½ cup batter onto the center of the iron, closing the lid immediately.
9. Cook for 4-5 minutes until steam stops escaping from the sides and the waffle is deep golden brown.
10. Tip: Don’t peek for the first 3 minutes—the waffle needs uninterrupted heat to develop its crisp exterior.
11. Transfer the finished waffle to a wire rack instead of a plate to keep the bottom from getting soggy.
12. Repeat with remaining batter, keeping cooked waffles warm in a 200°F oven if needed.
13. Rinse 2 cups mixed fresh berries in a colander, patting them dry with paper towels.
14. Tip: For intensified flavor, let the berries sit at room temperature for 15 minutes before serving.
15. Arrange berries over warm waffles and drizzle generously with maple syrup.
Crisp edges give way to tender centers that practically melt against the tart burst of berries. The buttermilk’s subtle tang plays beautifully with sweet maple syrup, creating layers of flavor that feel both nostalgic and new. Try stacking them high for a dramatic brunch presentation, or fold one around the berries like a warm embrace for eating with your hands.
Buttermilk Blueberry Muffins
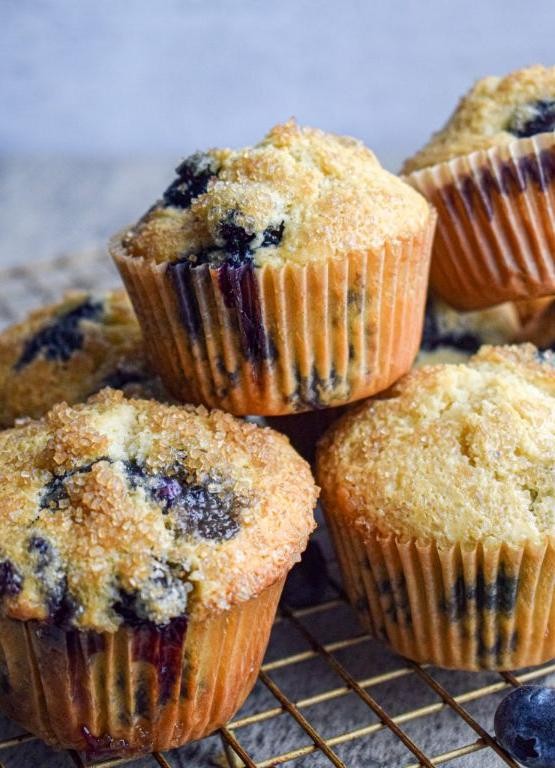
Unexpectedly, the morning light finds me in the kitchen again, drawn to the quiet ritual of measuring and mixing, to the simple comfort of creating something warm and familiar with my own hands. There’s something deeply peaceful about the rhythm of baking these particular muffins, the way the blueberries burst into tiny purple pools of sweetness, the gentle hum of the oven promising a small, perfect reward for patience.
12
muffins15
minutes25
minutesIngredients
Flour – 2 cups
Sugar – ¾ cup
Baking powder – 2 tsp
Salt – ½ tsp
Buttermilk – 1 cup
Egg – 1
Butter – ½ cup, melted
Blueberries – 1 ½ cups
Instructions
1. Preheat your oven to 375°F.
2. Line a 12-cup muffin tin with paper liners.
3. Whisk together the flour, sugar, baking powder, and salt in a large bowl.
4. In a separate medium bowl, whisk the buttermilk, egg, and melted butter until just combined.
5. Pour the wet ingredients into the dry ingredients.
6. Gently fold the mixture together with a spatula until the flour is just moistened; the batter will be lumpy, which is correct and prevents tough muffins.
7. Add the blueberries to the batter.
8. Fold the blueberries in gently until just distributed to avoid crushing them and staining the batter purple.
9. Divide the batter evenly among the 12 prepared muffin cups, filling each about ¾ full.
10. Place the muffin tin in the preheated oven.
11. Bake for 20-25 minutes, or until the tops are golden brown and a toothpick inserted into the center of a muffin comes out clean.
12. Remove the muffin tin from the oven.
13. Let the muffins cool in the tin for 5 minutes.
14. Transfer the muffins to a wire rack to cool completely. Resist eating one immediately; letting them cool fully allows the crumb to set properly for the best texture.
Remember how the cracked, sugar-sparkled tops give way to a tender, cake-like crumb, each bite punctuated by the warm, jammy burst of a blueberry. They’re perfect just as they are, but sometimes I’ll split one warm and spread it with a little honey butter, or crumble it over morning yogurt for a different kind of treat.
Buttermilk Scones with Lemon Glaze
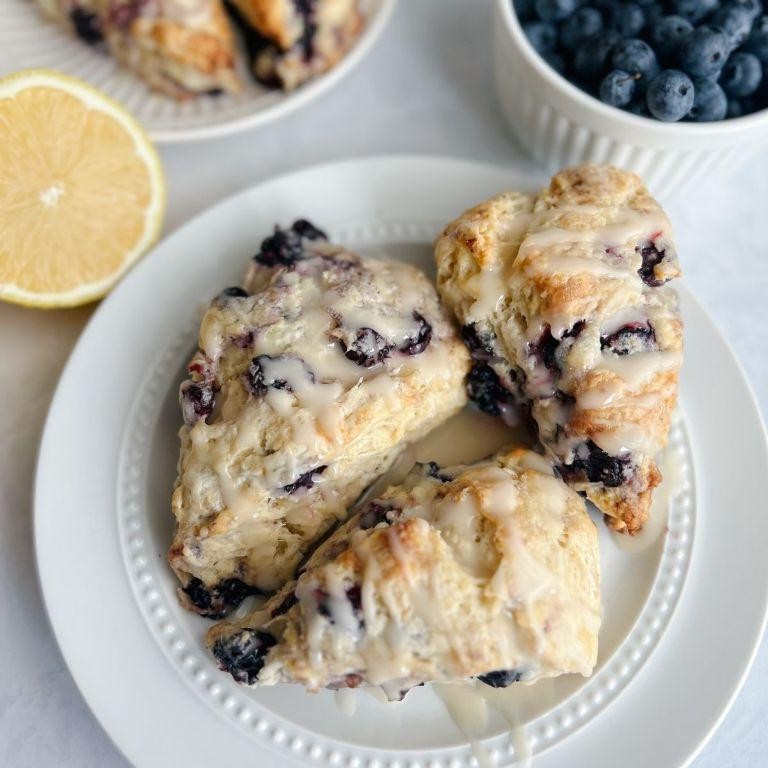
Even on the busiest mornings, there’s something quietly comforting about the ritual of baking—the way flour dusts the counter like fresh snow, the gentle rhythm of kneading, the warmth that slowly fills the kitchen. These buttermilk scones with lemon glaze are my small morning meditation, a tender pause before the day begins. They emerge golden and fragile, ready to be drizzled with sunshine-bright glaze.
8
wedges20
minutes18
minutesIngredients
Flour – 2 cups
Baking powder – 1 tbsp
Salt – ½ tsp
Sugar – ¼ cup
Butter – ½ cup
Buttermilk – ¾ cup
Powdered sugar – 1 cup
Lemon juice – 2 tbsp
Instructions
1. Preheat your oven to 400°F and line a baking sheet with parchment paper.
2. Whisk together 2 cups flour, 1 tbsp baking powder, ½ tsp salt, and ¼ cup sugar in a large bowl.
3. Cut ½ cup cold butter into small cubes and add to the dry ingredients.
4. Use your fingertips to rub the butter into the flour mixture until it resembles coarse crumbs.
5. Pour ¾ cup buttermilk into the bowl and stir gently with a fork until just combined.
6. Turn the shaggy dough onto a lightly floured surface and knead 4-5 times until it holds together.
7. Pat the dough into a 1-inch thick circle and cut into 8 wedges with a sharp knife.
8. Arrange the wedges 2 inches apart on the prepared baking sheet.
9. Bake for 15-18 minutes until the tops are pale gold and the bottoms are lightly browned.
10. Transfer the scones to a wire rack and let cool completely, about 30 minutes.
11. Whisk 1 cup powdered sugar with 2 tbsp lemon juice in a small bowl until smooth.
12. Drizzle the glaze over the cooled scones in a zigzag pattern.
13. Let the glaze set for 20 minutes before serving.
Crumbling gently at the touch, these scones reveal a tender, cake-like interior that melts against the sharp lemon glaze. I love serving them still slightly warm with a pot of Earl Grey tea, watching the steam curl toward the morning light. The contrast between the rich buttermilk tang and the citrus sparkle makes each bite feel like both comfort and celebration.
Savory Buttermilk Cheddar and Chive Muffins

Kind of like finding an old photograph you’d forgotten about, these muffins surfaced in my memory today—simple, comforting, and quietly satisfying. There’s something about the way they fill the kitchen with warmth that makes the world feel just a little softer. I thought I’d write it down before the moment slips away again.
9
muffins15
minutes22
minutesIngredients
– All-purpose flour – 1 ½ cups
– Baking powder – 1 tbsp
– Salt – ½ tsp
– Buttermilk – ¾ cup
– Egg – 1 large
– Unsalted butter – ¼ cup, melted
– Sharp cheddar cheese – 1 cup, shredded
– Fresh chives – ¼ cup, finely chopped
Instructions
1. Preheat your oven to 375°F and line a muffin tin with 9 paper liners.
2. Whisk together the all-purpose flour, baking powder, and salt in a large bowl until no streaks remain.
3. In a separate medium bowl, whisk the buttermilk, egg, and melted butter until fully combined and smooth.
4. Pour the wet ingredients into the dry ingredients and stir gently with a spatula until just incorporated—a few streaks of flour are fine to avoid overmixing.
5. Fold in the shredded sharp cheddar cheese and finely chopped fresh chives until evenly distributed.
6. Divide the batter evenly among the 9 muffin cups, filling each about ⅔ full.
7. Bake at 375°F for 18–22 minutes, until the tops are golden and a toothpick inserted into the center comes out clean.
8. Let the muffins cool in the tin for 5 minutes before transferring them to a wire rack.
9. Serve warm or at room temperature. Very much like a tender, savory hug, these muffins offer a subtle tang from the buttermilk and pockets of melted cheddar in every bite. I love splitting one open while it’s still warm and spreading a thin layer of salted butter, or crumbling it over a bowl of tomato soup for a cozy twist.
Buttermilk Cinnamon Coffee Cake
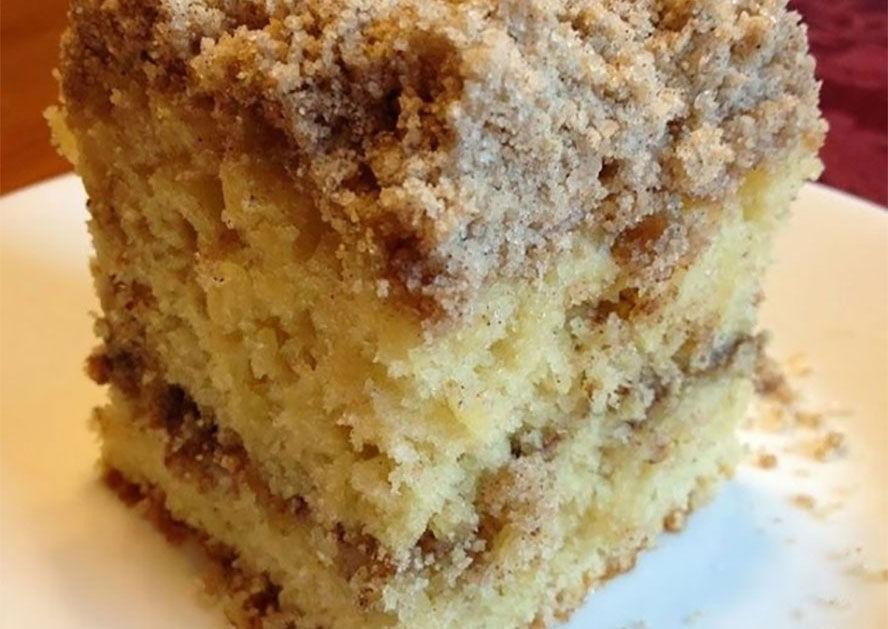
A quiet morning calls for something warm from the oven, something that fills the kitchen with the scent of cinnamon and comfort, a simple cake to enjoy with coffee while the world slowly wakes up.
9
portions15
minutes35
minutesIngredients
Flour – 1 ½ cups
Sugar – ¾ cup
Buttermilk – ½ cup
Egg – 1
Butter – ½ cup
Cinnamon – 1 tbsp
Baking powder – 1 tsp
Salt – ½ tsp
Instructions
1. Preheat your oven to 350°F and grease an 8-inch square baking pan.
2. Whisk together 1 ½ cups flour, ¾ cup sugar, 1 tsp baking powder, and ½ tsp salt in a large bowl.
3. Cut ½ cup cold butter into small cubes and work it into the flour mixture using your fingertips until it resembles coarse crumbs.
4. Remove ½ cup of this crumb mixture to a small bowl and stir in 1 tbsp cinnamon to create the topping.
5. In another bowl, whisk ½ cup buttermilk with 1 egg until fully combined.
6. Pour the buttermilk mixture into the remaining flour-butter crumbs and stir gently until just combined—do not overmix.
7. Spread the batter evenly into the prepared pan.
8. Sprinkle the cinnamon-sugar crumb topping evenly over the batter.
9. Bake for 30–35 minutes, or until a toothpick inserted into the center comes out clean.
10. Let the cake cool in the pan for 15 minutes before slicing.
Using your fingertips to work the butter in ensures a tender, flaky crumb, while gentle mixing keeps the cake soft. Under the cinnamon-sugar crust lies a moist, tender crumb with a subtle tang from the buttermilk. You might try serving it warm with a drizzle of honey or alongside fresh berries for a bright contrast.
Creamy Buttermilk Scrambled Eggs

Beneath the quiet morning light, I find myself returning to this simple comfort, the gentle rhythm of whisking eggs becoming a meditation before the day begins. There’s something deeply soothing about transforming humble ingredients into something soft, creamy, and nourishing—a small act of care that feels both grounding and hopeful.
2
servings3
minutes7
minutesIngredients
Buttermilk – ¼ cup
Eggs – 4 large
Unsalted butter – 2 tbsp
Salt – ½ tsp
Black pepper – ¼ tsp
Instructions
1. Crack 4 large eggs into a medium bowl.
2. Add ¼ cup buttermilk, ½ tsp salt, and ¼ tsp black pepper to the eggs.
3. Whisk the mixture vigorously for 45 seconds until fully combined and slightly frothy.
4. Place a nonstick skillet over low heat and add 2 tbsp unsalted butter.
5. Let the butter melt completely and coat the skillet evenly, about 1 minute.
6. Pour the egg mixture into the skillet.
7. Let the eggs sit undisturbed for 20 seconds until edges begin to set.
8. Gently push the eggs from the edges toward the center with a spatula every 15 seconds.
9. Continue this low, slow cooking process for 4-5 minutes until eggs form soft, moist curds.
10. Remove the skillet from heat when eggs are still slightly wet-looking.
11. Let the eggs rest in the hot pan for 1 minute to finish setting.
You’ll notice the buttermilk creates an exceptionally tender, almost custard-like texture with a subtle tang that brightens each bite. Serve these softly set eggs over toasted sourdough with fresh chives, or fold them into warm tortillas with avocado for a simple, satisfying breakfast taco—either way, their delicate richness feels like a quiet morning gift.
Buttermilk Banana Bread with Walnuts
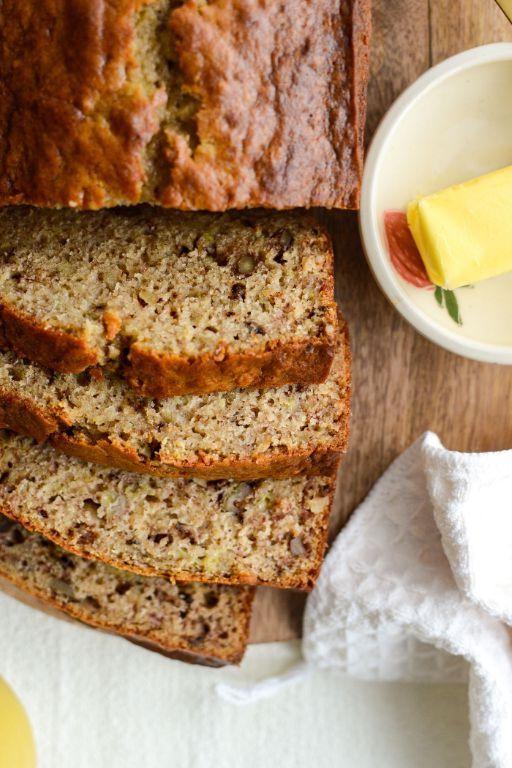
Cradling a warm loaf of banana bread feels like holding a piece of quiet comfort, the kind that settles softly into a rainy afternoon or a slow Sunday morning. There’s something deeply soothing about the familiar scent of ripe bananas and toasted walnuts mingling in the oven, a gentle reminder that some of the best things are made with patience and simplicity. This version, with its tender crumb and subtle tang, has become my go-to when the world outside feels a little too loud.
1
loaf15
minutes60
minutesIngredients
– Flour – 2 cups
– Sugar – ¾ cup
– Baking soda – 1 tsp
– Salt – ½ tsp
– Buttermilk – ½ cup
– Eggs – 2
– Mashed bananas – 1 cup
– Chopped walnuts – ½ cup
– Butter – ½ cup
Instructions
1. Preheat your oven to 350°F and generously grease a 9×5-inch loaf pan with butter or non-stick spray.
2. In a large mixing bowl, whisk together 2 cups of flour, ¾ cup of sugar, 1 teaspoon of baking soda, and ½ teaspoon of salt until no streaks remain.
3. In a separate bowl, combine ½ cup of buttermilk, 2 lightly beaten eggs, 1 cup of mashed bananas, and ½ cup of melted, cooled butter, stirring gently until just incorporated.
4. Pour the wet ingredients into the dry mixture and fold together with a spatula until barely combined; a few flour streaks are okay to avoid overmixing, which can make the bread tough.
5. Gently fold in ½ cup of chopped walnuts, distributing them evenly without overworking the batter.
6. Transfer the batter to the prepared loaf pan and smooth the top with your spatula.
7. Bake at 350°F for 55–65 minutes, or until a toothpick inserted into the center comes out clean with no wet batter clinging to it.
8. Let the bread cool in the pan for 15 minutes before turning it out onto a wire rack to cool completely, which helps it set without becoming gummy.
Just out of the oven, this bread boasts a crackly, golden crust that gives way to a moist, tender interior speckled with toasty walnuts. The buttermilk lends a subtle tang that balances the sweetness, making each slice feel both rich and light. For a cozy twist, try it lightly toasted with a smear of salted butter or crumbled over vanilla ice cream for a simple, comforting dessert.
Buttermilk Fried Chicken and Waffles

Wandering through memories of Sunday mornings, I find myself returning to the quiet comfort of buttermilk fried chicken resting atop golden waffles—a dish that feels like home in every crispy, tender bite.
2
portions30
minutes68
minutesIngredients
Buttermilk – 2 cups
Flour – 1½ cups
Salt – 1 tsp
Black pepper – ½ tsp
Paprika – 1 tsp
Garlic powder – ½ tsp
Baking powder – 1 tsp
Sugar – 2 tbsp
Eggs – 2
Vegetable oil – 4 cups
Chicken thighs – 4
Waffle mix – 2 cups
Instructions
1. Whisk buttermilk, 1 egg, ½ tsp salt, and ¼ tsp black pepper in a bowl until fully combined.
2. Submerge chicken thighs in the buttermilk mixture, cover, and refrigerate for 8 hours—this tenderizes the meat deeply.
3. Combine flour, ½ tsp salt, ¼ tsp black pepper, paprika, and garlic powder in a shallow dish.
4. Remove one chicken thigh from buttermilk, letting excess drip off for 10 seconds.
5. Dredge the chicken in the flour mixture, pressing firmly to create a thick, even coating.
6. Repeat steps 4-5 for all chicken thighs, placing them on a wire rack to prevent sogginess.
7. Heat vegetable oil in a deep pot to 350°F, checking with a thermometer for accuracy.
8. Carefully lower one chicken thigh into the oil and fry for 12-14 minutes until golden brown and internal temperature reaches 165°F.
9. Fry remaining thighs one at a time to maintain oil temperature, transferring to a paper towel-lined plate.
10. Whisk waffle mix, 1 egg, baking powder, sugar, and 1½ cups water in a bowl until smooth with minimal lumps.
11. Preheat waffle iron to medium-high and lightly grease with vegetable oil.
12. Pour ½ cup batter onto the iron and cook for 4-5 minutes until steam stops and waffles are crisp.
13. Repeat step 12 until all batter is used, keeping waffles warm in a 200°F oven.
Now, the magic unfolds as you break through the craggy crust into juicy chicken, its heat melting into the waffle’s soft pockets. Drizzle maple syrup along the edges where sweet and savory meet, or crown it with pickled jalapeños for a bright, spicy contrast.
Buttermilk Overnight Oats with Almonds
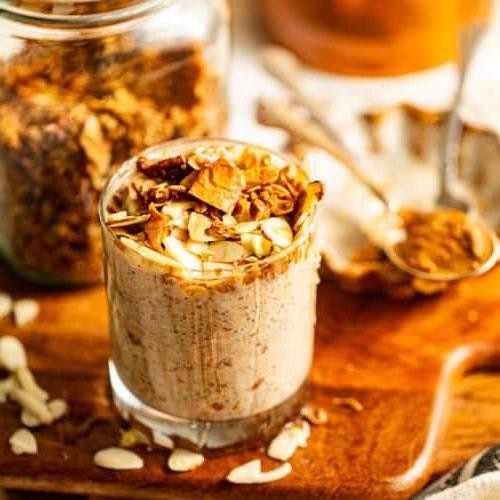
Sometimes the simplest mornings begin the night before, when you quietly stir together these few ingredients and tuck them away to transform while you sleep. There’s a gentle promise in that small act—a nourishing breakfast waiting with no morning rush.
1
servings10
minutesIngredients
Old-fashioned rolled oats – ½ cup
Buttermilk – ½ cup
Maple syrup – 1 tbsp
Raw almonds – 2 tbsp
Sea salt – ¼ tsp
Instructions
1. Measure ½ cup old-fashioned rolled oats into a 12-ounce jar or bowl with a lid.
2. Pour ½ cup buttermilk over the oats, ensuring all oats are fully submerged.
3. Drizzle 1 tablespoon maple syrup evenly over the buttermilk and oats.
4. Add ¼ teaspoon sea salt directly into the mixture.
5. Stir all ingredients thoroughly with a spoon until the maple syrup and salt are fully incorporated.
6. Place the lid securely on the jar or cover the bowl tightly with plastic wrap.
7. Refrigerate the mixture for at least 8 hours or overnight—this slow soak softens the oats perfectly.
8. Chop 2 tablespoons raw almonds into small pieces using a knife on a cutting board.
9. Remove the soaked oats from the refrigerator after the 8-hour chilling period.
10. Stir the chopped almonds into the oat mixture until evenly distributed.
11. Let the oats sit at room temperature for 10 minutes to take the chill off before serving.
12. Spoon the finished overnight oats into a serving bowl. What emerges is a creamy, tangy-sweet bowl with satisfying crunch from the almonds—try it layered with fresh berries or drizzled with extra maple syrup for a cozy, complete morning.
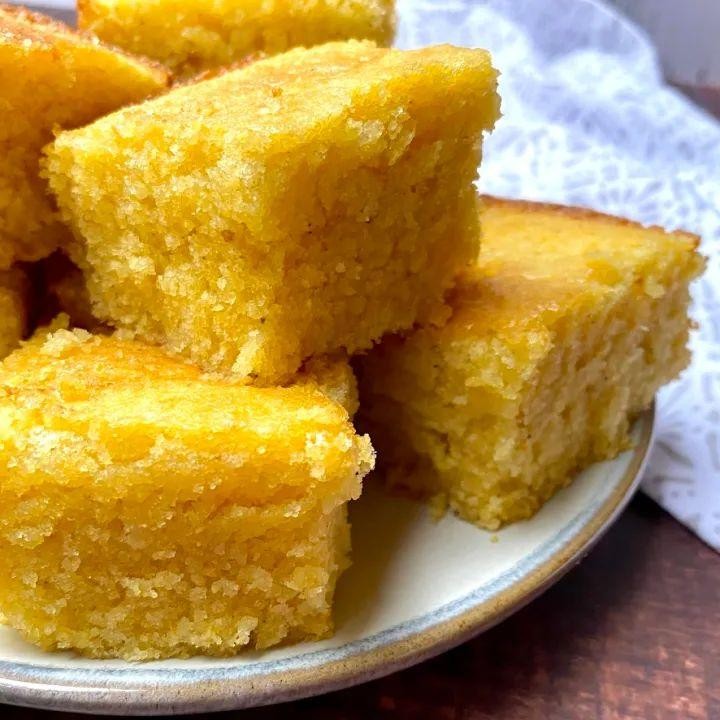
Buttermilk Cornbread with Honey Butter
Just sitting here with my notebook, thinking about how some recipes feel like coming home after a long journey. This cornbread is one of those quiet comforts that fills the kitchen with warmth and the heart with simple joy.
8
servings15
minutes25
minutesIngredients
Cornmeal – 1 cup
Flour – 1 cup
Baking powder – 1 tbsp
Salt – 1 tsp
Buttermilk – 1 cup
Egg – 1
Butter – ½ cup
Honey – ¼ cup
Instructions
1. Preheat your oven to 400°F and place a 10-inch cast iron skillet inside to heat.
2. Whisk together 1 cup cornmeal, 1 cup flour, 1 tbsp baking powder, and 1 tsp salt in a large bowl.
3. In another bowl, beat 1 egg and 1 cup buttermilk until fully combined.
4. Carefully remove the hot skillet from the oven using oven mitts and add ¼ cup of the butter, swirling until melted and coating the bottom.
5. Pour the melted butter from the skillet into the buttermilk mixture, reserving the greased skillet.
6. Tip: Pouring the hot butter into the cold buttermilk helps temper the mixture without curdling.
7. Combine the wet and dry ingredients, stirring just until no dry streaks remain – do not overmix.
8. Tip: A few lumps are fine; overmixing develops gluten and makes cornbread tough.
9. Immediately pour the batter into the hot skillet – it should sizzle upon contact.
10. Bake at 400°F for 20-25 minutes until golden brown and a toothpick inserted in the center comes out clean.
11. While baking, soften the remaining ¼ cup butter and whip with ¼ cup honey until light and fluffy.
12. Tip: For extra fluffy honey butter, use room temperature butter and whip for 2-3 minutes.
13. Let the cornbread cool in the skillet for 10 minutes before slicing.
14. Serve warm cornbread slices with honey butter.
A golden crust gives way to a tender, moist crumb that’s neither too sweet nor too plain. Drizzle extra honey butter over top while still warm, or crumble it into a bowl of chili for the ultimate comfort meal.
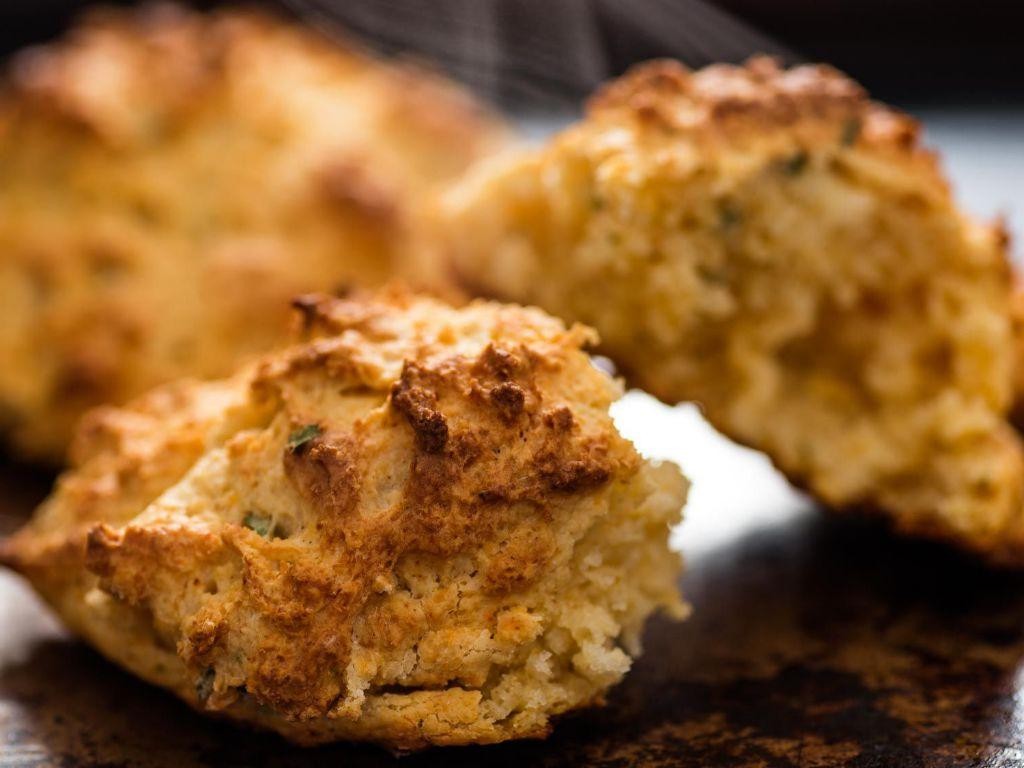
Cheese and Buttermilk Drop Biscuits
Under the quiet hum of the afternoon, there’s something deeply comforting about the simple act of mixing flour and buttermilk, watching a humble dough come together with just a few gentle stirs. These cheese and buttermilk drop biscuits emerge from the oven with craggy tops and a tender crumb, each bite carrying the subtle tang of buttermilk and the melt of sharp cheddar. They’re the kind of recipe that feels like a quiet gift to yourself, no fuss, no rolling—just soft, warm clouds of comfort.
12
biscuits15
minutes15
minutesIngredients
Flour – 2 cups
Baking powder – 1 tbsp
Salt – 1 tsp
Butter – ½ cup
Buttermilk – 1 cup
Cheddar cheese – 1 cup, shredded
Instructions
1. Preheat your oven to 450°F and line a baking sheet with parchment paper.
2. In a large bowl, whisk together 2 cups of flour, 1 tbsp of baking powder, and 1 tsp of salt until fully combined.
3. Cut ½ cup of cold butter into small cubes and add it to the flour mixture.
4. Use your fingertips or a pastry cutter to work the butter into the flour until the mixture resembles coarse crumbs with some pea-sized butter pieces remaining; this creates flaky layers as the biscuits bake.
5. Pour in 1 cup of buttermilk and gently stir with a fork until a shaggy, slightly sticky dough forms—do not overmix to keep the biscuits tender.
6. Fold in 1 cup of shredded cheddar cheese until just distributed throughout the dough.
7. Drop heaping tablespoonfuls of the dough onto the prepared baking sheet, spacing them about 2 inches apart to allow for spreading.
8. Bake for 12–15 minutes, or until the biscuits are golden brown on top and sound hollow when tapped lightly on the bottom.
9. Transfer the biscuits to a wire rack and let them cool for 5 minutes before serving.
Hot from the oven, these biscuits boast a craggy exterior that gives way to a soft, pillowy interior, with pockets of melted cheddar adding a savory richness. Serve them split and slathered with honey butter for a sweet-savory contrast, or alongside a bowl of soup to soak up every last drop.
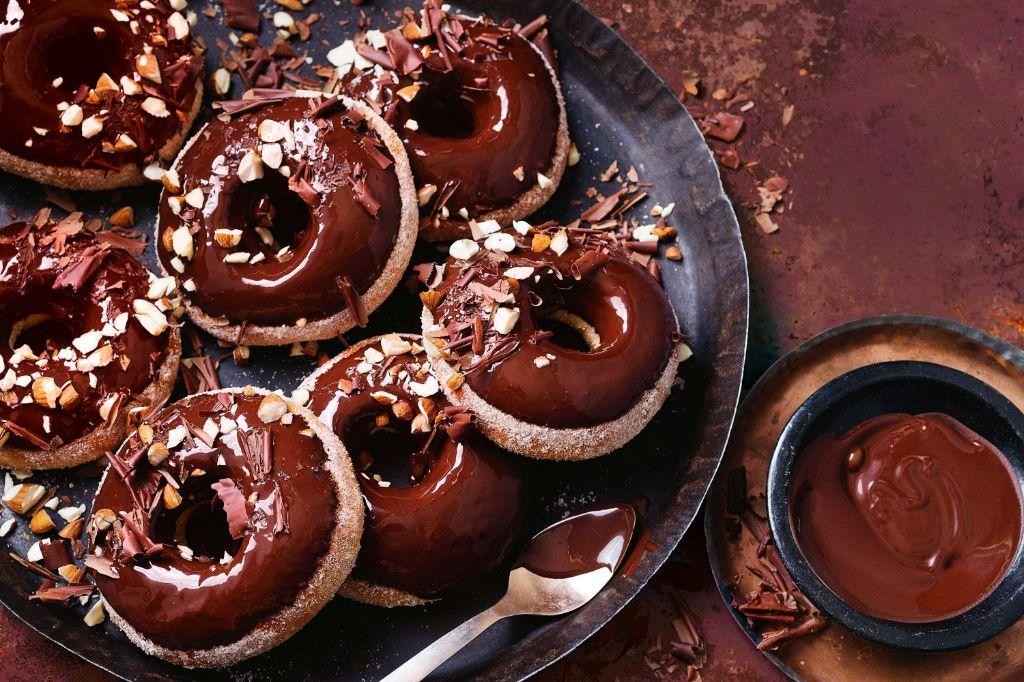
Buttermilk Donuts with Chocolate Glaze
Kind of like finding an old photograph, these donuts bring back that quiet Sunday morning feeling when the kitchen fills with the scent of something simple and sweet. There’s a gentle rhythm to making them, a slow unfolding that feels like a small meditation in the middle of a busy week.
12
donuts25
minutes20
minutesIngredients
All-Purpose Flour – 2 ½ cups
Granulated Sugar – ¾ cup
Baking Powder – 2 tsp
Salt – ½ tsp
Buttermilk – 1 cup
Large Egg – 1
Unsalted Butter – 2 tbsp, melted
Vegetable Oil – 4 cups
Semi-Sweet Chocolate Chips – 1 cup
Heavy Cream – ½ cup
Instructions
1. In a large bowl, whisk together 2 ½ cups of all-purpose flour, ¾ cup of granulated sugar, 2 teaspoons of baking powder, and ½ teaspoon of salt until no streaks remain. 2. In a separate medium bowl, whisk 1 cup of buttermilk, 1 large egg, and 2 tablespoons of melted unsalted butter until fully combined and smooth. 3. Pour the wet ingredients into the dry ingredients and stir with a spatula just until a soft, shaggy dough forms; do not overmix to ensure tender donuts. 4. Lightly flour a clean surface and turn the dough out onto it. 5. Gently pat the dough into a ½-inch thick circle. 6. Use a floured 3-inch round cutter to cut out donuts, then use a 1-inch cutter to remove the centers. 7. Gather the dough scraps, re-roll them to ½-inch thickness, and cut out more donuts until all dough is used. 8. Pour 4 cups of vegetable oil into a heavy-bottomed pot or Dutch oven, attaching a candy thermometer to the side. 9. Heat the oil over medium heat until the thermometer reads 350°F. 10. Carefully place 2-3 donuts into the hot oil using a slotted spoon, frying for 60-90 seconds per side until golden brown. 11. Remove the fried donuts with the slotted spoon and drain them on a wire rack set over a baking sheet; frying in small batches prevents the oil temperature from dropping. 12. Repeat steps 10-11 until all donuts and holes are fried. 13. Let the donuts cool completely on the wire rack for about 30 minutes. 14. For the glaze, combine 1 cup of semi-sweet chocolate chips and ½ cup of heavy cream in a microwave-safe bowl. 15. Microwave the mixture in 30-second intervals, stirring between each, until the chocolate is fully melted and the glaze is smooth. 16. Dip the top of each cooled donut into the warm chocolate glaze, allowing the excess to drip back into the bowl. 17. Return the glazed donuts to the wire rack and let the glaze set for 15 minutes. Really, the magic is in that first bite—the crisp shell giving way to a cloud-soft, cakey interior, with the dark chocolate glaze adding a rich, slightly bitter contrast. They’re wonderful still slightly warm, perhaps with a cold glass of milk, or crumbled over a bowl of vanilla ice cream for a decadent twist.
Buttermilk and Chive Frittata

Years of weekend mornings have taught me that the simplest dishes often hold the most comfort, and this quiet morning feels perfect for letting eggs, buttermilk, and chives come together in a gentle, forgiving bake. You can almost feel the kitchen settle as you begin, the process itself a kind of meditation.
2
portions10
minutes24
minutesIngredients
– Large eggs – 6
– Buttermilk – ½ cup
– Fresh chives – 2 tbsp, chopped
– Unsalted butter – 1 tbsp
– Salt – ½ tsp
– Black pepper – ¼ tsp
Instructions
1. Preheat your oven to 375°F.
2. Crack 6 large eggs into a medium mixing bowl.
3. Whisk the eggs vigorously for 60 seconds until they are pale and frothy.
4. Pour ½ cup of buttermilk into the whisked eggs.
5. Add ½ tsp of salt and ¼ tsp of black pepper to the bowl.
6. Whisk the mixture for another 45 seconds until it is fully combined and slightly bubbly.
7. Fold 2 tbsp of chopped fresh chives into the egg mixture with a spatula. Tip: For the most flavor, chop chives just before using them to prevent wilting.
8. Place a 10-inch oven-safe skillet on the stovetop over medium-low heat.
9. Melt 1 tbsp of unsalted butter in the skillet, swirling to coat the bottom and sides evenly.
10. Pour the egg and chive mixture into the warmed, buttered skillet.
11. Let the frittata cook undisturbed on the stovetop for 4 minutes, until the edges just begin to set. Tip: Avoid stirring to allow a solid base to form.
12. Transfer the skillet from the stovetop to the preheated oven.
13. Bake the frittata for 18-20 minutes, until the top is golden and the center is fully set (it should not jiggle when you gently shake the skillet). Tip: Check for doneness at 18 minutes; overbaking can make the eggs rubbery.
14. Remove the skillet from the oven using an oven mitt.
15. Let the frittata rest in the skillet for 5 minutes before slicing.
16. Slice the frittata into wedges and serve. My favorite part is the tender, custardy interior that the buttermilk creates, a soft contrast to the subtle onion flavor of the chives. It’s lovely served just warm, perhaps with a simple salad of bitter greens to balance its richness.
Buttermilk Crepes with Strawberries and Cream

Wandering through the quiet kitchen this morning, I found myself drawn to the simple elegance of crepes, their delicate folds holding memories of slow weekend breakfasts and the gentle promise of something sweet to start the day. There’s a softness to their preparation that feels like a meditation, each swirl of the batter in the pan a small, intentional act of care.
5
servings15
minutes24
minutesIngredients
Flour – 1 cup
Buttermilk – 1 ¼ cups
Eggs – 2
Butter – 2 tbsp, melted
Sugar – 2 tbsp
Salt – ¼ tsp
Strawberries – 1 cup, sliced
Heavy cream – ½ cup
Powdered sugar – 1 tbsp
Instructions
1. Whisk together 1 cup of flour, 2 tbsp of sugar, and ¼ tsp of salt in a medium bowl until fully combined.
2. In a separate bowl, lightly beat 2 eggs, then pour in 1 ¼ cups of buttermilk and 2 tbsp of melted butter, whisking until smooth.
3. Gradually pour the wet ingredients into the dry ingredients, whisking continuously to prevent lumps from forming.
4. Let the batter rest for 10 minutes at room temperature to allow the flour to hydrate, which results in more tender crepes.
5. Heat a non-stick skillet over medium heat (325°F), then lightly grease it with butter using a paper towel.
6. Pour ¼ cup of batter into the center of the skillet, immediately tilting and swirling the pan to spread it into a thin, even circle.
7. Cook the crepe for 60–90 seconds until the edges lift easily and the surface appears dry with light golden spots.
8. Flip the crepe using a thin spatula and cook for another 30–45 seconds until lightly browned on the second side.
9. Transfer the cooked crepe to a plate and repeat with the remaining batter, stacking crepes with parchment paper between to prevent sticking.
10. Whip ½ cup of heavy cream with 1 tbsp of powdered sugar until soft peaks form, being careful not to over-whip to maintain a silky texture.
11. Spoon the whipped cream onto the center of each crepe, then top with 1 cup of sliced strawberries.
12. Gently fold or roll the crepes to enclose the filling.
Buttery and subtly tangy, these crepes cradle the sweet burst of strawberries and cloud-like cream in each delicate bite. For a whimsical twist, layer them in a shallow bowl with extra berries and a drizzle of honey, letting the folds peek through like petals.
Conclusion
Ultimately, these 18 buttermilk breakfast recipes are your ticket to creating unforgettable morning moments. From fluffy pancakes to tender biscuits, each dish brings comfort and joy to your table. I’d love to hear which recipes become your family favorites—drop a comment below and don’t forget to share this roundup on Pinterest so others can discover these delicious morning treats too!