There’s something magical about that perfect crunch and peanut buttery goodness of Butterfinger candy bars. Whether you’re craving nostalgic treats or looking to impress with creative desserts, these irresistible recipes will transform that classic flavor into everything from cookies to cheesecakes. Get ready to discover 19 delicious ways to satisfy your sweet tooth—your next favorite treat is waiting!
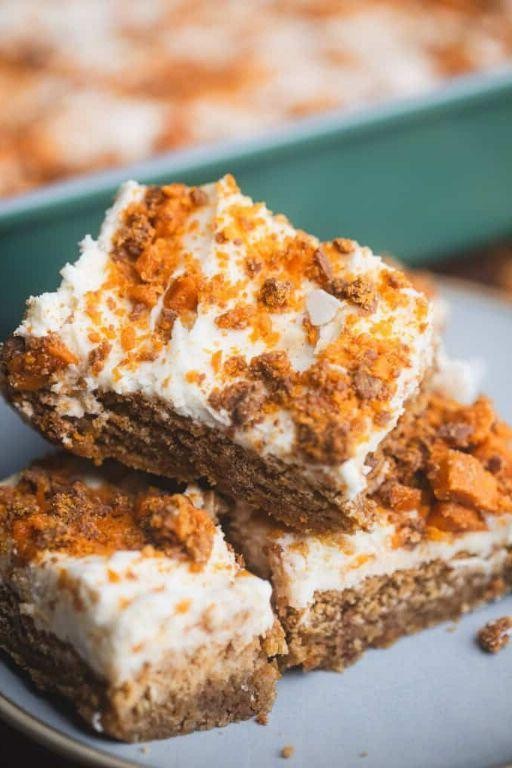
Butterfinger Brownie Bars

Gosh, I still remember the first time I made these Butterfinger Brownie Bars for my nephew’s birthday—he declared them “way better than regular brownies” and now requests them every year. There’s something magical about that crunchy peanut butter candy mixed into rich, fudgy brownie batter that just hits all the right notes. I always keep a few extra Butterfingers on hand because let’s be honest, some always seem to disappear during the baking process!
Ingredients
– 1 cup unsalted butter (melted, or use salted butter and reduce added salt)
– 2 cups granulated sugar
– 4 large eggs (at room temperature for easier mixing)
– 1 tsp vanilla extract
– 1 cup all-purpose flour (spooned and leveled to avoid dense brownies)
– 3/4 cup cocoa powder (natural, not Dutch-process)
– 1/2 tsp salt
– 1 1/2 cups chopped Butterfinger bars (about 8 full-size bars, reserve some for topping)
Instructions
1. Preheat your oven to 350°F and line a 9×13 inch baking pan with parchment paper, leaving overhang on two sides for easy removal.
2. In a large bowl, whisk together the melted butter and granulated sugar until fully combined and slightly glossy, about 1 minute.
3. Add the eggs one at a time, whisking vigorously after each addition until the mixture becomes thick and pale yellow.
4. Stir in the vanilla extract until just incorporated.
5. Sift the flour, cocoa powder, and salt directly into the wet ingredients to prevent lumps.
6. Use a spatula to fold the dry ingredients into the wet mixture until no flour streaks remain, being careful not to overmix.
7. Gently fold in 1 cup of the chopped Butterfinger pieces, reserving 1/2 cup for the topping.
8. Spread the batter evenly into the prepared pan using an offset spatula.
9. Sprinkle the remaining 1/2 cup of Butterfinger pieces evenly over the top of the batter.
10. Bake at 350°F for 25-30 minutes until the edges are set and a toothpick inserted 2 inches from the edge comes out with moist crumbs.
11. Cool completely in the pan on a wire rack for at least 2 hours before slicing.
Knowing when to pull these from the oven is key—they continue to set as they cool, so don’t wait for a clean toothpick test. Keep any leftovers (if there are any!) in an airtight container where the crispy Butterfinger bits will maintain their satisfying crunch against the dense, fudgy brownie base for days.
Butterfinger Cheesecake

Zesty and utterly irresistible, this Butterfinger Cheesecake has become my go-to dessert for every gathering since I first experimented with it last fall. I still remember how my kitchen smelled like caramelized peanut butter heaven that day, and now I make it whenever I need a guaranteed crowd-pleaser that feels both nostalgic and special.
Ingredients
– 1 ½ cups graham cracker crumbs (about 12 full sheets, crushed)
– ⅓ cup granulated sugar
– 6 tbsp unsalted butter, melted (plus extra for greasing)
– 24 oz cream cheese, softened to room temperature
– ¾ cup granulated sugar
– 1 cup sour cream, at room temperature
– 3 large eggs, at room temperature
– 1 tsp vanilla extract
– 1 ½ cups crushed Butterfinger bars (about 12 fun-size bars), divided
Instructions
1. Preheat your oven to 325°F and lightly grease a 9-inch springform pan with butter.
2. Combine graham cracker crumbs and ⅓ cup sugar in a medium bowl.
3. Pour melted butter over crumb mixture and stir until evenly moistened.
4. Press mixture firmly into the bottom of the prepared pan using the bottom of a measuring cup.
5. Bake crust for 10 minutes at 325°F until lightly golden, then cool completely on a wire rack.
6. Beat cream cheese and ¾ cup sugar with an electric mixer on medium speed for 3 minutes until completely smooth.
7. Add sour cream and vanilla extract, mixing for 1 minute until incorporated.
8. Add eggs one at a time, mixing just until each egg disappears into the batter.
9. Gently fold in 1 cup of crushed Butterfinger bars with a spatula.
10. Pour filling over cooled crust and smooth the top with an offset spatula.
11. Wrap the outside of the springform pan tightly with aluminum foil.
12. Place cheesecake in a large roasting pan and pour hot water into the roasting pan until it reaches halfway up the sides of the springform.
13. Bake at 325°F for 60-70 minutes until the edges are set but the center still jiggles slightly.
14. Turn off the oven, prop the door open with a wooden spoon, and let cheesecake cool in the oven for 1 hour.
15. Remove from oven and run a knife around the edge of the cheesecake to prevent cracking.
16. Cool completely at room temperature for 2 hours, then refrigerate for at least 6 hours or overnight.
17. Sprinkle remaining ½ cup crushed Butterfinger over the top before serving.
Keeping this cheesecake chilled overnight gives it that perfect dense-yet-creamy texture that slices beautifully. The Butterfinger pieces create wonderful crunchy surprises throughout the smooth filling, while the peanut butter flavor intensifies as it sits. I love serving thick slices with a drizzle of chocolate sauce and extra Butterfinger crumbs scattered around the plate for that diner-style presentation.
Butterfinger Cookies

A few weeks ago, I was cleaning out my pantry and found three leftover Butterfinger bars from Halloween—talk about a happy accident! These cookies were born from that discovery, and they’ve quickly become my family’s new favorite treat, perfect for satisfying those mid-afternoon sugar cravings.
Ingredients
– 1 cup unsalted butter, softened at room temperature (this helps create a chewier texture)
– ¾ cup granulated sugar
– ¾ cup packed light brown sugar
– 2 large eggs
– 1 tsp vanilla extract
– 2¼ cups all-purpose flour, spooned and leveled (for accurate measuring)
– 1 tsp baking soda
– ½ tsp salt
– 1½ cups chopped Butterfinger candy bars (about 8 fun-size bars)
Instructions
1. Preheat your oven to 375°F and line two baking sheets with parchment paper.
2. In a large mixing bowl, cream together the softened butter, granulated sugar, and brown sugar on medium speed for 2–3 minutes until light and fluffy.
3. Add the eggs one at a time, mixing fully after each addition until just combined.
4. Mix in the vanilla extract until incorporated.
5. In a separate bowl, whisk together the flour, baking soda, and salt to ensure even distribution.
6. Gradually add the dry ingredients to the wet ingredients, mixing on low speed until no flour streaks remain.
7. Gently fold in the chopped Butterfinger pieces with a spatula to avoid overmixing.
8. Scoop 2-tablespoon portions of dough onto the prepared baking sheets, spacing them 2 inches apart.
9. Bake for 9–11 minutes, or until the edges are golden brown but the centers still look slightly soft.
10. Let the cookies cool on the baking sheet for 5 minutes before transferring to a wire rack.
Fresh from the oven, these cookies have a crisp edge that gives way to a soft, chewy center packed with crunchy, caramel-y Butterfinger bits. For an extra indulgence, try sandwiching a scoop of vanilla ice cream between two slightly warm cookies—it’s a dessert upgrade that never fails to impress.
Butterfinger Blondies
Unbelievably, I almost skipped making these Butterfinger Blondies last fall when my neighbor brought over a giant bag of Halloween candy—thank goodness I didn’t! There’s something magical about how the candy bars transform into chewy, caramel-like pockets amidst the rich blondie base, creating what’s become my most-requested treat for potlucks and game days alike.
Ingredients
- 1 cup unsalted butter, melted (cooled slightly to avoid cooking the eggs)
- 1 ½ cups light brown sugar, packed (dark brown works for deeper molasses flavor)
- 2 large eggs, at room temperature
- 2 tsp vanilla extract
- 2 cups all-purpose flour, spooned and leveled
- 1 tsp baking powder
- ½ tsp salt
- 1 ½ cups chopped Butterfinger bars (about 8 full-size bars; freeze for easier chopping)
Instructions
- Preheat your oven to 350°F and line an 8×8-inch baking pan with parchment paper, leaving overhang on two sides for easy removal.
- Whisk the melted butter and brown sugar in a large bowl until smooth and no sugar lumps remain, about 1 minute.
- Add the eggs one at a time, whisking vigorously after each addition until fully incorporated and the mixture lightens slightly.
- Stir in the vanilla extract until evenly distributed throughout the wet ingredients.
- In a separate medium bowl, whisk together the flour, baking powder, and salt to ensure even leavening and avoid bitter spots.
- Gradually fold the dry ingredients into the wet mixture using a spatula until just combined—do not overmix, as this keeps the blondies tender.
- Gently fold in the chopped Butterfinger pieces, reserving 2 tablespoons for topping, to prevent them from sinking during baking.
- Spread the batter evenly into the prepared pan and smooth the top with the spatula.
- Sprinkle the reserved Butterfinger pieces over the surface for extra crunch and visual appeal.
- Bake for 25–30 minutes, or until the edges are golden and a toothpick inserted 2 inches from the center comes out with a few moist crumbs—this ensures fudgy, not dry, blondies.
- Cool completely in the pan on a wire rack for at least 1 hour before lifting out and slicing into squares.
Divinely chewy with crispy edges, these blondies hide melty peanut butter pockets that contrast the buttery base. Serve them slightly warm with a scoop of vanilla ice cream for a next-level dessert, or pack them in lunchboxes—they stay soft for days if hidden from hungry family members!
Butterfinger Ice Cream

Yesterday, I was craving something sweet and nostalgic, so I decided to whip up a batch of Butterfinger ice cream—it’s my go-to when I need a pick-me-up after a long day. There’s something magical about that crunchy, peanut buttery candy mixed into creamy vanilla ice cream that just hits the spot every single time.
Ingredients
- 2 cups heavy cream (chilled for best results)
- 1 cup whole milk (or substitute with half-and-half for extra richness)
- 3/4 cup granulated sugar (adjust slightly if you prefer less sweetness)
- 1 tablespoon vanilla extract (use pure vanilla for the best flavor)
- 4 large Butterfinger candy bars, crushed (about 1.5 cups; reserve some for topping)
Instructions
- Pour the heavy cream, whole milk, and granulated sugar into a large mixing bowl.
- Whisk the mixture vigorously for 2–3 minutes until the sugar is fully dissolved and the liquid is smooth.
- Stir in the vanilla extract until evenly combined with the base.
- Tip: Chill the mixture in the refrigerator for 30 minutes to help it thicken slightly before churning.
- Transfer the chilled mixture to an ice cream maker and churn according to the manufacturer’s instructions, usually about 20–25 minutes, until it reaches a soft-serve consistency.
- Tip: Avoid over-churning; stop once the ice cream holds its shape but is still creamy.
- Fold in 1 cup of the crushed Butterfinger pieces gently with a spatula to distribute them evenly.
- Transfer the ice cream to a freezer-safe container, spreading it into an even layer.
- Sprinkle the remaining 1/2 cup of crushed Butterfinger on top as a garnish.
- Cover the container tightly with a lid or plastic wrap to prevent ice crystals from forming.
- Freeze the ice cream for at least 4 hours, or until firm and scoopable.
- Tip: Let the ice cream sit at room temperature for 5–10 minutes before serving to soften slightly for easier scooping.
Perfectly creamy with bursts of crunchy, peanut buttery goodness, this ice cream is a dream come true for candy lovers. I love serving it in waffle cones with an extra sprinkle of Butterfinger on top—it’s like a party in every bite!
Butterfinger Cupcakes
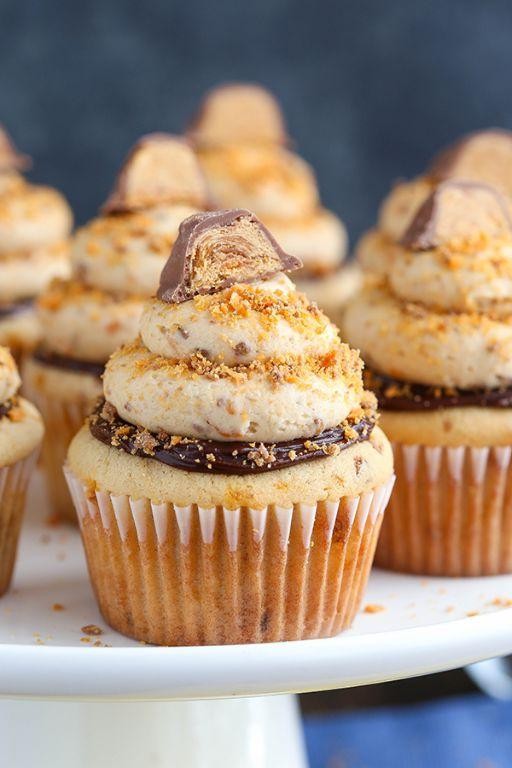
Gosh, I still remember the first time I tried to recreate my favorite candy bar in cupcake form – let’s just say the kitchen looked like a Butterfinger exploded! After plenty of trial and error (and sticky fingers), I’ve perfected these Butterfinger cupcakes that capture all that peanut-buttery, chocolatey crunch we love.
Ingredients
– 1 ½ cups all-purpose flour (spoon and level for accuracy)
– 1 cup granulated sugar
– ½ cup unsweetened cocoa powder (Dutch-processed works great)
– 1 tsp baking soda
– ½ tsp salt
– 1 cup buttermilk (or 1 cup milk + 1 tbsp vinegar)
– ½ cup vegetable oil (or any neutral oil)
– 2 large eggs, room temperature
– 1 tsp vanilla extract
– ¾ cup hot coffee (enhances chocolate flavor)
– 8 fun-size Butterfinger bars, crushed (reserve some for topping)
– 1 cup creamy peanut butter
– ½ cup unsalted butter, softened
– 2 cups powdered sugar
– 2-3 tbsp heavy cream
Instructions
1. Preheat your oven to 350°F and line a 12-cup muffin tin with cupcake liners.
2. Whisk together flour, sugar, cocoa powder, baking soda, and salt in a large bowl until well combined.
3. In a separate bowl, whisk buttermilk, oil, eggs, and vanilla until smooth.
4. Pour wet ingredients into dry ingredients and mix until just combined – don’t overmix!
5. Carefully stir in hot coffee until the batter is thin but uniform.
6. Fold in ½ cup of crushed Butterfinger pieces, reserving the rest for garnish.
7. Divide batter evenly among cupcake liners, filling each about ⅔ full.
8. Bake for 18-22 minutes until a toothpick inserted comes out clean.
9. Cool cupcakes in the pan for 5 minutes, then transfer to a wire rack to cool completely.
10. While cupcakes cool, beat peanut butter and softened butter with an electric mixer until creamy.
11. Gradually add powdered sugar, mixing on low speed until incorporated.
12. Add heavy cream one tablespoon at a time until frosting reaches spreadable consistency.
13. Frost cooled cupcakes generously with peanut butter frosting.
14. Top each cupcake with remaining crushed Butterfinger pieces.
The combination of moist chocolate cake with that signature Butterfinger crunch is pure magic – I love how the peanut butter frosting mimics the candy’s center. These are perfect for parties, but honestly, I’ve been known to enjoy one with my morning coffee (don’t judge!).
Butterfinger Fudge

Never have I been more excited to share a recipe than this Butterfinger Fudge that’s become my go-to holiday treat. After my nephew declared it “better than the candy aisle” last Christmas, I knew I had to perfect this version that balances that signature Butterfinger crunch with creamy, melt-in-your-mouth fudge. Now I make a double batch every December because it disappears faster than you can say “trick or treat.”
Ingredients
– 3 cups white chocolate chips (high-quality melts smoother)
– 1 (14 oz) can sweetened condensed milk (don’t substitute evaporated milk)
– 1 teaspoon vanilla extract (pure vanilla adds depth)
– 8 regular-size Butterfinger candy bars, crushed (about 2 cups, reserve ¼ cup for topping)
– ¼ teaspoon salt (enhances the chocolate flavor)
Instructions
1. Line an 8×8 inch baking pan with parchment paper, leaving overhang on two sides for easy removal.
2. Combine white chocolate chips and sweetened condensed milk in a medium saucepan over low heat.
3. Stir constantly with a silicone spatula for 4-5 minutes until chips are completely melted and mixture is smooth.
4. Remove saucepan from heat immediately when no white streaks remain (tip: overheating causes graininess).
5. Stir in vanilla extract and salt until fully incorporated.
6. Fold in 1¾ cups crushed Butterfinger bars until evenly distributed throughout the fudge base.
7. Transfer mixture to prepared pan and spread evenly with offset spatula.
8. Sprinkle reserved ¼ cup crushed Butterfinger over top, pressing gently to adhere (tip: this creates texture contrast).
9. Refrigerate uncovered for at least 3 hours until firm to the touch (tip: don’t rush this setting time).
10. Use parchment overhang to lift fudge from pan and place on cutting board.
11. Cut into 1-inch squares with sharp knife wiped clean between cuts for neat edges.
Absolutely magical how the creamy white chocolate fudge contrasts with those crispy Butterfinger bits throughout. The salt balance keeps it from being overly sweet, making it perfect for gifting in decorative tins or crumbling over vanilla ice cream for an extra-special sundae topping.
Butterfinger Pie

Now, I have to confess something—I’m a sucker for anything that combines chocolate and peanut butter, and this Butterfinger Pie is my latest obsession. It all started when my friend brought a version to a potluck, and after one bite, I knew I had to recreate it at home. Trust me, this no-bake dessert is so easy and satisfying, you’ll want to make it for every gathering.
Ingredients
– 1 ½ cups chocolate cookie crumbs (like Oreo filling removed, or graham crackers for a milder base)
– 6 tablespoons unsalted butter, melted (add a pinch of salt if using unsalted)
– 8 ounces cream cheese, softened to room temperature for smoother mixing
– 1 cup powdered sugar, sifted to avoid lumps
– 1 teaspoon vanilla extract (pure adds the best flavor)
– 1 ½ cups heavy whipping cream, chilled for better whipping
– 4 full-size Butterfinger candy bars, crushed into small chunks (reserve some for topping)
– ½ cup hot fudge sauce, warmed slightly for easy drizzling
Instructions
1. Combine 1 ½ cups chocolate cookie crumbs and 6 tablespoons melted unsalted butter in a medium bowl until the mixture holds together when pressed.
2. Press the crumb mixture firmly into the bottom and up the sides of a 9-inch pie dish using the back of a spoon or measuring cup.
3. Chill the crust in the refrigerator for 15 minutes to set it while you prepare the filling.
4. In a large mixing bowl, beat 8 ounces softened cream cheese with an electric mixer on medium speed for 1–2 minutes until smooth and creamy.
5. Gradually add 1 cup sifted powdered sugar to the cream cheese, mixing on low speed until fully incorporated to avoid a powdered sugar cloud.
6. Mix in 1 teaspoon vanilla extract until just combined.
7. In a separate chilled bowl, whip 1 ½ cups heavy whipping cream with the mixer on high speed for 2–3 minutes until stiff peaks form.
8. Gently fold the whipped cream into the cream cheese mixture using a spatula until no white streaks remain to keep the filling light and airy.
9. Stir in the crushed Butterfinger candy bars, reserving about 2 tablespoons for garnish.
10. Spoon the filling into the chilled crust and spread it evenly with the spatula.
11. Drizzle ½ cup warmed hot fudge sauce over the top in a zigzag pattern for a decorative touch.
12. Sprinkle the reserved crushed Butterfinger pieces over the fudge drizzle.
13. Cover the pie with plastic wrap and refrigerate for at least 4 hours, or until firm to the touch. Buttery and crunchy with that classic peanut butter-chocolate combo, this pie is pure nostalgia in every slice. I love serving it chilled with a dollop of extra whipped cream or even crumbling an extra Butterfinger on top for added texture.
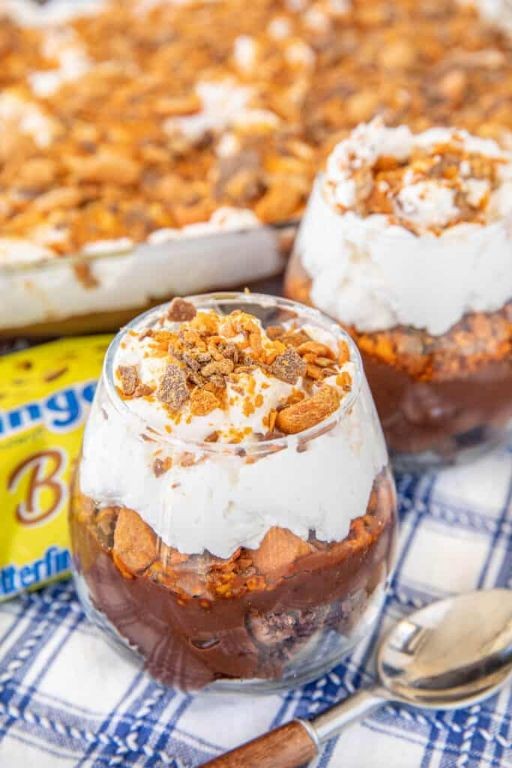
Butterfinger Trifle

Baking this Butterfinger Trifle always takes me back to my first potluck disaster—a lopsided cake that crumbled into what became this beloved dessert. I’ve tweaked it over the years, and now it’s my go-to for effortless entertaining, especially when I’m short on time but want to impress. Trust me, the layers of crunch and cream will have everyone asking for the recipe.
Ingredients
– 1 box (15.25 oz) chocolate cake mix, plus ingredients listed on box (typically eggs, oil, and water)
– 2 cups cold whole milk (for richer flavor)
– 2 packages (3.4 oz each) instant chocolate pudding mix
– 1 container (8 oz) frozen whipped topping, thawed (like Cool Whip)
– 4 full-size Butterfinger candy bars, crushed (reserve 2 tbsp for garnish)
– 1/2 cup hot fudge sauce, warmed slightly for easy drizzling
Instructions
1. Preheat your oven to 350°F and grease a 9×13-inch baking pan.
2. Prepare the chocolate cake batter according to the package directions, using the required eggs, oil, and water.
3. Pour the batter into the prepared pan and bake for 28–32 minutes, or until a toothpick inserted into the center comes out clean.
4. Let the cake cool completely on a wire rack for about 1 hour to avoid melting the whipped layers.
5. In a large bowl, whisk together the cold milk and instant chocolate pudding mixes for 2 minutes until thickened.
6. Gently fold the thawed whipped topping into the pudding mixture until fully combined.
7. Crumble half of the cooled chocolate cake into the bottom of a trifle bowl or large serving dish.
8. Spread half of the pudding mixture evenly over the cake layer.
9. Sprinkle half of the crushed Butterfinger bars over the pudding.
10. Drizzle 1/4 cup of the warmed hot fudge sauce over the candy layer.
11. Repeat the layers with the remaining cake, pudding, Butterfinger, and hot fudge.
12. Top with the reserved 2 tablespoons of crushed Butterfinger for garnish.
13. Cover and refrigerate for at least 2 hours before serving to allow the flavors to meld.
Crunchy, creamy, and downright addictive, this trifle balances the crisp Butterfinger bits with velvety pudding and moist cake. For a fun twist, layer it in individual mason jars for easy grab-and-go servings at your next gathering.
Butterfinger Banana Bread
My kitchen smelled like a candy factory last week when I decided to mash up my grandma’s banana bread recipe with my favorite Halloween candy—the result was this magical Butterfinger Banana Bread that disappeared faster than any treat I’ve ever baked. Honestly, I’ve been sneaking slices for breakfast all week, and I’m not even sorry about it.
Ingredients
– 3 very ripe bananas, mashed (the spottier the better for sweetness)
– 1/2 cup unsalted butter, melted (can substitute with coconut oil for dairy-free)
– 3/4 cup granulated sugar (reduce to 2/3 cup if you prefer less sweet)
– 1 large egg, room temperature (helps with even mixing)
– 1 teaspoon vanilla extract
– 1 1/2 cups all-purpose flour (spooned and leveled to avoid dense bread)
– 1 teaspoon baking soda
– 1/2 teaspoon salt
– 4 fun-size Butterfinger bars, roughly chopped (freeze for 10 minutes for easier chopping)
Instructions
1. Preheat your oven to 350°F and grease a 9×5-inch loaf pan thoroughly.
2. In a large bowl, mash the ripe bananas with a fork until only small lumps remain.
3. Pour the melted butter into the mashed bananas and stir until fully combined.
4. Add the granulated sugar to the banana mixture and mix well.
5. Crack the egg into the bowl and whisk vigorously until the mixture is smooth.
6. Stir in the vanilla extract until incorporated.
7. In a separate medium bowl, whisk together the flour, baking soda, and salt.
8. Gradually add the dry ingredients to the wet ingredients, folding gently until just combined—do not overmix.
9. Fold in the chopped Butterfinger pieces, reserving 2 tablespoons for topping.
10. Pour the batter into the prepared loaf pan and spread it evenly.
11. Sprinkle the reserved Butterfinger pieces over the top of the batter.
12. Bake at 350°F for 55–65 minutes, or until a toothpick inserted into the center comes out clean.
13. Cool the bread in the pan for 15 minutes before transferring to a wire rack.
Every slice of this bread is studded with melty Butterfinger bits that create little pockets of peanut buttery crunch against the moist banana base. I love serving it warm with a drizzle of caramel sauce or toasting thick slices for an indulgent breakfast—it’s the kind of treat that makes ordinary days feel special.
Butterfinger Milkshake
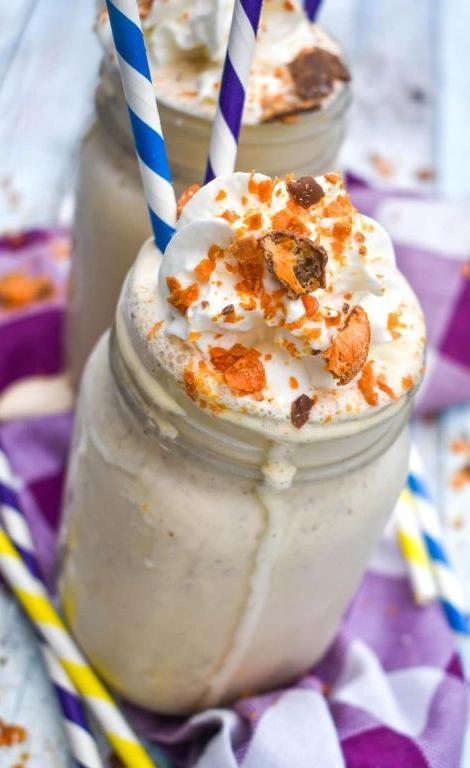
Oof, after a long day of recipe testing, sometimes all I want is a decadent treat that requires zero baking. This Butterfinger Milkshake is my go-to—it’s like blending up a candy bar into the creamiest, dreamiest drink imaginable, and it always hits the spot.
Ingredients
– 4 cups vanilla ice cream, slightly softened for easier blending
– 1/2 cup whole milk, or substitute with 2% for a lighter shake
– 3 full-size Butterfinger candy bars (about 2.1 oz each), roughly chopped
– Whipped cream for topping, optional but highly recommended
Instructions
1. Place the roughly chopped Butterfinger candy bars into a zip-top bag and seal it tightly.
2. Use a rolling pin or heavy skillet to crush the candy bars into small, chunky pieces, which will create both texture and even distribution in the shake.
3. Add the slightly softened vanilla ice cream and whole milk to a high-powered blender.
4. Blend on medium speed for 30–45 seconds, or until the mixture is smooth and no large ice cream chunks remain.
5. Add about two-thirds of the crushed Butterfinger pieces to the blender.
6. Pulse the blender 3–4 times, just until the candy is incorporated but some bits remain for texture—overmixing can make it too smooth.
7. Pour the milkshake immediately into two tall glasses.
8. Top each glass with a generous swirl of whipped cream, if using.
9. Sprinkle the remaining crushed Butterfinger pieces over the whipped cream for a crunchy finish.
You’ll love the way the creamy vanilla base lets the toffee-like crunch of the Butterfinger shine through, with little crispy bits in every sip. For a fun twist, try dipping the glass rims in melted chocolate and crushed candy before pouring—it turns an easy treat into a showstopper.
Butterfinger Popcorn Mix
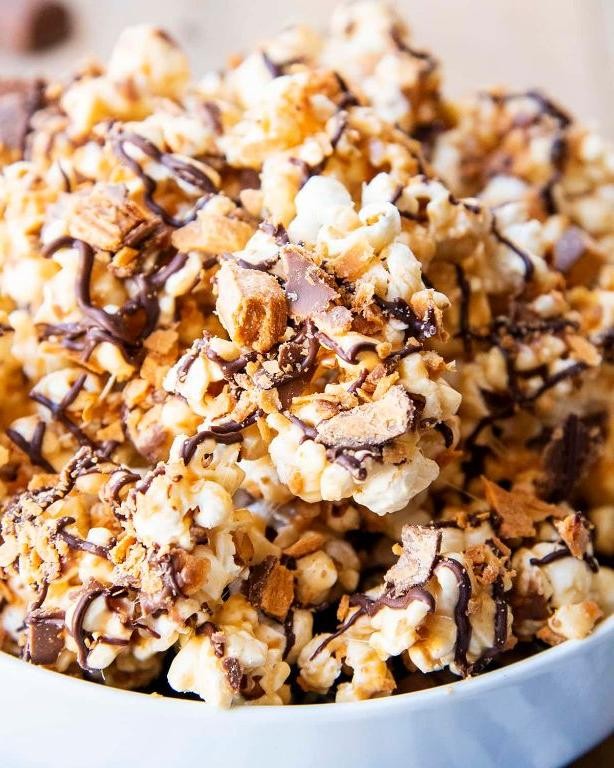
Whenever I’m craving something sweet and salty, this Butterfinger Popcorn Mix is my go-to treat—it reminds me of those cozy movie nights with my family where we’d pile on the couch with bowls of this irresistible snack. I first discovered this recipe when I needed to use up leftover Halloween candy, and now it’s become a staple in our house for any occasion. There’s something magical about how the crunchy popcorn pairs with that rich, peanut buttery chocolate coating that keeps everyone coming back for more.
Ingredients
– 8 cups popped popcorn (about 1/3 cup unpopped kernels, or use pre-popped to save time)
– 4 regular-sized Butterfinger candy bars, crushed (about 1.5 cups—freeze them first for easier crushing)
– 1/2 cup semi-sweet chocolate chips (milk chocolate works too if you prefer sweeter)
– 1/4 cup creamy peanut butter (natural or regular, but avoid oily separation)
– 2 tablespoons unsalted butter (salted works if that’s all you have)
– 1/4 teaspoon fine sea salt (adjust if using salted butter)
Instructions
1. Line a large baking sheet with parchment paper or a silicone mat to prevent sticking.
2. Place the popped popcorn in an extra-large mixing bowl, picking out any unpopped kernels to avoid breaking teeth.
3. Crush the Butterfinger bars into small chunks using a rolling pin or by pulsing in a food processor—aim for pea-sized pieces.
4. Sprinkle the crushed Butterfinger evenly over the popcorn in the bowl.
5. Combine the chocolate chips, peanut butter, and butter in a medium microwave-safe bowl.
6. Microwave the mixture on high for 60 seconds, then stir until smooth—if needed, heat in 15-second bursts to avoid scorching.
7. Immediately pour the warm chocolate-peanut butter mixture over the popcorn and Butterfinger.
8. Use a rubber spatula to gently fold everything together, coating evenly without crushing the popcorn.
9. Spread the mixture in a single layer on the prepared baking sheet.
10. Sprinkle the sea salt evenly over the top while the coating is still tacky for balanced flavor.
11. Let the mix cool completely at room temperature for about 45 minutes, or until the coating hardens—don’t rush this or it might clump.
12. Break apart any large clusters with your hands before transferring to an airtight container.
Seriously, the contrast between the crisp popcorn, crunchy candy bits, and smooth chocolate coating is pure bliss. I love serving this in individual paper cones at parties, or just grabbing a handful straight from the container when no one’s looking—it’s that addictive!
Butterfinger Rice Krispie Treats

Last week, I found myself with a bag of leftover Butterfinger bars from Halloween and a serious craving for something nostalgic—enter these incredible Butterfinger Rice Krispie Treats! I’ve always loved how the classic treat comes together in minutes, but adding crushed Butterfingers takes that crunchy, peanut-buttery goodness to a whole new level of deliciousness.
Ingredients
– 6 cups Rice Krispies cereal
– 10 oz mini marshmallows (fresh ones melt more evenly)
– 4 tbsp unsalted butter (salted works too, adjust to preference)
– 1 cup crushed Butterfinger bars (about 8 fun-size bars, crush roughly for varied texture)
– 1/4 tsp fine sea salt (enhances the peanut butter flavor, optional)
Instructions
1. Grease a 9×13-inch baking dish lightly with butter or cooking spray.
2. Melt 4 tbsp unsalted butter in a large pot over low heat, stirring constantly with a wooden spoon until fully liquid, about 2–3 minutes.
3. Add 10 oz mini marshmallows to the melted butter, stirring continuously until completely smooth and no lumps remain, roughly 4–5 minutes. Tip: Keep the heat low to avoid scorching the marshmallows.
4. Remove the pot from heat and immediately stir in 1/4 tsp fine sea salt.
5. Quickly fold in 6 cups Rice Krispies cereal using a spatula, ensuring every piece is coated evenly with the marshmallow mixture.
6. Gently mix in 1 cup crushed Butterfinger bars, reserving 2 tbsp for topping if desired. Tip: Work fast before the marshmallow sets to avoid clumping.
7. Transfer the mixture to the prepared baking dish, pressing it into an even layer with lightly greased hands or a sheet of parchment paper. Tip: Press firmly for compact treats or lightly for a chewier texture.
8. Sprinkle the reserved crushed Butterfinger bars over the top, pressing gently to adhere.
9. Let the treats cool completely at room temperature for at least 1 hour until firm to the touch.
10. Cut into 12–16 squares using a sharp knife wiped clean between cuts for neat edges.
Seriously, the crunch from the Butterfingers mixed with that classic marshmallow chew is pure magic. I love serving these stacked high on a platter for parties or crumbling them over vanilla ice cream for an easy dessert upgrade—they never last long in my house!
Butterfinger Pancakes

Nothing beats that moment when you flip a pancake and see that perfect golden-brown surface—except maybe when those pancakes are packed with crushed Butterfinger bars! I first tried this decadent breakfast after my nephew begged me to “make candy pancakes” for his birthday, and now it’s our special weekend tradition when he sleeps over. These pancakes turn an ordinary morning into something magical with their crispy edges and melty candy pieces.
Ingredients
– 1 cup all-purpose flour (spooned and leveled for accuracy)
– 2 tbsp granulated sugar (or reduce to 1 tbsp if you prefer less sweetness)
– 1 tsp baking powder
– ½ tsp baking soda
– ¼ tsp salt
– 1 cup buttermilk (shaken well before measuring)
– 1 large egg
– 2 tbsp melted butter (cooled slightly, or substitute with vegetable oil)
– 1 tsp vanilla extract
– ¾ cup crushed Butterfinger bars (about 4 fun-size bars, reserve some for topping)
– Butter or oil for greasing the pan
Instructions
1. Whisk together flour, sugar, baking powder, baking soda, and salt in a large bowl until fully combined.
2. In a separate medium bowl, whisk buttermilk, egg, melted butter, and vanilla extract until smooth.
3. Pour the wet ingredients into the dry ingredients and stir gently with a spatula until just combined—lumps are okay to avoid tough pancakes.
4. Fold in ½ cup of crushed Butterfinger bars, reserving the remaining ¼ cup for garnish.
5. Heat a non-stick skillet or griddle over medium heat (350°F if using an electric griddle) and lightly grease with butter.
6. Test the skillet by sprinkling a few water droplets—if they sizzle and evaporate quickly, it’s ready.
7. Pour ¼ cup batter onto the skillet for each pancake, spacing them about 2 inches apart.
8. Cook for 2–3 minutes until bubbles form on the surface and edges look set.
9. Flip pancakes carefully with a spatula and cook for another 1–2 minutes until golden brown underneath.
10. Transfer cooked pancakes to a wire rack (not a plate—this keeps them crispy) and repeat with remaining batter.
Heavenly doesn’t even begin to describe these pancakes! The Butterfinger bits caramelize into crunchy, buttery pockets that contrast beautifully with the fluffy interior. For an extra treat, I love stacking them high with a drizzle of chocolate syrup and a sprinkle of the reserved candy—it’s like dessert for breakfast, but we won’t tell anyone!
Butterfinger Brownie Parfait
Just when I thought brownies couldn’t get any better, I discovered the magic of layering them with crushed Butterfinger candy bars and fluffy whipped cream. My family now requests this dessert for every special occasion, and honestly, I don’t blame them one bit. There’s something about that chocolate-crunch combination that makes ordinary days feel like celebrations.
Ingredients
– 1 box (18.3 oz) fudge brownie mix, plus ingredients listed on box (typically 2 eggs, ½ cup vegetable oil, ¼ cup water)
– 8 full-size Butterfinger candy bars (about 2 cups when crushed), reserve some chunks for topping
– 2 cups heavy whipping cream
– ¼ cup powdered sugar
– 1 teaspoon vanilla extract
Instructions
1. Preheat your oven to 350°F and grease an 8×8 inch baking pan with cooking spray or butter.
2. Prepare the brownie batter according to package directions, mixing until no dry streaks remain but being careful not to overmix.
3. Pour the brownie batter into your prepared pan and spread evenly with a spatula.
4. Bake for 28-32 minutes until a toothpick inserted in the center comes out with moist crumbs but no wet batter.
5. Cool the brownies completely on a wire rack for at least 1 hour before handling.
6. While brownies cool, place Butterfinger bars in a zip-top bag and crush with a rolling pin until you have coarse crumbs with some small chunks.
7. In a large chilled bowl, beat heavy cream with an electric mixer on medium speed until soft peaks form.
8. Add powdered sugar and vanilla extract, then continue beating until stiff peaks form and the whipped cream holds its shape.
9. Cut the cooled brownies into 1-inch cubes using a sharp knife for clean edges.
10. Begin assembling parfaits by placing a layer of brownie cubes at the bottom of each serving glass.
11. Top with a generous spoonful of whipped cream, spreading gently to cover the brownies completely.
12. Sprinkle a layer of crushed Butterfinger over the whipped cream, using about 2 tablespoons per layer.
13. Repeat the layers until glasses are filled, ending with whipped cream and reserved Butterfinger chunks.
14. Chill the assembled parfaits in the refrigerator for at least 30 minutes before serving to allow flavors to meld. Zeroing in on that perfect bite where creamy whipped cream meets fudgy brownie and crunchy candy is what makes this dessert unforgettable. The contrasting textures create such satisfying layers that each spoonful feels like a new discovery. For an extra special presentation, I sometimes drizzle these with chocolate sauce or serve them in vintage milkshake glasses for that nostalgic diner feel.
Conclusion
Looking for delicious ways to enjoy Butterfinger? This collection offers 19 irresistible treats perfect for any occasion. From no-bake delights to decadent desserts, there’s something for every home cook. We’d love to hear which recipes become your favorites—leave a comment below and share your creations! Don’t forget to pin this article on Pinterest to save these sweet ideas for later.