Keenly observing the seasonal transition into autumn, buttercup squash emerges as a quintessential ingredient worthy of professional culinary attention. Known for its dense, sweet flesh and distinctive turban shape, this winter squash variety offers exceptional flavor development when prepared with precise technique. Mastering its preparation requires understanding its unique structural composition and optimal cooking methods.
Why This Recipe Works
- The high-temperature roasting method caramelizes the squash’s natural sugars while maintaining structural integrity, creating a perfect balance between tender interior and lightly crisped edges that provides textural complexity.
- Brown butter infusion with fresh sage creates a sophisticated flavor foundation through Maillard reaction development, where milk solids undergo careful browning to achieve nutty, aromatic compounds that complement the squash’s earthy sweetness.
- Strategic seasoning application at multiple stages ensures flavor penetration throughout the cooking process, with initial salt drawing out moisture to concentrate flavors and finishing adjustments providing balanced seasoning depth.
- Proper squash selection and preparation technique maximizes yield and cooking efficiency, as buttercup squash’s dense flesh requires specific cutting methodology to maintain even cooking and presentation quality.
- The final acidic component addition cuts through the richness of the brown butter while brightening the overall flavor profile, creating a sophisticated balance that elevates this humble ingredient to restaurant-quality status.
Ingredients
- 1 large buttercup squash (approximately 3-4 pounds), halved, seeded, and cut into 1-inch wedges
- 3 tablespoons extra virgin olive oil, divided
- 1 teaspoon kosher salt, plus additional for seasoning
- ½ teaspoon freshly ground black pepper
- 6 tablespoons unsalted butter, cut into 1-inch cubes
- 12 fresh sage leaves, plus 2 tablespoons finely chopped
- 2 tablespoons pure maple syrup
- 1 tablespoon apple cider vinegar
- ¼ cup toasted pepitas
- 2 ounces crumbled goat cheese
- Flaky sea salt for finishing
Equipment Needed
- Heavy-duty chef’s knife
- Large rimmed baking sheet
- Parchment paper
- Medium saucepan
- Whisk
- Mixing bowls
- Measuring spoons and cups
- Instant-read thermometer
- Microplane or zester
Instructions
Prepare the Squash for Roasting
Begin by positioning your buttercup squash on a stable cutting surface, identifying the natural ridges that will guide your knife placement. Using a heavy-duty chef’s knife, carefully slice through the squash horizontally, creating two equal halves while maintaining control throughout the cutting motion. Employ a sturdy metal spoon to thoroughly scrape out all seeds and stringy membranes, ensuring clean cavity preparation. Turn each half cut-side down and slice into uniform 1-inch wedges, maintaining consistent thickness to guarantee even cooking. Transfer the prepared squash to a large mixing bowl and drizzle with 2 tablespoons of extra virgin olive oil, using your hands to coat each piece thoroughly. Season with 1 teaspoon kosher salt and ½ teaspoon freshly ground black pepper, ensuring even distribution across all surfaces. Professional tip: When working with winter squash, always use a sharp knife and apply steady, controlled pressure rather than forceful chopping to prevent slippage and ensure clean cuts.
Initial Roasting Phase
Preheat your oven to 425°F and line a large rimmed baking sheet with parchment paper to facilitate easy cleanup and prevent sticking. Arrange the seasoned squash wedges in a single layer, ensuring adequate space between pieces to promote proper air circulation and even browning. Place the baking sheet on the middle oven rack and roast for 25 minutes, during which time the high heat will begin breaking down the squash’s cellular structure while developing initial caramelization. After this initial cooking period, carefully remove the baking sheet and use tongs to flip each wedge, exposing the opposite surface to direct heat. This flipping technique ensures uniform color development and prevents uneven cooking. Continue roasting for an additional 15 minutes, monitoring for the development of golden-brown edges and tender flesh that yields easily when pierced with a fork.
Create the Sage Brown Butter
While the squash undergoes its final roasting phase, begin preparing the brown butter component. Place a medium saucepan over medium heat and add the 6 tablespoons of cubed unsalted butter. Swirl the pan continuously as the butter melts, watching for the transition from foamy to clear, then to lightly browned. This process typically takes 4-6 minutes, and you’ll observe the milk solids separating and settling at the bottom. Once the butter reaches a nutty aroma and golden-brown color (approximately 300°F on an instant-read thermometer), immediately add the 12 whole sage leaves and cook for 30 seconds until crisp. Remove the pan from heat and carefully strain the butter through a fine-mesh sieve into a heatproof bowl, discarding the fried sage leaves but reserving the infused butter. Professional tip: Brown butter development requires constant visual monitoring, as it can transition from perfectly nutty to burnt in mere seconds—remove from heat the moment you detect the desired aroma and color.
Combine and Finish Roasting
Remove the partially roasted squash from the oven and carefully transfer it to a large mixing bowl. Pour the prepared sage brown butter over the squash wedges, followed by 2 tablespoons of pure maple syrup and the 2 tablespoons of finely chopped fresh sage. Using a rubber spatula, gently toss the squash to ensure complete coating, being careful not to break the tender wedges. Return the coated squash to the parchment-lined baking sheet, arranging in a single layer once more. Place back into the 425°F oven for a final 10-minute roasting period, which will allow the brown butter and maple syrup to caramelize further while infusing the squash with the sage’s aromatic qualities.
Final Assembly and Plating
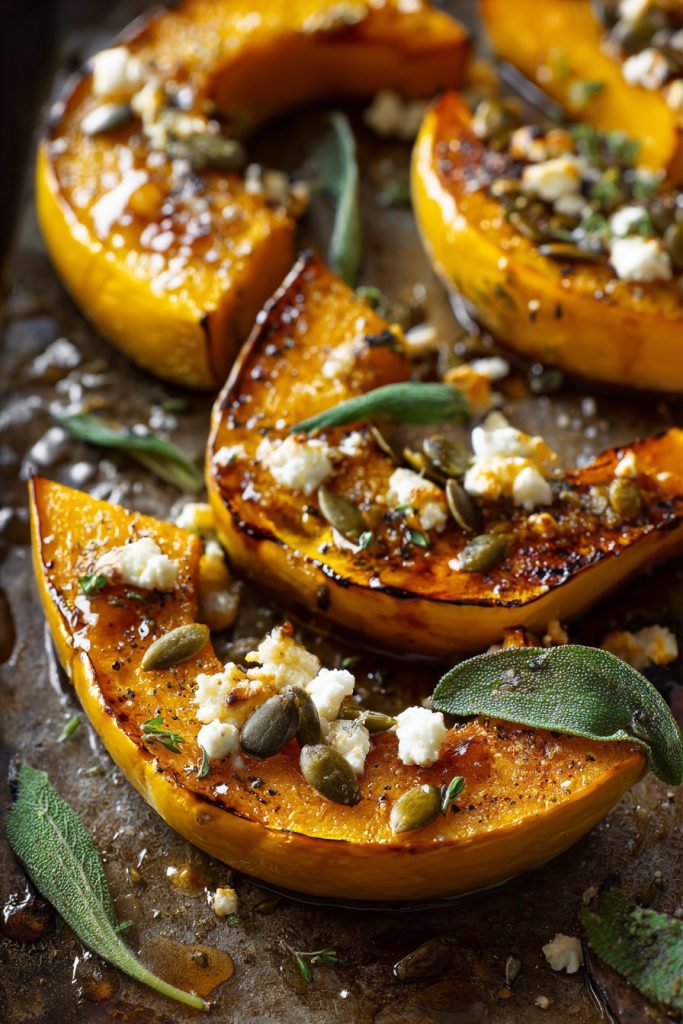
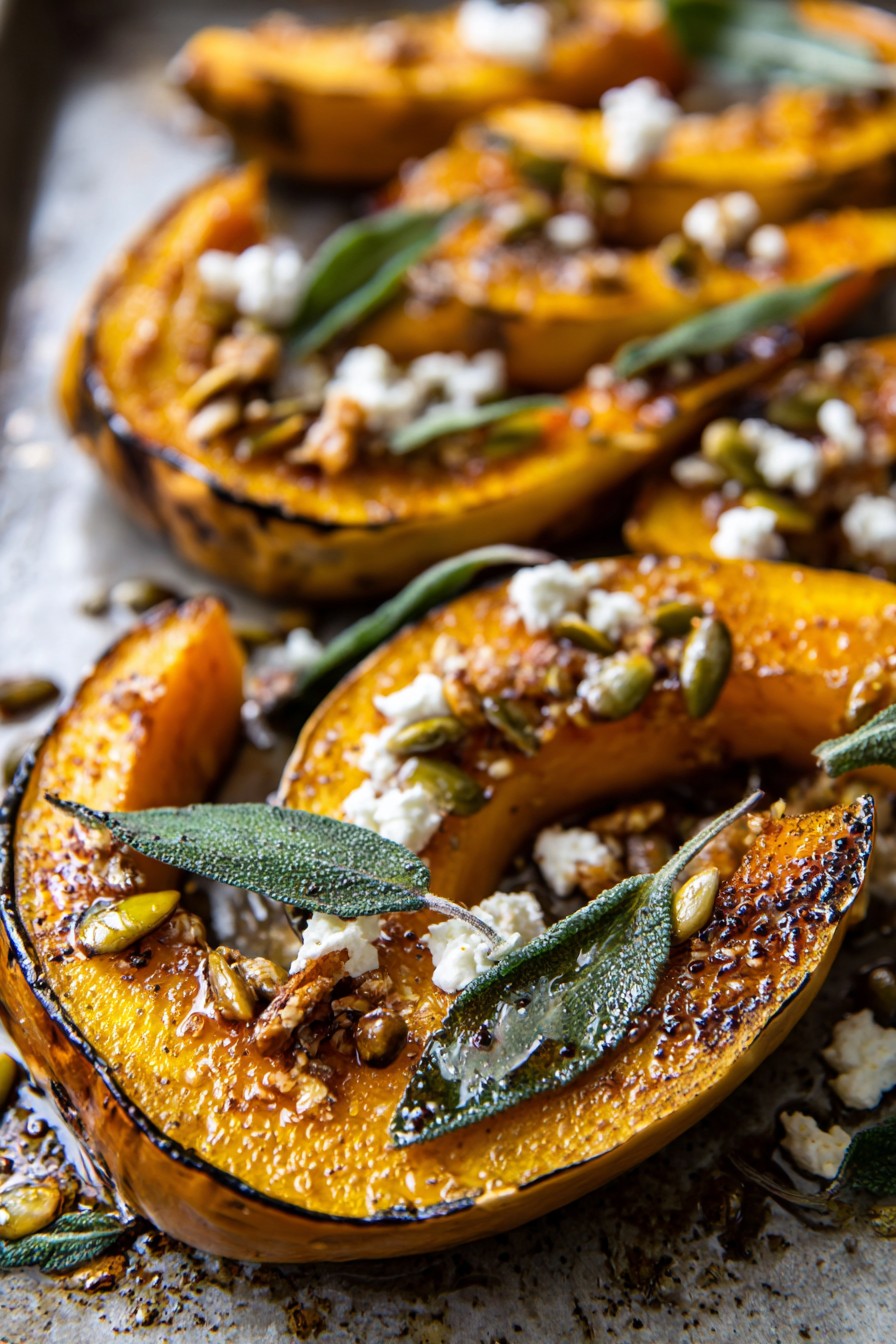
Once the squash has completed its final roasting phase and displays deep caramelization with tender flesh, carefully transfer the wedges to a serving platter using tongs or a spatula. Drizzle any remaining brown butter mixture from the baking sheet over the arranged squash. Sprinkle with ¼ cup of toasted pepitas for textural contrast and 2 ounces of crumbled goat cheese for creamy acidity. Finish with a light drizzle of 1 tablespoon apple cider vinegar to cut through the richness and a generous pinch of flaky sea salt to enhance all flavors. Serve immediately while the squash maintains its ideal temperature and textural integrity. Professional tip: The addition of acidic components like vinegar should always occur as a final step to preserve their brightening effect, as prolonged cooking diminishes their flavor impact.
Tips and Tricks
Selecting the optimal buttercup squash requires careful evaluation—seek specimens that feel heavy for their size with firm, matte skin free from soft spots or blemishes. The stem should appear dry and intact, indicating proper harvesting and storage. When preparing the squash for roasting, consider scoring the flesh lightly in a crosshatch pattern before the initial seasoning; this technique increases surface area for better oil absorption and creates more caramelized edges. For professional-level presentation, maintain the wedge shape throughout cooking by using a spatula rather than tongs during the final transfer to your serving vessel.
Temperature control proves critical throughout the cooking process. Ensure your oven has reached the specified 425°F before introducing the squash, as starting in a properly heated environment ensures immediate caramelization rather than steaming. When developing the brown butter component, consider using a light-colored saucepan to better monitor the color transition from pale gold to nutty brown. For additional flavor complexity, toast your spices—such as black pepper—before grinding to release their essential oils fully. If working in advance, par-roast the squash wedges until just tender, then complete the final roasting with the brown butter glaze immediately before service to maintain optimal texture.
Advanced technique application includes reserving the squash seeds, cleaning them thoroughly, tossing with oil and salt, and roasting separately at 350°F for 15-20 minutes until crisp—these make an excellent garnish or snack. For professional kitchen efficiency, prepare multiple baking sheets of squash simultaneously, rotating them halfway through cooking to account for hot spots in commercial ovens. When working with the brown butter component, consider browning larger batches and storing excess for future use—properly cooled and refrigerated brown butter maintains its flavor profile for up to two weeks. Finally, understand that resting the roasted squash for 5-7 minutes before final seasoning allows the flavors to meld while the structure firms slightly for cleaner plating.
Recipe Variations
- For a savory umami-forward preparation, replace the maple syrup with 2 tablespoons of white miso paste thinned with 1 tablespoon of warm water, and incorporate 1 tablespoon of toasted sesame oil into the brown butter. Garnish with black sesame seeds and sliced scallions instead of pepitas and goat cheese, creating an Asian-inspired flavor profile that complements the squash’s natural sweetness while adding complex savory notes.
- Transform this side dish into a complete vegetarian main course by layering the roasted squash over 2 cups of cooked farro or wheat berries that have been tossed with lemon zest and chopped parsley. Add ½ cup of toasted walnuts and increase the goat cheese to 4 ounces, creating a balanced plate with complex carbohydrates, plant-based protein, and varied textures that satisfies as a center-of-the-plate option.
- Create a warming soup variation by roasting the squash as directed, then transferring to a blender with 4 cups of vegetable stock and pureeing until completely smooth. Strain through a fine-mesh sieve for ultra-silken texture, then finish with the sage brown butter swirled throughout and topped with crispy sage leaves and croutons for contrasting texture.
- For a holiday-worthy presentation, incorporate the roasted squash into a layered gratin by alternating the wedges with thinly sliced potatoes and caramelized onions in a baking dish. Pour 1 cup of heavy cream seasoned with nutmeg over the layers, top with grated Gruyère cheese, and bake at 375°F for 45 minutes until golden and bubbling, creating a decadent casserole perfect for special occasions.
Frequently Asked Questions
Can I substitute another squash variety if buttercup squash isn’t available?
Buttercup squash possesses unique characteristics with dense, sweet flesh and minimal stringiness, but acceptable substitutes include kabocha squash, which shares similar texture and flavor profiles. Butternut squash serves as another alternative, though it contains higher water content and may require reduced roasting time to prevent mushiness. Acorn squash can be used but tends toward more fibrous texture and less sweetness. When substituting, adjust cooking times based on the specific variety’s density and moisture content, monitoring closely for proper doneness indicators rather than relying solely on timer-based cooking.
What’s the best method for storing and reheating leftovers?
Proper storage involves transferring cooled squash to an airtight container, where it will maintain quality for 3-4 days refrigerated. For optimal reheating, avoid microwave use which creates steam and compromises texture. Instead, arrange leftovers on a baking sheet and warm in a 375°F oven for 8-10 minutes until heated through, which helps restore some crispness to the edges. Alternatively, reheat in a skillet over medium heat with a small amount of oil, turning occasionally until properly warmed. The brown butter sauce may separate upon refrigeration but will reincorporate when gently reheated and stirred.
How can I tell when the buttercup squash is perfectly roasted?
Visual and textural indicators provide the most reliable doneness assessment. Perfectly roasted buttercup squash should display deep caramelization on the cut surfaces with edges showing slight browning, while the skin becomes tender enough to pierce easily with a paring knife. The flesh should yield completely to pressure without resistance yet maintain structural integrity rather than becoming mushy. Additionally, the natural sugars will have caramelized, creating a lightly sweet aroma throughout your kitchen. Using an instant-read thermometer, the internal temperature should register between 205-210°F when properly cooked through.
Can I prepare components of this recipe in advance?
Strategic advance preparation enhances efficiency without compromising quality. The squash can be cut, oiled, and seasoned up to 4 hours ahead, stored covered at room temperature. The brown butter can be prepared 2 days in advance and refrigerated, then gently reheated before use. Complete assembly and final roasting should occur just before serving to maintain optimal texture and temperature. If necessary, you can roast the squash completely 1 day ahead and reheat gently before adding the brown butter glaze and finishing components, though this approach slightly diminishes the ideal textural contrast.
Summary
This technique-driven buttercup squash preparation demonstrates how proper roasting methodology and sophisticated flavor pairing can transform humble ingredients. Through careful temperature control, strategic seasoning application, and balanced component integration, this recipe achieves restaurant-quality results worthy of any autumn table.
Roasted Buttercup Squash with Sage Brown Butter
4
servings15
minutes50
minutesIngredients
Instructions
- 1 Preheat oven to 425°F. Prepare squash by halving, seeding, and cutting into 1-inch wedges.
- 2 Toss squash with 2 tablespoons olive oil, 1 teaspoon salt, and ½ teaspoon pepper. Arrange on parchment-lined baking sheet.
- 3 Roast for 25 minutes, flip wedges, and roast 15 minutes more.
- 4 While squash roasts, melt butter in saucepan over medium heat until nutty brown. Add whole sage leaves, cook 30 seconds, then strain.
- 5 Transfer partially roasted squash to bowl, toss with brown butter, maple syrup, and chopped sage. Return to baking sheet.
- 6 Roast final 10 minutes until caramelized. Transfer to platter, top with pepitas, goat cheese, vinegar, and flaky salt.


