Never has there been a more misunderstood cut of meat than the humble pork chop, languishing in dinner-planning purgatory until now. Now we’re unleashing the broiler’s fiery magic to transform these pale slabs into golden-crusted, juicy masterpieces that’ll make you question every dry pork chop you’ve ever suffered through.
Why This Recipe Works
- The broiler becomes your personal culinary flamethrower, creating a caramelized crust that locks in juices while giving your pork chops the golden tan they’ve always deserved but never achieved through conventional baking methods.
- Our strategic dry-brine with salt works like a moisture insurance policy, drawing out liquid only to have it reabsorb with flavor reinforcements, ensuring each bite is juicier than a celebrity gossip magazine.
- The high-heat blast cookery means dinner is ready faster than you can scroll through your streaming options, making this the perfect weeknight hero for when hunger strikes with the urgency of a toddler demanding snacks.
- Simple seasoning lets the pork shine brighter than a politician’s promises, proving that sometimes the best relationships are the ones that don’t require excessive complication to work beautifully.
Ingredients
- 4 bone-in pork chops (1-inch thick), because bones add flavor and make you feel caveman-cool
- 2 tablespoons olive oil, the liquid gold that makes everything better
- 1 ½ teaspoons kosher salt, the flavor fairy dust
- 1 teaspoon black pepper, freshly ground like your morning coffee beans
- 1 teaspoon garlic powder, because fresh garlic would burn and throw a smoky tantrum
- 1 teaspoon smoked paprika, for that “I know what I’m doing” vibe
- ½ teaspoon onion powder, the subtle background singer to garlic’s lead vocals
Equipment Needed
- Broiler-safe baking sheet or broiler pan
- Wire rack that fits your baking sheet
- Small bowl for seasoning mix
- Tongs (the kitchen equivalent of extended reach grabbers)
- Instant-read thermometer (your pork’s personal lie detector)
- Paper towels for patting dry
Instructions
Step 1: The Dry Brine Preparation
First, pat your pork chops dry with paper towels like you’re giving them a spa treatment they didn’t know they needed. This isn’t just about drying—it’s about creating the perfect canvas for our seasoning to stick to, because nobody likes a seasoning slide-off situation. Sprinkle both sides generously with about half the kosher salt, then let them sit uncovered in your refrigerator for at least 30 minutes or up to 4 hours if you’re the planning type. This dry brine works like magic, pulling out moisture only to have it rush back in carrying all that salty goodness deep into the pork’s very soul. Think of it as flavor osmosis, where the salt becomes the popular kid everyone wants to hang out with inside the meat fibers. Pro tip: If you’re short on time, even 15 minutes will give you better results than skipping this step entirely—your future juicy self will thank you.
Step 2: Seasoning Symphony
While your pork is getting its salt therapy, mix the remaining salt, black pepper, garlic powder, smoked paprika, and onion powder in a small bowl. This is where the flavor party gets planned, and every guest is invited to mingle beautifully. Once your pork chops have completed their brine session, brush both sides with olive oil like you’re painting the Mona Lisa of meats—thorough but not drowning the masterpiece. Then sprinkle your seasoning mix over both sides, pressing gently to make sure it adheres like a stubborn piece of glitter. Don’t be shy here—this isn’t the time for subtlety. Make sure every nook and cranny gets some love, because uneven seasoning is the culinary equivalent of showing up to a formal event with one fancy shoe and one flip-flop. The oil helps create that beautiful crust we’re after while ensuring our spices don’t just jump ship during cooking.
Step 3: Broiler Preheating Protocol
Now for the main event: position your oven rack about 4-6 inches from the broiler element and turn that broiler to high. We want it screaming hot, like a toddler who just discovered their favorite toy is missing. Let it preheat for a solid 5-10 minutes while you place your wire rack on the baking sheet and arrange the seasoned pork chops in a single layer, not touching each other like awkward strangers on public transportation. This air circulation is crucial for even cooking and proper browning—crowded chops steam rather than sear, and nobody wants steamed pork unless we’re talking dumplings. Pro tip: If your broiler has multiple settings, use the highest one—we’re going for maximum heat blast here, not gentle warming. The sizzle when these hit the heat should be audible proof you’re doing things right.
Step 4: The Main Broiling Event
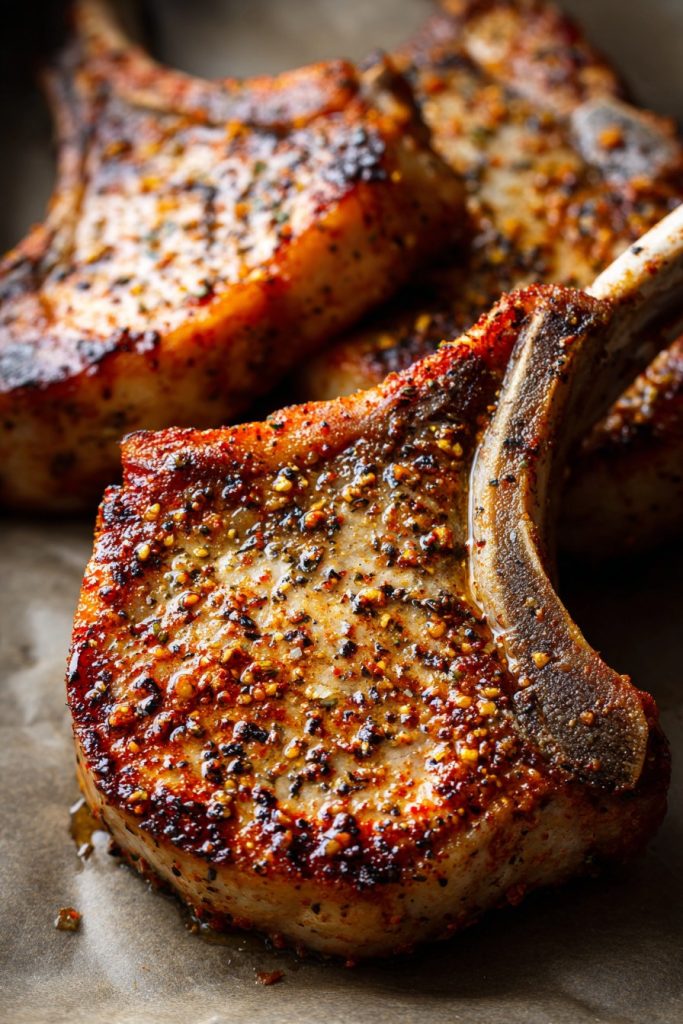
Slide your baking sheet into the oven and set your timer for 4-6 minutes, depending on your broiler’s personality and your pork chop thickness. Watch for the magical moment when the tops develop a beautiful brown crust with some slightly charred edges—this is the flavor gold we’re mining for. When the timer dings, carefully remove the pan using oven mitts (because broilers don’t care about your fingerprints) and flip each chop with tongs. The underside should be looking pale and jealous of its beautifully tanned counterpart. Return to the oven for another 4-6 minutes, but start checking at 4 minutes because broilers can be temperamental divas. You’re looking for that same gorgeous browning on the second side, but more importantly, we’re monitoring internal temperature like hawk parents watching their teenager’s first date.
Step 5: Temperature Check and Resting Period
Insert your instant-read thermometer into the thickest part of the chop, avoiding the bone like you’d avoid that one relative at family gatherings. We’re aiming for 145°F—the USDA-approved safe temperature that still keeps things juicy rather than turning your pork into shoe leather. If you haven’t reached temperature yet, return to the oven for 1-2 minute increments until you hit the magic number. Once achieved, transfer the chops to a clean plate or cutting board and let them rest for 5 minutes—this is non-negotiable, like pants in public places. During this time, the juices redistribute throughout the meat instead of rushing out onto your plate in a sad puddle. Pro tip: The temperature will continue rising about 5 degrees during resting, so pull them at 140°F if you’re the precise type.
Step 6: Serving and Savoring
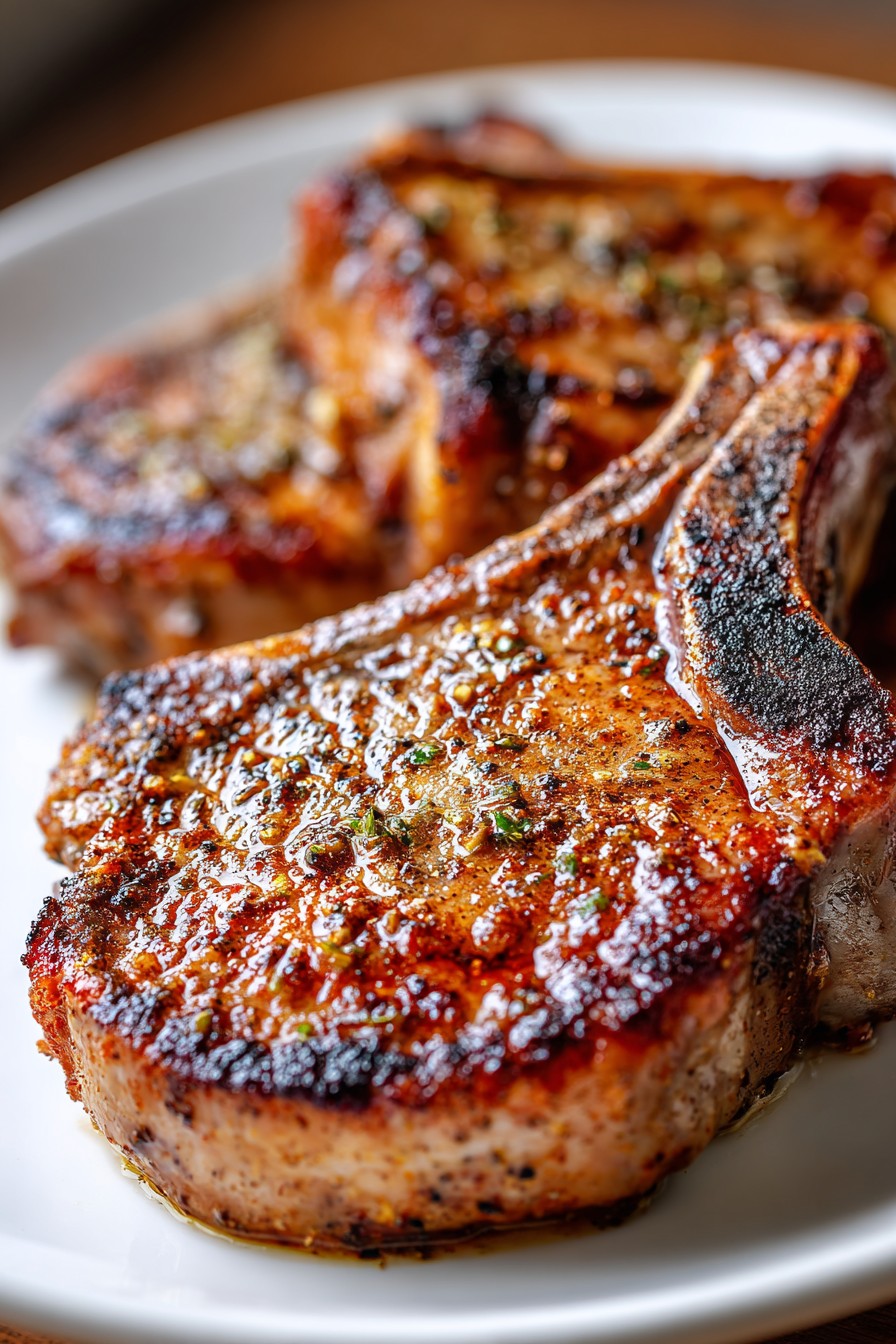
After the mandatory resting period (which feels longer than waiting for your coffee to brew on Monday morning), it’s time to serve these beauties. The crust should be crackly and flavorful, the interior moist and tender—a textural symphony in pork form. Pair with your favorite sides, though may I suggest something that won’t steal the spotlight from our main attraction? These chops deserve center stage, not to be upstaged by an overly ambitious potato dish. Cut into that first bite and listen for the satisfying crunch giving way to juicy perfection. This is what pork chop dreams are made of—no more dry, sad pork experiences haunting your culinary memories. You’ve officially graduated from pork chop amateur to broiling badass.
Tips and Tricks
Let’s dive deeper into the pork chop proficiency pool, because knowledge is power and perfectly cooked pork is delicious power. First up: thickness matters more than your last relationship. One-inch thick chops are the sweet spot—any thinner and they’ll cook faster than your motivation to exercise after New Year’s; any thicker and you risk uneven cooking where the outside resembles charcoal before the inside reaches temperature. If you can only find thinner chops, reduce cooking time significantly and watch them like they might try to escape the oven. For thicker chops, you might need to lower the rack position slightly to prevent excessive charring while the interior catches up.
Next, let’s talk broiler personalities—because not all broilers are created equal. Gas broilers tend to be more consistent, while electric ones can have hot spots that would make a middle school dance look evenly distributed. Get to know your broiler’s quirks by doing a test run with something less precious than pork chops. Some broilers are overachievers that cook everything in record time, while others are the lazy employees of the oven world. If you notice one side of your baking sheet consistently cooks faster, you’ll know to rotate your pan halfway through cooking. Also, remember that broiler temperatures can vary wildly between oven models—what takes 4 minutes in my oven might take 6 in yours, so treat those time estimates as suggestions rather than commandments.
The wire rack isn’t just a suggestion—it’s your insurance policy against steamed-bottom syndrome. Elevating the chops allows hot air to circulate completely around them, creating that all-over crust we’re after. If you don’t have a wire rack that fits your baking sheet, you can create a makeshift one with overturned ramekins or small oven-safe bowls, though this is definitely the culinary equivalent of using duct tape for home repairs. For extra crispiness, you can even lightly spray the wire rack with oil before placing the chops—this prevents sticking and promotes better browning. And while we’re talking equipment, don’t use glass baking dishes under the broiler unless you enjoy the sound of shattering dreams and pyrex.
Finally, let’s discuss the art of not poking your meat repeatedly. Every time you stab that thermometer in, precious juices escape like secrets at a family reunion. Take the temperature once, maybe twice if you’re uncertain, but avoid becoming a human porcupine. When checking temperature, aim for the thickest part while avoiding fat pockets and bones, which give false readings faster than a politician’s promises. And if you really want to level up your game, consider bringing your chops to room temperature for 15-20 minutes before cooking—this helps them cook more evenly, though it’s not mandatory if hunger is knocking louder than an impatient delivery driver.
Recipe Variations
- For an Asian-inspired twist, swap the paprika and onion powder for equal parts five-spice powder and ginger powder, then brush with a mixture of soy sauce and honey during the last minute of cooking. The sweet-savory glaze will caramelize beautifully under the broiler’s intense heat, creating flavors that dance across your tongue like they’re auditioning for a cooking competition show. Serve with steamed rice and quick-pickled vegetables for a complete meal that’ll make takeout jealous.
- Go Mediterranean by replacing the smoked paprika with dried oregano and lemon zest, then topping the finished chops with a fresh gremolata made from chopped parsley, garlic, and more lemon zest. The bright, herbaceous notes cut through the richness of the pork like a well-timed sarcastic comment cuts through awkward silence. Pair with roasted vegetables and maybe even some feta cheese crumbled over the top if you’re feeling extra fancy.
- Create a spicy Southwest version by doubling the smoked paprika and adding cumin, chili powder, and a pinch of cayenne to the seasoning mix. After broiling, squeeze fresh lime juice over the chops and garnish with chopped cilantro if you’re among the 50% of the population who doesn’t think it tastes like soap. The smoky heat plays beautifully with the pork’s natural sweetness, creating a flavor profile that’s more interesting than your neighbor’s holiday light display.
- For an herb-crusted approach, mix the salt and pepper with chopped fresh rosemary, thyme, and sage before pressing onto the oiled chops. The fresh herbs will crisp up beautifully under the broiler while infusing the pork with aromatic goodness that smells like Thanksgiving decided to visit on a random Tuesday. This variation pairs particularly well with apple-based sides, because pork and apples are the culinary equivalent of childhood best friends who still get along as adults.
Frequently Asked Questions
Can I use boneless pork chops instead of bone-in?
Absolutely, though you’ll be missing out on some flavor benefits that the bone provides—it acts like a little flavor conductor, helping distribute heat more evenly while adding richness to the meat. Boneless chops will cook slightly faster, so reduce your cooking time by about 1-2 minutes per side and watch them carefully like they might try to sneak out of the oven early. The lack of bone also means they might not stay as juicy, so consider brining them for the full recommended time to build in that moisture insurance policy. Either way, the broiling method works beautifully, creating that same crave-worthy crust that makes these chops so special.
Why did my pork chops turn out tough?
Tough pork chops are usually the result of either overcooking or not letting them rest properly afterward. Remember that pork continues cooking after it leaves the oven, so if you pull it at 145°F and let it rest, you’ll end up with perfectly cooked meat rather than something that could double as a hockey puck. Another common culprit is choosing chops that are too thin—they go from perfectly cooked to overdone faster than you can say “is that smoke?” Thicker chops forgive timing mistakes more readily, giving you a wider window of perfection. Also, make sure you’re slicing against the grain when serving, which makes even slightly overcooked chops more tender to the tooth.
Can I prepare these ahead of time?
You can absolutely season the pork chops earlier in the day and keep them covered in the refrigerator until cooking time—this actually helps the flavors penetrate more deeply, like gossip spreading through a small town. However, I don’t recommend fully cooking them ahead and reheating, as the broiler magic is best experienced fresh from the oven’s intense heat. If you must reheat, do it gently in a 300°F oven until just warmed through, but expect some textural compromise—the crust won’t be as crackly and glorious as it was initially. For meal prep purposes, these are better cooked fresh, making them perfect for quick weeknight dinners rather than make-ahead marvels.
What’s the difference between broiling and baking pork chops?
Broiling uses direct, intense heat from above to quickly sear and cook the chops, creating that beautiful crust while keeping the interior juicy—it’s the culinary equivalent of a quick, intense workout. Baking uses surrounding ambient heat that cooks more slowly and evenly but doesn’t create the same caramelized crust unless you sear first in a separate pan. Broiling is faster and creates more flavor through browning reactions, while baking is more hands-off but less exciting texturally. Think of broiling as the exciting new dating partner and baking as the comfortable long-term relationship—both have their merits, but broiling brings more immediate excitement to the table, literally.
Summary
Broiled pork chops deliver maximum flavor with minimal effort, transforming an often-overlooked cut into weeknight dinner royalty. The intense heat creates a crackling crust while keeping interiors juicy, proving that sometimes the fastest path is also the most delicious one worth taking repeatedly.
Broiled Pork Chops
6
servings35
minutes12
minutesIngredients
Instructions
- 1 Pat pork chops dry and sprinkle with half the salt. Refrigerate uncovered 30 minutes to 4 hours.
- 2 Mix remaining salt with pepper, garlic powder, paprika, and onion powder.
- 3 Brush chops with oil, then press seasoning mixture onto both sides.
- 4 Position oven rack 4-6 inches from broiler and preheat broiler to high.
- 5 Place chops on wire rack set over baking sheet. Broil 4-6 minutes until browned.
- 6 Flip chops and broil another 4-6 minutes until internal temperature reaches 145°F.
- 7 Rest 5 minutes before serving.


