Rise and shine, breakfast lovers! If your morning routine could use a sweet upgrade, you’ve come to the right place. We’ve gathered 30 delightful breakfast sweets that turn ordinary mornings into something special—think fluffy pancakes, cozy muffins, and decadent French toast. Whether you’re craving a quick treat or a weekend indulgence, these recipes are sure to inspire. Ready to sweeten your day? Let’s dive in!
Fluffy Blueberry Pancakes
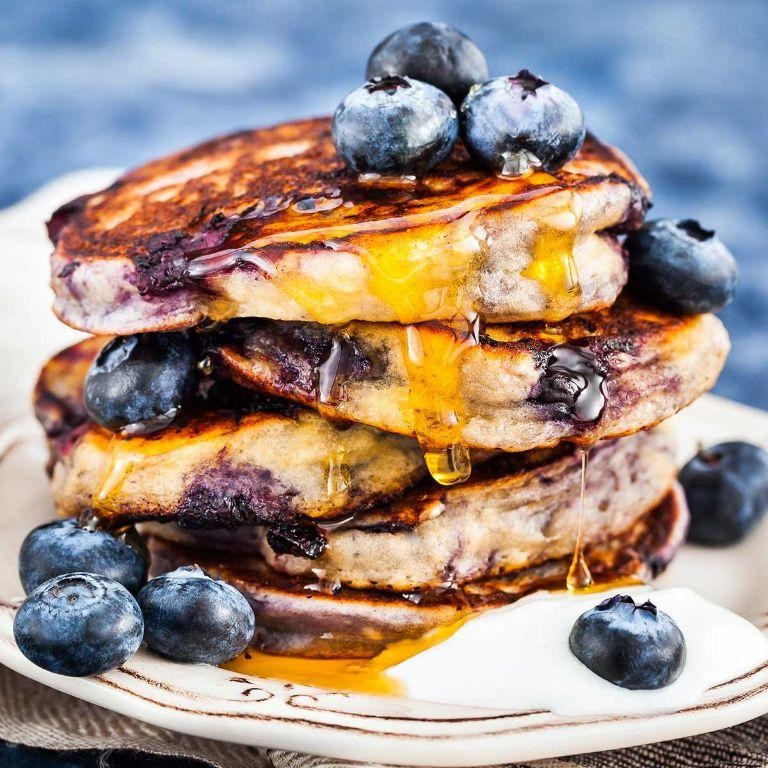
Deliciously fluffy blueberry pancakes are the weekend breakfast you’ve been dreaming about. They’re light, tender, and packed with juicy berries that burst in every bite. You’ll love how simple they are to make from scratch.
Serving: 4 | Pre Time: 10 minutes | Cooking Time: 15 minutes
Ingredients
- 1 ½ cups of all-purpose flour
- 3 ½ teaspoons of baking powder
- 1 teaspoon of fine sea salt
- 1 tablespoon of granulated sugar
- 1 ¼ cups of whole milk
- 1 large farm-fresh egg
- 3 tablespoons of melted unsalted butter
- 1 cup of fresh, plump blueberries
- Butter or oil for greasing the pan
Instructions
- In a large mixing bowl, whisk together 1 ½ cups of all-purpose flour, 3 ½ teaspoons of baking powder, 1 teaspoon of fine sea salt, and 1 tablespoon of granulated sugar until well combined.
- In a separate bowl, beat 1 large farm-fresh egg lightly, then stir in 1 ¼ cups of whole milk and 3 tablespoons of melted unsalted butter until smooth.
- Pour the wet ingredients into the dry ingredients and gently fold together with a spatula until just combined; do not overmix, as a few lumps are okay for fluffier pancakes.
- Gently fold in 1 cup of fresh, plump blueberries, being careful not to crush them.
- Heat a non-stick skillet or griddle over medium heat (about 350°F) and lightly grease it with butter or oil.
- Pour about ¼ cup of batter onto the hot skillet for each pancake, spacing them apart to prevent sticking.
- Cook for 2-3 minutes, or until bubbles form on the surface and the edges look set; this visual cue means it’s time to flip.
- Flip the pancakes carefully with a spatula and cook for another 1-2 minutes, until golden brown and cooked through.
- Repeat with the remaining batter, greasing the skillet as needed between batches to keep the pancakes from sticking.
- Serve the pancakes warm, stacked high on a plate.
Unbelievably tender and bursting with sweet-tart blueberries, these pancakes have a melt-in-your-mouth texture that’s perfect with a drizzle of maple syrup. For a fun twist, top them with a dollop of whipped cream or a sprinkle of lemon zest to brighten up the flavors.
Cinnamon Roll French Toast Bake
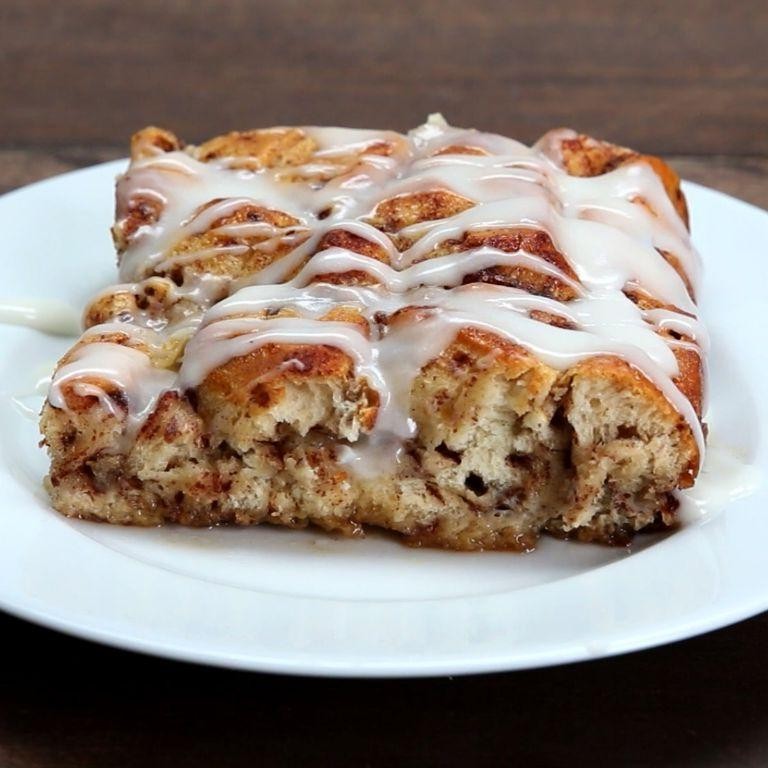
Mornings just got a whole lot cozier with this genius mashup. Imagine all the gooey, cinnamon-spiced goodness of your favorite pastry, baked right into a custardy French toast casserole that practically makes itself while you sip your coffee. You’re going to love how the house smells while it bakes.
Serving: 8 | Pre Time: 15 minutes | Cooking Time: 45 minutes
Ingredients
– 1 (12.4 oz) can of refrigerated cinnamon roll dough with rich cream cheese icing
– 6 large farm-fresh eggs
– 1 cup of creamy whole milk
– 1/2 cup of heavy whipping cream
– 1/3 cup of pure maple syrup
– 2 teaspoons of fragrant vanilla extract
– 1/2 teaspoon of finely ground cinnamon
– A pinch of flaky sea salt
– 1/2 cup of chopped, toasted pecans (optional)
Instructions
1. Preheat your oven to 350°F (175°C) and generously grease a 9×13-inch baking dish with butter or non-stick spray.
2. Open the can of cinnamon roll dough and cut each roll into 8 bite-sized pieces. Scatter the pieces evenly in the prepared baking dish.
3. In a large mixing bowl, vigorously whisk together the 6 farm-fresh eggs, 1 cup of creamy whole milk, and 1/2 cup of heavy whipping cream until completely smooth and frothy. Tip: Whisking well here ensures a silky, uniform custard with no eggy streaks.
4. Whisk in the 1/3 cup of pure maple syrup, 2 teaspoons of fragrant vanilla extract, 1/2 teaspoon of finely ground cinnamon, and a pinch of flaky sea salt until fully combined.
5. Slowly and evenly pour the custard mixture over the cinnamon roll pieces in the baking dish. Gently press down on any pieces that float to the top to ensure they are submerged.
6. Sprinkle the 1/2 cup of chopped, toasted pecans evenly over the top, if using.
7. Bake on the center rack of your preheated oven for 40-45 minutes. Tip: The bake is done when the top is a deep, golden brown and the center is set, with no visible liquid jiggle when you gently shake the pan.
8. Remove the bake from the oven and let it rest on a wire rack for 10 minutes. Tip: This resting time is crucial—it allows the custard to finish setting, making slicing much cleaner.
9. While the bake rests, microwave the included packet of rich cream cheese icing for 10-15 seconds until it’s a pourable consistency.
10. Drizzle the warm icing generously over the entire bake just before serving.
Just out of the oven, it’s a masterpiece of contrasts: the top is caramelized and slightly crisp, giving way to a soft, pillowy interior where the cinnamon roll pieces have soaked up all that sweet, spiced custard. Serve it warm, straight from the pan with a dusting of powdered sugar or a side of fresh berries for a bright counterpoint to all that cozy richness.
Nutella-Stuffed Crepes
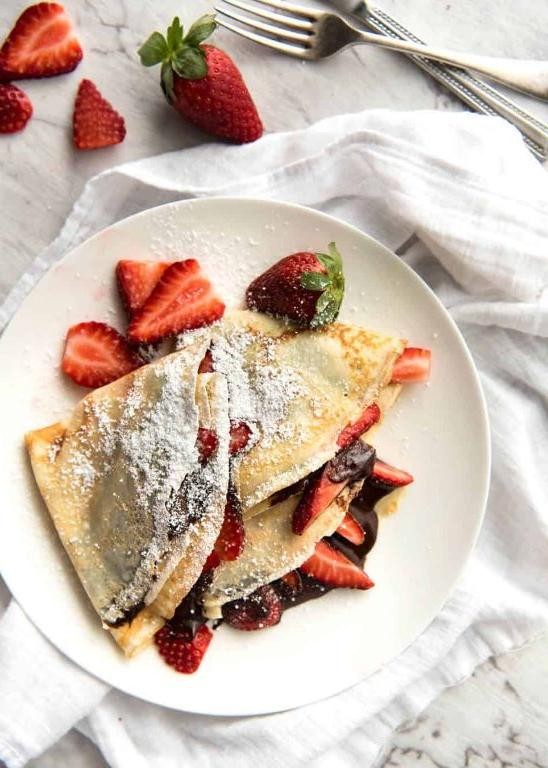
Kind of magical how something so simple can feel so decadent, right? You’ve probably had crepes before, but stuffing them with warm, gooey Nutella takes them to a whole new level of cozy indulgence. Let’s make some.
Serving: 4 | Pre Time: 10 minutes | Cooking Time: 15 minutes
Ingredients
– 1 cup of all-purpose flour
– 2 large farm-fresh eggs
– 1 1/4 cups of whole milk
– 2 tablespoons of melted unsalted butter, plus extra for the pan
– A pinch of fine sea salt
– 1/2 cup of creamy Nutella hazelnut spread
– Fresh berries or sliced bananas for serving (optional)
Instructions
1. In a large mixing bowl, whisk together 1 cup of all-purpose flour and a pinch of fine sea salt until combined.
2. Crack 2 large farm-fresh eggs into the bowl and pour in 1 1/4 cups of whole milk.
3. Whisk the mixture vigorously until it forms a smooth, thin batter with no lumps.
4. Stir in 2 tablespoons of melted unsalted butter until fully incorporated, then let the batter rest for 5 minutes to allow the flour to hydrate.
5. Heat a non-stick skillet or crepe pan over medium heat and lightly grease it with a bit of extra unsalted butter using a paper towel.
6. Pour about 1/4 cup of batter into the center of the hot pan, then immediately tilt and swirl the pan to spread it into a thin, even circle.
7. Cook the crepe for about 60-90 seconds, until the edges lift easily and the bottom is lightly golden brown.
8. Carefully flip the crepe using a spatula and cook the other side for another 30-45 seconds until set, then transfer it to a plate.
9. Repeat steps 5-8 with the remaining batter, stacking the cooked crepes on the plate, to make about 8 crepes total.
10. Warm 1/2 cup of creamy Nutella hazelnut spread in a microwave-safe bowl for 15-20 seconds until slightly runny, stirring halfway through.
11. Place a cooked crepe flat on a clean surface and spoon about 1 tablespoon of the warmed Nutella onto the center.
12. Fold the crepe in half over the filling, then fold it in half again to form a triangle, gently pressing to seal.
13. Repeat steps 11-12 with the remaining crepes and Nutella until all are stuffed and folded.
14. Serve the crepes immediately while warm. Optionally, top with fresh berries or sliced bananas for a fruity contrast.
Oh, the first bite is pure bliss—the delicate, slightly crisp crepe gives way to that molten, chocolate-hazelnut center. It’s wonderfully messy and satisfying, with the optional berries adding a bright, tangy pop. Try drizzling a little extra warmed Nutella on top or dusting with powdered sugar for an even more indulgent treat.
Banana Chocolate Chip Muffins
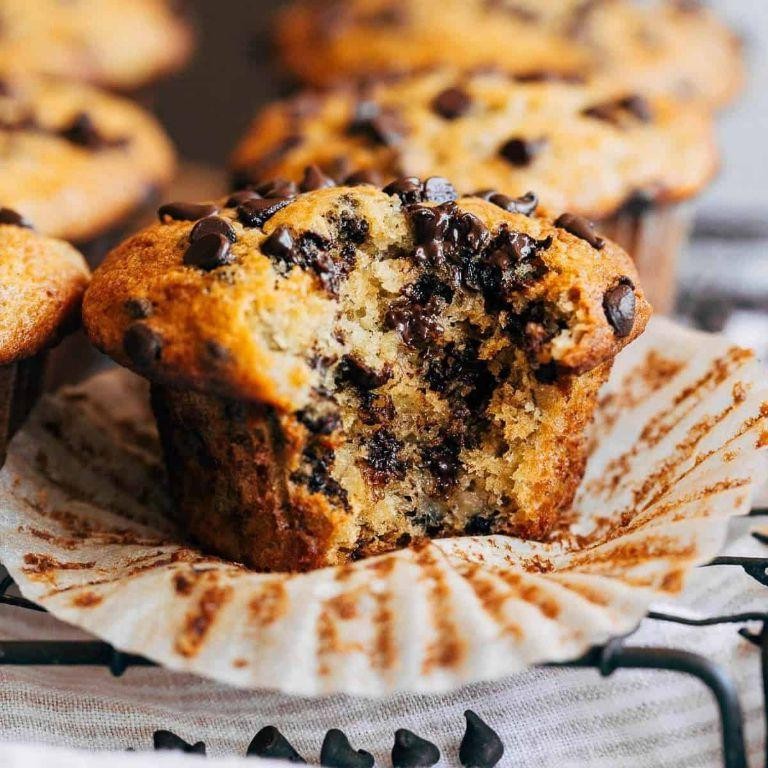
Tired of those overripe bananas sitting on your counter? You’re about to turn them into the most irresistible treat. These banana chocolate chip muffins are the perfect cozy bake—soft, sweet, and packed with melty chocolate in every bite.
Serving: 12 | Pre Time: 15 minutes | Cooking Time: 22 minutes
Ingredients
– 3 very ripe, spotty bananas (for maximum sweetness)
– 1/3 cup melted, creamy unsalted butter (cooled slightly)
– 1 large farm-fresh egg
– 1/2 cup packed light brown sugar
– 1 teaspoon pure vanilla extract
– 1 1/2 cups all-purpose flour
– 1 teaspoon baking soda
– 1/2 teaspoon fine sea salt
– 1 cup semi-sweet chocolate chips
Instructions
1. Preheat your oven to 375°F and line a 12-cup muffin tin with paper liners.
2. In a large mixing bowl, mash the very ripe, spotty bananas with a fork until mostly smooth, leaving a few small lumps for texture.
3. Add the melted, creamy unsalted butter, large farm-fresh egg, packed light brown sugar, and pure vanilla extract to the mashed bananas. Whisk vigorously until well combined and creamy.
4. In a separate medium bowl, whisk together the all-purpose flour, baking soda, and fine sea salt.
5. Tip: Gently fold the dry ingredients into the wet mixture using a spatula—overmixing can lead to tough muffins, so stop as soon as no flour streaks remain.
6. Fold in the semi-sweet chocolate chips until evenly distributed throughout the batter.
7. Divide the batter evenly among the 12 prepared muffin cups, filling each about 3/4 full.
8. Tip: For bakery-style muffin tops, sprinkle a few extra chocolate chips on top of each before baking.
9. Bake at 375°F for 20–22 minutes, or until a toothpick inserted into the center of a muffin comes out clean or with just a few moist crumbs.
10. Tip: Let the muffins cool in the tin for 5 minutes before transferring to a wire rack—this helps them set without getting soggy.
11. Allow the muffins to cool completely on the wire rack before serving.
You’ll love the tender, moist crumb that practically melts in your mouth, with pockets of gooey chocolate in every bite. Try them warm with a pat of butter, or pack them for a sweet on-the-go snack—they’re guaranteed to disappear fast!
Strawberry Jelly-Filled Donuts

Let’s be real—sometimes you just need a donut. And not just any donut, but a warm, fluffy, strawberry jelly-filled one that feels like a hug from the inside. These homemade beauties are easier than you think and totally worth the effort.
Serving: 12 | Pre Time: 25 minutes | Cooking Time: 15 minutes
Ingredients
– 3 ½ cups all-purpose flour, plus extra for dusting
– 1 cup whole milk, warmed to about 110°F
– ¼ cup granulated sugar
– 2 ¼ teaspoons active dry yeast (one packet)
– 2 large farm-fresh eggs, at room temperature
– 6 tablespoons unsalted butter, softened
– 1 teaspoon pure vanilla extract
– ½ teaspoon fine sea salt
– 1 cup high-quality strawberry jelly or preserves
– 4 cups vegetable oil, for frying
– 1 cup powdered sugar, for dusting
Instructions
1. In a large mixing bowl, combine the warmed whole milk, granulated sugar, and active dry yeast. Let it sit for 5 minutes until foamy.
2. Add the farm-fresh eggs, softened unsalted butter, and pure vanilla extract to the yeast mixture. Whisk until smooth.
3. Gradually mix in the all-purpose flour and fine sea salt until a shaggy dough forms.
4. Turn the dough onto a lightly floured surface and knead for 8-10 minutes until smooth and elastic. Tip: The dough is ready when it springs back slowly when poked.
5. Place the dough in a greased bowl, cover with a damp kitchen towel, and let rise in a warm spot for 1 hour or until doubled in size.
6. Punch down the dough and roll it out on a floured surface to ½-inch thickness.
7. Use a 3-inch round cutter to cut out donut shapes, re-rolling scraps as needed.
8. Place the cut donuts on a parchment-lined baking sheet, cover, and let rise for 30 minutes.
9. Heat the vegetable oil in a large, heavy-bottomed pot to 350°F. Use a candy thermometer for accuracy.
10. Carefully fry 2-3 donuts at a time for 1-2 minutes per side until golden brown. Tip: Don’t overcrowd the pot to maintain oil temperature.
11. Transfer fried donuts to a wire rack set over a baking sheet to drain and cool slightly.
12. Fill a piping bag fitted with a small round tip with the high-quality strawberry jelly.
13. Poke a hole in the side of each warm donut and gently pipe in about 1 tablespoon of jelly. Tip: Wipe the tip clean between donuts to prevent drips.
14. Dust the filled donuts generously with powdered sugar while still warm.
Craving satisfied? These donuts are pure magic—the soft, pillowy dough gives way to a burst of sweet-tart strawberry jelly in every bite. Serve them fresh with a cold glass of milk for the ultimate treat, or get fancy by drizzling with melted chocolate for an extra-decadent twist.
Glazed Lemon Poppyseed Scones
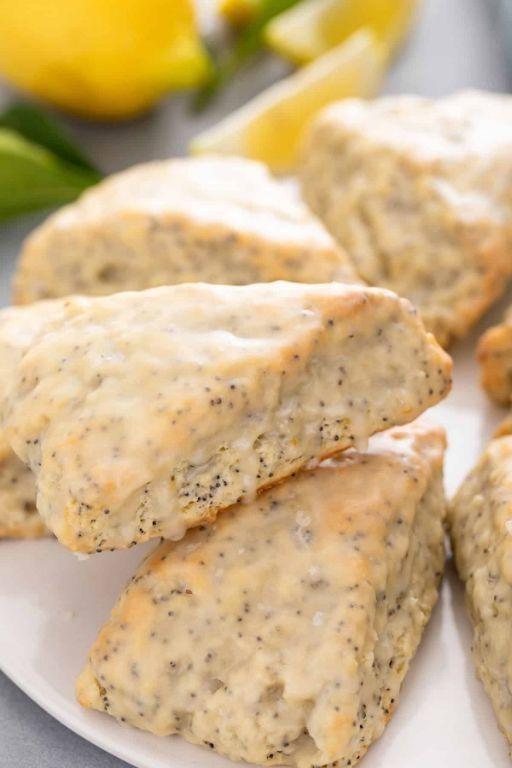
Haven’t you been craving something bright, buttery, and just a little bit fancy for your next lazy weekend morning? These glazed lemon poppyseed scones are exactly that—tender, flaky, and packed with sunny citrus flavor. They’re surprisingly simple to whip up and will make your kitchen smell absolutely incredible.
Serving: 8 | Pre Time: 15 minutes | Cooking Time: 18 minutes
Ingredients
– 2 cups of all-purpose flour, plus extra for dusting
– 1/3 cup of granulated sugar
– 1 tablespoon of baking powder
– 1/2 teaspoon of fine sea salt
– 1/2 cup of cold unsalted butter, cut into small cubes
– 2 tablespoons of fresh lemon zest
– 2 tablespoons of poppy seeds
– 1 large egg, at room temperature
– 1/2 cup of cold heavy cream, plus 1 tablespoon for brushing
– 1 teaspoon of pure vanilla extract
– 1 cup of powdered sugar, sifted
– 2 tablespoons of fresh lemon juice
Instructions
1. Preheat your oven to 400°F and line a baking sheet with parchment paper.
2. In a large bowl, whisk together the 2 cups of all-purpose flour, 1/3 cup of granulated sugar, 1 tablespoon of baking powder, and 1/2 teaspoon of fine sea salt.
3. Add the 1/2 cup of cold cubed butter to the dry ingredients. Use a pastry cutter or your fingers to work the butter into the flour until the mixture resembles coarse crumbs with some pea-sized pieces remaining.
4. Stir in the 2 tablespoons of fresh lemon zest and 2 tablespoons of poppy seeds until evenly distributed.
5. In a separate small bowl, whisk together the 1 large egg, 1/2 cup of cold heavy cream, and 1 teaspoon of pure vanilla extract until smooth.
6. Pour the wet ingredients into the dry ingredients and gently mix with a fork just until a shaggy dough forms. Tip: Don’t overmix—this keeps the scones tender.
7. Turn the dough out onto a lightly floured surface and gently pat it into an 8-inch circle, about 3/4-inch thick.
8. Use a sharp knife to cut the circle into 8 equal wedges.
9. Place the wedges on the prepared baking sheet, leaving about 2 inches between each.
10. Brush the tops of the scones lightly with the remaining 1 tablespoon of heavy cream. Tip: This helps them achieve a beautiful golden-brown color.
11. Bake for 16-18 minutes, or until the scones are puffed and the edges are just starting to turn a light golden brown.
12. Transfer the baked scones to a wire rack and let them cool completely, about 30 minutes. Tip: Letting them cool fully prevents the glaze from melting off.
13. While the scones cool, make the glaze by whisking together the 1 cup of sifted powdered sugar and 2 tablespoons of fresh lemon juice in a small bowl until smooth and pourable.
14. Drizzle the glaze generously over the cooled scones.
15. Allow the glaze to set for about 10 minutes before serving.
You’ll love the contrast of the crisp, sugary glaze against the soft, crumbly interior flecked with poppy seeds. The lemon flavor is vibrant but not overpowering, making these scones perfect with a hot cup of coffee or tea. For a special touch, serve them with a dollop of lemon curd or a side of fresh berries.
Apple Cinnamon Baked Oatmeal
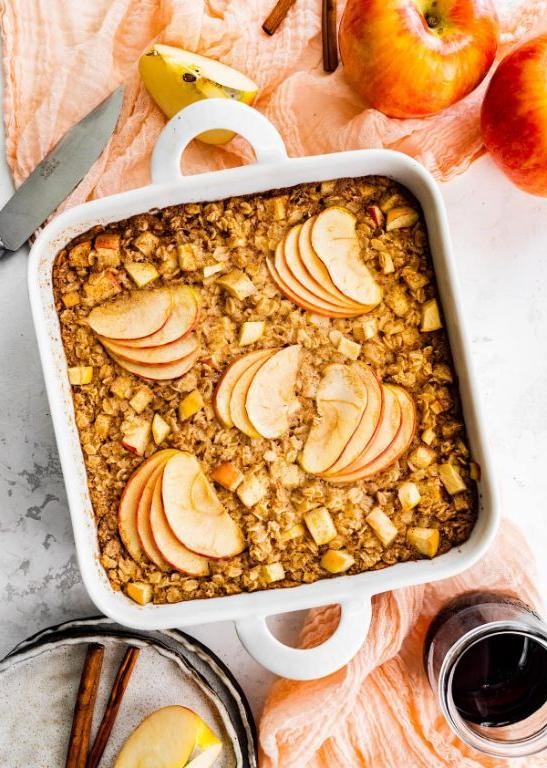
A cozy, comforting breakfast that feels like a warm hug on a chilly morning—this apple cinnamon baked oatmeal is your new go-to for busy mornings or lazy weekend brunches. You’ll love how the sweet apples and warm cinnamon meld together in a hearty, satisfying dish that’s easy to make ahead and reheat throughout the week.
Serving: 6 | Pre Time: 15 minutes | Cooking Time: 45 minutes
Ingredients
– 2 cups old-fashioned rolled oats
– 1 ½ cups unsweetened almond milk
– 2 large farm-fresh eggs
– ⅓ cup pure maple syrup
– 2 medium crisp Honeycrisp apples, peeled and diced
– 1 teaspoon ground cinnamon
– ½ teaspoon pure vanilla extract
– ¼ teaspoon fine sea salt
– 2 tablespoons melted unsalted butter
Instructions
1. Preheat your oven to 350°F and lightly grease an 8×8-inch baking dish with butter or cooking spray.
2. In a large mixing bowl, whisk together the 2 large farm-fresh eggs until frothy.
3. Pour in the 1 ½ cups unsweetened almond milk, ⅓ cup pure maple syrup, and ½ teaspoon pure vanilla extract, whisking until fully combined.
4. Add the 2 cups old-fashioned rolled oats, 1 teaspoon ground cinnamon, and ¼ teaspoon fine sea salt to the wet ingredients, stirring gently to coat everything evenly.
5. Fold in the 2 medium crisp Honeycrisp apples, peeled and diced, distributing them throughout the mixture.
6. Tip: For extra flavor, let the mixture sit for 10 minutes so the oats absorb some liquid—this helps prevent a dry texture.
7. Pour the mixture into the prepared baking dish, spreading it into an even layer with a spatula.
8. Drizzle the 2 tablespoons melted unsalted butter evenly over the top.
9. Tip: Sprinkle a pinch of extra cinnamon on top for a beautiful, aromatic crust.
10. Bake at 350°F for 40–45 minutes, or until the edges are golden brown and the center is set when lightly pressed.
11. Tip: Check at 40 minutes—if it jiggles slightly, bake for another 5 minutes until firm.
12. Remove from the oven and let it cool for 10 minutes before slicing.
Perfectly tender with a lightly crisp top, this baked oatmeal offers warm cinnamon notes and sweet apple bites in every spoonful. Serve it warm with a dollop of Greek yogurt or a drizzle of extra maple syrup for a decadent touch, or pack slices for an on-the-go breakfast that’ll keep you fueled all morning.
Pumpkin Spice Waffles
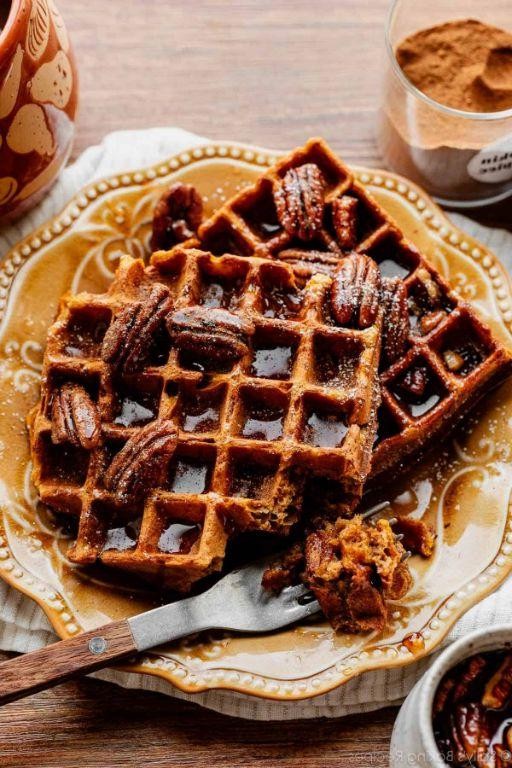
Grab your favorite mug of coffee because these pumpkin spice waffles are about to become your new fall weekend tradition. They’re cozy, perfectly spiced, and fill your kitchen with the best autumn aroma. You’ll love how simple they are to whip up for a special breakfast or brunch.
Serving: 4 | Pre Time: 10 minutes | Cooking Time: 15 minutes
Ingredients
– 1 ½ cups of all-purpose flour
– 2 teaspoons of baking powder
– 1 teaspoon of baking soda
– ½ teaspoon of fine sea salt
– 2 teaspoons of fragrant pumpkin pie spice
– 2 large farm-fresh eggs
– 1 ¼ cups of creamy buttermilk
– 1 cup of pure pumpkin puree
– ⅓ cup of packed light brown sugar
– ¼ cup of melted unsalted butter
– 1 teaspoon of pure vanilla extract
– Cooking spray or extra melted butter for greasing
Instructions
1. Preheat your waffle iron to a medium-high setting, around 375°F.
2. In a large mixing bowl, whisk together the all-purpose flour, baking powder, baking soda, fine sea salt, and fragrant pumpkin pie spice until fully combined.
3. In a separate medium bowl, lightly beat the two large farm-fresh eggs with a fork.
4. To the eggs, add the creamy buttermilk, pure pumpkin puree, packed light brown sugar, melted unsalted butter, and pure vanilla extract. Whisk until the mixture is smooth and uniform in color.
5. Pour the wet ingredients from the medium bowl into the large bowl with the dry ingredients. Gently fold together with a spatula until just combined; a few small lumps are okay to avoid tough waffles.
6. Lightly coat the preheated waffle iron grids with cooking spray or a brush of melted butter.
7. For a standard round waffle iron, scoop about ⅔ cup of batter onto the center of the bottom grid. Close the lid and cook according to your iron’s instructions, typically for 4-5 minutes, until the waffle is deeply golden brown and crisp on the outside.
8. Carefully remove the cooked waffle and place it on a wire rack instead of a plate to prevent sogginess while you repeat with the remaining batter.
9. Serve the waffles immediately while hot and crisp.
Ready to dig in? These waffles boast a wonderfully crisp exterior that gives way to a tender, fluffy interior packed with warm pumpkin spice flavor. For a decadent twist, top them with a dollop of whipped cream, a drizzle of maple syrup, and a sprinkle of toasted pecans.
Almond Croissants with Vanilla Glaze
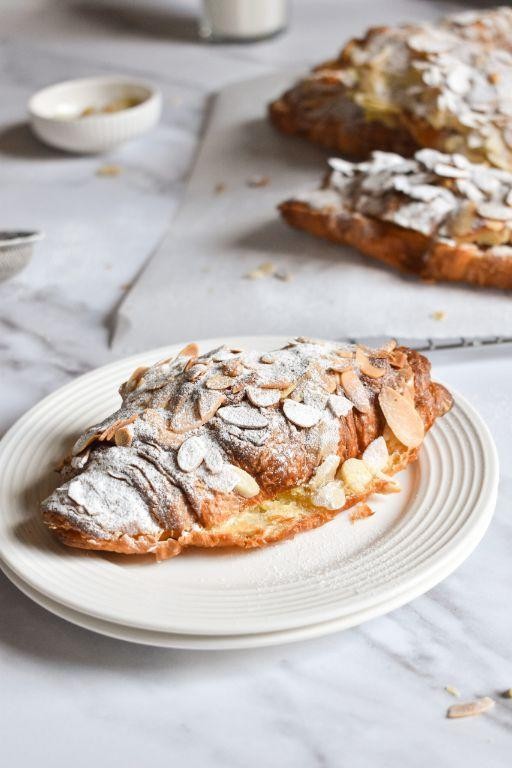
Finally, a bakery-style treat you can make at home without the fuss. These almond croissants with vanilla glaze are flaky, buttery, and packed with sweet almond flavor—perfect for a cozy weekend breakfast or a special brunch. You’ll love how the vanilla glaze adds that perfect finishing touch.
Serving: 8 | Pre Time: 20 minutes | Cooking Time: 20 minutes
Ingredients
– 1 package (8 count) of store-bought all-butter croissants, preferably day-old for better texture
– 1 cup of creamy almond paste, broken into small pieces
– 1/2 cup of unsalted butter, softened at room temperature
– 1/4 cup of granulated sugar
– 2 large farm-fresh eggs, lightly beaten
– 1/2 teaspoon of pure almond extract for enhanced flavor
– 1 cup of powdered sugar, sifted to avoid lumps
– 2 tablespoons of whole milk, warmed slightly
– 1 teaspoon of pure vanilla extract
– 1/4 cup of sliced almonds for a crunchy topping
Instructions
1. Preheat your oven to 350°F and line a baking sheet with parchment paper.
2. Slice each croissant in half horizontally, like a sandwich, using a serrated knife for clean cuts.
3. In a medium bowl, combine the creamy almond paste, softened unsalted butter, and granulated sugar; beat with a hand mixer on medium speed for 2-3 minutes until smooth and fluffy.
4. Add one lightly beaten farm-fresh egg and the pure almond extract to the bowl; mix for another minute until fully incorporated, scraping down the sides as needed.
5. Spread about 2 tablespoons of the almond filling evenly onto the bottom half of each croissant, then place the top half back on.
6. Brush the tops of the croissants with the remaining lightly beaten farm-fresh egg using a pastry brush for a golden finish.
7. Sprinkle the sliced almonds over the brushed croissants, pressing gently so they adhere.
8. Bake in the preheated oven at 350°F for 18-20 minutes, or until the croissants are puffed and golden brown.
9. While baking, make the glaze: in a small bowl, whisk together the sifted powdered sugar, warmed whole milk, and pure vanilla extract until smooth and pourable.
10. Remove the croissants from the oven and let them cool on the baking sheet for 5 minutes to set.
11. Drizzle the vanilla glaze over the warm croissants while they’re still slightly warm for better absorption.
12. Serve immediately or store in an airtight container for up to 2 days.
Mmm, these almond croissants are irresistibly flaky with a rich, nutty filling that melts in your mouth. The vanilla glaze adds a sweet, creamy contrast, making them perfect for pairing with a hot cup of coffee or tea. For a creative twist, try serving them with a dollop of whipped cream or fresh berries on the side.
Raspberry Almond Tartlets

Sometimes you want a dessert that feels fancy but doesn’t take all day. These raspberry almond tartlets are just that—a perfect mix of sweet, tart, and nutty flavors in a cute, handheld package.
Serving: 12 | Pre Time: 25 minutes | Cooking Time: 20 minutes
Ingredients
– 1 1/4 cups all-purpose flour
– 1/2 cup cold unsalted butter, cut into small cubes
– 1/4 cup granulated sugar
– 1 large farm-fresh egg yolk
– 2 tbsp ice water
– 1 cup almond flour
– 1/2 cup softened unsalted butter
– 1/2 cup granulated sugar
– 2 large farm-fresh eggs
– 1 tsp pure vanilla extract
– 1 1/2 cups fresh raspberries
– 2 tbsp sliced almonds
– 2 tbsp powdered sugar
Instructions
1. Preheat your oven to 350°F and lightly grease a 12-cup mini tart pan.
2. In a food processor, pulse 1 1/4 cups all-purpose flour, 1/2 cup cold unsalted butter cubes, and 1/4 cup granulated sugar until the mixture resembles coarse crumbs.
3. Add 1 large farm-fresh egg yolk and 2 tbsp ice water, then pulse just until the dough comes together.
4. Tip: Handle the dough gently to keep it tender—overworking can make it tough.
5. Press the dough evenly into the prepared tart pan cups, forming a thin crust.
6. In a mixing bowl, beat 1/2 cup softened unsalted butter and 1/2 cup granulated sugar with an electric mixer on medium speed for 2 minutes until light and fluffy.
7. Beat in 2 large farm-fresh eggs, one at a time, then mix in 1 tsp pure vanilla extract.
8. Fold in 1 cup almond flour until just combined to create the filling.
9. Spoon the filling into the crusts, filling each about three-quarters full.
10. Top each tartlet with 1 1/2 cups fresh raspberries, pressing them lightly into the filling.
11. Sprinkle 2 tbsp sliced almonds evenly over the top.
12. Bake at 350°F for 18-20 minutes, until the edges are golden brown and the filling is set.
13. Tip: Check for doneness by inserting a toothpick—it should come out clean, not wet.
14. Let the tartlets cool in the pan on a wire rack for 10 minutes.
15. Carefully remove the tartlets from the pan and let them cool completely on the rack.
16. Dust the cooled tartlets with 2 tbsp powdered sugar just before serving.
17. Tip: For a glossy finish, brush the raspberries with a little warmed apricot jam after baking.
Buttery, crumbly crust gives way to a moist almond filling that’s subtly sweet, while the raspberries add a bright, juicy pop. Serve these warm with a scoop of vanilla ice cream for a cozy treat, or pack them for a picnic—they’re as pretty as they are delicious.
Maple Walnut Sticky Buns
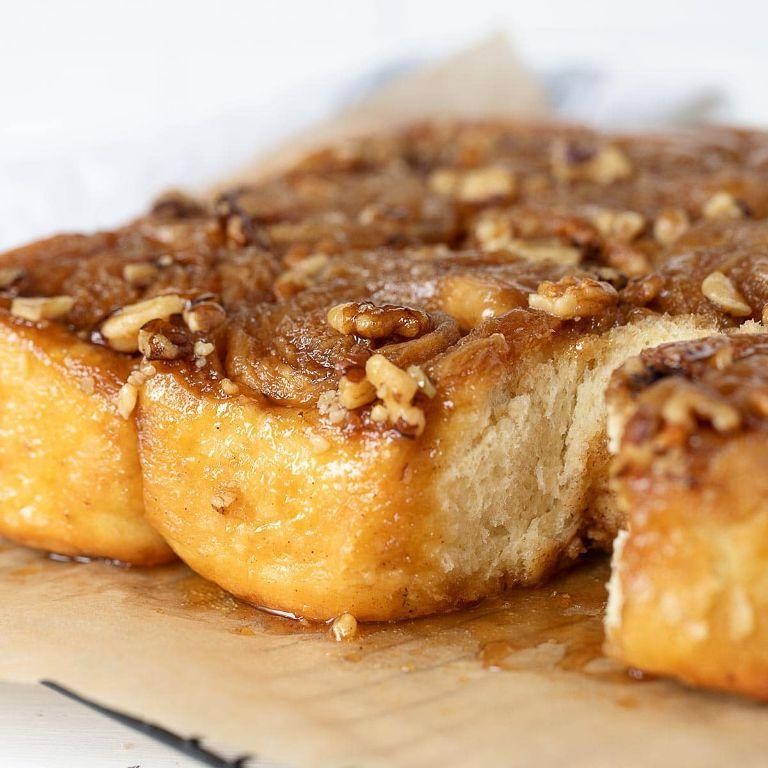
Nothing beats the smell of warm cinnamon and maple wafting through your kitchen on a cozy morning. You’re going to love these gooey, nutty buns—they’re the perfect weekend treat that feels special but is totally doable.
Serving: 12 | Pre Time: 20 minutes | Cooking Time: 25 minutes
Ingredients
– 1 package active dry yeast
– 1 cup warm whole milk (about 110°F)
– ¼ cup granulated sugar
– 1 large farm-fresh egg
– 3 cups all-purpose flour
– ½ teaspoon fine sea salt
– 4 tablespoons unsalted butter, softened
– ½ cup pure maple syrup
– ½ cup packed light brown sugar
– 1 tablespoon ground cinnamon
– 1 cup chopped walnuts
– 2 tablespoons heavy cream
Instructions
1. Dissolve the active dry yeast in the warm whole milk in a large bowl and let it sit for 5 minutes until frothy.
2. Whisk in the granulated sugar and farm-fresh egg until smooth.
3. Gradually mix in the all-purpose flour and fine sea salt until a shaggy dough forms.
4. Knead the dough on a floured surface for 8-10 minutes until smooth and elastic, then place it in a greased bowl, cover with a towel, and let rise in a warm spot for 1 hour until doubled in size.
5. Roll out the dough on a floured surface into a 12×18-inch rectangle.
6. Spread the softened unsalted butter evenly over the dough.
7. Sprinkle the light brown sugar, ground cinnamon, and chopped walnuts over the butter, leaving a ½-inch border.
8. Tightly roll the dough into a log starting from the long side and pinch the seam to seal.
9. Cut the log into 12 equal slices using a sharp serrated knife to prevent squishing.
10. Pour the pure maple syrup into a 9×13-inch baking dish and spread it evenly.
11. Arrange the dough slices cut-side up in the baking dish, cover with a towel, and let rise for 30 minutes until puffy.
12. Preheat your oven to 350°F.
13. Drizzle the heavy cream over the risen buns.
14. Bake for 22-25 minutes until golden brown and the maple syrup is bubbling around the edges.
15. Let the buns cool in the pan for 10 minutes, then invert them onto a serving plate to reveal the sticky topping.
Tip: For extra flavor, toast the walnuts in a dry skillet over medium heat for 3-4 minutes before chopping. Tip: If your kitchen is cool, let the dough rise in a turned-off oven with the light on for consistent warmth. Tip: Use a pastry brush to evenly coat the dough with butter for better cinnamon-sugar distribution.
These buns are irresistibly soft and pillowy with a caramelized, crunchy walnut topping. They’re best served warm, maybe with a drizzle of extra maple syrup or a scoop of vanilla ice cream for an indulgent twist.
Peach Melba Breakfast Parfaits

Usually, you want something special for breakfast but don’t have hours to spend in the kitchen. These peach melba parfaits are your answer—they come together in minutes and taste like a fancy dessert you can totally justify eating first thing in the morning.
Serving: 4 | Pre Time: 15 minutes | Cooking Time: 0 minutes
Ingredients
- 2 cups ripe, juicy peaches, peeled and diced
- 1 cup plump, sweet raspberries
- 1 tablespoon freshly squeezed lemon juice
- 2 tablespoons fragrant, golden honey
- 3 cups thick, creamy Greek yogurt
- 1 cup crunchy, toasted granola
- Fresh mint leaves for garnish (optional)
Instructions
- In a medium bowl, combine the diced ripe peaches, plump raspberries, freshly squeezed lemon juice, and fragrant honey.
- Gently stir the fruit mixture until the honey coats all the pieces evenly, about 1 minute. Tip: Let this sit for 5 minutes to allow the juices to release and create a light syrup.
- Place 1/4 cup of the thick Greek yogurt into the bottom of each of four serving glasses or jars.
- Top the yogurt layer with 1/4 cup of the macerated peach and raspberry mixture.
- Sprinkle 2 tablespoons of the crunchy granola over the fruit layer in each glass.
- Repeat the layers once more, adding another 1/4 cup of yogurt, then fruit, and finishing with a final sprinkle of granola.
- Garnish the top of each parfait with a fresh mint leaf, if using. Tip: For the best texture, assemble the parfaits just before serving so the granola stays crisp.
- Serve immediately. Tip: For a fun twist, you can layer the ingredients in a large trifle dish for a beautiful, shareable centerpiece.
What you get is a perfect balance of creamy, tangy yogurt with sweet, syrupy fruit and a satisfying crunch. The flavors of peach and raspberry are a classic combo that feels both nostalgic and fresh. Try serving these in clear mason jars to show off the beautiful layers, or pack them for a delightful, portable breakfast.
Conclusion
Absolutely, these 30 delightful breakfast sweets prove that a little indulgence makes mornings magical. From cozy muffins to elegant pastries, there’s a treat here for every taste and occasion. We hope you find a new favorite to bake and share! Don’t forget to leave a comment telling us which recipe you loved most, and pin this roundup to your Pinterest boards to save for later. Happy baking!


