
My friends, if you’ve ever dreamed of biting into fried chicken so perfectly crispy on the outside and tender on the inside that you question every other version you’ve tried, you’re in the right place. Many claim to have the secret, but today I’m sharing my foolproof method that’ll make you the hero of any gathering.
Why This Recipe Works
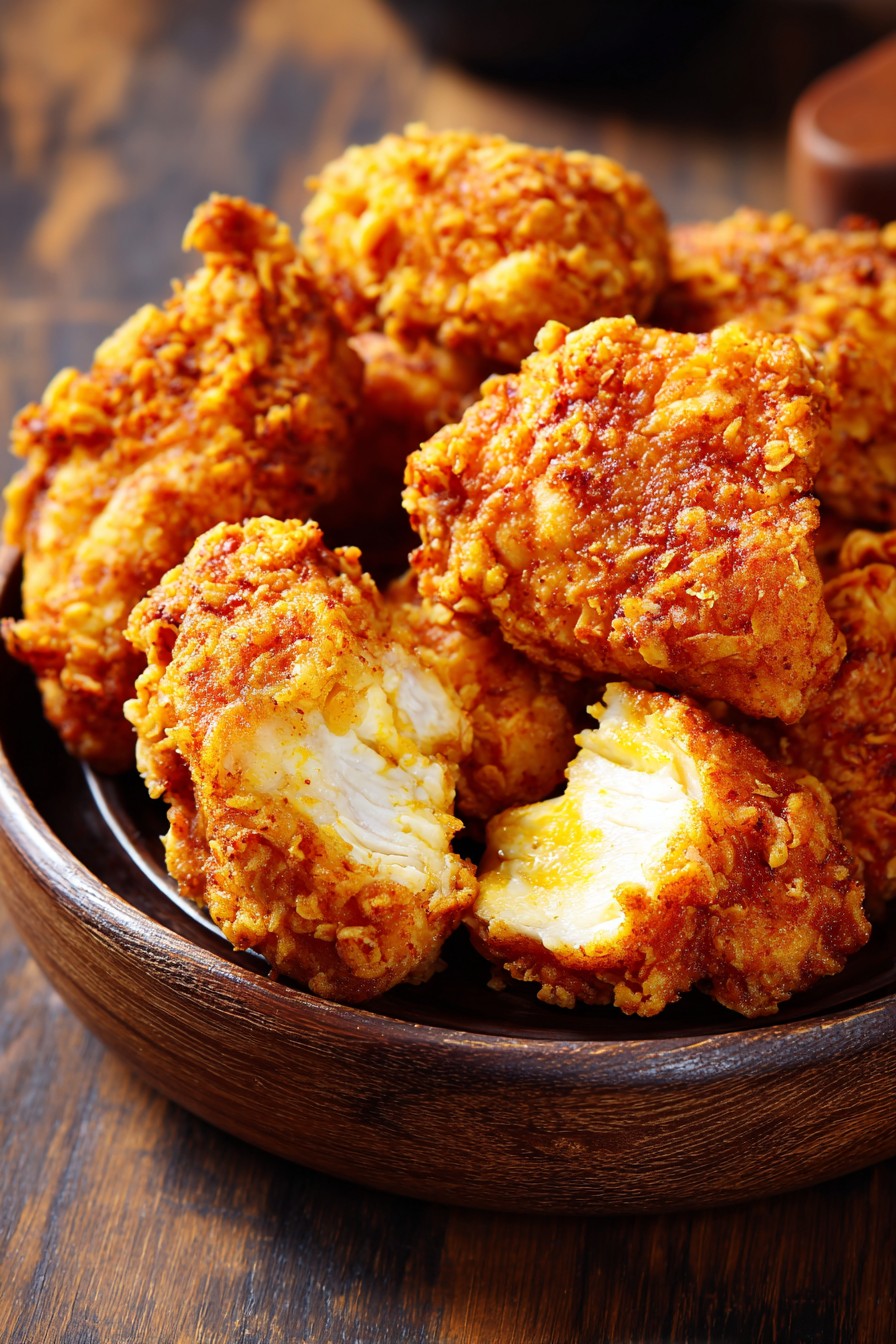
- The double-dredge technique creates an extra-crunchy crust that stays crispy even after cooling
- Buttermilk marinade tenderizes the chicken while adding tangy flavor that cuts through the richness
- Using boneless thighs instead of breasts ensures juicy, flavorful results every single time
- Maintaining oil temperature at precisely 350°F prevents greasy chicken while achieving golden perfection
- The secret spice blend in the flour adds layers of flavor that store-bought versions can’t match
Ingredients
- 2 pounds boneless, skinless chicken thighs, trimmed of excess fat
- 2 cups buttermilk, well-shaken
- 1 tablespoon hot sauce (I prefer Louisiana-style)
- 2 cups all-purpose flour, spooned and leveled
- 1/4 cup cornstarch
- 2 tablespoons paprika
- 1 tablespoon garlic powder
- 1 tablespoon onion powder
- 2 teaspoons cayenne pepper (adjust to taste)
- 1 tablespoon black pepper, freshly ground
- 2 tablespoons kosher salt
- 1 teaspoon baking powder
- 4 cups vegetable oil (or peanut oil) for frying
Equipment Needed
- Large mixing bowls (2)
- Whisk
- Digital kitchen thermometer
- Dutch oven or heavy-bottomed pot
- Spider strainer or slotted spoon
- Wire cooling rack
- Baking sheet
- Paper towels
- Tongs
Instructions
Prepare the Buttermilk Marinade
In a large bowl, whisk together the buttermilk and hot sauce until fully combined. The acidity in the buttermilk works magic on the chicken, breaking down proteins for maximum tenderness while the hot sauce adds a subtle kick that builds flavor from the inside out. Submerge the chicken thighs completely in the mixture, pressing down to ensure every piece is coated. Cover the bowl with plastic wrap and refrigerate for at least 4 hours, though overnight marinating yields even better results. This waiting period is crucial—it’s when the flavor foundation gets built, so don’t rush it unless you want mediocre chicken (and we don’t do mediocre here).
Create the Seasoned Flour Mixture
Dredge the Chicken Pieces
Remove the chicken from the buttermilk marinade, allowing excess liquid to drip off back into the bowl. Don’t shake it vigorously—you want a thin layer of buttermilk to remain as it helps the flour adhere. Working with one piece at a time, place the chicken in the flour mixture and press down firmly, then flip and press again. Lift, shake off excess flour, then dip back into the buttermilk marinade for a second coating. Return to the flour mixture for a final dredge, pressing firmly to create a craggy, textured surface that will become those beautiful crispy ridges. Place the double-dredged pieces on a wire rack set over a baking sheet while you heat the oil.
Heat the Oil to Perfect Temperature
Pour the vegetable oil into your Dutch oven or heavy-bottomed pot—it should come about 2 inches up the sides. Attach your digital thermometer to the side of the pot, making sure the tip isn’t touching the bottom. Heat over medium-high heat until the oil reaches 350°F, which typically takes 8-10 minutes. Maintaining this temperature is non-negotiable—too hot and the outside burns before the inside cooks; too cool and the chicken absorbs oil like a sponge. Pro tip: test the oil by dropping a small pinch of flour into it—if it sizzles immediately and floats to the top, you’re ready to rock and roll.
Fry to Golden Perfection
Carefully lower 3-4 pieces of chicken into the hot oil using tongs, making sure not to overcrowd the pot (this causes temperature drops). Fry for 5-6 minutes, then flip using tongs or a spider strainer. Continue frying for another 4-5 minutes until the internal temperature reaches 165°F and the exterior is deep golden brown with visible crispy texture. Remove each piece and let excess oil drip back into the pot for about 15 seconds before transferring to a wire rack set over a baking sheet—never place directly on paper towels as this creates steam that softens your perfect crust. Repeat with remaining chicken, allowing oil to return to 350°F between batches.
Rest and Serve Immediately
Let the fried chicken rest on the wire rack for exactly 5 minutes before serving—this allows the juices to redistribute while keeping the crust crispy. The internal temperature will continue rising about 5 degrees during this rest, ensuring food safety without overcooking. Serve immediately with your favorite sides—this chicken is at its absolute peak within 15 minutes of coming out of the oil. If you must wait longer, keep it in a single layer on the wire rack in a 200°F oven, but honestly, just gather everyone around and enjoy the crispy magic right away.
Tips and Tricks
For the absolute crispiest crust possible, try adding 1/4 cup of potato starch to your flour mixture—it creates an incredibly light and shatteringly crisp texture that’ll have people asking for your secret. If you’re feeding a crowd, you can dredge all the chicken first and let it sit on the wire rack for up to 30 minutes before frying—this helps the coating set and results in even crispier results. When testing oil temperature, remember that adding chicken will cause the temperature to drop about 25-30 degrees, so start at 350°F knowing it’ll settle around 325°F during cooking—adjust your burner accordingly to maintain this sweet spot.
For extra flavor infusion, add 2 tablespoons of the buttermilk marinade to your flour mixture and use your fingers to work it in until it creates small pebbles—these little clusters become incredibly crispy bits in the final product. If you’re concerned about oil splatters, place a splatter screen over your pot—it allows steam to escape while containing the oil. For perfectly cooked chicken every time, use an instant-read thermometer to check the internal temperature—insert it into the thickest part of the thigh without touching the bone (if using bone-in) and wait for 165°F.
To keep your oil clean between batches, use a spider strainer to remove any floating burnt bits—these can impart bitter flavors to subsequent batches. For the best texture, serve fried chicken on a wire rack rather than a plate—this prevents the bottom from getting soggy. If you need to reheat leftovers, never use the microwave—instead, place on a wire rack in a 375°F oven for 10-12 minutes until crispy again. For extra juicy chicken, try adding 1 tablespoon of vodka to your buttermilk marinade—the alcohol helps tenderize while evaporating during frying.
Recipe Variations
- Nashville Hot Style: After frying, brush with a mixture of 1/4 cup hot frying oil, 2 tablespoons cayenne pepper, 1 teaspoon paprika, 1/2 teaspoon garlic powder, and 1 tablespoon brown sugar for that signature spicy glaze
- Buttermilk Ranch: Add 2 tablespoons of dried ranch seasoning mix to the flour coating and serve with homemade ranch dressing for dipping
- Asian-Inspired: Replace paprika with 5-spice powder, add 1 tablespoon sesame seeds to the flour, and serve with sweet chili sauce
- Lemon Herb: Add zest of 2 lemons and 2 tablespoons of dried Italian herbs to the flour mixture, perfect for summer gatherings
- Gluten-Free: Substitute the all-purpose flour with 1 1/2 cups rice flour and 1/2 cup potato starch, adding 1 teaspoon xanthan gum to help binding
Frequently Asked Questions
Can I use chicken breasts instead of thighs?
While you absolutely can use boneless, skinless chicken breasts, I strongly recommend against it for this particular recipe. Chicken thighs have more fat and connective tissue, which means they stay juicy and tender through the frying process, while breasts can easily become dry and tough. If you must use breasts, pound them to an even 1/2-inch thickness and reduce frying time to 3-4 minutes per side, watching carefully to prevent overcooking. The margin for error is much smaller with breasts, so use your thermometer religiously!
How do I dispose of the used frying oil properly?
First, let the oil cool completely to room temperature—this usually takes 2-3 hours. Once cooled, strain it through a fine-mesh sieve lined with cheesecloth to remove any food particles. You can reuse the oil 2-3 times for frying if stored properly in an airtight container in a cool, dark place. When ready to dispose, pour the cooled oil into a sealable container (like an old coffee can or plastic bottle) and throw it in the trash—never pour it down the drain as it can cause serious plumbing issues. Some communities have oil recycling programs—check with your local waste management facility.
Can I make this recipe ahead of time?
You can prepare components ahead of time—marinate the chicken overnight and mix the dry ingredients a day in advance. However, I don’t recommend frying more than 30 minutes before serving as the crust will lose its crispiness. If you must make it ahead, fry as directed, let cool completely, then reheat in a 375°F oven on a wire rack for 10-12 minutes until crispy again. The texture won’t be quite as perfect as fresh-from-the-oil, but it’s still delicious. For best results, serve immediately after frying while that crust is at its peak crispiness.
Why did my coating fall off during frying?
Coating separation usually happens for three reasons: oil temperature too low (causing the coating to absorb oil instead of sealing), not pressing firmly enough during dredging, or moving the chicken too much during the first minute of frying. Make sure your oil is at exactly 350°F before adding chicken, press firmly during the flour coating stage to create good adhesion, and don’t disturb the chicken for at least 2 minutes after placing it in the oil—this allows the crust to set properly. Also ensure your chicken pieces are dry enough after marinating—let excess buttermilk drip off but don’t wipe it completely.
Can I bake this instead of frying?
While you won’t get the same crispy texture, you can bake at 400°F for 20-25 minutes on a wire rack set over a baking sheet. Spray the coated chicken generously with cooking spray to help browning. The result will be more like oven-fried chicken—still delicious but without that signature crunch. For better results, try air frying at 375°F for 12-15 minutes, flipping halfway through. However, for authentic fried chicken texture, nothing beats actual frying—the oil contact creates that blistered, crispy crust that baking simply can’t replicate.
Summary
This boneless fried chicken delivers maximum crunch and juiciness through buttermilk marination, double dredging, and perfect temperature control. Serve immediately for that unforgettable crispy experience that beats any restaurant version.
Boneless Fried Chicken
4
servings20
minutes15
minutesIngredients
Instructions
- 1 Marinate chicken in buttermilk and hot sauce for 4+ hours
- 2 Whisk dry ingredients together in large bowl
- 3 Dredge chicken twice in flour mixture with buttermilk dip between
- 4 Heat oil to 350°F in Dutch oven
- 5 Fry chicken 9-11 minutes until 165°F internal temperature
- 6 Drain on wire rack and rest 5 minutes before serving


