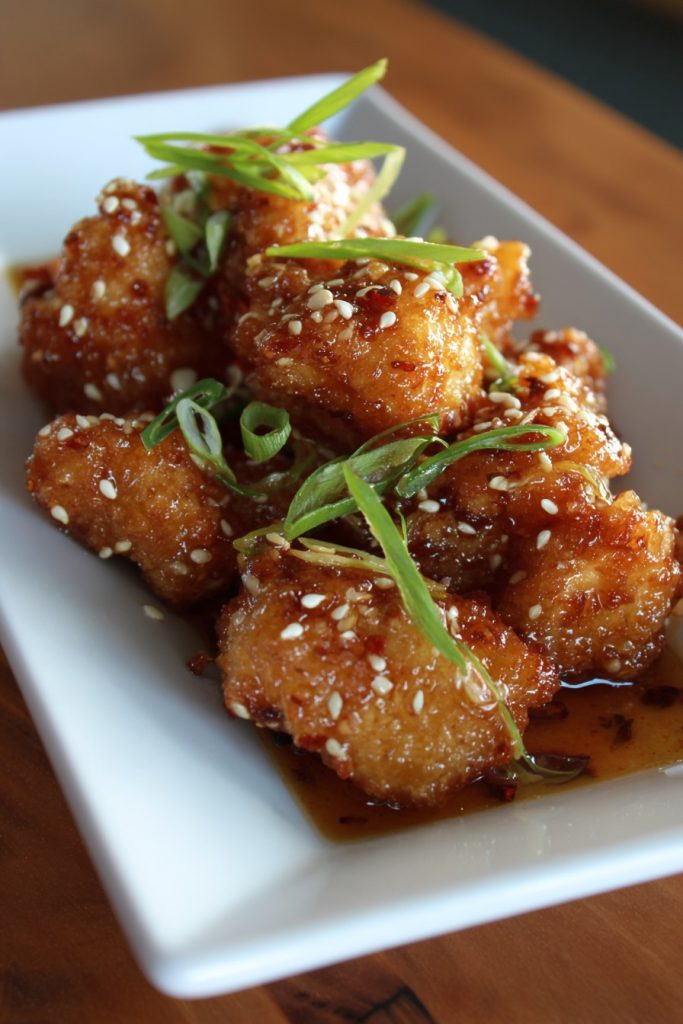
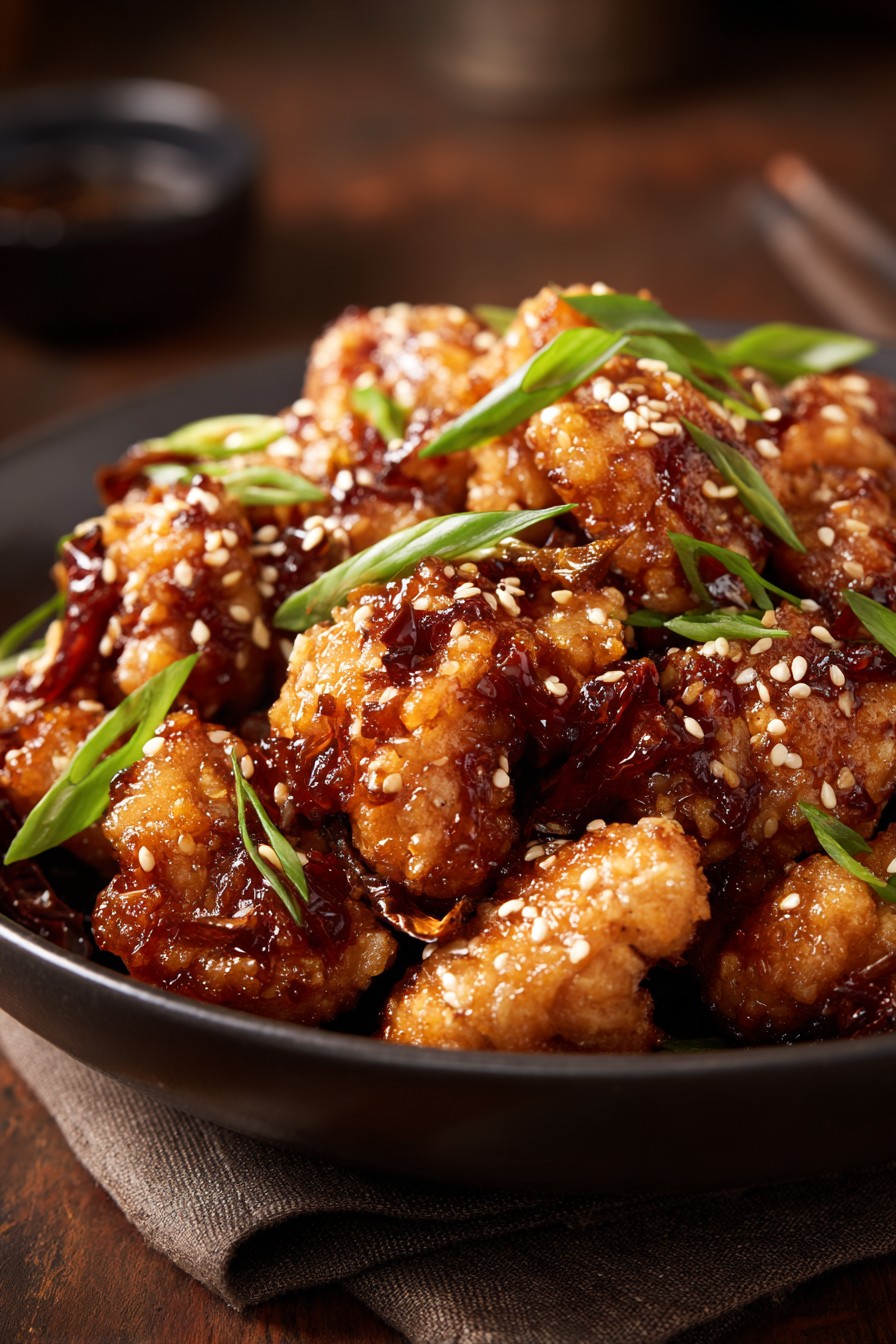
Unbelievably delicious and surprisingly simple, this boneless almond chicken will become your new weeknight hero! Using pantry staples and a clever technique, we’re creating restaurant-quality results right in your own kitchen without any fuss.
Why This Recipe Works
- The double coating method (flour, egg wash, almond mixture) creates an incredibly crispy exterior that stays crunchy even after saucing
- Toasting the almonds before crushing them releases their natural oils and intensifies their nutty flavor throughout the dish
- Using boneless, skinless chicken thighs instead of breasts ensures juicier results that won’t dry out during cooking
- The sweet and savory sauce perfectly balances the crunchy chicken without making it soggy when added at the end
- Quick pan-frying followed by a brief oven finish guarantees evenly cooked chicken with maximum crispiness
Ingredients
- 1.5 pounds boneless, skinless chicken thighs, cut into 1-inch pieces
- 1 cup all-purpose flour
- 2 large eggs, beaten
- 1.5 cups raw almonds, finely crushed
- 1/2 cup cornstarch
- 1 teaspoon garlic powder
- 1 teaspoon onion powder
- 1/2 teaspoon smoked paprika
- 1/2 cup vegetable oil for frying
- 1/4 cup low-sodium soy sauce
- 3 tablespoons honey
- 2 tablespoons rice vinegar
- 1 tablespoon sesame oil
- 2 cloves garlic, minced
- 1 teaspoon fresh ginger, grated
- 2 green onions, thinly sliced for garnish
- 1 tablespoon sesame seeds for garnish
Equipment Needed
- Large mixing bowls (3)
- Whisk
- Large skillet or frying pan
- Baking sheet
- Parchment paper
- Tongs
- Paper towels
- Small saucepan
- Measuring cups and spoons
- Knife and cutting board
- Meat thermometer (optional but recommended)
Instructions
Prepare Your Almond Coating Station
First, let’s set up our three-station breading assembly line for maximum efficiency. In your first bowl, combine the all-purpose flour with the garlic powder, onion powder, and smoked paprika, whisking thoroughly to ensure even distribution of spices. The second bowl should contain your beaten eggs – make sure they’re fully blended until no streaks of white remain. For the third bowl, combine your finely crushed almonds with the cornstarch, which will help create that extra-crispy texture we’re after. Pro tip: Crush your almonds by placing them in a zip-top bag and using a rolling pin or meat mallet – you want some texture with both fine crumbs and small chunks for the best crunch factor. Arrange your bowls in order from left to right: flour mixture, eggs, then almond mixture, with your prepared chicken pieces nearby and a clean plate at the end for the coated chicken.
Toast and Crush the Almonds
This step is absolutely crucial for developing deep, nutty flavor that will permeate every bite of your chicken. Spread your raw almonds in a single layer on a dry baking sheet and place them in a preheated 350°F oven for exactly 8-10 minutes. Watch them carefully after the 6-minute mark – you’re looking for a light golden brown color and that wonderful toasted aroma filling your kitchen. The almonds will continue to darken slightly after removal, so pull them when they’re just slightly lighter than your desired final color. Allow them to cool completely before crushing – warm almonds will turn into almond butter rather than maintaining their texture. Once cooled, transfer to a zip-top bag and crush using a rolling pin, aiming for a mixture of fine crumbs and small pea-sized pieces for optimal texture and coating adhesion.
Coat the Chicken Pieces Thoroughly
Now for the fun part – creating that perfect crispy coating! Working with one piece at a time, dredge each chicken piece first in the flour mixture, shaking off any excess. This initial layer helps the egg wash adhere properly. Next, dip the floured chicken into the beaten eggs, making sure every surface is coated – let any excess drip back into the bowl to prevent pooling. Finally, press the chicken firmly into the almond mixture, ensuring complete coverage on all sides. Use your dry hand for the flour and almond steps and your wet hand for the egg step to avoid clumpy fingers. Place each finished piece on a parchment-lined baking sheet, making sure they don’t touch each other. Pro tip: Refrigerate the coated chicken for 15-20 minutes before frying – this helps the coating set and adhere better during cooking.
Pan-Fry to Golden Perfection
Heat your vegetable oil in a large skillet over medium-high heat until it reaches 350°F – if you don’t have a thermometer, test by dropping a small piece of almond coating into the oil; it should sizzle immediately and float to the surface. Working in batches to avoid overcrowding (which lowers oil temperature and causes soggy chicken), carefully place chicken pieces in the hot oil using tongs. Fry for 3-4 minutes per side, until the coating is deep golden brown and crispy. The internal temperature should reach 165°F when checked with an instant-read thermometer. Maintain your oil temperature between 325-350°F throughout frying – if it gets too hot, your coating will burn before the chicken cooks through. Transfer finished pieces to a wire rack set over a baking sheet rather than paper towels, which keeps the bottom crispy.
Prepare the Flavor-Packed Sauce
Combine and Serve Immediately
Once all your chicken is fried and drained, it’s showtime! Place the crispy almond chicken in a large bowl and drizzle about three-quarters of your prepared sauce over the top. Using tongs, gently toss the chicken to coat evenly – be careful not to break the beautiful crispy coating you worked so hard to create. Add more sauce gradually until you reach your desired coverage level. Transfer to a serving platter and immediately garnish with thinly sliced green onions and a generous sprinkle of sesame seeds. Serve while piping hot – the contrast between the crispy almond coating and the glossy, savory-sweet sauce is what makes this dish truly extraordinary. Pair with steamed rice and your favorite vegetable side for a complete meal that will have everyone asking for seconds.
Tips and Tricks
For the absolute crispiest results, consider using a deep fry thermometer to maintain perfect oil temperature throughout cooking. Oil that’s too cool will make your chicken greasy, while oil that’s too hot will burn the coating before the chicken cooks through. The ideal frying range is 325-350°F – if you notice your chicken browning too quickly, reduce the heat slightly. When crushing your almonds, don’t go for uniformly fine powder – having some larger chunks creates wonderful textural contrast and visual appeal. If you’re concerned about the almonds burning during frying, you can toast them to a slightly lighter color than you ultimately want, as they’ll continue to darken in the oil.
For meal prep enthusiasts, you can prepare the coated chicken up to the frying stage and freeze it on a baking sheet before transferring to freezer bags. Fry directly from frozen, adding an extra minute or two to the cooking time. The sauce can be made ahead and refrigerated for up to a week – simply reheat gently before using. If you’re watching your oil intake, you can bake the coated chicken at 400°F for 20-25 minutes instead of frying, though the texture won’t be quite as crispy. Spray the chicken lightly with cooking spray before baking to help it brown properly.
When working with the three-station breading setup, keep one hand for dry ingredients and one for wet to avoid ending up with batter-covered fingers. If your coating isn’t adhering well, pat your chicken pieces completely dry before starting – moisture is the enemy of good adhesion. For extra flavor, add a teaspoon of five-spice powder to your flour mixture or a tablespoon of orange zest to your sauce. If you need to keep earlier batches warm while finishing others, place them on a wire rack in a 200°F oven – this prevents the steam from making the bottom soggy.
Don’t discard any leftover almond coating mixture – it makes an incredible topping for casseroles or baked fish. Similarly, any extra sauce can be used as a marinade for grilled meats or a dressing for Asian-inspired salads. If you find your sauce too thick after cooling, thin it with a teaspoon of warm water at a time until it reaches your desired consistency. For those who like heat, add a teaspoon of sriracha or red pepper flakes to the sauce mixture. Always let your oil come back to temperature between batches for consistently crispy results.
Recipe Variations
- Spicy Kung Pao Twist: Add 1-2 tablespoons of chili garlic paste to the sauce and garnish with dried red chilies and roasted peanuts instead of sesame seeds. Include diced bell peppers and zucchini stir-fried separately, then combined with the chicken for a complete meal-in-one bowl approach that brings the heat while maintaining the crunchy almond texture.
- Orange Almond Chicken: Replace the honey with 1/4 cup orange marmalade and add 2 tablespoons of fresh orange juice plus 1 teaspoon of orange zest to the sauce. Garnish with additional orange zest and serve with mandarin orange segments for a bright, citrusy version that plays beautifully with the nutty almonds.
- Gluten-Free Adaptation: Substitute tamari for soy sauce, use almond flour instead of all-purpose flour, and ensure your cornstarch is certified gluten-free. The recipe works beautifully with these swaps, creating a dish that’s accessible to those with gluten sensitivities while maintaining all the crispy, nutty goodness.
- Cashew or Pecan Alternative: Replace almonds with an equal amount of crushed cashews or pecans for a different nutty flavor profile. Cashews will give a creamier, milder taste while pecans add a richer, buttery dimension – toast them similarly to almonds for maximum flavor development.
- Vegetarian Version: Use extra-firm pressed tofu or cauliflower florets instead of chicken. For tofu, press thoroughly and cut into 1-inch cubes, following the same coating and frying process. For cauliflower, par-boil florets for 3 minutes before coating and increase frying time by 1-2 minutes per side.
Frequently Asked Questions
Can I use chicken breasts instead of thighs?
While you certainly can use chicken breasts, I highly recommend sticking with thighs for this recipe. Chicken thighs have more fat content and connective tissue, which means they stay juicier and more flavorful during the frying process. Breast meat tends to dry out more quickly and can become tough if slightly overcooked. If you do use breasts, cut them into slightly smaller pieces and reduce the cooking time by about 30 seconds per side. Also consider brining them in salted water for 30 minutes before coating to help retain moisture. The higher fat content in thighs also helps create a richer flavor that stands up better to the robust almond coating.
How do I prevent the almond coating from burning?
The key to preventing burnt almonds is maintaining proper oil temperature and watching carefully during the last minute of cooking. Keep your oil between 325-350°F using a thermometer – if it gets too hot, your coating will brown before the chicken cooks through. Also, toast your almonds to a light golden brown rather than dark brown during the initial toasting step, as they’ll continue to darken during frying. If you notice your almonds browning too quickly, reduce the heat slightly and consider flipping the chicken more frequently. The cornstarch in the coating mixture also helps protect the almonds from direct heat exposure.
Can I make this recipe ahead of time?
You can prepare components ahead but I don’t recommend fully assembling until serving time. The coated chicken can be refrigerated for up to 4 hours before frying, or frozen for up to 3 months (fry directly from frozen, adding 1-2 minutes cooking time). The sauce can be made up to a week in advance and refrigerated. However, once sauced, the crispy coating will begin to soften within 15-20 minutes. For best results, fry the chicken and make the sauce ahead, then quickly reheat the chicken in a 400°F oven for 5 minutes before saucing and serving immediately.
What’s the best way to crush the almonds?
For ideal texture, place cooled toasted almonds in a heavy-duty zip-top bag and use a rolling pin or meat mallet to crush them. You want a mixture of fine crumbs and small chunks rather than uniform powder – this creates better texture and coating adhesion. Avoid using a food processor unless you pulse very carefully, as it tends to create uneven results ranging from powder to large chunks. The bag method allows you to control the texture better and contains the mess. Aim for pieces no larger than pea-sized, with about 60% finer crumbs and 40% small chunks for the perfect balance of coverage and crunch.
Can I bake instead of fry this chicken?
Yes, though the texture will be different – baked version will be less crispy but still delicious. Arrange coated chicken on a wire rack set over a baking sheet and spray lightly with cooking oil. Bake at 400°F for 20-25 minutes, flipping halfway through, until internal temperature reaches 165°F. The coating won’t get as uniformly brown or crispy as fried, but it’s a good option for those avoiding fried foods. For better browning, use the convection setting if your oven has it, and make sure your almonds are toasted to a deeper color before crushing since they won’t brown as much during baking.
Summary
This boneless almond chicken delivers restaurant-quality crunch with homemade heart. The double-coated technique ensures maximum crispiness while the sweet-savory sauce provides perfect balance. Simple ingredients transform into extraordinary results that will become a family favorite.
Boneless Almond Chicken
4
servings25
minutes15
minutesIngredients
Instructions
- 1 Toast almonds at 350°F for 8-10 minutes, then crush coarsely
- 2 Set up three stations: flour with spices, beaten eggs, almond-cornstarch mixture
- 3 Coat chicken pieces in order: flour, egg, almond mixture
- 4 Fry in 350°F oil for 3-4 minutes per side until golden brown
- 5 Simmer sauce ingredients until slightly thickened
- 6 Toss crispy chicken with sauce, garnish, and serve immediately