Unleash the sweet, juicy potential of summer’s favorite berry with these 30 delightful blackberry dessert recipes! Whether you’re craving a quick cobbler, elegant tart, or refreshing sorbet, we’ve gathered irresistible treats that celebrate blackberries’ vibrant flavor. Perfect for home cooks looking to impress, these recipes will transform your seasonal bounty into unforgettable desserts. Keep reading to discover your new favorite sweet creation!
Blackberry Crisp Delight

Oh my goodness, you guys – I just discovered the most incredible blackberry crisp recipe after my neighbor’s bush went wild with ripe berries! It’s the perfect cozy dessert that fills your kitchen with the most amazing aroma while it bakes.
9
portions15
minutes40
minutesIngredients
Blackberries – 4 cups
Flour – 1 cup
Brown sugar – ¾ cup
Butter – ½ cup
Oats – ½ cup
Cinnamon – 1 tsp
Instructions
1. Preheat your oven to 375°F.
2. Spread 4 cups of blackberries evenly in a 9×9 inch baking dish.
3. In a medium bowl, combine 1 cup flour, ¾ cup brown sugar, and 1 tsp cinnamon.
4. Cut ½ cup cold butter into the flour mixture using a pastry cutter until crumbly.
5. Stir in ½ cup oats until evenly distributed.
6. Sprinkle the oat mixture evenly over the blackberries in the baking dish.
7. Bake at 375°F for 35-40 minutes until the topping is golden brown and the berries are bubbling.
8. Remove from oven and let cool for 15 minutes before serving.
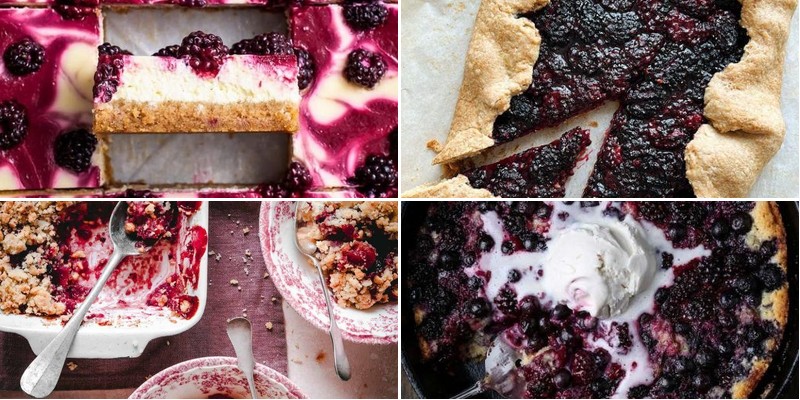
Very few desserts deliver such perfect texture contrast – that crunchy oat topping against the warm, jammy berries is pure magic. Try serving it with a scoop of vanilla ice cream melting into the warm crisp, or enjoy it cold straight from the fridge the next morning for breakfast (no judgment here!).
Luscious Blackberry Cheesecake Bars

Now, I have to confess something—I’m the type of person who always buys way too many blackberries when they’re in season, just because they look so beautiful in the store. Last week, my fridge was overflowing, and that’s how these luscious blackberry cheesecake bars were born. They’re the perfect solution for when you want that creamy, dreamy cheesecake experience without the fuss of a springform pan.
9
squares25
minutes48
minutesIngredients
– Graham cracker crumbs – 1 ½ cups
– Unsalted butter – ½ cup, melted
– Cream cheese – 16 oz, softened
– Granulated sugar – ¾ cup
– Eggs – 2 large
– Vanilla extract – 1 tsp
– Blackberries – 1 ½ cups
Instructions
1. Preheat your oven to 350°F and line an 8×8-inch baking pan with parchment paper, leaving some overhang for easy removal later.
2. In a medium bowl, combine the graham cracker crumbs and melted butter until the mixture resembles wet sand.
3. Press the crumb mixture firmly into the bottom of the prepared pan using the bottom of a measuring cup to create an even layer—this helps prevent a crumbly crust.
4. Bake the crust for 8 minutes until lightly golden, then remove from the oven and let it cool slightly while you prepare the filling.
5. In a large bowl, beat the softened cream cheese with an electric mixer on medium speed until smooth and lump-free, about 2 minutes.
6. Add the granulated sugar and continue beating for another 2 minutes until fully incorporated and creamy.
7. Beat in the eggs one at a time, mixing just until each is combined to avoid overbeating, which can cause cracking.
8. Mix in the vanilla extract until evenly distributed throughout the filling.
9. Gently fold in the blackberries with a spatula, being careful not to crush them too much to keep some whole berries for bursts of flavor.
10. Pour the filling over the pre-baked crust and spread it evenly with a spatula.
11. Bake for 35–40 minutes until the edges are set but the center still has a slight jiggle when you gently shake the pan—this is key for that perfect creamy texture.
12. Let the bars cool completely in the pan on a wire rack for about 1 hour.
13. Refrigerate for at least 4 hours, or preferably overnight, to allow the bars to fully set and develop their flavor.
14. Use the parchment paper overhang to lift the bars out of the pan, then cut into 9 squares with a sharp knife wiped clean between cuts for neat edges. Perfectly creamy and tangy, these bars have a velvety texture that melts in your mouth, with juicy blackberries adding little bursts of sweetness. I love serving them chilled with a dusting of powdered sugar or a dollop of whipped cream for an extra indulgent treat.
Blackberry and Cream Scones
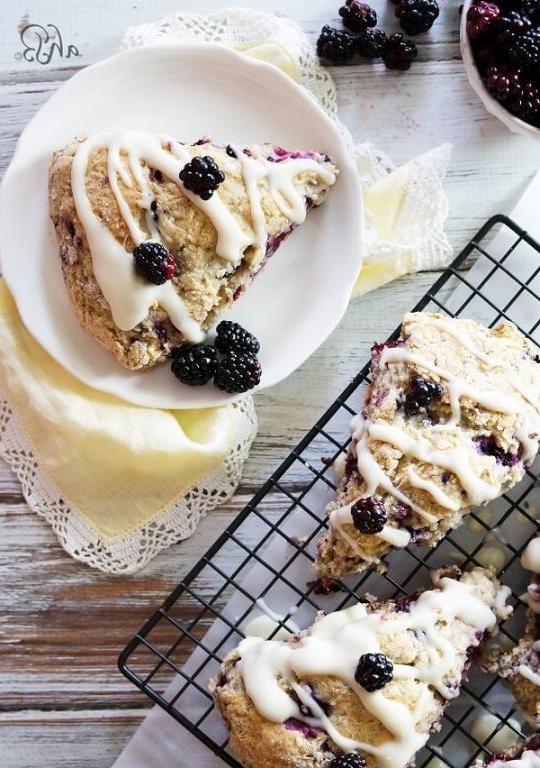
Zesty blackberries from my backyard bush inspired these tender scones—I love how their tartness cuts through the rich cream, creating a treat that’s perfect with morning coffee or as an afternoon pick-me-up. Over the years, I’ve learned that keeping the dough cold is the secret to flaky layers, so I pop everything in the freezer for a few minutes before baking. Trust me, these scones disappear faster than I can brew a second cup!
8
wedges15
minutes18
minutesIngredients
- Flour – 2 cups
- Sugar – ¼ cup
- Baking powder – 1 tbsp
- Salt – ½ tsp
- Heavy cream – 1 cup
- Blackberries – 1 cup
Instructions
- Preheat your oven to 400°F and line a baking sheet with parchment paper.
- Whisk together the flour, sugar, baking powder, and salt in a large bowl.
- Pour in the heavy cream and stir just until a shaggy dough forms—don’t overmix, or the scones will toughen.
- Gently fold in the blackberries, being careful not to crush them to avoid staining the dough.
- Turn the dough onto a lightly floured surface and pat it into a 1-inch-thick circle.
- Use a sharp knife to cut the circle into 8 wedges, wiping the blade clean between cuts for neat edges.
- Place the wedges 2 inches apart on the prepared baking sheet.
- Brush the tops lightly with extra heavy cream for a golden finish.
- Bake for 15–18 minutes, until the scones are puffed and golden brown on top.
- Let the scones cool on the baking sheet for 5 minutes before transferring to a wire rack.
Out of the oven, these scones boast a crisp exterior that gives way to a moist, berry-studded crumb. I love splitting them warm and slathering with clotted cream, or toasting day-old leftovers for a revived crunch. Their sweet-tart flavor pairs wonderfully with a drizzle of honey or a dollop of lemon curd for an extra zing.
Velvety Blackberry Sorbet
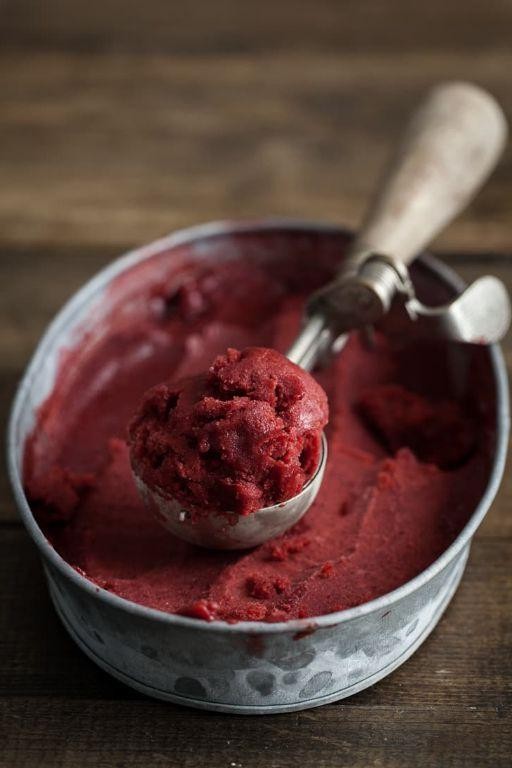
Remember those sweltering summer afternoons when nothing seems to cool you down? I was picking blackberries with my kids last weekend when inspiration struck—why not turn these juicy gems into the most refreshing sorbet imaginable? Let me show you how to make this velvety treat that’s become our new favorite way to beat the heat.
8
servings25
minutes4
minutesIngredients
Blackberries – 4 cups
Sugar – 1 cup
Water – 1 cup
Lemon juice – 2 tbsp
Instructions
1. Combine 1 cup sugar and 1 cup water in a saucepan over medium heat. 2. Stir constantly until sugar completely dissolves, about 3-4 minutes. 3. Remove simple syrup from heat and let cool to room temperature. 4. Rinse 4 cups blackberries under cold water and pat dry with paper towels. 5. Puree blackberries in blender until completely smooth, about 1 minute. 6. Press puree through fine-mesh strainer to remove all seeds. 7. Combine strained blackberry puree, cooled simple syrup, and 2 tbsp lemon juice in large bowl. 8. Whisk mixture thoroughly until fully incorporated. 9. Pour mixture into 9×13 inch baking dish. 10. Freeze for 1 hour until edges begin to set. 11. Remove from freezer and scrape with fork to break up ice crystals. 12. Return to freezer for another hour. 13. Repeat scraping process every hour for 3-4 hours total freezing time. 14. Transfer to airtight container and freeze overnight until firm. Let this sorbet transport you to berry-picking paradise with its intense fruit flavor and silky texture that melts on your tongue. I love serving scoops in chilled glasses with fresh mint sprigs, or layering it with vanilla yogurt for a stunning parfait that always impresses dinner guests.
Crisp Blackberry Galette
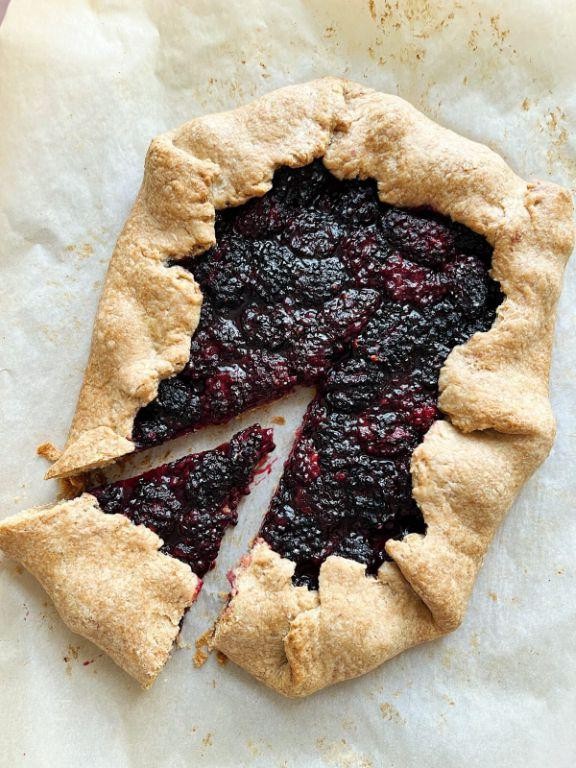
Very rarely does a dessert come along that feels both rustic and elegant, but this blackberry galette is exactly that. I first made it last summer when my neighbor’s bush overflowed with berries, and now it’s my go-to for impromptu gatherings. There’s something magical about how the juicy fruit bubbles up through the buttery crust—it’s forgiving, fuss-free, and always a crowd-pleaser.
6
servings45
minutes40
minutesIngredients
– Flour – 1 ¼ cups
– Sugar – ¼ cup
– Salt – ¼ tsp
– Unsalted butter – ½ cup
– Ice water – 3 tbsp
– Blackberries – 2 cups
– Egg – 1
Instructions
1. Preheat your oven to 375°F.
2. Combine 1 ¼ cups flour, ¼ cup sugar, and ¼ tsp salt in a large bowl.
3. Cut ½ cup cold unsalted butter into small cubes.
4. Work the butter into the flour mixture using your fingers until pea-sized crumbs form.
5. Add 3 tbsp ice water, one tablespoon at a time, mixing just until the dough comes together.
6. Tip: Handle the dough as little as possible to keep the crust flaky.
7. Shape the dough into a disc, wrap it in plastic, and refrigerate for 30 minutes.
8. Roll the chilled dough into a 12-inch circle on a floured surface.
9. Transfer the dough to a parchment-lined baking sheet.
10. Arrange 2 cups blackberries in the center, leaving a 2-inch border.
11. Fold the edges of the dough over the berries, pleating as you go.
12. Beat 1 egg in a small bowl.
13. Brush the egg wash over the dough edges.
14. Sprinkle the entire galette with 1 tbsp additional sugar from your pantry.
15. Tip: The egg wash gives the crust a beautiful golden shine—don’t skip it!
16. Bake for 35–40 minutes, until the crust is golden and the berries are bubbling.
17. Tip: Let it cool for 15 minutes before slicing so the juices set.
18. Slice and serve warm or at room temperature.
Keep in mind that the galette’s charm lies in its rustic appearance—imperfect folds mean more buttery, crisp edges. The blackberries soften into a jammy filling that contrasts beautifully with the flaky crust, and a scoop of vanilla ice cream melts into the warm juices perfectly. I love serving it straight from the baking sheet for that effortless, homey vibe.
Blackberry Lemon Cake
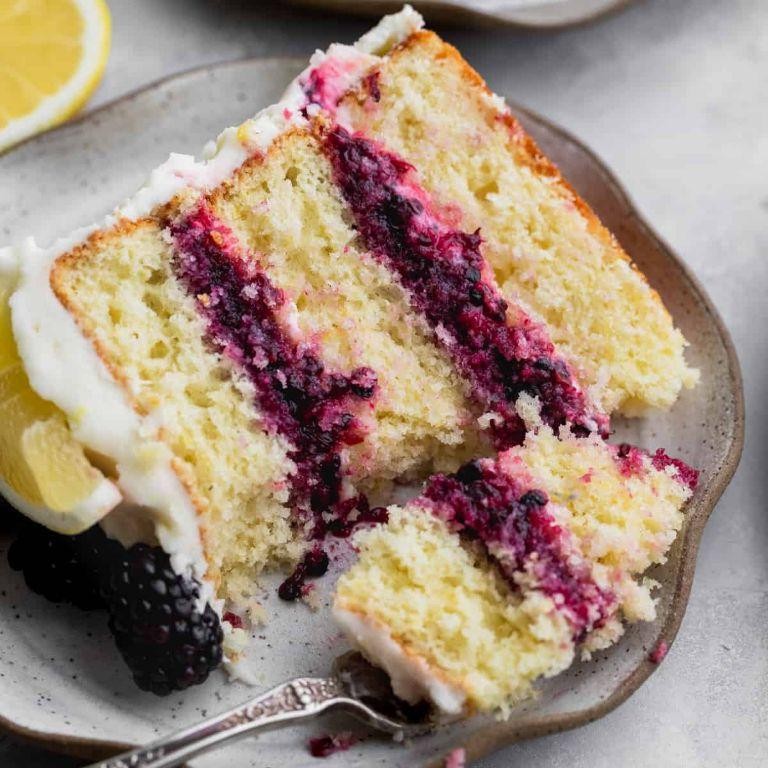
Just last weekend, I found myself with an abundance of fresh blackberries from the farmer’s market and decided to create this stunning Blackberry Lemon Cake—it’s become my new favorite summer dessert that perfectly balances sweet and tart flavors.
8
servings20
minutes50
minutesIngredients
All-purpose flour – 2 cups
Granulated sugar – 1 cup
Unsalted butter – ½ cup
Eggs – 2 large
Fresh blackberries – 1½ cups
Lemon juice – ¼ cup
Lemon zest – 1 tbsp
Baking powder – 2 tsp
Salt – ½ tsp
Milk – ½ cup
Instructions
1. Preheat your oven to 350°F and grease a 9-inch round cake pan. 2. In a large bowl, cream together ½ cup softened butter and 1 cup sugar until light and fluffy, about 3 minutes. 3. Beat in 2 eggs one at a time until fully incorporated. 4. Stir in ¼ cup lemon juice and 1 tablespoon lemon zest. 5. In a separate bowl, whisk together 2 cups flour, 2 teaspoons baking powder, and ½ teaspoon salt. 6. Alternate adding the dry ingredients and ½ cup milk to the wet ingredients, beginning and ending with flour mixture. 7. Gently fold in 1 cup of blackberries, being careful not to overmix. 8. Pour the batter into your prepared pan and smooth the top with a spatula. 9. Scatter the remaining ½ cup blackberries evenly over the top of the batter. 10. Bake at 350°F for 45-50 minutes until a toothpick inserted in the center comes out clean. 11. Let the cake cool in the pan for 15 minutes before transferring to a wire rack. Really, what makes this cake special is how the juicy blackberries create little pockets of tartness throughout the tender crumb, while the lemon adds a bright freshness that cuts through the sweetness. I love serving it slightly warm with a dollop of whipped cream for the perfect afternoon treat.
Mouthwatering Blackberry Pie
My grandmother’s blackberry pie recipe has been a family favorite for generations, and I still remember picking wild berries with her every summer. There’s something magical about that sweet-tart filling bubbling through a flaky crust—it’s pure comfort in every bite. I always make an extra one to share with neighbors because, let’s be honest, pie is better when it brings people together.
8
servings40
minutes50
minutesIngredients
Flour – 2 cups
Salt – ½ tsp
Butter – ¾ cup
Ice water – ¼ cup
Blackberries – 4 cups
Sugar – 1 cup
Cornstarch – 3 tbsp
Instructions
1. Combine 2 cups of flour and ½ tsp of salt in a large mixing bowl.
2. Cut ¾ cup of cold butter into small cubes and add them to the flour mixture.
3. Use a pastry cutter or your fingers to work the butter into the flour until the mixture resembles coarse crumbs with some pea-sized butter pieces remaining.
4. Sprinkle ¼ cup of ice water over the mixture and stir with a fork until the dough just comes together.
5. Divide the dough into two equal portions, shape each into a disc, wrap in plastic wrap, and refrigerate for 30 minutes.
6. Preheat your oven to 375°F and place a baking sheet on the middle rack to catch any drips.
7. Roll out one disc of dough on a floured surface to fit a 9-inch pie plate, then transfer it to the plate.
8. In a separate bowl, gently toss 4 cups of blackberries with 1 cup of sugar and 3 tbsp of cornstarch until evenly coated.
9. Pour the blackberry mixture into the prepared pie crust, spreading it evenly.
10. Roll out the second disc of dough and place it over the filling, crimping the edges to seal.
11. Cut several slits in the top crust to allow steam to escape during baking.
12. Bake the pie at 375°F for 45–50 minutes, until the crust is golden brown and the filling is bubbling through the slits.
13. Remove the pie from the oven and let it cool completely on a wire rack for at least 2 hours before slicing.
Perfectly baked blackberry pie boasts a crisp, golden crust that shatters with each forkful, revealing a juicy, jammy filling that’s both sweet and tangy. I love serving it slightly warm with a scoop of vanilla bean ice cream, where the cold creaminess melts into the warm berries for the ultimate dessert experience. Leftovers (if there are any!) taste even better the next day when the flavors have fully melded together.
Blackberry and Almond Tart

Last weekend, I found myself with a surplus of blackberries from the farmer’s market and decided to create this stunning tart that’s become my new favorite dessert. There’s something magical about how the sweet-tart berries pair with nutty almonds in a buttery crust. I love how impressive it looks while being surprisingly simple to put together.
8
portions15
minutes45
minutesIngredients
All-purpose flour – 1 ¼ cups
Cold unsalted butter – ½ cup
Granulated sugar – ¼ cup
Almond flour – ¾ cup
Fresh blackberries – 2 cups
Egg – 1
Vanilla extract – 1 tsp
Instructions
1. Preheat your oven to 375°F and grease a 9-inch tart pan.2. Combine 1 ¼ cups all-purpose flour and ¼ cup granulated sugar in a food processor.3. Add ½ cup cold unsalted butter cut into small cubes and pulse until the mixture resembles coarse crumbs.4. Press the dough evenly into the bottom and up the sides of the prepared tart pan.5. Bake the empty crust for 15 minutes at 375°F until lightly golden around the edges.6. While the crust bakes, whisk together ¾ cup almond flour, 1 egg, and 1 tsp vanilla extract until smooth.7. Spread the almond mixture evenly over the partially baked crust.8. Arrange 2 cups fresh blackberries in a single layer over the almond filling.9. Bake for 25-30 minutes at 375°F until the filling is set and the crust is deep golden brown.10. Allow the tart to cool completely in the pan before slicing.11. Serve at room temperature or slightly warmed. A perfect slice of this tart features a crisp, buttery crust that gives way to the creamy almond layer and juicy blackberries. I love serving it with a dollop of whipped cream or alongside afternoon coffee—the nutty sweetness complements both beautifully.
Indulgent Blackberry Cobbler
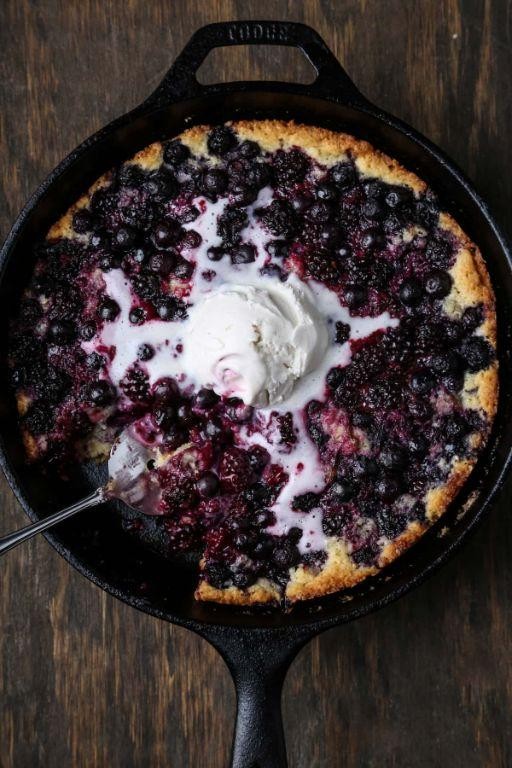
Crisp autumn afternoons always make me crave something warm and fruity from the oven, and this blackberry cobbler is my ultimate comfort dessert. I first made it after a successful blackberry picking trip with my kids—though we ended up eating more berries than we collected! Now I keep frozen blackberries on hand year-round for those sudden cobbler cravings.
8
servings15
minutes45
minutesIngredients
Blackberries – 4 cups
Sugar – 1 cup
Flour – 1 cup
Baking powder – 2 tsp
Salt – ½ tsp
Milk – 1 cup
Butter – ½ cup
Instructions
1. Preheat your oven to 375°F.
2. Melt the butter completely in a 9×13 inch baking dish while the oven preheats.
3. Rinse the blackberries thoroughly and pat them dry with paper towels.
4. Combine the blackberries with ½ cup of sugar in a medium bowl.
5. Whisk together the flour, remaining ½ cup sugar, baking powder, and salt in a separate bowl.
6. Pour the milk into the dry ingredients and stir until just combined—don’t overmix or your cobbler topping will be tough.
7. Remove the hot baking dish from the oven using oven mitts.
8. Pour the batter directly over the melted butter—do not stir.
9. Spoon the sugared blackberries evenly over the batter.
10. Bake for 45 minutes until the top is golden brown and a toothpick inserted comes out clean.
11. Let the cobbler rest for 15 minutes before serving—this allows the juices to thicken properly.
Golden and bubbling straight from the oven, this cobbler develops a wonderfully crisp top that gives way to juicy, tart berries underneath. I love serving it warm with a scoop of vanilla ice cream that melts into all the nooks and crannies—the contrast between hot cobbler and cold ice cream is absolutely magical.
Blackberry Lemon Bars
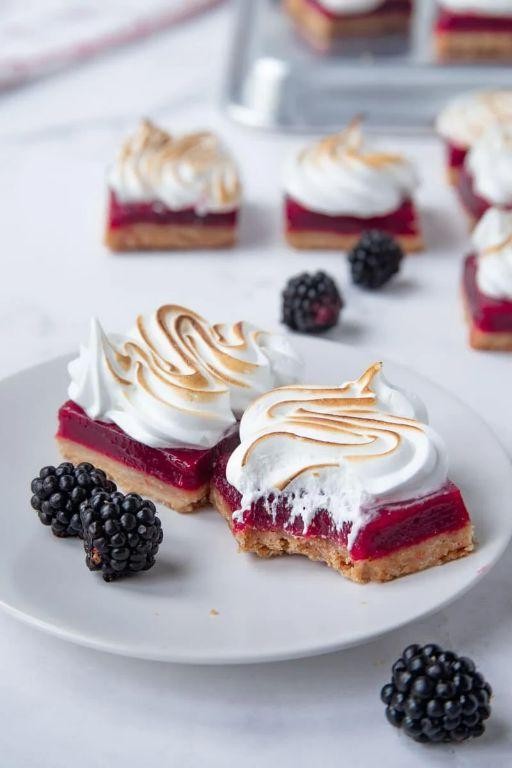
Baking these blackberry lemon bars always reminds me of summer visits to my grandparents’ farm, where we’d pick wild blackberries along the fence line. There’s something magical about how the tart lemon and sweet berries create the perfect balance in these easy-to-make bars that disappear faster than I can photograph them!
16
bars15
minutes40
minutesIngredients
Flour – 1 cup
Butter – ½ cup
Sugar – ¾ cup
Eggs – 2
Lemon juice – ¼ cup
Blackberries – 1 cup
Salt – ¼ tsp
Instructions
1. Preheat your oven to 350°F and line an 8×8 inch baking pan with parchment paper.
2. Combine 1 cup flour, ½ cup softened butter, and ¼ cup sugar in a medium bowl until crumbly.
3. Press the mixture firmly into the bottom of your prepared pan using the bottom of a measuring cup for an even crust.
4. Bake the crust for 15 minutes until lightly golden around the edges.
5. While the crust bakes, whisk together 2 eggs, ½ cup sugar, ¼ cup lemon juice, and ¼ tsp salt in a separate bowl.
6. Gently fold in 1 cup blackberries, being careful not to crush them too much.
7. Pour the filling over the hot crust immediately after removing it from the oven.
8. Return the pan to the oven and bake for 25 minutes until the filling is set and doesn’t jiggle when you gently shake the pan.
9. Cool completely at room temperature for 2 hours before cutting into squares.
10. Dust with powdered sugar just before serving for a beautiful finish.
A perfect blackberry lemon bar should have a buttery shortbread crust that crumbles just right against the creamy, tangy filling studded with juicy berries. I love serving these chilled with a dollop of whipped cream for contrast, or packing them in lunch boxes for a bright midday treat that always earns compliments from friends and family.
Blackberry Ice Cream Sundae
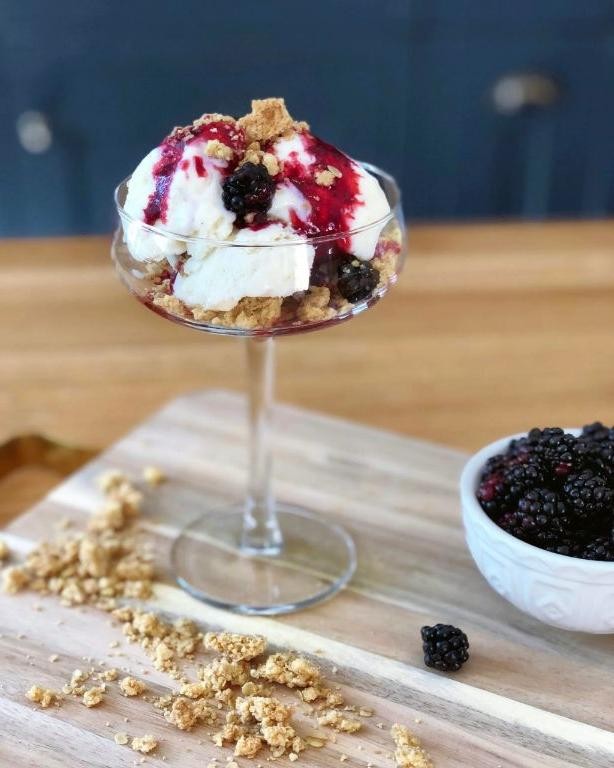
Remember that time I bought way too many blackberries at the farmer’s market? Rather than let them go to waste, I created this ridiculously easy blackberry ice cream sundae that’s become my go-to summer dessert. It’s the perfect way to use up seasonal fruit when you’re craving something cool and refreshing.
2
scoops10
minutes10
minutesIngredients
Blackberries – 2 cups
Granulated sugar – ½ cup
Vanilla ice cream – 4 scoops
Whipped cream – ½ cup
Instructions
1. Combine 2 cups of blackberries and ½ cup of granulated sugar in a medium saucepan.
2. Cook the blackberry mixture over medium heat for 8-10 minutes, stirring frequently with a wooden spoon until the berries break down and release their juices.
3. Use a fine-mesh strainer to press the cooked blackberry mixture through, separating the seeds from the sauce into a clean bowl.
4. Let the blackberry sauce cool completely at room temperature for about 30 minutes before using.
5. Place 4 scoops of vanilla ice cream into serving bowls while the sauce cools.
6. Pour the cooled blackberry sauce generously over the ice cream scoops.
7. Top each sundae with ½ cup of whipped cream, creating soft peaks.
8. Drizzle any remaining blackberry sauce over the whipped cream for a decorative finish.
Using a wooden spoon prevents scratching your pan while stirring the berries, and letting the sauce cool completely ensures it won’t melt your ice cream too quickly. The straining step is worth it for that smooth, seed-free texture that makes this sundae feel extra special. Ultimately, you get this beautiful contrast between the tart blackberry sauce and creamy vanilla ice cream that just melts together perfectly. Try serving it in chilled glasses for an extra-refreshing treat, or add some crushed cookies for a bit of crunch.
Rich Blackberry Trifle
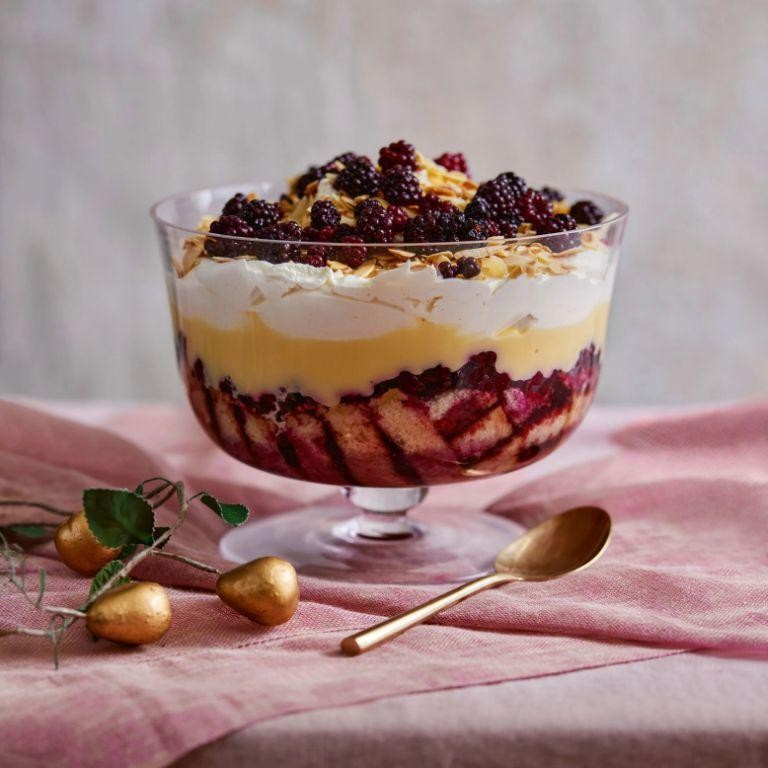
Vivid memories of my grandmother’s berry-stained fingers come flooding back whenever I make this rich blackberry trifle—it’s the dessert that always disappears first at our family gatherings, and I’ve finally perfected my own version after years of tweaking.
8
servings20
minutesIngredients
Blackberries – 2 cups
Pound cake – 1 (10.75 oz) loaf
Heavy cream – 2 cups
Granulated sugar – ¼ cup
Vanilla extract – 1 tsp
Instructions
1. Cut the pound cake into 1-inch cubes using a serrated knife for clean edges. 2. Place 1 cup of blackberries in a bowl and mash them with a fork until juicy. 3. Whip the heavy cream in a chilled metal bowl on medium-high speed for 3 minutes until soft peaks form. 4. Add the granulated sugar and vanilla extract to the whipped cream. 5. Continue whipping for 1 more minute until stiff peaks form when you lift the beaters. 6. Arrange half of the pound cake cubes in a single layer at the bottom of a trifle dish. 7. Spread half of the mashed blackberries evenly over the cake layer. 8. Spoon half of the whipped cream over the blackberry layer and smooth with a spatula. 9. Repeat layers with remaining cake cubes, mashed blackberries, and whipped cream. 10. Top with the remaining 1 cup of whole blackberries, arranging them in a circular pattern. Just imagine digging your spoon through those cloud-like layers to reveal the jewel-toned berries nestled between tender cake—the contrast of sweet cream against tart blackberries makes this trifle absolutely irresistible served chilled in individual mason jars for a portable summer treat.
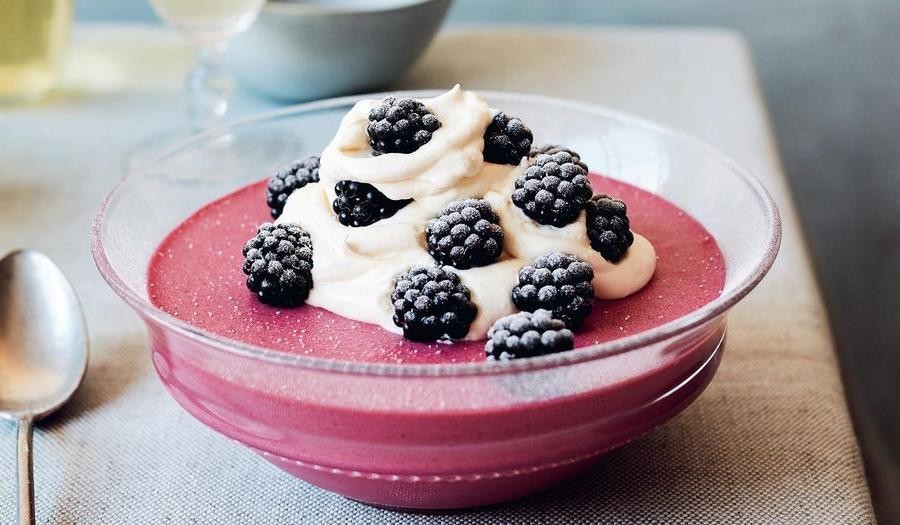
Blackberry Eton Mess
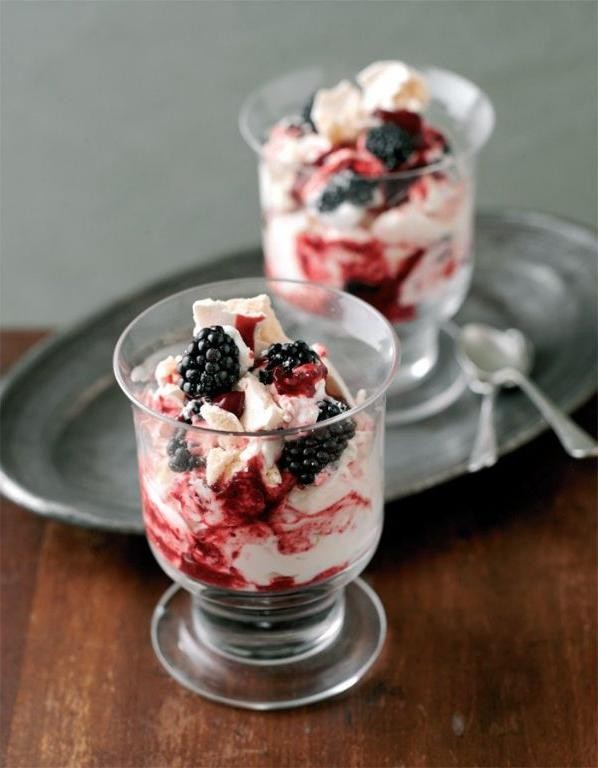
My first taste of Blackberry Eton Mess was at a summer garden party, and I’ve been obsessed with recreating that perfect balance of sweet, tart, and crunchy ever since. It’s become my go-to dessert when I want something impressive but don’t feel like turning on the oven for hours—plus, it’s basically foolproof, which suits my sometimes-scatterbrained cooking style perfectly.
4
servings20
minutesIngredients
– Heavy cream – 1 cup
– Powdered sugar – ¼ cup
– Vanilla extract – 1 tsp
– Fresh blackberries – 2 cups
– Meringue cookies – 2 cups
Instructions
1. Place a medium metal mixing bowl and the beaters from your hand mixer in the freezer for 15 minutes to chill thoroughly.
2. Pour 1 cup of heavy cream into the chilled bowl.
3. Add ¼ cup of powdered sugar and 1 tsp of vanilla extract to the cream.
4. Beat the mixture on medium-high speed for 3–4 minutes, or until stiff peaks form that hold their shape when the beaters are lifted.
5. Gently fold in 1½ cups of the fresh blackberries, being careful not to overmix and turn the cream pink.
6. Crumble 2 cups of meringue cookies into bite-sized pieces directly into the cream mixture.
7. Fold the meringue pieces into the cream and berries just until combined, leaving some visible streaks.
8. Divide the mixture evenly among 4 serving glasses or bowls.
9. Top each serving with the remaining ½ cup of fresh blackberries.
10. Serve immediately, or refrigerate for up to 30 minutes if not serving right away.
Just out of the bowl, this dessert is pure texture heaven—the crisp meringue melts into pillowy cream, while the blackberries burst with juicy tartness. I love serving it in vintage mason jars for a rustic touch, or layering it with extra crushed meringue for added crunch. The contrast between the cool cream and vibrant berries makes it feel both decadent and refreshing at the same time.
Blackberry and Apple Crumble
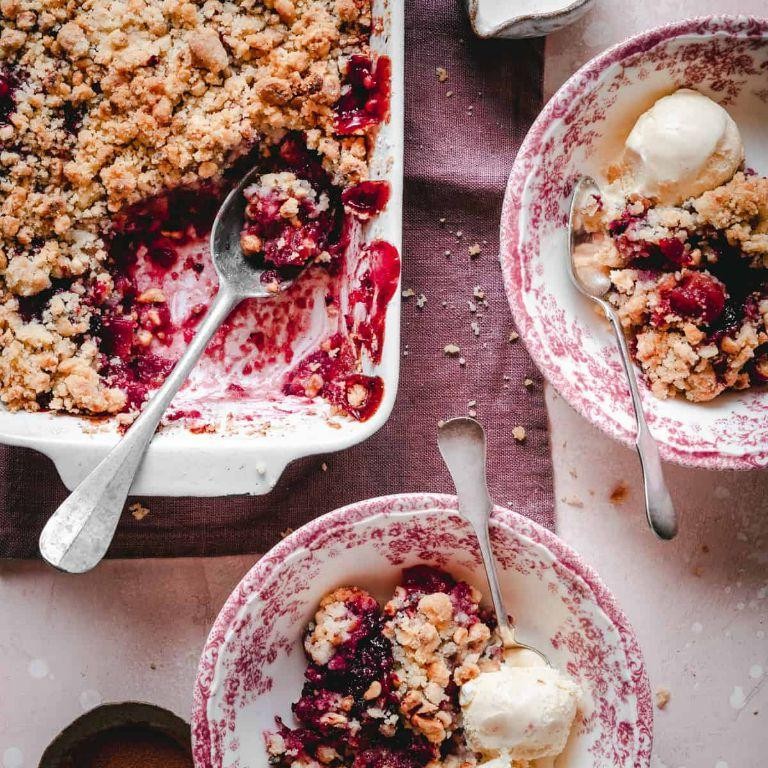
Sometimes the best desserts are the ones that feel like a warm hug, and this blackberry and apple crumble is exactly that—a cozy, comforting treat that reminds me of autumn afternoons at my grandma’s house. I love how the tart berries mingle with sweet apples under that golden, buttery topping, and it’s become my go-to when I need something simple yet impressive. Plus, it fills the kitchen with the most incredible aroma while it bakes!
6
servings20
minutes40
minutesIngredients
Apples – 4 cups, peeled and sliced
Blackberries – 2 cups
Flour – 1 cup
Brown sugar – ¾ cup
Butter – ½ cup, cold and cubed
Cinnamon – 1 tsp
Salt – ¼ tsp
Instructions
1. Preheat your oven to 375°F.
2. Peel and slice the apples into ¼-inch thick pieces.
3. Combine the sliced apples and blackberries in a 9-inch baking dish.
4. Sprinkle ¼ cup of brown sugar and ½ teaspoon of cinnamon over the fruit mixture.
5. In a separate bowl, mix the flour, remaining ½ cup of brown sugar, ½ teaspoon of cinnamon, and salt.
6. Add the cold, cubed butter to the flour mixture.
7. Use your fingers to rub the butter into the dry ingredients until the mixture resembles coarse crumbs. (Tip: Work quickly to keep the butter cold for a flakier topping.)
8. Spread the crumble mixture evenly over the fruit in the baking dish.
9. Place the baking dish in the preheated oven.
10. Bake for 35–40 minutes, until the topping is golden brown and the fruit is bubbling at the edges. (Tip: If the top browns too quickly, loosely tent it with foil.)
11. Remove the crumble from the oven and let it rest for 10 minutes before serving. (Tip: Allowing it to cool slightly helps the juices thicken.)
You’ll love the contrast between the soft, jammy fruit and the crisp, sugary topping—it’s pure comfort in every spoonful. Try serving it warm with a scoop of vanilla ice cream for that classic hot-and-cold combo, or enjoy it for breakfast with a dollop of Greek yogurt.
Lavish Blackberry Mousse
My kitchen counter was practically overflowing with glossy blackberries from the farmer’s market when inspiration struck—I needed to transform this seasonal bounty into something truly spectacular. There’s something magical about turning simple berries into an elegant dessert that feels both fancy and completely approachable, especially when you’re craving a sweet treat that won’t keep you in the kitchen for hours.
2
servings20
minutesIngredients
Blackberries – 2 cups
Heavy cream – 1 cup
Powdered sugar – ¼ cup
Gelatin – 1 packet
Water – 2 tbsp
Instructions
1. Combine blackberries and powdered sugar in a blender and puree until completely smooth.2. Strain the blackberry puree through a fine-mesh sieve into a clean bowl to remove all seeds.3. Sprinkle gelatin over water in a small microwave-safe bowl and let it bloom for 5 minutes until the surface looks wrinkled.4. Microwave the gelatin mixture for 15 seconds until completely liquid and clear.5. Whisk the warm gelatin liquid into the strained blackberry puree until fully incorporated.6. Pour heavy cream into a chilled metal bowl and whip on medium-high speed until stiff peaks form.7. Gently fold the blackberry mixture into the whipped cream using a spatula, making sure not to deflate the air bubbles.8. Divide the mousse evenly among 4 serving glasses or ramekins.9. Refrigerate the mousse for at least 4 hours until completely set and chilled through.10. Serve the mousse directly from the refrigerator.Keep your mixing bowl and beaters in the freezer for 10 minutes before whipping cream—it creates the fluffiest texture every time. The mousse should feel light as air yet rich with intense berry flavor that’s neither too sweet nor too tart. I love serving these in clear glasses to show off the beautiful purple hue, sometimes topping them with fresh blackberries and a sprig of mint for that extra special touch.
Blackberry Pavlova Perfection

Getting this blackberry pavlova just right took me three attempts last summer, but the final result was so worth those cracked meringue trials. I’ve learned that patience and a trusty oven thermometer are your best friends when creating this cloud-like dessert that always impresses at dinner parties.
8
servings25
minutes75
minutesIngredients
Egg whites – 4 large
Sugar – 1 cup
Cornstarch – 1 tsp
White vinegar – 1 tsp
Vanilla extract – 1 tsp
Heavy cream – 1 cup
Fresh blackberries – 2 cups
Instructions
1. Preheat your oven to 250°F and line a baking sheet with parchment paper.
2. Separate 4 large egg whites into a perfectly clean, grease-free bowl.
3. Beat the egg whites on medium speed until soft peaks form, about 3 minutes.
4. Gradually add 1 cup of sugar while continuing to beat, 1 tablespoon at a time.
5. Increase mixer speed to high and beat until stiff, glossy peaks form, about 5-7 minutes.
6. Gently fold in 1 teaspoon each of cornstarch, white vinegar, and vanilla extract using a spatula.
7. Spoon the meringue onto the prepared baking sheet, forming an 8-inch circle with slightly higher edges.
8. Bake at 250°F for 1 hour and 15 minutes, then turn off the oven and let the pavlova cool completely inside for at least 2 hours.
9. Whip 1 cup of heavy cream until medium peaks form, about 4 minutes.
10. Spread the whipped cream over the cooled meringue base.
11. Arrange 2 cups of fresh blackberries over the whipped cream.
12. Serve immediately or refrigerate for up to 2 hours before serving. That crisp shell giving way to the marshmallow-soft interior never fails to delight. The tart blackberries cut through the sweetness beautifully, and I love serving this with a drizzle of blackberry coulis for extra berry intensity.
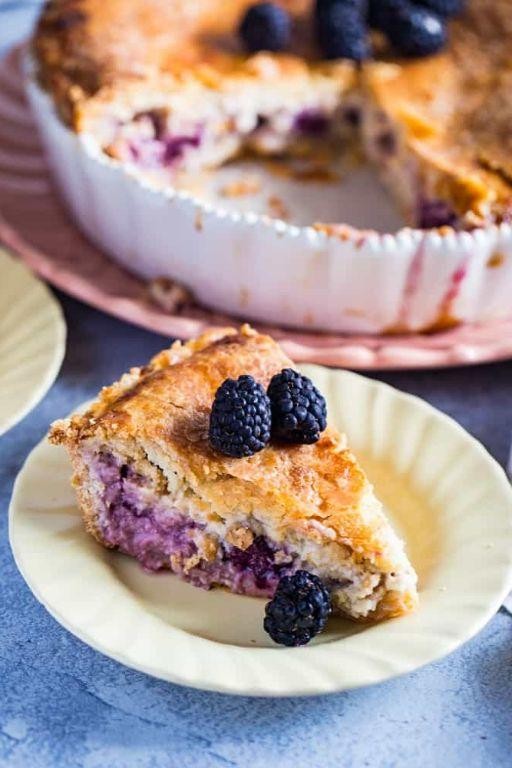
No-Bake Blackberry Cheesecake
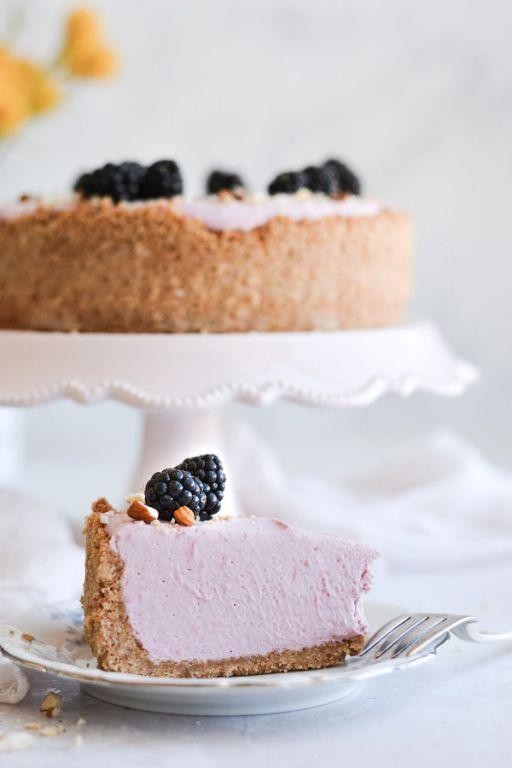
Perfect for when I’m craving something sweet but don’t want to turn on the oven during these hot summer days, this no-bake blackberry cheesecake has become my go-to dessert. I actually first made it when my blackberry bush went wild last August, and now my family requests it weekly—it’s that simple and delicious.
8
servings30
minutesIngredients
- Graham crackers – 1½ cups crushed
- Butter – 6 tbsp melted
- Cream cheese – 16 oz softened
- Powdered sugar – ¾ cup
- Heavy cream – 1 cup
- Blackberries – 2 cups fresh
- Lemon juice – 1 tbsp
Instructions
- Combine graham cracker crumbs and melted butter in a medium bowl until the mixture resembles wet sand.
- Press the crumb mixture firmly into the bottom of a 9-inch springform pan using the bottom of a measuring cup to create an even layer.
- Refrigerate the crust for exactly 15 minutes while you prepare the filling—this helps prevent a soggy bottom layer.
- Beat softened cream cheese with an electric mixer on medium speed for 2 minutes until completely smooth and lump-free.
- Gradually add powdered sugar to the cream cheese while mixing on low speed to prevent a sugar cloud in your kitchen.
- In a separate bowl, whip heavy cream until stiff peaks form, which should take about 3-4 minutes on high speed.
- Gently fold the whipped cream into the cream cheese mixture using a spatula until no white streaks remain.
- Spread half of the cheesecake filling over the chilled crust in an even layer.
- Mash 1 cup of blackberries with lemon juice using a fork until they become a chunky sauce.
- Spoon the blackberry mixture over the first layer of cheesecake filling, leaving a 1-inch border around the edges.
- Carefully spread the remaining cheesecake filling over the blackberry layer, sealing the edges completely.
- Arrange the remaining 1 cup of fresh blackberries on top in a decorative pattern.
- Refrigerate the cheesecake for at least 4 hours, or until firmly set—overnight chilling gives the best texture.
Unbelievably creamy with pockets of tart blackberry swirl, this cheesecake develops an almost mousse-like texture when properly chilled. The contrast between the sweet filling and tangy berries makes each bite exciting, and I love serving it with extra fresh blackberries scattered around the plate for a beautiful presentation that always impresses guests.
Conclusion
Get ready to transform those beautiful blackberries into something spectacular! From simple cobblers to elegant tarts, this collection offers something for every baker. We’d love to hear which recipes become your new favorites—drop us a comment below and don’t forget to share these sweet ideas on Pinterest for later!