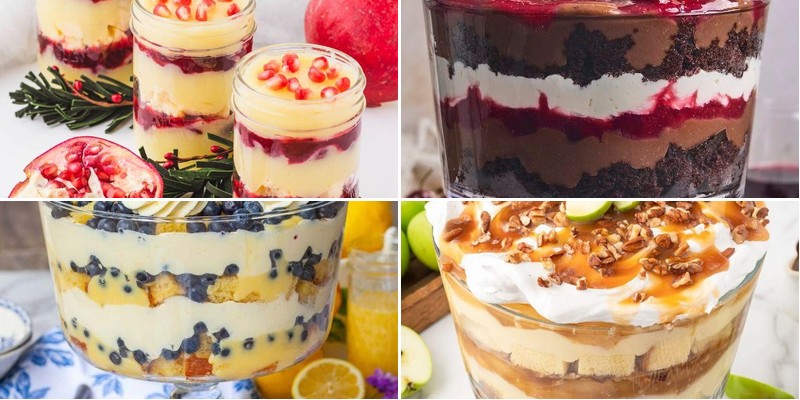
Dazzling desserts don’t get more versatile than trifle! Whether you’re hosting a holiday gathering, planning a summer picnic, or just craving something sweet, these layered beauties are the perfect solution. From classic English trifle to creative modern twists, we’ve gathered 32 spectacular recipes that will make any occasion extra special. Get ready to dig into the most delicious collection of trifles you’ll ever encounter!
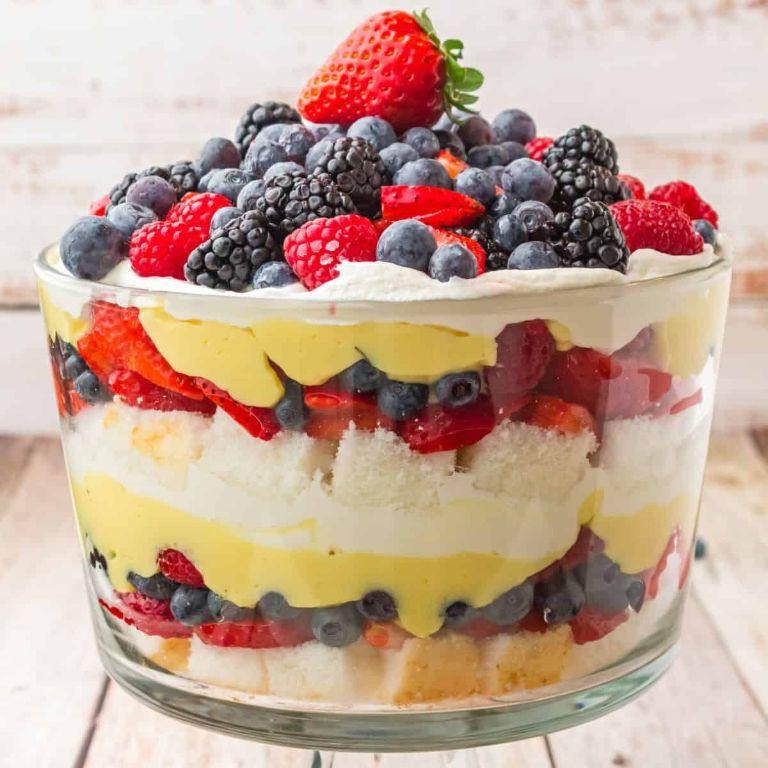
Classic English Berry Trifle
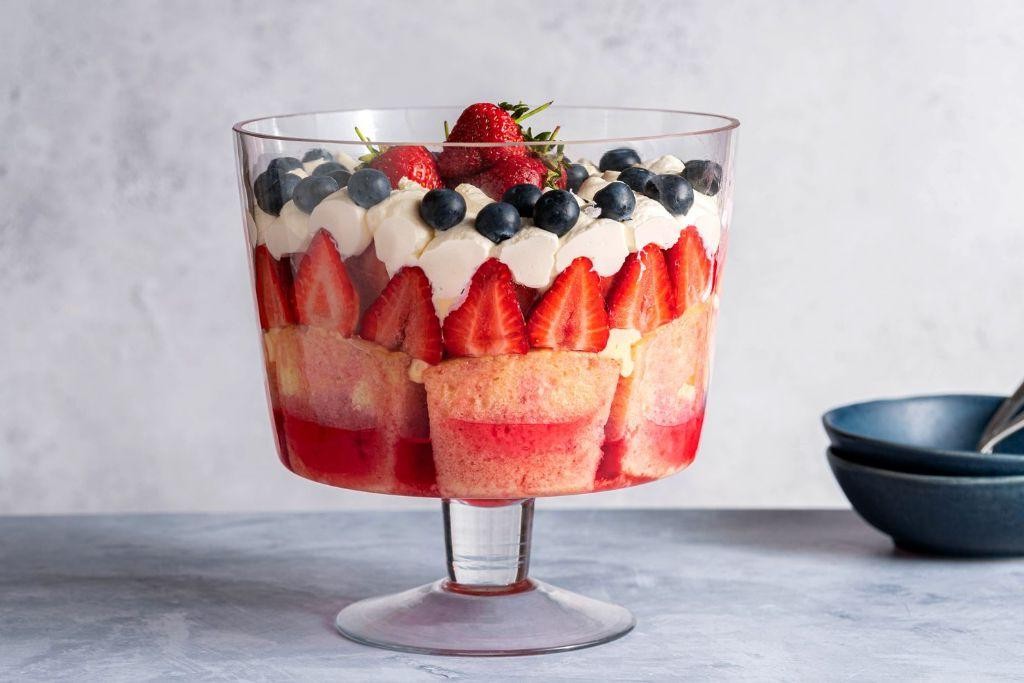
Unbelievably decadent yet deceptively simple, this Classic English Berry Trifle is the dessert equivalent of wearing pajamas to a fancy party—comfortable, slightly inappropriate, but absolutely delightful. You’ll have everyone thinking you slaved for hours when really, you’re just artfully layering deliciousness. Trust me, this is the showstopper that requires minimal effort for maximum “oohs” and “aahs.”
8
servings25
minutesIngredients
– 1 package (3.4 oz) instant vanilla pudding mix – because who has time to make custard from scratch on a Tuesday?
– 2 cups whole milk – none of that skim nonsense, we’re going for creamy luxury here
– 1 pound cake (store-bought is perfectly acceptable, no judgment)
– 1/4 cup sherry – the secret weapon that makes this truly English
– 2 cups mixed fresh berries (strawberries, raspberries, blueberries) – frozen works too if berries are out of season
– 1 cup heavy whipping cream – cold from the fridge for perfect peaks
– 2 tablespoons granulated sugar – just enough sweetness to balance the tart berries
– 1/2 cup raspberry jam – seedless if you’re fancy, with seeds if you like texture
Instructions
1. Whisk the vanilla pudding mix with 2 cups cold whole milk in a medium bowl for exactly 2 minutes until thickened.
2. Cover the pudding with plastic wrap pressed directly against the surface and refrigerate for 15 minutes to prevent skin formation.
3. Cut the pound cake into 1-inch thick slices while the pudding chills.
4. Arrange a single layer of pound cake slices in the bottom of a clear trifle bowl to show off those beautiful layers.
5. Drizzle 2 tablespoons of sherry evenly over the pound cake layer using a spoon.
6. Spread 1/4 cup of raspberry jam over the sherry-soaked cake with a spatula.
7. Hull and slice 1 cup of strawberries while leaving other berries whole for visual interest.
8. Scatter half of the mixed berries over the jam layer, making sure some press against the glass.
9. Spoon half of the chilled pudding over the berries and smooth with the back of a spoon.
10. Repeat steps 4 through 9 to create a second identical layer in the trifle bowl.
11. Chill the assembled trifle in the refrigerator for 30 minutes to let the flavors meld.
12. Pour 1 cup cold heavy whipping cream into a chilled metal bowl and add 2 tablespoons granulated sugar.
13. Whip the cream on medium-high speed for 3-4 minutes until stiff peaks form that hold their shape.
14. Spread the whipped cream over the top layer of the trifle using a piping bag for decorative swirls or a spatula for rustic charm.
15. Arrange the remaining fresh berries artistically on top of the whipped cream as garnish.
Yummy doesn’t even begin to describe the magical texture happening here—creamy pudding meets boozy cake meets bursting berries in every spoonful. The sherry-soaked layers become almost cake-pudding hybrids that’ll have people fighting for the bottom scoop. For maximum drama, serve this beauty in individual mason jars and watch your guests’ Instagram feeds explode with envy.
Decadent Chocolate Brownie Trifle
Y’all, let’s be real—sometimes a regular brownie just doesn’t cut it. This Decadent Chocolate Brownie Trifle is what happens when you take chocolate obsession to its logical, glorious conclusion. It’s basically a party in a bowl, and everyone’s invited.
1
trifle25
minutes32
minutesIngredients
- 1 box fudge brownie mix (I swear by the one with chocolate chunks—no skimping!)
- 2 large eggs, at room temperature because they mix in smoother, trust me
- 1/2 cup vegetable oil (the neutral kind lets chocolate shine)
- 1/4 cup water
- 1 (3.4 oz) package instant chocolate pudding mix
- 2 cups cold whole milk (none of that watery stuff—rich is the goal)
- 1 (8 oz) container frozen whipped topping, thawed (I always sneak a spoonful first)
- 1/2 cup chocolate shavings (because more chocolate is never a bad idea)
Instructions
- Preheat your oven to 350°F and grease a 9×9-inch baking pan—I use butter for extra flavor.
- In a large bowl, combine the brownie mix, eggs, oil, and water, stirring until just blended; overmixing makes tough brownies, so stop when no dry spots remain.
- Pour the batter into the prepared pan and spread it evenly with a spatula.
- Bake for 28–32 minutes, until a toothpick inserted in the center comes out with a few moist crumbs (not wet batter).
- Let the brownies cool completely in the pan on a wire rack, about 1 hour—this prevents sogginess later.
- While brownies cool, whisk the pudding mix and cold milk in a medium bowl for 2 minutes until thickened; chilling it for 5 minutes firms it up perfectly.
- Cut the cooled brownies into 1-inch cubes—they’ll be fudgy, so a serrated knife works best.
- In a trifle bowl or large glass dish, layer half the brownie cubes, half the pudding, and half the whipped topping, repeating the layers.
- Sprinkle the chocolate shavings evenly over the top for a fancy finish.
- Refrigerate the trifle for at least 30 minutes before serving to let flavors meld.
Prepare for layers of fudgy brownie, silky pudding, and cloud-like whipped cream that melt together in every spoonful. The textures are a dream—chewy, creamy, and downright addictive. Serve it in mason jars for a portable treat, or just grab a big spoon and dive right in; no one will judge.
Tropical Passion Fruit and Mango Trifle
Ever had one of those days where you’re craving something tropical, but your kitchen feels more like a desert? Enter this showstopping trifle that’s basically a vacation in a bowl—no passport required. Packed with sunny mangoes and tangy passion fruit, it’s the kind of dessert that makes you forget you’re still in your pajamas.
5
servings25
minutesIngredients
- 1 cup heavy cream (chilled—trust me, it whips up fluffier when it’s cold)
- 1/4 cup powdered sugar (sifted to avoid lumpy disasters)
- 1 tsp vanilla extract (the real stuff, not imitation—your taste buds will thank you)
- 2 ripe mangoes, peeled and diced (go for the ones that smell like sunshine)
- 1/2 cup passion fruit pulp (I like to scoop it fresh, but jarred works in a pinch)
- 8 oz store-bought pound cake, cubed (no shame in taking shortcuts here)
- Fresh mint leaves for garnish (a few sprigs make it look fancy)
Instructions
- Chill a large mixing bowl and whisk attachment in the freezer for 10 minutes—this helps the cream whip faster and hold its shape.
- Pour 1 cup heavy cream into the chilled bowl and whip on medium speed until soft peaks form, about 2–3 minutes.
- Add 1/4 cup sifted powdered sugar and 1 tsp vanilla extract, then whip on high until stiff peaks form, roughly 1 more minute; avoid over-whipping or you’ll end up with butter.
- Gently fold in 1/2 cup passion fruit pulp until just combined to create a marbled effect—don’t overmix or you’ll lose those pretty swirls.
- Arrange half of the 8 oz cubed pound cake in a single layer at the bottom of a trifle dish or large glass bowl.
- Spread half of the passion fruit cream mixture evenly over the cake layer using a spatula.
- Scatter half of the diced mangoes over the cream layer, pressing them lightly to secure.
- Repeat layers with remaining cake, cream, and mangoes, ending with a mango topping.
- Cover the trifle with plastic wrap and refrigerate for at least 2 hours to let the flavors meld and the cake soften.
- Garnish with fresh mint leaves just before serving to keep them vibrant and crisp.
What you’ll love is how the creamy, tangy passion fruit melds with the sweet mango and soft cake—each spoonful is a textural dream. Serve it in individual glasses for a dinner party wow-factor, or just grab a big spoon and dive in straight from the bowl; we won’t judge.
Layered Lemon and Blueberry Trifle
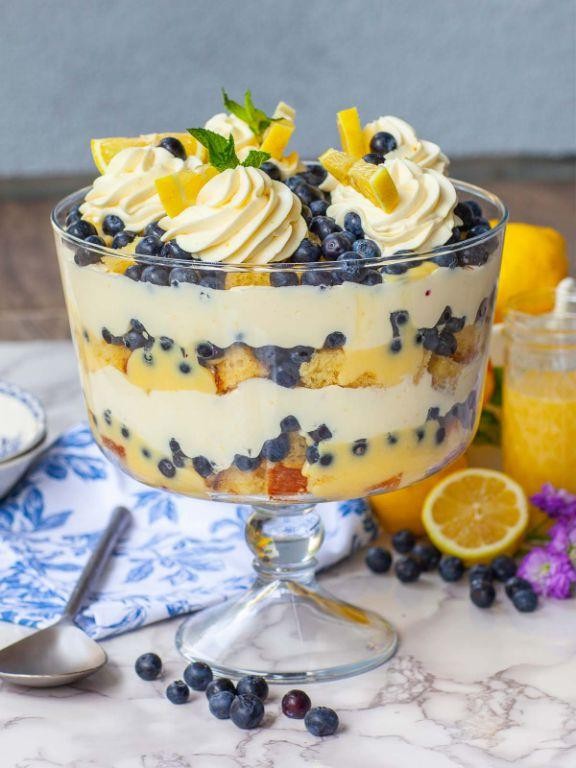
Sometimes summer needs a dessert that screams “I’m fabulous” without requiring a culinary degree. This layered lemon and blueberry trifle is basically sunshine in a bowl, guaranteed to make your taste buds do a happy dance while impressing even your most judgmental foodie friends.
8
servings45
minutes32
minutesIngredients
- 1 package lemon cake mix (I always grab the one with pudding in the mix—trust me, it makes all the difference)
- 3 large eggs (room temperature eggs here create the fluffiest cake texture)
- 1/2 cup vegetable oil (the neutral flavor lets the lemon and berry notes shine)
- 1 cup water
- 2 cups fresh blueberries (frozen work too, but fresh give that satisfying pop)
- 1 tablespoon lemon zest (use a microplane—your knuckles will thank you)
- 1/4 cup granulated sugar (for macerating those beautiful berries)
- 2 cups heavy whipping cream (chill your bowl and beaters for peak peaks)
- 1/4 cup powdered sugar (sifted to avoid lumpy whipped cream disasters)
- 1 teaspoon vanilla extract (the real stuff—imitation vanilla is a crime against desserts)
- 1 (3.4 oz) package instant lemon pudding mix
- 2 cups whole milk (whole milk makes the pudding extra creamy and luxurious)
Instructions
- Preheat your oven to 350°F and grease a 9×13 inch baking pan.
- Combine lemon cake mix, 3 eggs, 1/2 cup vegetable oil, and 1 cup water in a large bowl, mixing on medium speed for exactly 2 minutes until smooth.
- Pour batter into prepared pan and bake for 28-32 minutes until golden and a toothpick inserted in center comes out clean.
- Cool cake completely on a wire rack—about 1 hour—then cut into 1-inch cubes.
- While cake cools, toss 2 cups blueberries with 1/4 cup granulated sugar and 1 tablespoon lemon zest in a bowl, letting them macerate for 20 minutes until juicy.
- Whisk 1 package instant lemon pudding mix with 2 cups whole milk in another bowl for 2 minutes until thickened, then refrigerate for 15 minutes.
- Beat 2 cups heavy whipping cream, 1/4 cup powdered sugar, and 1 teaspoon vanilla extract on high speed for 3-4 minutes until stiff peaks form.
- Fold half the whipped cream into the chilled pudding until fully combined.
- Layer one-third cake cubes in bottom of trifle bowl, followed by one-third blueberry mixture, then one-third pudding mixture.
- Repeat layers twice more, ending with remaining plain whipped cream.
- Chill assembled trifle for at least 2 hours before serving.
Ready for the grand finale? The magic happens when that chilled trifle hits your spoon—creamy pudding, juicy berries, and soft cake creating a texture party. Refreshing lemon cuts through the sweetness while those blueberries burst like tiny flavor fireworks. Try serving it in individual mason jars for portable perfection, or go full drama with a clear bowl to show off those gorgeous layers!
Traditional Sherry Trifle
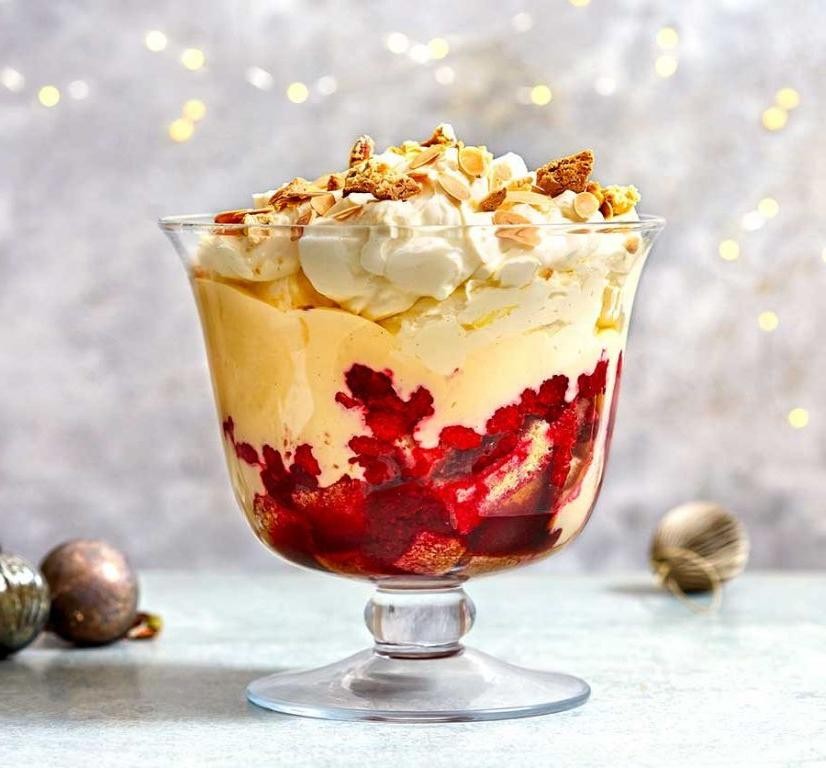
Let’s be real—most desserts whisper sweet nothings, but this traditional sherry trifle shouts ‘party in a bowl!’ from the rooftops. Layers of boozy-soaked cake, silky custard, and clouds of whipped cream create a dessert that’s basically a hug for your taste buds. It’s the kind of treat that makes you want to cancel plans just to stay home and eat the whole thing yourself.
8
servings25
minutesIngredients
– 1 (16 oz) store-bought pound cake, sliced 1-inch thick—because life’s too short to bake from scratch on a Tuesday
– 1/2 cup medium-dry sherry—the kind you’d happily sip while judging reality TV
– 1 (3.4 oz) box instant vanilla pudding mix—my secret weapon for custard that never fails
– 2 cups whole milk, straight from the fridge for maximum thickening power
– 1 cup heavy whipping cream, so cold it could give your fridge the chills
– 2 tbsp granulated sugar, because even clouds need a little sweetness
– 1/2 cup raspberry jam, preferably seedless to avoid texture surprises
– 1/4 cup toasted sliced almonds, for that satisfying crunch that says ‘I’m fancy’
– Fresh raspberries for garnish—the jewel-toned confetti this dessert deserves
Instructions
1. Arrange pound cake slices in a single layer across the bottom of a 3-quart trifle dish.
2. Spread raspberry jam evenly over the cake layer using a spatula, getting all the way to the edges.
3. Drizzle sherry slowly over the jam-covered cake, pausing to let it soak in—this is where the magic starts.
4. Whisk pudding mix and milk in a medium bowl for exactly 2 minutes until smooth and slightly thickened.
5. Let pudding stand for 5 minutes to set up—perfect timing to wash that whisk you were about to leave in the sink.
6. Pour pudding over the sherry-soaked cake layer, spreading evenly with a spatula.
7. Chill the trifle in the refrigerator for 30 minutes to let the layers firm up—no peeking!
8. Beat heavy cream and sugar in a chilled metal bowl with an electric mixer on high speed until stiff peaks form, about 3-4 minutes.
9. Spread whipped cream over the chilled pudding layer, creating decorative swirls with the back of a spoon.
10. Sprinkle toasted almonds evenly over the whipped cream, avoiding clumps.
11. Arrange fresh raspberries artistically across the top, pressing gently to secure them.
12. Refrigerate for at least 2 hours before serving to let flavors meld—patience is a virtue, especially with trifle.
My favorite thing about this trifle is how the textures play together—the soft cake gives way to creamy custard, then fluffy whipped cream, all with that occasional almond crunch. The sherry adds this sophisticated warmth that makes it feel like you’re eating something far more complicated than it actually is. Serve it in the trifle dish for maximum drama, or scoop into individual glasses for Instagram-worthy portions that’ll have your friends asking for the recipe.
Nutty Peanut Butter and Banana Trifle
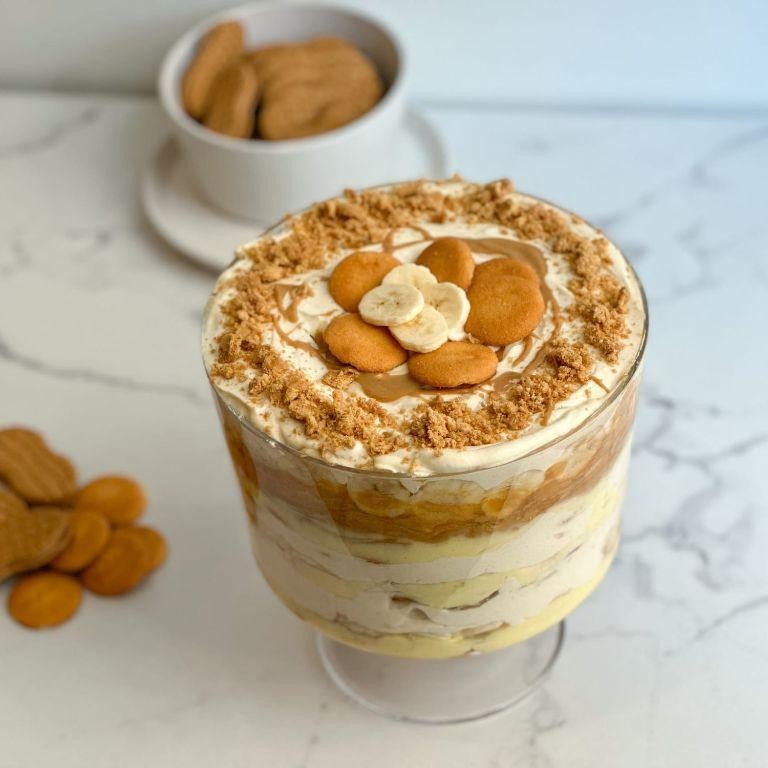
Alright, let’s dive into this deliciously chaotic dessert that somehow manages to be both sophisticated and completely ridiculous. Assembling this nutty masterpiece is basically like building a dessert skyscraper—just way more delicious and with zero risk of structural collapse (unless you eat it too fast).
8
servings30
minutes30
minutesIngredients
- 2 cups heavy cream (the real deal, none of that whipped topping nonsense)
- 1 cup creamy peanut butter (I’m team Jif all the way, but you do you)
- 3 ripe bananas (the spottier the better—they’re sweeter and mash like a dream)
- 1 package vanilla pudding mix (instant, because who has time to cook pudding?)
- 2 cups whole milk (trust me, the extra fat makes all the difference)
- 1 box chocolate cake mix (plus whatever oil/eggs it calls for—I always add an extra egg for moisture)
- 1 cup chopped peanuts (salted, because sweet and salty is the ultimate power couple)
- ½ cup chocolate syrup (the cheap squeeze bottle kind is perfect here)
Instructions
- Preheat your oven to 350°F and grease a 9×13 inch baking pan with butter or cooking spray.
- Prepare the chocolate cake mix according to package directions, pouring the batter into your prepared pan.
- Bake the cake for 25-30 minutes until a toothpick inserted in the center comes out completely clean.
- Let the cake cool completely on a wire rack—this is crucial so it doesn’t melt your other layers.
- While the cake cools, whisk together the vanilla pudding mix and 2 cups whole milk in a medium bowl until thickened, about 2 minutes.
- In a separate large bowl, beat 2 cups heavy cream with an electric mixer on high speed until stiff peaks form, about 3-4 minutes.
- Gently fold the peanut butter into the whipped cream until fully incorporated but still fluffy.
- Peel and slice the 3 bananas into ¼-inch thick rounds.
- Cut the cooled chocolate cake into 1-inch cubes using a serrated knife for clean cuts.
- Begin assembling in a large trifle bowl: create a base layer using half the cake cubes.
- Drizzle ¼ cup chocolate syrup evenly over the cake layer.
- Arrange half the banana slices in a single layer over the chocolate-drizzled cake.
- Spread half the vanilla pudding over the banana layer using a spatula.
- Top with half the peanut butter whipped cream, spreading it to the edges.
- Sprinkle ½ cup chopped peanuts over the whipped cream layer.
- Repeat all layers exactly once more with remaining ingredients.
- Refrigerate the assembled trifle for at least 2 hours before serving to let flavors meld.
Ready to experience texture nirvana? The contrast between fluffy cake, creamy peanut butter clouds, and crunchy peanuts is pure magic. Seriously, serve this in fancy glasses for a dinner party or eat it straight from the bowl while watching reality TV—both are equally valid life choices.
Refreshing Raspberry and Mint Trifle
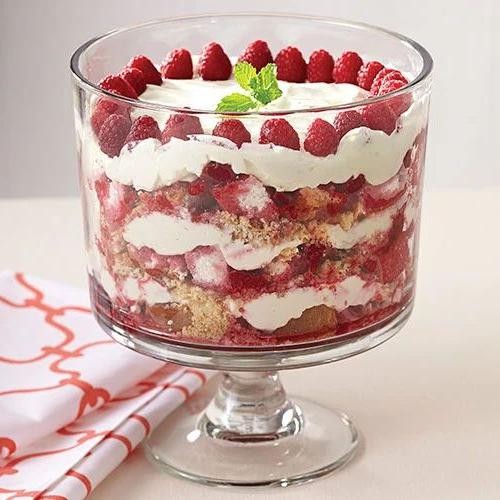
Ladies and gentlemen, prepare your spoons for a dessert that’s basically a party in a bowl—this Refreshing Raspberry and Mint Trifle is the summer fling your taste buds didn’t know they needed. It’s cool, creamy, and just sassy enough to make you forget you ever liked boring old cake. Trust me, this trifle is the life of the picnic, and it’s ready to steal the show.
8
servings25
minutesIngredients
– 1 pound fresh raspberries (because frozen ones can get a bit mushy, and we’re fancy like that)
– 1/4 cup fresh mint leaves, chopped (go wild—it adds a zing that’ll wake up your senses)
– 2 cups heavy cream (chilled, so it whips up fluffy without throwing a tantrum)
– 1/4 cup granulated sugar (for that sweet kiss of perfection)
– 1 teaspoon vanilla extract (pure, not imitation—your trifle deserves the real deal)
– 1 pre-made angel food cake, cut into 1-inch cubes (store-bought is totally fine; no shame in shortcuts!)
Instructions
1. In a large mixing bowl, combine the fresh raspberries and chopped mint leaves, gently tossing them together to let the flavors mingle—think of it as a pre-party for your ingredients.
2. In a separate chilled bowl, pour in the heavy cream, and use an electric mixer on medium speed to whip it until soft peaks form, about 2-3 minutes (tip: chill your bowl and beaters first to avoid a soupy disaster).
3. Gradually add the granulated sugar and vanilla extract to the whipped cream, continuing to mix on low speed for 1 minute until fully incorporated and smooth.
4. Arrange a single layer of angel food cake cubes at the bottom of a trifle dish or large glass bowl, covering the base evenly.
5. Spoon half of the raspberry and mint mixture over the cake layer, spreading it out to create a vibrant, fruity blanket.
6. Top the raspberry layer with half of the whipped cream, spreading it gently with a spatula to avoid squishing the berries (tip: work in layers for that picture-perfect look when serving).
7. Repeat the layers: add the remaining cake cubes, followed by the rest of the raspberry and mint mixture, and finish with the remaining whipped cream.
8. Cover the trifle with plastic wrap and refrigerate it for at least 2 hours to let the flavors meld and the cake soften (tip: don’t skip the chill time—it turns this from good to “can I have seconds?” amazing).
Prepare for a texture that’s like a cloud meeting a berry patch—creamy, light, and bursting with tangy-sweet notes. Serve it straight from the fridge on a hot day, or get creative by garnishing with extra mint sprigs for a Insta-worthy touch that’ll have everyone asking for the recipe.
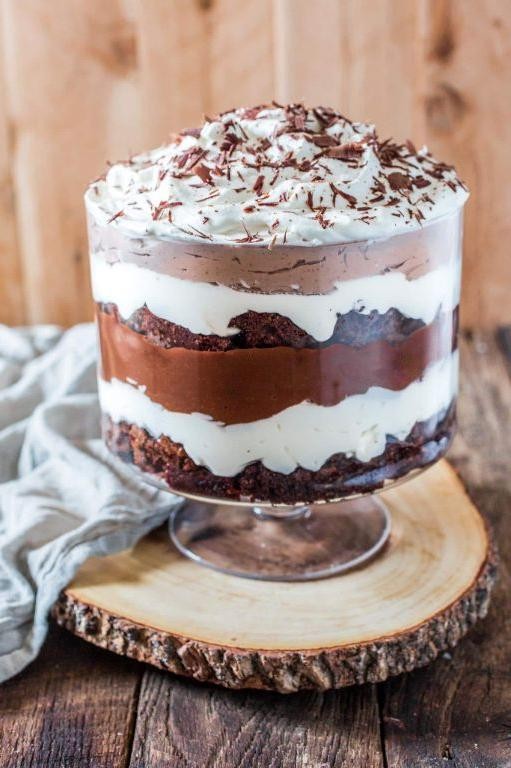
Rich Black Forest Trifle

Nothing says “I’m fancy but also secretly lazy” quite like a Rich Black Forest Trifle. This glorious dessert takes all the decadent flavors of the classic German cake and turns them into a no-bake masterpiece that’ll have your guests thinking you slaved for hours. Let’s be real—we’re just doing some strategic layering here, and the result is pure magic.
8
servings30
minutes35
minutesIngredients
- 1 box of devil’s food cake mix (plus the oil, eggs, and water it calls for—trust the box, it knows things)
- 2 cups heavy whipping cream (go for the good stuff, it makes all the difference)
- 1/4 cup granulated sugar (for sweetening that glorious cream)
- 1 teaspoon vanilla extract (the real deal, not the imitation stuff)
- 1 (21 oz) can of cherry pie filling (because pitting cherries is a special kind of torture)
- 1/2 cup chocolate shavings (I like using a vegetable peeler on a chocolate bar—feels very chef-y)
Instructions
- Preheat your oven to 350°F and prepare the devil’s food cake mix according to package directions in a 9×13 inch pan.
- Bake the cake for 30-35 minutes until a toothpick inserted in the center comes out completely clean—no crumb buddies hitching a ride.
- Let the cake cool completely on a wire rack for at least 1 hour (this prevents your whipped cream from melting into a sad puddle).
- While the cake cools, pour 2 cups heavy whipping cream into a large chilled bowl and beat with an electric mixer on medium speed.
- When soft peaks form, gradually add 1/4 cup granulated sugar and 1 teaspoon vanilla extract while continuing to beat.
- Beat until stiff peaks form—when you lift the beaters, the cream should stand straight up like it’s at attention.
- Cut the completely cooled cake into 1-inch cubes using a serrated knife for clean cuts without squishing.
- Place one-third of the cake cubes in the bottom of a trifle bowl or large glass serving dish.
- Spread one-third of the cherry pie filling evenly over the cake layer, getting those cherries right to the edges for maximum visual appeal.
- Dollop one-third of the whipped cream over the cherries and gently spread it into an even layer.
- Repeat the layering process twice more with remaining cake, cherries, and whipped cream.
- Sprinkle 1/2 cup chocolate shavings evenly over the top layer of whipped cream.
- Cover and refrigerate for at least 2 hours to let the flavors meld—this waiting period is the hardest part, I know.
Let this beauty chill properly and you’ll be rewarded with layers that hold their shape when scooped. The chocolate cake becomes wonderfully moist from the cherry juices, while the whipped cream provides clouds of lightness between the rich, fruity layers. Serve it in clear glasses to show off those stunning stripes, or just grab a spoon and stand directly in front of the fridge—we don’t judge here.
Indulgent Caramel and Apple Trifle
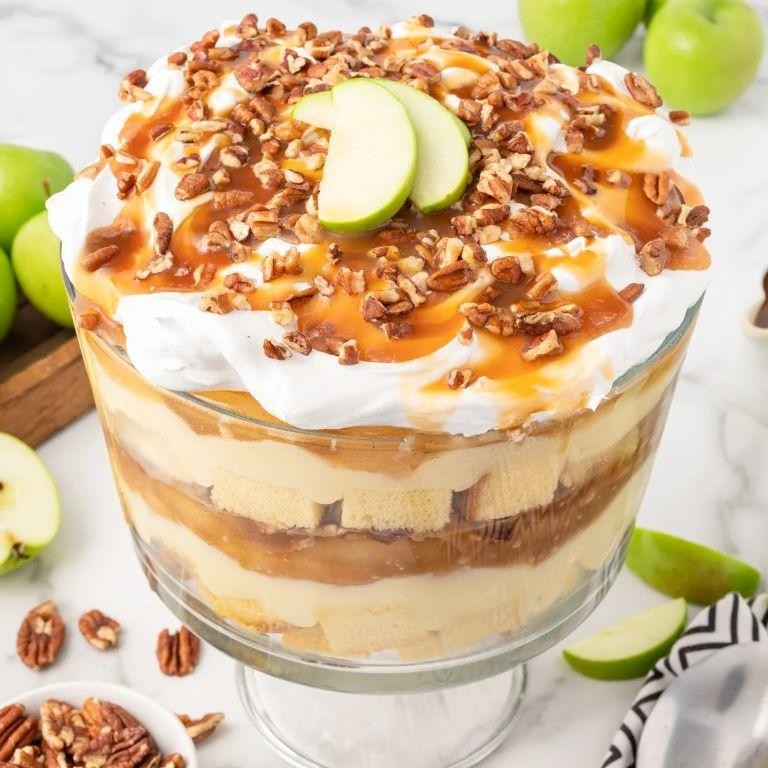
Zesty, zingy, and downright irresistible—this caramel and apple trifle is the dessert equivalent of wearing pajamas to a fancy party: comfort meets elegance in the most deliciously chaotic way possible. Imagine layers of tender cake, spiced apples, and velvety caramel cream conspiring to make your spoon very, very happy. It’s the kind of treat that turns Tuesday into a celebration, no fancy pants required.
8
servings25
minutes10
minutesIngredients
– 1 store-bought pound cake (I always grab the one with a buttery crumb—it’s a time-saver and tastes like grandma’s hug)
– 4 large Granny Smith apples (tart and firm, they hold up beautifully against the sweet caramel)
– 1/2 cup granulated sugar (for that glossy apple glaze)
– 1 tsp ground cinnamon (the cozy spice that whispers “autumn” in every bite)
– 2 cups heavy whipping cream (chilled straight from the fridge—cold cream whips up fluffier, trust me)
– 1/4 cup powdered sugar (sifted to avoid lumps, because nobody wants gritty cream)
– 1 tsp vanilla extract (pure vanilla here—it’s the difference between “meh” and “more, please”)
– 1 cup store-bought caramel sauce (I opt for the thick, pourable kind—it clings to every layer like edible glitter)
Instructions
1. Slice the pound cake into 1-inch cubes and set them aside in a medium bowl.
2. Peel, core, and thinly slice the apples into 1/4-inch pieces.
3. In a large skillet over medium heat, combine the sliced apples, granulated sugar, and cinnamon.
4. Cook the apple mixture for 8–10 minutes, stirring occasionally, until the apples are tender but not mushy and the sugar has dissolved into a syrupy glaze.
5. Transfer the cooked apples to a plate and let them cool completely to room temperature (about 15 minutes)—this prevents the cream from melting later.
6. In a large mixing bowl, pour the chilled heavy whipping cream, powdered sugar, and vanilla extract.
7. Use an electric mixer on medium-high speed to whip the cream for 3–4 minutes until stiff peaks form (tip: stop mixing as soon as peaks hold their shape to avoid over-whipping into butter).
8. In a trifle dish or large glass bowl, arrange half of the pound cake cubes in an even layer at the bottom.
9. Drizzle 1/2 cup of caramel sauce evenly over the cake layer.
10. Spoon half of the cooled spiced apples over the caramel.
11. Spread half of the whipped cream over the apples using a spatula, smoothing it gently to cover the layer completely.
12. Repeat the layers with the remaining pound cake, caramel sauce, apples, and whipped cream.
13. Chill the assembled trifle in the refrigerator for at least 2 hours to let the flavors meld and the cake soften (tip: cover it with plastic wrap to keep it fresh).
14. Before serving, drizzle extra caramel sauce on top for a glossy finish. The trifle’s layers meld into a creamy, spiced symphony with contrasting textures—soft cake, tender apples, and airy cream. Try serving it in individual mason jars for a portable party treat, or scoop it straight from the bowl while nobody’s watching.
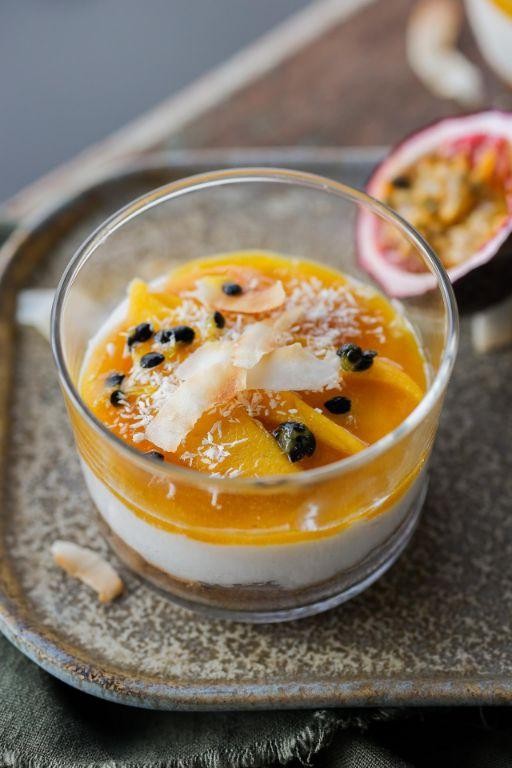
Exotic Pineapple and Coconut Trifle
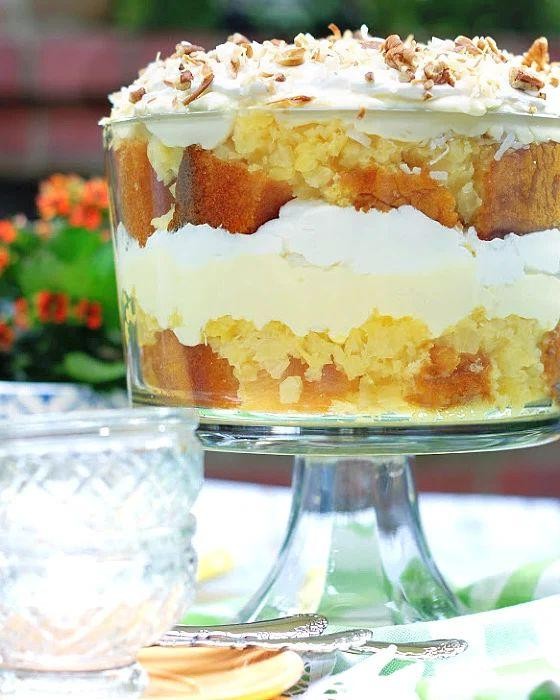
So, you’ve decided to dive fork-first into dessert paradise—welcome! This Exotic Pineapple and Coconut Trifle is basically a tropical vacation in a bowl, minus the sunburn and questionable airline food. It’s the kind of sweet escape that’ll have your taste buds doing the hula.
2
servings20
minutes7
minutesIngredients
- 1 cup pineapple chunks (fresh is fab, but canned works in a pinch—just drain well!)
- 1 cup shredded coconut (toasted, because life’s too short for bland flakes)
- 2 cups vanilla pudding (homemade or store-bought—no judgment here, just creamy goodness)
- 1 cup whipped cream (the fluffier, the better—I always chill my bowl first for peak peaks)
- 1/2 cup coconut milk (full-fat for that lush, island-vibe richness)
- 8 oz sponge cake cubes (store-bought or bake your own—stale cake soaks up flavors like a dream)
Instructions
- Preheat your oven to 350°F and spread the shredded coconut evenly on a baking sheet.
- Toast the coconut for 5–7 minutes, stirring once halfway, until it’s golden brown and fragrant—watch closely to avoid burning!
- Let the toasted coconut cool completely on the baking sheet; this keeps it crisp for layering.
- In a medium bowl, combine the vanilla pudding and coconut milk, whisking until smooth and lump-free.
- Gently fold the whipped cream into the pudding mixture until just combined; overmixing deflates the fluff.
- Arrange a single layer of sponge cake cubes at the bottom of a trifle dish or large glass bowl.
- Spoon half of the pineapple chunks evenly over the cake layer, pressing lightly to nestle them in.
- Spread half of the pudding mixture over the pineapple, using a spatula to smooth it into an even layer.
- Sprinkle half of the toasted coconut over the pudding, creating a crunchy, aromatic topping.
- Repeat the layers once more: cake, remaining pineapple, pudding, and ending with the last of the toasted coconut.
- Cover the trifle with plastic wrap and refrigerate for at least 2 hours, or up to overnight, to let the flavors meld.
Chill out and dig in—each spoonful is a creamy, tropical symphony with juicy pineapple bursts and toasty coconut crunch. Serve it in mason jars for a picnic-perfect twist, or just grab a big spoon and embrace the chaos.
Zesty Orange and Vanilla Cream Trifle
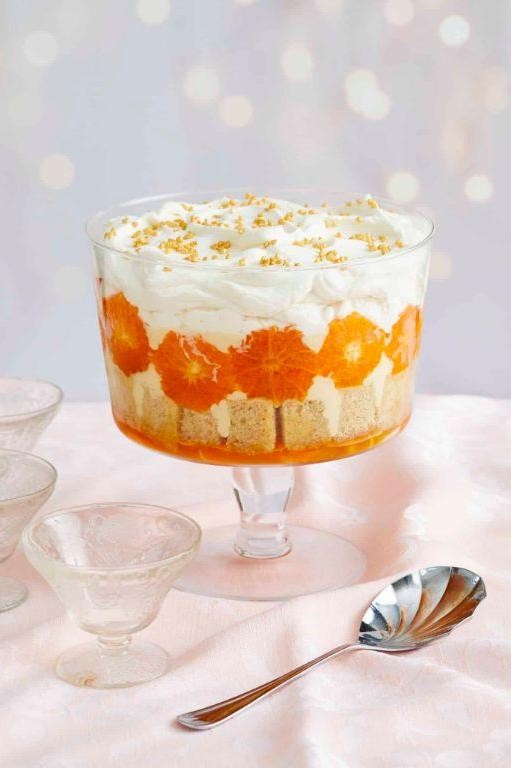
Fabulous news for anyone who thinks dessert should be both sophisticated and secretly easy to throw together—this zesty orange and vanilla cream trifle is about to become your new party trick. It’s the kind of showstopper that looks like you spent hours, but really, it’s just a happy assembly of bright, sunny flavors and dreamy layers. Seriously, your guests will never know you basically just stacked deliciousness in a bowl and called it genius.
8
servings25
minutesIngredients
– 1 package (about 14 ounces) of store-bought pound cake, cubed—I grab the pre-sliced kind to save my sanity
– 4 large oranges, peeled and segmented—navels are my go-to for their sweetness and easy-to-remove membranes
– 2 cups heavy cream, straight from the fridge for maximum fluffiness
– 1/2 cup granulated sugar—I sometimes use a tad less if the oranges are super ripe
– 1 teaspoon pure vanilla extract, because imitation just doesn’t hit the same
– 1/4 cup orange juice, freshly squeezed from those segmented oranges (no waste!)
– 1/4 cup orange zest, finely grated—I use a microplane and try not to zest my knuckles
Instructions
1. In a large mixing bowl, combine the heavy cream, granulated sugar, and vanilla extract.
2. Using an electric mixer on medium-high speed, whip the cream mixture until stiff peaks form, which should take about 3–4 minutes—don’t walk away, or you’ll end up with butter (tip: chill your bowl and beaters first for faster whipping).
3. Gently fold the orange zest into the whipped cream with a spatula until just combined to keep it airy.
4. In a separate small bowl, toss the orange segments with the freshly squeezed orange juice to coat them lightly.
5. Arrange a single layer of pound cake cubes at the bottom of a trifle dish or large glass bowl.
6. Spoon half of the orange segments and any juice evenly over the pound cake layer.
7. Spread half of the orange-zest whipped cream over the oranges in a smooth, even layer.
8. Repeat the layers: add the remaining pound cake cubes, followed by the rest of the orange segments and juice.
9. Top with the remaining whipped cream, spreading it to cover the oranges completely.
10. Cover the trifle with plastic wrap and refrigerate for at least 2 hours, or up to overnight, to let the flavors meld and the cake soften (tip: this waiting game is tough, but it makes the texture perfect).
11. Before serving, garnish with extra orange zest or a few reserved segments if you’re feeling fancy.
Seriously, the first spoonful is a revelation—creamy, citrusy, and with just the right amount of cakey give. Serve it in individual glasses for a chic touch, or let everyone dig straight into the big bowl for that family-style chaos we all love.
Velvety Red Velvet Cake Trifle
Tired of red velvet cake that’s all show and no substance? This trifle takes that classic beauty and turns it into a textural party where every spoonful delivers pure velvet magic. Think of it as red velvet’s fun, unapologetically messy cousin who always brings the best dessert to the potluck.
12
servings30
minutes32
minutesIngredients
- 1 box red velvet cake mix (plus the oil, eggs, and water it calls for—I swear by room temp eggs for a fluffier crumb)
- 8 oz cream cheese, softened (don’t even think about using it cold from the fridge)
- 1 cup powdered sugar (sifted, unless you enjoy battling lumps)
- 2 cups heavy whipping cream (the real deal, none of that whipped topping nonsense)
- 1 tsp vanilla extract (my go-to for that warm, cozy flavor)
Instructions
- Preheat your oven to 350°F and grease a 9×13 inch baking pan.
- Prepare the red velvet cake batter according to the package directions, mixing for exactly 2 minutes on medium speed until smooth.
- Pour the batter into the prepared pan and bake for 28-32 minutes, until a toothpick inserted in the center comes out clean.
- Cool the cake completely on a wire rack for 1 hour—this prevents your trifle from turning into a warm, soupy mess.
- While the cake cools, beat the softened cream cheese and powdered sugar together on medium-high speed for 3 minutes until no lumps remain.
- In a separate bowl, whip the heavy cream and vanilla extract on high speed for 4-5 minutes until stiff peaks form.
- Gently fold the whipped cream into the cream cheese mixture until fully combined—this is your dreamy, no-bake cheesecake layer.
- Cut the cooled cake into 1-inch cubes using a serrated knife for clean edges.
- In a large trifle bowl, create a layer using half of the cake cubes, pressing them down slightly.
- Spread half of the cream cheese mixture evenly over the cake layer.
- Repeat the layers with the remaining cake cubes and cream cheese mixture.
- Cover the trifle and refrigerate for at least 4 hours, though overnight is ideal for the flavors to meld perfectly.
My favorite thing about this dessert is how the cake softens into almost a brownie-like texture while the cream stays luxuriously light. Serve it in individual mason jars for a portable treat that looks as good as it tastes, or just grab a big spoon and dive directly into the bowl—we won’t judge.
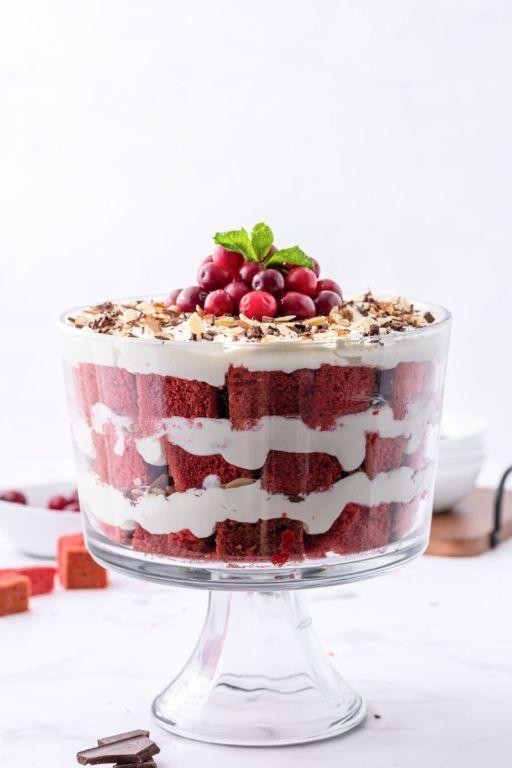
Festive Cranberry and Pomegranate Trifle
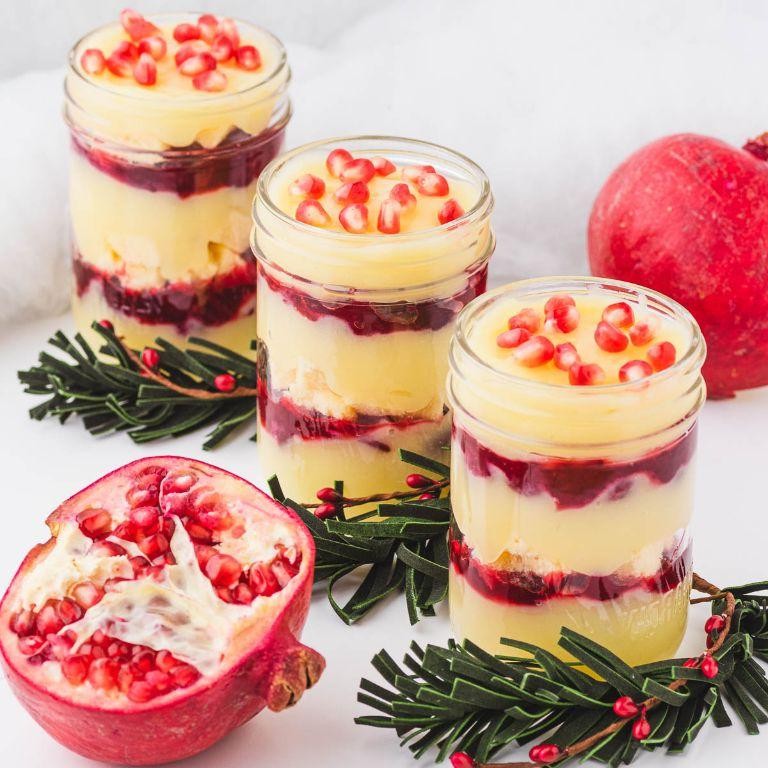
Mmm, just when you thought holiday desserts couldn’t get more spectacular, along comes this crimson beauty that’ll have your guests forgetting all about pumpkin pie. Seriously, this festive cranberry and pomegranate trifle is the edible equivalent of wearing sequins to brunch—unapologetically extra and absolutely worth it. It’s the dessert that says ‘I’m fancy but still know how to have fun.’
8
servings30
minutes10
minutesIngredients
– 2 cups fresh cranberries (the tarter the better for that perfect pucker)
– 1 cup pomegranate arils (those little ruby jewels that stain everything but taste divine)
– 1/4 cup granulated sugar (just enough to tame the cranberries’ feisty nature)
– 1 tablespoon lemon juice (freshly squeezed, because bottled lemon juice is basically sad water)
– 2 cups vanilla pudding (homemade or the good store-bought kind—no judgment here)
– 1 cup whipped cream (the real stuff, none of that aerosol can nonsense)
– 12 ounces pound cake, cubed (store-bought is totally fine—we’re making trifle, not winning baking competitions)
Instructions
1. Combine 2 cups fresh cranberries, 1/4 cup granulated sugar, and 1 tablespoon lemon juice in a medium saucepan over medium heat.
2. Cook the cranberry mixture for 8-10 minutes, stirring frequently, until the cranberries have burst and created a thick sauce.
3. Remove the cranberry sauce from heat and stir in 1 cup pomegranate arils, then let the mixture cool completely to room temperature (about 30 minutes)—this prevents your whipped cream from melting later.
4. Cut 12 ounces of pound cake into 1-inch cubes while the cranberry mixture cools.
5. Spread one-third of the pound cake cubes in an even layer across the bottom of your trifle dish.
6. Spoon one-third of the cooled cranberry-pomegranate mixture over the pound cake layer.
7. Spread one-third of the 2 cups vanilla pudding over the fruit layer using the back of a spoon.
8. Repeat steps 5-7 two more times to create three complete layers.
9. Top the final pudding layer with 1 cup whipped cream, spreading it evenly across the surface.
10. Garnish with extra pomegranate arils if desired, then refrigerate the trifle for at least 2 hours before serving to let the flavors meld—this waiting period is the ultimate test of your willpower.
Really, the magic happens when those tart cranberries meet the sweet pudding and creamy layers, creating a texture party in your mouth. Serve this beauty in clear glasses to show off those stunning red layers, or just grab a spoon and stand by the fridge—we won’t tell.
Light Angel Food Cake and Mixed Berry Trifle
Kicking off this dessert adventure with a creation so heavenly, it might just earn you angel status at your next potluck. This Light Angel Food Cake and Mixed Berry Trifle is the dessert equivalent of wearing sweatpants that somehow make you look chic—effortlessly impressive and ridiculously satisfying. Prepare for layers of fluffy cake, juicy berries, and clouds of cream that’ll have everyone fighting for the last spoonful.
1
trifle30
minutesIngredients
– 1 store-bought angel food cake (because life’s too short to whip all those egg whites)
– 2 cups mixed fresh berries (strawberries, blueberries, raspberries—the more colorful, the better)
– 1/4 cup granulated sugar (for that sweet berry magic)
– 2 cups heavy whipping cream (go for the good stuff—it makes all the difference)
– 1/4 cup powdered sugar (sifted to avoid lumpy disasters)
– 1 tsp pure vanilla extract (imitation vanilla is a crime against dessert)
– Fresh mint leaves for garnish (optional but makes it Instagram-worthy)
Instructions
1. Tear the angel food cake into 1-inch chunks using your hands—this rustic approach creates perfect texture pockets.
2. Hull and slice strawberries, then combine all berries with granulated sugar in a medium bowl.
3. Let berries macerate for 15 minutes at room temperature until they release their natural juices.
4. Pour heavy whipping cream into a chilled metal bowl—I pop mine in the freezer for 10 minutes first for faster whipping.
5. Add powdered sugar and vanilla extract to the cream.
6. Whip the mixture on medium-high speed for 3-4 minutes until stiff peaks form when you lift the beaters.
7. Arrange one-third of the cake chunks in the bottom of a clear trifle dish to show off those beautiful layers.
8. Spoon one-third of the macerated berries and their juices over the cake layer.
9. Spread one-third of the whipped cream evenly over the berries using an offset spatula.
10. Repeat layers twice more, ending with a final whipped cream layer.
11. Garnish the top with fresh mint leaves and a few reserved whole berries.
12. Refrigerate the trifle for at least 1 hour before serving to let the flavors meld.
Yielding to this dessert’s charms is inevitable once you experience the magical contrast between the cloud-like cake and the vibrant, juicy berries. The cream acts as the perfect silky bridge between textures, creating spoonfuls that are simultaneously light and decadent. Serve it in individual mason jars for a portable picnic treat, or go full drama with the trifle dish centerpiece—either way, prepare for recipe requests and happy sighs.
Conclusion
Excitingly, this collection offers the perfect trifle for every celebration, from family gatherings to holiday feasts. Whether you’re a baking novice or dessert expert, you’ll find inspiration to create stunning layered treats. We’d love to hear which recipes become your favorites—drop a comment below and share your trifle triumphs on Pinterest so others can discover these delightful desserts too!