Tired of feeling sluggish after carb-heavy meals? You’re not alone! We’ve gathered 27 mouthwatering low-carb recipes that prove healthy eating can be incredibly delicious. From quick weeknight dinners to satisfying comfort foods, these dishes will keep you energized and excited about your kitchen adventures. Let’s dive into a world of flavor without the carb overload—your taste buds are in for a treat!
Zucchini Noodles with Pesto
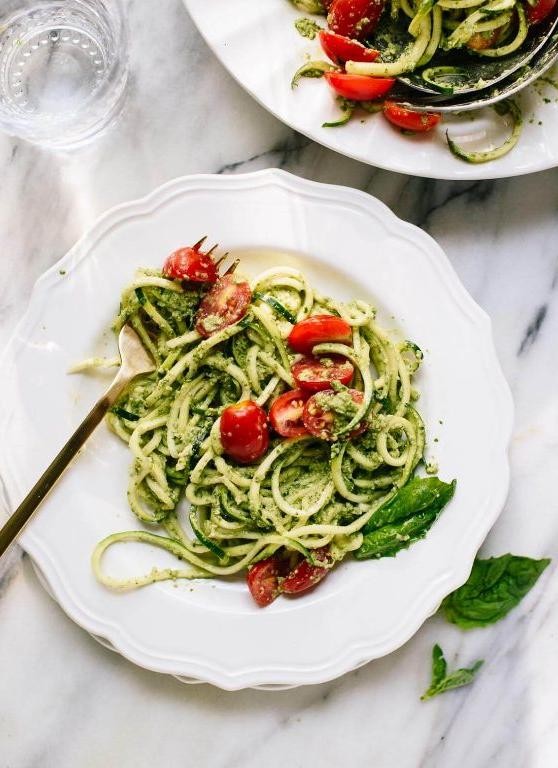
Faced with a garden glut or just craving something fresh? Zucchini noodles with pesto deliver a vibrant, low-carb meal in minutes. This dish swaps heavy pasta for crisp vegetable strands, tossed with a bright, herby sauce.
Serving: 4 | Pre Time: 15 minutes | Cooking Time: 5 minutes
Ingredients
– 4 medium firm zucchini
– 2 cups fresh, fragrant basil leaves
– 1/2 cup rich extra virgin olive oil, divided
– 1/3 cup nutty, toasted pine nuts
– 2 cloves pungent garlic
– 1/2 cup finely grated, sharp Parmesan cheese
– 1/2 tsp coarse sea salt
– 1/4 tsp freshly cracked black pepper
Instructions
1. Wash and dry 4 medium firm zucchini thoroughly.
2. Using a spiralizer, create long, thin zucchini noodles, discarding the seedy core.
3. In a food processor, combine 2 cups fresh, fragrant basil leaves, 1/3 cup nutty, toasted pine nuts, and 2 cloves pungent garlic.
4. Pulse the mixture 5-7 times until coarsely chopped.
5. With the processor running on low, slowly drizzle in 1/4 cup rich extra virgin olive oil until a thick paste forms.
6. Add 1/2 cup finely grated, sharp Parmesan cheese, 1/2 tsp coarse sea salt, and 1/4 tsp freshly cracked black pepper to the processor.
7. Pulse 3-4 more times just to incorporate, being careful not to over-process the pesto.
8. Heat the remaining 1/4 cup rich extra virgin olive oil in a large skillet over medium-high heat until shimmering, about 1 minute.
9. Add the zucchini noodles to the hot skillet and sauté for 2-3 minutes, tossing frequently, until just tender but still crisp.
10. Immediately remove the skillet from the heat to prevent overcooking.
11. Gently fold the prepared pesto into the warm zucchini noodles until evenly coated.
12. Divide the mixture among 4 plates and serve immediately.
Ultra-fresh and satisfying, the zucchini retains a pleasant al dente bite against the creamy, garlicky pesto. For a protein boost, top with grilled shrimp or sliced chicken, or keep it simple with an extra sprinkle of Parmesan and a drizzle of olive oil.
Cauliflower Crust Pizza

Veggie lovers, rejoice! This cauliflower crust pizza swaps traditional dough for a low-carb, gluten-free alternative that’s surprisingly sturdy and delicious. You’ll need a food processor and a hot oven to transform humble cauliflower into a crisp, golden base ready for your favorite toppings.
Serving: 4 | Pre Time: 20 minutes | Cooking Time: 30 minutes
Ingredients
– 1 large head of fresh cauliflower, cut into florets
– 1 cup of finely shredded, part-skim mozzarella cheese
– 1/4 cup of freshly grated Parmesan cheese
– 1 large farm-fresh egg, lightly beaten
– 1 tsp of dried Italian seasoning
– 1/2 tsp of coarse kosher salt
– 1/4 tsp of freshly ground black pepper
– 1/2 cup of robust marinara sauce
– 1/2 cup of additional shredded mozzarella cheese for topping
– 2 tbsp of rich extra virgin olive oil
– Fresh basil leaves for garnish
Instructions
1. Preheat your oven to 400°F and line a baking sheet with parchment paper.
2. Pulse the cauliflower florets in a food processor until they resemble fine rice-like crumbs.
3. Tip: Squeeze the cauliflower rice in a clean kitchen towel over the sink to remove excess moisture—this prevents a soggy crust.
4. In a large mixing bowl, combine the squeezed cauliflower, 1 cup of mozzarella, Parmesan, egg, Italian seasoning, salt, and pepper.
5. Mix thoroughly with your hands until a cohesive dough forms.
6. Press the dough onto the prepared baking sheet into a 12-inch round, about 1/4-inch thick.
7. Bake the crust for 20 minutes, or until it turns golden brown and firm to the touch.
8. Tip: Rotate the baking sheet halfway through baking for even browning.
9. Remove the crust from the oven and brush the surface evenly with olive oil.
10. Spread the marinara sauce over the crust, leaving a 1/2-inch border around the edges.
11. Sprinkle the additional 1/2 cup of mozzarella cheese evenly over the sauce.
12. Return the pizza to the oven and bake for 8–10 minutes, until the cheese is melted and bubbly.
13. Tip: For extra crispiness, broil the pizza for 1–2 minutes at the end, watching closely to prevent burning.
14. Let the pizza cool on the baking sheet for 5 minutes before slicing.
15. Garnish with fresh basil leaves just before serving.
Just out of the oven, this pizza boasts a crisp, golden crust with a tender bite, topped with gooey, melted cheese and tangy sauce. Jazz it up with pepperoni slices or roasted vegetables for a customizable meal that’s perfect for a quick weeknight dinner or a fun gathering.
Chicken and Broccoli Stir Fry
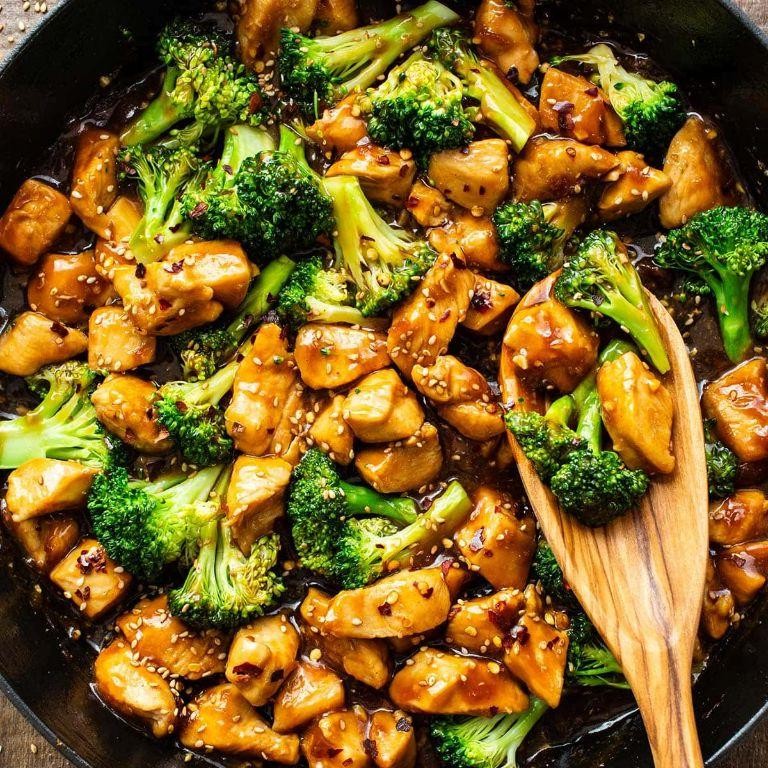
Mondays demand quick, satisfying dinners that don’t compromise on flavor. This Chicken and Broccoli Stir Fry delivers exactly that—a vibrant, one-pan meal ready in minutes. Serving: 4 | Pre Time: 15 minutes | Cooking Time: 15 minutes
Ingredients
– 1.5 pounds boneless, skinless chicken breasts, cut into 1-inch cubes
– 4 cups fresh broccoli florets, cut into bite-sized pieces
– 3 cloves garlic, finely minced
– 1 tablespoon fresh ginger, grated
– 1/3 cup low-sodium soy sauce
– 2 tablespoons honey
– 1 tablespoon rice vinegar
– 2 teaspoons toasted sesame oil
– 1/4 teaspoon red pepper flakes
– 2 tablespoons vegetable oil, divided
– 1 tablespoon cornstarch
– 2 tablespoons water
– Cooked white rice, for serving
Instructions
1. In a small bowl, whisk together 1/3 cup low-sodium soy sauce, 2 tablespoons honey, 1 tablespoon rice vinegar, 2 teaspoons toasted sesame oil, and 1/4 teaspoon red pepper flakes until fully combined. Set the sauce aside.
2. Pat 1.5 pounds of cubed chicken breasts completely dry with paper towels to ensure a good sear.
3. In a large wok or skillet, heat 1 tablespoon of vegetable oil over high heat until shimmering, about 1 minute.
4. Add the dried chicken cubes in a single layer, working in batches if necessary to avoid crowding the pan.
5. Sear the chicken undisturbed for 3-4 minutes until a golden-brown crust forms on one side.
6. Flip the chicken pieces and cook for an additional 2-3 minutes until cooked through and no longer pink inside. Transfer the cooked chicken to a clean plate.
7. Add the remaining 1 tablespoon of vegetable oil to the same pan over medium-high heat.
8. Add 4 cups of fresh broccoli florets and stir-fry for 3 minutes until bright green and slightly tender.
9. Push the broccoli to the sides of the pan and add 3 cloves of finely minced garlic and 1 tablespoon of grated ginger to the center. Cook for 30 seconds until fragrant, stirring constantly to prevent burning.
10. Return the cooked chicken to the pan with the broccoli, garlic, and ginger.
11. Pour the prepared sauce over the chicken and broccoli mixture, stirring to coat everything evenly.
12. In a separate small bowl, make a slurry by mixing 1 tablespoon of cornstarch with 2 tablespoons of water until smooth.
13. Pour the cornstarch slurry into the pan and stir continuously for 1-2 minutes until the sauce thickens and coats the ingredients with a glossy finish.
14. Remove the pan from the heat immediately to prevent overcooking.
15. Serve the stir fry hot over a bed of cooked white rice.
Finally, the tender chicken and crisp-tender broccoli are enveloped in a glossy, savory-sweet sauce with a hint of heat. For a creative twist, serve it over cauliflower rice or toss in some sliced bell peppers during the broccoli step for extra color and crunch.
Eggplant Lasagna
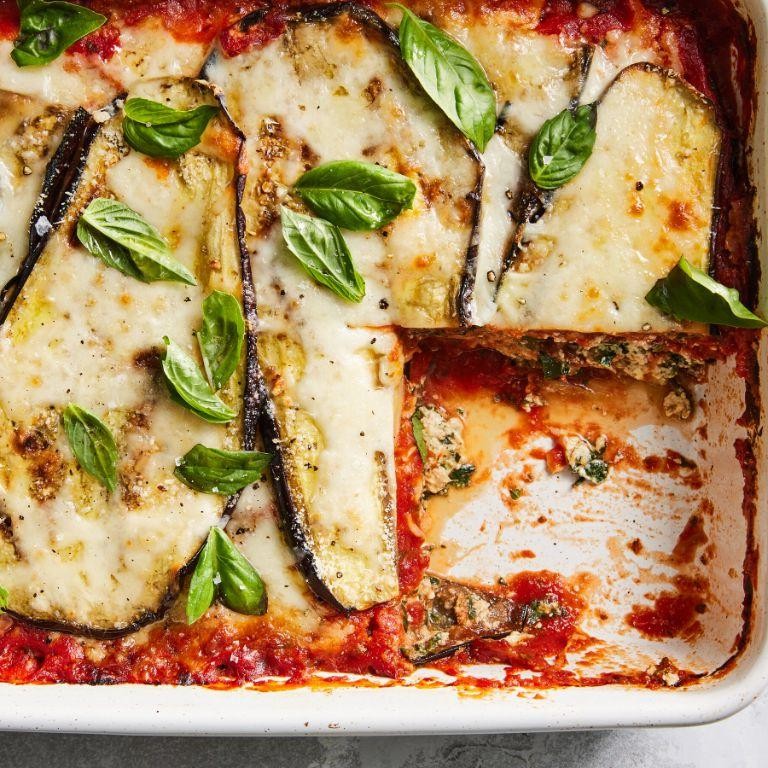
Whip up this hearty eggplant lasagna for a satisfying vegetarian meal that layers roasted eggplant with rich tomato sauce and creamy cheeses. Perfect for feeding a crowd or meal prepping, it’s a comforting dish that comes together with straightforward techniques. You’ll love how the flavors meld during baking.
Serving: 6 | Pre Time: 20 minutes | Cooking Time: 50 minutes
Ingredients
– 2 large firm eggplants, sliced lengthwise into 1/4-inch planks
– 2 tablespoons rich extra virgin olive oil
– 1 teaspoon coarse kosher salt
– 1/2 teaspoon freshly ground black pepper
– 1 pound whole milk ricotta cheese
– 1 large farm-fresh egg
– 1/4 cup freshly grated Parmesan cheese
– 1 tablespoon finely chopped fresh basil
– 3 cups robust marinara sauce
– 2 cups shredded whole milk mozzarella cheese
Instructions
1. Preheat your oven to 425°F and line two baking sheets with parchment paper.
2. Arrange eggplant planks in a single layer on the baking sheets.
3. Brush both sides of each plank generously with extra virgin olive oil.
4. Season the eggplant evenly with coarse kosher salt and freshly ground black pepper.
5. Roast the eggplant for 20 minutes until tender and lightly browned, flipping halfway through.
6. Reduce the oven temperature to 375°F.
7. In a medium bowl, combine whole milk ricotta cheese, farm-fresh egg, freshly grated Parmesan cheese, and finely chopped fresh basil. Mix until fully incorporated.
8. Spread 1 cup of robust marinara sauce evenly across the bottom of a 9×13-inch baking dish.
9. Layer half of the roasted eggplant planks over the sauce.
10. Spread the entire ricotta mixture evenly over the eggplant layer.
11. Sprinkle 1 cup of shredded whole milk mozzarella cheese over the ricotta.
12. Top with another 1 cup of marinara sauce.
13. Add the remaining roasted eggplant planks in a single layer.
14. Pour the final 1 cup of marinara sauce over the eggplant.
15. Sprinkle the remaining 1 cup of shredded mozzarella cheese evenly over the top.
16. Cover the baking dish tightly with aluminum foil.
17. Bake at 375°F for 25 minutes.
18. Remove the foil and bake for an additional 10 minutes until the cheese is bubbly and golden brown.
19. Let the lasagna rest for 15 minutes before slicing to allow the layers to set.
Keep in mind that resting is crucial for clean slices. The final dish boasts tender, savory eggplant layers contrasted with creamy ricotta and tangy tomato sauce. For a fresh twist, garnish with extra basil leaves and serve alongside a crisp green salad.
Spaghetti Squash Carbonara
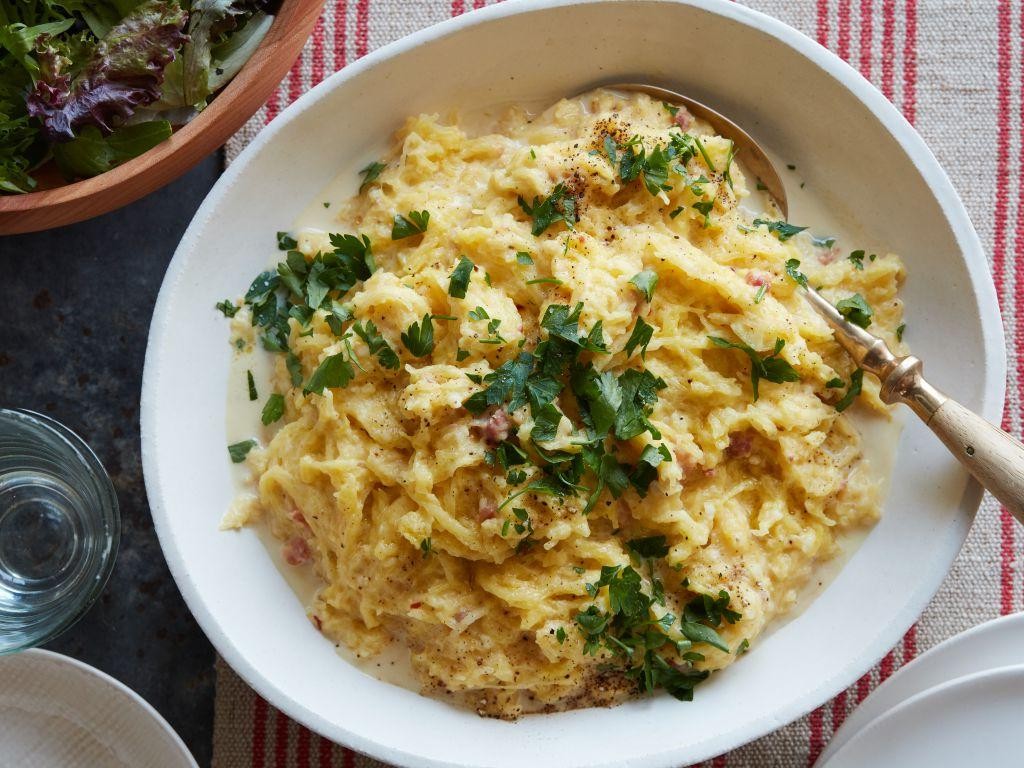
Overwhelmed by heavy pasta? Spaghetti squash carbonara swaps noodles for roasted strands. This lighter twist keeps the creamy, savory soul of the classic dish intact.
Serving: 4 | Pre Time: 15 minutes | Cooking Time: 45 minutes
Ingredients
– 1 large spaghetti squash, about 3 pounds
– 2 tbsp rich extra virgin olive oil
– 6 oz thick-cut pancetta, diced into 1/4-inch pieces
– 4 farm-fresh large egg yolks
– 1/2 cup finely grated Pecorino Romano cheese
– 1/4 cup finely grated Parmesan cheese
– 3 cloves aromatic garlic, minced
– 1/2 tsp coarsely ground black pepper
– 1/4 tsp kosher salt
Instructions
1. Preheat your oven to 400°F.
2. Slice the spaghetti squash in half lengthwise using a sharp chef’s knife.
3. Scoop out all the seeds and stringy pulp from each half with a spoon.
4. Drizzle 1 tbsp of the extra virgin olive oil over the cut sides of the squash.
5. Season the squash flesh evenly with the kosher salt.
6. Place the squash halves cut-side down on a rimmed baking sheet.
7. Roast the squash in the preheated oven for 35-40 minutes, until the flesh is tender and easily shreds with a fork.
8. Let the roasted squash cool for 5 minutes to handle safely.
9. Use a fork to scrape all the flesh from the skins into long, spaghetti-like strands into a large bowl. Discard the skins.
10. While the squash roasts, cook the diced pancetta in a large skillet over medium heat for 8-10 minutes, until crisp and golden brown.
11. Use a slotted spoon to transfer the crisp pancetta to a paper towel-lined plate, leaving the rendered fat in the skillet.
12. Add the remaining 1 tbsp of extra virgin olive oil and the minced garlic to the skillet with the pancetta fat.
13. Cook the garlic over medium-low heat for 1 minute, just until fragrant, to prevent burning.
14. In a separate medium bowl, whisk together the egg yolks, grated Pecorino Romano, grated Parmesan, and coarsely ground black pepper until smooth.
15. Tip: Temper the egg mixture by slowly whisking in 2 tbsp of the warm skillet fat to prevent scrambling.
16. Add the hot spaghetti squash strands and crisp pancetta to the skillet with the garlic oil, tossing to coat and heat through for 1 minute.
17. Remove the skillet from the heat immediately.
18. Quickly pour the tempered egg and cheese mixture over the hot squash, tossing constantly with tongs for 30 seconds until a creamy, glossy sauce forms.
19. Tip: The residual heat from the squash will cook the eggs safely into a silky sauce without curdling.
20. Serve immediately. Tip: For extra richness, finish with an additional sprinkle of black pepper and grated cheese.
Just pulled from the skillet, the dish offers tender, slightly al dente squash strands cloaked in a velvety, peppery sauce. The crisp pancetta provides a salty, savory crunch in every bite. For a bright finish, top with a handful of fresh chopped parsley or a squeeze of lemon juice.
Keto Avocado Spinach Smoothie
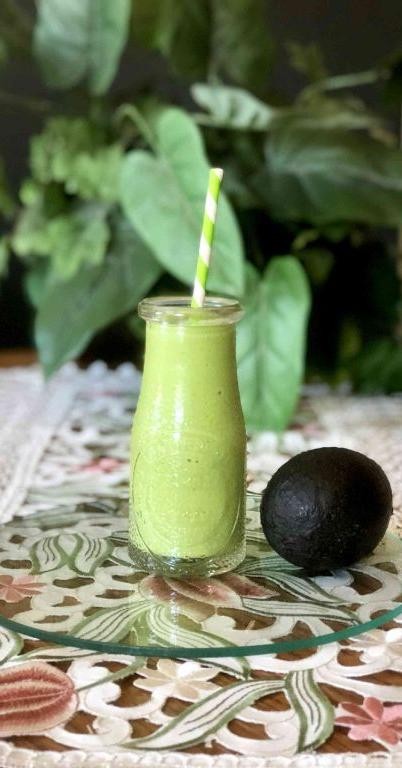
Whip up a creamy, nutrient-packed smoothie that fuels your day without derailing your keto goals. This vibrant green blend combines healthy fats and fiber for lasting energy. It’s quick, satisfying, and perfect for busy mornings.
Serving: 1 | Pre Time: 5 minutes | Cooking Time: 0 minutes
Ingredients
– 1 medium ripe avocado, creamy and pitted
– 1 cup fresh baby spinach leaves, packed
– 1/2 cup unsweetened almond milk, chilled
– 1 tablespoon creamy almond butter
– 1/2 teaspoon pure vanilla extract
– 1 cup ice cubes
– Optional: 1-2 drops liquid stevia for sweetness
Instructions
1. Add 1 medium ripe avocado, creamy and pitted, to a high-speed blender.
2. Place 1 cup fresh baby spinach leaves, packed, into the blender.
3. Pour in 1/2 cup unsweetened almond milk, chilled.
4. Spoon 1 tablespoon creamy almond butter into the mixture.
5. Add 1/2 teaspoon pure vanilla extract.
6. Tip: For a thicker consistency, freeze the avocado for 30 minutes before blending.
7. Add 1 cup ice cubes to the blender.
8. Tip: If using, add 1-2 drops liquid stevia now for subtle sweetness.
9. Secure the blender lid tightly.
10. Blend on high speed for 45-60 seconds until completely smooth and frothy.
11. Tip: Stop and scrape down the sides once during blending to ensure no chunks remain.
12. Pour the smoothie immediately into a tall glass.
Zesty and rich, this smoothie boasts a velvety texture with a subtle nutty undertone from the almond butter. Serve it straight up for a quick breakfast, or pour it into a bowl and top with chia seeds and crushed nuts for a keto-friendly smoothie bowl. The vibrant green color and creamy consistency make it as visually appealing as it is delicious.
Stuffed Bell Peppers with Ground Turkey
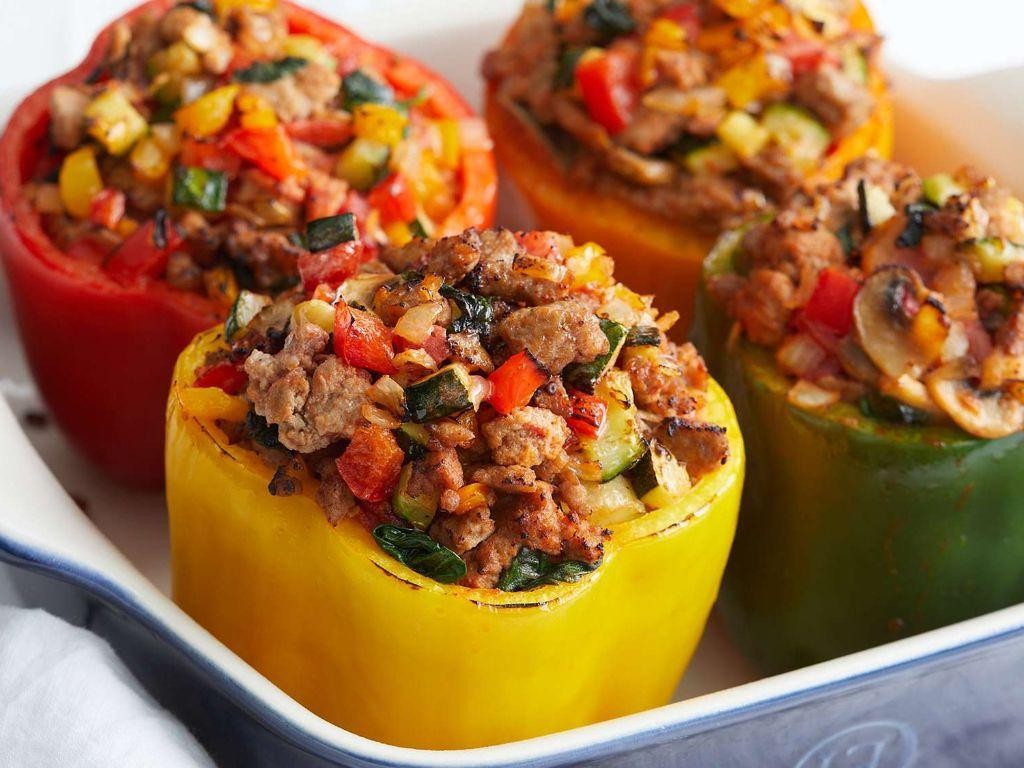
Dinner just got more exciting with these vibrant stuffed bell peppers. They’re packed with lean ground turkey and savory seasonings for a satisfying meal that looks impressive but comes together easily. Perfect for weeknights when you want something wholesome without the fuss.
Serving: 4 | Pre Time: 15 minutes | Cooking Time: 45 minutes
Ingredients
– 4 large, firm red bell peppers
– 1 lb lean ground turkey (93/7 blend)
– 1 cup cooked long-grain white rice
– 1/2 cup finely diced sweet yellow onion
– 2 cloves fresh garlic, minced
– 1 cup rich marinara sauce
– 1/2 cup shredded sharp cheddar cheese
– 1 tbsp extra virgin olive oil
– 1 tsp smoked paprika
– 1/2 tsp dried oregano
– 1/4 tsp freshly ground black pepper
– 1/4 tsp kosher salt
Instructions
1. Preheat your oven to 375°F. Line a baking dish with parchment paper.
2. Slice the tops off the bell peppers and remove all seeds and membranes. Tip: Choose peppers that stand upright easily for even cooking.
3. Heat extra virgin olive oil in a large skillet over medium-high heat until shimmering.
4. Add finely diced sweet yellow onion and sauté for 3-4 minutes until translucent.
5. Add minced fresh garlic and cook for 30 seconds until fragrant.
6. Add lean ground turkey, breaking it apart with a spatula. Cook for 6-7 minutes until no pink remains.
7. Stir in smoked paprika, dried oregano, freshly ground black pepper, and kosher salt.
8. Add cooked long-grain white rice and rich marinara sauce. Mix thoroughly and remove from heat.
9. Spoon the turkey mixture evenly into the bell pepper cavities, packing it down gently. Tip: Leave 1/4 inch space at the top for cheese.
10. Place stuffed peppers in the prepared baking dish. Bake uncovered for 30 minutes.
11. Remove from oven and top each pepper with shredded sharp cheddar cheese.
12. Return to oven and bake for 10-12 minutes until cheese is bubbly and peppers are tender when pierced with a fork. Tip: For extra browning, broil for the final 1-2 minutes.
13. Let rest for 5 minutes before serving.
Savory ground turkey and melted cheese create a hearty filling that contrasts beautifully with the sweet, tender pepper shells. The smoked paprika adds a subtle depth that makes this dish stand out. Serve alongside a crisp green salad or with crusty bread to soak up any extra sauce.
Baked Salmon with Asparagus
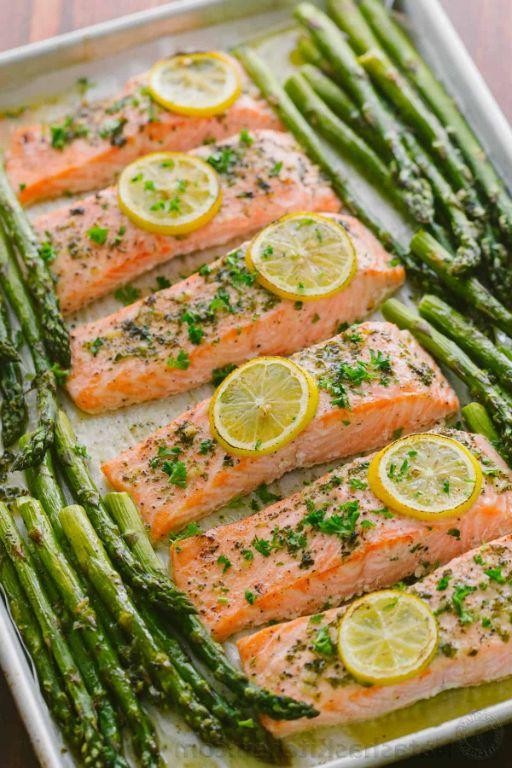
Zesty and nutritious, this baked salmon with asparagus delivers a complete meal in one pan. It’s a simple, elegant dish perfect for busy weeknights or easy entertaining. You’ll love the tender, flaky fish paired with crisp-tender spears.
Serving: 4 | Pre Time: 10 minutes | Cooking Time: 15 minutes
Ingredients
– 4 (6-ounce) skin-on salmon fillets
– 1 pound fresh asparagus spears, woody ends trimmed
– 3 tablespoons rich extra virgin olive oil
– 2 tablespoons freshly squeezed lemon juice
– 3 cloves garlic, finely minced
– 1 teaspoon smoked paprika
– 1/2 teaspoon kosher salt
– 1/4 teaspoon freshly ground black pepper
– 2 tablespoons chopped fresh dill
Instructions
1. Preheat your oven to 400°F and line a large, rimmed baking sheet with parchment paper.
2. Pat the 4 (6-ounce) skin-on salmon fillets completely dry with paper towels to ensure a crisp exterior.
3. In a small bowl, whisk together the 3 tablespoons of rich extra virgin olive oil, 2 tablespoons of freshly squeezed lemon juice, and 3 cloves of finely minced garlic.
4. Arrange the 1 pound of trimmed fresh asparagus spears in a single layer on the prepared baking sheet.
5. Drizzle half of the olive oil mixture over the asparagus and toss to coat evenly.
6. Push the asparagus to the sides of the pan, creating space in the center for the salmon.
7. Place the dried salmon fillets skin-side down in the center of the pan.
8. Brush the remaining olive oil mixture evenly over the top of each salmon fillet.
9. Sprinkle the 1 teaspoon of smoked paprika, 1/2 teaspoon of kosher salt, and 1/4 teaspoon of freshly ground black pepper evenly over the salmon and asparagus.
10. Bake in the preheated 400°F oven for 12-15 minutes, until the salmon flakes easily with a fork and the asparagus is crisp-tender.
11. Remove the pan from the oven and immediately sprinkle the 2 tablespoons of chopped fresh dill over everything.
Glistening with lemon and herbs, the salmon emerges moist and flaky, while the asparagus retains a satisfying snap. The smoky paprika adds a warm depth that complements the bright, fresh dill. For a complete plate, serve it over a bed of fluffy quinoa or with crusty bread to soak up the flavorful juices.
Cauliflower Fried Rice
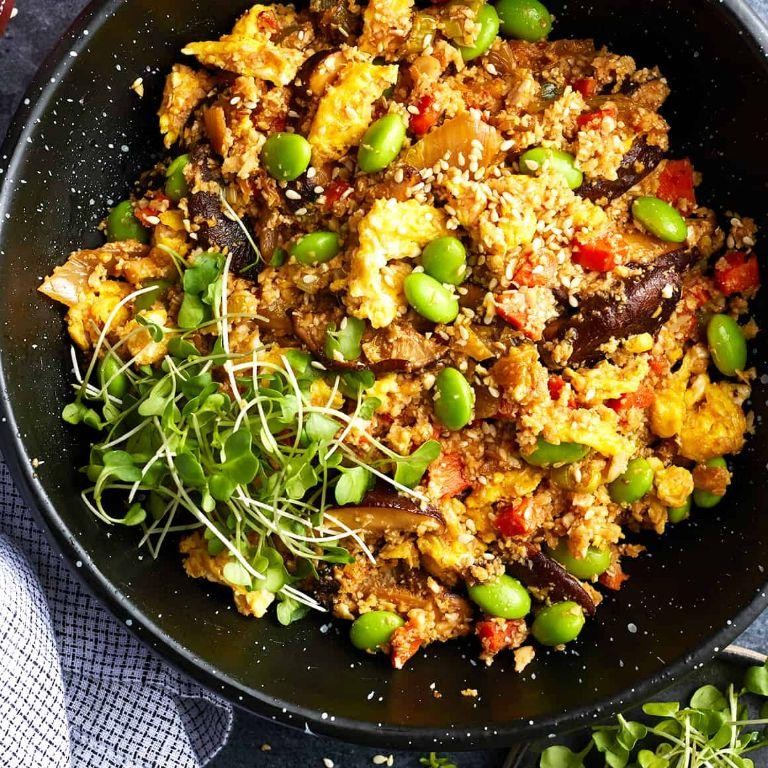
Unlock a low-carb dinner solution with this cauliflower fried rice. Using riced cauliflower instead of grains keeps it light while delivering savory satisfaction. It’s a quick, one-pan meal ready in under 30 minutes.
Serving: 4 | Pre Time: 15 minutes | Cooking Time: 12 minutes
Ingredients
– 1 large head fresh cauliflower, riced (about 4 cups)
– 2 tbsp rich toasted sesame oil
– 3 farm-fresh large eggs, lightly beaten
– 1 cup finely diced sweet yellow onion
– 3 cloves aromatic garlic, minced
– 1 cup crisp frozen peas and carrots blend
– 3 tbsp savory soy sauce
– 2 tsp fragrant toasted sesame seeds
– 2 thinly sliced green onions for garnish
Instructions
1. Pulse the fresh cauliflower florets in a food processor until they resemble coarse rice grains, about 10 pulses. Tip: Squeeze the riced cauliflower in a clean kitchen towel to remove excess moisture for a better fry.
2. Heat 1 tbsp of the rich toasted sesame oil in a large skillet or wok over medium-high heat until shimmering, about 1 minute.
3. Pour the 3 lightly beaten farm-fresh eggs into the hot oil and scramble for 45-60 seconds until just set, then transfer to a plate.
4. Add the remaining 1 tbsp of rich toasted sesame oil to the same skillet.
5. Sauté the 1 cup of finely diced sweet yellow onion for 3 minutes until translucent.
6. Stir in the 3 cloves of minced aromatic garlic and cook for 30 seconds until fragrant.
7. Add the 4 cups of riced cauliflower and 1 cup of crisp frozen peas and carrots blend to the skillet.
8. Cook the mixture, stirring frequently, for 5-7 minutes until the cauliflower is tender and lightly browned. Tip: Press the cauliflower down with your spatula occasionally to encourage browning.
9. Return the scrambled eggs to the skillet and break them into small pieces with your spatula.
10. Pour the 3 tbsp of savory soy sauce evenly over the mixture and toss to combine thoroughly.
11. Cook for 1 final minute to heat everything through, then remove from heat. Tip: For a deeper flavor, let the fried rice rest for 2 minutes before serving to allow the soy sauce to absorb.
12. Sprinkle with the 2 tsp of fragrant toasted sesame seeds and garnish with the thinly sliced green onions.
A fluffy, grain-like texture pairs with the savory soy sauce and sweet vegetable crunch. Serve it immediately in bowls, or get creative by stuffing it into lettuce wraps for a fresh, handheld meal. Leftovers reheat beautifully for a quick lunch the next day.
Lemon Garlic Shrimp Skewers
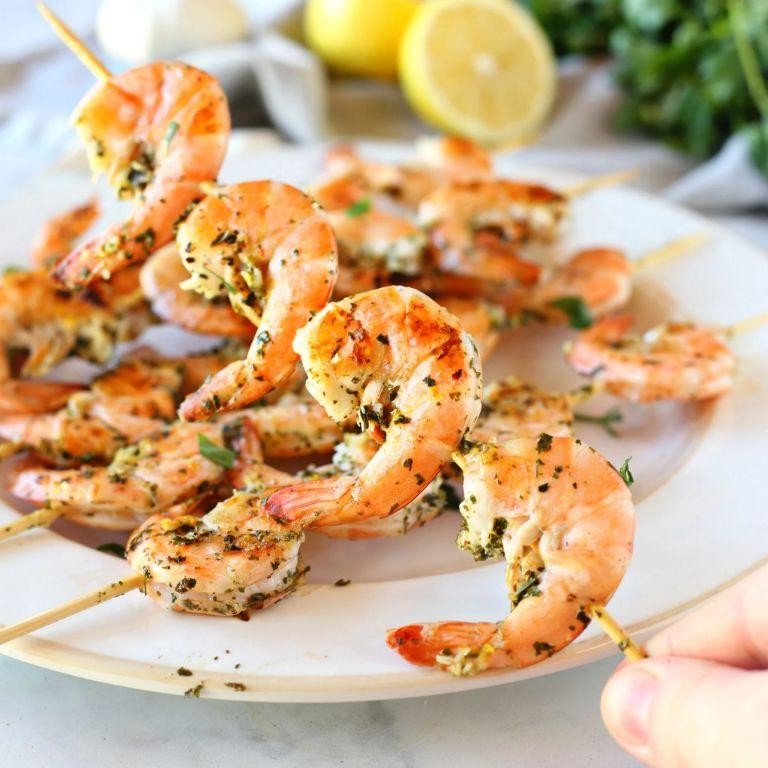
Sizzling with bright citrus and savory garlic, these Lemon Garlic Shrimp Skewers are a quick, flavorful meal perfect for weeknights or gatherings. Soak wooden skewers for 30 minutes to prevent burning. This recipe delivers juicy shrimp with minimal effort.
Serving: 4 | Pre Time: 15 minutes | Cooking Time: 10 minutes
Ingredients
– 1.5 pounds large raw shrimp, peeled and deveined
– 3 tablespoons rich extra virgin olive oil
– 4 cloves fresh garlic, finely minced
– Zest and juice of 2 large, juicy lemons
– 1 teaspoon coarse kosher salt
– 1/2 teaspoon freshly cracked black pepper
– 1 tablespoon finely chopped fresh parsley
– 8 wooden skewers, soaked
Instructions
1. Soak 8 wooden skewers in water for 30 minutes to prevent burning on the grill.
2. In a medium bowl, whisk together 3 tablespoons rich extra virgin olive oil, 4 cloves finely minced fresh garlic, zest and juice of 2 large juicy lemons, 1 teaspoon coarse kosher salt, and 1/2 teaspoon freshly cracked black pepper.
3. Pat 1.5 pounds large raw shrimp dry with paper towels to ensure the marinade sticks.
4. Add the dried shrimp to the marinade bowl, tossing to coat evenly.
5. Thread 4-5 marinated shrimp onto each soaked wooden skewer.
6. Preheat a grill or grill pan to medium-high heat (400°F).
7. Place the shrimp skewers on the hot grill.
8. Grill for 2-3 minutes per side until shrimp turn pink and opaque, flipping once.
9. Remove skewers from the grill and sprinkle with 1 tablespoon finely chopped fresh parsley.
Keep the shrimp moving on the grill to avoid overcooking—they cook quickly. The result is tender, succulent shrimp with a vibrant lemon-garlic punch. Serve over fluffy rice or with a crisp green salad for a complete meal.
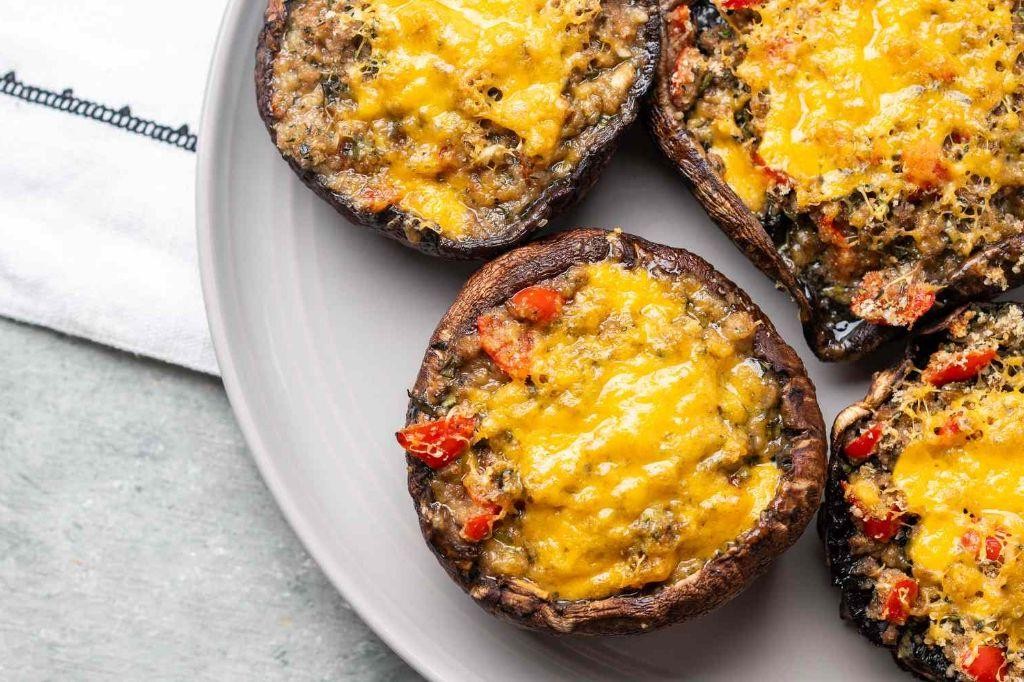
Grilled Portobello Mushrooms with Cheese
Ready for a satisfying meatless meal? Grilled portobello mushrooms with cheese deliver smoky, savory flavor with minimal effort. These hearty caps become tender and juicy on the grill, perfect for a quick dinner or impressive side.
Serving: 4 | Pre Time: 10 minutes | Cooking Time: 15 minutes
Ingredients
– 4 large, meaty portobello mushroom caps
– 3 tbsp rich extra virgin olive oil
– 2 cloves fragrant garlic, minced
– 1 tsp coarse kosher salt
– ½ tsp freshly cracked black pepper
– 1 cup shredded sharp cheddar cheese
– 2 tbsp finely chopped fresh parsley
Instructions
1. Preheat your grill to medium-high heat, about 400°F.
2. Gently wipe the 4 large, meaty portobello mushroom caps with a damp paper towel to clean them.
3. Remove the stems from the mushroom caps using a small knife.
4. In a small bowl, whisk together 3 tbsp rich extra virgin olive oil, 2 cloves minced fragrant garlic, 1 tsp coarse kosher salt, and ½ tsp freshly cracked black pepper.
5. Brush both sides of each mushroom cap generously with the olive oil mixture.
6. Place the mushroom caps gill-side down on the preheated grill.
7. Grill for 6-8 minutes until the caps release easily and have prominent grill marks.
8. Flip the mushroom caps carefully using tongs.
9. Divide 1 cup shredded sharp cheddar cheese evenly among the caps, filling the gill side.
10. Close the grill lid and cook for 4-5 minutes until the cheese is fully melted and bubbly.
11. Transfer the grilled mushrooms to a serving plate using a spatula.
12. Sprinkle with 2 tbsp finely chopped fresh parsley.
Velvety melted cheese contrasts with the firm, smoky mushroom flesh. Serve these immediately on toasted buns for a vegetarian burger, or slice and add to salads for extra heft.
Avocado Chicken Salad
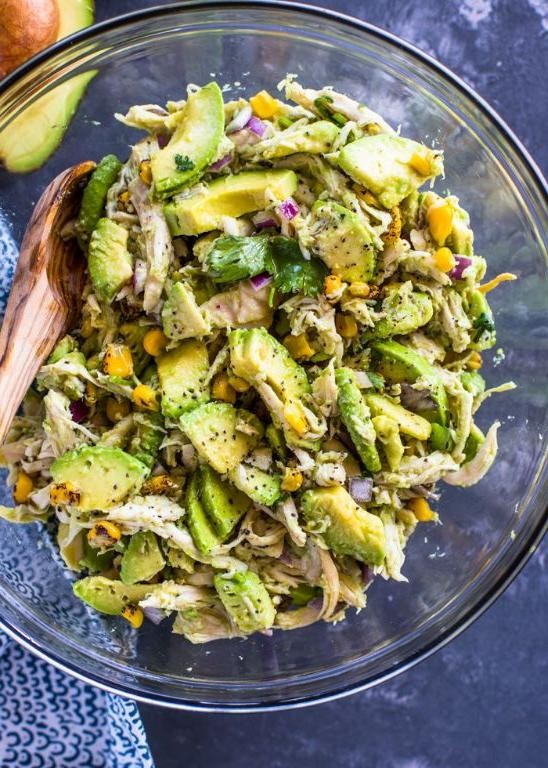
This avocado chicken salad delivers a creamy, protein-packed meal without the mayo. Toss it together in minutes for a fresh lunch or light dinner. The bright lime and cilantro keep it lively.
Serving: 4 | Pre Time: 15 minutes | Cooking Time: 0 minutes
Ingredients
– 2 cups shredded cooked chicken breast
– 2 ripe Hass avocados
– 1/4 cup finely chopped red onion
– 1/4 cup chopped fresh cilantro
– 2 tbsp fresh lime juice
– 1/2 tsp kosher salt
– 1/4 tsp freshly ground black pepper
– 4 large butter lettuce leaves
Instructions
1. Place 2 cups shredded cooked chicken breast in a large mixing bowl.
2. Halve 2 ripe Hass avocados and remove the pits.
3. Scoop the avocado flesh directly into the bowl with the chicken.
4. Immediately add 2 tbsp fresh lime juice to the bowl to prevent avocado browning.
5. Mash the avocado and chicken together with a fork until creamy but still slightly chunky.
6. Stir in 1/4 cup finely chopped red onion and 1/4 cup chopped fresh cilantro.
7. Season the mixture with 1/2 tsp kosher salt and 1/4 tsp freshly ground black pepper.
8. Fold all ingredients together until evenly combined.
9. Arrange 4 large butter lettuce leaves on a serving platter.
10. Spoon the avocado chicken salad evenly onto each lettuce leaf.
Fresh avocado creates a luxuriously creamy base that clings to every shred of chicken. For a crunchier version, add diced celery or serve it in toasted whole-wheat pitas.
Bacon Wrapped Asparagus
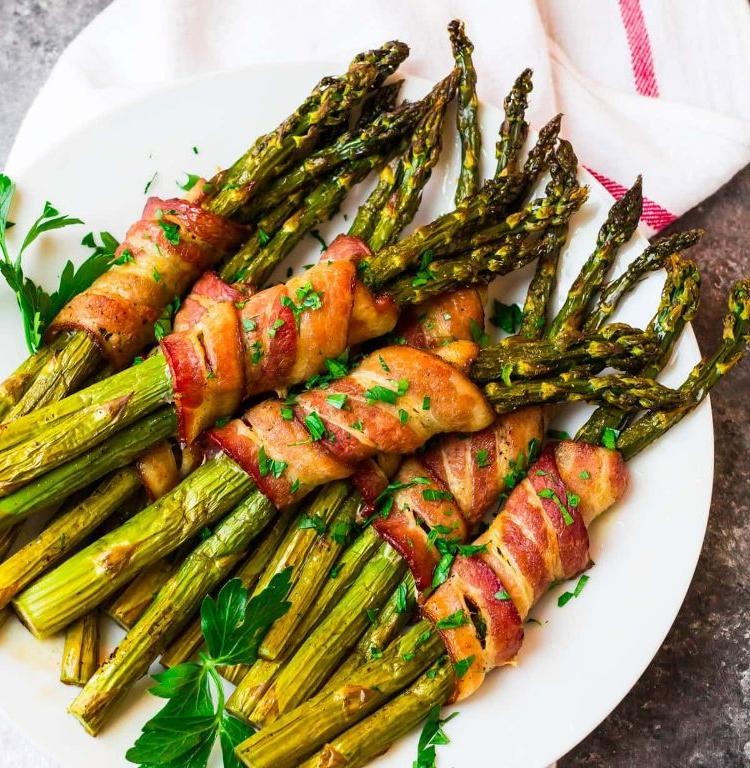
You’ll love this savory side that’s perfect for any gathering. Crisp asparagus gets wrapped in smoky bacon for a simple yet impressive bite. It’s a crowd-pleaser that comes together in minutes.
Serving: 4 | Pre Time: 10 minutes | Cooking Time: 20 minutes
Ingredients
– 1 pound fresh, crisp asparagus spears
– 8 slices thick-cut, smoky bacon
– 2 tablespoons rich extra virgin olive oil
– 1 teaspoon coarse sea salt
– ½ teaspoon freshly cracked black pepper
– 1 tablespoon pure maple syrup
Instructions
1. Preheat your oven to 400°F and line a rimmed baking sheet with parchment paper.
2. Trim the tough ends from the fresh, crisp asparagus spears by snapping them off where they naturally break.
3. Divide the asparagus into 8 equal bundles, each with 3–4 spears.
4. Wrap one slice of thick-cut, smoky bacon tightly around the middle of each asparagus bundle, slightly overlapping the ends.
5. Place the wrapped bundles seam-side down on the prepared baking sheet, spacing them 1 inch apart.
6. Drizzle the bundles with 2 tablespoons of rich extra virgin olive oil, ensuring each is lightly coated.
7. Sprinkle evenly with 1 teaspoon of coarse sea salt and ½ teaspoon of freshly cracked black pepper.
8. Roast in the preheated oven for 15 minutes, until the bacon starts to crisp and render fat.
9. Remove the sheet from the oven and brush each bundle with 1 tablespoon of pure maple syrup for a glossy finish.
10. Return to the oven and roast for an additional 5 minutes, until the bacon is fully crispy and the asparagus is tender-crisp.
11. Let cool on the sheet for 2–3 minutes before serving to allow the bacon to set.
Flaky, salty bacon gives way to tender, slightly sweet asparagus with a hint of maple caramelization. Serve these bundles warm as an appetizer or alongside grilled steak for a complete meal—their smoky aroma will have everyone reaching for more.
Roasted Cauliflower Tabbouleh
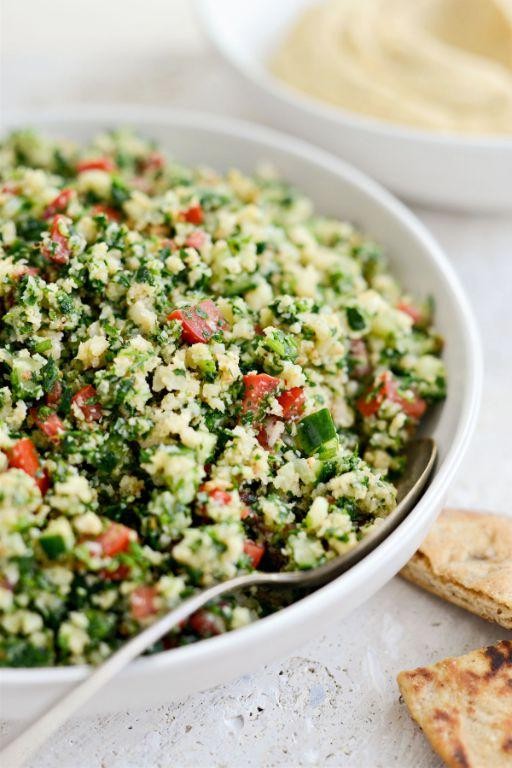
Hearty roasted cauliflower transforms this classic Middle Eastern salad into a satisfying main. Toss charred florets with bright parsley, mint, and a zesty lemon dressing for a fresh, filling meal. It’s a vibrant, veggie-packed dish that comes together quickly.
Serving: 4 | Pre Time: 15 minutes | Cooking Time: 25 minutes
Ingredients
– 1 large head of cauliflower, cut into bite-sized florets
– 3 tablespoons rich extra virgin olive oil, divided
– 1 teaspoon coarse kosher salt, divided
– ½ teaspoon freshly cracked black pepper
– 1 cup finely chopped fresh curly parsley
– ½ cup finely chopped fresh mint leaves
– ½ cup finely diced ripe red tomato
– ¼ cup finely diced crisp red onion
– ⅓ cup plump, cooked quinoa, cooled
– 3 tablespoons freshly squeezed lemon juice
Instructions
1. Preheat your oven to 425°F (220°C) and line a large, rimmed baking sheet with parchment paper.
2. In a large bowl, toss the cauliflower florets with 2 tablespoons of the extra virgin olive oil, ½ teaspoon of the coarse kosher salt, and the freshly cracked black pepper until evenly coated.
3. Spread the cauliflower in a single layer on the prepared baking sheet. Roast for 20-25 minutes, flipping the florets halfway through, until they are tender and have deep golden-brown edges.
4. While the cauliflower roasts, combine the finely chopped fresh curly parsley, finely chopped fresh mint leaves, finely diced ripe red tomato, finely diced crisp red onion, and plump, cooked quinoa in your serving bowl.
5. In a small bowl, whisk together the remaining 1 tablespoon of extra virgin olive oil, the freshly squeezed lemon juice, and the remaining ½ teaspoon of coarse kosher salt to create the dressing.
6. Once the cauliflower is roasted, let it cool for 5 minutes to prevent wilting the herbs.
7. Add the slightly cooled roasted cauliflower to the bowl with the herb and quinoa mixture.
8. Pour the lemon-olive oil dressing over everything in the bowl.
9. Gently toss all ingredients together until the cauliflower and herbs are evenly coated with the dressing.
10. Let the tabbouleh sit for 10 minutes before serving to allow the flavors to meld.
Delightfully textured, this salad offers a crunch from the roasted cauliflower against the soft herbs and quinoa. The charred, nutty florets balance the bright, lemony dressing and fresh mint. Serve it scooped into butter lettuce cups for a light lunch or alongside grilled chicken for a more substantial dinner.
Zoodles with Garlic Butter Shrimp
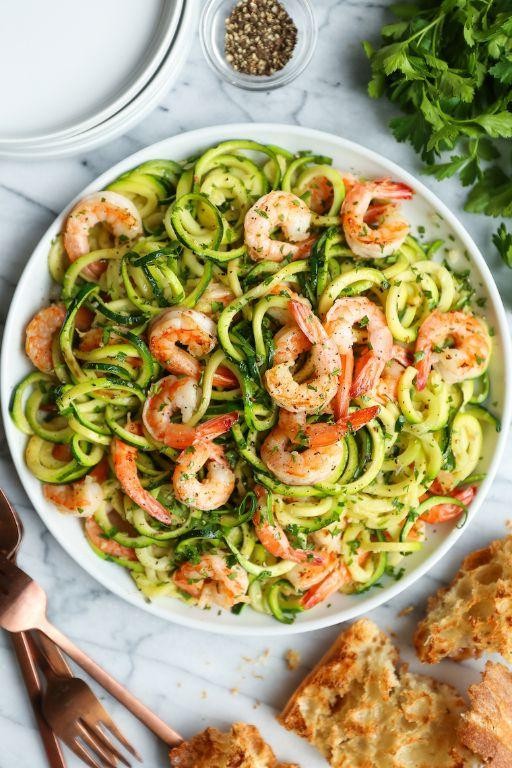
Vibrant zucchini noodles and plump shrimp come together in this quick, satisfying meal that’s ready in under 30 minutes. Garlic butter coats every strand, making it a flavorful weeknight winner that feels indulgent yet light.
Serving: 2 | Pre Time: 15 minutes | Cooking Time: 10 minutes
Ingredients
– 2 medium firm zucchini, spiralized into noodles
– 1 pound large raw shrimp, peeled and deveined
– 3 tablespoons unsalted butter, divided
– 4 cloves fresh garlic, minced
– 1 tablespoon rich extra virgin olive oil
– 1 tablespoon freshly squeezed lemon juice
– 1/4 cup finely chopped fresh parsley
– 1/2 teaspoon coarse kosher salt
– 1/4 teaspoon finely ground black pepper
– 1/4 teaspoon crushed red pepper flakes
Instructions
1. Pat the raw shrimp completely dry with paper towels to ensure a good sear.
2. Season the shrimp evenly with coarse kosher salt and finely ground black pepper.
3. Heat a large skillet over medium-high heat and add 1 tablespoon of rich extra virgin olive oil.
4. Add the shrimp to the hot skillet in a single layer, cooking for 1–2 minutes per side until opaque and lightly browned.
5. Transfer the cooked shrimp to a clean plate and set aside.
6. Reduce the skillet heat to medium and melt 2 tablespoons of unsalted butter.
7. Add the minced fresh garlic and crushed red pepper flakes, sautéing for 30–45 seconds until fragrant but not browned.
8. Add the spiralized zucchini noodles to the skillet, tossing to coat in the garlic butter.
9. Cook the zoodles for 2–3 minutes, stirring frequently, until just tender but still al dente—overcooking makes them watery.
10. Return the cooked shrimp to the skillet with the zoodles.
11. Add the remaining 1 tablespoon of unsalted butter and freshly squeezed lemon juice, tossing everything to combine and warm through.
12. Remove the skillet from the heat and stir in the finely chopped fresh parsley.
13. Taste and adjust seasoning with an extra pinch of salt if needed.
Hearty yet light, the zoodles have a pleasant bite while soaking up the garlicky, buttery sauce. Serve immediately with a sprinkle of extra red pepper flakes for heat, or top with grated Parmesan for a richer finish.
Keto Beef Lettuce Wraps
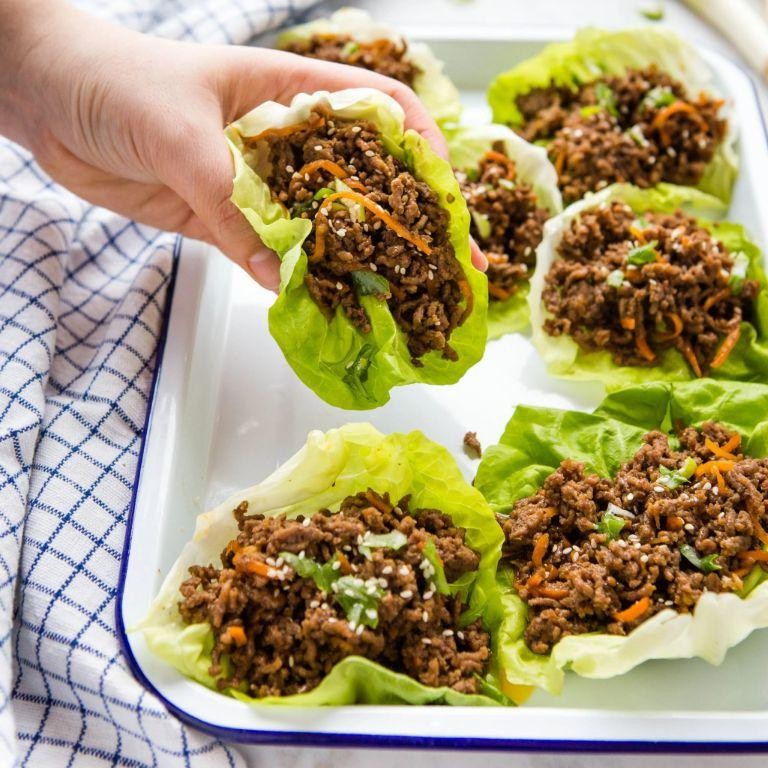
Bold flavors meet low-carb satisfaction in these keto beef lettuce wraps. They’re perfect for quick lunches or light dinners when you want something satisfying without the carbs. The savory beef filling pairs perfectly with crisp lettuce cups for a fresh, handheld meal.
Serving: 4 | Pre Time: 10 minutes | Cooking Time: 15 minutes
Ingredients
– 1 lb grass-fed ground beef
– 1 tbsp rich extra virgin olive oil
– ½ cup finely diced yellow onion
– 3 cloves fresh garlic, minced
– 1 tbsp freshly grated ginger
– ¼ cup naturally brewed soy sauce
– 1 tbsp smooth rice vinegar
– 1 tsp toasted sesame oil
– ½ tsp finely ground black pepper
– 8 large, crisp butter lettuce leaves
– 2 thinly sliced green onions for garnish
– 1 tbsp toasted sesame seeds for garnish
Instructions
1. Heat the rich extra virgin olive oil in a large skillet over medium-high heat until shimmering.
2. Add the finely diced yellow onion and cook for 3-4 minutes until softened and translucent.
3. Add the fresh garlic, minced and freshly grated ginger, stirring constantly for 30 seconds until fragrant.
4. Crumble in the grass-fed ground beef, breaking it up with a spatula as it cooks.
5. Cook the beef for 6-8 minutes, stirring occasionally, until fully browned and no pink remains.
6. Pour in the naturally brewed soy sauce, smooth rice vinegar, toasted sesame oil, and finely ground black pepper.
7. Stir the mixture thoroughly to combine all ingredients, then reduce heat to low and simmer for 2 minutes to let flavors meld.
8. While the beef simmers, rinse the large, crisp butter lettuce leaves under cold water and pat completely dry with paper towels.
9. Spoon the warm beef mixture evenly into the center of each butter lettuce leaf.
10. Garnish each wrap with thinly sliced green onions and toasted sesame seeds.
11. Serve immediately while the beef is still warm and the lettuce remains crisp.
Generously filled wraps offer a satisfying crunch from the lettuce against the savory, umami-rich beef. The toasted sesame seeds add subtle nuttiness while the green onions provide fresh contrast. For a creative twist, add a dollop of spicy mayo or serve with quick-pickled vegetables on the side.
Spinach and Feta Stuffed Chicken Breasts
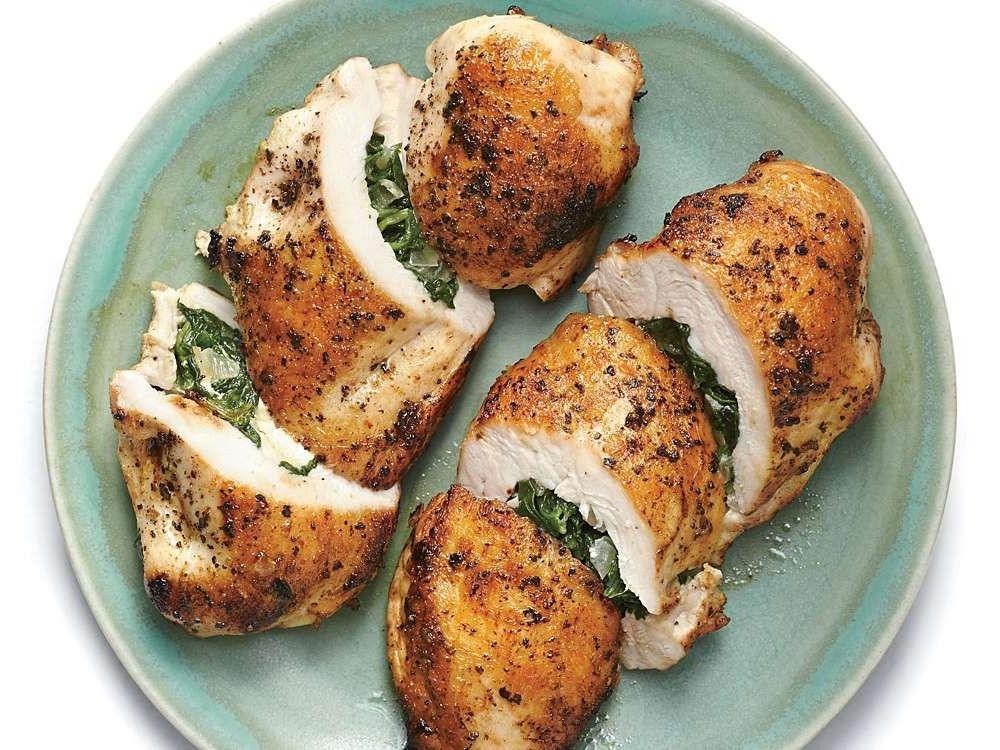
Elevate your weeknight dinner with this elegant yet approachable dish. Tender chicken breasts cradle a vibrant spinach and feta filling, creating a meal that’s both impressive and surprisingly simple to prepare. The result is a juicy, flavorful main course perfect for any occasion.
Serving: 4 | Pre Time: 15 minutes | Cooking Time: 25 minutes
Ingredients
– 4 boneless, skinless chicken breasts (about 6 oz each)
– 5 oz fresh baby spinach leaves
– 4 oz crumbled feta cheese
– 2 cloves garlic, minced
– 1 tbsp rich extra virgin olive oil
– 1 tsp dried oregano
– 1/2 tsp kosher salt
– 1/4 tsp freshly ground black pepper
– 1 tbsp all-purpose flour
Instructions
1. Preheat your oven to 400°F.
2. Pat the chicken breasts completely dry with paper towels.
3. Create a pocket in each chicken breast by slicing horizontally through the thickest part, stopping 1/2 inch from the opposite edge.
4. Heat the extra virgin olive oil in a large oven-safe skillet over medium-high heat.
5. Add the fresh baby spinach and minced garlic to the skillet.
6. Sauté for 2-3 minutes until the spinach is wilted and the garlic is fragrant.
7. Transfer the spinach mixture to a bowl and let it cool for 5 minutes.
8. Stir the crumbled feta cheese, dried oregano, kosher salt, and black pepper into the cooled spinach mixture.
9. Evenly divide the spinach-feta filling among the four chicken breast pockets.
10. Secure each pocket closed with 2-3 toothpicks.
11. Lightly dust both sides of each stuffed chicken breast with all-purpose flour.
12. Place the chicken breasts in the same skillet over medium-high heat.
13. Sear for 3-4 minutes per side until golden brown.
14. Transfer the skillet directly to the preheated oven.
15. Bake for 15-18 minutes until the internal temperature reaches 165°F.
16. Remove from oven and let rest for 5 minutes before serving.
Delightfully juicy chicken contrasts with the creamy, tangy filling in every bite. The spinach adds a fresh, earthy note that balances the rich feta perfectly. For a complete meal, serve alongside roasted potatoes or a simple arugula salad dressed with lemon vinaigrette.
Cabbage and Sausage Skillet
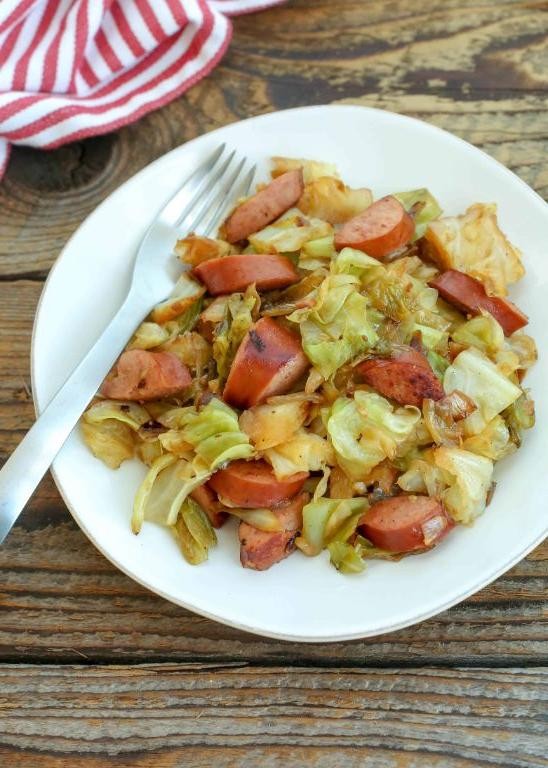
This hearty one-pan meal transforms humble ingredients into a satisfying dinner. Tender cabbage caramelizes alongside smoky sausage for a dish that’s both comforting and quick to prepare.
Serving: 4 | Pre Time: 10 minutes | Cooking Time: 25 minutes
Ingredients
– 1 lb smoked kielbasa sausage, sliced into ½-inch coins
– 1 medium head green cabbage, cored and thinly sliced
– 1 large yellow onion, thinly sliced
– 2 cloves garlic, minced
– 2 tbsp rich extra virgin olive oil
– 1 tsp smoked paprika
– ½ tsp freshly ground black pepper
– ½ cup low-sodium chicken broth
– 1 tbsp apple cider vinegar
– 2 tbsp chopped fresh parsley
Instructions
1. Heat the rich extra virgin olive oil in a large cast-iron skillet over medium-high heat until shimmering.
2. Add the sliced smoked kielbasa sausage and cook for 5–6 minutes, stirring occasionally, until browned on both sides. Remove sausage with a slotted spoon and set aside.
3. In the same skillet, add the thinly sliced yellow onion. Cook for 4–5 minutes, stirring frequently, until softened and translucent.
4. Add the minced garlic and cook for 1 minute, stirring constantly, until fragrant.
5. Add the thinly sliced green cabbage to the skillet. Cook for 8–10 minutes, stirring every 2–3 minutes, until the cabbage wilts and begins to brown at the edges.
6. Stir in the smoked paprika and freshly ground black pepper, coating the cabbage evenly.
7. Pour in the low-sodium chicken broth and apple cider vinegar, scraping up any browned bits from the bottom of the skillet.
8. Return the browned sausage to the skillet, stirring to combine. Reduce heat to medium-low, cover, and simmer for 10 minutes until the cabbage is tender and the liquid is mostly absorbed.
9. Remove from heat and stir in the chopped fresh parsley.
Dishes like this develop deep, savory flavors as the cabbage softens and soaks up the smoky sausage juices. Serve it directly from the skillet over a bed of creamy mashed potatoes or with crusty bread to soak up the pan sauce.
Conclusion
Just like that, you’ve got 27 tasty low-carb recipes to keep healthy eating exciting! We hope this roundup inspires your kitchen adventures. Give a few a try, then drop a comment below to tell us your favorite. If you found this helpful, we’d be so grateful if you’d share it on Pinterest to help other home cooks. Happy cooking!


