Oh, the humble cucumber—so much more than just salad filler! Whether you’re craving quick weeknight dinners, light seasonal favorites, or creative twists on comfort food, this crisp, hydrating veggie is your go-to. From zesty dips to refreshing mains, we’ve gathered 33 irresistible cucumber recipes that’ll brighten any meal. Ready to get inspired? Dive in and discover your new favorite dish!
Cucumber and Mint Salad

After a long summer day at the farmers market, I found myself drawn to the crispest cucumbers and most fragrant mint—the perfect inspiration for this refreshing salad that has become my go-to side dish for everything from backyard barbecues to elegant dinner parties. There’s something magical about how these simple ingredients come together to create such a vibrant, cooling dish that always impresses guests while being incredibly easy to prepare.
Ingredients
– 2 large English cucumbers, thinly sliced into ¼-inch rounds
– ½ cup fresh mint leaves, chiffonade-cut
– ¼ cup extra virgin olive oil
– 2 tablespoons freshly squeezed lemon juice
– 1 teaspoon fine sea salt
– ½ teaspoon freshly cracked black pepper
– ¼ cup crumbled feta cheese
– 2 tablespoons toasted pine nuts
Instructions
1. Wash and thoroughly dry 2 large English cucumbers, then slice them into uniform ¼-inch rounds using a mandoline for consistent thickness.
2. Stack fresh mint leaves and roll them tightly before making fine chiffonade cuts with a sharp chef’s knife to prevent bruising.
3. In a large mixing bowl, whisk together ¼ cup extra virgin olive oil and 2 tablespoons freshly squeezed lemon juice until emulsified, about 30 seconds of vigorous whisking.
4. Add 1 teaspoon fine sea salt and ½ teaspoon freshly cracked black pepper to the dressing mixture, whisking for an additional 15 seconds to fully incorporate.
5. Gently fold the cucumber rounds into the dressing using a rubber spatula, ensuring each slice is lightly coated without crushing the delicate flesh.
6. Sprinkle the chiffonade-cut mint leaves over the dressed cucumbers and toss with two forks to distribute evenly throughout the salad.
7. Transfer the salad to a serving platter, arranging the cucumbers in an overlapping circular pattern for visual appeal.
8. Evenly distribute ¼ cup crumbled feta cheese across the top of the arranged salad, allowing some to fall between the cucumber layers.
9. Toast 2 tablespoons pine nuts in a dry skillet over medium heat for 2-3 minutes until golden brown, then immediately sprinkle over the completed salad. Every bite delivers an incredible textural contrast—the cool crispness of cucumbers against the creamy feta and crunchy pine nuts creates a symphony in your mouth. I love serving this alongside grilled fish or as a bright counterpoint to rich, spicy dishes, where the mint really shines through and cleanses the palate between bites.
Creamy Cucumber Yogurt Dip
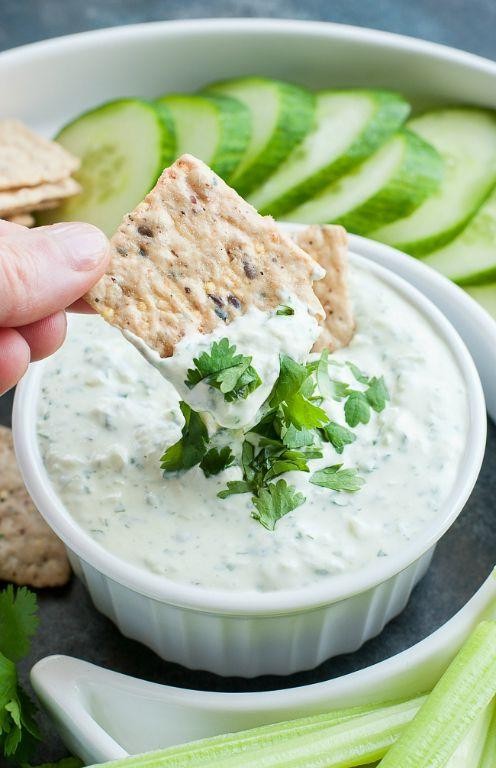
Recently, I found myself with an abundance of garden cucumbers and that familiar summer dilemma—what to make that’s refreshing yet substantial enough for gatherings. This creamy cucumber yogurt dip became my go-to solution after a particularly hot afternoon when nothing but cool, tangy flavors would satisfy. Let me share how this simple combination transformed my approach to warm-weather entertaining.
Ingredients
- 2 medium English cucumbers, finely grated and thoroughly drained
- 1 ½ cups full-fat Greek yogurt
- 3 tablespoons extra virgin olive oil
- 2 tablespoons freshly squeezed lemon juice
- 2 garlic cloves, microplaned
- ¼ cup fresh dill fronds, finely minced
- 1 teaspoon fine sea salt
- ½ teaspoon freshly cracked black pepper
Instructions
- Place a box grater over a large mixing bowl and grate both English cucumbers using the fine shredding side.
- Transfer the grated cucumber to a clean cheesecloth or fine-mesh strainer, then press firmly to extract excess liquid until the cucumber pulp feels dry to the touch—this prevents a watery dip.
- In a separate medium bowl, combine the full-fat Greek yogurt, extra virgin olive oil, and freshly squeezed lemon juice, whisking vigorously until the emulsion appears smooth and fully incorporated.
- Microplane the garlic cloves directly into the yogurt mixture to distribute flavor evenly while avoiding large chunks.
- Add the thoroughly drained cucumber pulp to the yogurt base, folding gently with a spatula to maintain texture.
- Incorporate the finely minced fresh dill fronds, fine sea salt, and freshly cracked black pepper, mixing until all components are uniformly distributed.
- Cover the bowl tightly with plastic wrap, ensuring it touches the dip’s surface to prevent oxidation, and refrigerate for exactly 2 hours to allow flavors to meld.
- Stir the chilled dip once more before serving to redistribute any separated liquids.
Last night, I served this alongside pita chips and radish slices—the cool creaminess against the garlic’s sharpness made everyone reach for seconds. What surprised me most was how the dip thickened beautifully in the fridge, developing an almost spreadable consistency perfect for smearing on grilled flatbreads or as a bed for spiced shrimp.
Spicy Asian Cucumber Salad
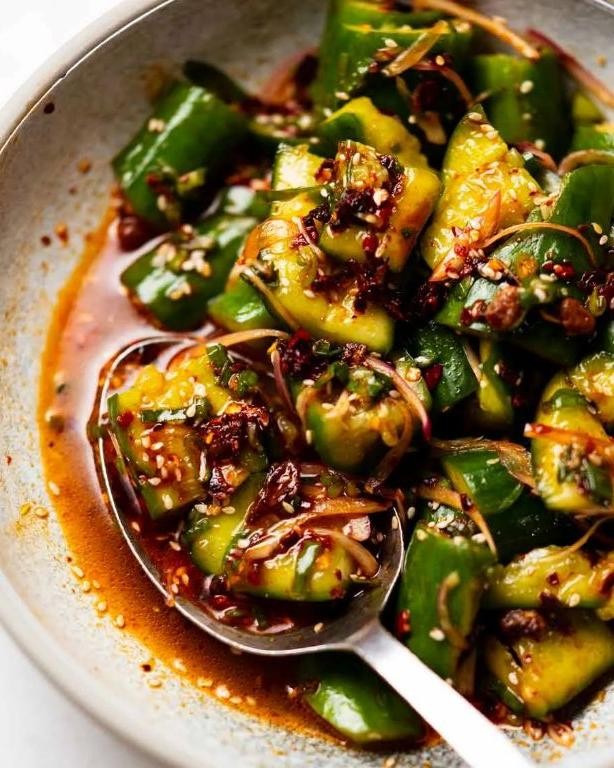
My love affair with spicy Asian cucumber salad began during a sweltering summer farmers’ market visit, where a vendor handed me a sample that instantly cooled my palate while waking up my taste buds. Perfect for those days when you crave something refreshing yet bold, this dish has become my go-to for potlucks and weeknight dinners alike—it’s the kind of recipe that makes people ask for seconds before they’ve finished their first bite.
Ingredients
– 2 large English cucumbers, thinly sliced into 1/8-inch rounds
– 1 tablespoon fine sea salt
– 3 tablespoons unseasoned rice vinegar
– 2 tablespoons toasted sesame oil
– 1 tablespoon gochugaru (Korean red pepper flakes)
– 2 teaspoons freshly grated ginger root
– 1 teaspoon granulated sugar
– 2 cloves garlic, microplaned
– 1 tablespoon toasted sesame seeds
– 2 scallions, thinly sliced on bias
Instructions
1. Place cucumber slices in a large colander and sprinkle evenly with fine sea salt.
2. Toss cucumbers gently to distribute salt, then let rest for 15 minutes to draw out excess moisture.
3. Meanwhile, in a medium mixing bowl, whisk together unseasoned rice vinegar, toasted sesame oil, gochugaru, freshly grated ginger root, granulated sugar, and microplaned garlic until fully emulsified.
4. Rinse salted cucumbers under cold running water for 30 seconds to remove excess salt.
5. Pat cucumbers completely dry using a clean kitchen towel or paper towels, ensuring no moisture remains.
6. Transfer dried cucumbers to the bowl with dressing and toss thoroughly to coat every slice.
7. Fold in toasted sesame seeds and bias-cut scallions until evenly distributed throughout the salad.
8. Refrigerate salad for exactly 20 minutes to allow flavors to meld and cucumbers to slightly soften while remaining crisp. Perfectly balanced between spicy, tangy, and refreshing, this salad offers a satisfying crunch that holds up beautifully against the complex dressing. I love serving it alongside grilled meats or spooning it over steamed rice for a quick vegetarian meal—the contrast between cool cucumbers and fiery gochugaru creates an addictive tension that keeps you coming back for more.
Cucumber and Avocado Sushi Roll
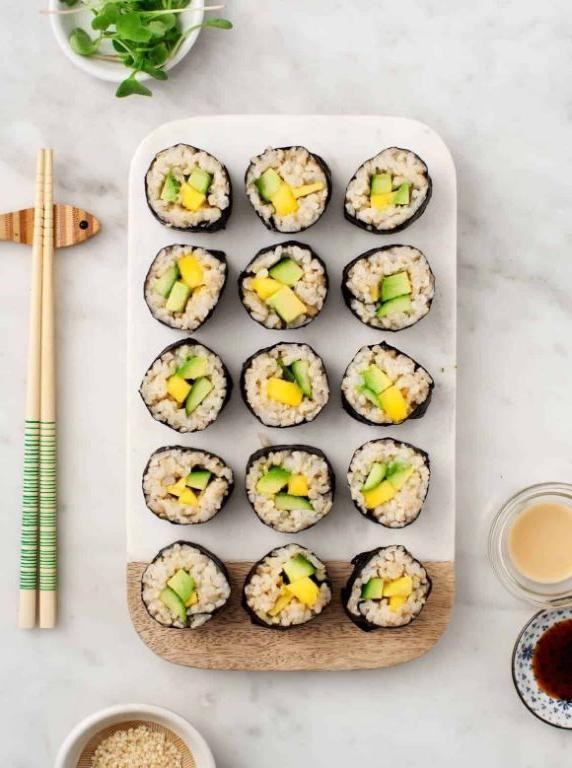
Sometimes the most satisfying meals come from the simplest combinations, and that’s exactly what I discovered when I first made these cucumber and avocado sushi rolls during a sweltering summer afternoon. I was craving something light yet substantial, and this vibrant, no-cook recipe quickly became my go-to for quick lunches and impressive appetizers. Now, I love preparing these rolls on my bamboo mat while sharing stories with friends in the kitchen—it turns meal prep into a joyful, communal experience.
Ingredients
- 1 cup sushi rice, rinsed until water runs clear
- 1 ¼ cups filtered water
- 2 tablespoons rice vinegar
- 1 teaspoon organic cane sugar
- ½ teaspoon fine sea salt
- 4 sheets nori seaweed
- 1 ripe Hass avocado, sliced into ¼-inch thick strips
- 1 English cucumber, julienned into 3-inch matchsticks
- 2 tablespoons toasted sesame seeds
- ¼ cup tamari (for serving)
- 1 teaspoon wasabi paste (for serving)
- 2 tablespoons pickled ginger (for serving)
Instructions
- Combine the rinsed sushi rice and filtered water in a heavy-bottomed saucepan, then bring to a boil over high heat.
- Immediately reduce the heat to low, cover the saucepan tightly, and simmer the rice for 18 minutes until all liquid is absorbed. Tip: Resist lifting the lid during cooking to prevent steam escape, which ensures perfectly tender grains.
- Remove the saucepan from the heat and let the rice stand, covered, for 10 minutes to finish steaming.
- Transfer the cooked rice to a large, non-metallic bowl and gently fold in the rice vinegar, organic cane sugar, and fine sea salt using a slicing motion with a rice paddle. Tip: Fan the rice while mixing to cool it rapidly and achieve the ideal glossy, slightly sticky texture.
- Lay one nori sheet shiny-side down on a bamboo sushi mat, then evenly spread ¾ cup of seasoned rice over the nori, leaving a 1-inch border at the top edge.
- Arrange one-quarter of the avocado strips and julienned cucumber horizontally across the center of the rice.
- Sprinkle ½ tablespoon of toasted sesame seeds evenly over the fillings.
- Lift the edge of the bamboo mat closest to you, then roll the nori and rice over the fillings, applying gentle pressure to form a tight cylinder. Tip: Moisten the bare nori border with a dab of water before completing the roll to seal it securely.
- Repeat steps 5 through 8 with the remaining ingredients to create three additional rolls.
- Use a sharp, wet knife to slice each roll into 8 even pieces, wiping the blade clean between cuts for neat edges.
- Arrange the sushi pieces on a platter and serve immediately with tamari, wasabi paste, and pickled ginger. Just sliced, these rolls reveal a stunning mosaic of creamy avocado and crisp cucumber against the seasoned rice. The contrast between the cool, refreshing fillings and the nutty sesame seeds makes each bite incredibly satisfying, especially when paired with a dab of spicy wasabi. For a creative twist, try serving them alongside miso soup or topping with microgreens for an extra burst of color and freshness.
Tzatziki Stuffed Cucumbers
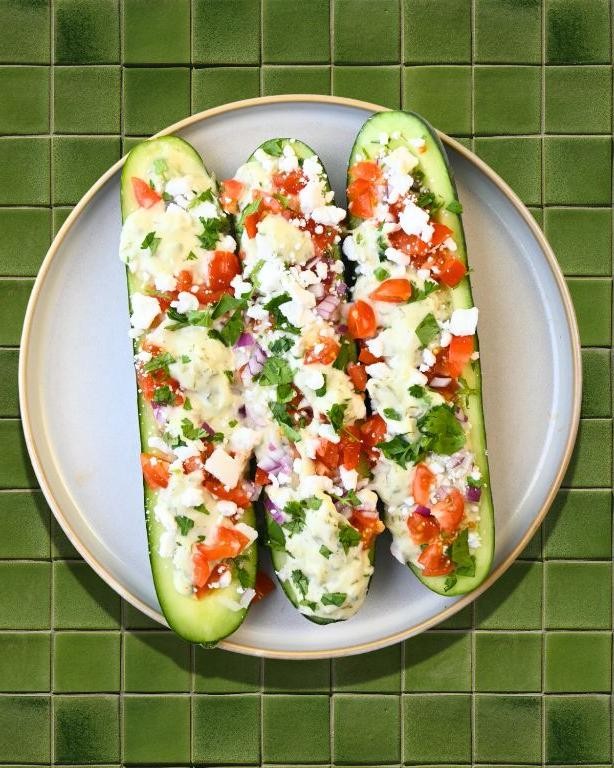
Tzatziki stuffed cucumbers are my go-to summer appetizer when I want something refreshing yet impressive. I first discovered this twist on traditional tzatziki during a sweltering August picnic, where their cool crunch saved us from the heat. Now I keep these prepped in my fridge for those moments when unexpected guests drop by or I need a quick healthy snack.
Ingredients
– 4 large English cucumbers, ends trimmed
– 2 cups full-fat Greek yogurt, strained
– 3 medium garlic cloves, microplaned
– 1/4 cup extra virgin olive oil
– 2 tablespoons fresh dill fronds, finely minced
– 1 tablespoon fresh mint leaves, chiffonade-cut
– 1 teaspoon fine sea salt
– 1/2 teaspoon freshly cracked black pepper
– 1 tablespoon freshly squeezed lemon juice
Instructions
1. Cut each cucumber crosswise into 1-inch thick rounds using a sharp chef’s knife.
2. Use a melon baller to carefully hollow out the center of each cucumber round, leaving a 1/4-inch thick base at the bottom to create small cups.
3. Sprinkle the hollowed cucumber cups with 1/2 teaspoon of the sea salt and place them upside down on a wire rack set over a baking sheet to drain excess moisture for 15 minutes.
4. While cucumbers drain, combine Greek yogurt, microplaned garlic, olive oil, minced dill, chiffonade-cut mint, remaining 1/2 teaspoon sea salt, black pepper, and lemon juice in a medium mixing bowl.
5. Whisk the tzatziki mixture vigorously for 45 seconds until completely emulsified and smooth.
6. Pat the interior of each cucumber cup dry with paper towels to remove any remaining moisture.
7. Transfer the tzatziki mixture to a piping bag fitted with a large star tip for elegant presentation.
8. Pipe the tzatziki filling into each cucumber cup, creating a decorative swirl that rises slightly above the rim.
9. Arrange the stuffed cucumbers on a serving platter and refrigerate uncovered for exactly 20 minutes to allow flavors to meld while maintaining optimal texture.
But the real magic happens when you bite into these chilled delights—the crisp cucumber shell gives way to the creamy, garlicky filling that’s brightened by the fresh herbs. I love serving these on a bed of crushed ice for dramatic presentation at summer parties, or packing them in my lunchbox for a refreshing midday treat that never fails to impress.
Cucumber Lemon Detox Water
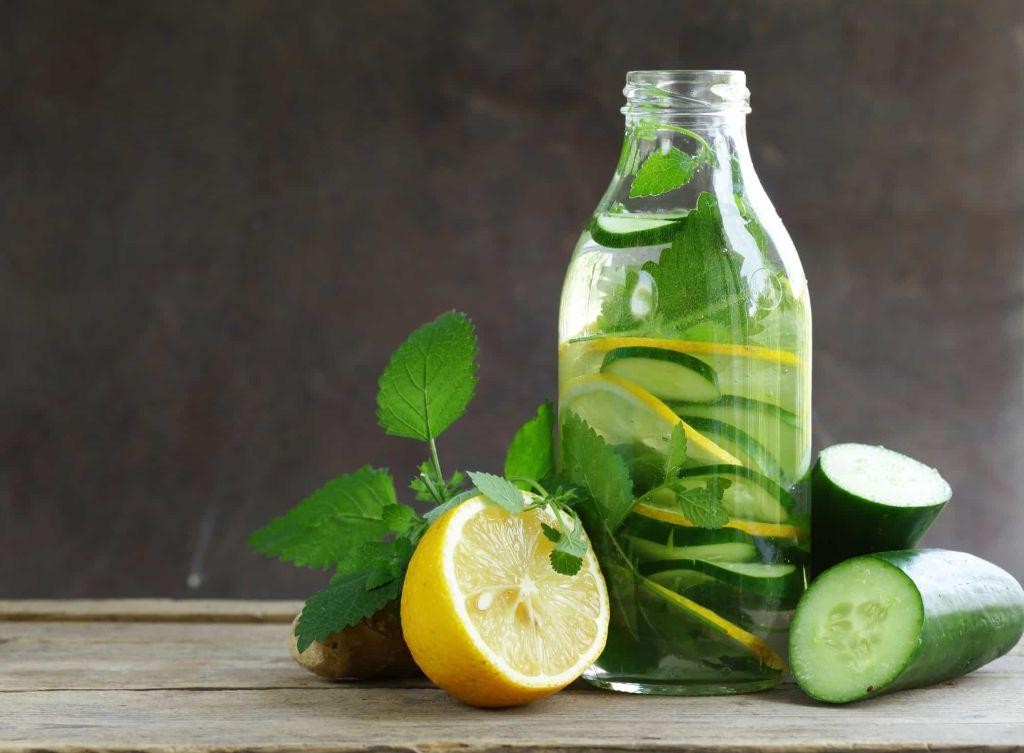
Now that summer’s heat is finally fading, I find myself craving lighter beverages that still pack a flavor punch—this cucumber lemon detox water has become my go-to afternoon refresher after long recipe testing sessions in the kitchen. Nothing beats slicing into crisp produce while the afternoon light streams through my kitchen window, transforming simple ingredients into something truly revitalizing.
Ingredients
– 1 large English cucumber, thinly sliced
– 2 medium organic lemons, thinly sliced
– 8 cups filtered water
– 10 fresh mint sprigs
– 1 tablespoon raw honey
Instructions
1. Thoroughly wash the English cucumber under cold running water to remove any wax coating.
2. Using a mandoline slicer, slice the cucumber into 1/8-inch thick rounds for maximum surface area exposure.
3. Scrub the organic lemons under warm water to remove any residue from the peel.
4. Slice the lemons into 1/4-inch thick rounds, removing any visible seeds with the tip of your knife.
5. Gently bruise the fresh mint sprigs by pressing them between your palms to release their essential oils.
6. Combine the cucumber slices, lemon rounds, and bruised mint sprigs in a 1-gallon glass pitcher.
7. Pour 8 cups of filtered water over the ingredients in the pitcher.
8. Drizzle 1 tablespoon of raw honey directly into the water mixture.
9. Stir the mixture gently with a long-handled wooden spoon for exactly 30 seconds to dissolve the honey.
10. Cover the pitcher tightly with plastic wrap and refrigerate for precisely 4 hours to allow flavors to fully infuse.
11. Strain the infused water through a fine-mesh sieve into serving glasses to remove pulp and seeds.
12. Serve immediately over fresh ice cubes made from filtered water.
Beyond just being refreshing, this detox water develops a wonderfully crisp texture with subtle herbal notes from the mint. The lemon provides a bright acidity that perfectly balances the cucumber’s clean freshness, making it ideal for serving in tall glasses garnished with extra mint sprigs during afternoon gatherings.
Cucumber Gazpacho
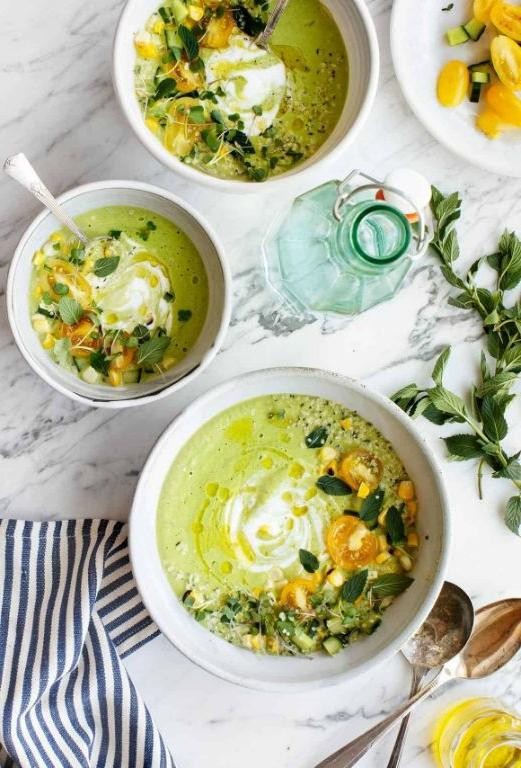
Perfect for those sweltering late summer afternoons when turning on the stove feels like a punishment, this chilled cucumber gazpacho has become my go-to for effortless elegance. I first fell for this soup during a heatwave last August, when my garden was overflowing with cucumbers and the mere thought of a hot meal was unbearable. Now, I make a big batch every Sunday to have a cool, refreshing lunch ready for the week ahead.
Ingredients
– 2 pounds English cucumbers, peeled and roughly chopped
– 1 cup plain Greek yogurt (preferably full-fat)
– 1/4 cup extra virgin olive oil, plus more for drizzling
– 2 tablespoons freshly squeezed lemon juice
– 1 small garlic clove, minced
– 1/4 cup raw almonds, toasted and finely chopped
– 1/4 cup fresh dill fronds, plus more for garnish
– 1 teaspoon fine sea salt
– 1/2 teaspoon freshly cracked black pepper
Instructions
1. Combine the peeled and roughly chopped English cucumbers, plain Greek yogurt, extra virgin olive oil, freshly squeezed lemon juice, minced garlic clove, fresh dill fronds, fine sea salt, and freshly cracked black pepper in a high-speed blender.
2. Blend the mixture on high speed for exactly 90 seconds, or until completely smooth and emulsified. (Tip: For the silkiest texture, let the blender run longer than you think necessary.)
3. Transfer the blended soup to an airtight container and refrigerate for a minimum of 4 hours, or preferably overnight, to allow the flavors to fully meld.
4. While the soup chills, place the raw almonds in a dry skillet over medium heat and toast for 4-5 minutes, shaking the pan frequently, until fragrant and lightly golden. (Tip: Toasting nuts enhances their flavor and adds a pleasant crunch to finished dishes.)
5. Allow the toasted almonds to cool completely, then finely chop them using a sharp chef’s knife.
6. Taste the chilled soup and adjust seasoning with additional fine sea salt if needed. (Tip: Cold foods often require more salt than warm dishes to achieve balanced flavor.)
7. Ladle the chilled cucumber gazpacho into serving bowls.
8. Garnish each portion with a sprinkle of the finely chopped toasted almonds, additional fresh dill fronds, and a final drizzle of extra virgin olive oil.
Just spooned into the bowl, this gazpacho delivers an incredibly smooth, almost creamy texture that belies its dairy-light base. The dominant cool cucumber flavor is brightened by the sharp lemon and punctuated by the garlic’s gentle warmth, while the toasted almonds provide essential textural contrast. For a stunning presentation, serve it in clear glass bowls and top with edible flowers from your garden alongside the standard garnishes.
Chilled Cucumber and Dill Soup
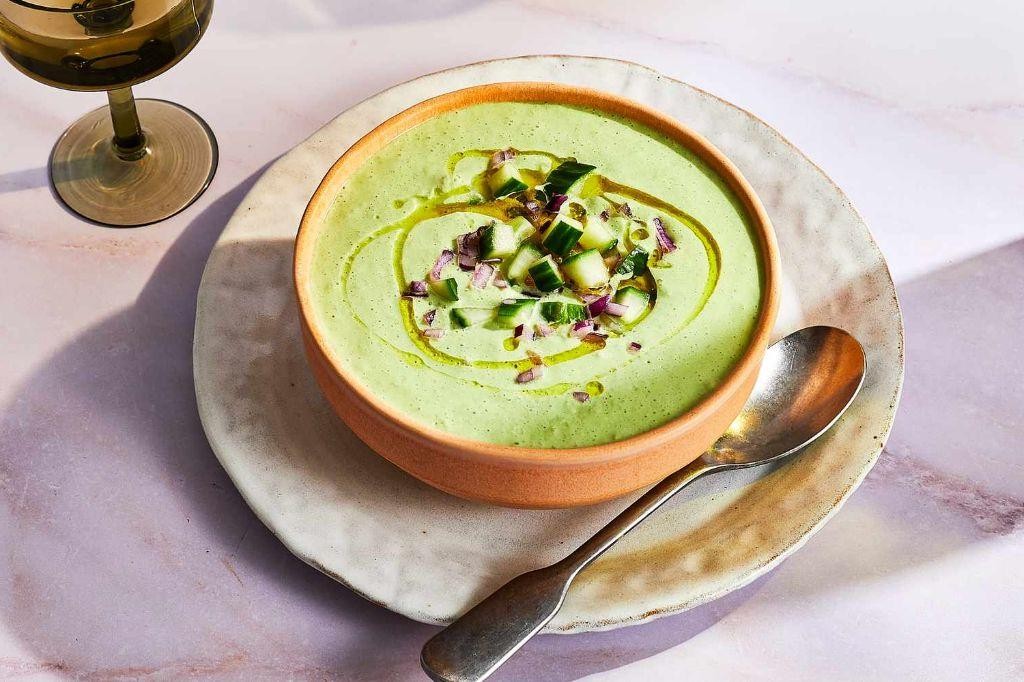
Vivid memories of my grandmother’s summer garden inspired this refreshing chilled soup—I can still picture her plucking fresh dill between the cucumber vines on hot afternoons. When temperatures climb, this becomes my go-to make-ahead dish that somehow tastes even better the next day after the flavors fully meld. There’s something magical about how these simple ingredients transform into such an elegant, cooling soup that feels both rustic and sophisticated.
Ingredients
– 2 pounds English cucumbers, peeled and roughly chopped
– 1 cup plain Greek yogurt (full-fat)
– ½ cup raw almonds, toasted and finely ground
– ¼ cup fresh dill fronds, plus additional for garnish
– 2 tablespoons extra virgin olive oil
– 1 tablespoon freshly squeezed lemon juice
– 1 small garlic clove, microplaned
– 1 teaspoon fine sea salt
– ½ teaspoon freshly cracked black pepper
– ¼ teaspoon cayenne pepper
– Ice water for adjusting consistency
Instructions
1. Combine the peeled cucumbers, Greek yogurt, ground almonds, dill fronds, olive oil, lemon juice, microplaned garlic, sea salt, black pepper, and cayenne in a high-speed blender.
2. Blend on high speed for exactly 90 seconds until completely smooth and pale green in color.
3. Taste the mixture and adjust seasoning—the salt should be pronounced since chilling dulls flavors.
4. Strain the soup through a fine-mesh sieve into a large bowl, pressing with a silicone spatula to extract maximum liquid.
5. Discard the fibrous pulp remaining in the sieve for the silkiest texture.
6. Gradually incorporate ice water, 2 tablespoons at a time, until the soup reaches your preferred pouring consistency.
7. Transfer the soup to an airtight container and refrigerate for minimum 4 hours or preferably overnight at 38°F.
8. Ladle the chilled soup into chilled bowls just before serving.
9. Garnish each portion with fresh dill fronds and a drizzle of extra virgin olive oil.
A silky, cool elegance defines this soup’s texture, with the almonds providing subtle body without heaviness. The garlic and cayenne create a gentle warmth that plays beautifully against the bright dill and cucumber notes. For an unexpected presentation, I sometimes serve it in hollowed-out cucumber cups or topped with quick-pickled radish slices for contrasting crunch.
Cucumber and Tomato Bruschetta

A perfect summer appetizer that never fails to impress, this cucumber and tomato bruschetta has become my go-to for effortless entertaining. I first discovered this refreshing twist on classic bruschetta during a sweltering August potluck, where its cool crunch stood out among heavier dishes. Now I keep the components prepped in my fridge for spontaneous gatherings or lazy afternoon snacks.
Ingredients
– 1 artisan baguette, sliced into ½-inch thick rounds
– 3 tablespoons extra-virgin olive oil, divided
– 2 medium heirloom tomatoes, seeded and finely diced
– 1 English cucumber, peeled and brunoise-cut
– ¼ cup fresh basil leaves, chiffonade-cut
– 1 tablespoon aged balsamic vinegar
– 2 cloves garlic, microplaned
– ½ teaspoon flaky sea salt
– ¼ teaspoon freshly cracked black pepper
Instructions
1. Preheat your oven to 375°F and arrange the baguette slices in a single layer on a baking sheet.
2. Brush each bread slice lightly with 2 tablespoons of extra-virgin olive oil using a pastry brush.
3. Toast the bread slices in the preheated oven for 8-10 minutes until golden brown and crisp around the edges.
4. While the bread toasts, combine the diced heirloom tomatoes and brunoise-cut English cucumber in a medium mixing bowl.
5. Add the chiffonade-cut basil, microplaned garlic, remaining 1 tablespoon of olive oil, and aged balsamic vinegar to the vegetable mixture.
6. Season the mixture with flaky sea salt and freshly cracked black pepper, then gently toss to combine all ingredients evenly.
7. Allow the vegetable mixture to marinate at room temperature for 5 minutes to let the flavors meld.
8. Remove the toasted baguette slices from the oven and let them cool for 2 minutes until warm but not hot.
9. Spoon approximately 2 tablespoons of the cucumber-tomato mixture onto each toasted baguette slice.
10. Arrange the finished bruschetta on a serving platter and serve immediately. Light and refreshing with a satisfying crunch, these bruschetta offer a delightful contrast between the crisp toast and juicy vegetable topping. Last-minute tip: For an elegant presentation, garnish with additional basil leaves and a drizzle of reduced balsamic glaze just before serving.
Cucumber Tea Sandwiches
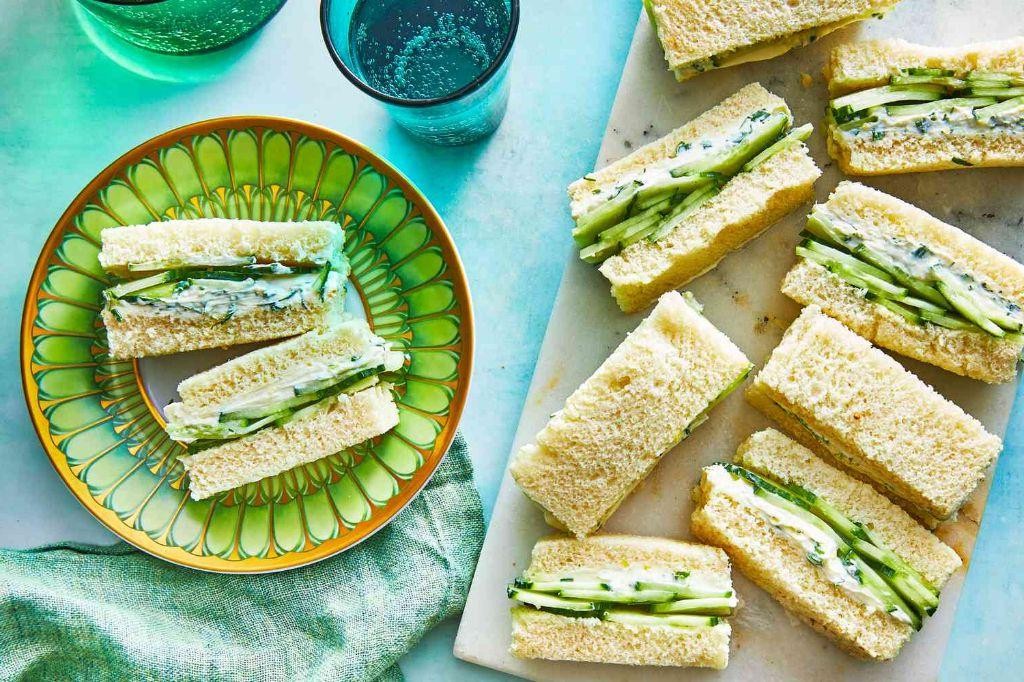
Every time I host an afternoon tea, these delicate cucumber tea sandwiches disappear first from the tiered tray—they’re the perfect balance of crisp freshness and creamy indulgence that makes guests feel truly pampered. I first learned to make them from my grandmother, who insisted on paper-thin cucumber slices and always kept her cream cheese at room temperature for easier spreading. There’s something wonderfully nostalgic about preparing these elegant little bites that transforms any ordinary afternoon into a special occasion.
Ingredients
– 8 slices high-quality white sandwich bread, crusts removed
– 4 ounces full-fat cream cheese, softened to room temperature
– 2 tablespoons unsalted European-style butter, softened
– 1 English cucumber, very thinly sliced using a mandoline
– 1 tablespoon freshly chopped dill
– 1/2 teaspoon fine sea salt
– 1/4 teaspoon freshly ground white pepper
Instructions
1. Place cream cheese and butter in a medium mixing bowl and whip with a hand mixer on medium speed for 2 minutes until completely smooth and fluffy.
2. Fold in freshly chopped dill, fine sea salt, and freshly ground white pepper using a silicone spatula until evenly distributed throughout the mixture.
3. Arrange all 8 slices of crustless white sandwich bread on a clean work surface in a single layer.
4. Spread exactly 1 1/2 tablespoons of the cream cheese mixture onto each bread slice, covering the entire surface evenly from edge to edge.
5. Using a mandoline set to 1/16-inch thickness, slice the English cucumber into perfectly uniform rounds.
6. Blot cucumber slices between layers of paper towels to remove excess moisture, which prevents soggy sandwiches.
7. Arrange cucumber slices in a single, slightly overlapping layer across 4 of the cream cheese-covered bread slices.
8. Top each cucumber-covered slice with one of the remaining cream cheese-covered bread slices, cream cheese side down, to create 4 complete sandwiches.
9. Wrap each sandwich tightly in plastic wrap and refrigerate for exactly 30 minutes to firm up the filling for cleaner cutting.
10. Remove sandwiches from refrigerator and unwrap, then cut each sandwich diagonally twice to create 4 triangular tea sandwiches per whole sandwich.
Finally, these tea sandwiches offer the most satisfying contrast between the creamy, herbaceous filling and the crisp, watery crunch of the cucumbers. The chilled temperature makes them particularly refreshing, while the thin bread ensures the filling remains the star. For an elegant presentation, arrange them on a vintage china plate with extra dill sprigs and serve immediately to maintain that perfect texture.
Pickled Cucumber Relish
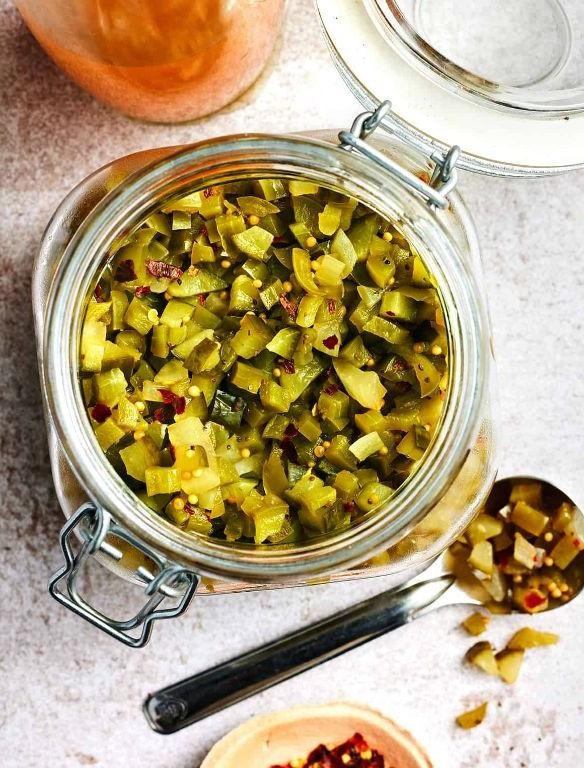
Whenever I find myself with an abundance of crisp cucumbers from the farmers’ market, my mind immediately goes to this vibrant pickled cucumber relish that has become my go-to condiment for everything from grilled meats to simple crackers. I first perfected this recipe during a summer when my garden produced more cucumbers than I knew what to do with, and now I make batches throughout the year to capture that fresh-picked flavor. The tangy-sweet balance with just the right crunch makes it worth the minimal effort required.
Ingredients
– 4 cups English cucumbers, finely diced
– 1 cup sweet onions, brunoise cut
– 1 cup apple cider vinegar
– 3/4 cup granulated sugar
– 1/2 cup filtered water
– 2 tablespoons kosher salt
– 1 tablespoon yellow mustard seeds
– 1 teaspoon celery seeds
– 1/2 teaspoon turmeric powder
– 1/4 teaspoon red pepper flakes
Instructions
1. Combine the finely diced English cucumbers and brunoise-cut sweet onions in a large non-reactive mixing bowl.
2. Sprinkle the kosher salt evenly over the cucumber-onion mixture and toss thoroughly to coat.
3. Allow the salted vegetables to rest at room temperature for exactly 45 minutes to draw out excess moisture.
4. Transfer the vegetables to a fine-mesh strainer and press firmly with the back of a spoon to extract all liquid.
5. Rinse the vegetables under cold running water for 30 seconds to remove excess salt.
6. Pat the vegetables completely dry using multiple layers of cheesecloth or a clean kitchen towel.
7. Combine apple cider vinegar, granulated sugar, filtered water, yellow mustard seeds, celery seeds, turmeric powder, and red pepper flakes in a medium stainless steel saucepan.
8. Bring the vinegar mixture to a rolling boil over medium-high heat, stirring constantly with a wooden spoon until the sugar fully dissolves.
9. Reduce the heat to low and simmer the brine for exactly 3 minutes to allow the spices to infuse.
10. Add the prepared vegetables to the hot brine and stir continuously for 2 minutes until slightly softened.
11. Immediately transfer the relish to sterilized glass jars using a stainless steel canning funnel.
12. Seal the jars tightly and process in a boiling water bath for 10 minutes if preserving, or refrigerate immediately for fresh use.
Glistening with that beautiful golden hue from the turmeric, this relish maintains a delightful crunch that contrasts beautifully with its tangy-sweet brine. The mustard seeds provide subtle pops of flavor that elevate even the simplest hot dog or burger, while the gentle heat from the pepper flakes lingers pleasantly on the palate. I love serving it alongside grilled sausages or as a bright topping for fish tacos to cut through rich flavors.
Cucumber Mint Raita
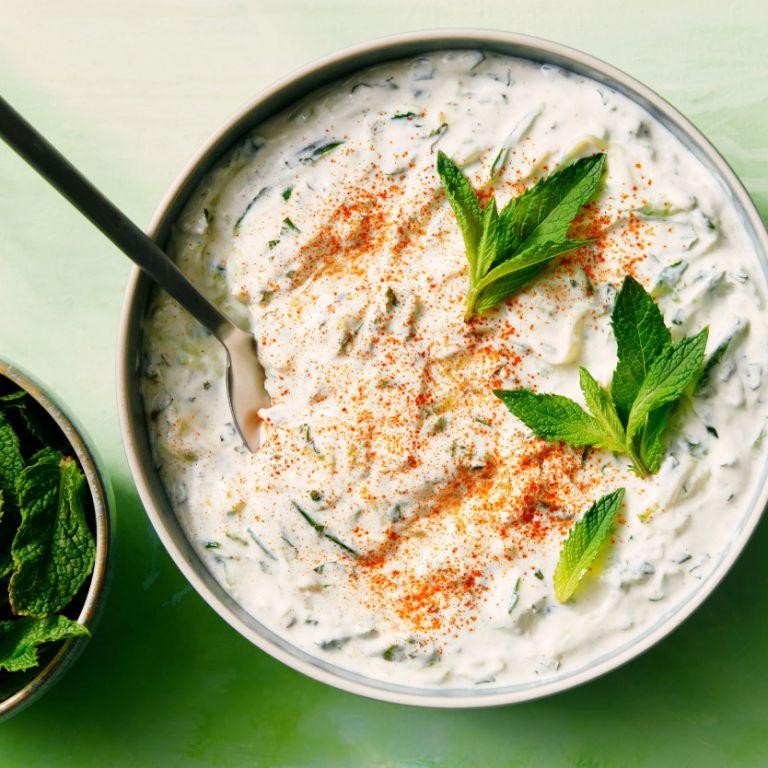
Sometimes the simplest recipes become the most cherished staples in our kitchen, and this cooling cucumber mint raita is exactly that for me—I first discovered it during a sweltering summer picnic where it single-handedly saved my spicy grilled chicken from being too fiery to enjoy, and now I make it weekly as my go-to cooling condiment.
Ingredients
– 1 large English cucumber, finely grated and thoroughly drained
– 2 cups full-fat Greek yogurt
– ¼ cup fresh mint leaves, finely chiffonaded
– 1 tablespoon extra-virgin olive oil
– 1 teaspoon toasted cumin seeds
– ½ teaspoon Kashmiri red chili powder
– ¼ teaspoon fine sea salt
Instructions
1. Place a fine-mesh strainer over a medium bowl and grate the English cucumber directly into the strainer using the fine holes of a box grater.
2. Sprinkle the grated cucumber with fine sea salt and let it drain for 15 minutes to remove excess moisture, which prevents a watery raita.
3. Firmly press the grated cucumber against the strainer with the back of a spoon to extract any remaining liquid, then transfer the drained cucumber to a clean mixing bowl.
4. Add the full-fat Greek yogurt to the bowl and whisk vigorously with a wire whisk until the mixture is smooth and creamy.
5. Heat a small skillet over medium heat for 2 minutes until hot, then add the cumin seeds and toast for 45 seconds until fragrant and slightly darkened.
6. Immediately transfer the toasted cumin seeds to a mortar and lightly crush them with a pestle to release their aromatic oils.
7. Fold the crushed cumin seeds, chiffonaded mint leaves, and extra-virgin olive oil into the yogurt-cucumber mixture using a rubber spatula until fully incorporated.
8. Transfer the raita to a serving bowl and sprinkle the surface evenly with Kashmiri red chili powder for visual appeal and mild heat.
9. Cover the bowl tightly with plastic wrap and refrigerate for at least 30 minutes to allow the flavors to meld. Versatile and refreshing, this raita achieves a perfect balance between the creamy tang of yogurt and the crisp freshness of cucumber, with the mint providing a bright, herbal lift that cuts through richness. I love serving it alongside spicy curries or as a dip for vegetable crudités—the cool, creamy texture makes it an irresistible contrast to any boldly seasoned dish.
Thai Cucumber Noodle Salad
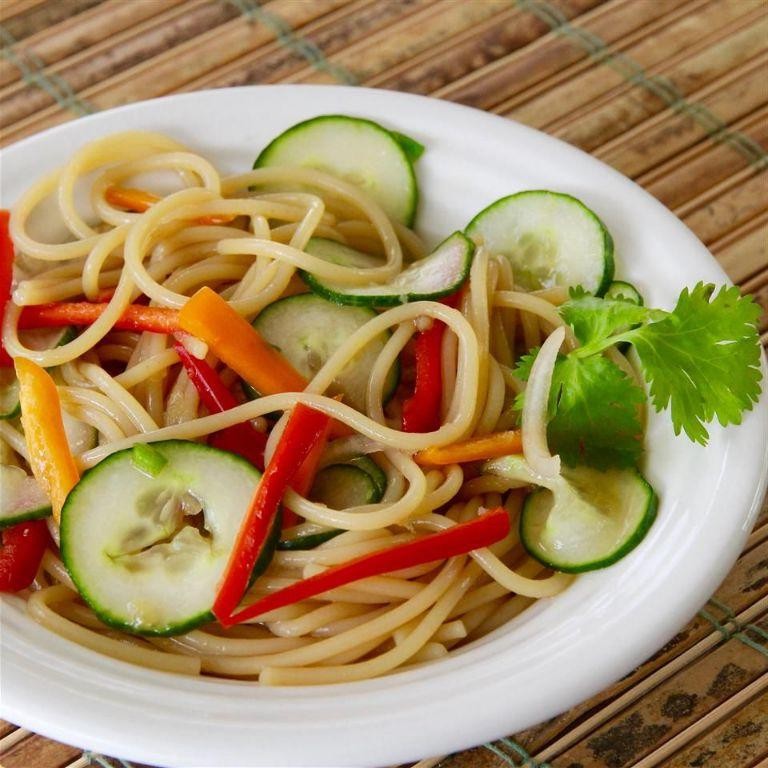
Huddled over my kitchen counter after a sweltering summer farmers’ market haul, I found myself craving something that would cut through the heat without weighing me down—enter this vibrant Thai cucumber noodle salad, my go-to for turning abundant cucumbers into a refreshing, restaurant-worthy meal. Honestly, it’s the kind of dish I whip up when I want to impress guests with minimal effort, and it never fails to transport me straight to a breezy Bangkok street food stall.
Ingredients
– 2 large English cucumbers, spiralized into noodles
– 8 oz dried rice vermicelli noodles
– ¼ cup freshly squeezed lime juice
– 3 tbsp fish sauce
– 2 tbsp coconut palm sugar
– 1 tbsp toasted sesame oil
– 2 Thai bird’s eye chilies, finely minced
– 2 cloves garlic, microplaned
– ½ cup fresh cilantro leaves, roughly chopped
– ¼ cup fresh mint leaves, thinly sliced
– ¼ cup roasted peanuts, coarsely crushed
– 2 tbsp fried shallots
Instructions
1. Bring a large pot of water to a rolling boil over high heat.
2. Submerge 8 oz dried rice vermicelli noodles completely in the boiling water.
3. Cook the noodles for exactly 3 minutes, stirring once with tongs to prevent sticking.
4. Immediately drain the noodles into a colander and rinse under cold running water for 1 minute to halt cooking.
5. Shake the colander vigorously to remove excess water, then transfer noodles to a large mixing bowl.
6. Spiralize 2 large English cucumbers into noodle-like strands using a spiralizer on the medium blade setting.
7. Add the cucumber noodles to the bowl with the rice vermicelli.
8. In a small bowl, whisk together ¼ cup freshly squeezed lime juice, 3 tbsp fish sauce, 2 tbsp coconut palm sugar, and 1 tbsp toasted sesame oil until the sugar fully dissolves.
9. Microplane 2 cloves of garlic directly into the dressing mixture.
10. Finely mince 2 Thai bird’s eye chilies and stir them into the dressing.
11. Pour the dressing over the cucumber and noodle mixture.
12. Use salad tongs to toss everything thoroughly for 45 seconds, ensuring each strand is coated.
13. Fold in ½ cup roughly chopped fresh cilantro leaves and ¼ cup thinly sliced fresh mint leaves.
14. Garnish the salad with ¼ cup coarsely crushed roasted peanuts and 2 tbsp fried shallots.
15. Serve immediately or chill for up to 20 minutes for a crisper texture.
Zesty, crunchy, and irresistibly light, this salad delivers a perfect harmony of sweet, sour, and spicy notes that dance on the palate. I love serving it piled high in shallow bowls with grilled shrimp skewers perched on top for a complete meal, or packing it for picnics where the cucumbers stay remarkably crisp. The contrast between the cool cucumber noodles and the chewy rice vermicelli makes every bite a textural adventure you’ll crave all season long.
Conclusion
Perfect for any gathering or quiet meal, these 33 cucumber recipes offer endless freshness and flavor. We hope you find new favorites to enjoy and share! Try one today, then leave a comment telling us which you loved most—and don’t forget to pin this roundup on Pinterest for easy access later. Happy cooking!