
Whether you’re craving classic chocolate chip, festive holiday treats, or something new to wow your friends, you’ve come to the right place. We’ve gathered 28 of the most delicious cookie recipes ever—from quick and easy bakes to show-stopping creations. Get ready to find your next favorite and fill your kitchen with the irresistible aroma of freshly baked cookies. Let’s dive in!
Classic Chocolate Chip Cookies

Cradling a warm mug this quiet afternoon, I find myself drawn back to that timeless comfort of chocolate chip cookies—the way their golden edges give way to soft centers, how the melted chocolate pools in little pockets of sweetness, a simple pleasure that feels like coming home after a long day.
24
cookies15
minutes11
minutesIngredients
– 2¼ cups all-purpose flour (I like to spoon and level it for accuracy)
– 1 tsp baking soda
– 1 tsp fine sea salt (it dissolves better than coarse here)
– 1 cup unsalted butter, softened at room temperature until it gives gently to pressure
– ¾ cup granulated sugar
– ¾ cup packed light brown sugar (press it firmly into the cup)
– 2 large eggs, brought to room temperature for easier blending
– 2 tsp pure vanilla extract (the real stuff makes all the difference)
– 2 cups semi-sweet chocolate chips (I sometimes mix in dark for depth)
Instructions
1. Preheat your oven to 375°F and line two baking sheets with parchment paper.
2. In a medium bowl, whisk together the flour, baking soda, and salt until fully combined.
3. In a separate large bowl, use an electric mixer on medium speed to cream the softened butter, granulated sugar, and brown sugar for exactly 3 minutes, until pale and fluffy.
4. Add the eggs one at a time, mixing on low speed until each is fully incorporated before adding the next.
5. Mix in the vanilla extract until just blended.
6. Gradually add the flour mixture to the wet ingredients, mixing on low speed until no dry streaks remain—don’t overmix.
7. Fold in the chocolate chips with a spatula until evenly distributed.
8. Scoop rounded tablespoons of dough onto the prepared baking sheets, spacing them 2 inches apart to allow for spreading.
9. Bake for 9–11 minutes, until the edges are lightly golden but the centers still look slightly soft.
10. Let the cookies cool on the baking sheet for 5 minutes before transferring to a wire rack. Zeroing in on that first bite, you’ll find a delicate crispness yielding to a chewy, buttery interior, with molten chocolate weaving through each crumb. Try serving them slightly warm with a drizzle of sea salt or crumbling them over vanilla ice cream for a midnight treat.
Chewy Oatmeal Raisin Cookies
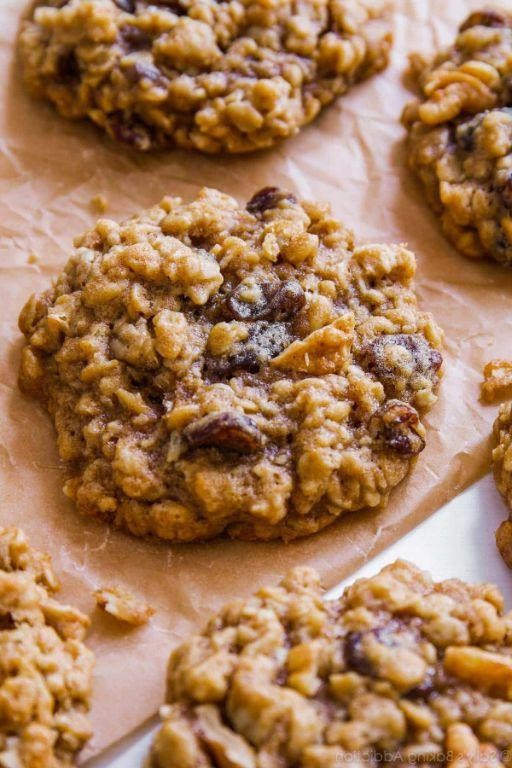
Perhaps there’s something deeply comforting about the ritual of baking these cookies, the way the kitchen fills with the warm scent of cinnamon and brown sugar, pulling memories of autumn afternoons and quiet moments from the air.
24
cookies20
minutes12
minutesIngredients
- 1 cup unsalted butter, softened (I always leave mine out for an hour—it creams so much better)
- 1 cup packed light brown sugar, my favorite for that molasses depth
- ½ cup granulated sugar, just to balance the sweetness
- 2 large eggs, brought to room temperature for a smoother dough
- 1 teaspoon pure vanilla extract, a splash of warmth I never skip
- 1 ½ cups all-purpose flour, spooned and leveled to avoid dense cookies
- 1 teaspoon baking soda, fresh for that perfect rise
- 1 teaspoon ground cinnamon, because extra spice is always nice
- ½ teaspoon salt, to make the flavors pop
- 3 cups old-fashioned rolled oats, the heart of the chewiness
- 1 cup raisins, plumped in warm water for 10 minutes first—it keeps them juicy
Instructions
- Preheat your oven to 350°F and line two baking sheets with parchment paper.
- In a large bowl, beat the softened butter, brown sugar, and granulated sugar with an electric mixer on medium speed for exactly 2 minutes, until light and fluffy. Tip: Scrape the bowl halfway through to ensure everything is evenly mixed.
- Add the room-temperature eggs one at a time, beating for 30 seconds after each addition until fully incorporated.
- Stir in the vanilla extract until just combined.
- In a separate bowl, whisk together the flour, baking soda, cinnamon, and salt.
- Gradually add the dry ingredients to the wet mixture, mixing on low speed until no white streaks remain, about 1 minute. Tip: Avoid overmixing to keep the cookies tender.
- Fold in the rolled oats and drained raisins with a spatula until evenly distributed.
- Scoop 2-tablespoon portions of dough onto the prepared baking sheets, spacing them 2 inches apart to allow for spreading.
- Bake for 10–12 minutes, or until the edges are golden brown but the centers still look slightly soft. Tip: Rotate the pans halfway through baking for even browning.
- Let the cookies cool on the baking sheets for 5 minutes before transferring them to a wire rack to cool completely.
Out of the oven, these cookies emerge with a crisp edge that gives way to a wonderfully chewy center, the oats providing a hearty texture against the sweet, plump raisins. Enjoy them warm with a glass of cold milk, or crumble one over vanilla ice cream for a simple, nostalgic dessert that feels like a hug in every bite.
Gooey Double Chocolate Brownie Cookies
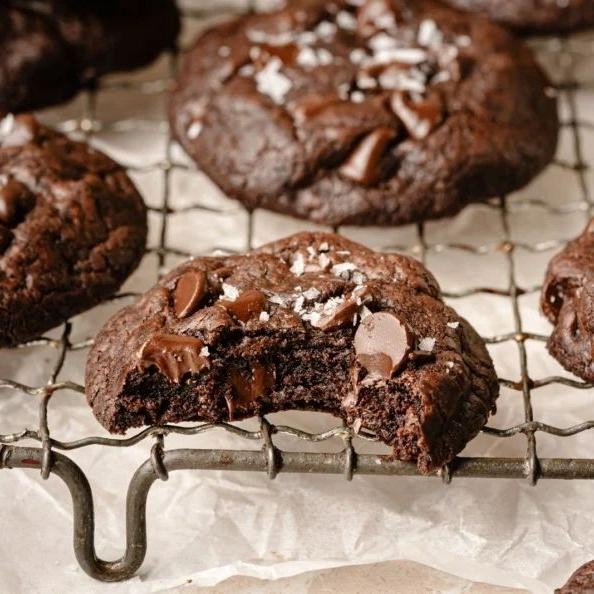
Holding this warm cookie in my palm, I’m transported back to rainy afternoons in my grandmother’s kitchen, where chocolate was always the answer to everything. These gooey double chocolate brownie cookies capture that same comforting magic—crisp edges giving way to a fudgy center that melts slowly on the tongue. They’re the kind of treat that makes you pause, close your eyes, and just breathe in the moment.
24
cookies15
minutes12
minutesIngredients
– 1 cup all-purpose flour (I like to spoon and level it for accuracy)
– ¾ cup unsweetened cocoa powder (the darker, the better for that rich depth)
– 1 teaspoon baking soda
– ½ teaspoon salt (I always use fine sea salt for even distribution)
– ½ cup unsalted butter, softened (truly softened butter makes all the difference here)
– ¾ cup granulated sugar
– ¾ cup packed light brown sugar (pack it firmly for that molasses warmth)
– 2 large eggs at room temperature (they incorporate so much better this way)
– 1 teaspoon pure vanilla extract (the real stuff, never imitation)
– 1 cup semi-sweet chocolate chips (I sometimes mix in dark chocolate chunks too)
Instructions
1. Preheat your oven to 350°F and line two baking sheets with parchment paper.
2. Whisk together 1 cup all-purpose flour, ¾ cup unsweetened cocoa powder, 1 teaspoon baking soda, and ½ teaspoon salt in a medium bowl until no streaks remain.
3. Cream ½ cup softened unsalted butter with ¾ cup granulated sugar and ¾ cup packed light brown sugar in a separate large bowl using an electric mixer on medium speed for exactly 2 minutes until pale and fluffy.
4. Beat in 2 room temperature eggs one at a time, waiting until each is fully incorporated before adding the next.
5. Mix in 1 teaspoon pure vanilla extract until just combined.
6. Gradually add the dry ingredients to the wet ingredients, mixing on low speed until the dough just comes together—be careful not to overmix.
7. Fold in 1 cup semi-sweet chocolate chips with a spatula until evenly distributed throughout the dough.
8. Scoop 2-tablespoon portions of dough onto prepared baking sheets, spacing them 2 inches apart to allow for spreading.
9. Bake at 350°F for 10-12 minutes until the edges look set but the centers still appear slightly soft and underbaked.
10. Let cookies cool on baking sheets for 5 minutes before transferring to a wire rack.
Remember how the crackled tops give way to that almost-liquid center when they’re still warm from the oven. I love serving these slightly warm with a dusting of powdered sugar or alongside a cold glass of milk—the way the chocolate melts against your fingers feels like pure comfort.
Buttery Shortbread Cookies
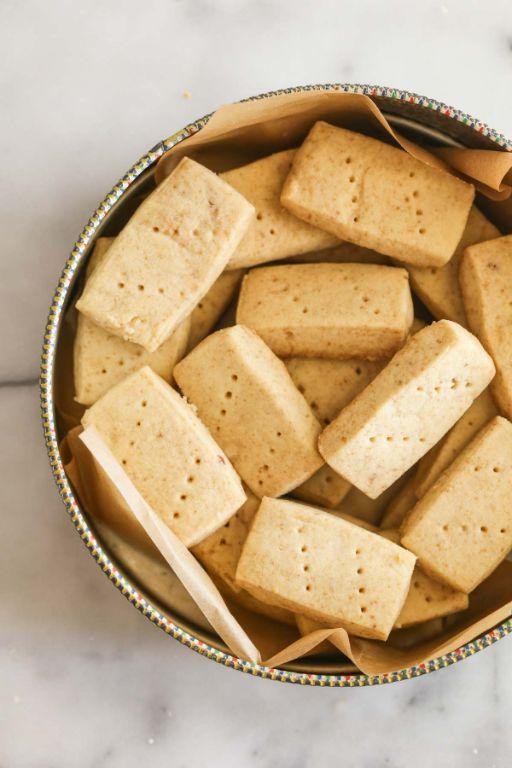
Oftentimes, the simplest recipes hold the most comfort, like these buttery shortbread cookies that require little more than patience and gentle hands to transform humble ingredients into something quietly spectacular. There’s a meditative quality to making them, a slow unfolding of flavor that feels like a gift to yourself on an ordinary afternoon. Each crumbly bite carries the warmth of butter and a subtle sweetness, a reminder that some joys are best savored slowly.
24
cookies15
minutes20
minutesIngredients
– 1 cup (2 sticks) unsalted butter, softened to room temperature—I find this makes the creaming process smoother and the texture more tender
– 1/2 cup granulated sugar, just enough to sweeten without overwhelming the buttery notes
– 2 1/4 cups all-purpose flour, spooned and leveled to avoid packing it down
– 1/4 teaspoon fine sea salt, which I prefer for its clean, subtle enhancement of flavors
Instructions
1. Preheat your oven to 325°F and line a baking sheet with parchment paper.
2. In a large bowl, use an electric mixer on medium speed to cream the softened butter and granulated sugar together for 3–4 minutes, until pale and fluffy—this incorporates air for a lighter texture.
3. Gradually add the all-purpose flour and fine sea salt to the butter mixture, mixing on low speed just until the dough comes together and no dry streaks remain; avoid overmixing to keep the cookies tender.
4. Turn the dough out onto a lightly floured surface and gently press it into a cohesive ball.
5. Roll the dough out to a 1/2-inch thickness, using a ruler to check—this ensures even baking.
6. Use a cookie cutter or knife to cut the dough into desired shapes, placing them 1 inch apart on the prepared baking sheet.
7. Prick each cookie several times with a fork to prevent puffing during baking.
8. Bake for 18–20 minutes, until the edges are lightly golden and the centers look set but not browned.
9. Let the cookies cool on the baking sheet for 5 minutes before transferring them to a wire rack to cool completely.
Gently crisp at the edges and tender within, these cookies melt on the tongue with a rich, buttery flavor that needs no embellishment. Serve them alongside a cup of Earl Grey tea for a quiet moment, or crumble them over vanilla ice cream for a simple, elegant dessert that feels both nostalgic and new.
Soft Sugar Cookies with Royal Icing

Often, on quiet afternoons like this one, I find myself drawn to the kitchen, where the simple act of measuring flour and sugar becomes a kind of meditation. There’s something profoundly comforting about these soft sugar cookies—their gentle sweetness and the quiet focus required to decorate them with royal icing feels like a small, personal ritual.
24
cookies25
minutes10
minutesIngredients
– 2 ¾ cups all-purpose flour (I always spoon and level it for accuracy, never scoop)
– 1 teaspoon baking powder
– ¼ teaspoon salt (a fine sea salt is my quiet preference)
– 1 cup unsalted butter, softened at room temperature until it yields gently to pressure
– 1 ½ cups granulated sugar
– 1 large egg, brought to room temperature for better emulsion
– 2 teaspoons pure vanilla extract
– ½ cup whole milk, slightly warmed to take the chill off
– 2 cups powdered sugar, sifted to avoid lumps
– 1 ½ tablespoons meringue powder (this is my reliable choice for stable icing)
– 3 tablespoons warm water, plus more as needed for flow
Instructions
1. Preheat your oven to 375°F and line two baking sheets with parchment paper.
2. In a medium bowl, whisk together the 2 ¾ cups all-purpose flour, 1 teaspoon baking powder, and ¼ teaspoon salt until fully combined.
3. In a large bowl, use an electric mixer on medium speed to cream the 1 cup softened unsalted butter and 1 ½ cups granulated sugar for 3 minutes, until pale and fluffy.
4. Beat in the 1 large room temperature egg and 2 teaspoons vanilla extract until just incorporated.
5. Tip: Scrape down the bowl sides with a spatula halfway through mixing to ensure even blending.
6. Alternately add the flour mixture and ½ cup warmed whole milk to the butter mixture, beginning and ending with flour, mixing on low speed after each addition until a soft dough forms.
7. Scoop 1 ½ tablespoon portions of dough, roll into balls, and place 2 inches apart on the prepared baking sheets.
8. Tip: Lightly flatten each ball with the bottom of a glass dipped in sugar to prevent sticking and promote even spreading.
9. Bake for 8–10 minutes, until the edges are set and the tops show no wet shine.
10. Cool cookies on the baking sheet for 5 minutes before transferring to a wire rack to cool completely, about 30 minutes.
11. For the icing, combine 2 cups sifted powdered sugar, 1 ½ tablespoons meringue powder, and 3 tablespoons warm water in a bowl.
12. Beat on low speed for 1 minute, then increase to high and beat for 3–4 minutes until stiff peaks form.
13. Tip: If the icing is too thick for piping, add warm water 1 teaspoon at a time until it ribbons off the spoon.
14. Pipe or spread the icing onto cooled cookies and let set for 2 hours at room temperature until firm.
Perhaps the truest joy of these cookies lies in their texture—the center stays tender and cake-like, yielding to a bite that’s neither crumbly nor dense. The royal icing hardens to a delicate, matte finish that contrasts beautifully with the soft cookie beneath, and I love serving them stacked on a vintage plate with a pot of Earl Grey tea, letting the vanilla notes mingle with the bergamot in the steam.
Almond Flour Apricot Thumbprint Cookies

Evenings like this, when the light softens and the kitchen grows quiet, I find myself reaching for simple comforts—like these almond flour apricot thumbprint cookies, which feel like little edible hugs. Each one cradles a dollop of apricot preserves, a sweet surprise that reminds me of sun-warmed afternoons and gentle moments. They’re tender, subtly nutty, and just sweet enough to feel like a treat without being overwhelming.
12
cookies15
minutes14
minutesIngredients
– 2 cups almond flour (I love the fine, blanched kind for a smoother texture)
– 1/4 cup maple syrup (the real, dark amber type—it adds such a lovely depth)
– 1/4 cup coconut oil, melted but not hot (this keeps the dough from becoming greasy)
– 1 teaspoon vanilla extract (pure vanilla makes all the difference here)
– 1/4 teaspoon fine sea salt (it really balances the sweetness)
– 1/3 cup apricot preserves (I prefer the kind with tiny fruit bits for extra texture)
Instructions
1. Preheat your oven to 325°F and line a baking sheet with parchment paper.
2. In a medium bowl, combine the almond flour, maple syrup, melted coconut oil, vanilla extract, and sea salt.
3. Mix everything with a spatula until a soft, slightly sticky dough forms—it should hold together when pressed.
4. Scoop 1 tablespoon of dough and roll it into a smooth ball between your palms.
5. Place the dough balls on the prepared baking sheet, spacing them about 2 inches apart.
6. Gently press your thumb into the center of each ball to create a small, deep well.
7. Fill each thumbprint with about 1/2 teaspoon of apricot preserves, being careful not to overfill.
8. Bake for 12–14 minutes, or until the edges are lightly golden and the preserves are bubbly.
9. Let the cookies cool on the baking sheet for 10 minutes—they’re fragile when warm, so this helps them set.
10. Transfer the cookies to a wire rack to cool completely before serving.
You’ll love how these cookies crumble delicately with each bite, the almond flour lending a tender, almost shortbread-like quality. The apricot preserves offer a bright, tangy contrast that cuts through the richness beautifully—try serving them alongside a cup of herbal tea for a quiet afternoon pause.
Rich Peanut Butter Blossoms

Cradling a warm cookie in my palm always feels like holding a small piece of comfort, especially when it’s one of these rich peanut butter blossoms, their chocolate kiss centers melting just slightly from the oven’s lingering heat. There’s something quietly magical about how the salty-sweet peanut butter dough embraces that chocolate, creating a treat that feels both nostalgic and perfectly present. I find myself making these most often on overcast afternoons, when the kitchen fills with their nutty aroma and time seems to slow down.
48
cookies15
minutes10
minutesIngredients
– 1 cup creamy peanut butter, the kind where oil separates at the top—I find it gives the best texture
– 1 cup granulated sugar, plus an extra ¼ cup for rolling
– 1 large egg, brought to room temperature so it blends smoothly
– 1 teaspoon vanilla extract, my favorite is the one with visible vanilla bean specks
– 1 teaspoon baking soda, for that perfect little lift
– 48 milk chocolate kisses, unwrapped patiently while the dough chills
Instructions
1. Preheat your oven to 375°F and line two baking sheets with parchment paper.
2. In a medium bowl, combine 1 cup peanut butter, 1 cup sugar, 1 egg, 1 teaspoon vanilla extract, and 1 teaspoon baking soda using a wooden spoon until a soft dough forms.
3. Cover the bowl with plastic wrap and refrigerate the dough for exactly 30 minutes—this prevents spreading and makes rolling easier.
4. Place the remaining ¼ cup sugar in a small, shallow bowl.
5. Scoop 1 tablespoon of chilled dough and roll it into a smooth ball between your palms.
6. Roll each dough ball in the sugar until lightly coated, then place them 2 inches apart on the prepared baking sheets.
7. Bake one sheet at a time in the center rack for 8-10 minutes, until the edges are lightly golden and the tops have cracked slightly.
8. Immediately press one chocolate kiss firmly into the center of each warm cookie—they’ll crack beautifully around the edges.
9. Let cookies cool on the baking sheet for 5 minutes before transferring to a wire rack. Perhaps my favorite tip: if the chocolate seems too soft, a brief 10-minute chill firms them up perfectly.
10. Repeat with remaining dough, always using cool baking sheets for consistent results. Patience rewards you here—the contrast between the crisp sugar shell, tender peanut butter crumb, and molten chocolate center is worth every moment. I love serving these slightly warm with cold milk, watching the chocolate soften just enough to make each bite feel like a gentle embrace.
Zesty Lemon Crinkle Cookies

Often, on quiet afternoons like this one, I find myself drawn to recipes that feel like sunshine in cookie form—these zesty lemon crinkles are exactly that, a bright little pause in the day that’s both simple to make and deeply satisfying to share.
24
cookies15
minutes12
minutesIngredients
– 2 cups all-purpose flour (I always spoon and level mine for accuracy)
– 1 ½ cups granulated sugar (this creates that lovely crackly top)
– ½ cup unsalted butter, softened (room temp makes creaming so much easier)
– 2 large eggs (I prefer room temperature eggs here for better emulsion)
– ¼ cup fresh lemon juice (about 2 juicy lemons—freshly squeezed is key)
– 1 tablespoon lemon zest (from those same lemons, for extra fragrance)
– 1 teaspoon baking powder
– ½ teaspoon salt (I use fine sea salt to balance the sweetness)
– ½ cup powdered sugar (for rolling—this gives them their snowy look)
Instructions
1. Preheat your oven to 350°F and line two baking sheets with parchment paper.
2. In a medium bowl, whisk together the all-purpose flour, baking powder, and salt until fully combined.
3. In a separate large bowl, use an electric mixer on medium speed to cream the softened unsalted butter and granulated sugar together for 2–3 minutes, until light and fluffy.
4. Add the room temperature eggs one at a time to the butter mixture, mixing on low speed until each is fully incorporated before adding the next.
5. Mix in the fresh lemon juice and lemon zest on low speed just until blended.
6. Gradually add the flour mixture to the wet ingredients, mixing on low speed until a soft dough forms and no dry streaks remain.
7. Place the powdered sugar in a shallow bowl.
8. Scoop 1 tablespoon-sized portions of dough and roll them into smooth balls between your palms.
9. Roll each dough ball thoroughly in the powdered sugar until fully coated, then place them 2 inches apart on the prepared baking sheets.
10. Bake one sheet at a time in the preheated oven for 10–12 minutes, until the cookies are set at the edges and have crinkled tops with pale centers.
11. Let the cookies cool on the baking sheet for 5 minutes before transferring them to a wire rack to cool completely.
Vividly tart yet sweet, these cookies emerge with a tender, cake-like crumb and a cheerful crackled exterior that begs to be enjoyed with a cup of tea; for a playful twist, sandwich two with a dollop of lemon curd or crumble them over vanilla ice cream for a sunny dessert.
Crispy Gingerbread Cookies
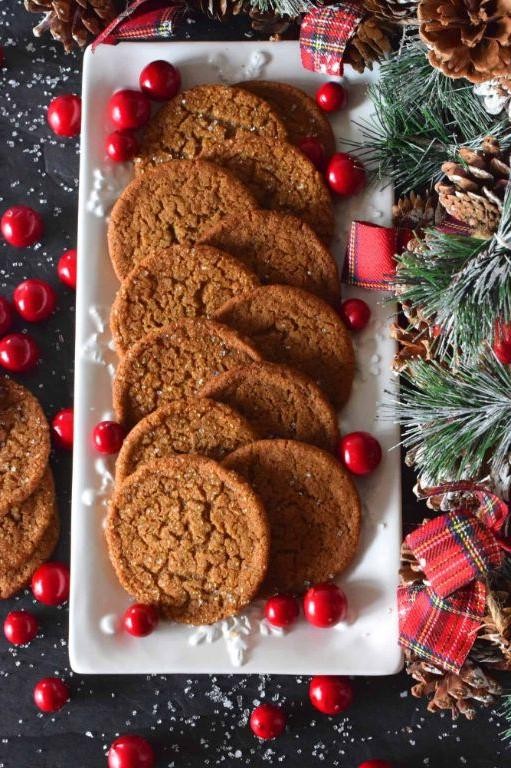
Perhaps it’s the chill in the October air today that has me craving the warmth of molasses and spice, the kind that fills the kitchen with a scent so deeply comforting it feels like a quiet conversation with the past. There’s something about rolling out gingerbread dough that slows the world down, a simple ritual of flour-dusted hands and the gentle press of a cutter that promises crisp, spiced cookies perfect for sharing with a cup of tea or savoring alone by the window.
24
cookies25
minutes12
minutesIngredients
- 3 cups all-purpose flour, spooned and leveled for accuracy—it makes all the difference in texture
- 1 cup unsalted butter, softened at room temperature until it yields to a gentle press
- 3/4 cup dark brown sugar, packed firmly to bring out its caramel notes
- 1/2 cup molasses, my favorite robust, dark variety for that deep, bittersweet flavor
- 1 large egg, brought to room temperature to help the dough come together smoothly
- 2 tsp ground ginger, the star of the show for that warm, peppery kick
- 1 tsp baking soda, sifted with the flour to ensure even leavening
- 1 tsp ground cinnamon, for a subtle, sweet warmth
- 1/2 tsp ground cloves, just a hint to add complexity without overpowering
- 1/4 tsp salt, to balance the sweetness and enhance the spices
Instructions
- Preheat your oven to 350°F and line two baking sheets with parchment paper.
- In a medium bowl, whisk together the flour, baking soda, ginger, cinnamon, cloves, and salt until fully combined.
- In a separate large bowl, use an electric mixer on medium speed to cream the softened butter and brown sugar for 2 minutes, until light and fluffy.
- Add the molasses and egg to the butter mixture, mixing on low speed just until incorporated, about 30 seconds.
- Gradually add the flour mixture to the wet ingredients, mixing on low speed until a cohesive dough forms, then stop to avoid overworking it.
- Divide the dough into two equal portions, flatten each into a 1-inch thick disk, wrap tightly in plastic wrap, and chill in the refrigerator for 1 hour to firm up.
- Lightly flour a clean surface and roll one dough disk to a consistent 1/4-inch thickness, using a ruler to check for evenness.
- Cut shapes with cookie cutters, pressing firmly and lifting carefully to maintain clean edges.
- Arrange the cutouts 2 inches apart on the prepared baking sheets to allow for spreading.
- Bake one sheet at a time in the center rack for 10–12 minutes, until the edges are firm and the centers appear set but not browned.
- Cool the cookies on the baking sheet for 5 minutes to firm up before transferring to a wire rack to cool completely.
Delightfully crisp with a tender crumb, these cookies carry the warmth of ginger and molasses in every bite, their edges snapping cleanly while the centers hold a subtle chew. I love stacking them high on a vintage plate or crumbling them over vanilla ice cream for a spiced dessert that feels both nostalgic and new.
Melt-in-Your-Mouth Snickerdoodles
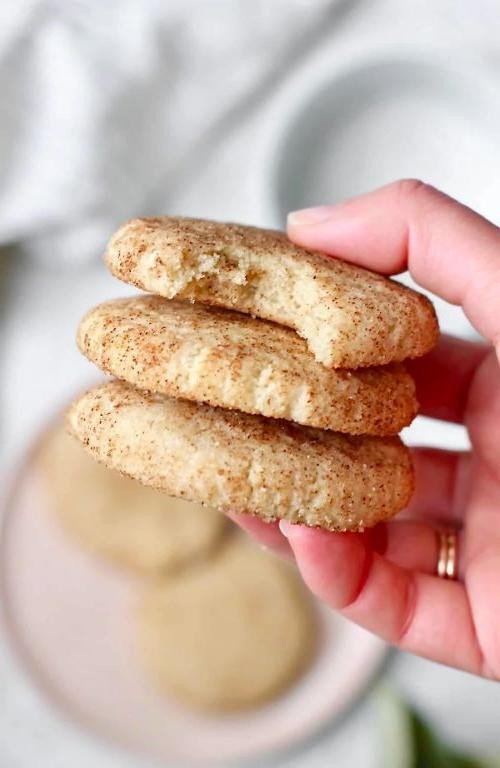
Years of baking have taught me that some recipes feel like coming home, and these snickerdoodles are exactly that—soft, cinnamon-kissed cookies that seem to hug you back with every bite.
24
cookies15
minutes10
minutesIngredients
– 2¼ cups all-purpose flour (I always spoon and level mine for accuracy)
– 2 tsp cream of tartar (the secret to that signature tang)
– 1 tsp baking soda
– ½ tsp fine sea salt (I find it balances the sweetness perfectly)
– 1 cup unsalted butter, softened (leave it out for an hour—truly softened butter makes all the difference)
– 1½ cups granulated sugar
– 2 large eggs, room temperature (they incorporate so much better this way)
– 2 tsp pure vanilla extract
– ¼ cup granulated sugar for rolling
– 2 tbsp ground cinnamon for rolling (I use Saigon cinnamon for its warm, complex flavor)
Instructions
1. Preheat your oven to 375°F and line two baking sheets with parchment paper.
2. Whisk together the flour, cream of tartar, baking soda, and salt in a medium bowl until fully combined.
3. In a separate large bowl, beat the softened butter and 1½ cups sugar on medium speed for exactly 2 minutes until pale and fluffy.
4. Add the room temperature eggs one at a time, beating for 30 seconds after each addition until fully incorporated.
5. Mix in the vanilla extract until just combined.
6. Gradually add the dry ingredients to the wet ingredients, mixing on low speed until no flour streaks remain—don’t overmix.
7. In a small shallow bowl, stir together the remaining ¼ cup sugar and 2 tablespoons cinnamon.
8. Scoop 1½ tablespoon-sized portions of dough and roll into smooth balls between your palms.
9. Roll each dough ball in the cinnamon-sugar mixture until evenly coated.
10. Place dough balls 2 inches apart on prepared baking sheets—they’ll spread as they bake.
11. Bake one sheet at a time in the center rack for 8–10 minutes, until the edges are set but centers still look slightly soft.
12. Let cookies cool on the baking sheet for 5 minutes before transferring to a wire rack.
Underbaking them slightly gives these cookies their magical softness, with crackled tops that give way to tender, buttery interiors. I love serving them still warm with a cold glass of milk, or crumbling them over vanilla ice cream for the coziest dessert.
Nutty Pecan Sandies
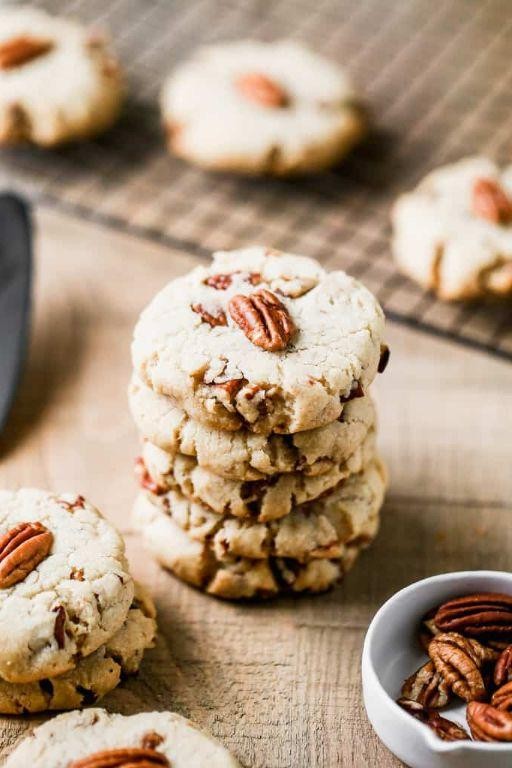
Holding this warm cookie in my palm, I’m reminded how some of the coziest moments happen right here at my kitchen counter, with just the hum of the oven and the rich, buttery scent of pecans toasting. There’s something quietly comforting about these sandies—they’re not flashy, but they hold a gentle, nutty sweetness that feels like a slow, deep breath after a long day. I love how their crumbly texture melts away almost like shortbread, leaving behind the faintest whisper of vanilla and the earthy crunch of pecans.
24
cookies15
minutes20
minutesIngredients
– 1 cup unsalted butter, softened (I always let mine sit out for an hour—it creams so much better when it’s truly room temperature)
– ½ cup granulated sugar (I sometimes use a fine-grain organic sugar for a slightly softer texture)
– 2 teaspoons pure vanilla extract (the real stuff makes all the difference here, with its warm, floral notes)
– 2 cups all-purpose flour (I gently spoon it into the measuring cup to avoid packing it down)
– 1 cup finely chopped pecans (toasting them first brings out their oils and deepens the flavor beautifully)
– ¼ teaspoon salt (a pinch of fine sea salt balances the sweetness just right)
Instructions
1. Preheat your oven to 325°F and line a baking sheet with parchment paper.
2. In a large mixing bowl, use an electric mixer on medium speed to cream the softened butter and granulated sugar together for 2–3 minutes, until the mixture is pale and fluffy. (Tip: Scrape down the sides of the bowl halfway through to ensure everything is evenly incorporated.)
3. Add the vanilla extract and mix for another 30 seconds until fully combined.
4. In a separate bowl, whisk together the all-purpose flour and salt.
5. Gradually add the flour mixture to the butter mixture, mixing on low speed just until the dough comes together and no dry streaks remain.
6. Fold in the finely chopped pecans with a spatula until they are evenly distributed throughout the dough.
7. Scoop tablespoon-sized portions of dough and roll them into smooth balls between your palms.
8. Place the dough balls 2 inches apart on the prepared baking sheet and gently flatten each one to about ½-inch thickness with the bottom of a glass. (Tip: Lightly flour the glass to prevent sticking.)
9. Bake for 18–20 minutes, or until the edges are lightly golden and the centers look set. (Tip: Rotate the baking sheet halfway through baking for even browning.)
10. Let the cookies cool on the baking sheet for 5 minutes before transferring them to a wire rack to cool completely.
Light and crumbly, these sandies have a delicate melt-in-your-mouth quality that pairs wonderfully with a cup of earl grey tea. I love how the toasted pecans add just enough texture to keep each bite interesting, and sometimes I’ll even drizzle them with a thin layer of dark chocolate for a subtle, bittersweet contrast.
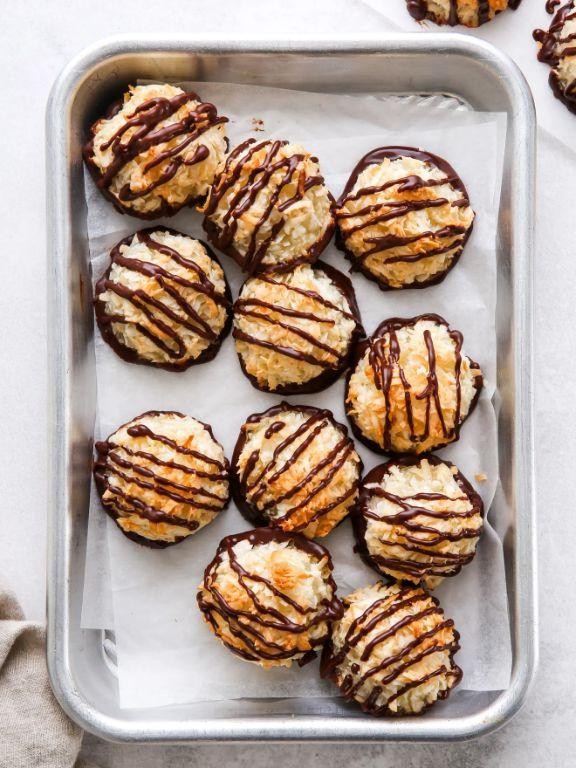
Coconut Macaroons
O
n quiet afternoons like this, when the light slants golden through the kitchen window, I find myself drawn to recipes that feel like a gentle embrace, and few things are as comforting to make as a batch of coconut macaroons. There’s something deeply soothing about their simplicity, the way sweet coconut and egg whites transform into chewy, golden mounds with just a little patience and care.
12
macaroons15
minutes22
minutesIngredients
– 3 large egg whites, at room temperature (I find they whip up much fluffier this way)
– 1/4 teaspoon of fine sea salt (it really makes the coconut flavor pop)
– 1/2 cup of granulated sugar
– 1 teaspoon of pure vanilla extract (my go-to for that warm, classic aroma)
– 3 cups of sweetened shredded coconut
Instructions
1. Preheat your oven to 325°F (163°C) and line a large baking sheet with parchment paper.
2. Place the 3 room temperature egg whites and 1/4 teaspoon of fine sea salt into a very clean, dry mixing bowl.
3. Using an electric mixer on medium-high speed, beat the egg whites and salt until they form soft peaks that gently curl over when you lift the beaters, which usually takes about 2 to 3 minutes.
4. Gradually add the 1/2 cup of granulated sugar to the egg whites while continuing to beat on medium-high speed.
5. Continue beating the mixture for another 2 to 3 minutes until it becomes glossy and forms stiff peaks that stand straight up when you lift the beaters.
6. Gently fold in the 1 teaspoon of pure vanilla extract using a spatula, being careful not to deflate the egg whites.
7. Add the 3 cups of sweetened shredded coconut to the mixture in three separate additions, folding gently with the spatula after each addition until the coconut is evenly coated.
8. Use a 2-tablespoon cookie scoop or two spoons to drop rounded mounds of the coconut mixture onto the prepared baking sheet, spacing them about 2 inches apart to allow for spreading.
9. Bake the macaroons in the preheated 325°F (163°C) oven for 18 to 22 minutes, or until the edges and tops are a deep golden brown.
10. Remove the baking sheet from the oven and let the macaroons cool on the sheet for 5 minutes to firm up.
11. Carefully transfer the macaroons to a wire rack to cool completely, which usually takes about 30 minutes.
But the true magic happens when you bite into one—the crisp, toasted exterior gives way to a wonderfully moist, chewy center that’s intensely coconutty. I love serving them still slightly warm with a cold glass of milk, or for a special treat, dipping the bottoms in melted dark chocolate and letting it set into a thin, crackly shell.
Raspberry Linzer Tart Cookies

There’s something quietly magical about these raspberry linzer tart cookies—the way the buttery dough cradles the jewel-like jam, creating little windows to sweetness within. They feel like edible heirlooms, passed down through generations with each delicate cut-out and careful dusting of sugar.
12
cookies30
minutes14
minutesIngredients
- 1 cup unsalted butter, softened (I always take mine out about an hour before baking—it makes all the difference)
- 2/3 cup granulated sugar, plus extra for dusting (I keep a small bowl handy just for this)
- 1 large egg, at room temperature (cold eggs can make the dough tricky to work with)
- 2 1/4 cups all-purpose flour (I sometimes substitute 1/4 cup with almond flour for extra tenderness)
- 1/2 teaspoon ground cinnamon (just enough to whisper through the dough)
- 1/4 teaspoon salt (I use fine sea salt for even distribution)
- 1/2 cup raspberry jam (seedless gives the cleanest look, but either works beautifully)
Instructions
- Beat 1 cup softened unsalted butter and 2/3 cup granulated sugar together in a large bowl using an electric mixer on medium speed for exactly 2 minutes until pale and fluffy.
- Add 1 large room temperature egg and beat for 30 seconds more until fully incorporated, scraping down the bowl with a spatula to ensure no streaks remain.
- Whisk together 2 1/4 cups all-purpose flour, 1/2 teaspoon ground cinnamon, and 1/4 teaspoon salt in a separate bowl to evenly distribute the dry ingredients.
- Gradually add the flour mixture to the butter mixture, mixing on low speed just until the dough comes together and no dry patches remain—be careful not to overmix.
- Divide the dough into two equal discs, wrap each tightly in plastic wrap, and refrigerate for at least 2 hours until firm enough to roll without sticking.
- Preheat your oven to 350°F and line two baking sheets with parchment paper for easy cleanup and even baking.
- Roll one disc of chilled dough on a lightly floured surface to exactly 1/4-inch thickness, rotating the dough occasionally to prevent sticking.
- Cut out an even number of 2-inch circles using a floured cookie cutter, then use a smaller cutter to remove centers from half the circles to create window frames.
- Arrange the solid circles and window frames 1 inch apart on prepared baking sheets and bake for 12-14 minutes until the edges show the faintest golden hue.
- Transfer cookies to a wire rack and cool completely—about 30 minutes—before assembling to prevent the jam from melting.
- Spread 1 teaspoon raspberry jam on each solid cookie, staying 1/4-inch from the edge to prevent seepage during sandwiching.
- Dust the window frame cookies with reserved granulated sugar using a fine-mesh sieve for even coverage.
- Gently press a sugared frame cookie onto each jam-covered base, applying light pressure until the jam just peeks through the center opening.
Now the cookies reveal their true character—the crisp, shortbread-like texture gives way to the bright burst of raspberry, while the sugar-dusted tops provide the slightest crunch. I love serving them stacked on a vintage cake stand, where their jeweled centers catch the afternoon light like stained glass windows.
Espresso Biscotti

Venturing into the quiet kitchen this afternoon, I find myself craving something that holds its shape through multiple coffee dips—something sturdy yet delicate in flavor, with the deep warmth of espresso woven through each crisp bite. There’s a particular satisfaction in baking that requires patience, where the reward comes not just from eating but from the slow, methodical process itself. These espresso biscotti are precisely that kind of comfort, a twice-baked treat that invites you to slow down and savor each step.
2
logs20
minutes40
minutesIngredients
– 2 cups all-purpose flour (I like to spoon and level it for accuracy, as packing can make the dough too dense)
– 1 cup granulated sugar (just the right amount to balance the espresso’s bitterness)
– 2 large eggs, at room temperature (they blend more smoothly into the dough this way)
– 1 tbsp baking powder (freshness matters here, so I always check the date)
– 1/4 cup strongly brewed espresso, cooled (I use my morning leftover—it adds a rich, authentic flavor)
– 1 tsp vanilla extract (pure vanilla gives it that warm, aromatic note I love)
– 1/2 cup chopped almonds (toasted lightly first for a deeper nuttiness)
Instructions
1. Preheat your oven to 350°F and line a baking sheet with parchment paper for easy cleanup.
2. In a large bowl, whisk together the all-purpose flour, granulated sugar, and baking powder until no lumps remain.
3. Crack the room-temperature eggs into a separate bowl and beat them lightly with a fork for about 30 seconds until frothy.
4. Pour the beaten eggs into the dry ingredients, followed by the cooled espresso and vanilla extract.
5. Stir the mixture with a wooden spoon just until a shaggy dough forms, being careful not to overmix—this keeps the biscotti tender.
6. Fold in the chopped almonds evenly throughout the dough using a gentle folding motion.
7. Turn the dough out onto a lightly floured surface and divide it into two equal portions.
8. Shape each portion into a log about 12 inches long and 2 inches wide, pressing gently to compact them.
9. Place the logs on the prepared baking sheet, spacing them at least 3 inches apart to allow for spreading.
10. Bake for 25 minutes at 350°F until the logs are firm to the touch and lightly golden on top.
11. Remove the baking sheet from the oven and let the logs cool on the sheet for 10 minutes—this makes slicing easier and prevents crumbling.
12. Transfer the cooled logs to a cutting board and use a serrated knife to slice them diagonally into 1/2-inch thick pieces.
13. Arrange the slices cut-side down on the same baking sheet in a single layer.
14. Return the slices to the oven and bake for an additional 15 minutes at 325°F, flipping them halfway through, until crisp and dry.
15. Let the biscotti cool completely on a wire rack, about 30 minutes, to achieve their signature crunch.
Perhaps what I love most is how these biscotti transform with time—their initial firmness gives way to a satisfying snap, revealing a subtle espresso warmth that pairs beautifully with a morning latte. Try dipping them in dark chocolate for an indulgent twist, or simply enjoy their rustic charm as they are, each bite a quiet moment of comfort.
Decadent Molasses Cookies

Gently, as the afternoon light fades, I find myself drawn to the kitchen, craving something that feels like a warm embrace—these molasses cookies, with their deep, spiced sweetness, are my quiet comfort on days that feel a little too rushed.
24
cookies15
minutes12
minutesIngredients
– 2 cups all-purpose flour (I always sift mine first for a lighter texture)
– 1 tsp baking soda (freshly opened, it makes all the difference)
– 1/2 tsp salt (a fine sea salt is my preference here)
– 1 tsp ground ginger (I love the warmth it adds)
– 1/2 tsp ground cinnamon (just a hint, not overpowering)
– 1/4 tsp ground cloves (use sparingly—it’s strong but lovely)
– 3/4 cup unsalted butter, softened (room temp is key for easy creaming)
– 1 cup dark brown sugar, packed (the molasses in it deepens the flavor)
– 1 large egg, room temperature (it blends smoother this way)
– 1/4 cup molasses (I use blackstrap for its robust taste)
– 1/4 cup granulated sugar (for rolling—it gives a delicate crunch)
Instructions
1. Preheat your oven to 350°F and line two baking sheets with parchment paper.
2. In a medium bowl, whisk together the flour, baking soda, salt, ginger, cinnamon, and cloves until fully combined.
3. In a separate large bowl, use an electric mixer on medium speed to cream the softened butter and dark brown sugar for about 2 minutes, until light and fluffy.
4. Add the room temperature egg to the butter mixture and beat for 30 seconds until incorporated.
5. Pour in the molasses and mix on low speed just until smooth, scraping down the sides of the bowl with a spatula.
6. Gradually add the dry ingredients to the wet mixture, mixing on low speed until a soft dough forms—don’t overmix.
7. Place the granulated sugar in a small bowl.
8. Scoop tablespoon-sized portions of dough, roll them into balls, and coat each lightly in the granulated sugar.
9. Arrange the dough balls 2 inches apart on the prepared baking sheets to allow for spreading.
10. Bake one sheet at a time in the preheated oven for 10–12 minutes, until the edges are set but the centers are still soft.
11. Let the cookies cool on the baking sheet for 5 minutes before transferring to a wire rack to cool completely. Buttery and spiced, these cookies emerge with a crackled top and chewy center that melts with each bite. Serve them slightly warm with a glass of cold milk, or crumble over vanilla ice cream for a simple, indulgent treat.
Funfetti Birthday Cake Cookies

There’s something quietly magical about transforming the nostalgic joy of birthday cake into a humble cookie form, where each colorful sprinkle becomes a tiny celebration waiting to be discovered. These funfetti cookies carry that same childhood wonder, but with the gentle satisfaction of something made slowly by hand, perfect for when you need a small moment of sweetness without the fuss of a whole cake. They’re like little edible hugs, crisp at the edges yet tender within, best enjoyed with a cup of tea while watching afternoon light fade through the kitchen window.
24
cookies15
minutes11
minutesIngredients
– 1 cup unsalted butter, softened (I always leave mine on the counter for a good hour—it creams so much better when it yields gently to pressure)
– ¾ cup granulated sugar (I sometimes reduce this slightly if I want them less sweet, but this amount gives that classic cookie crust)
– ¾ cup light brown sugar, packed (I love how the molasses notes deepen the flavor)
– 2 large eggs, at room temperature (truly, room temp eggs incorporate more smoothly and give better rise)
– 1 teaspoon pure vanilla extract (the real stuff makes all the difference here)
– 2 ¼ cups all-purpose flour (I fluff it lightly before measuring to avoid dense cookies)
– 1 teaspoon baking soda
– ½ teaspoon fine sea salt (it balances the sweetness so beautifully)
– ½ cup rainbow sprinkles (the long jimmies hold their color better than tiny nonpareils during baking)
Instructions
1. Preheat your oven to 375°F and line two baking sheets with parchment paper.
2. In a large mixing bowl, beat the softened butter with both sugars on medium speed for exactly 3 minutes until pale and fluffy.
3. Add the room temperature eggs one at a time, beating for 30 seconds after each addition until fully incorporated.
4. Mix in the vanilla extract until just combined.
5. In a separate bowl, whisk together the flour, baking soda, and sea salt until evenly distributed.
6. Gradually add the dry ingredients to the wet mixture, mixing on low speed until no flour streaks remain.
7. Gently fold in the rainbow sprinkles with a spatula until evenly distributed throughout the dough.
8. Scoop 2-tablespoon portions of dough and roll them into smooth balls between your palms.
9. Place dough balls 2 inches apart on prepared baking sheets to allow for spreading.
10. Bake one sheet at a time in the center rack for 9-11 minutes until edges are golden but centers still look slightly underdone.
11. Let cookies cool on the baking sheet for 5 minutes before transferring to a wire rack.
Let these cookies transport you back to simpler times with their soft, cake-like centers and cheerful confetti bursts. The edges develop a delicate crispness that gives way to a tender crumb, while the vanilla warmth wraps around each sugary bite. I love serving them stacked high on a vintage plate with cold milk for dipping, or crumbling one over vanilla ice cream for a spontaneous birthday-inspired sundae.
Conclusion
Baking these 28 delicious cookie recipes promises sweet moments and kitchen success! Whether you’re craving classics or creative twists, there’s a perfect treat waiting. We’d love to hear which recipes become your favorites—leave a comment below and share this roundup on Pinterest so fellow bakers can discover these irresistible cookies too. Happy baking!