Are you ready to transform your cookie game? From classic spritz to festive holiday shapes, a cookie press unlocks a world of buttery, melt-in-your-mouth treats perfect for any occasion. Whether you’re a seasoned baker or just starting out, these 21 delicious recipes will inspire you to create beautiful, tasty cookies with ease. Let’s dive in and find your new favorite!
Classic Butter Cookies
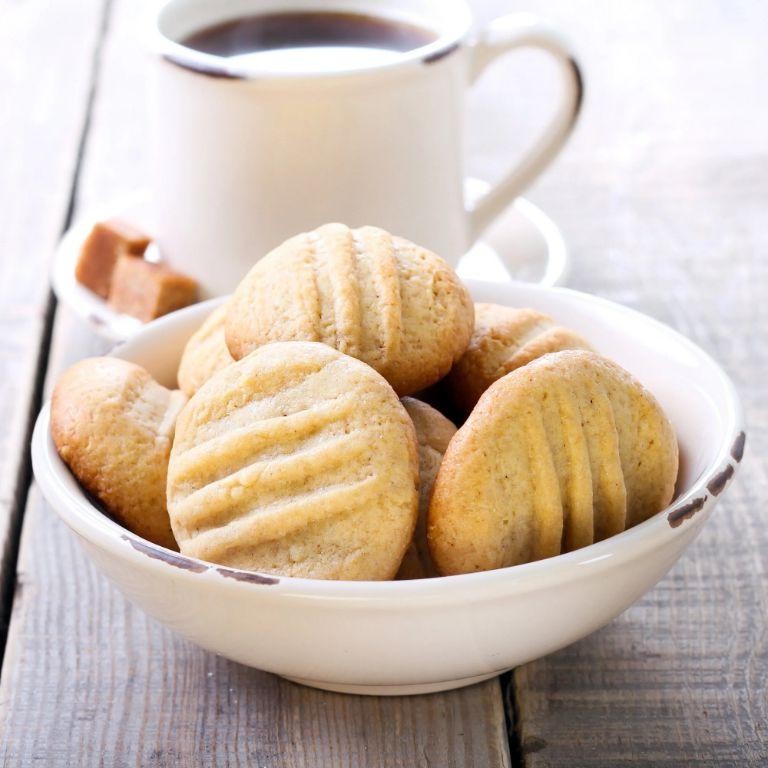
Yikes, have you ever met a cookie so simple yet so dangerously addictive? These classic butter cookies are the ultimate pantry-raid rescue—they require just a handful of ingredients but deliver a melt-in-your-mouth, buttery bliss that’ll have you sneaking back to the cookie jar. Let’s bake up some nostalgia, shall we?
Serving: 24 | Pre Time: 15 minutes | Cooking Time: 12 minutes
Ingredients
– 1 cup (2 sticks) unsalted butter, softened to room temperature—trust me, this is non-negotiable for that perfect creamy texture!
– ⅔ cup granulated sugar, because a little sweetness never hurt anyone.
– 1 large egg, also at room temperature to avoid a curdled mess.
– 1 teaspoon pure vanilla extract, my go-to for that warm, cozy flavor.
– 2 ¼ cups all-purpose flour, sifted to keep things light and airy.
– ¼ teaspoon salt, just a pinch to balance out all that butter goodness.
Instructions
1. Preheat your oven to 350°F (175°C) and line two baking sheets with parchment paper—no sticking allowed!
2. In a large mixing bowl, use an electric mixer on medium speed to cream together the softened butter and granulated sugar for 2–3 minutes, until light and fluffy. Tip: Don’t rush this step; it’s key for tender cookies!
3. Add the room-temperature egg and vanilla extract to the bowl, then mix on low speed just until combined, about 30 seconds.
4. Gradually add the sifted all-purpose flour and salt to the wet ingredients, mixing on low speed until a soft dough forms, about 1–2 minutes. Tip: Stop mixing as soon as the flour disappears to avoid tough cookies.
5. Scoop tablespoon-sized portions of dough and roll them into balls, placing them 2 inches apart on the prepared baking sheets.
6. Use a fork to gently press down on each dough ball, creating a crisscross pattern—this isn’t just for looks; it helps them bake evenly!
7. Bake the cookies in the preheated oven for 10–12 minutes, until the edges are lightly golden. Tip: They’ll firm up as they cool, so don’t overbake!
8. Let the cookies cool on the baking sheets for 5 minutes, then transfer them to a wire rack to cool completely.
Zesty as they are simple, these cookies boast a delicate, crumbly texture with a rich, buttery flavor that’s pure comfort. Serve them alongside a hot cup of coffee for a cozy afternoon treat, or get creative by dipping half in melted chocolate for an extra indulgent twist—they’re basically begging to be dressed up!
Vanilla Spritz Cookies
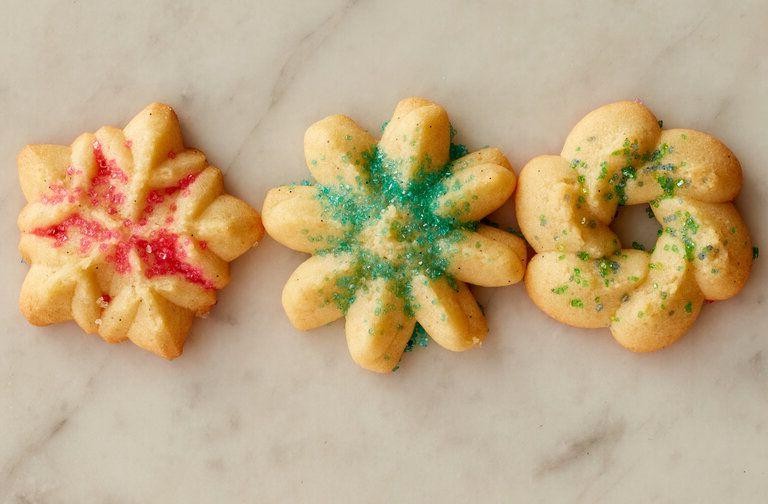
Whip out your cookie press and get ready for a holiday classic that’s easier than untangling Christmas lights! These Vanilla Spritz Cookies are buttery, delicate, and the perfect canvas for sprinkles—or your next baking triumph. Let’s make some magic.
Serving: 36 | Pre Time: 15 minutes | Cooking Time: 8 minutes
Ingredients
– 1 cup unsalted butter, softened (I like to leave mine out for an hour—it creams like a dream)
– ⅔ cup granulated sugar (just the right sweetness, trust me)
– 1 large egg, at room temperature (this helps everything blend smoothly)
– 1 teaspoon pure vanilla extract (the good stuff makes all the difference)
– 2¼ cups all-purpose flour (spooned and leveled to avoid dense cookies)
– ¼ teaspoon salt (a pinch to balance the sweetness)
– Optional: food coloring or sprinkles for decorating (go wild with holiday colors!)
Instructions
1. Preheat your oven to 375°F (190°C) and line baking sheets with parchment paper.
2. In a large bowl, use an electric mixer on medium speed to cream the softened butter and granulated sugar together for 2–3 minutes, until light and fluffy. Tip: Don’t rush this—proper creaming gives the cookies their tender texture.
3. Add the room-temperature egg and vanilla extract to the bowl, then mix on low speed until fully combined, about 30 seconds.
4. Gradually add the all-purpose flour and salt to the wet ingredients, mixing on low speed just until a soft dough forms and no dry streaks remain, about 1–2 minutes. Tip: Overmixing can make the cookies tough, so stop as soon as it comes together.
5. If using, gently fold in food coloring or sprinkles by hand until evenly distributed.
6. Load the dough into a cookie press fitted with your desired disk shape (I love the classic wreath or star).
7. Press cookies directly onto the prepared baking sheets, spacing them about 1 inch apart.
8. Bake in the preheated oven for 7–9 minutes, until the edges are just lightly golden. Tip: They firm up as they cool, so pull them out when they look set but not browned.
9. Let the cookies cool on the baking sheets for 5 minutes, then transfer to a wire rack to cool completely.
Yield to buttery bliss with these melt-in-your-mouth treats—their crisp edges and tender centers are pure vanilla joy. Try stacking them with a dollop of frosting for a festive sandwich, or simply enjoy with a hot cocoa for the ultimate cozy moment.
Cheddar Cheese Crackers
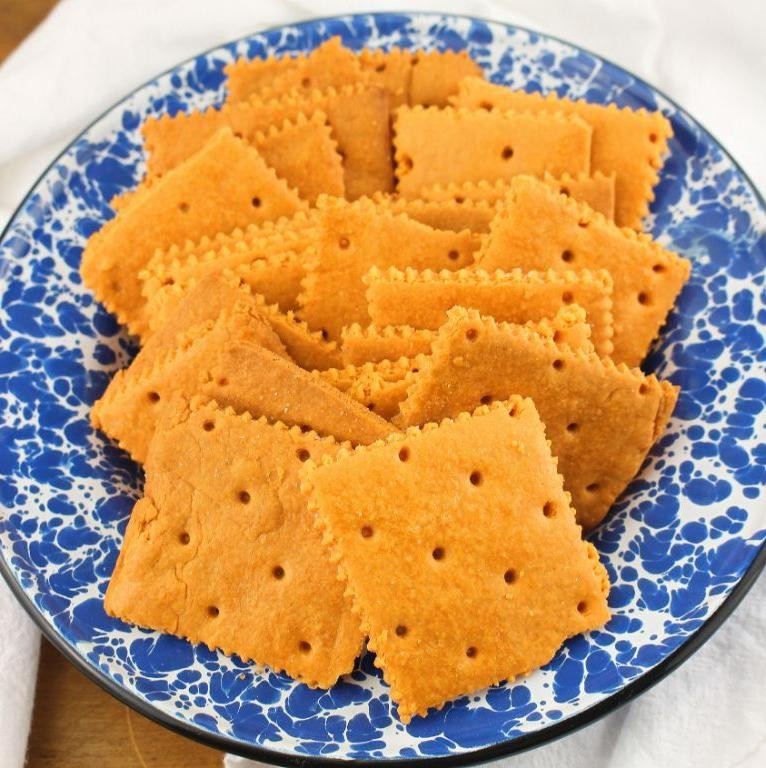
Forget everything you thought you knew about snack time—these homemade cheddar cheese crackers are about to become your new pantry hero, delivering that irresistible cheesy crunch without the mystery ingredients (looking at you, store-bought version!). They’re shockingly simple to whip up, and I promise they’ll vanish faster than you can say “cheese please.”
Serving: 24 crackers | Pre Time: 15 minutes | Cooking Time: 12 minutes
Ingredients
– 1 cup all-purpose flour (I always sift mine first for extra fluffiness)
– 1 cup finely shredded sharp cheddar cheese (the sharper, the better—it packs a punch!)
– 1/2 cup unsalted butter, cold and cubed (cold is key for that perfect flaky texture)
– 1/4 teaspoon salt (a pinch of kosher salt is my go-to for balance)
– 1/4 teaspoon garlic powder (optional, but it adds a sneaky savory kick)
– 2 tablespoons ice water (just enough to bring it all together)
Instructions
1. Preheat your oven to 375°F and line a baking sheet with parchment paper.
2. In a large mixing bowl, combine the all-purpose flour, shredded sharp cheddar cheese, cold unsalted butter, salt, and garlic powder.
3. Use a pastry cutter or your fingers to work the mixture until it resembles coarse crumbs, about 2-3 minutes. Tip: Keep the butter cold to avoid a greasy dough.
4. Gradually add the ice water, 1 tablespoon at a time, mixing until the dough just comes together into a ball.
5. Roll the dough out on a lightly floured surface to 1/8-inch thickness. Tip: Chill the dough for 10 minutes if it gets too sticky—it makes rolling a breeze.
6. Use a small cookie cutter or knife to cut the dough into 1-inch squares or desired shapes.
7. Place the cut crackers on the prepared baking sheet, spacing them about 1/2 inch apart.
8. Bake in the preheated oven for 10-12 minutes, or until the edges are golden brown and crisp. Tip: Rotate the sheet halfway through for even browning.
9. Remove from the oven and let cool completely on the baking sheet to crisp up further.
Buttery and bursting with cheddar flavor, these crackers offer a satisfying snap that’s perfect for dipping into hummus or enjoying solo. Serve them warm from the oven for an extra melty treat, or stash them in an airtight container—if they last that long!
Chocolate Espresso Spritz
Gather ’round, caffeine and chocolate lovers—this Chocolate Espresso Spritz is the sophisticated, fizzy cousin of your morning coffee that decided to dress up for a party. It’s the kind of drink that whispers, “I’m fancy,” but really just wants to have fun and give you a delightful buzz. Perfect for when you need a pick-me-up that feels like a celebration in a glass.
Serving: 2 | Pre Time: 5 minutes | Cooking Time: 0 minutes
Ingredients
– 1 cup cold brew coffee (I like it strong—go for a bold roast to stand up to the chocolate)
– 1/2 cup chocolate syrup (the good, thick kind—none of that watery stuff)
– 1/4 cup heavy cream (chilled, because nobody likes warm cream in their spritz)
– 1 tbsp espresso powder (for that extra kick—trust me, it’s worth it)
– 1 cup club soda (freshly opened, please—flat soda is a sad soda)
– Ice cubes (as many as your heart desires, but don’t skimp)
Instructions
1. Fill two tall glasses with ice cubes—pack them in there like you’re building a frosty fortress.
2. In a small bowl, whisk together 1 cup cold brew coffee, 1/2 cup chocolate syrup, and 1 tbsp espresso powder until fully combined and smooth. Tip: If the espresso powder clumps, sift it first for a silky mixture.
3. Slowly pour the coffee-chocolate mixture evenly over the ice in both glasses, filling each about halfway.
4. In a separate bowl, vigorously whisk 1/4 cup heavy cream until it thickens slightly—aim for a pourable consistency, not stiff peaks. Tip: Use a chilled bowl and whisk for faster results.
5. Gently drizzle the whipped cream over the coffee mixture in each glass, letting it float on top like a creamy cloud.
6. Top off each glass with 1/2 cup club soda, pouring slowly down the side to preserve the layers and create a fizzy effect. Tip: Pour from a height of about 6 inches to minimize splashing and maximize bubbles.
7. Give each glass a light stir with a long spoon to blend the layers slightly, but don’t overdo it—you want to see those beautiful swirls.
8. Serve immediately with straws or spoons for sipping and stirring as you go.
Brace yourself for a sip that’s rich and velvety from the chocolate, with a bold espresso punch that’s smoothed out by the creamy foam. The effervescence from the club soda adds a playful tingle, making it feel like a dessert and a drink had a very happy marriage. Try garnishing with a sprinkle of cocoa powder or a chocolate-covered espresso bean for an extra indulgent touch—it’s like giving your taste buds a high-five.
Holiday Almond Crescents
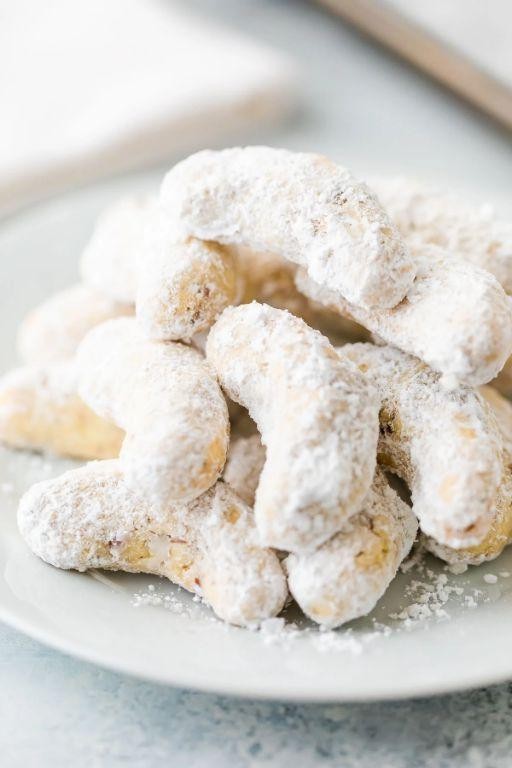
Now, if you’re anything like me, you’ve probably stared down a holiday cookie platter and thought, “Where’s the buttery, nutty, melt-in-your-mouth magic?” Fear not, my friend—these Holiday Almond Crescents are here to answer that delicious cry for help with a wink and a sprinkle of powdered sugar.
Serving: 24 | Pre Time: 20 minutes | Cooking Time: 15 minutes
Ingredients
– 1 cup unsalted butter, softened (I always let mine sit out for an hour—it makes creaming a dream)
– 1/2 cup powdered sugar, plus more for dusting (trust me, you’ll want that extra for a snowy finish)
– 1 teaspoon pure vanilla extract (the good stuff, because imitation just won’t do)
– 2 cups all-purpose flour (I sift mine to avoid any lumpy surprises)
– 1 cup finely ground almonds (toast them lightly first for a deeper, nuttier flavor—my secret weapon)
– 1/4 teaspoon salt (a pinch to balance all that sweetness)
Instructions
1. Preheat your oven to 350°F and line two baking sheets with parchment paper—this prevents sticking and makes cleanup a breeze.
2. In a large mixing bowl, use an electric mixer on medium speed to cream the softened butter and 1/2 cup powdered sugar together for about 2 minutes, until light and fluffy. Tip: Scrape down the sides of the bowl halfway through to ensure everything is evenly mixed.
3. Beat in the vanilla extract until just combined.
4. In a separate bowl, whisk together the flour, ground almonds, and salt.
5. Gradually add the dry ingredients to the butter mixture, mixing on low speed until a soft dough forms. Tip: Don’t overmix—stop as soon as it comes together to keep the cookies tender.
6. Scoop out tablespoon-sized portions of dough and roll each into a small log about 2 inches long.
7. Shape each log into a crescent by curving the ends inward and placing them on the prepared baking sheets, spacing them about 1 inch apart.
8. Bake in the preheated oven for 12-15 minutes, or until the edges are just lightly golden. Tip: Rotate the baking sheets halfway through baking for even browning.
9. Remove from the oven and let the cookies cool on the sheets for 5 minutes.
10. While still warm, gently roll each crescent in the extra powdered sugar to coat evenly, then transfer to a wire rack to cool completely.
These crescents boast a delicate, crumbly texture that practically dissolves on your tongue, with a rich almond flavor that’s perfectly sweet without being cloying. Serve them piled high on a vintage platter for a festive touch, or sneak a few with your morning coffee—they’re irresistible any time of day.
Lemon Poppy Seed Cookies
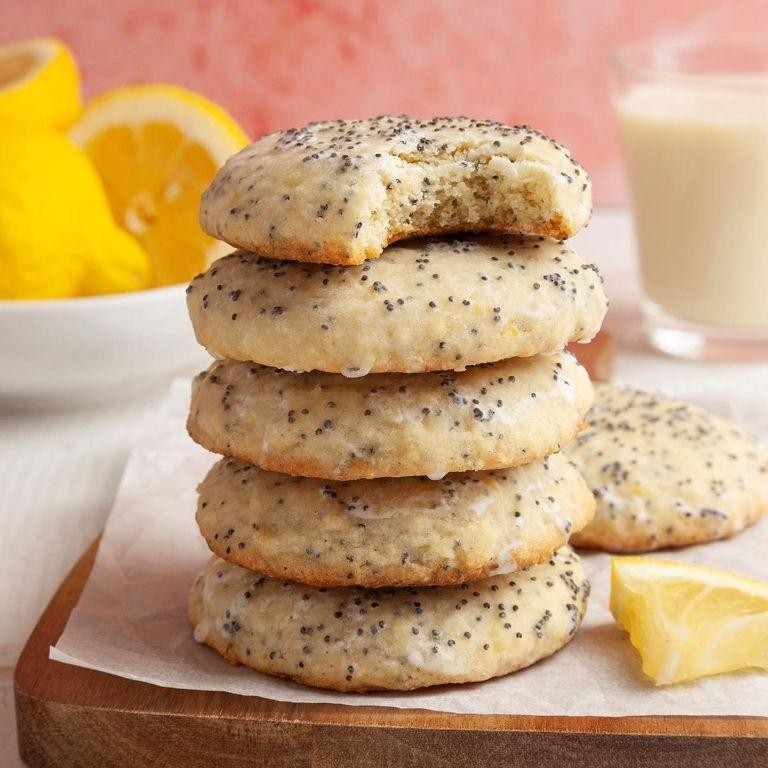
Ready to turn your kitchen into a sunshine factory? These lemon poppy seed cookies are the cheerful, zesty pick-me-up your cookie jar desperately needs—they’re basically edible confetti that’s way more fun than a boring old lemon wedge. Trust me, one bite and you’ll be grinning like you just won the lottery (or at least found a forgotten $20 in your pocket).
Serving: 24 cookies | Pre Time: 15 minutes | Cooking Time: 10 minutes
Ingredients
- 1 cup unsalted butter, softened (I always leave mine on the counter for an hour—no microwave cheating!)
- ¾ cup granulated sugar, because life is sweet enough already
- 1 large egg, at room temperature for that perfect emulsion (cold eggs are a cookie’s worst enemy)
- 2 tablespoons fresh lemon juice, squeezed from real lemons (bottled stuff? Not in my kitchen!)
- 1 tablespoon lemon zest, finely grated for maximum citrus punch
- 2 cups all-purpose flour, spooned and leveled to avoid dense cookies
- 2 tablespoons poppy seeds, for that delightful crunch and speckled charm
- ½ teaspoon baking powder, the secret lift agent
- ¼ teaspoon salt, to balance all that sweetness
Instructions
- Preheat your oven to 350°F and line two baking sheets with parchment paper—trust me, it prevents sticking and makes cleanup a breeze.
- In a large bowl, beat the softened butter and granulated sugar together with an electric mixer on medium speed for 2–3 minutes, until light and fluffy. Tip: Don’t rush this step; creaming properly gives cookies their tender texture.
- Add the room-temperature egg, fresh lemon juice, and lemon zest to the butter mixture, and beat on low speed just until combined, about 30 seconds.
- In a separate bowl, whisk together the all-purpose flour, poppy seeds, baking powder, and salt until evenly distributed.
- Gradually add the dry ingredients to the wet mixture, mixing on low speed until a soft dough forms, about 1 minute. Tip: Avoid overmixing to keep the cookies from becoming tough.
- Scoop tablespoon-sized portions of dough, roll them into balls, and place them 2 inches apart on the prepared baking sheets.
- Bake one sheet at a time in the preheated oven for 8–10 minutes, until the edges are lightly golden but the centers are still soft. Tip: Rotate the sheet halfway through for even baking.
- Remove the baking sheet from the oven and let the cookies cool on it for 5 minutes before transferring them to a wire rack to cool completely.
Perfectly crisp around the edges with a soft, chewy center, these cookies burst with bright lemon flavor and a subtle crunch from the poppy seeds. Serve them alongside a cup of herbal tea for an afternoon treat, or crumble them over vanilla ice cream for a dessert that’s downright irresistible.
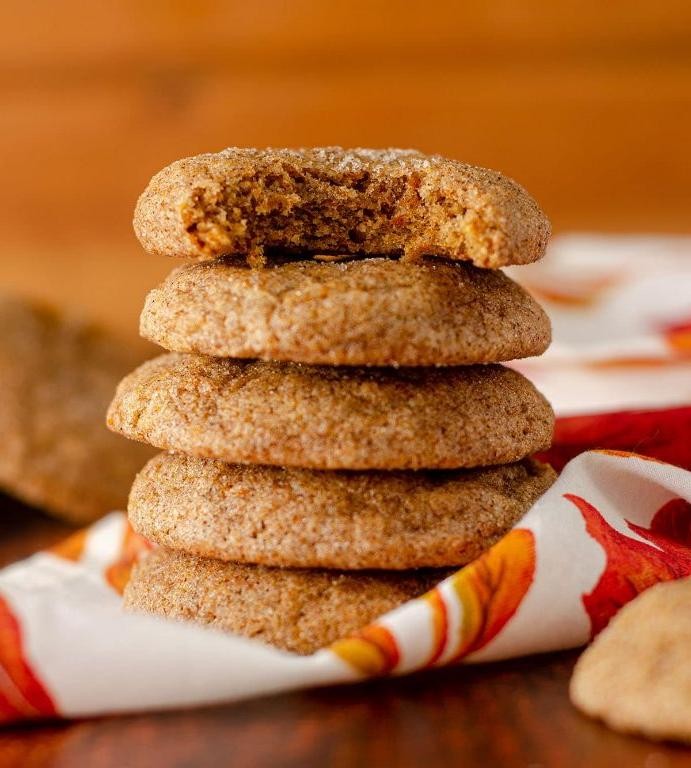
Cinnamon Sugar Butter Cookies
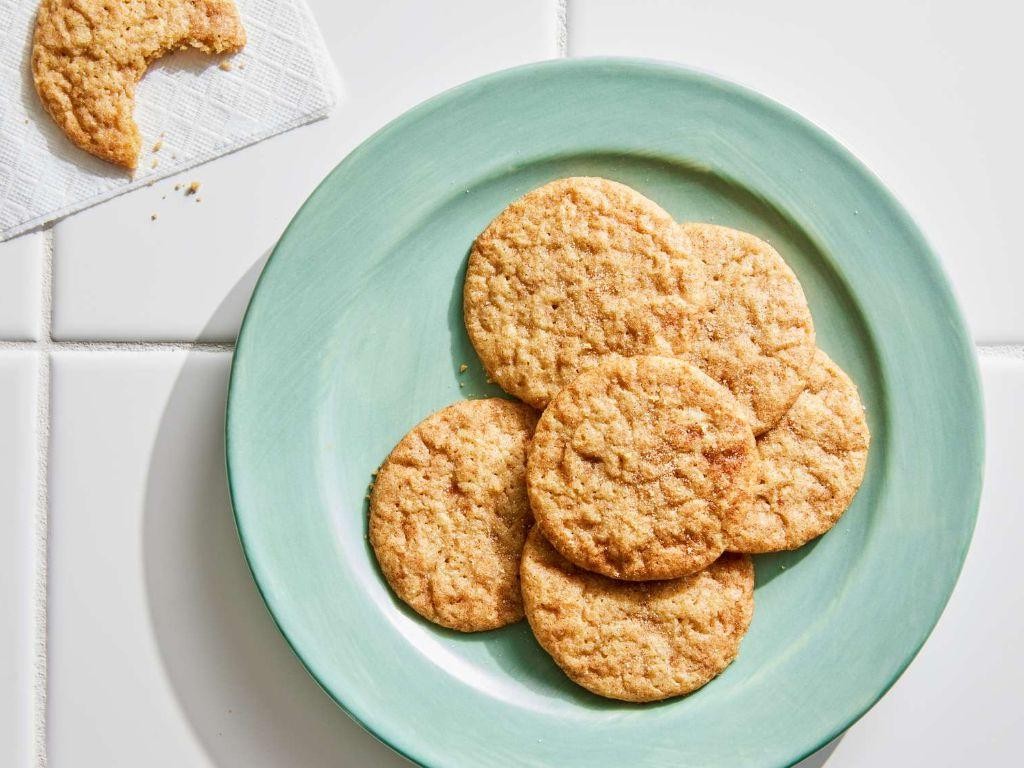
Virtually every holiday season, my kitchen becomes a cinnamon-scented snow globe of powdered sugar chaos—and these buttery, sparkly cookies are the delightful reason why. They’re like little edible hugs, perfect for gifting (or, let’s be real, hoarding with a mug of hot cocoa).
Serving: 24 cookies | Pre Time: 20 minutes | Cooking Time: 12 minutes
Ingredients
– 1 cup (2 sticks) unsalted butter, softened to room temperature—this is non-negotiable for that dreamy, creamy texture.
– 1 cup granulated sugar, plus ½ cup extra for the sparkly cinnamon-sugar coating.
– 1 large egg, also at room temperature (I pop mine in warm water for 5 minutes if I forget to plan ahead).
– 2 teaspoons pure vanilla extract—the good stuff makes all the difference.
– 2½ cups all-purpose flour, spooned and leveled to avoid dense cookies.
– 1 teaspoon baking soda, because we want a little lift.
– ½ teaspoon salt, to balance the sweetness.
– 2 tablespoons ground cinnamon, divided (1 tablespoon for the dough, 1 tablespoon for the coating).
Instructions
1. Preheat your oven to 350°F (175°C) and line two baking sheets with parchment paper.
2. In a large bowl, use an electric mixer on medium speed to cream the softened butter and 1 cup of granulated sugar together for 2–3 minutes, until light and fluffy. Tip: Don’t rush this step—proper creaming traps air for a tender cookie.
3. Beat in the room-temperature egg and vanilla extract until fully combined, about 1 minute.
4. In a separate bowl, whisk together the flour, baking soda, salt, and 1 tablespoon of cinnamon.
5. Gradually add the dry ingredients to the wet mixture, mixing on low speed just until a soft dough forms and no flour streaks remain. Tip: Overmixing can lead to tough cookies, so stop as soon as it’s combined.
6. In a small bowl, stir together the remaining ½ cup of granulated sugar and 1 tablespoon of cinnamon for the coating.
7. Scoop 1½-tablespoon portions of dough, roll them into balls, and generously roll each ball in the cinnamon-sugar mixture to coat completely.
8. Place the coated dough balls 2 inches apart on the prepared baking sheets.
9. Bake one sheet at a time in the preheated oven for 10–12 minutes, until the edges are lightly golden and the centers look set. Tip: For chewier cookies, pull them out at 10 minutes; for crispier edges, go for the full 12.
10. Let the cookies cool on the baking sheet for 5 minutes before transferring them to a wire rack to cool completely.
These cookies emerge with a crisp, sugary shell that gives way to a soft, buttery interior infused with warm cinnamon. They’re irresistible straight from the rack, but try crumbling one over vanilla ice cream for an instant dessert upgrade—trust me, it’s a game-changer.
Orange Zest Spritz Cookies
Kick off your holiday baking with these zesty little gems that’ll make your taste buds do a happy dance—they’re like sunshine in cookie form, perfect for when you need a break from all the heavy winter treats. Seriously, one bite and you’ll be hooked on their bright, citrusy charm.
Serving: 24 cookies | Pre Time: 20 minutes | Cooking Time: 10 minutes
Ingredients
– 1 cup unsalted butter, softened (I always let mine sit out for an hour—it makes creaming so much easier)
– ¾ cup granulated sugar
– 1 large egg, at room temperature (trust me, it blends better this way)
– 2 teaspoons pure vanilla extract
– 2 tablespoons fresh orange zest (from about 1 large orange, and go for the bright outer layer only—avoid the bitter white pith)
– 2 ¼ cups all-purpose flour
– ½ teaspoon baking powder
– ¼ teaspoon salt
– Optional: extra sugar for rolling, because a little sparkle never hurt anyone
Instructions
1. Preheat your oven to 350°F and line two baking sheets with parchment paper.
2. In a large bowl, use an electric mixer on medium speed to cream the softened butter and granulated sugar together for about 2–3 minutes, until light and fluffy.
3. Add the room-temperature egg and vanilla extract, mixing on low until fully incorporated, about 30 seconds.
4. Gently fold in the fresh orange zest with a spatula to distribute it evenly without overmixing.
5. In a separate bowl, whisk together the all-purpose flour, baking powder, and salt until well combined.
6. Gradually add the dry ingredients to the wet mixture, mixing on low speed just until a soft dough forms—be careful not to overwork it, or the cookies might turn tough.
7. Scoop tablespoon-sized portions of dough and roll them into balls between your palms.
8. If desired, roll each ball in extra sugar to coat lightly for a sparkly finish.
9. Place the dough balls about 2 inches apart on the prepared baking sheets, then use a fork to gently press down twice in a crisscross pattern to flatten slightly.
10. Bake in the preheated oven for 8–10 minutes, until the edges are just starting to turn a very light golden brown—they’ll firm up as they cool, so don’t overbake.
11. Let the cookies cool on the baking sheets for 5 minutes before transferring them to a wire rack to cool completely.
12. Lightly dust with more orange zest or serve as is for a simple, elegant touch.
Let these cookies cool fully to achieve that perfect crisp-yet-tender texture, with a burst of citrus in every bite. They’re fantastic with a cup of tea or crumbled over vanilla ice cream for a playful twist—honestly, they might just become your new go-to for impressing guests or just treating yourself!
Pecan Shortbread Delights

Dare I say, these buttery, nutty morsels are the cookie jar’s answer to a cozy winter hug—they’re so simple to whip up, you’ll be tempted to make them your signature holiday treat (just try not to eat them all before your guests arrive!). Serving: 24 | Pre Time: 15 minutes | Cooking Time: 25 minutes
Ingredients
– 1 cup unsalted butter, softened to room temperature (trust me, this makes all the difference for that melt-in-your-mouth texture)
– 1/2 cup granulated sugar (I like to use organic cane sugar for a subtle caramel note)
– 2 cups all-purpose flour (sifted once to avoid lumps—no one wants a floury surprise!)
– 1 cup finely chopped pecans (toasted lightly in a 350°F oven for 5 minutes first for extra crunch and flavor)
– 1/2 teaspoon vanilla extract (pure vanilla is my go-to for that warm, aromatic kick)
– 1/4 teaspoon salt (a pinch of sea salt balances the sweetness perfectly)
Instructions
1. Preheat your oven to 325°F and line a baking sheet with parchment paper.
2. In a large mixing bowl, cream together the softened butter and granulated sugar using an electric mixer on medium speed for 2–3 minutes, until light and fluffy. Tip: Scrape down the sides of the bowl halfway through to ensure everything is evenly mixed.
3. Add the sifted all-purpose flour, finely chopped pecans, vanilla extract, and salt to the butter mixture.
4. Mix on low speed just until the dough comes together and no dry flour remains, about 1–2 minutes. Tip: Avoid overmixing to keep the shortbread tender and crumbly.
5. Scoop tablespoon-sized portions of dough and roll them into balls between your palms.
6. Place the dough balls on the prepared baking sheet, spacing them about 2 inches apart.
7. Gently press each ball with the bottom of a glass or your fingers to flatten slightly into 1/2-inch-thick rounds.
8. Bake in the preheated oven at 325°F for 20–25 minutes, until the edges are lightly golden brown. Tip: Rotate the baking sheet halfway through baking for even browning.
9. Remove from the oven and let the shortbread cool on the baking sheet for 5 minutes.
10. Transfer the shortbread to a wire rack to cool completely for another 15–20 minutes.
Oh, the joy of biting into these delights! They boast a crisp, buttery exterior that gives way to a tender, nutty crumb, with the toasted pecans adding a delightful crunch in every bite. Serve them warm with a drizzle of honey or alongside a scoop of vanilla ice cream for an indulgent twist—they’re so versatile, they might just become your new favorite snack to share (or sneak!).
Hazelnut Cocoa Cookies

Crisp, chewy, and packed with nutty-chocolatey goodness, these Hazelnut Cocoa Cookies are the ultimate treat to satisfy your sweet tooth—just try not to eat the whole batch in one sitting (we won’t judge if you do!). They’re like a cozy hug in cookie form, perfect for dunking in milk or sneaking as a midnight snack. Serving: 24 cookies | Pre Time: 15 minutes | Cooking Time: 10 minutes
Ingredients
– 1 cup unsalted butter, softened (I always use room temp butter for that perfect creamy blend—it makes all the difference!)
– 1 cup granulated sugar (for that sweet crunch)
– 1 cup brown sugar, packed (adds a lovely molasses depth)
– 2 large eggs, at room temperature (trust me, room temp eggs help everything mix smoothly without curdling)
– 1 tsp vanilla extract (pure vanilla is my go-to for that warm aroma)
– 2 cups all-purpose flour (sifted to avoid lumps)
– ¾ cup cocoa powder (I use Dutch-processed for a rich, dark flavor)
– 1 tsp baking soda
– ½ tsp salt (a pinch balances the sweetness perfectly)
– 1 cup chopped hazelnuts, toasted (toasting them first brings out their nutty magic—don’t skip this!)
– ½ cup chocolate chips (I prefer semi-sweet for a bittersweet kick)
Instructions
1. Preheat your oven to 350°F (175°C) and line two baking sheets with parchment paper.
2. In a large mixing bowl, cream together the softened butter, granulated sugar, and brown sugar on medium speed for 2–3 minutes until light and fluffy.
3. Add the room temperature eggs one at a time, beating well after each addition, then mix in the vanilla extract until combined.
4. In a separate bowl, whisk together the sifted all-purpose flour, cocoa powder, baking soda, and salt.
5. Gradually add the dry ingredients to the wet mixture, mixing on low speed just until no flour streaks remain—overmixing can make the cookies tough.
6. Fold in the toasted chopped hazelnuts and chocolate chips with a spatula until evenly distributed.
7. Scoop tablespoon-sized portions of dough onto the prepared baking sheets, spacing them about 2 inches apart to allow for spreading.
8. Bake in the preheated oven for 8–10 minutes, or until the edges are set but the centers still look slightly soft—they’ll firm up as they cool.
9. Let the cookies cool on the baking sheets for 5 minutes before transferring to a wire rack to cool completely.
10. Keep an eye on them; baking time can vary, so check at 8 minutes to avoid over-browning.
Kick back and enjoy these gems! They boast a crisp edge with a fudgy center, thanks to that cocoa-hazelnut duo, and are divine served warm with a scoop of vanilla ice cream or crumbled over yogurt for a breakfast twist.
Maple Walnut Spritz
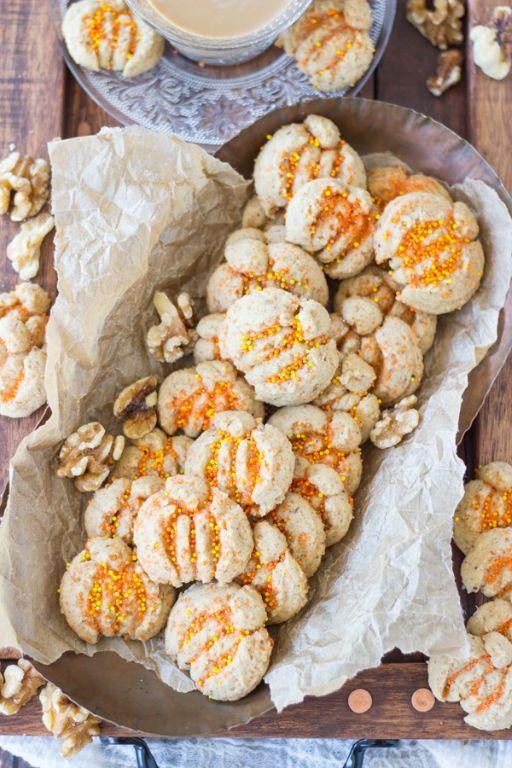
Kick off your holiday baking with these Maple Walnut Spritz cookies—they’re the buttery, maple-kissed bites that’ll have everyone reaching for seconds (and thirds, no judgment!). Seriously, these little guys are so good, they might just upstage your main dessert.
Serving: 36 | Pre Time: 20 minutes | Cooking Time: 10 minutes
Ingredients
– 1 cup unsalted butter, softened to room temp (trust me, this makes all the difference for that perfect texture)
– ¾ cup granulated sugar
– ¼ cup pure maple syrup, the real stuff—none of that pancake syrup imposter!
– 1 large egg, also at room temp for smooth mixing
– 1 teaspoon vanilla extract
– 2 ¼ cups all-purpose flour, spooned and leveled to avoid dense cookies
– ½ teaspoon baking powder
– ¼ teaspoon salt
– ½ cup finely chopped walnuts, toasted for extra nutty flavor (I always toast a bit extra for snacking)
Instructions
1. Preheat your oven to 375°F and line two baking sheets with parchment paper.
2. In a large bowl, beat the softened butter and granulated sugar together with an electric mixer on medium speed for 2–3 minutes, until light and fluffy.
3. Add the maple syrup, egg, and vanilla extract to the butter mixture, and beat on medium speed for 1 minute until fully combined.
4. In a separate medium bowl, whisk together the all-purpose flour, baking powder, and salt.
5. Gradually add the flour mixture to the wet ingredients, mixing on low speed just until a soft dough forms—don’t overmix!
6. Gently fold in the chopped walnuts with a spatula until evenly distributed throughout the dough.
7. Spoon the dough into a cookie press fitted with a star or flower disk, and press cookies directly onto the prepared baking sheets, spacing them about 1 inch apart.
8. Bake one sheet at a time in the preheated oven for 8–10 minutes, until the edges are lightly golden but the centers are still soft.
9. Let the cookies cool on the baking sheet for 5 minutes, then transfer them to a wire rack to cool completely.
Just baked, these spritz cookies are delightfully crisp with a tender, melt-in-your-mouth center, thanks to that maple-walnut duo. Serve them stacked high on a festive platter or crumbled over vanilla ice cream for an extra-decadent treat—they’re basically holiday magic in cookie form!
Pumpkin Spice Cookies
Fancy a cookie that tastes like autumn in a cozy sweater? These pumpkin spice cookies are the edible equivalent of a crisp fall day—warm, spiced, and utterly irresistible. They’re so good, you might just forget about that pumpkin spice latte (well, almost!).
Serving: 24 | Pre Time: 15 minutes | Cooking Time: 12 minutes
Ingredients
– 2 cups all-purpose flour (I always sift mine for fluffiness)
– 1 teaspoon baking soda (fresh is key—check the date!)
– 1/2 teaspoon salt (a pinch of sea salt adds a nice contrast)
– 1 cup unsalted butter, softened (room temp makes creaming a breeze)
– 1 cup granulated sugar (for that classic sweetness)
– 1/2 cup brown sugar, packed (dark brown gives a richer molasses note)
– 1 large egg (I prefer room temp eggs here for even mixing)
– 1 teaspoon vanilla extract (pure vanilla is my go-to for depth)
– 1 cup pumpkin puree (not pumpkin pie filling—trust me on this)
– 1 tablespoon pumpkin pie spice (homemade blend or store-bought works)
– 1/2 cup chopped pecans (optional, but they add a lovely crunch)
Instructions
1. Preheat your oven to 350°F and line two baking sheets with parchment paper.
2. In a medium bowl, whisk together the all-purpose flour, baking soda, and salt until well combined.
3. In a large bowl, use an electric mixer to cream the softened butter, granulated sugar, and brown sugar on medium speed for 2-3 minutes, until light and fluffy.
4. Add the room temp egg and vanilla extract to the butter mixture, beating on low until just incorporated.
5. Mix in the pumpkin puree and pumpkin pie spice on low speed until smooth, scraping down the sides of the bowl as needed.
6. Gradually add the flour mixture to the wet ingredients, mixing on low until a soft dough forms, then fold in the chopped pecans if using.
7. Drop rounded tablespoons of dough onto the prepared baking sheets, spacing them about 2 inches apart.
8. Bake in the preheated oven for 10-12 minutes, until the edges are lightly golden and the centers look set.
9. Let the cookies cool on the baking sheets for 5 minutes before transferring to a wire rack to cool completely.
Delightfully soft and chewy, these cookies boast a warm pumpkin flavor with just the right hint of spice. Serve them warm with a glass of milk or crumble them over vanilla ice cream for an instant fall dessert upgrade—they’re so versatile, you’ll want to bake a double batch!
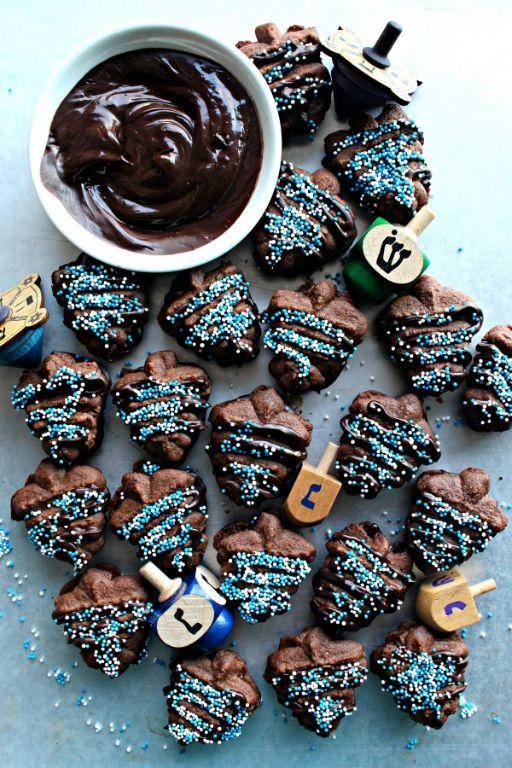
Mint Chocolate Swirls
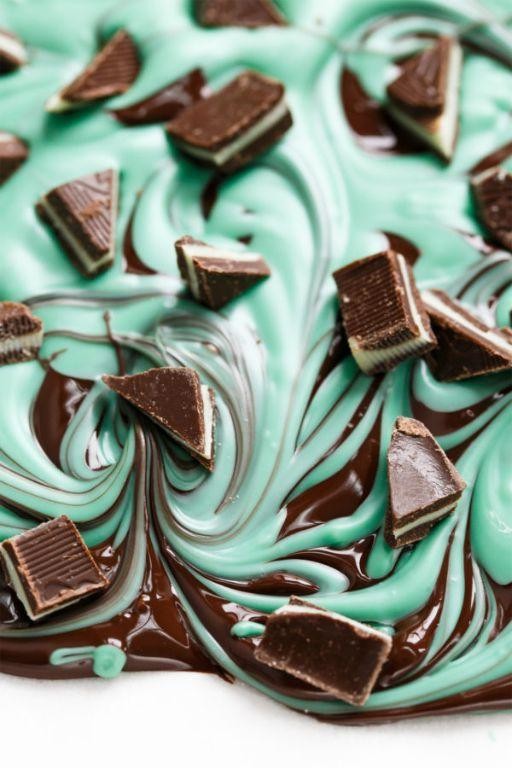
Venture into a world where dessert rebellion meets holiday cheer with these Mint Chocolate Swirls—a cookie so delightfully twisted, it’ll have you questioning why all treats aren’t this whimsically striped. Imagine the cool, refreshing kiss of mint dancing with rich, decadent chocolate in a buttery dough that bakes up into soft, swirly masterpieces. They’re the perfect festive bite to impress guests or simply treat yourself after a long day of holiday chaos (we won’t judge!).
Serving: 24 | Pre Time: 25 minutes | Cooking Time: 10 minutes
Ingredients
– 1 cup unsalted butter, softened (I always let mine sit out for 30 minutes—it creams like a dream)
– ¾ cup granulated sugar, because sweetness is non-negotiable here
– 1 large egg, preferably at room temp for smoother mixing
– 1 tsp pure vanilla extract, the good stuff makes all the difference
– 2 ¼ cups all-purpose flour, spooned and leveled to avoid dense cookies
– ½ tsp baking powder, for a little lift without puffiness
– ¼ tsp salt, to balance the sweetness
– ½ cup cocoa powder, sifted to banish any lumps
– 1 tsp peppermint extract, for that refreshing minty kick (adjust if you’re sensitive to strong flavors)
– Green food coloring, a few drops to get that vibrant swirl—I go for gel-based for intense color
Instructions
1. Preheat your oven to 350°F and line two baking sheets with parchment paper—trust me, it prevents sticking and makes cleanup a breeze.
2. In a large bowl, cream together the softened butter and granulated sugar with an electric mixer on medium speed for 2–3 minutes, until light and fluffy; this incorporates air for tender cookies.
3. Add the room temperature egg and pure vanilla extract, mixing on low until just combined to avoid overbeating.
4. In a separate bowl, whisk together the all-purpose flour, baking powder, and salt until evenly distributed.
5. Gradually add the dry ingredients to the wet mixture, mixing on low speed until a soft dough forms; don’t overmix, or the cookies can turn tough.
6. Divide the dough in half evenly—I use a kitchen scale for precision, but eyeballing works too.
7. To one half, add the sifted cocoa powder and mix until fully incorporated and the dough is uniformly chocolatey.
8. To the other half, add the peppermint extract and green food coloring, mixing until the mint flavor is even and the color is vibrant.
9. On a lightly floured surface, roll each dough half into a rectangle about ¼-inch thick; if it sticks, chill for 10 minutes to firm up.
10. Place the mint dough on top of the chocolate dough, pressing gently to adhere, then roll tightly from the long side into a log.
11. Wrap the log in plastic wrap and refrigerate for at least 1 hour, or until firm—this prevents spreading and ensures clean slices.
12. Slice the chilled log into ¼-inch thick rounds and place them 2 inches apart on the prepared baking sheets.
13. Bake in the preheated oven for 8–10 minutes, until the edges are set but the centers are still soft; they’ll firm up as they cool.
14. Let the cookies cool on the baking sheets for 5 minutes, then transfer to a wire rack to cool completely.
Zesty and cool, these swirls boast a tender crumb with a playful contrast of flavors that melts in your mouth. Serve them stacked high on a platter for a holiday party, or crumble over ice cream for an indulgent twist—either way, they’re sure to disappear faster than you can say “mint chocolate magic!”
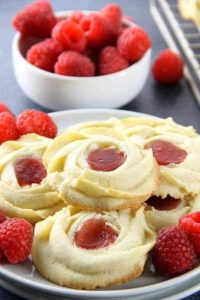
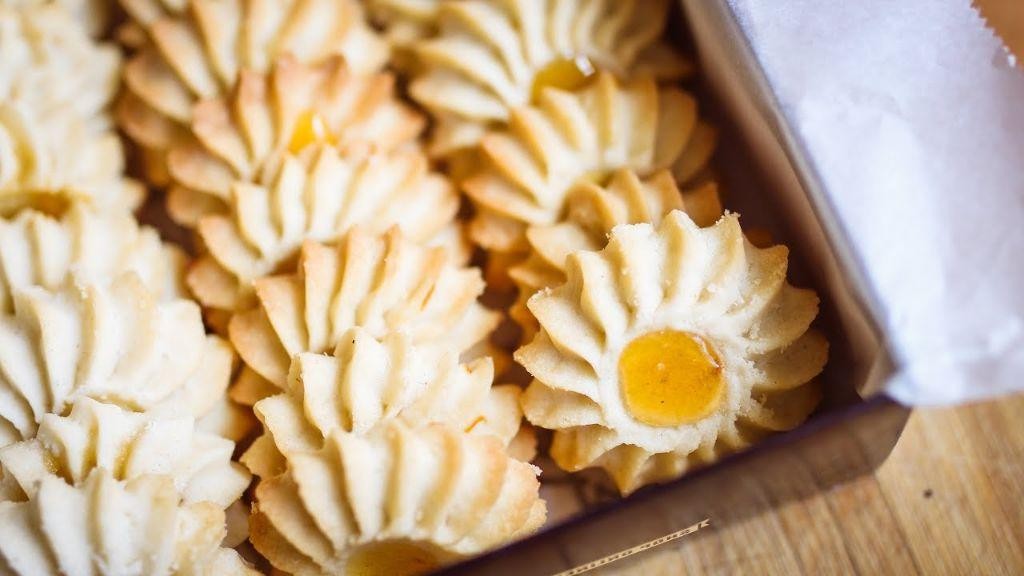
Raspberry Filled Butter Buttons

Unbelievably, the most delightful little pastry you’ll ever meet is hiding in your kitchen right now—these Raspberry Filled Butter Buttons are like tiny, flaky hugs with a sweet-tart surprise inside. They’re the perfect treat to whip up when you want to impress without the stress, and trust me, they disappear faster than you can say “second breakfast.” Get ready to fall in love with buttery layers and a burst of raspberry joy in every single bite.
Serving: 24 | Pre Time: 25 minutes | Cooking Time: 15 minutes
Ingredients
– 2 cups all-purpose flour (I always sift mine for extra fluffiness)
– 1 cup unsalted butter, cold and cubed (the colder, the flakier—I keep mine in the freezer for 10 minutes first)
– 1/2 cup granulated sugar (for that perfect sweet balance)
– 1/4 teaspoon salt (just a pinch to make the flavors pop)
– 1 large egg, room temperature (it blends smoother, I promise)
– 1 teaspoon vanilla extract (pure vanilla is my go-to for that warm aroma)
– 1/2 cup raspberry jam (seedless is my preference to avoid crunch, but seeded works too for texture lovers)
– 1 tablespoon milk (any kind will do, but whole milk gives a nice golden finish)
Instructions
1. Preheat your oven to 350°F and line two baking sheets with parchment paper—this prevents sticking and makes cleanup a breeze.
2. In a large mixing bowl, combine the all-purpose flour, granulated sugar, and salt, whisking them together until well blended.
3. Add the cold, cubed unsalted butter to the dry ingredients, using a pastry cutter or your fingers to work it in until the mixture resembles coarse crumbs (tip: don’t overmix to keep those buttery pockets intact).
4. In a small bowl, whisk the room temperature egg and vanilla extract until smooth, then pour this into the flour mixture, stirring just until a dough forms.
5. Roll the dough into 1-inch balls and place them on the prepared baking sheets, spacing them about 2 inches apart.
6. Use your thumb or the back of a spoon to make a deep indentation in the center of each dough ball, being careful not to press all the way through.
7. Fill each indentation with about 1/2 teaspoon of raspberry jam, gently smoothing it to avoid overflow (tip: a small spoon or piping bag works great for precision).
8. Brush the tops of the dough with milk using a pastry brush, which helps them brown evenly in the oven.
9. Bake in the preheated oven for 12-15 minutes, or until the edges turn a light golden brown and the jam is bubbly (tip: rotate the sheets halfway through for even baking).
10. Remove from the oven and let cool on the baking sheets for 5 minutes before transferring to a wire rack to cool completely.
Gloriously, these Raspberry Filled Butter Buttons emerge with a tender, crumbly texture that melts in your mouth, contrasted by the gooey, tangy raspberry center. Serve them warm with a dusting of powdered sugar for extra whimsy, or pair with a scoop of vanilla ice cream for an indulgent dessert—they’re so addictive, you might just hide a batch for yourself!
Conclusion
Kickstart your holiday baking with these 21 delicious cookie press recipes! From classic spritz to creative shapes, there’s a perfect treat for every occasion. We’d love to hear which recipes become your favorites—leave a comment below and share this roundup on Pinterest to spread the baking joy!