
Zesty and deeply satisfying, beef neck bones transform into a remarkable meal with proper preparation. Zero culinary expertise required for this straightforward approach that yields impressive results. This method ensures tender meat and rich broth with minimal effort.
Why This Recipe Works
- Slow cooking breaks down tough connective tissues, transforming chewy neck bones into fork-tender meat that falls off the bone with minimal effort
- Browning creates deep Maillard reaction flavors that infuse throughout the cooking liquid, building complex savory notes that simple boiling cannot achieve
- The combination of aromatic vegetables and basic seasonings enhances natural beef flavors without overwhelming the dish with unnecessary complexity
- Simmering at controlled temperatures ensures collagen converts to gelatin gradually, resulting in both tender meat and rich, velvety broth simultaneously
- Resting time allows flavors to meld and meat to reabsorb juices, creating superior texture and taste compared to immediate serving
Ingredients
- 3 pounds beef neck bones, trimmed of excess fat
- 2 tablespoons vegetable oil
- 1 large yellow onion, chopped into 1-inch pieces
- 3 carrots, peeled and cut into 2-inch chunks
- 3 celery stalks, cut into 2-inch pieces
- 6 garlic cloves, smashed and peeled
- 2 bay leaves
- 1 teaspoon dried thyme
- 1 teaspoon black peppercorns
- 8 cups cold water
- 2 teaspoons kosher salt
- 2 tablespoons tomato paste
- 1 tablespoon Worcestershire sauce
Equipment Needed
- Large Dutch oven or heavy-bottomed pot with lid
- Tongs
- Slotted spoon
- Cutting board
- Chef’s knife
- Measuring spoons
- Ladle
Instructions
Prepare and Brown the Neck Bones
Pat 3 pounds of beef neck bones completely dry with paper towels. This step ensures proper browning rather than steaming. Heat 2 tablespoons of vegetable oil in a large Dutch oven over medium-high heat until shimmering but not smoking. Working in batches to avoid overcrowding, place neck bones in single layer and brown for 4-5 minutes per side until deep golden brown crust forms. Use tongs to turn bones, getting good color on all accessible surfaces. The browning creates fond on pot bottom that will later deglaze for added flavor. Remove browned bones to plate and repeat with remaining batches. Tip: Allow space between bones during browning – overcrowding lowers pan temperature and causes steaming rather than proper searing.
Sauté Aromatics and Build Flavor Base
Reduce heat to medium and add chopped onion to the same pot, scraping bottom to incorporate browned bits. Cook onions for 5-6 minutes until softened and translucent, stirring occasionally to prevent burning. Add 2 tablespoons tomato paste and cook for 2 minutes, stirring constantly until it darkens slightly and becomes fragrant. This cooking step eliminates raw tomato flavor and develops deeper, richer notes. Add smashed garlic cloves and cook for 1 minute until aromatic but not browned. Incorporate chopped carrots and celery, cooking for 3-4 minutes until slightly softened. The vegetable foundation provides sweetness and complexity to balance the rich beef flavors.
Combine Ingredients and Begin Simmering
Return all browned neck bones to the pot along with any accumulated juices. Add 8 cups cold water, ensuring bones are fully submerged. The cold water start helps extract flavors gradually rather than shocking the meat. Add 2 teaspoons kosher salt, 1 teaspoon dried thyme, 2 bay leaves, 1 teaspoon black peppercorns, and 1 tablespoon Worcestershire sauce. Bring liquid to a gentle boil over high heat, then immediately reduce to lowest possible simmer. Cover pot with lid slightly ajar to allow some steam escape. Maintain steady simmer where small bubbles occasionally break surface but liquid never reaches rolling boil. Tip: Consistent low simmer preserves meat texture while extracting maximum flavor from bones and connective tissues.
Slow Cook to Tenderness
Maintain covered simmer for 2.5 to 3 hours, checking occasionally to ensure gentle bubbling continues. After first hour, skim any foam or fat that rises to surface using slotted spoon. Do not stir vigorously to avoid breaking down vegetables prematurely. Test doneness after 2.5 hours by inserting fork into meat – it should meet no resistance and meat should easily separate from bone. The collagen should fully convert to gelatin, creating rich, velvety broth texture. If needed, continue cooking up to 3.5 hours total for extremely tender results. The extended cooking time transforms tough connective tissues into luxurious, melt-in-your-mouth texture.
Finish and Serve
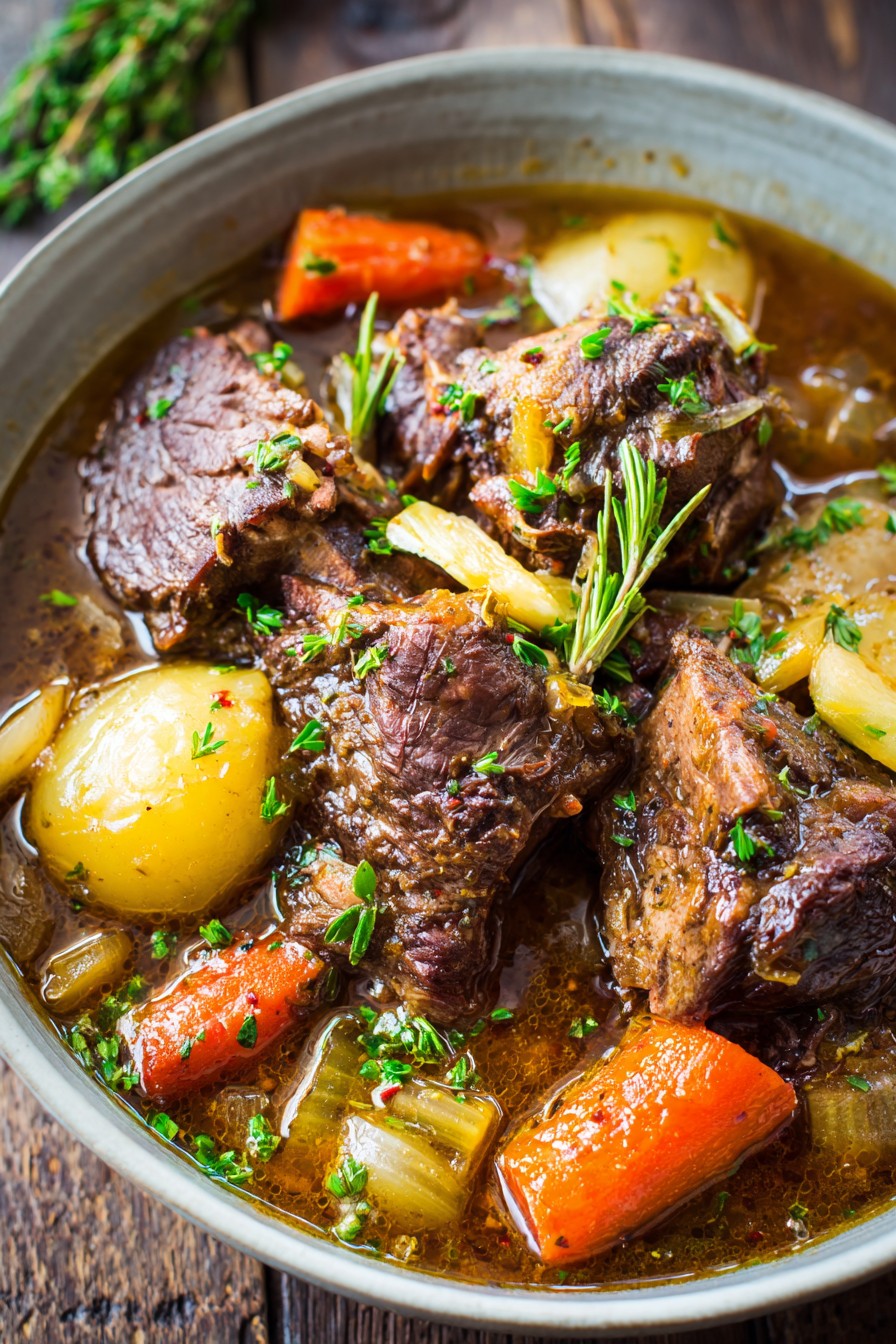
Once meat reaches desired tenderness, carefully remove neck bones using tongs and transfer to serving platter. Use slotted spoon to remove vegetables and arrange around bones. For clearer broth, strain remaining liquid through fine-mesh sieve into clean container, pressing on solids to extract all flavor. Skim excess fat from surface if desired. Taste broth and adjust seasoning with additional salt if needed. Ladle hot broth over arranged bones and vegetables. Allow to rest for 10 minutes before serving to let flavors meld and meat reabsorb juices. Tip: Resting time significantly improves both texture and flavor integration throughout the dish.
Tips and Tricks
Selecting quality neck bones significantly impacts final results. Look for pieces with good meat coverage rather than mostly bone. Fresh bones should have pinkish-red color and minimal odor. If available, ask butcher to cut larger pieces into more manageable 3-4 inch segments for easier handling and more consistent cooking. For enhanced flavor development, consider dry-brining the night before cooking. Simply pat bones dry, rub with 1 tablespoon kosher salt, place on rack over baking sheet, and refrigerate uncovered overnight. This process seasons meat throughout and improves browning capability.
Temperature control remains crucial throughout cooking process. Use instant-read thermometer to monitor broth temperature, maintaining ideal range between 180-200°F for optimal collagen breakdown without toughening proteins. If using electric stove, the “low” setting often runs too hot – consider using flame tamer or heat diffuser to achieve proper simmer. For gas stoves, the smallest burner on lowest flame typically provides perfect simmer temperature. If broth reduces too quickly, add hot water in 1/2 cup increments to maintain proper liquid level covering bones.
Storage and repurposing extend the value of this preparation. Cool completely before refrigerating in airtight containers for up to 5 days. The broth develops richer flavor when made ahead and reheated. Freeze separated meat and broth for up to 3 months. Use leftover meat in tacos, sandwiches, or pasta dishes. The rich broth serves as excellent base for soups, stews, or cooking grains. For clearer broth, strain through cheesecloth-lined sieve after initial straining. To remove excess fat efficiently, refrigerate until fat solidifies on surface, then easily skim off solidified layer.
Advanced techniques include oven finishing for more consistent heat distribution. After initial stovetop simmering, transfer covered pot to 300°F oven for final hour of cooking. This method prevents hot spots and requires less monitoring. For richer flavor, substitute 2 cups of water with beef broth or red wine. If using wine, add during vegetable sauté step and cook until reduced by half before adding remaining liquid. For thicker sauce, remove 1 cup cooking liquid, whisk with 2 tablespoons flour until smooth, then return to pot during last 30 minutes of cooking.
Recipe Variations
- Spicy Korean-style: Replace standard seasonings with 1/4 cup gochujang, 3 tablespoons soy sauce, 2 tablespoons sesame oil, and 1 tablespoon grated ginger. Add 1 sliced Asian pear during last hour of cooking for subtle sweetness that balances heat. Serve over rice with kimchi and sliced scallions for complete meal that incorporates bold Korean flavors while maintaining the tender texture of slow-cooked neck bones.
- Italian-inspired with tomatoes and herbs: Substitute 4 cups water with crushed tomatoes and add 1 teaspoon each dried oregano and basil. Include 1 Parmesan rind while simmering for umami depth. Serve with polenta or pasta, garnishing with fresh basil and grated Parmesan. This variation creates rich, tomato-based dish reminiscent of traditional Italian osso buco but using more affordable cut of meat with similar collagen-rich properties.
- Barbecue-glazed version: After cooking, remove meat from bones and toss with 1 cup barbecue sauce. Spread on baking sheet and broil for 3-5 minutes until caramelized. Alternatively, reserve cooking liquid, reduce by half, and mix with barbecue sauce for glazing. Serve on buns with coleslaw for pulled beef sandwiches that utilize the exceptionally tender results achieved through slow cooking while adding familiar barbecue flavors.
- Hearty vegetable stew: Add 2 diced potatoes, 1 cup chopped cabbage, and 1 cup frozen peas during last 30 minutes of cooking. Increase liquid by 2 cups and thicken with 2 tablespoons cornstarch slurry at end. This creates complete one-pot meal that incorporates additional vegetables and starches, transforming the basic neck bone preparation into substantial stew that requires no additional side dishes for satisfying meal.
Frequently Asked Questions
Can I use a slow cooker instead of stovetop cooking?
Yes, slow cookers work well for beef neck bones with minor adjustments. After browning bones and sautéing vegetables on stovetop, transfer everything to slow cooker insert. Reduce liquid to 6 cups since slow cookers lose less evaporation. Cook on low for 7-8 hours or high for 4-5 hours until meat easily separates from bone. The extended cooking time at consistent temperature yields similar tender results with convenience of set-and-forget preparation. Slow cookers provide particularly even heat distribution ideal for tough cuts requiring prolonged gentle cooking.
How do I know when the neck bones are fully cooked?
Properly cooked neck bones show several visual and textural indicators. Meat should pull away from bone ends significantly, exposing approximately 1/2 inch of clean bone. When tested with fork, meat should offer no resistance and easily shred with gentle pressure. The connective tissues around joints should appear gelatinous and translucent rather than white and opaque. If bones contain marrow, it should be soft enough to push out with gentle pressure. Undercooked meat remains tough and tightly attached to bones, while overcooked may become mushy and lose structural integrity.
What’s the best way to remove excess fat from the final dish?
Several effective methods address excess fat removal. For immediate serving, use fat separator pitcher when ladling broth, which pours from bottom while leaving fat on top. For planned ahead preparation, refrigerate entire pot until fat solidifies into white layer on surface, then easily remove with spoon. For small quantity removal while hot, drag paper towel across surface to absorb floating fat. If concerned about fat content during cooking, refrigerate bones overnight before preparation to easily remove solidified surface fat before beginning recipe.
Can I substitute other beef cuts if neck bones are unavailable?
Several alternative cuts provide similar results when neck bones prove unavailable. Beef shanks offer comparable bone-in structure and collagen content with slightly leaner meat. Short ribs provide rich marbling and excellent flavor though at higher cost. Oxtails deliver exceptional gelatin-rich results with similar cooking requirements. For boneless options, beef chuck roast cut into 2-inch cubes works well though will lack bone-derived flavor depth. All substitutions require similar slow, moist cooking methods to achieve desired tenderness from these traditionally tougher cuts.
Summary
This beef neck bones recipe transforms an economical cut into exceptionally tender, flavorful results through proper browning and patient simmering. The straightforward technique yields rich broth and fall-off-the-bone meat with minimal active effort. Various adaptations allow customization while maintaining the essential slow-cooked approach that makes this preparation successful.
Beef Neck Bones
5
servings20
minutes3
minutesIngredients
Instructions
- 1 Pat neck bones dry and brown in batches in hot oil until deeply colored on all sides
- 2 Cook onions until softened, add tomato paste and cook 2 minutes, then add garlic, carrots, and celery
- 3 Return bones to pot, add water and remaining ingredients, bring to boil then reduce to simmer
- 4 Cover and maintain gentle simmer for 2.5-3 hours until meat is fork-tender
- 5 Remove bones and vegetables, strain broth, adjust seasoning, and serve after 10 minute rest


