Mastering the art of grilled pork chops requires precise technique and quality ingredients. My chef-developed approach ensures juicy, perfectly charred chops every time, elevating this classic American dish to restaurant-quality standards. Mastering fire management and proper resting transforms simple pork into an extraordinary culinary experience.
Why This Recipe Works
- The dual-zone grilling setup allows for perfect searing over high heat followed by gentle cooking through indirect heat, preventing the common pitfall of charred exteriors and undercooked interiors that plagues many grilled pork preparations.
- Brining the pork chops for precisely 4 hours in a carefully balanced salt-sugar solution fundamentally alters the protein structure, resulting in significantly enhanced moisture retention and tenderness throughout the cooking process.
- Applying barbecue sauce in multiple thin layers during the final cooking stages creates a complex, caramelized glaze rather than the burnt, bitter coating that occurs when sauce is applied too early or too thickly.
- Resting the cooked chops for exactly 8 minutes allows the muscle fibers to reabsorb expelled juices, ensuring maximum succulence and preventing the dry texture that ruins improperly rested grilled meats.
- The specific internal temperature target of 145°F followed by carryover cooking guarantees food safety while preserving the ideal texture and moisture content that distinguishes professionally prepared pork from amateur attempts.
Ingredients
- 4 bone-in pork chops, 1.5 inches thick
- 1/4 cup kosher salt for brining
- 1/4 cup brown sugar for brining
- 4 cups cold water for brining solution
- 2 tablespoons vegetable oil for coating
- 2 teaspoons freshly ground black pepper
- 1 teaspoon garlic powder
- 1 teaspoon smoked paprika
- 1 cup high-quality barbecue sauce
- 2 tablespoons apple cider vinegar for sauce thinning
Equipment Needed
- Gas or charcoal grill with lid
- Instant-read thermometer
- Tongs
- Basting brush
- Mixing bowls
- Rimmed baking sheet
- Aluminum foil
Instructions
Prepare the Brine Solution
Begin by creating the brine foundation that will transform your pork chops’ texture. Combine 1/4 cup kosher salt and 1/4 cup brown sugar with 4 cups cold water in a large non-reactive container, whisking vigorously until the crystals completely dissolve. The specific gravity of this solution creates optimal osmotic pressure for moisture absorption. Submerge 4 bone-in pork chops completely in the brine, ensuring no portion remains exposed to air. Refrigerate for exactly 4 hours—this duration allows sufficient time for the salt to denature proteins while the sugar balances flavor without making the meat overly sweet. Remove chops from brine and pat thoroughly dry with paper towels; this critical step ensures proper searing rather than steaming when they hit the grill surface. Discard the brine solution as it has served its purpose and should not be reused.
Season and Prepare the Grill
After patting the brined chops completely dry, lightly coat all surfaces with 2 tablespoons vegetable oil using a pastry brush—this thin layer promotes even heat transfer and prevents sticking. Combine 2 teaspoons freshly ground black pepper, 1 teaspoon garlic powder, and 1 teaspoon smoked paprika in a small bowl, then apply this rub mixture evenly to both sides of each chop, pressing gently to adhere. For charcoal grilling, arrange hot coals on one side of the grill only, creating distinct direct and indirect heat zones. For gas grills, turn burners on high on one side and leave the other side completely off. Preheat the grill with lid closed until the grates register approximately 450°F over the direct heat zone—this surface temperature is essential for achieving the Maillard reaction that creates complex flavor compounds and appealing visual sear marks.
Sear Over Direct Heat
Place the seasoned pork chops directly over the high-heat zone, arranging them perpendicular to the grill grates to create professional cross-hatch sear marks. Close the lid and sear undisturbed for exactly 3 minutes to develop a substantial crust—resisting the urge to move them prematurely ensures proper caramelization. Using tongs (never a fork that would pierce the meat and release precious juices), flip each chop and sear the second side for another 3 minutes with the lid closed. During this stage, the surface temperature should reach approximately 375°F, creating the initial char that provides textural contrast to the tender interior. Monitor for flare-ups but avoid spraying water directly on the flames as this creates bitter-tasting compounds; instead, temporarily move chops to the cool zone if necessary.
Finish Cooking Over Indirect Heat
Transfer the seared pork chops to the indirect heat zone of the grill, arranging them with adequate space between each piece to ensure proper air circulation. Close the lid and maintain a consistent temperature of 325-350°F by adjusting vents or burner controls as needed. Cook for 12-15 minutes, rotating the chops halfway through to account for any hot spots in your grill. Begin checking internal temperature at the 10-minute mark using an instant-read thermometer inserted horizontally into the thickest part of the chop without touching bone. The target temperature is 140°F before saucing—this accounts for the carryover cooking that will occur during the final glazing and resting stages. The gradual temperature increase through indirect heat allows collagen to properly convert to gelatin without toughening the muscle fibers.
Apply Barbecue Sauce Glaze
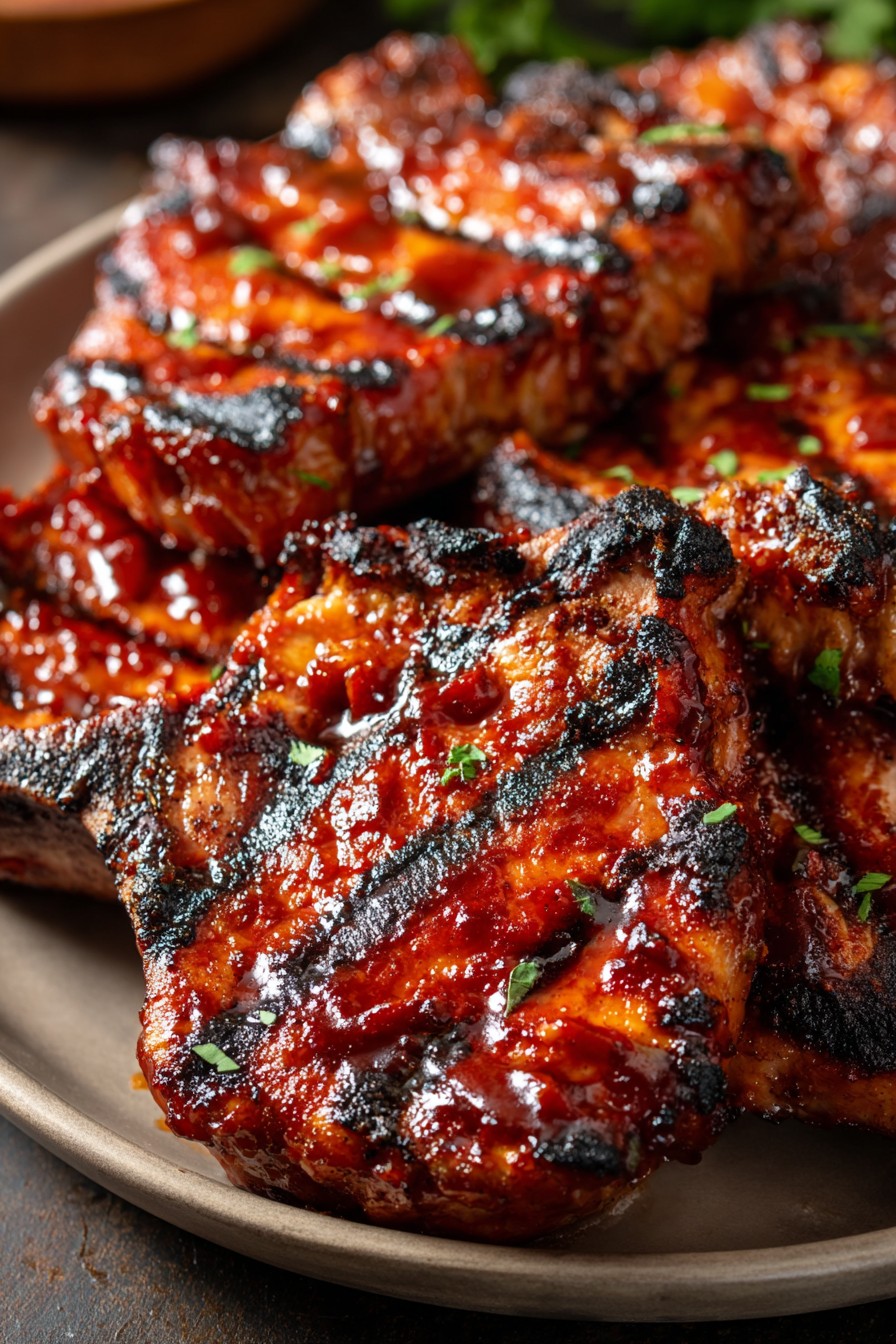
Thin 1 cup high-quality barbecue sauce with 2 tablespoons apple cider vinegar to improve brushability and prevent burning. When the pork chops reach 140°F internal temperature, move them back to the direct heat zone briefly. Using a silicone basting brush, apply a thin, even layer of the thinned sauce to one side of each chop. Close the lid and cook for exactly 1 minute until the sauce begins to caramelize and bubble. Flip the chops, apply sauce to the second side, and cook for another minute with the lid closed. Repeat this process one additional time for each side, building multiple thin layers rather than one thick coating—this technique creates complex flavor depth without charring the sugars in the sauce. The final internal temperature should now register 145°F.
Rest and Serve
Transfer the glazed pork chops to a clean platter or wire rack set over a rimmed baking sheet—never place them directly on a solid surface where they would steam and lose their carefully developed crust. Tent loosely with aluminum foil, ensuring the foil doesn’t touch the glazed surface to preserve its texture. Allow the chops to rest undisturbed for exactly 8 minutes—this critical period allows the muscle fibers to relax and reabsorb approximately 20% of the juices that were forced toward the center during cooking. The internal temperature will continue rising 5-7 degrees during this resting phase, reaching the USDA-recommended 145°F for pork while maintaining optimal moisture content. Serve immediately after the resting period to enjoy the perfect balance of caramelized exterior and succulent interior.
Tips and Tricks
Selecting the proper cut of pork dramatically impacts your final results. Opt for bone-in chops cut between 1.25 and 1.5 inches thick—the bone contributes flavor and acts as a heat buffer, while the thickness provides sufficient mass to develop a substantial crust without overcooking the interior. Avoid chops labeled “enhanced” or containing solutions, as these have already been injected with saltwater and will not benefit from brining. When brining, use kosher salt rather than table salt due to its pure flavor and consistent crystal size that dissolves evenly. The brine temperature should remain below 40°F throughout the process to prevent bacterial growth—consider placing the brining container in a larger bowl of ice if your refrigerator tends to fluctuate in temperature. Grill maintenance significantly affects cooking performance—thoroughly scrape grates while hot before cooking, then oil them using tongs and a paper towel dipped in vegetable oil to create a non-stick surface. Temperature control separates amateur grilling from professional results. Invest in a high-quality instant-read thermometer and calibrate it regularly in ice water. When checking temperatures, insert the probe through the side of the chop into the thickest part, avoiding bone and fat pockets that give false readings. For exceptionally juicy results, consider the reverse sear method: start the chops over indirect heat until they reach 120°F internal temperature, then finish with a quick sear over direct heat—this technique yields incredibly even doneness but requires precise temperature monitoring. Sauce selection matters tremendously—choose a barbecue sauce with balanced sweetness and acidity rather than one dominated by high-fructose corn syrup, which burns easily. If using homemade sauce, apply it in the final stages as described, but commercial sauces often benefit from additional thinning with vinegar or apple juice to improve application and caramelization characteristics. Leftover grilled pork chops should be cooled completely before refrigerating in an airtight container for up to 3 days—reheat gently in a 300°F oven rather than microwaving to preserve texture.
Recipe Variations
- For a spicy Southwest interpretation, modify the dry rub by adding 2 teaspoons ancho chili powder, 1 teaspoon cumin, and 1/2 teaspoon cayenne pepper. Replace the standard barbecue sauce with a chipotle-infused version, and serve with lime wedges for bright acidity that cuts through the richness. The smokiness of chipotle complements the grilled character while the additional spices create complex layers of heat that develop gradually rather than overwhelming the palate immediately.
- Create an Asian-inspired version by substituting the brine with a marinade containing 1/4 cup soy sauce, 2 tablespoons rice vinegar, 1 tablespoon grated ginger, and 2 minced garlic cloves. Replace the barbecue sauce with a glaze made from hoisin sauce, honey, and sesame oil, garnishing with sliced scallions and toasted sesame seeds. The umami-rich components transform the flavor profile completely while maintaining the technical cooking approach that ensures perfect texture.
- For a herbaceous Mediterranean variation, incorporate 2 tablespoons chopped fresh rosemary and 4 minced garlic cloves into the brine solution. Skip the barbecue sauce entirely and instead baste with a mixture of olive oil, lemon juice, and fresh oregano during the final minutes of cooking. Serve with a gremolata of parsley, lemon zest, and garlic sprinkled over the finished chops for bright, fresh flavors that highlight the pork’s natural sweetness without heavy saucing.
- Experiment with a coffee-rubbed approach by adding 2 tablespoons finely ground dark roast coffee to the standard dry rub mixture. The coffee’s bitterness balances the pork’s richness while creating an exceptionally dark, flavorful crust. Use a coffee-infused barbecue sauce or simply finish with the coffee rub alone for a sophisticated flavor profile that pairs exceptionally well with grilled stone fruits or a bourbon-based glaze.
Frequently Asked Questions
Can I use boneless pork chops instead of bone-in?
While boneless chops can be substituted, they require significant technique adjustments to achieve similar results. Bone-in chops provide structural integrity and act as a natural insulator, resulting in more even cooking and enhanced flavor from the marrow. Boneless chops typically cook 25-30% faster and are more prone to drying out due to the absence of the bone’s protective influence. If using boneless, reduce both searing time and indirect cooking time by approximately 2-3 minutes per side, and monitor internal temperature even more closely since they can transition from perfectly cooked to overdone in just minutes. Consider brining boneless chops for only 2-3 hours rather than 4 to prevent over-salting the thinner cut.
What if I don’t have time for the 4-hour brine?
While the full brine period produces optimal results, a 30-minute quick brine can provide some benefits if you’re constrained by time. Use 2 tablespoons salt and 2 tablespoons sugar dissolved in 2 cups warm water, then cool completely before adding chops for 30 minutes. This abbreviated version won’t achieve the same level of moisture retention but will still season the meat more effectively than surface salting alone. Alternatively, apply a dry brine by generously salting the chops and refrigerating uncovered for 1 hour—this draws out moisture that then reabsorbs with the salt, though it lacks the sugar’s flavor-balancing effect of a wet brine.
How can I tell when pork chops are done without a thermometer?
While I strongly recommend using a thermometer for precision, visual and tactile cues can provide guidance. Properly cooked pork should have faint pink hues rather than gray throughout, with juices that run clear when pierced with a knife. The firmness test involves comparing the resistance when pressed—properly cooked pork should feel similar to the fleshy part of your palm when your thumb and middle finger are touching. However, these methods are notoriously unreliable compared to temperature monitoring, particularly with varying chop thickness and grill heat distribution. Investing in even an inexpensive digital thermometer provides far more consistent results than subjective assessment methods.
Why did my barbecue sauce burn before the pork was cooked through?
Barbecue sauce contains sugars that caramelize quickly and can burn if exposed to high heat for too long. This typically occurs when sauce is applied too early in the cooking process or in too thick a layer. The solution is twofold: first, ensure the pork is nearly cooked through (around 140°F internal temperature) before applying any sauce. Second, thin the sauce with vinegar, apple juice, or water and apply in multiple thin layers rather than one thick coating. Each application should be just enough to glaze the surface, with brief cooking periods between layers to set the previous application before adding more.
Can I prepare these pork chops indoors using a grill pan or oven?
While the characteristic smoky flavor of grilling is difficult to replicate indoors, acceptable results can be achieved using alternative methods. For stove-top preparation, use a heavy cast-iron grill pan preheated over medium-high heat and follow the same searing technique, then transfer to a 375°F oven to finish cooking through. For oven-only preparation, reverse the process by baking at 375°F until nearly done, then finish under the broiler for caramelization. Neither method will achieve the same complex flavor profile as live-fire grilling, but they can produce juicy, well-cooked pork chops when outdoor grilling isn’t feasible.
Summary
This technique-driven approach to grilled BBQ pork chops emphasizes proper brining, dual-zone grilling, precise temperature monitoring, and layered saucing to achieve restaurant-quality results. The method transforms simple ingredients into an extraordinary dish through careful attention to culinary science and professional grilling principles.
Grilled BBQ Pork Chops
4
servings4
minutes25
minutesIngredients
Instructions
- 1 Dissolve salt and sugar in water, brine chops for 4 hours, then pat dry
- 2 Coat chops with oil, apply spice rub, and preheat grill to 450°F with two zones
- 3 Sear chops over direct heat for 3 minutes per side with lid closed
- 4 Move to indirect heat, cook at 325-350°F until internal temperature reaches 140°F
- 5 Thin barbecue sauce with vinegar, apply thin layers over direct heat, caramelizing 1 minute per side
- 6 Rest chops for 8 minutes before serving