Virtually every fitness enthusiast has faced the tragic dilemma: those sad, overripe bananas staring you down while your protein powder collection mocks you from the pantry. Very soon, you’ll discover how to transform these kitchen castaways into the most deliciously deceptive fitness food since someone decided cauliflower could be pizza crust. This isn’t just banana bread—it’s your new post-workout obsession that actually tastes like dessert rather than punishment.
Why This Recipe Works
- The protein powder integration is smoother than a politician’s excuse for being late—we use a specific mixing technique that prevents that chalky texture that normally makes protein baked goods taste like someone blended a brick with disappointment.
- Our banana-to-flour ratio would make mathematicians weep with joy, creating moisture levels so perfect you could use this bread to hydrate in the desert while simultaneously getting your gains.
- The strategic use of Greek yogurt adds tangy complexity while boosting the protein content, making each slice practically flex on its own while delivering flavor that doesn’t scream “I’m healthy, suffer through me.”
- We’ve cracked the code on sweetener balance, using just enough honey and banana sweetness to trick your brain into thinking you’re cheating while your muscles get exactly what they need for recovery.
- The baking temperature and time have been tested more thoroughly than a conspiracy theory, ensuring your bread emerges golden-brown rather than charcoal-brickette that could double as home defense weaponry.
Ingredients
- 3 very ripe medium bananas, mashed until they resemble baby food gone wild
- 2 large eggs, beaten like they owe you money
- 1/2 cup plain Greek yogurt, the kind that makes your probiotics do happy dances
- 1/4 cup honey, preferably from bees that enjoyed their work
- 1 teaspoon vanilla extract, the good stuff that doesn’t taste like rubbing alcohol
- 1 3/4 cups whole wheat flour, because we’re fancy like that
- 1/2 cup vanilla or unflavored protein powder, quality matters here unless you enjoy the taste of regret
- 1 teaspoon baking soda, our little chemical leavening friend
- 1/2 teaspoon salt, to make all the other ingredients play nice together
- 1/2 teaspoon cinnamon, for that warm hug feeling in every bite
- 1/4 cup chopped walnuts or pecans, because crunch is life
- Optional: 1/4 cup dark chocolate chips, for when you want to feel rebellious
Equipment Needed
- 9×5 inch loaf pan
- Mixing bowls (one large, one medium)
- Whisk and spatula
- Measuring cups and spoons
- Fork or potato masher for banana destruction
- Cooling rack
- Toothpick or cake tester for doneness verification
Instructions
Step 1: Banana Smashing and Wet Ingredient Party
Grab those bananas that have seen better days—the ones that look like they’ve been through a breakup and a Netflix binge simultaneously. Peel them and place them in your large mixing bowl, then attack them with a fork or potato masher until they reach a consistency somewhere between baby food and what you imagine banana pudding dreams of becoming. To this banana mush, add your Greek yogurt, beaten eggs, honey, and vanilla extract. Whisk this concoction with the enthusiasm of a golden retriever spotting a squirrel until everything is beautifully combined and slightly frothy. The mixture should look like it’s ready for its close-up, with no streaks of any single ingredient trying to be a diva. This is where the magic begins, folks—the wet ingredients are the life of this party, and they need to be properly introduced before the dry ingredients crash the scene.
Step 2: Dry Ingredient Summit Meeting
In your medium bowl, we’re going to conduct what I like to call “The Dry Ingredient Summit” where all our powdery friends gather to discuss their upcoming merger with the wet team. Combine your whole wheat flour, protein powder, baking soda, salt, and cinnamon. Whisk these together like you’re trying to solve world peace through vigorous mixing—we need everything evenly distributed so no bite gets an unexpected mouthful of pure protein powder (unless you’re into that sort of punishment). The key here is ensuring the baking soda is thoroughly mixed in, because nobody wants a bite of bread that tastes like cleaning supplies. This dry mixture should look uniform in color, like a well-blended spice market rather than separate territories of flavor waiting to stage a coup in your mouth.
Step 3: The Great Ingredient Merger
Now for the moment of truth: gently pour your dry ingredients into the wet ingredient party happening in your large bowl. Use a spatula to fold them together with the care of someone handling ancient artifacts—we’re not making cement here, so no aggressive stirring that would develop too much gluten and turn our bread into doorstop material. Mix just until the flour disappears and no dry pockets remain, which should take about 30-40 strokes. Then, fold in your nuts and chocolate chips if you’re using them, distributing them like treasure throughout the batter. The batter will be thick, like it’s judging your life choices, but that’s exactly what we want. Pro tip: if your batter seems too thick, resist adding liquid—the bananas will release moisture as they bake, creating perfect texture.
Step 4: Pan Preparation and Batter Transfer
Take your 9×5 inch loaf pan and give it a good spray with cooking spray or line it with parchment paper—think of this as making a comfortable bed for your bread baby before it takes its hot nap. Pour your batter into the prepared pan and use your spatula to spread it evenly, making sure it reaches into the corners like it’s trying to hide from responsibility. The surface should be relatively smooth, though it’s okay if it looks a bit rustic—we’re going for homemade charm, not factory perfection. Give the pan a gentle tap on the counter to release any air bubbles that might be planning sabotage during baking. At this point, your kitchen should smell like anticipation and bananas, which is exactly the vibe we’re aiming for.
Step 5: The Baking Transformation
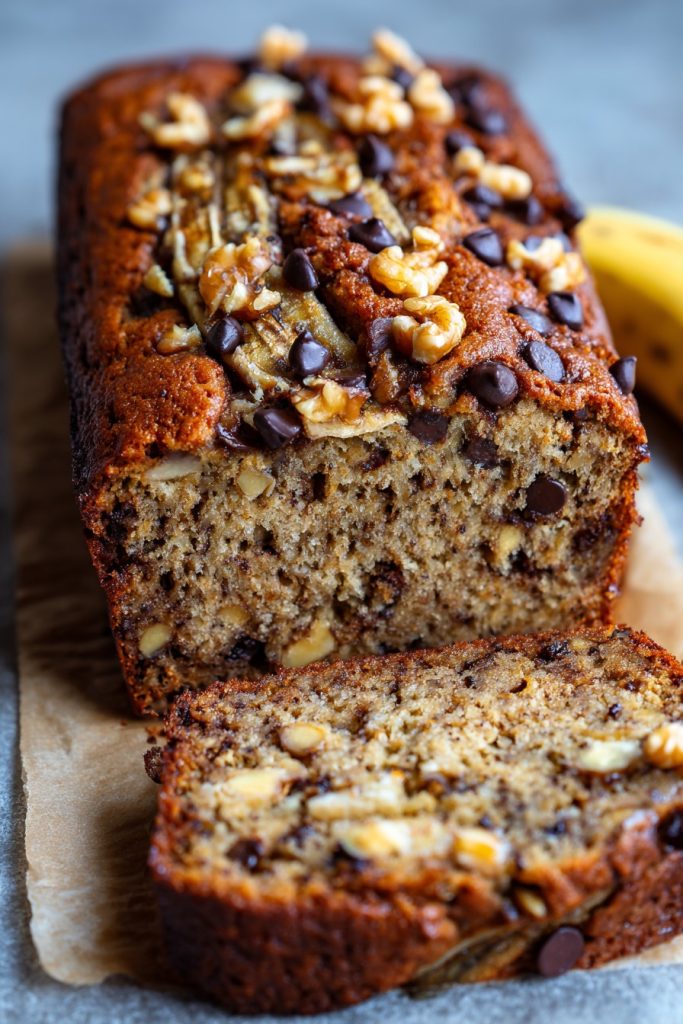
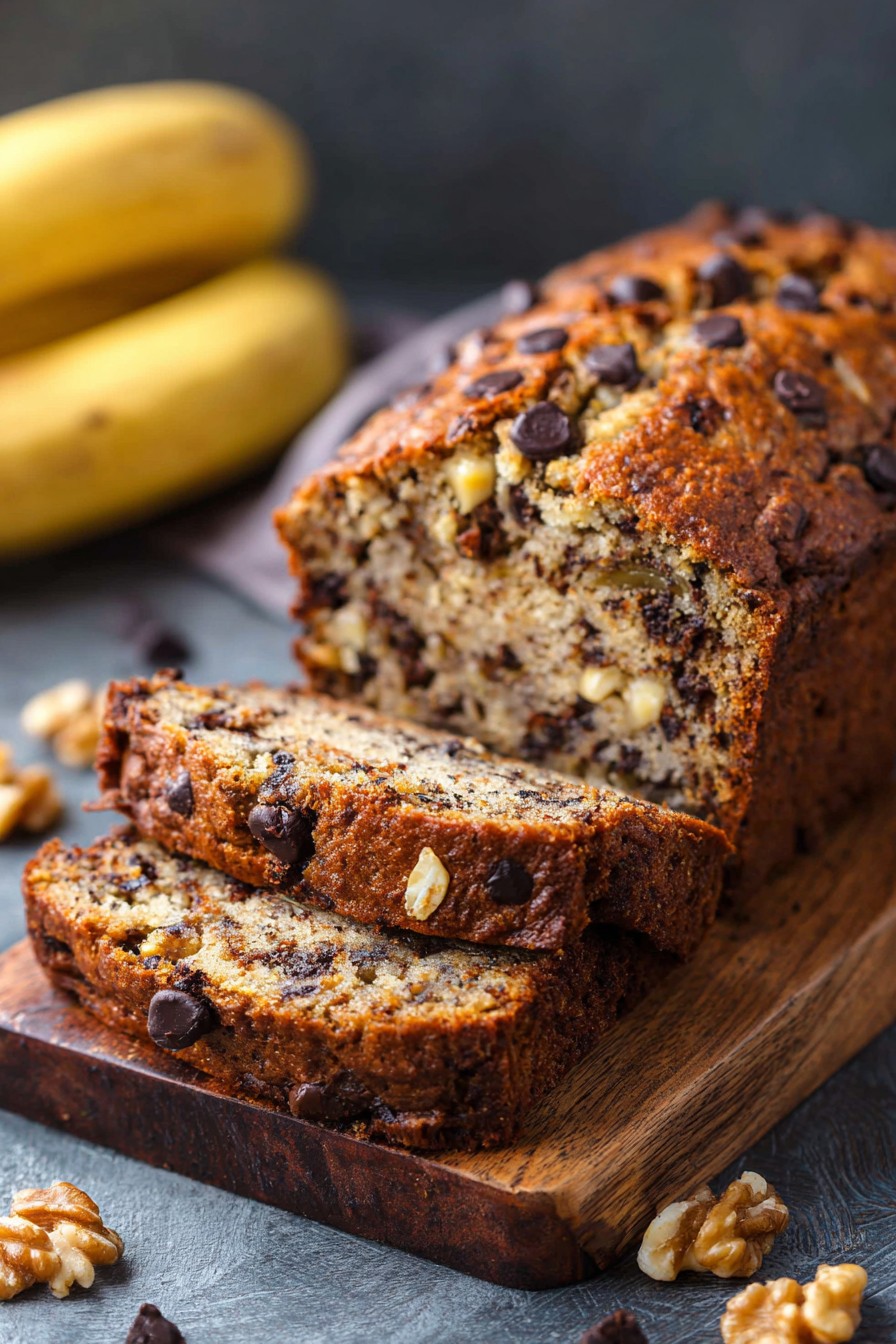
Preheat your oven to 350°F if you haven’t already—this isn’t a suggestion, it’s a requirement unless you enjoy dense, sad bread that never reached its full potential. Once your oven beeps with that sweet temperature confirmation, place your loaf pan in the center rack and set your timer for 50 minutes. After 50 minutes, perform the toothpick test: insert a toothpick into the center of the loaf, and if it comes out with a few moist crumbs clinging to it (but no wet batter), your bread is ready. If not, continue baking in 5-minute increments until it passes the test. The top should be golden brown and your kitchen should smell like heaven opened a bakery. Total baking time typically ranges from 50-65 minutes depending on your oven’s personality.
Step 6: The Patience Test
Once your bread has achieved baked perfection, remove it from the oven and place the pan on a cooling rack. This is where your willpower gets its workout—you must let the bread cool in the pan for at least 15 minutes before attempting to remove it. Then, carefully run a knife around the edges and transfer the loaf to the cooling rack to complete its cooling journey. Wait until it’s completely cool before slicing—I know, I know, this feels as impossible as skipping dessert at a birthday party, but slicing warm protein bread results in crumbly disappointment. The structure needs time to set, much like your resolve needs time to strengthen between sets at the gym. This waiting period builds character and ensures perfect slices that won’t fall apart when you’re trying to impress your gym buddies.
Tips and Tricks
Let’s talk banana ripeness because this isn’t just a suggestion—it’s the difference between “wow, this is amazing” and “well, it has protein.” Your bananas should be so ripe they’re basically black on the outside and mushy on the inside, like they’ve given up on life and are ready to become something greater. This level of ripeness provides natural sweetness that means we can use less added sweetener, and the soft texture blends seamlessly into the batter. If your bananas aren’t quite there yet, you can speed-ripen them by placing them on a baking sheet in a 300°F oven for 15-20 minutes until the skins blacken—it’s like banana botox, instantly aging them to perfection.
Protein powder selection is crucial here—stick with whey or casein-based powders rather than plant-based ones for this recipe, as they tend to bake better and don’t give that gritty texture that reminds you of eating sand at the beach. If you must use plant-based protein, reduce the amount by 2 tablespoons and add an extra tablespoon of flour to compensate. And for heaven’s sake, if your protein powder is already sweetened, reduce the honey by half unless you have a sweet tooth that could qualify as a dental emergency.
Storage is where many protein bread dreams go to die, so listen up: once completely cooled, wrap your bread tightly in plastic wrap or store it in an airtight container at room temperature for up to 3 days. For longer storage, slice it first, wrap individual slices, and freeze them—then you can pop a slice straight from freezer to toaster for a quick protein-packed breakfast. Don’t refrigerate your bread unless you enjoy the texture of damp cardboard, as refrigeration accelerates staling in baked goods.
If you’re watching your sugar intake but still want that sweet satisfaction, you can replace the honey with sugar-free maple syrup or even mashed dates. The dates will change the texture slightly but add wonderful depth of flavor. And if you’re going full keto warrior, you can experiment with almond flour instead of whole wheat, but you’ll need to adjust the liquid ingredients and accept that the texture will be more dense—like everything else in the keto universe.
For those who can’t handle nuts, sunflower seeds or pumpkin seeds make excellent substitutes that provide similar crunch without the allergy concerns. And if you’re chocolate chip averse (who are you?), dried cranberries or chopped dried apricots can bring that burst of sweetness and texture variation. The beauty of this recipe is its flexibility—it’s like the yoga instructor of baked goods, able to bend to your dietary needs without losing its essential character.
Recipe Variations
- Chocolate Lover’s Delight: Replace 1/4 cup of flour with cocoa powder and add an extra 1/4 cup chocolate chips. This creates a bread so chocolaty it should probably come with a warning label and a glass of milk. The cocoa powder adds depth while the extra chips ensure every bite has that melty chocolate goodness that makes you forget you’re eating something that’s actually good for you.
- Tropical Escape: Add 1/2 cup shredded coconut and 1/4 cup chopped dried pineapple to the batter. Close your eyes while eating and you might just imagine you’re on a beach somewhere instead of staring at your gym bag. The coconut adds healthy fats and texture while the pineapple provides natural sweetness and that tropical vibe that makes even Monday mornings feel like vacation.
- Nut Butter Swirl: Before baking, drop spoonfuls of almond or peanut butter onto the batter and use a knife to swirl it through. This creates marbled pockets of nutty goodness that will make you question all your previous life choices about not adding nut butter to everything. The swirls not only look Instagram-worthy but add protein and healthy fats that keep you satisfied longer.
- Apple Cinnamon Comfort: Replace one banana with 1/2 cup unsweetened applesauce and add an extra teaspoon of cinnamon plus 1/2 cup chopped apples. This variation tastes like autumn in loaf form, perfect for those days when you want comfort food without the food coma. The apples add moisture and fiber while complementing the cinnamon notes beautifully.
- Lemon Blueberry Brightness: Add the zest of one lemon to the wet ingredients and fold in 1 cup fresh or frozen blueberries. The lemon cuts through the sweetness while the blueberries provide bursts of flavor that make each bite exciting. This variation feels sophisticated, like the bread version of wearing a little black dress to breakfast.
Frequently Asked Questions
Can I make this recipe without protein powder?
Absolutely! If you want to ditch the protein powder, simply replace it with an additional 1/2 cup of whole wheat flour. The bread will still be delicious, though it will have less protein content—about 5 grams per slice instead of 12. You might want to add an extra tablespoon of honey since protein powder often contributes sweetness, and consider adding a tablespoon of ground flaxseed for some extra nutrition. The texture will be slightly different—more traditional banana bread rather than the dense, satisfying protein version—but still completely worthy of your counter space.
Why did my bread turn out dry?
Dry bread is the culinary equivalent of getting socks for Christmas—disappointing and entirely preventable. The most common culprit is overbaking, so invest in an oven thermometer since most home ovens lie about their temperature more than a politician during election season. Another possibility is measuring your flour incorrectly—scooping directly from the bag packs in too much flour, so always spoon flour into your measuring cup and level it off. Also, if your bananas weren’t ripe enough, they didn’t contribute sufficient moisture. Remember, we want bananas that look like they’ve been through a dramatic character arc in a telenovela.
Can I make this gluten-free?
You can absolutely take this recipe gluten-free, but it requires some adjustments that are more complex than just swapping flours. Replace the whole wheat flour with 1 1/2 cups almond flour and 1/4 cup coconut flour, and add 1/4 teaspoon xanthan gum to help with structure. The baking time might need reduction by 5-10 minutes, so start checking at 40 minutes. The texture will be more delicate and moist, with a nuttier flavor profile that’s actually quite delightful. Just don’t expect it to slice as cleanly as the wheat version—gluten-free breads have more personality, by which I mean they crumble when you look at them wrong.
How can I tell when my bananas are ripe enough?
Your bananas should look like they’ve given up on life and are ready to be reincarnated as something better—think completely yellow with lots of brown spots or even mostly brown. The peel should yield easily to gentle pressure, and when you peel them, the fruit should be soft and almost liquid in texture. If your bananas aren’t there yet but you’re impatient (I get it), you can speed up the process by placing them on a baking sheet in a 300°F oven for 15-20 minutes until the skins blacken. This artificial ripening works surprisingly well, like botox for fruit.
Can I double this recipe?
Doubling this recipe works beautifully if you need more bread to feed your gains-obsessed household or want to stock your freezer. Simply double all ingredients and divide the batter between two 9×5 inch loaf pans. The baking time might need a slight increase of 5-10 minutes, so keep an eye on them after the 50-minute mark. Having extra loaves means you’re always prepared for unexpected guests or sudden cravings, which in my world counts as adulting at its finest. Just make sure your mixing bowl is large enough to handle the doubled volume—overflowing batter is the kitchen equivalent of crying over spilled milk, only stickier and more frustrating.
Summary
This banana protein bread transforms sad bananas into glorious, protein-packed sustenance that actually tastes incredible. With perfect moisture, clever ingredient balancing, and flexibility for dietary needs, it’s the smartest thing you’ll bake this week. Your muscles and taste buds will thank you simultaneously—a rare culinary achievement worth celebrating.
Banana Protein Bread
4
servings15
minutes55
minutesIngredients
Instructions
- 1 Preheat oven to 350°F and prepare 9x5 inch loaf pan with cooking spray or parchment paper
- 2 In large bowl, mash bananas until smooth, then whisk in eggs, yogurt, honey, and vanilla until well combined
- 3 In separate bowl, whisk together flour, protein powder, baking soda, salt, and cinnamon
- 4 Gently fold dry ingredients into wet ingredients until just combined, then fold in walnuts and chocolate chips if using
- 5 Pour batter into prepared pan and bake for 50-65 minutes until toothpick inserted in center comes out clean
- 6 Cool in pan for 15 minutes, then transfer to wire rack to cool completely before slicing