Are you ready to elevate your plant-based baking game? Whether you’re a seasoned vegan baker or just starting your journey, mastering these essential techniques will transform your kitchen creations. From fluffy cakes to perfectly chewy cookies, we’ve gathered the fundamental skills every home baker needs for delicious vegan treats. Let’s dive into these game-changing methods that will make your baked goods the talk of the table!
Aquafaba Meringues for Light Desserts
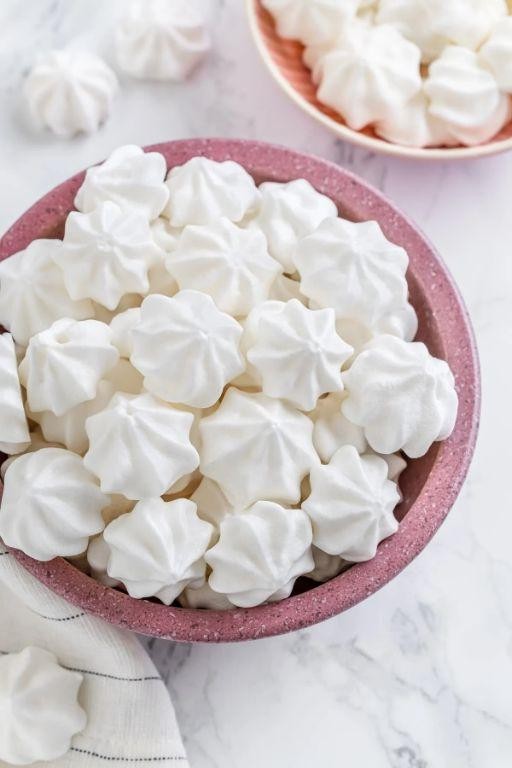
Saving leftover chickpea liquid might seem unusual, but this magical ingredient transforms into light, airy meringues perfect for guilt-free desserts. Simply follow these straightforward steps to create delicate treats that melt in your mouth. You’ll be amazed how easily aquafaba whips up just like traditional egg whites.
2
baking sheets20
minutes150
minutesIngredients
– ¾ cup aquafaba (liquid from canned chickpeas, use unsalted variety)
– ½ cup granulated sugar (superfine works best for dissolving)
– ¼ tsp cream of tartar (helps stabilize the foam)
– ½ tsp vanilla extract (or almond extract for variation)
Instructions
1. Preheat your oven to 200°F and line two baking sheets with parchment paper.
2. Pour aquafaba into a completely clean, dry mixing bowl, ensuring no grease residue remains.
3. Add cream of tartar to the aquafaba and begin whipping on medium speed for 2 minutes until frothy.
4. Increase mixer speed to high and gradually add sugar one tablespoon at a time over 3 minutes.
5. Continue whipping for 8-10 minutes until stiff, glossy peaks form that hold their shape when you lift the beaters.
6. Gently fold in vanilla extract using a spatula, being careful not to deflate the mixture.
7. Spoon or pipe meringue into 2-inch mounds on prepared baking sheets, spacing them 1 inch apart.
8. Bake for 90 minutes at 200°F, then turn off the oven and let meringues cool inside for 1 hour without opening the door.
9. Carefully remove cooled meringues from parchment—they should sound hollow when tapped.
Crisp exteriors give way to airy, marshmallow-like centers in these vegan meringues. Their subtle sweetness pairs beautifully with fresh berries or crushed between layers of dairy-free ice cream. For an elegant presentation, sandwich two meringues with dark chocolate ganache or lemon curd.
Fluffy Vegan Sourdough Bread
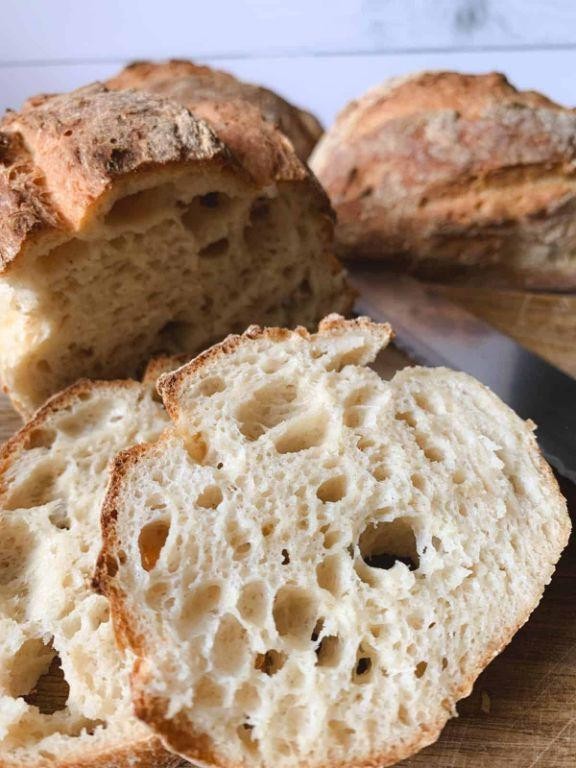
Nailing the perfect vegan sourdough might seem intimidating, but with careful attention to timing and technique, you’ll achieve that coveted airy crumb and crisp crust. This methodical approach breaks down the fermentation and baking process into manageable steps, ensuring even beginners can create bakery-quality bread at home. Let’s walk through each stage together, from starter activation to that satisfying final tap on the crust.
1
loaf120
minutes50
minutesIngredients
- 1 cup active sourdough starter (bubbly and doubled in size)
- 3 ½ cups bread flour (plus extra for dusting)
- 1 ¼ cups warm water (about 85°F)
- 1 ½ tsp salt (fine sea salt preferred)
- 1 tbsp olive oil (for bowl coating)
- Rice flour for dusting banneton (prevents sticking)
Instructions
- Combine 1 cup active sourdough starter and 1 ¼ cups warm water in a large bowl, whisking until milky.
- Add 3 ½ cups bread flour gradually, mixing with a spatula until no dry patches remain.
- Cover bowl with damp cloth and rest dough for 30 minutes at room temperature (autolyse hydrates flour).
- Sprinkle 1 ½ tsp salt over dough and dimple it in with wet fingers to incorporate evenly.
- Perform first stretch and fold: grab dough edge, pull upward, and fold to center; rotate bowl and repeat 4 times.
- Cover and rest 30 minutes; repeat stretch-and-fold cycle 3 more times at 30-minute intervals.
- Let dough bulk ferment 4-6 hours at 75°F until puffy with surface bubbles (time varies with starter activity).
- Coat clean bowl with 1 tbsp olive oil and transfer dough, rolling to coat surface lightly.
- Cover and refrigerate 12-16 hours for slow fermentation (develops tangy flavor).
- Dust banneton generously with rice flour and shape dough into tight boule on floured surface.
- Place dough seam-up in banneton, cover with plastic, and proof 3-4 hours at room temperature until springy.
- Preheat Dutch oven and lid at 500°F for 45 minutes (creates steam environment).
- Score dough top with sharp blade and bake covered at 450°F for 25 minutes to set crust.
- Remove lid and bake uncovered 20-25 minutes until deep golden brown with hollow sound when tapped.
- Cool completely on wire rack (2+ hours prevents gummy crumb).
Airy with an open crumb and tangy notes, this bread’s crisp crust gives way to a tender interior. Slice thick for avocado toast or tear into chunks for dipping in olive oil—its sturdy structure holds up to hearty toppings without becoming soggy.
Moist Vegan Chocolate Cake with Avocado Frosting
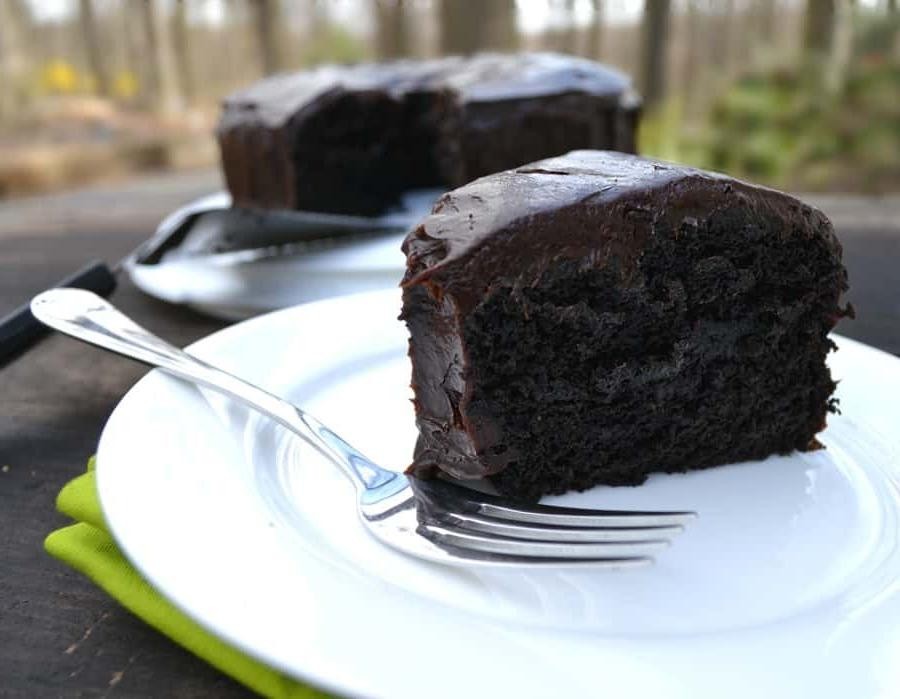
Often, vegan baking can feel intimidating, but this chocolate cake recipe proves that plant-based desserts can be incredibly moist and rich without any dairy or eggs. Our version uses simple pantry staples and a surprising avocado-based frosting that’s both creamy and nutritious. Let’s walk through each step together to create a dessert that will impress everyone at your table.
8
servings15
minutes35
minutesIngredients
- 1 ½ cups all-purpose flour
- 1 cup granulated sugar
- ½ cup unsweetened cocoa powder
- 1 tsp baking soda
- ½ tsp salt
- 1 cup cold water
- ⅓ cup vegetable oil (or any neutral oil)
- 1 tbsp white vinegar
- 1 tsp vanilla extract
- 2 ripe avocados
- ¼ cup maple syrup
- ¼ cup cocoa powder
- 1 tsp vanilla extract
- Pinch of salt
Instructions
- Preheat your oven to 350°F and grease an 8-inch round cake pan.
- Whisk together 1 ½ cups all-purpose flour, 1 cup granulated sugar, ½ cup unsweetened cocoa powder, 1 tsp baking soda, and ½ tsp salt in a large mixing bowl until no lumps remain.
- Create three wells in the dry ingredients and pour 1 cup cold water into one, ⅓ cup vegetable oil into another, and 1 tbsp white vinegar into the third.
- Add 1 tsp vanilla extract to the bowl and stir everything together until just combined, being careful not to overmix.
- Pour the batter into your prepared pan and smooth the top with a spatula.
- Bake for 30-35 minutes until a toothpick inserted into the center comes out clean.
- Cool the cake in the pan for 10 minutes, then transfer to a wire rack to cool completely.
- While the cake cools, scoop the flesh from 2 ripe avocados into a food processor.
- Add ¼ cup maple syrup, ¼ cup cocoa powder, 1 tsp vanilla extract, and a pinch of salt to the food processor.
- Blend the frosting ingredients on high speed for 2-3 minutes until completely smooth and creamy.
- Once the cake is completely cool, spread the avocado frosting evenly over the top using an offset spatula.
Rich, fudgy, and surprisingly light, this cake delivers deep chocolate flavor with an exceptionally moist crumb that stays tender for days. The avocado frosting provides a silky, not-too-sweet contrast that complements the dense cake perfectly. For an elegant presentation, garnish with fresh raspberries or shaved dark chocolate before serving.
No-Butter Vegan Croissants

You’ve probably thought vegan croissants were impossible without butter, but this methodical approach will guide you through creating flaky, layered pastries using plant-based ingredients. Let’s walk through each step together to achieve that classic croissant texture with a compassionate twist. We’ll build the dough carefully, create distinct layers, and bake to golden perfection.
8
croissants105
minutes22
minutesIngredients
– 4 cups all-purpose flour (plus extra for dusting)
– 1 ½ cups cold water
– 2 tbsp active dry yeast
– ¼ cup granulated sugar
– 1 tsp salt
– ¾ cup coconut oil, chilled and solid (or any solid plant-based fat)
– 2 tbsp plant-based milk for brushing (almond or oat work well)
Instructions
1. Combine 4 cups flour, 2 tbsp yeast, ¼ cup sugar, and 1 tsp salt in a large mixing bowl.
2. Gradually pour in 1 ½ cups cold water while stirring with a wooden spoon.
3. Knead the dough on a floured surface for 8-10 minutes until smooth and elastic.
4. Place the dough in a lightly oiled bowl, cover with a damp cloth, and let rise in a warm place for 1 hour until doubled in size.
5. Roll the dough into a 12×18-inch rectangle on a floured surface.
6. Dot ¾ cup chilled coconut oil evenly over two-thirds of the dough surface.
7. Fold the un-oiled third over the middle, then fold the remaining oiled third on top, creating three layers.
8. Roll the folded dough into a 12×18-inch rectangle again, applying even pressure.
9. Repeat the folding process two more times, chilling the dough for 30 minutes between each fold to keep the fat solid.
10. Roll the final folded dough to ¼-inch thickness and cut into 8 triangles.
11. Roll each triangle from the wide end to the point, curving slightly to form crescent shapes.
12. Place shaped croissants on a parchment-lined baking sheet, cover, and proof for 45 minutes until puffy.
13. Preheat your oven to 375°F during the last 15 minutes of proofing.
14. Brush each croissant lightly with 2 tbsp plant-based milk using a pastry brush.
15. Bake at 375°F for 18-22 minutes until deeply golden brown and flaky.
Creating these vegan croissants yields surprisingly flaky layers that shatter beautifully when broken apart. The coconut oil provides a subtle tropical note that pairs wonderfully with jam or chocolate spread. Consider splitting them warm and filling with vegan almond cream for an extra special breakfast treat.
Vegan Banana Bread with Flaxseed
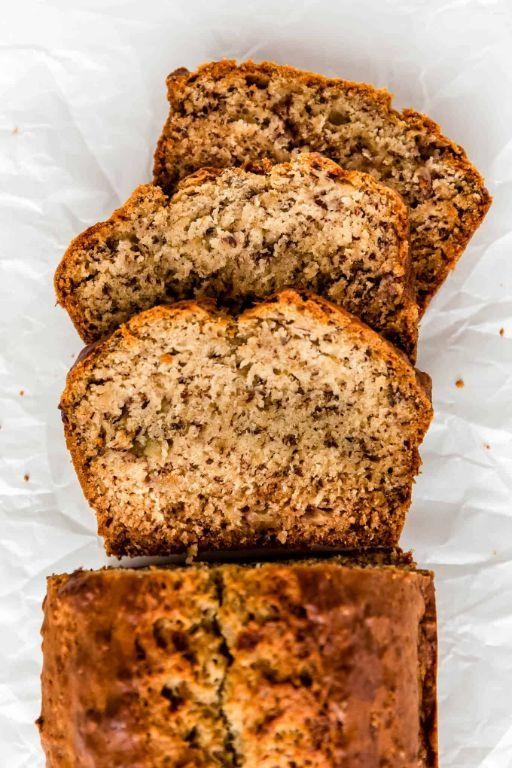
Even the most novice baker can master this vegan banana bread with flaxseed, a moist and wholesome treat that transforms overripe bananas into something special. This methodical approach ensures perfect results every time, guiding you through each step with precision and helpful tips for baking success.
1
loaf15
minutes60
minutesIngredients
– 3 very ripe medium bananas, mashed (about 1½ cups)
– ½ cup coconut oil, melted (or any neutral oil)
– ¾ cup granulated sugar
– ¼ cup ground flaxseed mixed with ½ cup water (flax egg substitute)
– 2 cups all-purpose flour
– 1 tsp baking soda
– ½ tsp salt
– 1 tsp cinnamon
– ½ cup chopped walnuts (optional, for crunch)
Instructions
1. Preheat your oven to 350°F and grease a 9×5-inch loaf pan thoroughly.
2. In a large bowl, mash the bananas with a fork until only small lumps remain.
3. Add melted coconut oil and sugar to the bananas, stirring until fully combined.
4. Mix ground flaxseed with ½ cup water in a separate small bowl and let sit for 5 minutes until gelatinous.
5. Add the prepared flax mixture to the banana mixture, stirring until uniform.
6. In another bowl, whisk together flour, baking soda, salt, and cinnamon.
7. Gradually add dry ingredients to wet ingredients, folding gently until just combined—do not overmix.
8. Fold in walnuts if using, distributing them evenly throughout the batter.
9. Pour batter into the prepared loaf pan and smooth the top with a spatula.
10. Bake at 350°F for 55-65 minutes, until a toothpick inserted in the center comes out clean.
11. Cool the bread in the pan for 15 minutes before transferring to a wire rack.
12. Let cool completely before slicing for clean cuts.
Lightly spiced with cinnamon and studded with walnuts, this banana bread boasts a tender, moist crumb and subtle nutty flavor from the flaxseed. Try toasting slices and spreading with almond butter for a satisfying breakfast, or serve warm with a drizzle of maple syrup for an indulgent dessert.
Dairy-Free Shortcrust Pastry
Just because you’re avoiding dairy doesn’t mean you have to miss out on flaky, buttery pastry. Join me as we methodically create this versatile dairy-free shortcrust pastry, perfect for both sweet and savory applications. Keep your ingredients cold and follow each step precisely for the best results.
2
disks15
minutesIngredients
– 2 ½ cups all-purpose flour (spoon and level for accuracy)
– 1 cup cold coconut oil, solid (or cold vegetable shortening)
– 1 tsp salt (fine sea salt preferred)
– 6-8 tbsp ice water (add gradually until dough comes together)
Instructions
1. Measure 2 ½ cups of all-purpose flour by spooning it into your measuring cup and leveling it off with a straight edge.
2. Add 1 teaspoon of fine sea salt to the flour and whisk them together thoroughly for even distribution.
3. Cut 1 cup of solid, cold coconut oil into small cubes approximately ½-inch in size.
4. Work the cold coconut oil cubes into the flour mixture using a pastry cutter or two forks until the mixture resembles coarse crumbs with some pea-sized pieces remaining.
5. Add 6 tablespoons of ice water to the flour mixture one tablespoon at a time, mixing gently with a fork after each addition.
6. Test the dough by squeezing a small handful – it should hold together without being sticky; add the remaining ice water one tablespoon at a time if needed.
7. Turn the dough out onto a lightly floured surface and gently press it together into a cohesive ball.
8. Divide the dough in half and shape each portion into a flat disk about 1-inch thick.
9. Wrap each disk tightly in plastic wrap and refrigerate for at least 30 minutes or up to 2 days before using.
10. When ready to use, roll the chilled dough on a floured surface to your desired thickness, typically ⅛ to ¼-inch thick.
Knowing this dairy-free pastry yields a surprisingly flaky texture with a subtle coconut undertone makes it ideal for both fruit tarts and quiches. The crust holds its shape beautifully when blind-baked and provides a sturdy yet tender base that pairs wonderfully with both sweet fillings like lemon curd or savory options like mushroom galette.
Vegan Laminated Dough for Perfect Puff Pastries
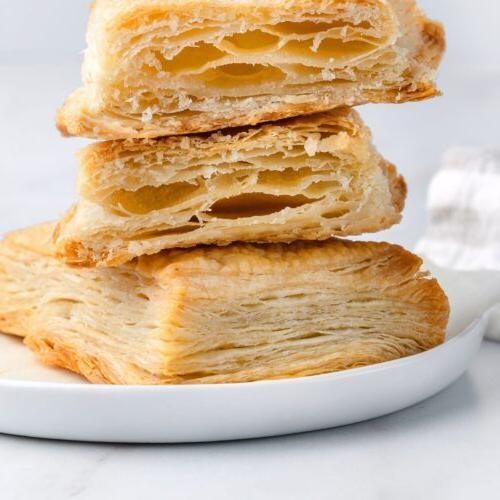
Zipping through the world of vegan baking, laminated dough might seem intimidating, but this method breaks it down into manageable steps for perfect, flaky puff pastries every time. We’ll use simple ingredients and precise techniques to create those beautiful, buttery layers without any dairy.
1
batch150
minutes22
minutesIngredients
– 2 cups all-purpose flour, plus extra for dusting
– 1 tsp salt
– ¾ cup cold water
– ½ cup + 2 tbsp refined coconut oil, solid but pliable
– 1 tbsp apple cider vinegar
Instructions
1. Combine 2 cups all-purpose flour and 1 tsp salt in a large mixing bowl.
2. Add ¾ cup cold water and 1 tbsp apple cider vinegar to the flour mixture.
3. Mix with a spatula until a shaggy dough forms, then knead by hand for 2 minutes until smooth.
4. Shape the dough into a rectangle, wrap tightly in plastic, and refrigerate for 30 minutes.
5. Place ½ cup + 2 tbsp solid coconut oil between two sheets of parchment paper.
6. Pound the coconut oil with a rolling pin into a 6×4-inch rectangle, about ½-inch thick.
7. Remove the chilled dough from refrigerator and roll it into a 10×6-inch rectangle on a floured surface.
8. Place the coconut oil rectangle in the center of the dough rectangle.
9. Fold the left third of dough over the coconut oil, then fold the right third over to completely encase it.
10. Rotate the dough package 90 degrees and roll it into a 10×6-inch rectangle again.
11. Fold the dough into thirds again, wrap in plastic, and refrigerate for 30 minutes.
12. Repeat the rolling and folding process two more times, chilling for 30 minutes between each turn.
13. After the final fold, refrigerate the dough for at least 2 hours or overnight before using.
14. Roll the chilled dough to ¼-inch thickness for cutting into desired pastry shapes.
15. Bake shaped pastries at 400°F for 18-22 minutes until golden brown and puffed.
When you pull these pastries from the oven, you’ll be rewarded with dozens of delicate, crisp layers that shatter beautifully with each bite. The coconut oil provides a subtle richness that pairs wonderfully with both sweet fillings like fruit compote and savory options like mushroom duxelles. Try cutting the dough into triangles for palmiers or squares for turnover-style pastries to showcase the impressive lamination.
Egg-Free Chia Seed Muffins
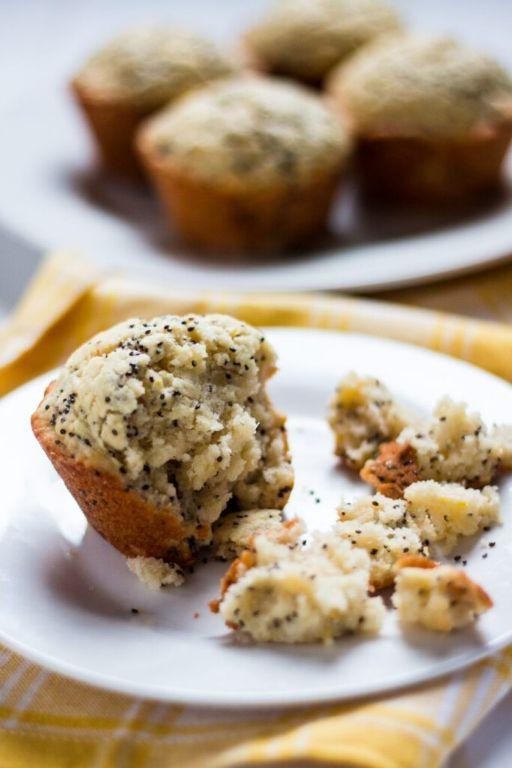
Baking without eggs can seem daunting, but these chia seed muffins prove it’s entirely possible to create moist, fluffy treats with simple substitutions. By using chia gel as our binding agent, we’ll achieve perfect texture while adding a nutritional boost. Let me walk you through each step to ensure muffin success.
12
muffins10
minutes22
minutesIngredients
– 2 cups all-purpose flour (or whole wheat flour for more fiber)
– 1/2 cup white sugar (can substitute with coconut sugar)
– 2 tablespoons chia seeds (for the egg replacement gel)
– 6 tablespoons water (to create the chia gel)
– 1 cup milk (dairy or any plant-based alternative)
– 1/3 cup vegetable oil (or any neutral oil like canola)
– 2 teaspoons baking powder (for proper rise)
– 1/2 teaspoon salt (enhances flavor)
– 1 teaspoon vanilla extract (pure extract recommended)
Instructions
1. Preheat your oven to 375°F and line a 12-cup muffin tin with paper liners.
2. Combine 2 tablespoons chia seeds with 6 tablespoons water in a small bowl and let sit for 5 minutes until a thick gel forms – this replaces eggs by providing binding power.
3. In a large mixing bowl, whisk together 2 cups flour, 1/2 cup sugar, 2 teaspoons baking powder, and 1/2 teaspoon salt until well combined.
4. Make a well in the center of your dry ingredients and pour in the chia gel, 1 cup milk, 1/3 cup oil, and 1 teaspoon vanilla extract.
5. Gently fold the wet and dry ingredients together using a spatula until just combined – overmixing creates tough muffins, so stop when you no longer see dry flour.
6. Divide the batter evenly among the 12 muffin cups, filling each about 2/3 full to allow room for rising.
7. Bake at 375°F for 18-22 minutes until the tops spring back when lightly pressed and a toothpick inserted comes out clean.
8. Let the muffins cool in the pan for 5 minutes before transferring to a wire rack – this prevents steaming and soggy bottoms.
Keeping these muffins fresh reveals their tender crumb and subtle sweetness that pairs wonderfully with your morning coffee. The chia seeds add a pleasant texture without being overwhelming, making them perfect for both breakfast and snacks. Try splitting one warm and spreading with almond butter for an extra protein boost.
Vegan Cheesecake with Cashew Filling
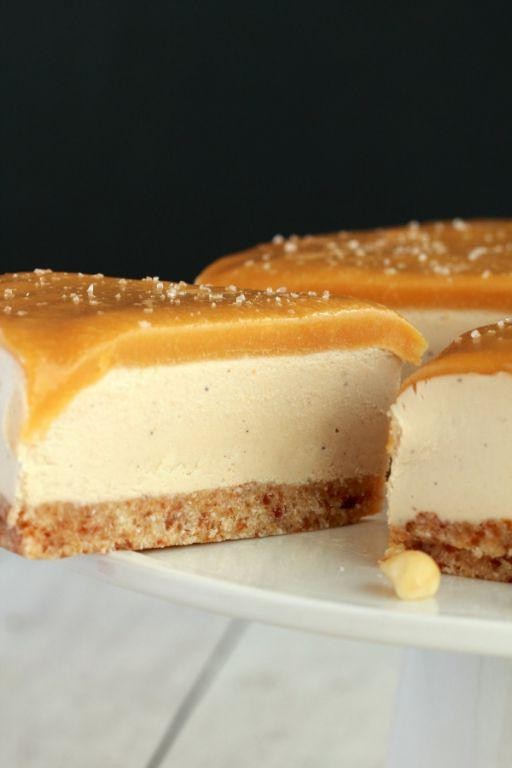
Ready to create a dairy-free dessert that will impress even the most skeptical cheesecake lovers? This vegan cheesecake with cashew filling delivers that classic creamy texture without any animal products, using simple techniques that build confidence in the kitchen.
1
cheesecake75
minutes8
minutesIngredients
- 1 ½ cups raw cashews (soaked overnight for creamiest texture)
- ½ cup maple syrup (or agave for similar sweetness)
- ¼ cup coconut oil, melted (refined for neutral flavor)
- 2 tbsp lemon juice (freshly squeezed for brightest flavor)
- 1 tsp vanilla extract (pure rather than imitation)
- ¼ tsp salt (fine sea salt dissolves best)
- 2 cups graham cracker crumbs (about 15 whole crackers)
- 5 tbsp vegan butter, melted (or coconut oil as alternative)
Instructions
- Place raw cashews in a medium bowl and cover with hot water by 2 inches, then soak for 1 hour to soften.
- Combine graham cracker crumbs and melted vegan butter in a 9-inch springform pan, mixing until crumbs are evenly moistened.
- Press crumb mixture firmly into the bottom of the pan using a flat-bottomed cup, creating an even layer about ¼-inch thick.
- Bake crust at 350°F for 8 minutes until lightly golden, then cool completely on a wire rack.
- Drain soaked cashews thoroughly and transfer to a high-speed blender.
- Add maple syrup, melted coconut oil, lemon juice, vanilla extract, and salt to the blender with the cashews.
- Blend on high speed for 2-3 minutes, scraping down sides as needed, until completely smooth with no graininess.
- Pour cashew filling over cooled crust and smooth the top with an offset spatula.
- Tap pan firmly on counter 5-6 times to release any air bubbles from the filling.
- Refrigerate cheesecake uncovered for at least 6 hours, or preferably overnight, until completely set.
Key to this dessert’s success is the velvety texture that comes from properly blended cashews, creating a richness that mimics traditional cream cheese. The subtle tang from lemon juice balances the maple sweetness beautifully, making this cheesecake sophisticated enough for special occasions yet simple enough for weeknight treats when served with fresh berries or a drizzle of chocolate sauce.
Whole Wheat Vegan Pizza Dough
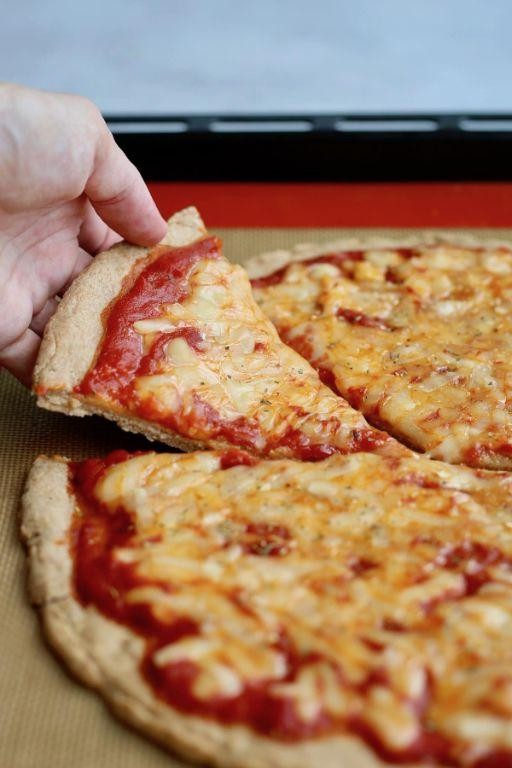
A perfectly crisp, chewy vegan pizza crust is easier than you think with this whole wheat version that requires just a few simple ingredients and patience. As your cooking teacher, I’ll guide you methodically through each step to ensure success, even if you’re new to working with yeast dough. Let’s begin with gathering our ingredients and preparing our workspace for this wholesome homemade pizza dough.
2
portions85
minutes5
minutesIngredients
– 3 cups whole wheat flour (plus extra for dusting)
– 1 packet active dry yeast (about 2¼ teaspoons)
– 1¼ cups warm water (110°F, use thermometer for accuracy)
– 2 tablespoons olive oil (or any neutral oil)
– 1 teaspoon salt (fine grain dissolves better)
– 1 teaspoon sugar (helps activate yeast)
Instructions
1. Combine warm water (110°F), sugar, and yeast in a large mixing bowl, then let sit for 5 minutes until foamy.
2. Add olive oil and salt to the yeast mixture, stirring gently with a wooden spoon to incorporate.
3. Gradually add whole wheat flour ½ cup at a time, mixing after each addition until a shaggy dough forms.
4. Turn dough onto a lightly floured surface and knead for 8-10 minutes until smooth and elastic.
5. Form dough into a ball, place in a lightly oiled bowl, and cover with a damp kitchen towel.
6. Let dough rise in a warm place for 1 hour or until doubled in size (test by pressing finger—indentation should remain).
7. Punch down dough to release air bubbles, then divide into two equal portions if making smaller pizzas.
8. Roll each portion into a 12-inch circle on a floured surface, stretching from center outward.
9. Transfer rolled dough to a parchment-lined baking sheet or pizza stone dusted with cornmeal.
10. Preheat oven to 475°F and par-bake crust for 5 minutes before adding toppings to prevent sogginess.
Zesty and wholesome, this crust bakes up with a satisfying chew and nutty flavor that stands up to bold vegan toppings. Try topping with roasted vegetables and cashew cream for a creamy contrast, or keep it simple with tomato sauce and fresh herbs for a classic pizza night that feels both nourishing and indulgent.
Vegan Pecan Pie with Maple Syrup
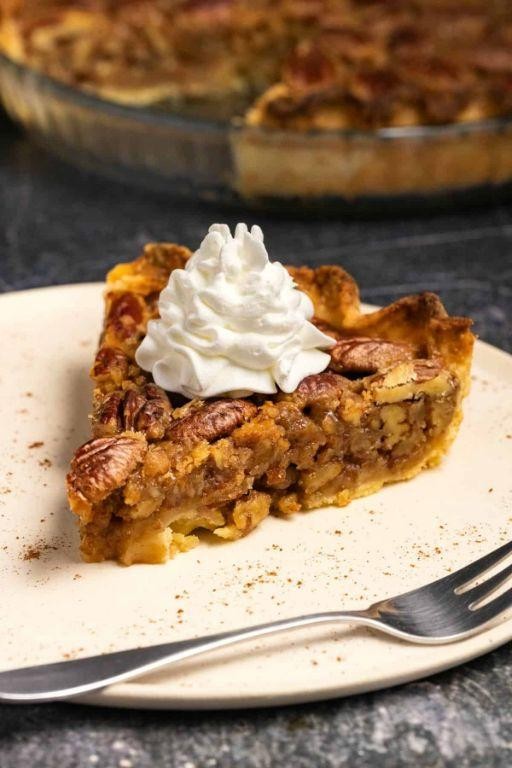
During the crisp autumn months, nothing satisfies quite like a classic pecan pie with a vegan twist. Developing this recipe required careful testing to achieve that perfect balance of sweetness and texture without traditional ingredients. Let’s walk through creating this delightful dessert step by step, ensuring even beginner bakers can achieve impressive results.
8
servings25
minutes53
minutesIngredients
– 1 ½ cups raw pecans (plus extra for garnish)
– 1 cup pure maple syrup (grade B for richer flavor)
– ½ cup coconut oil, melted (or any neutral vegetable oil)
– ¼ cup cornstarch (arrowroot powder works as substitute)
– 1 teaspoon vanilla extract (pure, not imitation)
– ½ teaspoon salt (fine sea salt preferred)
– 1 prepared vegan pie crust (9-inch, or homemade)
Instructions
1. Preheat your oven to 350°F and position the rack in the center.
2. Spread 1 ½ cups pecans evenly on a baking sheet.
3. Toast pecans in the preheated oven for 8 minutes until fragrant and lightly browned.
4. Remove toasted pecans from oven and let them cool completely on the baking sheet.
5. In a medium mixing bowl, combine 1 cup maple syrup and ½ cup melted coconut oil.
6. Whisk the maple syrup and coconut oil mixture vigorously for 1 minute until fully emulsified.
7. Add ¼ cup cornstarch to the liquid mixture and whisk until no lumps remain.
8. Stir in 1 teaspoon vanilla extract and ½ teaspoon salt until fully incorporated.
9. Chop the cooled toasted pecans roughly into large pieces using a sharp knife.
10. Fold the chopped pecans into the filling mixture until evenly distributed.
11. Pour the prepared filling into the 9-inch vegan pie crust, spreading it evenly.
12. Arrange additional whole pecans in a decorative pattern on top of the filling.
13. Place the pie on the center oven rack and bake at 350°F for 45 minutes.
14. Check the pie after 30 minutes – if the crust edges are browning too quickly, cover them with foil strips.
15. Remove the pie from the oven when the filling is set and the center jiggles slightly when shaken.
16. Cool the pie completely on a wire rack for at least 4 hours before slicing.
Perfectly setting this pie requires patience during cooling, but the reward is a firm yet tender texture that slices cleanly. The maple syrup creates a deep caramel-like flavor that complements the toasted pecans beautifully. Present slices warm with a scoop of vegan vanilla ice cream for a stunning dessert that will impress any guest.
Coconut Oil Based Vegan Cookies
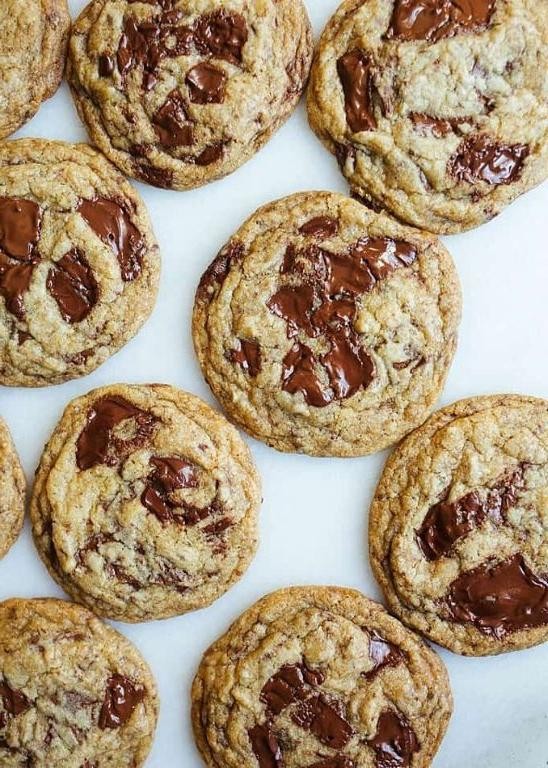
Perfecting vegan baking requires thoughtful ingredient choices, and these coconut oil cookies demonstrate how simple substitutions can yield delicious results. Preparing these treats involves straightforward techniques that even novice bakers can master, creating cookies with a delightful texture and rich flavor profile that will satisfy any sweet craving.
24
cookies15
minutes12
minutesIngredients
– 1 cup coconut oil, solid but scoopable (measure when firm for accuracy)
– ¾ cup brown sugar, packed (light or dark both work)
– ¼ cup granulated sugar
– ¼ cup unsweetened applesauce (acts as egg replacement)
– 2 teaspoons vanilla extract
– 2 cups all-purpose flour (spoon and level for proper measurement)
– 1 teaspoon baking soda
– ½ teaspoon salt
– 1 cup vegan chocolate chips (or chopped dark chocolate)
Instructions
1. Preheat your oven to 350°F and line two baking sheets with parchment paper.
2. Combine 1 cup solid coconut oil, ¾ cup brown sugar, and ¼ cup granulated sugar in a large mixing bowl.
3. Beat the mixture with an electric mixer on medium speed for exactly 2 minutes until creamy and well-combined.
4. Add ¼ cup applesauce and 2 teaspoons vanilla extract to the bowl.
5. Mix on low speed for 30 seconds until fully incorporated.
6. In a separate bowl, whisk together 2 cups flour, 1 teaspoon baking soda, and ½ teaspoon salt.
7. Gradually add the dry ingredients to the wet ingredients, mixing on low speed just until no flour streaks remain.
8. Fold in 1 cup vegan chocolate chips using a spatula until evenly distributed.
9. Scoop tablespoon-sized portions of dough and roll into balls between your palms.
10. Place dough balls 2 inches apart on prepared baking sheets and flatten slightly with your palm.
11. Bake one sheet at a time in the center rack for 10-12 minutes until edges are golden brown.
12. Remove cookies from oven when centers still appear slightly soft.
13. Let cookies cool on baking sheet for 5 minutes to finish setting.
14. Transfer cookies to a wire rack to cool completely. Creating these cookies yields a crisp edge with a soft, chewy center that contrasts beautifully with the melted chocolate pockets. Consider serving them slightly warmed with a glass of cold almond milk, or crumble them over dairy-free ice cream for an elevated dessert experience.
Vegan Cinnamon Rolls with Plant-Based Cream Cheese Icing

Just imagine waking up to the warm, comforting aroma of freshly baked cinnamon rolls that happen to be completely vegan. These soft, fluffy rolls are filled with a sweet cinnamon swirl and topped with a tangy plant-based cream cheese icing that will make you forget they’re dairy-free. Perfect for weekend brunches or holiday mornings, this recipe walks you through each step with precision.
9
rolls90
minutes30
minutesIngredients
- 2 ¼ cups all-purpose flour, plus extra for dusting
- 1 cup warm almond milk (110°F), or any plant-based milk
- ¼ cup granulated sugar
- ¼ cup vegan butter, melted
- 2 ¼ tsp active dry yeast
- ½ tsp salt
- ½ cup brown sugar
- 1 tbsp ground cinnamon
- 4 oz vegan cream cheese, softened
- 1 cup powdered sugar
- 1 tsp vanilla extract
Instructions
- Combine warm almond milk, granulated sugar, and yeast in a large bowl, then let sit for 5 minutes until foamy.
- Stir in melted vegan butter and salt until fully incorporated.
- Gradually mix in 2 ¼ cups flour until a shaggy dough forms. Tip: If the dough feels too sticky, add 1-2 tbsp more flour.
- Knead the dough on a floured surface for 5-7 minutes until smooth and elastic.
- Place dough in a greased bowl, cover with a damp cloth, and let rise in a warm place for 1 hour or until doubled in size.
- Roll the dough into a 12×9-inch rectangle on a floured surface.
- Sprinkle brown sugar and cinnamon evenly over the dough, leaving a ½-inch border.
- Tightly roll the dough into a log starting from the long side, then pinch the seam to seal.
- Cut the log into 9 equal slices using a sharp knife or dental floss. Tip: For clean cuts, chill the rolled log for 15 minutes first.
- Arrange slices in a greased 9-inch round pan, cover, and let rise for 30 minutes until puffy.
- Bake at 350°F for 25-30 minutes until golden brown and firm to the touch.
- Beat vegan cream cheese, powdered sugar, and vanilla extract until smooth while rolls bake.
- Spread icing over warm rolls immediately after removing from oven. Tip: For a thinner icing, add 1-2 tsp plant-based milk.
Expect soft, pillowy layers with a gooey cinnamon center that pairs beautifully with the slightly tangy icing. Enjoy them warm with a drizzle of caramel sauce or alongside a frothy latte for an extra cozy treat.
Nut-Free Vegan Brownies
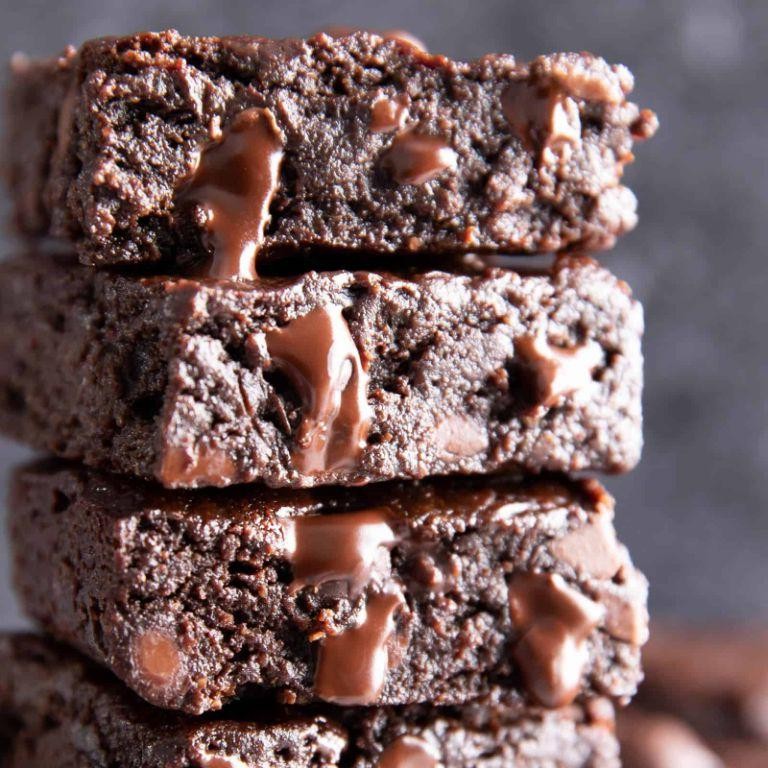
Creating nut-free vegan brownies is simpler than you might think, and this methodical approach ensures perfect results every time. Carefully following these steps will yield fudgy, chocolatey brownies that everyone can enjoy, regardless of dietary restrictions. Let’s walk through the process together, paying close attention to timing and technique for the best outcome.
9
portions15
minutes28
minutesIngredients
– 1 cup all-purpose flour
– 1 cup granulated sugar
– ¾ cup unsweetened cocoa powder
– ½ teaspoon salt
– ½ cup vegetable oil (or any neutral oil)
– ½ cup water
– 1 teaspoon vanilla extract
– 1 tablespoon apple cider vinegar
– ½ cup dairy-free chocolate chips
Instructions
1. Preheat your oven to 350°F and line an 8×8 inch baking pan with parchment paper.
2. Whisk together 1 cup all-purpose flour, 1 cup granulated sugar, ¾ cup unsweetened cocoa powder, and ½ teaspoon salt in a large mixing bowl until thoroughly combined.
3. Pour ½ cup vegetable oil, ½ cup water, and 1 teaspoon vanilla extract into the dry ingredients.
4. Stir the mixture with a spatula until just combined, being careful not to overmix.
5. Add 1 tablespoon apple cider vinegar to the batter and stir for exactly 15 seconds to activate the leavening.
6. Fold in ½ cup dairy-free chocolate chips until evenly distributed throughout the batter.
7. Transfer the batter to your prepared baking pan and spread it into an even layer using your spatula.
8. Bake at 350°F for 25-28 minutes, until the edges are set and the center appears slightly underdone.
9. Remove the pan from the oven and place it on a wire cooling rack.
10. Allow the brownies to cool completely in the pan for at least 1 hour before slicing.
Rich and fudgy with a crackly top, these brownies have an intense chocolate flavor that belies their simple ingredients. The texture remains moist and dense, perfect for serving warm with a scoop of vegan ice cream or cutting into small squares for portion-controlled indulgence.
Savory Vegan Quiche with Tofu
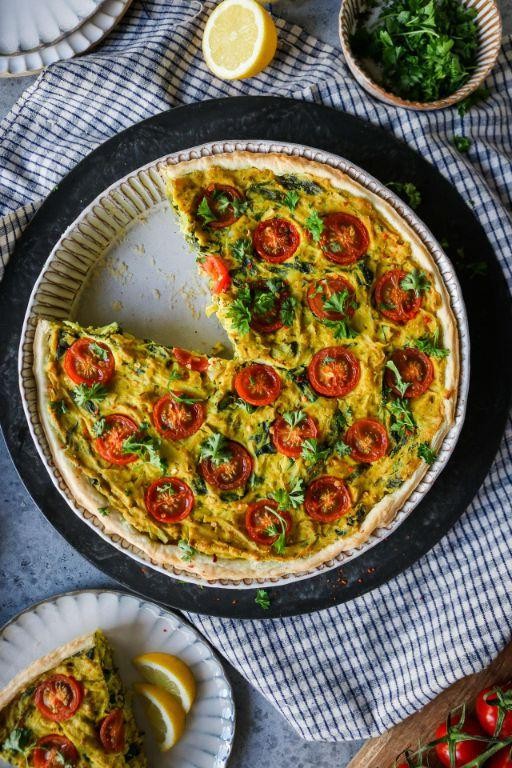
Knowing how to create a satisfying vegan quiche can transform your brunch game, especially when using tofu as the creamy, protein-packed base that mimics traditional eggs perfectly. Keep reading for a straightforward method that builds flavor step by step, ensuring even beginners achieve a golden, savory result every time. Let’s get started with the ingredients and a clear path to your finished dish.
6
servings20
minutes50
minutesIngredients
– 1 (14 oz) block firm tofu, drained
– 1 pre-made 9-inch pie crust (or homemade, chilled)
– 1 tbsp olive oil (or any neutral oil)
– 1 small yellow onion, diced
– 2 cloves garlic, minced
– 1 cup fresh spinach, roughly chopped
– 1/4 cup nutritional yeast
– 1 tsp turmeric (for color)
– 1/2 tsp black salt (kala namak, for eggy flavor, or sea salt)
– 1/4 tsp black pepper
– 1/4 cup unsweetened plant-based milk (e.g., almond or soy)
Instructions
1. Preheat your oven to 375°F (190°C) and place the pie crust in a 9-inch pie dish, pricking the bottom with a fork to prevent bubbling.
2. Heat 1 tablespoon of olive oil in a skillet over medium heat for 1 minute until shimmering.
3. Add the diced onion and cook for 5–7 minutes, stirring occasionally, until translucent and lightly browned.
4. Stir in the minced garlic and cook for 1 minute more until fragrant, being careful not to burn it.
5. Add the chopped spinach and cook for 2–3 minutes, just until wilted, then remove the skillet from heat.
6. Crumble the drained firm tofu into a blender or food processor until it resembles coarse crumbs.
7. Add the nutritional yeast, turmeric, black salt, black pepper, and plant-based milk to the blender.
8. Blend the mixture on medium speed for 30–45 seconds until smooth and creamy, scraping down the sides if needed.
9. Transfer the tofu mixture to a mixing bowl and fold in the cooked onion, garlic, and spinach until evenly combined.
10. Pour the filling into the prepared pie crust, spreading it evenly with a spatula.
11. Bake the quiche in the preheated oven for 35–40 minutes, or until the edges are golden and the center is set to the touch.
12. Remove the quiche from the oven and let it cool on a wire rack for 10–15 minutes before slicing.
This quiche firms up beautifully as it cools, offering a creamy interior with a subtle egg-like savoriness from the black salt. Try serving it warm with a side of roasted potatoes or a fresh arugula salad for a balanced meal that highlights its rich, savory depth.
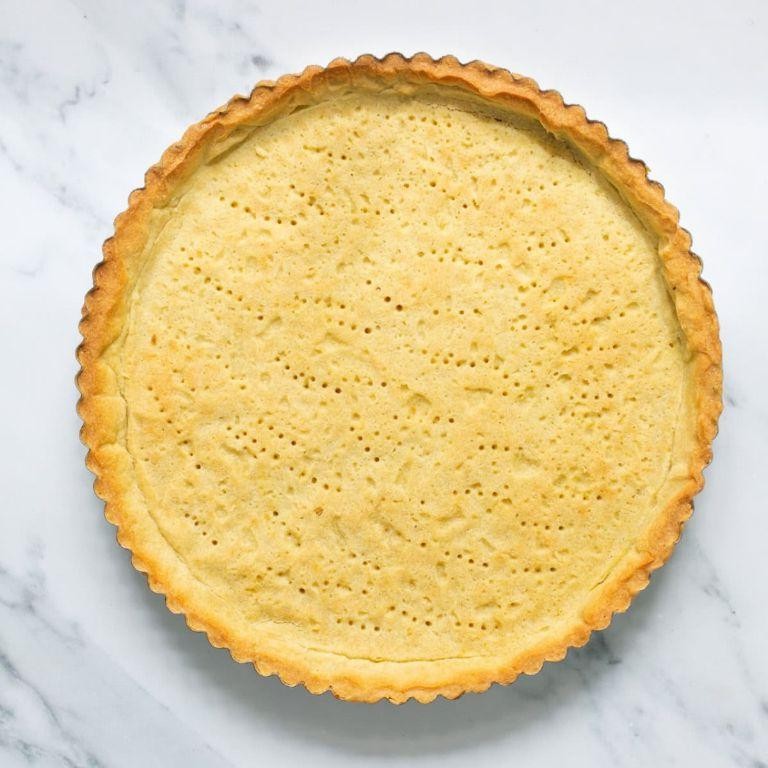
Vegan Lemon Tart with Almond Flour Crust
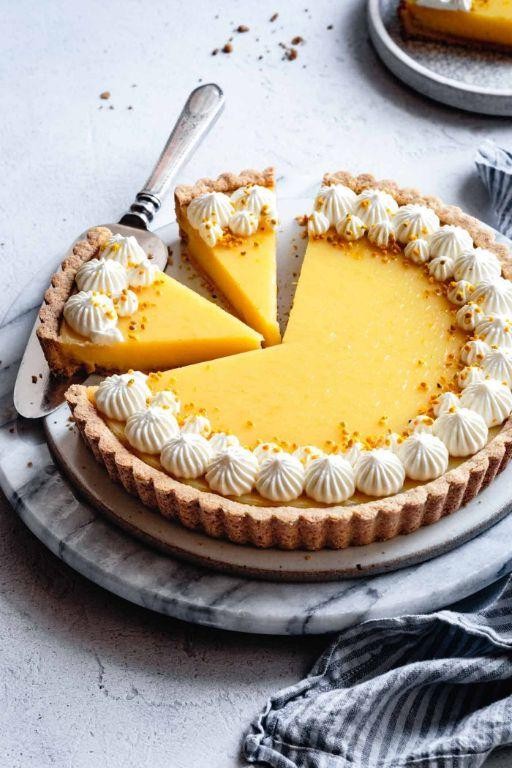
Tackling a vegan dessert doesn’t have to be intimidating, especially when it comes to this bright and creamy lemon tart. This recipe breaks down the process into simple, manageable steps that even novice bakers can follow successfully. You’ll create a nutty almond crust and a tangy lemon filling that sets perfectly without any dairy or eggs.
8
portions20
minutes20
minutesIngredients
- 1 ½ cups almond flour (for a gluten-free crust)
- ¼ cup maple syrup (or agave for similar sweetness)
- 3 tbsp coconut oil, melted (helps bind the crust)
- ½ cup fresh lemon juice (about 3-4 lemons for best flavor)
- ¼ cup cornstarch (essential for thickening the filling)
- ¾ cup full-fat coconut milk (shaken well before measuring)
- ½ cup granulated sugar (adjust slightly for preferred tartness)
- 1 tsp vanilla extract (enhances the citrus notes)
- Pinch of salt (balances the sweetness)
Instructions
- Preheat your oven to 350°F and lightly grease a 9-inch tart pan with removable bottom.
- In a medium bowl, combine almond flour, melted coconut oil, and maple syrup until the mixture resembles wet sand.
- Press the crust mixture evenly into the bottom and up the sides of the prepared tart pan using your fingers or a flat-bottomed cup.
- Bake the crust for 12-15 minutes until the edges are lightly golden, then remove and let it cool completely.
- In a saucepan, whisk together lemon juice, cornstarch, coconut milk, sugar, vanilla extract, and salt until no lumps remain.
- Cook the filling over medium heat, stirring constantly with a spatula to prevent sticking.
- Continue cooking until the mixture thickens noticeably and large bubbles break the surface, about 5-7 minutes.
- Immediately pour the hot filling into the cooled crust and smooth the top with a spatula.
- Refrigerate the tart for at least 4 hours or until the filling is firm to the touch.
Perfectly set with a velvety smooth texture, this tart delivers a vibrant lemon punch that’s balanced by the subtly sweet almond crust. For an elegant presentation, garnish with fresh raspberries or toasted coconut flakes just before serving. The crisp crust holds up beautifully against the creamy filling, making each slice a refreshing treat that’s surprisingly simple to master.
Conclusion
Now you have all the essential techniques to create amazing vegan baked goods! These 33 methods will transform your kitchen creations into delicious, plant-based masterpieces. We’d love to hear which techniques become your favorites—drop a comment below and share your baking triumphs. Don’t forget to pin this article to your Pinterest boards so you can reference these tips anytime!


