My kitchen smells absolutely incredible right now, and it’s all thanks to this magical baked orange chicken that’s about to become your new weeknight hero. Many busy home cooks think delicious orange chicken requires deep frying or takeout, but this oven-baked version delivers all that crispy, saucy goodness with way less mess and guilt.
Why This Recipe Works
- The double coating technique (flour then egg wash) creates an extra crispy crust that holds up beautifully to the sticky orange sauce without getting soggy
- Baking at 425°F ensures the chicken gets golden brown and crispy while staying juicy inside, eliminating the need for messy deep frying
- Fresh orange zest and juice combined with soy sauce and ginger create a perfectly balanced sweet-tangy-savory sauce that clings to every piece of chicken
- Using both light brown sugar and honey gives the sauce complex sweetness and helps it caramelize beautifully in the oven
- The optional cornstarch slurry thickens the sauce to that perfect glossy, restaurant-quality consistency we all crave
Ingredients
- 2 pounds boneless, skinless chicken thighs, cut into 1-inch pieces
- 1 cup all-purpose flour
- 2 large eggs, beaten
- 1 cup orange juice, freshly squeezed
- 2 tablespoons orange zest
- 1/3 cup soy sauce
- 1/4 cup light brown sugar, packed
- 2 tablespoons honey
- 3 cloves garlic, minced
- 1 tablespoon fresh ginger, grated
- 2 tablespoons rice vinegar
- 1 tablespoon cornstarch (optional for thickening)
- 2 tablespoons water (if using cornstarch)
- 2 tablespoons vegetable oil
- 1 teaspoon sesame seeds for garnish
- 2 green onions, thinly sliced for garnish
Equipment Needed
- Large mixing bowls (2)
- Whisk
- Rimmed baking sheet
- Parchment paper or silicone baking mat
- Medium saucepan
- Zester or fine grater
- Juicer or reamer
- Tongs
- Measuring cups and spoons
Instructions

Prepare Your Chicken Coating Station
Grab two large mixing bowls and set up your assembly line like a pro. In the first bowl, add your all-purpose flour and season it generously with a pinch of salt and black pepper—I’m talking about 1/2 teaspoon of each to really make that coating sing. In the second bowl, crack those two large eggs and beat them until they’re completely smooth and uniform, no streaks of white remaining. Now take your chicken pieces and pat them completely dry with paper towels—this is the secret weapon for extra crispy results because moisture is the enemy of crunch. Working in batches of about 6-8 pieces at a time, dredge each chicken piece thoroughly in the flour mixture, shaking off any excess, then dip them in the egg wash, letting the excess drip off before returning them to the flour for a final coat. This double-dredging technique creates those craggy, crispy bits we all love.
Create the Magical Orange Sauce
Bake to Golden Perfection
Preheat your oven to 425°F—this relatively high temperature is key for getting that crispy texture without frying. Line your rimmed baking sheet with parchment paper or a silicone mat (trust me, cleanup will be so much easier) and drizzle with 2 tablespoons of vegetable oil, spreading it around evenly. Arrange your coated chicken pieces in a single layer with a little space between each piece—crowding will steam them instead of crisping them. Bake for 15 minutes, then carefully flip each piece using tongs—they should be lightly golden on the bottom already. Continue baking for another 10-15 minutes until the chicken is deeply golden brown, crispy on the outside, and reaches an internal temperature of 165°F when checked with an instant-read thermometer.
Combine Chicken and Sauce
Once your chicken is perfectly crispy and cooked through, transfer it to a large mixing bowl—be gentle to maintain that beautiful crust you worked so hard to create. Pour about 3/4 of your prepared orange sauce over the chicken and toss gently until every piece is evenly coated. I like to reserve some sauce for serving because everyone has different sauciness preferences. If you want that extra glossy finish, return the sauced chicken to the baking sheet and pop it back in the oven for just 2-3 minutes—this helps the sauce caramelize slightly and adhere better to the chicken. Pro tip: If your sauce thickened too much while sitting, warm it gently with a tablespoon of water to bring it back to pourable consistency.
Garnish and Serve Immediately
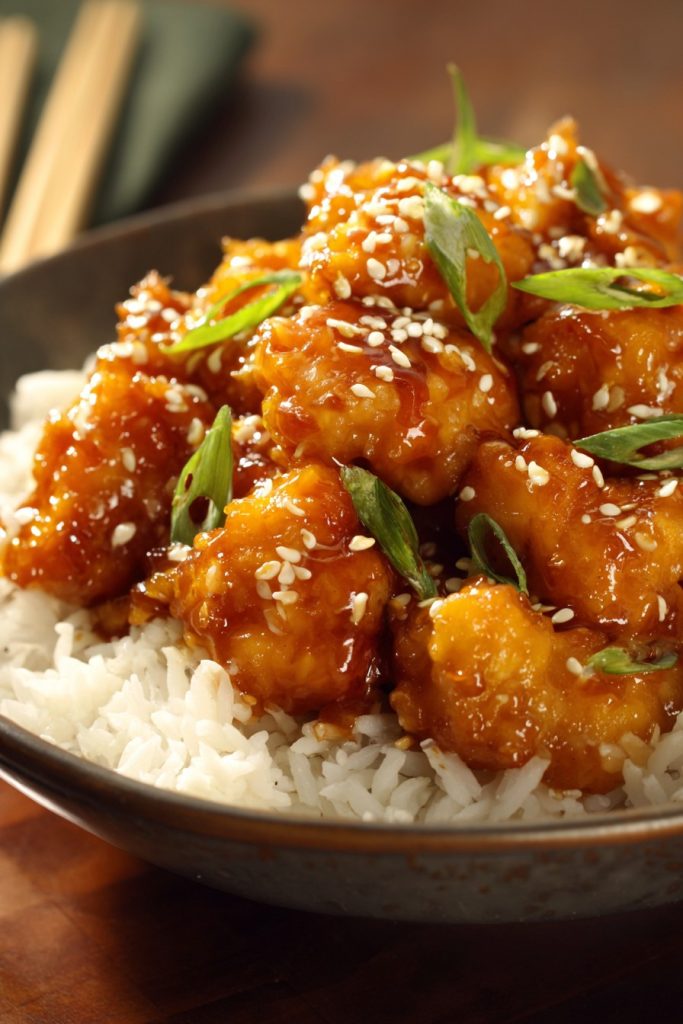
Transfer your glorious orange chicken to a serving platter and drizzle with any remaining sauce from the bowl—don’t let those delicious bits go to waste! Sprinkle with thinly sliced green onions and sesame seeds for that beautiful color contrast and extra flavor dimension. Serve immediately while it’s still hot and crispy—this dish is best enjoyed right out of the oven before the sauce has time to soften that perfect crust. I love serving this over steamed jasmine rice with some quick-steamed broccoli on the side to soak up all that amazing orange sauce. Leftovers will keep in the refrigerator for up to 3 days, though the crust will soften—still delicious for quick lunches!
Tips and Tricks
If you really want to take your orange chicken to the next level, here are some pro tips that will make you feel like a restaurant chef. First, consider marinating your chicken pieces in 2 tablespoons of the orange sauce mixed with 1 tablespoon of soy sauce for 20-30 minutes before coating—this adds an extra layer of flavor right into the meat itself. When zesting your oranges, be careful to only get the bright orange part—the white pith underneath is bitter and can throw off your sauce balance. For maximum citrus flavor, use a microplane zester and zest directly over your measuring spoon to capture all those precious essential oils.
Regarding the sauce consistency: if you prefer a thinner, more glazy sauce, skip the cornstarch slurry and simply reduce the sauce by simmering for 5-7 minutes longer until it coats the back of a spoon. For those who like it extra thick, you can increase the cornstarch to 2 tablespoons mixed with 3 tablespoons water. If your sauce becomes too thick after cooling, don’t panic—just whisk in a tablespoon of warm water or orange juice at a time until it reaches your desired consistency. Always taste your sauce before adding it to the chicken—sometimes oranges vary in sweetness, so you might need an extra teaspoon of honey or a splash more vinegar to balance it perfectly.
For the crispiest possible coating, make sure your chicken pieces are completely dry before dredging—I even like to leave them uncovered on a rack in the refrigerator for 30 minutes to air-dry the surface. When baking, don’t overcrowd the pan—if necessary, use two baking sheets and rotate them halfway through cooking for even browning. If you want extra crunch, you can add 2 tablespoons of cornstarch to your flour mixture or even use panko breadcrumbs for the final coating. For easier cleanup, line your baking sheet with foil first, then parchment paper—the foil catches any drips while the parchment prevents sticking.
If you’re making this for a crowd, you can prepare the sauce up to 3 days ahead and store it in the refrigerator—just reheat gently before using. The chicken can be coated and arranged on the baking sheet up to 2 hours ahead and kept in the refrigerator until ready to bake. For meal prep, bake the chicken without sauce, then cool completely and store separately from the sauce—when ready to eat, reheat the chicken in a 400°F oven for 10 minutes until crispy, then toss with warmed sauce. Freeze baked unsauced chicken for up to 3 months—reheat from frozen at 400°F for 15-18 minutes until hot and crispy.
Recipe Variations
- Spicy Orange Chicken: Add 1-2 teaspoons of red pepper flakes or 1 tablespoon of sriracha to the sauce for a kick that balances the sweetness beautifully. You can also add sliced fresh chili peppers or a teaspoon of chili garlic paste for more complex heat. Garnish with additional red pepper flakes and serve with cooling cucumber salad to balance the spice level.
- Healthy Twist: Use chicken breast instead of thighs and increase baking time by 3-5 minutes since breast meat cooks faster. Replace half the flour with whole wheat flour or almond flour for extra fiber, and reduce the brown sugar to 3 tablespoons while increasing orange zest for brightness. Serve over cauliflower rice with extra steamed vegetables mixed right in.
- Different Citrus: Try this with lemon juice and zest for a brighter, tangier version, or use blood oranges when in season for incredible color and slightly berry-like flavor. Grapefruit works surprisingly well too—use 3/4 cup grapefruit juice with 1/4 cup orange juice and reduce sweetener by 1 tablespoon since grapefruit is less sweet.
- Extra Crunchy: Add 1/2 cup of panko breadcrumbs to your flour mixture for extra texture, or for gluten-free version, use crushed gluten-free crackers or cornmeal. You can also spray the coated chicken lightly with cooking spray before baking to encourage additional browning and crunch without adding significant calories.
- Asian Fusion: Add 1 tablespoon of hoisin sauce and 1 teaspoon of five-spice powder to the sauce for deeper flavor, and garnish with chopped peanuts and cilantro instead of green onions. Serve in lettuce cups for a fun handheld version, or stuff into bao buns with quick-pickled vegetables for a restaurant-worthy presentation.
Frequently Asked Questions
Can I use chicken breasts instead of thighs?
Absolutely! Chicken breasts work well but require slightly different handling. Since breast meat is leaner, it can dry out more easily, so I recommend cutting into slightly larger pieces—about 1.5 inches—and reducing baking time by 2-3 minutes. Check for doneness at 160°F since carryover cooking will bring it to 165°F. For extra moisture, you can marinate the breast pieces in 2 tablespoons of the orange sauce mixed with 1 tablespoon of olive oil for 20 minutes before coating. The result will be slightly less juicy than thighs but still delicious, especially if you don’t overcook it.
Why did my sauce turn out bitter?
Bitterness usually comes from getting too much of the white pith when zesting your oranges—always zest only the brightly colored outer layer. Another common culprit is overcooking the sauce, which can make the citrus compounds turn bitter. If your sauce tastes bitter, try balancing it with an extra tablespoon of honey or brown sugar and a pinch of salt. Sometimes older garlic or ginger can contribute bitterness too—always use fresh for the best flavor. If all else fails, strain the sauce through a fine mesh sieve to remove any zest or garlic bits that might be causing the issue.
Can I make this gluten-free?
Yes, this recipe adapts beautifully to gluten-free needs! Replace the all-purpose flour with your favorite gluten-free flour blend—I recommend one that contains xanthan gum for better adhesion. Use tamari instead of regular soy sauce, and ensure your baking powder (if using in variations) is gluten-free. For extra crispiness, you can use half gluten-free flour and half cornstarch in your coating mixture. The sauce is naturally gluten-free when made with tamari, but always check labels on ingredients like rice vinegar which occasionally contain gluten additives. Baking times and temperatures remain exactly the same.
How do I prevent the coating from getting soggy?
Sogginess usually happens from too much sauce or not baking long enough initially. Make sure your chicken is truly crispy before saucing—it should sound hollow when tapped and be deep golden brown. Toss the chicken in sauce right before serving rather than letting it sit, and consider serving extra sauce on the side instead of coating everything. If making ahead, store sauce and chicken separately until ready to serve. For reheating leftovers, use the oven or air fryer at 400°F for 5-7 minutes rather than the microwave to restore crispiness. Also ensure your sauce isn’t too thin—proper thickness helps it cling without saturating the crust.
Can I prepare this ahead of time?
You can prep components ahead but I don’t recommend saucing until ready to serve. The sauce can be made up to 3 days ahead and stored refrigerated—reheat gently before using. The chicken can be cut, coated, and arranged on the baking sheet up to 2 hours ahead and kept in the refrigerator. For longer prep, freeze the uncooked coated chicken on the baking sheet until solid, then transfer to freezer bags for up to 3 months—bake from frozen, adding 5-7 minutes to the cooking time. Leftovers will keep for 3 days refrigerated but the crust will soften—reheat in a 400°F oven for best results.
Summary
This baked orange chicken delivers all the crispy, saucy goodness of takeout without the frying mess. With a perfect sweet-tangy sauce and pro tips for maximum crunch, it’s weeknight magic that’ll have everyone begging for seconds. Simple enough for beginners but impressive enough for company!
Baked Orange Chicken
6
servings20
minutes25
minutesIngredients
Instructions
- 1 Preheat oven to 425°F and line baking sheet with parchment paper
- 2 Dredge chicken in flour, then egg wash, then flour again
- 3 Arrange on prepared baking sheet and bake for 15 minutes
- 4 Flip chicken and bake additional 10-15 minutes until crispy
- 5 Meanwhile, combine sauce ingredients and simmer until thickened
- 6 Toss crispy chicken with sauce and garnish before serving


