Get ready folks, because we’re about to transform your chicken game forever! Great news for all you crispy chicken lovers out there – I’ve perfected a baked version that gives you that irresistible crunch without the deep-frying mess. This hot honey chicken combines sweet, spicy, and savory flavors in the most addictive way possible, and the best part? It’s all happening in your oven!
Why This Recipe Works
- The double coating technique creates an incredibly crispy exterior that stays crunchy even after baking, thanks to the perfect combination of panko breadcrumbs and cornstarch that forms a protective barrier around the chicken
- Using both baking powder and high heat (425°F) creates tiny air pockets in the coating that mimic deep-fried texture while keeping the chicken incredibly juicy and tender inside
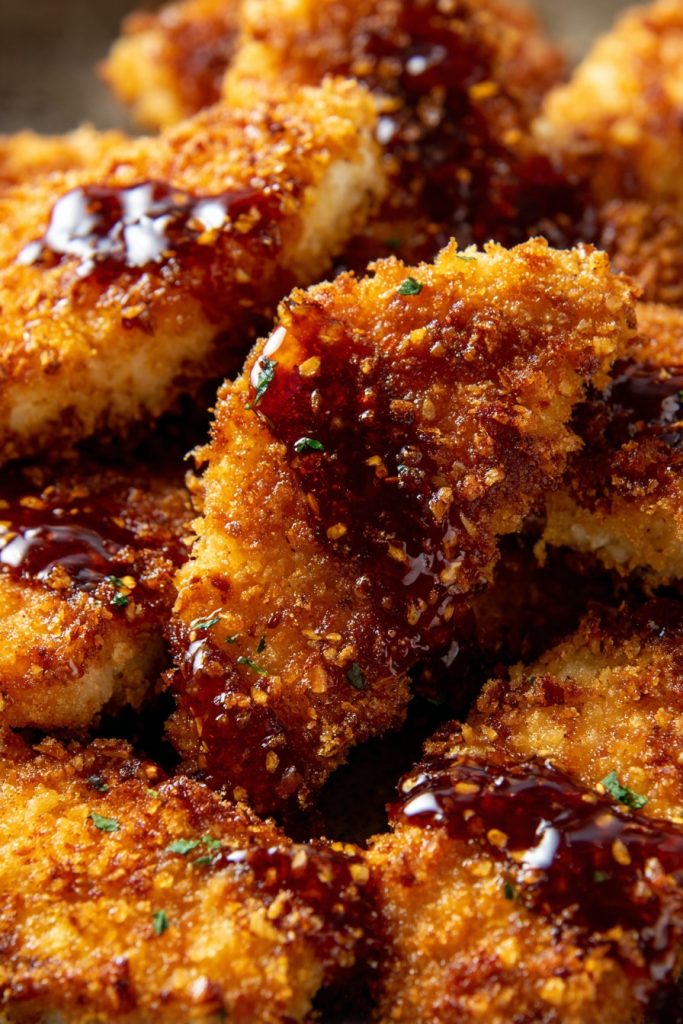
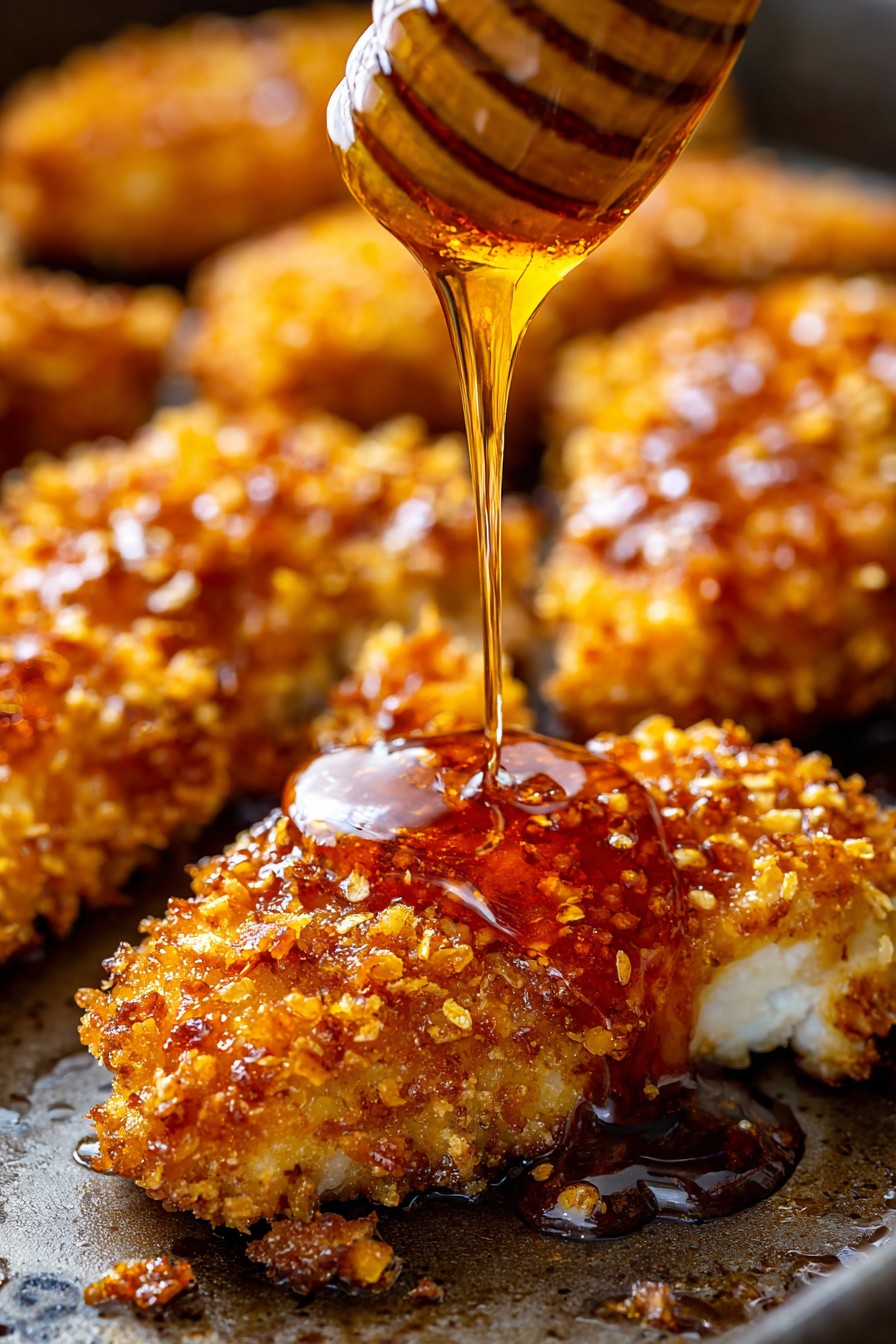
- The hot honey glaze is applied after baking to maintain the crispy texture while adding the perfect balance of sweet honey, spicy chili, and tangy acidity that clings to every nook and cranny
- Resting the coated chicken on a wire rack allows hot air to circulate evenly around each piece, ensuring uniform browning and preventing the dreaded soggy bottom syndrome
- The recipe uses simple pantry staples but delivers restaurant-quality results that will have everyone thinking you ordered takeout
Ingredients
- 2 pounds boneless, skinless chicken thighs, trimmed of excess fat and patted completely dry
- 1 cup all-purpose flour, for the initial coating
- 3 large eggs, beaten until smooth and frothy
- 2 cups panko breadcrumbs, the Japanese-style ones that create extra crunch
- 1/4 cup cornstarch, for that ultra-crispy texture
- 1 tablespoon baking powder, the secret weapon for lift and crunch
- 2 teaspoons garlic powder, for savory depth
- 2 teaspoons smoked paprika, for color and smoky flavor
- 1 teaspoon onion powder, for allium goodness
- 1 teaspoon salt, plus more for seasoning
- 1/2 teaspoon black pepper, freshly ground
- 1/2 teaspoon cayenne pepper, adjustable to your heat preference
- 1/2 cup honey, preferably raw and local if available
- 2 tablespoons hot sauce (like Frank’s RedHot or Sriracha), for that signature heat
- 1 tablespoon apple cider vinegar, to balance the sweetness
- 2 tablespoons unsalted butter, for richness in the glaze
- Cooking spray or olive oil, for helping the coating brown
Equipment Needed
- Rimmed baking sheet
- Wire rack that fits inside baking sheet
- Three shallow bowls or plates for dredging station
- Whisk
- Measuring cups and spoons
- Small saucepan
- Tongs
- Instant-read thermometer
- Paper towels
- Mixing bowls
Instructions
Step 1: Prepare Your Chicken and Set Up Dredging Station
Begin by prepping your chicken thighs – make sure they’re completely dry by patting them firmly with paper towels, as moisture is the enemy of crispiness. Season both sides generously with salt and pepper, then set aside while you create your three-stage dredging station. In your first shallow bowl, combine the all-purpose flour with half of your spices (1 teaspoon each of garlic powder, smoked paprika, onion powder, plus the cayenne). In the second bowl, beat your three eggs until they’re completely smooth and uniform. In the third bowl, mix together the panko breadcrumbs, cornstarch, baking powder, and the remaining spices. This organized setup is crucial for efficient coating – I like to line them up left to right so my clean hand can handle dry ingredients and my messy hand deals with the wet stuff. Pro tip: let your coated chicken rest on the wire rack for 10 minutes before baking to help the coating adhere better.
Step 2: Coat the Chicken Thoroughly and Methodically
Now for the fun part – the coating process! Working with one piece at a time, dredge each chicken thigh in the seasoned flour mixture, making sure to shake off any excess. Next, dip it into the beaten eggs, ensuring complete coverage and letting any excess drip back into the bowl. Finally, press the chicken firmly into the panko mixture, using your fingers to really pack the crumbs onto all surfaces. Don’t be gentle here – you want maximum coating adhesion! Place each coated piece on your wire rack set over the baking sheet, making sure they’re not touching. Continue until all chicken is coated, then let them rest for about 10 minutes while your oven preheats to 425°F. This resting period allows the coating to set up properly, which means less falling off during baking and better overall crispiness.
Step 3: Bake to Golden Brown Perfection
Preheat your oven to 425°F and make sure it’s fully heated – use an oven thermometer if you’re unsure, as temperature accuracy is key here. Lightly spray or brush the coated chicken with oil – this helps with browning and adds extra crunch. Place the baking sheet with the wire rack in the center of the oven and bake for 20-22 minutes. After the first 10 minutes, rotate the pan 180 degrees to ensure even cooking since most ovens have hot spots. You’re looking for a deep golden brown color and an internal temperature of 165°F when measured with an instant-read thermometer inserted into the thickest part of the chicken. The coating should feel firm and crispy to the touch, and you should see little bubbles and cracks in the surface – that’s the baking powder doing its magic!
Step 4: Prepare the Addictive Hot Honey Glaze
While the chicken is baking, let’s make that magical hot honey glaze that takes this dish to the next level. In a small saucepan over medium heat, combine the honey, hot sauce, apple cider vinegar, and butter. Whisk constantly until the butter melts completely and the mixture becomes smooth and slightly bubbly around the edges – this should take about 3-4 minutes. Reduce the heat to low and let it simmer gently for another 2 minutes to allow the flavors to meld together. The glaze should coat the back of a spoon nicely – if it seems too thick, you can add a teaspoon of warm water to thin it out. Remove from heat and keep warm until ready to use. Pro tip: taste and adjust the heat level now – add more hot sauce if you want it spicier!
Step 5: Glaze and Serve Immediately
Once your chicken reaches that perfect 165°F internal temperature and gorgeous golden brown color, remove it from the oven. Working quickly while the chicken is still piping hot, use a pastry brush or spoon to generously coat each piece with the warm hot honey glaze. You want to cover all surfaces but not drown them – the heat from the chicken will help the glaze adhere beautifully. Serve immediately while everything is still hot and crispy! I recommend serving over rice or with roasted vegetables to soak up that amazing sauce. The contrast between the crispy coating, juicy chicken, and sticky-sweet-spicy glaze is absolutely irresistible. Pro tip: reserve a little extra glaze for dipping at the table!
Tips and Tricks
For the ultimate crispy texture, consider using a combination of panko and crushed cornflakes in your coating mixture – the cornflakes add an extra dimension of crunch that holds up beautifully to the glaze. If you’re really serious about maximum crispiness, you can place your wire rack with coated chicken in the refrigerator for 30 minutes before baking – this helps the coating set up even better and results in fewer crumbs falling off during baking. When making your hot honey glaze, consider infusing it with additional flavors – try adding a smashed garlic clove to the saucepan while heating, or a teaspoon of grated fresh ginger for an extra flavor dimension that you remove before glazing. For those who love extra heat, add a pinch of red pepper flakes to the glaze or even a few slices of fresh jalapeño while it simmers. If you’re watching your sugar intake, you can make a lower-sugar version by using sugar-free honey substitute and reducing the amount by half, then balancing with a bit more vinegar and hot sauce. For meal prep purposes, you can bake the chicken without glazing, let it cool completely, then store in an airtight container in the refrigerator for up to 3 days – reheat in a 400°F oven for 10-12 minutes until crispy again, then add the glaze fresh. If you don’t have a wire rack, you can bake directly on a parchment-lined baking sheet, but flip the chicken halfway through cooking to ensure even browning on both sides. For extra flavor in the coating, try adding grated Parmesan cheese to the panko mixture – about 1/4 cup will add a nice savory note that complements the sweet heat beautifully. If your chicken pieces are particularly thick, you can pound them to an even 1/2-inch thickness before coating to ensure even cooking and maximum crispiness throughout. Always let your baked chicken rest for 5 minutes after removing from the oven before glazing – this allows the juices to redistribute so they don’t all run out when you cut into it. For a smoother glaze, you can strain it through a fine mesh sieve after heating to remove any seeds from the hot sauce or specks of spice. If you’re making this for a crowd, you can keep the glazed chicken warm in a 200°F oven for up to 30 minutes without losing too much crispiness – just place them on a clean wire rack over a baking sheet. For extra insurance against sticking, make sure to spray your wire rack with cooking spray before placing the coated chicken on it – nobody wants to lose that beautiful coating to sticking! Finally, if you have leftovers (unlikely, but possible), store them in the refrigerator and reheat in an air fryer or toaster oven to restore the crispiness – microwave will make them soggy.
Recipe Variations
- Spicy Buffalo Twist: Replace the hot honey glaze with a mixture of 1/2 cup melted butter and 1/2 cup Frank’s RedHot sauce, adding a teaspoon of Worcestershire sauce for depth. After baking, toss the chicken in this buffalo sauce and serve with celery sticks and blue cheese dressing for game day perfection.
- Asian-Inspired Version: Modify the coating by adding 1 tablespoon of five-spice powder to the flour mixture. For the glaze, use 1/2 cup honey, 2 tablespoons soy sauce, 1 tablespoon Sriracha, 1 minced garlic clove, and 1 teaspoon grated fresh ginger. Garnish with sesame seeds and sliced green onions for an East-meets-West fusion dish.
- Herb-Crusted Option: Add 2 tablespoons of dried Italian seasoning or herbes de Provence to the panko mixture, and use olive oil instead of cooking spray for brushing. Skip the spicy glaze and instead make a lemon-herb butter sauce with melted butter, lemon juice, and fresh chopped parsley for a more elegant, less spicy version.
- BBQ Honey Chipotle: Create a smoky-sweet variation by adding 1 tablespoon of chipotle powder to the flour coating. For the glaze, mix 1/2 cup honey with 1/4 cup of your favorite BBQ sauce, 1 tablespoon apple cider vinegar, and 1 teaspoon smoked paprika. This version has deeper smoky notes that barbecue lovers will adore.
- Sweet and Sour Adaptation: For a tropical twist, add 1/4 cup crushed pineapple (well-drained) to the hot honey glaze along with 1 tablespoon of rice vinegar. You can also add 2 tablespoons of orange juice and 1 teaspoon of orange zest for a citrusy brightness that cuts through the richness beautifully.
Frequently Asked Questions
Can I use chicken breasts instead of thighs?
Absolutely! Chicken breasts work well but require slightly different handling. Since breasts are leaner and can dry out more easily, I recommend pounding them to an even 1/2-inch thickness before coating to ensure they cook at the same rate as the coating. You’ll also want to reduce the baking time by 2-3 minutes and check for doneness at 160°F since carryover cooking will bring them to 165°F. The result will be slightly less juicy than thighs but still delicious, especially if you brine the breasts in salt water for 30 minutes before patting dry and proceeding with the recipe.
How do I make this recipe gluten-free?
Easy peasy! Simply replace the all-purpose flour with your favorite gluten-free flour blend (I like Cup4Cup or Bob’s Red Mill 1-to-1), and use certified gluten-free panko breadcrumbs, which are now widely available. Make sure your baking powder is gluten-free (most are, but check the label), and verify that your hot sauce is gluten-free (many popular brands are). The cornstarch is naturally gluten-free, so you’re good there. The resulting chicken will be just as crispy and delicious, and nobody will guess it’s gluten-free!
Can I make the hot honey glaze less spicy?
Of course! The beauty of this recipe is its adaptability. To reduce the heat, simply decrease the amount of hot sauce to 1 tablespoon or even less, and eliminate the cayenne pepper from the coating mixture. You could also use a milder hot sauce like Cholula or even skip it entirely and add a pinch of black pepper instead. Another option is to make the glaze with just honey and butter, then serve with hot sauce on the side for those who want extra heat. Remember, you can always add more spice but you can’t take it away!
How do I store and reheat leftovers?
Store any leftovers in an airtight container in the refrigerator for up to 3 days. To reheat, do NOT use the microwave unless you want soggy chicken! Instead, place the chicken on a wire rack over a baking sheet and heat in a 375°F oven for 8-10 minutes until hot and crispy again. If you have an air fryer, that’s even better – 350°F for 4-5 minutes works perfectly. The glaze might make the coating slightly less crispy upon reheating, but it will still be delicious. I don’t recommend freezing the finished dish as the coating tends to get soggy upon thawing.
Can I make this recipe ahead of time?
You can partially prepare this recipe ahead of time for easier entertaining. You can coat the chicken pieces and arrange them on the wire rack up to 4 hours in advance, then cover loosely with plastic wrap and refrigerate until ready to bake. The hot honey glaze can be made up to 3 days ahead and stored in the refrigerator – simply reheat gently before using. You can also mix the dry coating ingredients ahead of time and store in an airtight container. I don’t recommend baking the chicken more than an hour before serving, as the coating will lose its crispiness over time.
Summary
This baked crispy hot honey chicken delivers restaurant-quality results with minimal fuss. The perfect balance of sweet, spicy, and crunchy makes it an instant crowd-pleaser that’s sure to become a regular in your dinner rotation.
Baked Crispy Hot Honey Chicken
5
servings20
minutes22
minutesIngredients
Instructions
- 1 Preheat oven to 425°F and set wire rack in rimmed baking sheet
- 2 Pat chicken dry and season with salt and pepper
- 3 Set up three bowls: flour with spices, beaten eggs, panko with cornstarch and baking powder
- 4 Coat chicken in flour, then egg, then panko mixture, pressing firmly
- 5 Place on wire rack, spray with oil, and bake for 20-22 minutes until 165°F internal temperature
- 6 Meanwhile, make glaze by heating honey, hot sauce, vinegar, and butter until smooth
- 7 Brush hot chicken with glaze and serve immediately


