
Let’s face it, we’ve all had those chicken breast disasters that turn out drier than the Sahara desert. Last week I was craving that perfect crispy skin and juicy interior that only properly cooked chicken thighs can deliver, so I spent three days testing variations until I nailed this foolproof method.
Why This Recipe Works
- The high initial baking temperature of 425°F creates that irresistible crispy skin while locking in juices, then we lower it to 375°F to cook through without burning
- Using both baking powder and cornstarch in the seasoning mix creates microscopic bubbles on the skin’s surface, resulting in an extra-crunchy texture that’ll have you fighting over the last piece
- Starting skin-side down for the first half of cooking renders out excess fat, then flipping ensures both sides get perfectly crispy without the mess of pan-frying
- Resting the chicken for 5-7 minutes after baking allows the juices to redistribute throughout the meat, preventing that sad, dry chicken experience we’ve all endured
- The simple seasoning blend of paprika, garlic powder, and onion powder enhances without overpowering, letting the natural chicken flavor shine through
Ingredients
- 8 bone-in, skin-on chicken thighs (about 3 pounds total), patted completely dry with paper towels
- 2 tablespoons olive oil
- 1 tablespoon baking powder (not baking soda!)
- 2 teaspoons cornstarch
- 2 teaspoons kosher salt
- 1 teaspoon smoked paprika
- 1 teaspoon garlic powder
- 1 teaspoon onion powder
- ½ teaspoon black pepper, freshly ground
- ¼ teaspoon cayenne pepper (optional for heat)
- Fresh parsley, chopped (for garnish)
- Lemon wedges (for serving)
Equipment Needed
- Rimmed baking sheet
- Wire rack that fits inside baking sheet
- Mixing bowls (one large, one medium)
- Paper towels
- Tongs
- Instant-read thermometer
- Measuring spoons
- Cutting board
- Chef’s knife
Instructions
Prep Your Chicken and Seasoning Mix
Take your chicken thighs out of the refrigerator about 20-30 minutes before cooking to bring them to room temperature—this ensures more even cooking. While waiting, grab a large mixing bowl and combine the baking powder, cornstarch, kosher salt, smoked paprika, garlic powder, onion powder, black pepper, and cayenne if using. Whisk these dry ingredients together until thoroughly combined; you want every particle distributed evenly. Now pat each chicken thigh completely dry with paper towels—I mean REALLY dry, like desert-dry. This step is non-negotiable for crispy skin. Place the dried thighs in another large bowl, drizzle with olive oil, and massage it into every nook and cranny. Sprinkle the seasoning mix over both sides, rubbing it under the skin too if you’re feeling fancy. Pro tip: For extra flavor, you can gently loosen the skin from the meat with your fingers and get some seasoning directly on the meat itself.
Arrange on Baking Rack and Preheat
Position your oven rack in the center position and preheat that bad boy to 425°F—yes, we’re starting hot! While it heats, take your wire rack and place it inside your rimmed baking sheet. This setup is crucial because it allows hot air to circulate around the chicken, cooking it evenly and preventing the bottom from getting soggy in rendered fat. Arrange your seasoned chicken thighs skin-side down on the wire rack, leaving about an inch between each piece. Don’t crowd them! If they’re too close, they’ll steam instead of crisp up. The rimmed baking sheet will catch all the delicious rendered chicken fat (save it for roasting vegetables later!). Give the rack a quick spray with cooking spray if you’re worried about sticking, though the olive oil usually prevents this. Now set this aside while your oven comes to temperature—about 10-15 minutes should do it.
Initial High-Temperature Bake
Once your oven hits 425°F, carefully place the baking sheet with chicken on the center rack and set your timer for 20 minutes. This initial blast of high heat will start rendering the fat from the skin and create those beautiful browned bits. You should hear some gentle sizzling within the first 5 minutes—that’s the sound of success! Resist the temptation to open the oven door during this phase; you’ll let out precious heat and slow down the cooking process. After 20 minutes, the skin should be starting to brown and crisp up on the edges. Now reduce the oven temperature to 375°F—but don’t take the chicken out while it adjusts. The residual heat will help maintain the cooking process. Pro tip: If your oven runs hot or cold, invest in an inexpensive oven thermometer to ensure accurate temperatures.
Flip and Continue Baking
After reducing the temperature, carefully remove the baking sheet from the oven—those handles will be hot! Using tongs, flip each chicken thigh skin-side up. You should see beautiful golden-brown coloring on what was the bottom side. Return the baking sheet to the oven and bake for another 20-25 minutes at 375°F. During this phase, the skin will continue crisping up while the meat cooks through. Keep an eye on it through the oven window—if the skin starts getting too dark too quickly, you can tent loosely with foil. The chicken is done when the skin is deep golden brown and crispy, and an instant-read thermometer inserted into the thickest part of the thigh (without touching bone) reads 165°F. If you don’t have a thermometer, the juices should run clear when pierced.
Rest and Serve Perfectly
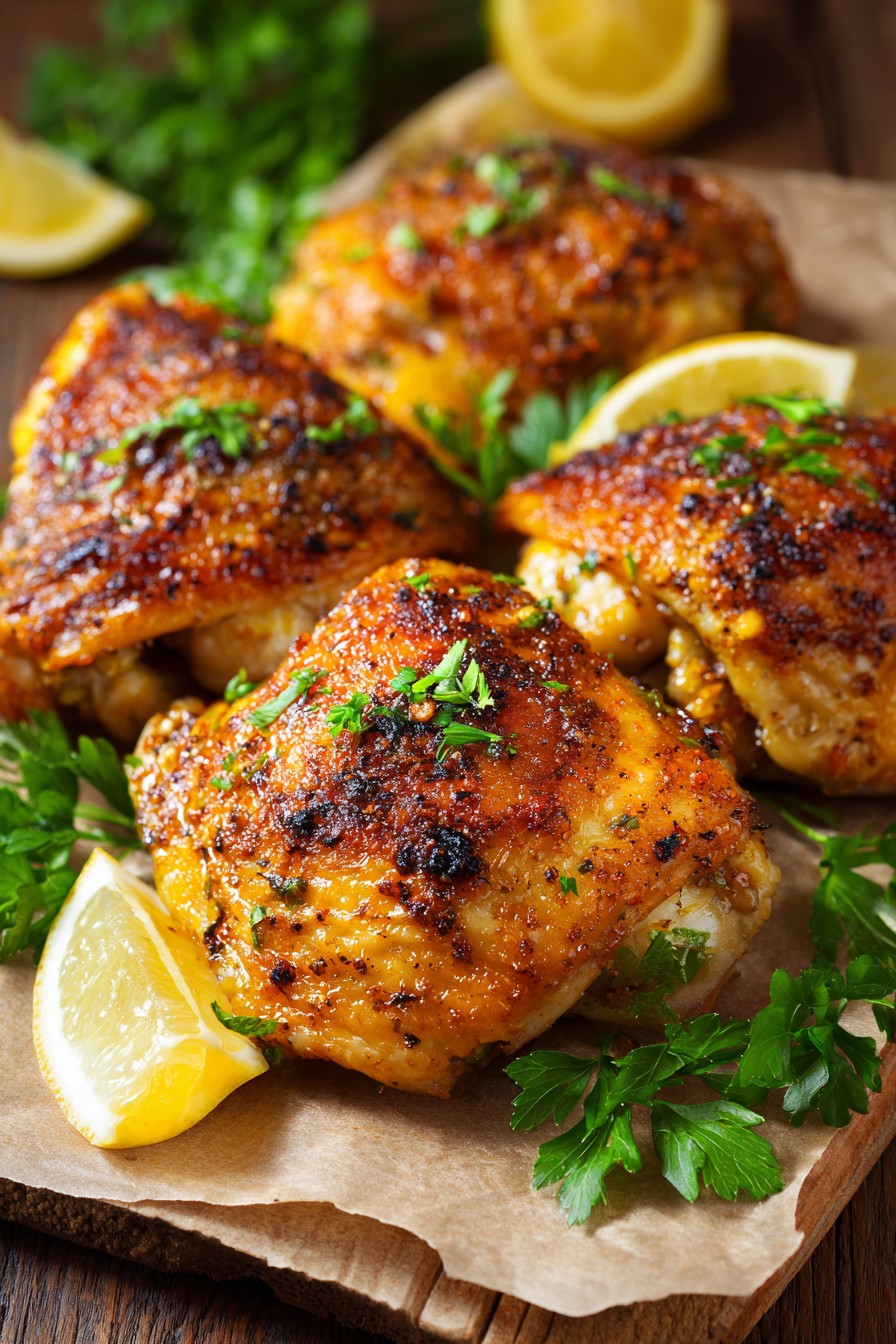
Once your chicken reaches 165°F, remove it from the oven and transfer the thighs to a clean plate or cutting board—don’t leave them on the hot baking sheet or they’ll continue cooking. Let them rest for at least 5-7 minutes; this allows the juices to redistribute throughout the meat. If you cut into them immediately, all those beautiful juices will end up on your cutting board instead of in your mouth! While resting, the internal temperature will rise another 5-10 degrees, reaching the perfect 170-175°F for thigh meat. Garnish with freshly chopped parsley and serve with lemon wedges for squeezing over the top. The acid brightens all the rich flavors beautifully. Pro tip: Pour the rendered chicken fat from the baking sheet through a fine mesh strainer and save it in a jar in your refrigerator—it’s liquid gold for roasting potatoes or vegetables!
Tips and Tricks
If you want next-level crispy skin, after patting the chicken dry, place it uncovered on a wire rack set over a baking sheet and refrigerate for 4-24 hours. This air-drying technique removes even more moisture from the skin, resulting in crackling-level crispiness that’ll make you feel like a professional chef. For those who love extra flavor, consider brining your chicken thighs before seasoning. Dissolve ¼ cup kosher salt and 2 tablespoons sugar in 4 cups warm water, then submerge the thighs and refrigerate for 2-4 hours. This not only adds flavor throughout the meat but also helps it retain moisture during cooking. If you’re watching sodium, you can reduce the salt in the seasoning mix since the brine will have seasoned the meat internally.
When it comes to equipment, if you don’t have a wire rack, you can create a makeshift one by lining the baking sheet with aluminum foil and placing sliced onions or potatoes underneath the chicken—they’ll absorb the delicious drippings and cook simultaneously. For easy cleanup, line your baking sheet with foil before placing the wire rack, but make sure the foil doesn’t cover the entire surface or it can affect air circulation. If your chicken skin isn’t getting as crispy as you’d like, during the last 5 minutes of cooking, you can switch your oven to broil on high—but watch it like a hawk because it can go from perfectly crispy to burnt in seconds.
For meal prep enthusiasts, you can mix the dry seasoning blend in larger batches and store it in an airtight container for up to 3 months—just label it clearly so you don’t confuse it with other spice mixes. If you have leftovers, store them in an airtight container in the refrigerator for up to 4 days. To reheat while maintaining crispiness, use an air fryer at 375°F for 3-4 minutes or place on a wire rack in a 375°F oven for 8-10 minutes—avoid the microwave unless you want rubbery chicken. For freezing, place cooled chicken thighs in a single layer on a baking sheet until frozen solid, then transfer to freezer bags for up to 3 months.
Recipe Variations
- Lemon Herb: Add 2 tablespoons each of fresh chopped rosemary, thyme, and parsley to the seasoning mix, plus the zest of one lemon. Squeeze fresh lemon juice over the chicken after baking for a bright, herbaceous twist that pairs beautifully with roasted vegetables or a simple salad.
- Spicy Buffalo: Replace the paprika with 2 tablespoons of your favorite hot sauce mixed into the olive oil before coating the chicken. After baking, brush with additional hot sauce mixed with 1 tablespoon melted butter, then return to the oven for 2-3 minutes. Serve with celery sticks and blue cheese dressing for game day perfection.
- BBQ Glazed: Bake the chicken as directed, then during the last 10 minutes of cooking, brush with your favorite BBQ sauce every 3-4 minutes until caramelized. Choose a sauce with lower sugar content to prevent burning, and consider adding a teaspoon of liquid smoke to the seasoning mix for that authentic grilled flavor.
- Mediterranean: Use 2 teaspoons dried oregano instead of paprika, add 1 teaspoon lemon zest to the seasoning, and after baking, top with crumbled feta cheese, kalamata olives, and fresh dill. This variation transforms the chicken into a complete meal when served with couscous or Greek salad.
- Asian-Inspired: Replace the paprika with 1 tablespoon five-spice powder, use soy sauce instead of salt in the seasoning mix, and add 1 teaspoon grated fresh ginger. Garnish with sliced green onions and sesame seeds for a fusion twist that works wonderfully with steamed rice and stir-fried vegetables.
Frequently Asked Questions
Can I use boneless, skinless chicken thighs instead?
Absolutely! Boneless, skinless thighs will work, but you’ll need to adjust the cooking time and expectations. Reduce the initial bake time to 15 minutes at 425°F, then flip and cook for another 10-15 minutes at 375°F until they reach 165°F internally. Without the skin, you won’t get that signature crispiness, but they’ll still be incredibly juicy and flavorful. Consider increasing the seasoning slightly since you have more surface area without skin, and maybe add a tablespoon of breadcrumbs to the seasoning mix for some texture. The total cook time will be about 25-30 minutes compared to 40-45 for bone-in, skin-on versions.
Why did my chicken skin turn out rubbery instead of crispy?
Can I make this recipe with chicken breasts instead?
You can, but it’s a completely different experience! Chicken breasts are much leaner and will cook faster—about 20-25 minutes total at 375°F. I’d skip the initial high-temperature phase to prevent drying out. Without the skin, you won’t get the same crispy texture, so consider adding a crunchy topping like crushed crackers or panko breadcrumbs mixed with the seasonings. Brush the breasts with olive oil, press the topping mixture onto them, and bake at 375°F until they reach 165°F internally. The result will be tasty but more like baked chicken rather than the crispy, juicy thighs we’re celebrating here.
How do I know when the chicken is done without a thermometer?
While I highly recommend using an instant-read thermometer for perfect results every time, there are visual cues you can use. The chicken should have golden brown, crispy skin that looks slightly shrunken around the edges. When you pierce the thickest part with a knife or fork, the juices should run completely clear with no pink tint. The meat should feel firm to the touch but still have some give—if it feels rock hard, it’s overdone. Another test is wiggling the drumstick end; if it moves easily and almost wants to separate, it’s likely done. However, these methods aren’t as reliable as a $15 thermometer!
Can I prepare the chicken ahead of time?
You can absolutely season the chicken up to 24 hours in advance! After patting dry and applying the oil and seasoning mixture, place the thighs on a wire rack over a baking sheet, cover loosely with plastic wrap, and refrigerate. This actually helps dry the skin even more for extra crispiness. When ready to cook, let them sit at room temperature for 20-30 minutes before baking as directed. Don’t let seasoned chicken sit longer than 24 hours as the salt can begin to cure the meat, changing its texture. The seasoning mix itself can be prepared weeks ahead and stored in an airtight container.
Summary
Crispy baked chicken thighs deliver perfect crunch and juiciness through high-then-low baking, proper drying, and strategic seasoning. Resting ensures maximum flavor in every bite.
Crispy Baked Chicken Thighs
5
servings15
minutes40
minutesIngredients
Instructions
- 1 Preheat oven to 425°F. Pat chicken thighs completely dry with paper towels.
- 2 Mix baking powder, cornstarch, salt, paprika, garlic powder, onion powder, black pepper, and cayenne in bowl.
- 3 Coat chicken with olive oil, then rub seasoning mix all over, including under skin.
- 4 Arrange skin-side down on wire rack in rimmed baking sheet. Bake 20 minutes at 425°F.
- 5 Reduce oven to 375°F, flip chicken skin-side up, bake 20-25 minutes until 165°F internally.
- 6 Rest 5-7 minutes before serving with parsley and lemon wedges.


