Hey there, hungry friends! How about we skip the greasy splatter and dive into a baked version of chicken parmesan that delivers all the crispy, cheesy goodness without the deep-fry drama. Honestly, this recipe is about to become your new weeknight hero—it’s foolproof, family-friendly, and packed with flavor that’ll have everyone begging for seconds.
Why This Recipe Works
- Baking instead of frying cuts down on oil and mess while still achieving a golden, crunchy crust that holds up beautifully under the sauce and cheese.
- A double coating of seasoned breadcrumbs mixed with grated Parmesan ensures maximum flavor and texture in every single bite, avoiding any bland or soggy spots.
- Layering the marinara sauce and mozzarella strategically prevents the chicken from steaming and keeps that crispy exterior intact right until you serve it.
- Using a wire rack on the baking sheet allows hot air to circulate evenly, crisping both sides of the chicken without the need for flipping halfway through.
- Resting the coated chicken for 10 minutes before baking helps the breading adhere better, reducing the risk of it sliding off when you add the toppings.
Ingredients
- 4 boneless, skinless chicken breasts (about 1.5 pounds total), pounded to 1/2-inch thickness
- 1 cup all-purpose flour
- 2 large eggs, beaten
- 1.5 cups Italian-seasoned breadcrumbs
- 1/2 cup grated Parmesan cheese, divided
- 1 teaspoon garlic powder
- 1 teaspoon dried oregano
- 1/2 teaspoon black pepper
- 1/2 teaspoon salt
- 2 cups marinara sauce, preferably jarred for convenience
- 2 cups shredded mozzarella cheese
- 2 tablespoons olive oil
- Fresh basil leaves for garnish (optional)
Equipment Needed
- Rimmed baking sheet
- Wire rack that fits inside the baking sheet
- Three shallow dishes (for flour, eggs, and breadcrumb mixture)
- Meat mallet or rolling pin (for pounding chicken)
- Measuring cups and spoons
- Tongs or fork for handling chicken
- Oven mitts
Instructions
Prep the Chicken and Coating Stations
Start by preheating your oven to 425°F and placing a wire rack inside a rimmed baking sheet—this setup is crucial for airflow and crispiness. Take your chicken breasts and, if they’re uneven, pound them to an even 1/2-inch thickness using a meat mallet or rolling pin; this ensures they cook uniformly without drying out. Set up three shallow dishes: one with the all-purpose flour, another with the beaten eggs, and the third with a mix of Italian-seasoned breadcrumbs, 1/4 cup of the grated Parmesan, garlic powder, dried oregano, black pepper, and salt. Whisk the dry ingredients together thoroughly so every bit of chicken gets evenly seasoned. Pro tip: Let the coated chicken rest for 10 minutes before baking to help the breading stick better and reduce flaking.
Coat the Chicken Thoroughly
Working with one piece at a time, dredge each chicken breast in the flour, shaking off any excess—this initial layer helps the egg adhere and creates a barrier against moisture. Next, dip it into the beaten eggs, making sure to coat both sides completely and allowing any excess to drip off to avoid a gloopy mess. Finally, press the chicken firmly into the breadcrumb mixture, ensuring an even, generous coating on all sides; don’t be shy here—press those crumbs on for maximum crunch. Place each coated piece on the wire rack set over the baking sheet, spacing them about an inch apart to allow hot air to circulate freely. Repeat for all chicken breasts, and if you have time, let them sit for 10 minutes to set the coating, which prevents it from sliding off during baking.
Bake to Golden Perfection
Once the oven hits 425°F, drizzle the olive oil evenly over the top of each chicken breast—this helps brown the breading and adds flavor without deep-frying. Slide the baking sheet into the preheated oven and bake for 15-18 minutes, or until the coating is golden brown and crispy; you should see firm, lightly browned edges and hear a slight sizzle. Avoid opening the oven door too early, as this can cause temperature fluctuations that might lead to uneven cooking. After the initial bake, remove the chicken from the oven—it won’t be fully cooked yet, but the exterior should be set and crisp. Use tongs to gently flip each piece if desired for extra even browning, though the wire rack often makes this unnecessary. Pro tip: For extra crispiness, you can lightly spray the chicken with cooking oil before baking instead of drizzling, which distributes it more evenly.
Add Sauces and Cheeses
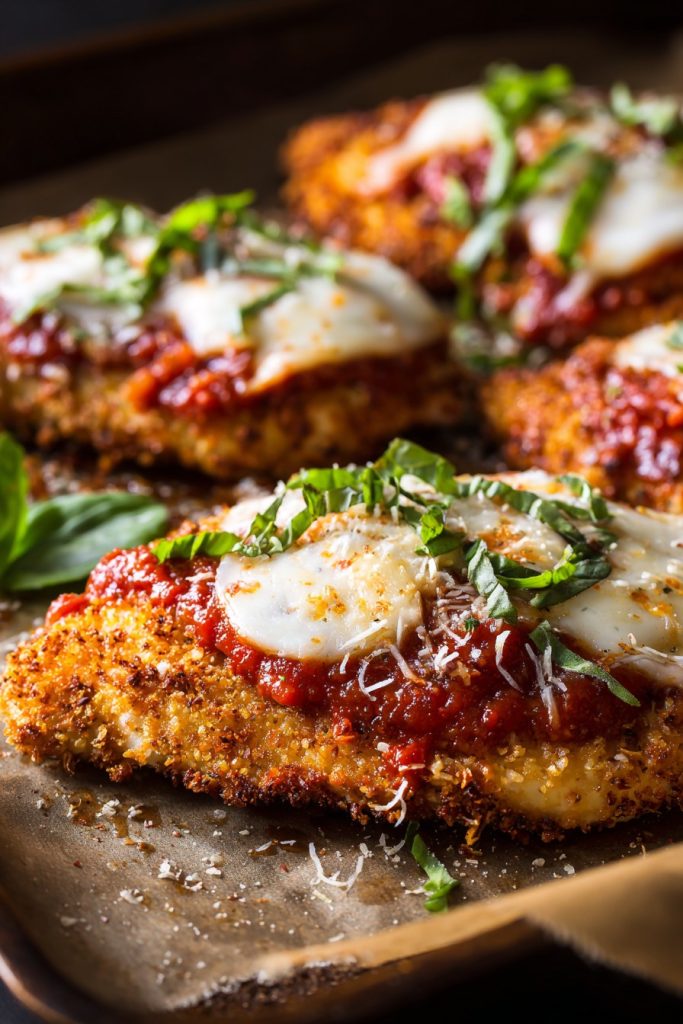
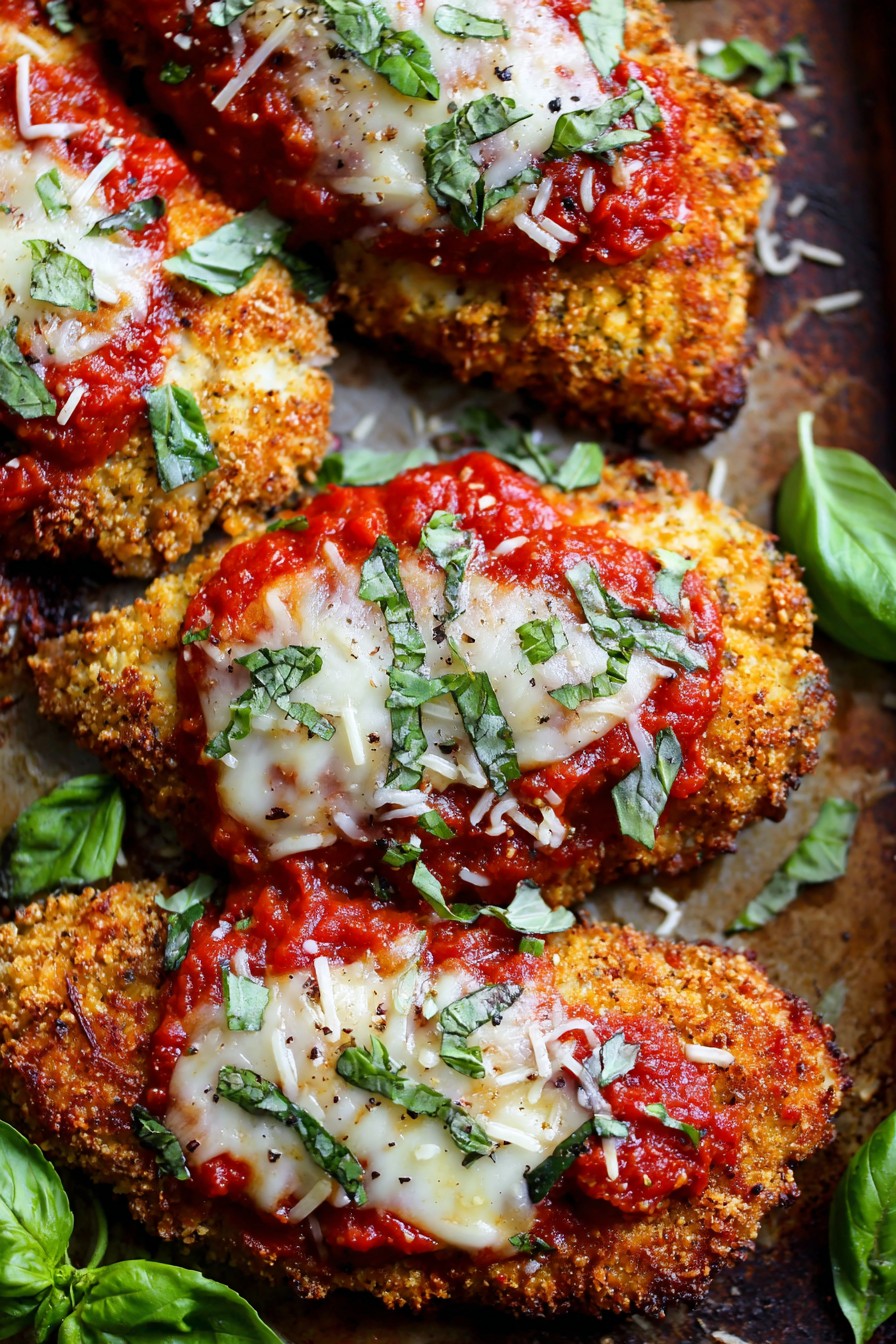
Pull the baking sheet out and spoon about 1/4 cup of marinara sauce onto the center of each chicken breast, spreading it lightly but leaving a border around the edges to keep the crust crispy. Sprinkle a generous 1/2 cup of shredded mozzarella cheese over the sauce on each piece, followed by the remaining 1/4 cup of grated Parmesan for an extra cheesy, savory kick. Work quickly to get the chicken back into the oven while it’s still hot, as this helps the cheese melt evenly without overcooking the chicken. Return the baking sheet to the oven and bake for an additional 8-10 minutes, or until the cheese is fully melted, bubbly, and lightly golden in spots. The internal temperature of the chicken should reach 165°F when checked with a meat thermometer inserted into the thickest part.
Rest and Serve Immediately
Once the cheese is perfectly melted and the chicken registers 165°F, carefully remove the baking sheet from the oven—remember, those handles are hot! Let the chicken rest on the wire rack for 3-5 minutes; this allows the juices to redistribute, ensuring moist, tender meat instead of a dry outcome. While resting, the crust will firm up slightly, making it easier to handle and slice without falling apart. Garnish with fresh basil leaves if using, which add a pop of color and fresh flavor that cuts through the richness. Serve immediately alongside your favorite pasta, garlic bread, or a simple salad for a complete meal that’s sure to impress. Pro tip: For extra flavor, try brushing the chicken with a bit of garlic-infused olive oil before the final bake—it adds a subtle depth that pairs wonderfully with the tomatoes and cheese.
Tips and Tricks
For the crispiest results, make sure your chicken is thoroughly dry before coating—pat it down with paper towels to remove any excess moisture, which can steam the breading instead of letting it crisp up. If you’re short on time, use a store-bought marinara sauce, but opt for one with low sugar content to avoid burning; or, jazz it up by simmering it with a pinch of red pepper flakes and fresh garlic for 10 minutes before using. When pounding the chicken, place it between two pieces of plastic wrap or in a zip-top bag to prevent tearing and make cleanup a breeze—aim for uniform thickness to avoid undercooked thick spots or overcooked thin edges. For a gluten-free version, swap the all-purpose flour for almond flour and use gluten-free breadcrumbs, but note that they might brown faster, so keep an eye on the baking time. If you love extra cheese, try adding a thin layer of provolone under the mozzarella for a gooier, more complex flavor, or mix in some fontina for its excellent melting properties. To make ahead, you can coat the chicken up to the baking step, cover it, and refrigerate for up to 4 hours before baking—just add a few extra minutes to the initial bake time if it’s cold from the fridge. For a lighter twist, use part-skim mozzarella and reduce the Parmesan slightly, but don’t skimp too much, as cheese is key for that classic chicken parm texture and taste. If your breadcrumbs aren’t pre-seasoned, boost their flavor by adding a teaspoon of Italian seasoning, a pinch of onion powder, and a dash of paprika to the mixture. Always use a wire rack rather than placing the chicken directly on the baking sheet—this prevents the bottom from getting soggy and promotes all-around crispiness. For a golden cheese top without broiling (which can risk burning), ensure your oven is fully preheated and place the rack in the center position for even heat distribution.
Recipe Variations
- Spicy Kick: Add 1/2 teaspoon of crushed red pepper flakes to the breadcrumb mixture and use a arrabbiata sauce instead of marinara for a fiery twist that’ll wake up your taste buds.
- Eggplant Swap: Replace the chicken with sliced eggplant (peeled and cut into 1/2-inch rounds), salt it to draw out moisture, then coat and bake as directed for a vegetarian version that’s equally delicious.
- Pesto Twist: Spread a thin layer of basil pesto under the marinara sauce or mix it into the sauce itself for an herby, vibrant flavor profile that pairs wonderfully with the cheese.
- Chicken Parm Sliders: Use smaller, thinner chicken cutlets or even chicken tenders, bake as directed, then serve on mini buns with extra sauce and cheese for a fun, party-friendly appetizer.
- Low-Carb Option: Skip the breadcrumbs and use crushed pork rinds or almond flour mixed with Parmesan for the coating, and serve over zucchini noodles instead of pasta to keep it keto-friendly.
Frequently Asked Questions
Can I use frozen chicken for this recipe?
It’s best to avoid frozen chicken here because thawing can release excess moisture that makes the breading soggy. If you must use frozen, fully thaw it in the refrigerator overnight, then pat it very dry with paper towels before pounding and coating. This extra step helps ensure a crispy crust, but fresh chicken will always give you superior results with less effort and better texture.
How do I store and reheat leftovers?
Store leftovers in an airtight container in the refrigerator for up to 3 days. To reheat, place them on a wire rack over a baking sheet and bake at 375°F for 10-15 minutes until warmed through and crispy. Avoid microwaving, as it will make the breading soft and the chicken rubbery—the oven method preserves that delightful crunch and keeps the cheese melty.
What can I use instead of Italian-seasoned breadcrumbs?
If you don’t have Italian-seasoned breadcrumbs, make your own by combining plain breadcrumbs with 1 teaspoon of Italian seasoning, 1/2 teaspoon garlic powder, and 1/4 teaspoon each of salt and black pepper. Panko breadcrumbs also work well for an extra-crispy texture, but you’ll need to add those same seasonings since they’re typically unflavored.
Can I make this recipe gluten-free?
Absolutely! Substitute the all-purpose flour with almond flour or a gluten-free all-purpose blend, and use gluten-free breadcrumbs. Check that your marinara sauce and cheeses are gluten-free (most are, but some brands might contain additives), and you’ll have a delicious gluten-free version that’s just as crispy and satisfying.
Why is my chicken coming out dry?
Dry chicken usually means it’s overcooked. Use a meat thermometer to ensure it reaches exactly 165°F—no higher—and pull it out promptly. Also, pounding the chicken to an even thickness prevents thin parts from drying out while thicker parts cook through. Letting it rest after baking allows juices to redistribute, which further helps keep it moist.
Summary
This baked chicken parm delivers all the crispy, cheesy goodness of the classic without the fryer mess. With a foolproof method and customizable twists, it’s a weeknight winner that’ll have everyone asking for more.
Baked Chicken Parm
5
servings20
minutes25
minutesIngredients
Instructions
- 1 Preheat oven to 425°F and set a wire rack on a rimmed baking sheet.
- 2 Dredge chicken in flour, dip in eggs, then coat in breadcrumb mixture mixed with 1/4 cup Parmesan and seasonings.
- 3 Place on wire rack, drizzle with oil, and bake for 15-18 minutes until golden.
- 4 Top with sauce, mozzarella, and remaining Parmesan, then bake another 8-10 minutes until cheese melts and chicken reaches 165°F.
- 5 Rest for 5 minutes, garnish, and serve.


