Very few kitchen tricks deliver as much bang for your buck as brining, and today we’re diving into the ultimate baked chicken brine that’ll make your bird so juicy, it might just start singing show tunes. This isn’t just another recipe—it’s your ticket to chicken that stays moist through baking, roasting, or even accidental overcooking (we’ve all been there!).
Why This Recipe Works
- The perfect salt-to-water ratio ensures maximum moisture retention without making your chicken taste like the Dead Sea—science says 1/4 cup kosher salt per quart of water is the sweet spot for cellular osmosis magic.
- Brown sugar isn’t just for sweetness; its molasses content helps create beautiful caramelization on the skin while balancing the saltiness for a more complex flavor profile that’ll have your taste buds doing cartwheels.
- Fresh garlic and herbs penetrate deep into the meat during the brining process, infusing every single bite with aromatic goodness rather than just sitting on the surface like lazy dinner guests.
- The optional baking powder in the dry brine variation creates microscopic bubbles on the skin surface, leading to crackling-crispy skin that shatters like glass—because nobody wants flabby chicken skin, am I right?
- Brining works for all cuts—whether you’re doing whole birds, breasts, or thighs, this method prevents that tragic dry-out that happens when chicken meets oven heat, making it foolproof for weeknight dinners and fancy Sunday suppers alike.
Ingredients
- 1 gallon cold water (divided use)
- 1/4 cup kosher salt (Diamond Crystal recommended for consistent dissolving)
- 2 tablespoons light brown sugar (packed firmly)
- 3 cloves garlic (crushed with the side of your knife)
- 1 tablespoon black peppercorns (slightly cracked in mortar)
- 2 bay leaves (preferably fresh but dried works)
- 3-4 pound whole chicken (pat dried thoroughly with paper towels)
- 1 teaspoon vegetable oil (for rubbing before baking)
Equipment Needed
- Large stockpot or food-safe bucket (must hold at least 1.5 gallons)
- Measuring cups and spoons
- Chef’s knife and cutting board
- Mixing spoon (wooden or silicone)
- Paper towels
- Roasting pan with rack
- Instant-read thermometer
- Refrigerator space (because nobody wants room temp chicken hanging out)
Instructions

Prepare the Brine Solution
In your large stockpot, combine 2 cups of water with the kosher salt, brown sugar, crushed garlic cloves, cracked peppercorns, and bay leaves. Heat over medium-high heat while stirring constantly until the salt and sugar completely dissolve—this should take about 3-4 minutes and you’ll see no granules at the bottom when you swirl the pot. Remove from heat and stir in the remaining cold water (that’s about 14 cups) to bring the temperature down rapidly. You want this mixture to be completely cool before adding chicken—if you’re impatient, throw in some ice cubes but account for dilution. Pro tip: Taste the brine—it should be pleasantly salty like seawater but not overwhelming; if it makes you pucker, add more water.
Brine the Chicken
Place your thoroughly dried whole chicken breast-side down into the completely cooled brine solution, making sure it’s fully submerged—if it floats, place a small plate on top to weigh it down. Cover the pot and refrigerate for exactly 4 hours if using a 3-4 pound bird (add 30 minutes per additional pound). Set a timer because over-brining leads to mushy texture and over-salting that no amount of side dishes can fix. About 30 minutes before brining time ends, remove the chicken from refrigerator to take the chill off—this helps with even cooking. Pro tip: Brine in the morning for dinner or overnight for next-day cooking, but never exceed 8 hours for whole chicken or 2 hours for individual parts.
Preheat and Prepare for Baking
Preheat your oven to 425°F—yes, that’s hotter than usual because we want crispy skin and we want it now! Remove the chicken from brine and rinse thoroughly under cold running water, inside and out, to remove excess salt; pat completely dry with paper towels until the skin feels like parchment paper. Place the chicken breast-side up on a rack set in a roasting pan—the rack is non-negotiable for air circulation and even browning. Rub the entire surface with about 1 teaspoon of vegetable oil, making sure to get into all the nooks and crannies for maximum crispiness. Let it sit at room temperature while oven preheats—about 20-30 minutes.
Bake to Perfection
Place the roasting pan with chicken on the center rack of your preheated 425°F oven and bake for 15 minutes—this initial high heat blast will start the crisping process. After 15 minutes, reduce oven temperature to 375°F without opening the door (trust the process!) and continue baking for approximately 50-60 minutes. Begin checking for doneness at the 45-minute mark by inserting an instant-read thermometer into the thickest part of the thigh without touching bone—you’re looking for 165°F exactly. If some parts brown too quickly, tent loosely with foil but avoid steaming the skin. The chicken is done when juices run clear and legs wiggle freely in joints.
Rest and Serve
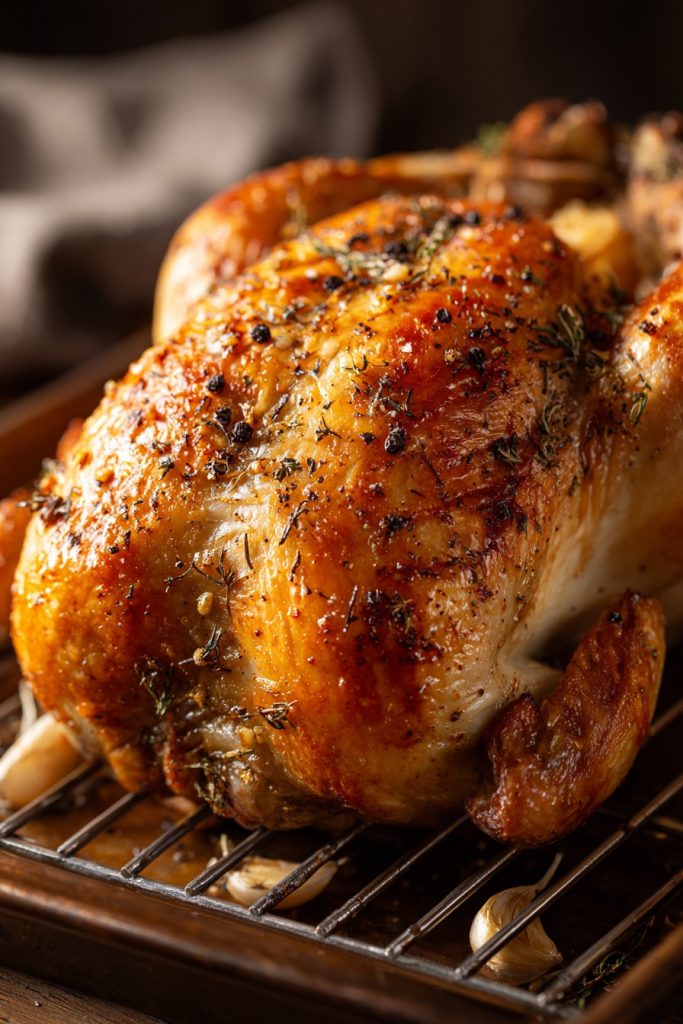
Once the internal temperature reaches 165°F in the thickest part of the thigh, remove the chicken from oven and transfer to a cutting board—do not place on a plate where juices will pool and make the bottom skin soggy. Let it rest for exactly 15 minutes—this allows juices to redistribute throughout the meat instead of ending up on your cutting board. While resting, you can make a quick pan gravy from the drippings if desired. Carve using a sharp chef’s knife, starting by removing legs and thighs, then wings, before slicing breast meat against the grain. Serve immediately while skin is still crackling-crisp.
Tips and Tricks
If you’re short on time, try a dry brine method: Mix 1 tablespoon kosher salt with 1 teaspoon baking powder and rub all over dried chicken skin, then refrigerate uncovered on a rack for 4-8 hours—the baking powder raises skin’s pH for incredible crispiness without wet brining. For herb-infused chicken, add fresh rosemary, thyme, or sage directly under the skin before baking: gently separate skin from breast using fingers and slide whole sprigs underneath—this perfumes the meat from within rather than just sitting on surface. For ultimate crispy skin, after patting dry post-brine, leave chicken uncovered in refrigerator for 2-4 hours to air-dry the skin further—this removes even more moisture for shatteringly crisp results. If brining chicken parts instead of whole bird, reduce brining time to 1-2 hours maximum for breasts and 2-3 hours for thighs to prevent over-salting. For easy cleanup, brine in a large zip-top bag placed in a bowl—this uses less brine solution and takes less refrigerator space while keeping chicken fully submerged. To add citrus notes, include lemon or orange slices in the brine during heating step, but remove before adding chicken to prevent bitterness from pith. If you accidentally over-brine, soak chicken in plain cold water for 30 minutes before cooking to draw out excess salt—taste a small cooked piece before serving to check seasoning. For golden-brown color without burning, brush skin with melted butter instead of oil during last 15 minutes of cooking—the milk solids caramelize beautifully. Always bring chicken to room temperature for 30 minutes before baking—cold chicken straight from fridge will cook unevenly and take longer, risking dry meat while waiting for interior to cook.
Recipe Variations
- Spicy Southwest Version: Replace black peppercorns with 1 tablespoon chili flakes and add 2 sliced jalapeños to brine; after baking, brush with mixture of honey and lime juice for sticky-spicy glaze that’ll make your taste buds dance the macarena.
- Asian-Inspired Brine: Substitute brown sugar with 1/4 cup honey and add 3 star anise, 1 cinnamon stick, and 1/4 cup soy sauce to brine solution; garnish with sliced scallions and sesame seeds after baking for umami explosion.
- Herb Garden Delight: Add 1/2 cup packed fresh herbs (parsley, thyme, rosemary) to brine and stuff cavity with lemon halves and additional herbs before baking; perfect for summer dinners when your garden is overflowing with goodness.
- Beer Brine Magic: Replace 2 cups water with your favorite lager or ale—the carbonation and hops add subtle flavor complexity while the sugars promote beautiful browning; just avoid dark stouts which can overpower.
- Citrus Burst Variation: Add zest and juice of 2 oranges or lemons to brine along with 1/4 cup maple syrup instead of brown sugar; the acidity tenderizes while the citrus oils perfume the meat from inside out.
Frequently Asked Questions
Can I brine frozen chicken?
Absolutely not—always thaw chicken completely before brining. Brining frozen chicken creates uneven salt penetration and dangerous temperature zones where bacteria can thrive. Thaw in refrigerator for 24-48 hours depending on size, or use cold water thawing method by placing sealed chicken in bowl of cold water, changing water every 30 minutes until thawed. Never brine partially frozen chicken as the interior won’t absorb brine properly while exterior becomes over-salted. If you’re in a pinch, skip brining altogether rather than risking food safety—properly cooked unbrined chicken is better than questionable brined chicken.
How long can I keep brined chicken in refrigerator?
After brining, rinse and pat dry the chicken, then you can refrigerate it for up to 24 hours before cooking—this actually improves the skin crispiness as it air-dries. However, do not leave chicken in brine solution for more than 8 hours for whole birds or 2 hours for parts as the texture becomes unpleasantly mushy and too salty. If you need to delay cooking, remove from brine, rinse thoroughly, dry completely, and store uncovered on a rack in refrigerator—the dry surface will become even crispier when baked. Always cook within 24 hours of brining for food safety and best texture.
Can I reuse brine solution?
Under no circumstances should you reuse brine solution—it contains raw chicken juices and bacteria that can multiply even in salty environment. Always discard brine immediately after use and thoroughly clean the container with hot soapy water. Making fresh brine takes only 5 minutes and costs pennies, so it’s not worth the risk of foodborne illness. If you’re concerned about waste, remember that the salt and sugar quantities are minimal compared to the flavor improvement you get. Some people suggest boiling used brine to kill bacteria, but this concentrates salts and alters flavors unpredictably—just make new brine each time.
Why did my chicken turn out too salty?
This usually happens from over-brining—remember that brining time should be 4 hours for 3-4 pound whole chicken, adding 30 minutes per additional pound, but never exceed 8 hours. Individual parts need only 1-2 hours for breasts and 2-3 hours for thighs. Also ensure you’re using kosher salt rather than table salt—table salt is denser and will make chicken saltier. Always rinse thoroughly after brining and pat dry to remove surface salt. If chicken still tastes too salty after cooking, serve with bland sides like mashed potatoes or rice to balance, or make a pan sauce with unsalted stock to dilute the saltiness.
Can I brine kosher or pre-seasoned chicken?
Generally not recommended—kosher chicken has already been salted during processing, and additional brining will make it extremely salty. Similarly, pre-marinated or injected chickens from the store already contain solutions that will conflict with your brine. Always check labels: if chicken contains added sodium or solutions, skip brining altogether. For best results, start with plain, unenhanced chicken—look for “all natural” or “no solutions added” on packaging. If you accidentally brine pre-salted chicken, soak in cold water for 1 hour before cooking to draw out excess salt, then taste a small piece after cooking before serving.
Summary
Brining transforms ordinary baked chicken into extraordinarily juicy, flavorful perfection with crackling-crisp skin. This simple technique requires minimal effort for maximum payoff, making it a game-changer for home cooks.
Baked Chicken Brine Recipe
6
servings10
minutes65
minutesIngredients
Instructions
- 1 Heat 2 cups water with salt, sugar, garlic, peppercorns, and bay leaves until dissolved. Cool completely with remaining water.
- 2 Submerge dried chicken in brine; refrigerate 4 hours for 3-4 lb bird.
- 3 Rinse chicken; pat completely dry. Place on rack in pan; rub with oil.
- 4 Bake at 425°F for 15 minutes, then reduce to 375°F for 50-60 minutes until 165°F internal temp.
- 5 Rest 15 minutes before carving and serving.


