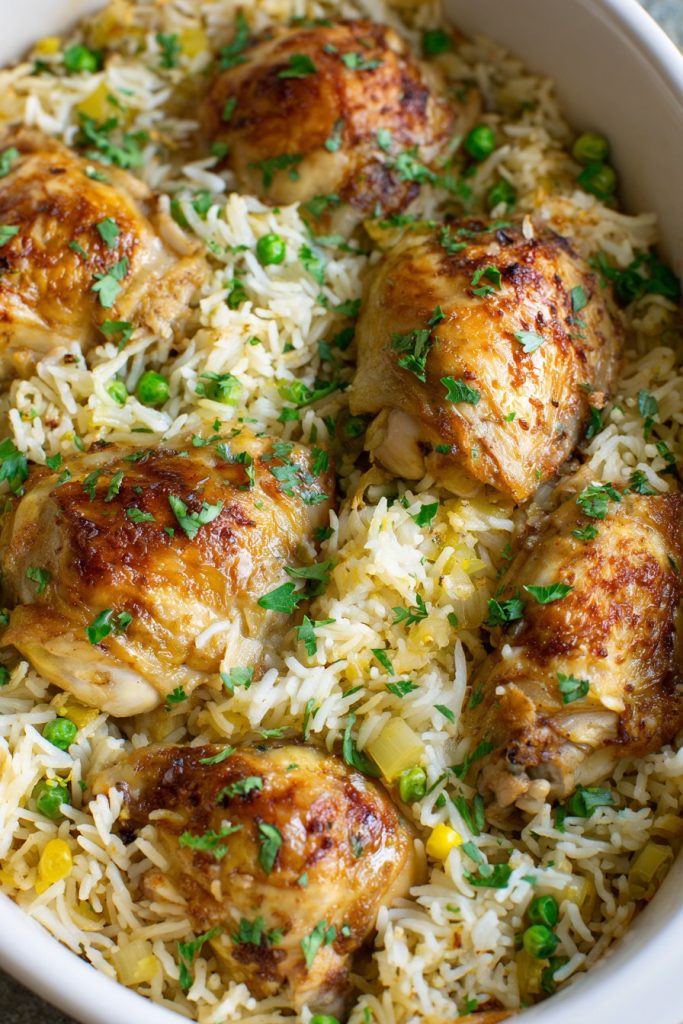
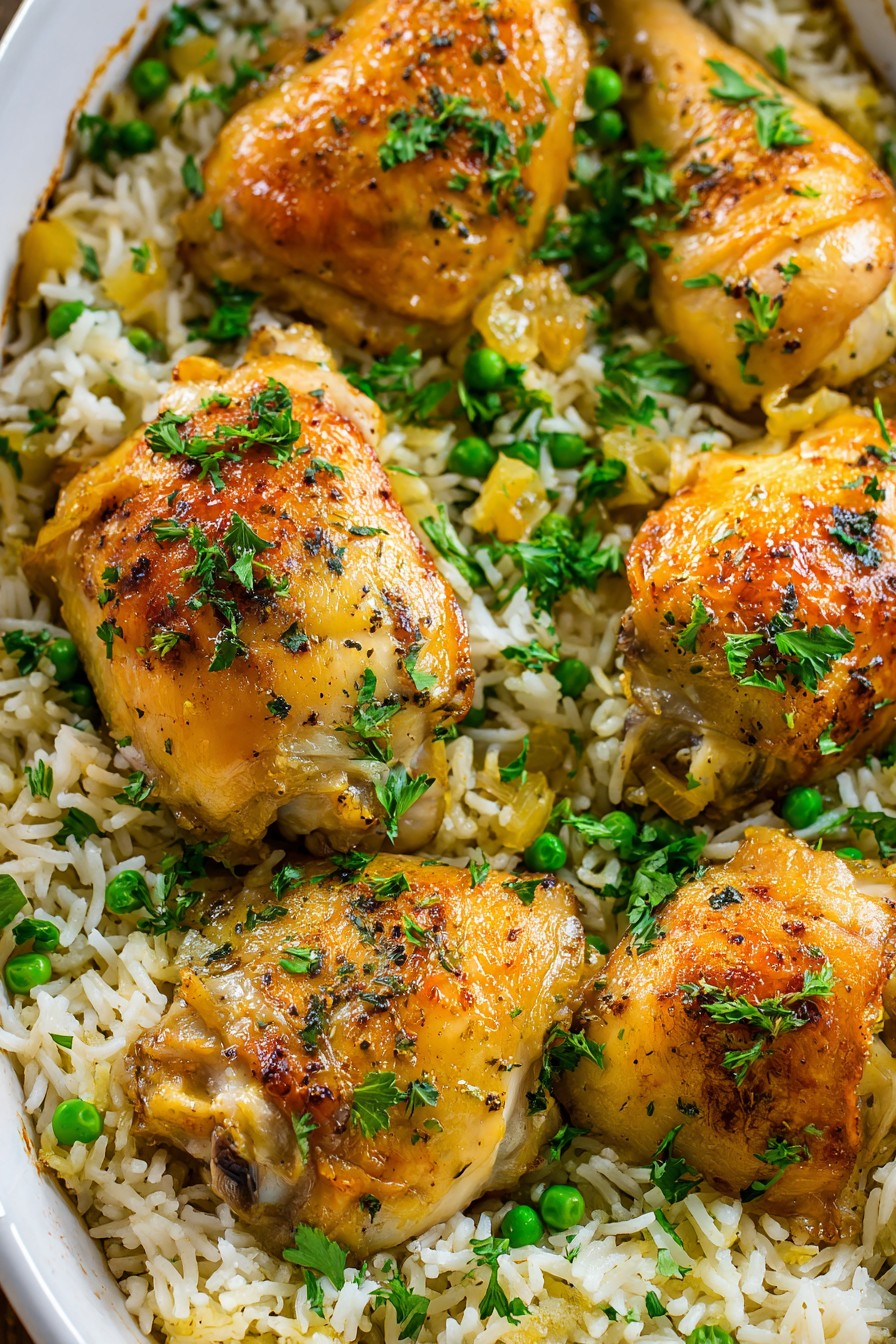
Perfect for those busy weeknights when you crave something hearty and delicious without spending hours in the kitchen! This baked chicken and rice casserole is your new best friend—it’s cozy, flavorful, and practically makes itself while you kick back and relax. Plus, it’s a crowd-pleaser that’ll have everyone asking for seconds.
Why This Recipe Works
- One-Pan Wonder: Everything cooks together in a single dish, meaning less cleanup and more time to enjoy your meal (and maybe even dessert).
- Flavor Infusion: The chicken thighs bake right on top of the rice, allowing their juices to seep down and season every grain for a deeply savory result.
- Crispy-Topped Comfort: A quick broil at the end gives the chicken skin a satisfying crunch that contrasts beautifully with the tender rice beneath.
- Customizable Base: This recipe is a blank canvas—easily adaptable with different spices, veggies, or proteins to suit your mood or pantry contents.
- Meal Prep Friendly: Make it ahead and reheat like a dream, so you’ve got delicious leftovers ready to go for lunches or lazy dinners.
Ingredients
- 1 ½ cups long-grain white rice, rinsed and drained
- 4 bone-in, skin-on chicken thighs (about 2 pounds total), patted dry
- 1 medium yellow onion, finely diced
- 3 cloves garlic, minced
- 1 ½ cups chicken broth, low-sodium preferred
- 1 cup whole milk
- 1 cup frozen peas, thawed
- 2 tablespoons olive oil
- 1 teaspoon paprika
- 1 teaspoon dried thyme
- ½ teaspoon garlic powder
- Salt and black pepper, to taste
- Fresh parsley, chopped (for garnish)
Equipment Needed
- 9×13 inch baking dish
- Large skillet
- Mixing bowls
- Measuring cups and spoons
- Aluminum foil
- Knife and cutting board
- Whisk or fork
Instructions
Preheat and Prep Your Ingredients
Start by preheating your oven to 375°F so it’s ready to go when you are. While that’s heating up, rinse 1 ½ cups of long-grain white rice under cold water until the water runs clear—this removes excess starch and prevents your casserole from turning into a gluey mess. Pat dry your chicken thighs thoroughly with paper towels; crispy skin starts with dry skin, folks! Dice one medium yellow onion and mince three cloves of garlic, then measure out your liquids: 1 ½ cups chicken broth and 1 cup whole milk. Having everything prepped and within arm’s reach makes the cooking process smooth and stress-free, almost like you’re on a cooking show but without the cameras.
Sear the Chicken to Golden Perfection
Heat 2 tablespoons of olive oil in a large skillet over medium-high heat until it shimmers. Season both sides of your chicken thighs generously with salt, black pepper, 1 teaspoon paprika, and ½ teaspoon garlic powder. Place them skin-side down in the hot skillet and sear for about 5-7 minutes without moving them, until the skin is golden brown and crispy. Flip and cook for another 3-4 minutes on the other side just to add some color. This step isn’t just for looks—it renders fat and builds a flavor foundation that’ll make your casserole unforgettable. Remove the chicken and set it aside on a plate; leave those delicious drippings in the skillet!
Sauté the Aromatics and Combine the Base
In the same skillet with the chicken drippings, add your diced onion and cook over medium heat for about 5 minutes until softened and translucent. Toss in the minced garlic and cook for another minute until fragrant—be careful not to burn it, or you’ll get bitterness instead of that lovely aroma. Sprinkle in 1 teaspoon dried thyme and give it a quick stir to wake up the flavors. Now, add the rinsed rice and stir to coat it in the oily, oniony goodness, toasting it slightly for about 2 minutes. This toasting step helps the rice absorb liquid more evenly and prevents it from becoming mushy during baking.
Transfer to Baking Dish and Add Liquids
Pour the rice and onion mixture into your 9×13 inch baking dish and spread it out evenly. Slowly pour in 1 ½ cups chicken broth and 1 cup whole milk, then gently stir to combine everything. The milk adds creaminess while the broth brings savory depth—trust me, this duo works magic. Season the mixture with a pinch of salt and pepper, remembering that the chicken will also season it as it cooks. Scatter 1 cup of thawed frozen peas over the top; they’ll cook perfectly in the oven and add a pop of color and sweetness. Nestle the seared chicken thighs skin-side up on top of the rice mixture, making sure they’re evenly spaced.
Bake Until Tender and Bubbly
Cover the baking dish tightly with aluminum foil—this traps steam and ensures the rice cooks through without drying out. Slide it into your preheated 375°F oven and bake for 35 minutes. After that time, remove the foil and continue baking for another 20-25 minutes, until the rice has absorbed most of the liquid and the chicken’s internal temperature reaches 165°F when checked with a meat thermometer. If you want extra crispy skin, switch the oven to broil for the last 2-3 minutes, but watch it closely to avoid burning! The casserole is done when the rice is tender, the chicken is cooked through, and the top is golden.
Rest, Garnish, and Serve Warm
Once out of the oven, let the casserole rest for 10 minutes uncovered—this allows the rice to set and the flavors to meld together beautifully. Sprinkle with freshly chopped parsley for a burst of color and freshness. Serve directly from the baking dish for that family-style vibe, making sure each portion gets a chicken thigh and a hearty scoop of rice. This dish pairs wonderfully with a simple green salad or some steamed veggies on the side. Leftovers? They reheat like a dream in the microwave or oven, tasting maybe even better the next day as the flavors continue to develop.
Tips and Tricks
For the crispiest chicken skin, make sure to pat the thighs completely dry before seasoning and searing—any moisture will steam instead of crisp up. If you’re using skinless chicken, add a tablespoon of butter to the skillet when searing to get some browning and extra flavor. To avoid soggy rice, rinse it thoroughly until the water runs clear; this removes surface starch that can cause clumping. If you prefer darker meat, chicken legs or drumsticks work great here too, just adjust the baking time if they’re larger. For a richer dish, substitute half of the milk with heavy cream or use all broth instead of milk for a more savory profile. If your oven runs hot, check the casserole a few minutes early to prevent over-browning—every oven is different, so get to know yours! To make ahead, assemble everything except the liquids, cover, and refrigerate for up to 24 hours; add the broth and milk right before baking. For a deeper flavor, use homemade chicken stock instead of store-bought broth. If you’re adding other veggies like carrots or celery, sauté them with the onions to soften before mixing with the rice. To prevent the foil from sticking to the chicken, lightly grease it or use parchment paper under the foil. For extra browning on the rice, bake uncovered for the last 10 minutes instead of just broiling the chicken. If you’re doubling the recipe, use a larger dish or two 9×13 pans to ensure even cooking. Always let the casserole rest after baking—it helps the rice absorb any remaining liquid and makes serving easier. For a gluten-free version, ensure your broth and spices are certified gluten-free, as some brands may contain additives. If you’re short on time, use quick-cooking rice and reduce the baking time by 10-15 minutes, but keep an eye on the liquid levels. To add a cheesy twist, sprinkle shredded cheddar or Parmesan over the top before broiling for a golden crust. For those who love heat, add a pinch of red pepper flakes to the rice mixture or season the chicken with cayenne pepper. If your chicken is done but the rice is still undercooked, add a splash of hot broth, cover, and bake for another 5-10 minutes. To avoid a messy cleanup, place the baking dish on a sheet pan to catch any bubbles that might overflow during baking.
Recipe Variations
- Cheesy Broccoli Twist: Stir in 2 cups of chopped fresh broccoli florets and 1 cup of shredded cheddar cheese into the rice mixture before baking. Top with extra cheese during the last 5 minutes of baking for a gooey, veggie-packed version that kids and adults alike will adore.
- Mediterranean Inspiration: Replace the peas with ½ cup of chopped sun-dried tomatoes and ¼ cup of sliced kalamata olives. Add 1 teaspoon of dried oregano to the seasoning, and use feta cheese crumbles as a garnish after baking for a tangy, sunny flavor profile.
- Spicy Southwest Style: Swap the paprika for 1 tablespoon of taco seasoning, and add a can of drained black beans and 1 cup of corn kernels to the rice. Top with sliced jalapeños before baking, and serve with avocado and lime wedges for a fiesta in a dish.
- Creamy Mushroom Upgrade: Sauté 8 ounces of sliced cremini mushrooms with the onions, and use 1 cup of cream of mushroom soup mixed with the broth instead of milk. Finish with a sprinkle of fresh thyme and a dash of white wine for an elegant, earthy twist.
- Italian Herb Delight: Use Italian seasoning blend instead of thyme, and add ½ cup of grated Parmesan to the rice mixture. Include 1 cup of chopped spinach and serve with a side of marinara sauce for dipping, turning this casserole into a cozy Italian feast.
Frequently Asked Questions
Can I use boneless chicken instead of bone-in?
Absolutely! Boneless, skinless chicken thighs or breasts work well, but adjust the cooking time since they cook faster. Reduce the initial baked time by about 10 minutes to prevent dryness, and consider adding a tablespoon of olive oil to the rice mixture to compensate for the missing chicken fat. The result will still be delicious, though you might miss the crispy skin and extra juiciness that bone-in thighs provide.
Why did my rice turn out mushy or undercooked?
Mushy rice usually means too much liquid or not rinsing the rice beforehand, while undercooked rice suggests insufficient liquid or baking time. Always rinse your rice to remove excess starch, measure liquids accurately, and ensure your oven temperature is correct—using an oven thermometer can help. If issues persist, try adding an extra 1/4 cup of broth and extending the bake time by 5-10 minutes, covered, until the rice is tender.
Can I make this casserole ahead of time?
Yes, this is a great make-ahead meal! Assemble the casserole up to the point of adding liquids, cover tightly, and refrigerate for up to 24 hours. When ready to bake, add the broth and milk, and you may need to add 5-10 minutes to the baking time since it’s starting cold. You can also fully bake it, cool it, and reheat covered in the oven at 350°F for 20-25 minutes until warmed through.
What can I use instead of milk for a dairy-free version?
For a dairy-free option, substitute the milk with an equal amount of unsweetened almond milk, oat milk, or additional chicken broth. The broth will make it more savory, while plant-based milks add creaminess without dairy. Just ensure your other ingredients, like spices and broth, are dairy-free certified if needed, and you’ll still get a flavorful, comforting casserole that everyone can enjoy.
How do I store and reheat leftovers?
Store leftovers in an airtight container in the refrigerator for up to 4 days. To reheat, place individual portions in the microwave covered with a damp paper towel for 2-3 minutes, or bake covered at 350°F for 15-20 minutes until hot. Add a splash of broth or water before reheating to keep the rice moist. Unfortunately, this casserole doesn’t freeze well due to the dairy and rice texture changes, so enjoy it fresh or refrigerated.
Summary
This baked chicken and rice casserole is a one-dish wonder that delivers comfort, flavor, and ease. With crispy chicken, tender rice, and customizable options, it’s perfect for busy nights or cozy gatherings. Give it a try—it might just become your new favorite!