Every home cook needs a reliable baked chicken recipe in their arsenal, and this one delivers juicy meat with rich, savory gravy that’ll have everyone begging for seconds. Even better, it’s surprisingly simple to master!
Why This Recipe Works
- The initial high-temperature sear creates a beautiful golden-brown crust that locks in juices while adding incredible flavor and texture to the chicken skin
- Using chicken drippings as the base for the gravy ensures maximum flavor depth, creating a rich, savory sauce that complements the meat perfectly without needing artificial thickeners
- The combination of aromatic vegetables and fresh herbs infuses the entire dish with complex, comforting flavors that make this recipe taste like it took hours to prepare
- Finishing the chicken at a lower temperature allows the meat to cook through gently, resulting in incredibly tender, moist chicken that practically falls off the bone
Ingredients
- 3 ½ pounds chicken pieces (bone-in, skin-on thighs and drumsticks work best)
- 2 tablespoons olive oil
- 1 ½ teaspoons kosher salt
- 1 teaspoon freshly ground black pepper
- 1 teaspoon garlic powder
- 1 teaspoon paprika
- 1 large yellow onion, roughly chopped
- 2 medium carrots, peeled and chopped into ½-inch pieces
- 2 celery stalks, chopped
- 4 cloves garlic, minced
- 3 tablespoons all-purpose flour
- 2 cups chicken broth (low-sodium recommended)
- ½ cup dry white wine (optional but recommended)
- 2 sprigs fresh thyme
- 1 sprig fresh rosemary
- 2 tablespoons unsalted butter
- 2 tablespoons chopped fresh parsley for garnish
Equipment Needed
- Large oven-safe skillet or Dutch oven (12-inch minimum)
- Cutting board and sharp knife
- Measuring cups and spoons
- Tongs
- Whisk
- Instant-read thermometer
- Mixing bowl
- Plate for resting chicken
Instructions
Prepping the Chicken and Vegetables
Pat the chicken pieces completely dry with paper towels – this is crucial for achieving that perfect crispy skin. In a small bowl, combine the kosher salt, black pepper, garlic powder, and paprika. Rub this seasoning mixture evenly over all sides of the chicken pieces, making sure to get under the skin where possible. Let the chicken sit at room temperature for about 20 minutes while you prep the vegetables. Chop the onion, carrots, and celery into roughly uniform pieces – they don’t need to be perfect since they’ll soften during cooking. Mince the garlic cloves and set aside separately since they’ll be added later to prevent burning. This resting time allows the seasoning to penetrate the meat while bringing the chicken to room temperature for more even cooking.
Searing the Chicken to Perfection
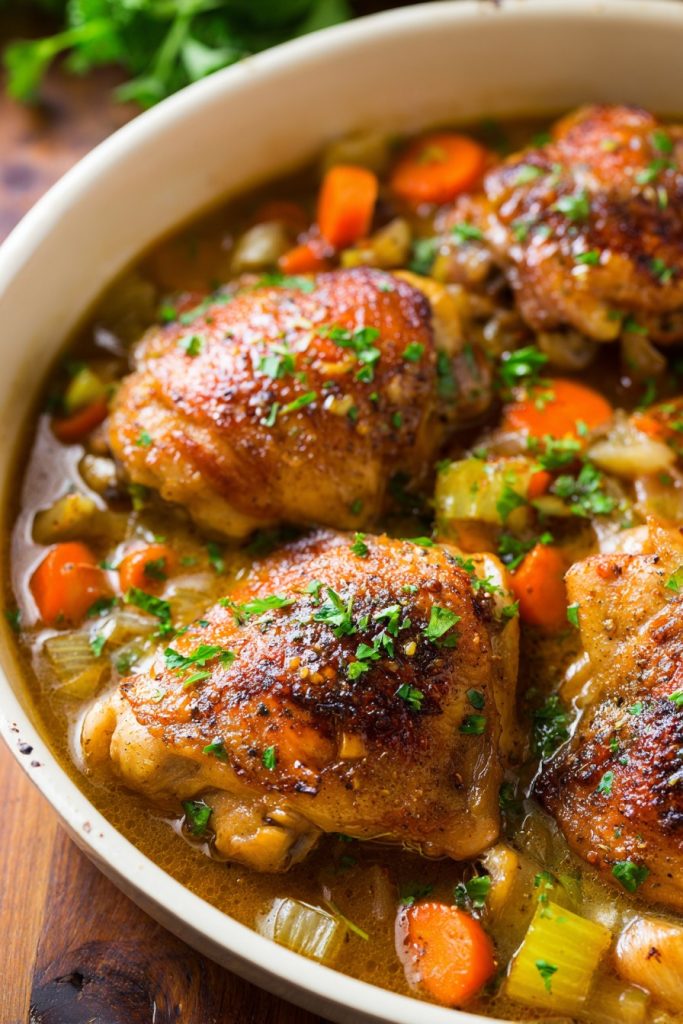
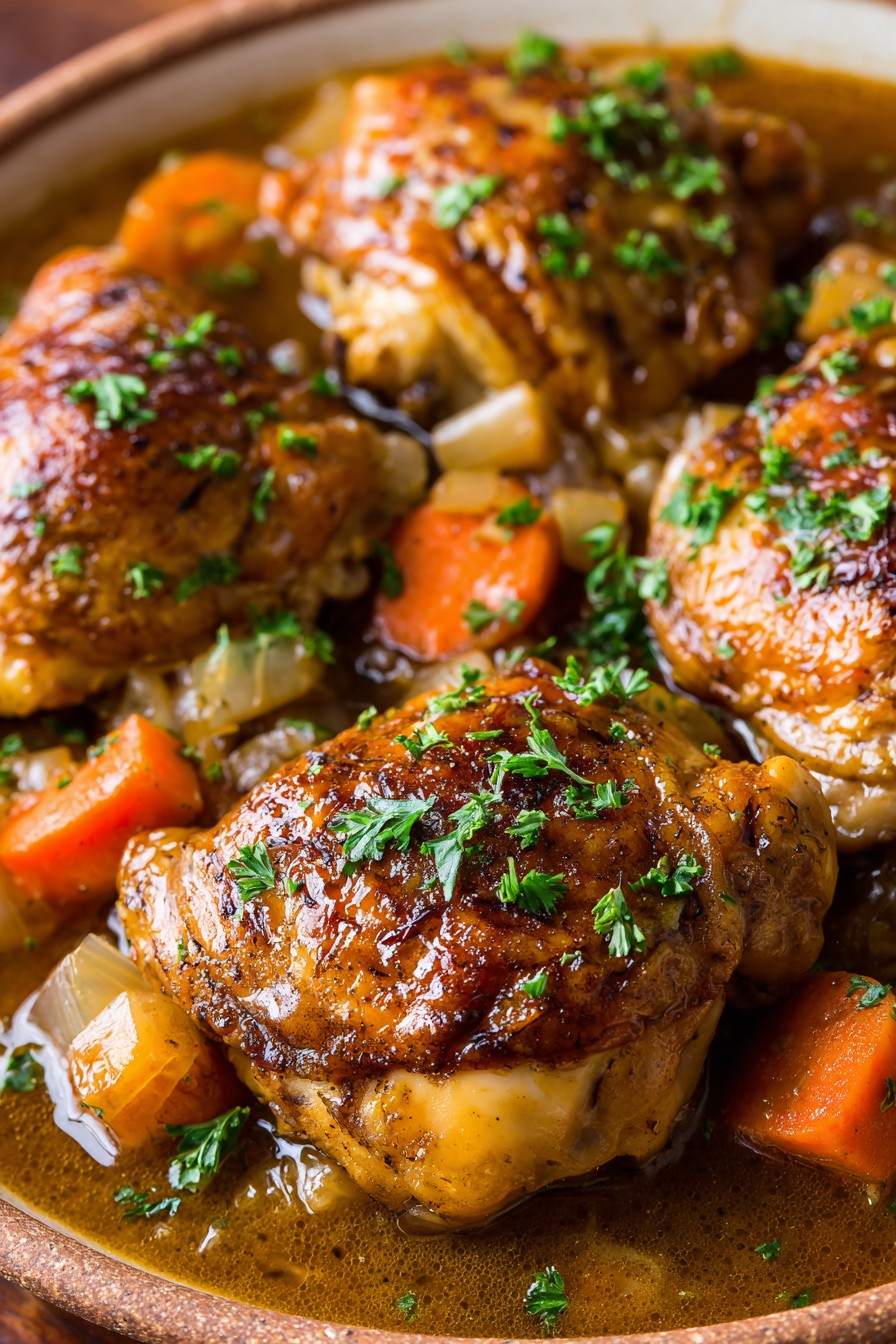
Preheat your oven to 425°F. Heat the olive oil in your large oven-safe skillet over medium-high heat until it shimmers – about 2-3 minutes. Carefully place the chicken pieces skin-side down in the hot oil, working in batches if necessary to avoid overcrowding the pan. Cook undisturbed for 6-8 minutes until the skin is deeply golden brown and crispy. Resist the urge to move the chicken around – this patience will reward you with that perfect crust! Using tongs, flip the chicken and cook for another 3-4 minutes on the other side. Transfer the chicken to a clean plate, leaving the rendered fat and browned bits in the pan. These flavorful bits are liquid gold for your gravy!
Building Flavor with Aromatics
Reduce the heat to medium and add the chopped onion, carrots, and celery to the same skillet. Cook, stirring occasionally, for 6-8 minutes until the vegetables begin to soften and the onions turn translucent. Add the minced garlic and cook for another minute until fragrant – be careful not to burn it! Sprinkle the flour over the vegetables and cook, stirring constantly, for about 2 minutes until the flour is fully incorporated and begins to turn golden brown. This cooking time eliminates the raw flour taste and creates the base for your gravy. Slowly pour in the white wine (if using), scraping up all those delicious browned bits from the bottom of the pan with your whisk.
Creating the Gravy and Final Baking
Gradually whisk in the chicken broth, making sure to incorporate everything smoothly without lumps. Add the fresh thyme and rosemary sprigs, then bring the mixture to a simmer. Nestle the seared chicken pieces back into the skillet, skin-side up, along with any accumulated juices from the plate. Transfer the skillet to the preheated oven and bake uncovered for 25-30 minutes. The chicken is done when an instant-read thermometer inserted into the thickest part of the meat (without touching bone) registers 165°F and the gravy has thickened slightly. The skin should remain crispy while the meat becomes fork-tender.
Finishing and Serving Your Masterpiece
Carefully remove the skillet from the oven – remember that handle will be extremely hot! Transfer the chicken to a serving platter and tent loosely with foil to keep warm. Place the skillet back on the stove over medium heat. Remove and discard the herb stems. Whisk in the butter until melted and incorporated, which will give your gravy a beautiful glossy finish and rich flavor. Taste and adjust seasoning with additional salt and pepper if needed. Spoon the gravy over the chicken, garnish with fresh parsley, and serve immediately while hot. This dish pairs wonderfully with mashed potatoes, rice, or crusty bread to soak up every last drop of that incredible gravy.
Tips and Tricks
For the crispiest possible skin, consider air-drying your chicken in the refrigerator uncovered for a few hours or overnight before cooking. This extra step removes additional moisture from the skin, resulting in an exceptionally crispy texture that holds up beautifully even when surrounded by gravy. If you have time, brining the chicken in a solution of ¼ cup salt dissolved in 4 cups water for 2-4 hours before patting dry and seasoning will ensure incredibly moist and flavorful meat throughout.
When making the gravy, if you find it’s too thin after baking, you can create a quick slurry by mixing 1 tablespoon of cornstarch with 2 tablespoons of cold water or broth. Whisk this into the simmering gravy and cook for 1-2 minutes until thickened to your desired consistency. Conversely, if the gravy becomes too thick, simply whisk in additional broth or water a tablespoon at a time until it reaches the perfect pouring consistency.
For deeper flavor development, consider using homemade chicken stock instead of store-bought broth. If using store-bought, opt for low-sodium varieties so you can control the salt level yourself. The white wine adds wonderful acidity and complexity to the gravy, but if you prefer not to use alcohol, you can substitute with additional broth plus a tablespoon of lemon juice or apple cider vinegar.
Leftovers store beautifully in an airtight container in the refrigerator for up to 4 days. The gravy may thicken when chilled – simply reheat gently with a splash of broth or water to return it to the right consistency. This dish actually tastes even better the next day as the flavors continue to meld together. You can also freeze the chicken and gravy for up to 3 months, though the texture of the vegetables may soften slightly upon reheating.
If you’re watching your fat content, you can skim excess fat from the pan drippings before making the gravy by tilting the skillet and spooning off the clear fat that rises to the top. For a richer gravy, leave all the drippings in place. For extra herb flavor, tie your thyme and rosemary together with kitchen twine to make a bouquet garni that’s easy to remove before serving.
Recipe Variations
- Creamy Herb Version: Stir in ½ cup of heavy cream or whole milk during the final gravy stage for a richer, creamier sauce. Add additional fresh herbs like tarragon or chives along with the parsley garnish for a fresh herbal note that cuts through the richness.
- Mushroom Lover’s Delight: Sauté 8 ounces of sliced cremini or wild mushrooms along with the vegetables for an earthy, umami-packed variation. The mushrooms will release their liquid and absorb all the wonderful pan flavors, making them a delicious addition to both the chicken and gravy.
- Spicy Kick: Add 1 teaspoon of crushed red pepper flakes to the seasoning rub or include a diced jalapeño (seeds removed for less heat) with the vegetables. For even more heat, stir in a tablespoon of your favorite hot sauce to the finished gravy before serving.
- Lemon Herb Twist: Add the zest of one lemon to the seasoning rub and squeeze the juice into the gravy during the final simmering stage. This bright, citrusy variation cuts through the richness beautifully and makes the dish feel lighter and more spring-like.
- White Wine and Mustard: Increase the white wine to ¾ cup and whisk in 2 tablespoons of whole grain mustard when making the gravy. The mustard adds tanginess and texture while the extra wine contributes more complex flavor notes to the finished dish.
Frequently Asked Questions
Can I use boneless, skinless chicken breasts instead?
Absolutely! Boneless, skinless chicken breasts will work, though the cooking time will need adjustment. Since they cook faster and can dry out more easily, reduce the initial searing time to 3-4 minutes per side and the baking time to 15-20 minutes, checking for doneness at 165°F. The gravy helps keep the lean meat moist, but consider brining the breasts first for best results. You’ll miss the crispy skin and some flavor from the rendered fat, but it’s still a delicious, healthier option.
What if I don’t have an oven-safe skillet?
No worries! You can still make this recipe by searing the chicken in a regular skillet, then transferring everything to a baking dish for the oven portion. Make sure to scrape all the browned bits and drippings from the searing skillet into your baking dish – that’s where the flavor lives! A 9×13 inch baking dish works perfectly. The cooking time might increase slightly since the ingredients will be in a deeper layer, so check for doneness a few minutes earlier than the recipe suggests.
Can I make this recipe ahead of time?
You can prepare components ahead to save time. Season the chicken and chop the vegetables up to 24 hours in advance, storing them separately in the refrigerator. The complete dish can be made 1-2 days ahead and reheated gently in a 350°F oven until warmed through. The gravy may thicken upon standing, so have extra broth on hand to adjust consistency when reheating. The flavors actually improve with time, making this a great make-ahead option for entertaining.
How can I make this recipe gluten-free?
Easy substitution! Replace the all-purpose flour with an equal amount of cornstarch or a gluten-free flour blend. If using cornstarch, make a slurry with cold water first rather than adding it directly to the hot pan to prevent clumping. Arrowroot powder or tapioca starch also work well as thickeners. Ensure your chicken broth is certified gluten-free, as some brands may contain hidden gluten ingredients. All other components are naturally gluten-free.
Why is my gravy lumpy and how can I fix it?
Lumps typically form when flour isn’t properly incorporated or is added to liquid that’s too hot too quickly. To prevent this, make sure to cook the flour with the vegetables for the full 2 minutes before adding liquid, and whisk constantly while adding the broth. If you end up with lumps, don’t panic! Simply strain the gravy through a fine-mesh sieve before serving, or use an immersion blender to smooth it out. Adding the liquid gradually while whisking vigorously is the key to lump-free gravy every time.
Summary
This baked chicken and gravy recipe delivers incredibly juicy meat with crispy skin and rich, flavorful gravy that comes together surprisingly easily. Perfect for weeknights or company, it’s comfort food at its finest!
Baked Chicken and Gravy Recipe
5
servings15
minutes55
minutesIngredients
Instructions
- 1 Preheat oven to 425°F. Pat chicken dry and season with salt, pepper, garlic powder, and paprika.
- 2 Heat oil in oven-safe skillet over medium-high heat. Sear chicken skin-side down for 6-8 minutes until golden brown, then flip and cook 3-4 minutes more. Remove chicken.
- 3 Add onion, carrots, and celery to skillet. Cook 6-8 minutes until softening. Add garlic and cook 1 minute. Sprinkle with flour and cook 2 minutes, stirring constantly.
- 4 Add wine (if using), scraping up browned bits. Gradually whisk in broth. Add herbs and bring to simmer. Return chicken to skillet skin-side up.
- 5 Transfer to oven and bake 25-30 minutes until chicken reaches 165°F. Remove chicken to platter. Whisk butter into gravy on stovetop. Serve chicken with gravy and garnish with parsley.


