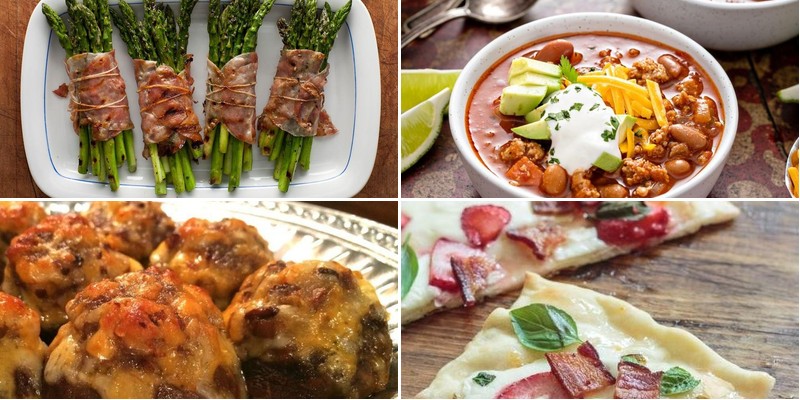
Oh, the magic of bacon ends and pieces! These flavorful morsels are the secret weapon for turning simple meals into extraordinary comfort food creations. From sizzling breakfast hashes to cozy weeknight dinners, we’ve gathered 23 delicious recipes that will make you fall in love with these budget-friendly treasures. Get ready to discover new ways to add that irresistible bacon goodness to your cooking—your taste buds will thank you!
Savory Bacon Ends and Spinach Quiche

Haven’t we all had those mornings where we want something special but don’t want to spend hours in the kitchen? This savory bacon ends and spinach quiche has become my weekend brunch staple—it’s the perfect balance of rich, salty bacon and fresh greens that makes even the sleepiest guests perk up. I actually started making this after discovering bacon ends at my local butcher, which are more flavorful and affordable than regular bacon strips.
6
servings20
minutes55
minutesIngredients
– 1 pre-made pie crust (I keep these frozen for quick breakfast emergencies)
– 6 large eggs at room temperature (they incorporate better into the filling)
– 1 cup heavy cream (the secret to that custardy texture)
– 1 cup cooked bacon ends, chopped (these little nuggets pack so much flavor)
– 2 cups fresh spinach, roughly chopped (I love how it wilts down into the eggs)
– 1 cup shredded Gruyère cheese (its nutty flavor pairs perfectly with bacon)
– 1/2 teaspoon salt (I use kosher salt for better distribution)
– 1/4 teaspoon black pepper (freshly ground makes all the difference)
– 1/4 teaspoon nutmeg (just a pinch adds wonderful warmth)
Instructions
1. Preheat your oven to 375°F and place the frozen pie crust on a baking sheet.
2. In a medium skillet over medium heat, cook the bacon ends for 8-10 minutes until crispy and browned.
3. Remove the bacon with a slotted spoon, leaving about 1 tablespoon of bacon fat in the skillet.
4. Add the fresh spinach to the skillet and cook for 2-3 minutes until just wilted.
5. In a large mixing bowl, whisk the room temperature eggs until smooth and pale yellow.
6. Pour in the heavy cream while continuously whisking to create an emulsion.
7. Stir in the salt, black pepper, and nutmeg until fully incorporated.
8. Sprinkle the cooked bacon ends evenly across the bottom of the pie crust.
9. Distribute the wilted spinach over the bacon layer in the crust.
10. Scatter the shredded Gruyère cheese evenly over the spinach and bacon.
11. Carefully pour the egg and cream mixture over all the ingredients in the pie crust.
12. Gently tap the baking sheet on the counter to remove any air bubbles from the filling.
13. Bake at 375°F for 35-40 minutes until the center is set and the top is golden brown.
14. Let the quiche rest for 15 minutes before slicing to allow the custard to set properly.
My favorite thing about this quiche is how the crispy bacon ends create little pockets of salty goodness throughout the creamy custard. The spinach adds just enough freshness to balance the richness, making each slice feel indulgent yet balanced. I often serve wedges with a simple arugula salad dressed with lemon vinaigrette—the peppery greens complement the quiche beautifully.
Smoky Bacon and Cheddar Stuffed Mushrooms
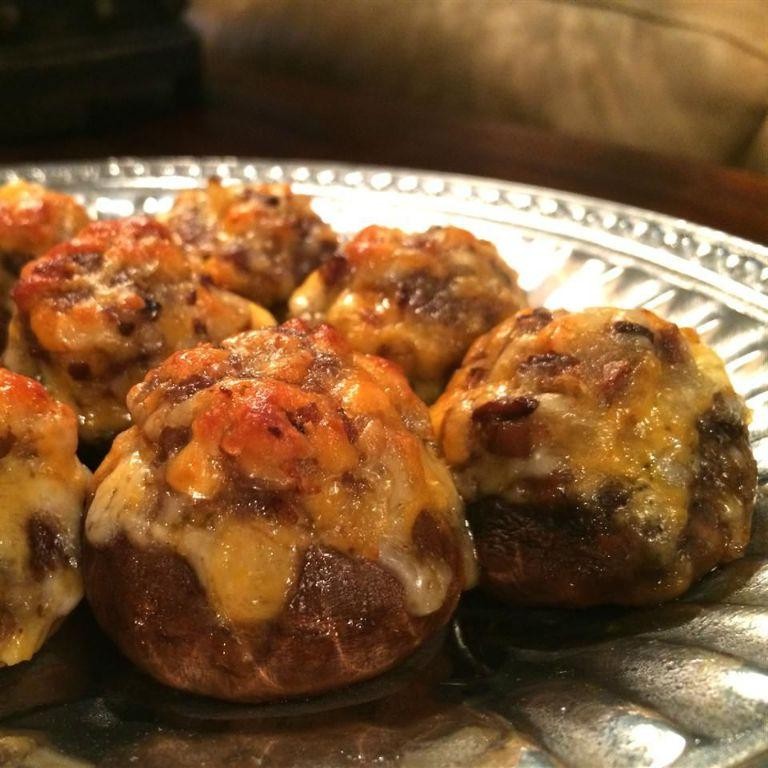
Keeping my kitchen cozy on crisp fall evenings always calls for these smoky bacon and cheddar stuffed mushrooms—they’re the first appetizer to disappear at my game-day gatherings, and my husband swears they’re better than any restaurant version.
16
mushrooms25
minutes35
minutesIngredients
– 16 large white mushrooms (look for ones with deep caps—they hold more filling!) – 6 slices thick-cut bacon (I always go for applewood-smoked for that extra flavor) – 1 cup shredded sharp cheddar cheese (freshly grated melts so much better than pre-shredded) – 4 oz cream cheese, softened (leave it on the counter for 30 minutes—it blends smoother) – 1/4 cup finely chopped yellow onion (my trick: a quick freeze makes chopping tear-free) – 2 cloves garlic, minced (fresh is key here, not the jarred stuff) – 1/4 cup panko breadcrumbs (they stay crispier than regular breadcrumbs) – 2 tbsp olive oil (extra virgin is my go-to for roasting) – 1/2 tsp smoked paprika (adds a hint of smokiness without overpowering) – 1/4 tsp black pepper
Instructions
1. Preheat your oven to 375°F and line a baking sheet with parchment paper. 2. Gently twist the stems from all 16 mushrooms and set the caps aside. 3. Finely chop the mushroom stems—don’t discard them; they add great texture to the filling. 4. Cook the 6 bacon slices in a skillet over medium heat for 8–10 minutes until crispy, then transfer to a paper towel-lined plate. 5. Drain all but 1 tablespoon of bacon grease from the skillet. 6. Sauté the 1/4 cup chopped onion and 2 minced garlic cloves in the reserved bacon grease for 3–4 minutes until fragrant and translucent. 7. Add the chopped mushroom stems to the skillet and cook for another 5 minutes until softened. 8. Crumble the cooked bacon into small pieces. 9. In a medium bowl, combine the sautéed mushroom stem mixture, crumbled bacon, 1 cup shredded cheddar, 4 oz softened cream cheese, 1/4 cup panko, 1/2 tsp smoked paprika, and 1/4 tsp black pepper. 10. Mix until all ingredients are fully incorporated—tip: use your hands for even blending! 11. Brush the outside of each mushroom cap with 2 tbsp olive oil to prevent drying. 12. Generously stuff each mushroom cap with the filling, mounding it slightly. 13. Arrange the stuffed mushrooms on the prepared baking sheet. 14. Bake at 375°F for 18–20 minutes until the tops are golden and the mushrooms are tender. 15. Let cool for 5 minutes before serving—they’re hottest and most flavorful then. Perfectly savory, these mushrooms boast a creamy, smoky interior with a satisfying crunch from the panko topping. Pair them with a cold beer or serve over a bed of arugula for a light meal—they’re so versatile, you’ll want to make a double batch!
Bacon Ends and Mozzarella Flatbread

T
There’s something magical about transforming humble ingredients into a showstopping meal, and this Bacon Ends and Mozzarella Flatbread is my latest obsession. I discovered this combination during a lazy Sunday fridge clean-out, and now it’s become my go-to for impromptu gatherings or when I’m craving something indulgent yet surprisingly simple to make.
2
flatbreads15
minutes25
minutesIngredients
– 1 lb bacon ends (I love the meatier texture compared to regular bacon strips)
– 2 pre-made flatbreads (the kind from the bakery section works perfectly)
– 2 cups shredded mozzarella cheese (freshly shredded melts so much better than pre-shredded)
– 1/4 cup olive oil (extra virgin is my kitchen staple)
– 1 tsp garlic powder (I always double-check this isn’t garlic salt)
– 1/2 tsp black pepper (freshly ground makes all the difference)
– 1/4 cup chopped fresh parsley (the bright green color makes it pop)
Instructions
1. Preheat your oven to 425°F and line a baking sheet with parchment paper.
2. Chop the bacon ends into 1/2-inch pieces using a sharp chef’s knife.
3. Cook bacon pieces in a skillet over medium heat for 8-10 minutes until crispy and browned.
4. Transfer cooked bacon to a paper towel-lined plate to drain excess grease.
5. Brush both flatbreads evenly with olive oil, making sure to reach the edges.
6. Sprinkle garlic powder and black pepper directly onto the oiled flatbread surfaces.
7. Distribute shredded mozzarella cheese evenly between both flatbreads.
8. Scatter the cooked bacon pieces over the cheese layer.
9. Bake at 425°F for 12-15 minutes until the cheese is bubbly and edges are golden.
10. Remove from oven and immediately sprinkle with fresh parsley.
11. Let rest for 2 minutes before slicing to allow the cheese to set slightly.
12. Cut each flatbread into 8 triangular slices using a pizza cutter.
Creative serving ideas make this flatbread even more special – try drizzling with balsamic glaze or serving alongside a simple arugula salad. The contrast between the crispy bacon, stretchy mozzarella, and chewy flatbread creates texture heaven, while the garlic and parsley cut through the richness perfectly. I often make two batches because the first always disappears within minutes of hitting the table.
Creamy Potato Soup with Bacon Pieces

Brrr, there’s nothing quite like a chilly autumn evening to make me crave a big bowl of creamy potato soup. I actually learned this recipe from my grandmother, who always said the secret was in the patience—something I’m still working on! It’s become my go-to comfort food when the leaves start turning and I need something to warm me from the inside out.
5
servings20
minutes35
minutesIngredients
– 6 slices thick-cut bacon (I always buy the applewood smoked kind for that extra flavor)
– 1 large yellow onion, diced (my eyes still water every single time)
– 3 cloves garlic, minced (fresh is best—I keep a garlic press right by my cutting board)
– 6 medium russet potatoes, peeled and cubed (about 4 cups—I like them cut into 1-inch pieces)
– 4 cups chicken broth (I use low-sodium so I can control the salt)
– 1 cup heavy cream (room temperature blends in smoother)
– 2 tablespoons unsalted butter (my grandmother would only use the real stuff)
– 1 teaspoon dried thyme
– ½ teaspoon black pepper
– ½ teaspoon salt (plus more if needed after tasting)
– Chopped fresh chives for garnish (from my little kitchen herb garden)
Instructions
1. Place 6 slices of thick-cut bacon in a large Dutch oven or heavy-bottomed pot over medium heat.
2. Cook bacon for 8-10 minutes, flipping occasionally, until crispy and browned.
3. Transfer bacon to a paper towel-lined plate using tongs, leaving 2 tablespoons of bacon drippings in the pot.
4. Add 1 diced yellow onion to the hot bacon drippings and cook for 5 minutes, stirring frequently, until softened and translucent.
5. Add 3 minced garlic cloves and cook for 1 minute until fragrant but not browned.
6. Stir in 4 cups of cubed russet potatoes, making sure they’re coated in the onion mixture.
7. Pour in 4 cups of chicken broth and bring to a boil over high heat.
8. Reduce heat to medium-low, cover, and simmer for 15 minutes until potatoes are fork-tender.
9. While potatoes cook, crumble the cooled bacon into small pieces using your hands.
10. Carefully transfer half of the hot soup to a blender and blend until completely smooth.
11. Return the blended soup to the pot with the remaining chunky soup.
12. Stir in 1 cup of heavy cream, 2 tablespoons of butter, 1 teaspoon dried thyme, ½ teaspoon black pepper, and ½ teaspoon salt.
13. Heat over low heat for 5 minutes, stirring constantly, until butter is melted and soup is heated through.
14. Ladle soup into bowls and top with crumbled bacon and fresh chives.
Deliciously creamy with just the right amount of potato chunks, this soup has that perfect velvety texture that coats your spoon. The smoky bacon adds that salty crunch contrast I absolutely love. Sometimes I’ll serve it in bread bowls for a fun presentation that makes cleanup easier too!
Bacon Ends and Cheddar Macaroni and Cheese
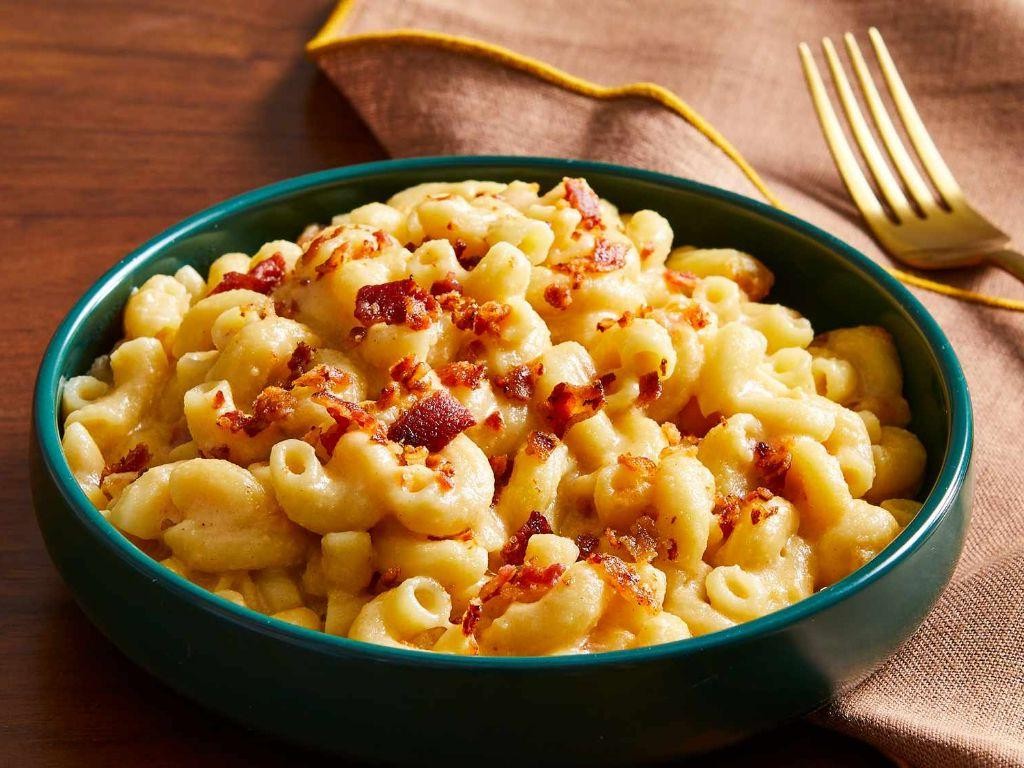
You know those comfort food cravings that just won’t quit? Yesterday’s rainy afternoon had me dreaming of something cheesy, smoky, and utterly satisfying—which is how this bacon ends and cheddar macaroni and cheese came to life in my kitchen. It’s the kind of dish that makes you forget about the weather outside.
5
servings15
minutes25
minutesIngredients
– 8 ounces elbow macaroni (I always keep a box in the pantry for emergencies)
– 1 pound bacon ends, chopped into ½-inch pieces (these give so much more flavor than regular bacon)
– 3 tablespoons unsalted butter (I like to use the good stuff for the roux)
– ¼ cup all-purpose flour
– 2 cups whole milk, warmed slightly (cold milk can make the sauce grainy)
– 2 cups shredded sharp cheddar cheese (I prefer hand-shredding for better melting)
– ½ teaspoon garlic powder
– ½ teaspoon smoked paprika
– ½ teaspoon black pepper
– ¼ teaspoon salt (taste after adding since the bacon is salty)
Instructions
1. Bring a large pot of salted water to a rolling boil over high heat.
2. Add the elbow macaroni and cook for 7-9 minutes until al dente, stirring occasionally.
3. Drain the macaroni in a colander and set it aside.
4. While the pasta cooks, place a large skillet over medium heat and add the chopped bacon ends.
5. Cook the bacon for 10-12 minutes, stirring frequently, until crispy and browned.
6. Use a slotted spoon to transfer the bacon to a paper towel-lined plate, reserving 3 tablespoons of bacon drippings in the skillet.
7. Melt the unsalted butter into the bacon drippings over medium heat.
8. Whisk in the all-purpose flour and cook for 1 minute until bubbly and golden.
9. Gradually pour in the warmed whole milk while whisking constantly to prevent lumps.
10. Continue whisking for 3-4 minutes until the sauce thickens enough to coat the back of a spoon.
11. Reduce the heat to low and stir in the shredded sharp cheddar cheese until completely melted and smooth.
12. Add the garlic powder, smoked paprika, black pepper, and salt, stirring to combine.
13. Fold in the cooked macaroni and crispy bacon ends until everything is evenly coated.
14. Serve immediately while hot and creamy. Let this mac and cheese cool for a minute—the cheese sauce sets beautifully, creating this incredible creamy texture with smoky bacon bits in every bite. Last night, I served it with a simple green salad to balance the richness, but it’s also fantastic topped with extra crispy bacon for that crunch factor.
Spicy Jalapeño Bacon Popper Bites

T
There’s something magical about bite-sized appetizers that disappear within minutes at any gathering. These Spicy Jalapeño Bacon Popper Bites have become my go-to party staple after I accidentally created them during a game night panic—when I realized I’d forgotten to plan snacks! They combine that perfect spicy-creamy-crunchy balance that keeps everyone coming back for more.
12
bites20
minutes25
minutesIngredients
– 8 ounces cream cheese, softened (I leave mine on the counter for about 30 minutes—it makes mixing so much easier)
– 6 fresh jalapeños, sliced in half lengthwise and seeded (don’t skip the seeding unless you want serious heat!)
– 8 slices thick-cut bacon, cut into thirds (I prefer the smoky flavor of hickory-smoked bacon here)
– 1/2 cup shredded sharp cheddar cheese (the extra sharp gives that wonderful tangy bite)
– 1/4 cup chopped green onions (I use both the white and green parts for maximum flavor)
– 1 teaspoon garlic powder (this little addition makes all the difference)
– 1/2 teaspoon smoked paprika (my secret ingredient for that smoky depth)
Instructions
1. Preheat your oven to 375°F and line a baking sheet with parchment paper.
2. Arrange the jalapeño halves cut-side up on the prepared baking sheet.
3. In a medium bowl, combine the softened cream cheese, shredded cheddar, green onions, garlic powder, and smoked paprika until fully incorporated.
4. Spoon the cheese mixture evenly into each jalapeño half, filling them just to the top but not overflowing.
5. Wrap each stuffed jalapeño half with one piece of the cut bacon, securing it around the pepper.
6. Place the wrapped poppers back on the baking sheet, making sure they’re not touching.
7. Bake at 375°F for 22-25 minutes until the bacon is crispy and the filling is bubbly.
8. Remove from oven and let rest for 5 minutes before serving—this allows the cheese to set slightly so they’re easier to handle.
U
nder that crispy bacon exterior lies a creamy, spicy center that practically melts in your mouth. The jalapeños soften just enough to lose their raw bite while maintaining a slight crunch, and that smoky paprika really comes through in the final moments. I love serving these on a wooden board with cold beer or arranging them around a bowl of cool ranch dip for those who need to temper the heat.
Bacon and Herb Deviled Eggs
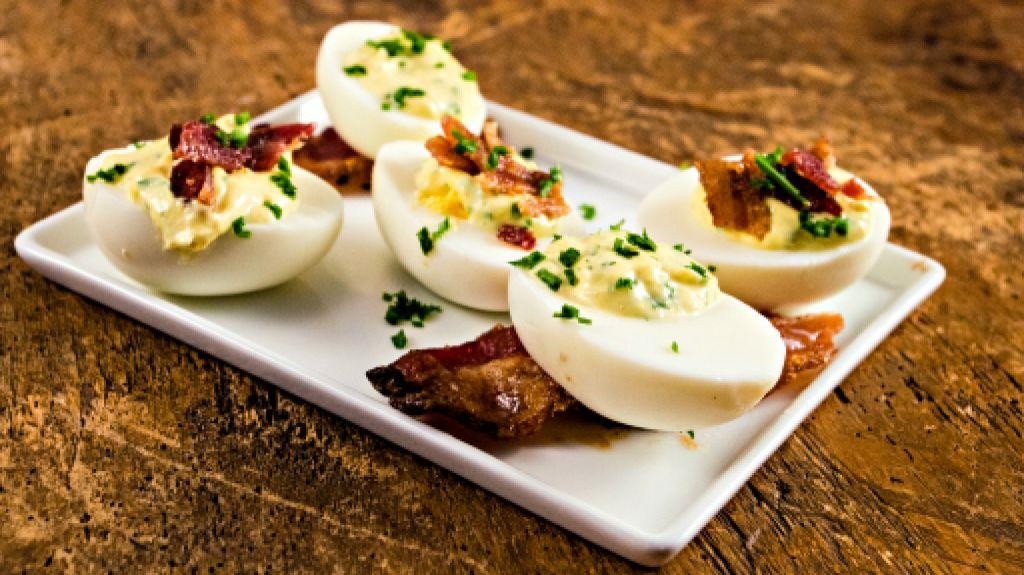
Last weekend, I was cleaning out my fridge and found myself staring at a dozen eggs and some leftover bacon from breakfast—you know how it goes. Suddenly, I remembered my grandma’s trick for turning simple ingredients into something unforgettable, and that’s how these Bacon and Herb Deviled Eggs came to life. They’re the perfect blend of creamy, smoky, and fresh, and I guarantee they’ll disappear faster than you can say “potluck.”
12
portions15
minutes22
minutesIngredients
– 6 large eggs (I always use room temperature ones—they peel so much easier!)
– 4 slices thick-cut bacon (crispy is key here, trust me)
– 1/4 cup mayonnaise (I’m loyal to Duke’s for that tangy kick)
– 1 tbsp Dijon mustard (it adds a subtle sharpness without overpowering)
– 1 tbsp fresh chives, finely chopped (from my little herb garden, of course)
– 1/2 tsp smoked paprika (for that gorgeous color and smoky hint)
– 1/4 tsp garlic powder (my secret for depth)
– Salt, to taste (I use kosher salt for better control)
Instructions
1. Place 6 large eggs in a single layer in a saucepan and cover with cold water by 1 inch.
2. Bring the water to a rolling boil over high heat, then immediately cover the pan and remove it from the heat.
3. Let the eggs sit in the hot water for exactly 12 minutes to achieve perfectly cooked yolks without that gray ring.
4. Transfer the eggs to an ice bath and let them cool for 5 minutes to stop the cooking process and make peeling effortless.
5. Gently tap each egg on the counter and roll it to crack the shell, then peel under cool running water.
6. Slice the peeled eggs in half lengthwise and carefully scoop the yolks into a medium bowl.
7. Arrange the empty egg white halves on a serving platter.
8. Cook 4 slices of thick-cut bacon in a skillet over medium heat for 8–10 minutes until crisp, then drain on paper towels.
9. Crumble the cooled bacon into small pieces, reserving a tablespoon for garnish.
10. Mash the egg yolks with a fork until they’re fine and crumbly.
11. Add 1/4 cup mayonnaise, 1 tbsp Dijon mustard, 1 tbsp chopped chives, 1/2 tsp smoked paprika, 1/4 tsp garlic powder, and the crumbled bacon to the yolks.
12. Mix everything until smooth and well combined, then season with salt to taste.
13. Spoon or pipe the yolk mixture evenly into the egg white halves.
14. Sprinkle the reserved bacon and a pinch of smoked paprika on top for a beautiful finish.
Zesty, creamy, and with that irresistible bacon crunch, these deviled eggs are a total crowd-pleaser. I love serving them on a rustic wooden board with extra chives scattered around—it makes even a casual get-together feel special. The smoky paprika and fresh herbs really shine, making these anything but ordinary.
Loaded Bacon Ends Nachos

Tuesdays are for comfort food in my house, and nothing says cozy like a massive tray of nachos loaded with crispy bacon ends. I discovered this recipe during a football Sunday when I had leftover bacon pieces from breakfast and a serious craving for something cheesy and indulgent. Trust me, once you try these, you’ll be looking for excuses to make them every week.
4
servings15
minutes23
minutesIngredients
– 1 bag (12 oz) sturdy tortilla chips (I always go for the thick restaurant-style ones—they hold up better under all the toppings)
– 1 lb bacon ends, chopped into ½-inch pieces (these are cheaper than regular bacon and have more fat, which means extra flavor)
– 2 cups shredded Monterey Jack cheese (I like the pre-shredded kind for convenience, but freshly grated melts smoother)
– 1 cup shredded sharp cheddar cheese (the sharpness cuts through the richness of the bacon)
– ½ cup pickled jalapeños, sliced (I keep a jar in my fridge at all times for spontaneous spicy cravings)
– ½ cup sour cream (full-fat is my preference for that creamy tang)
– ¼ cup chopped fresh cilantro (from my little herb garden when it’s thriving)
– 1 medium tomato, diced (I remove the seeds to prevent sogginess)
Instructions
1. Preheat your oven to 375°F and line a large baking sheet with parchment paper.
2. Spread the tortilla chips in a single layer on the prepared baking sheet, making sure they overlap slightly to create a solid base.
3. Cook the chopped bacon ends in a large skillet over medium heat for 12-15 minutes, stirring occasionally, until they’re crispy and browned.
4. Use a slotted spoon to transfer the cooked bacon to a paper towel-lined plate to drain excess grease. Tip: Reserve 1 tablespoon of the bacon drippings—it adds incredible flavor if you drizzle it over the chips before baking.
5. Sprinkle half of the Monterey Jack and cheddar cheeses evenly over the tortilla chips.
6. Scatter all of the cooked bacon ends and pickled jalapeños over the cheese layer.
7. Top with the remaining Monterey Jack and cheddar cheeses, covering the bacon and jalapeños completely. Tip: Press down gently on the toppings to help them adhere to the chips.
8. Bake in the preheated oven for 8-10 minutes, or until the cheese is fully melted and bubbly around the edges.
9. Remove the nachos from the oven and let them rest for 2 minutes to set. Tip: This prevents the toppings from sliding off when you serve them.
10. Dollop the sour cream evenly over the top, then sprinkle with the diced tomato and fresh cilantro.
Fresh from the oven, these nachos have the perfect contrast of crispy chips, gooey cheese, and smoky bacon. The pickled jalapeños add a tangy kick that cuts through the richness, making them irresistible for game days or casual dinners. I love serving them straight on the baking sheet with extra sour cream on the side for dipping.
Rich Bacon Carbonara Pasta
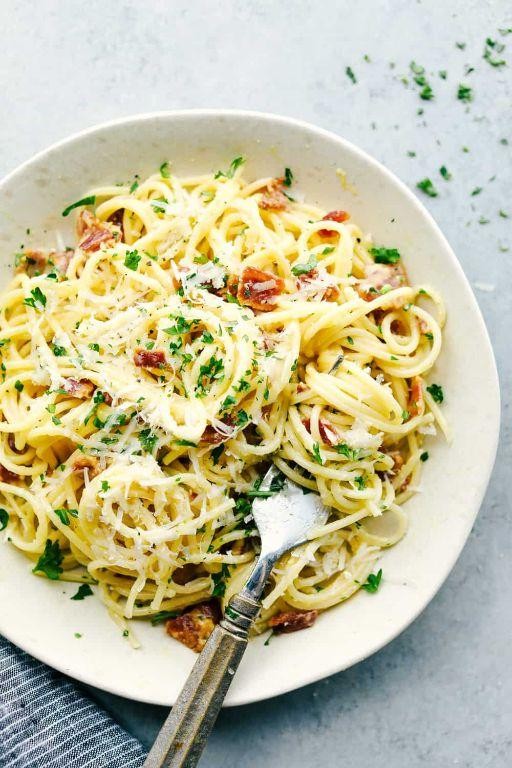
Unbelievably creamy and comforting, this bacon carbonara has been my go-to weeknight dinner for years—it’s the dish I make when I want something that feels indulgent but comes together in under 30 minutes. I first learned this recipe from my Italian grandmother, who always insisted on using guanciale, but I’ve adapted it with easily accessible bacon because let’s be honest, that’s what most of us have in our fridge right now.
3
servings10
minutes20
minutesIngredients
- 8 ounces spaghetti (I always keep a good quality bronze-cut pasta in my pantry for that perfect sauce cling)
- 6 slices thick-cut bacon, chopped (the smoky flavor makes all the difference)
- 2 large eggs at room temperature (this is crucial—cold eggs can cause the sauce to break)
- 1/2 cup grated Pecorino Romano cheese (I prefer the sharper flavor over Parmesan for carbonara)
- 1/4 cup grated Parmesan cheese (because why not have both?)
- 2 cloves garlic, minced (fresh only—jarred garlic just doesn’t compare)
- 1/2 teaspoon black pepper, freshly ground (trust me, freshly ground makes a world of difference)
- 1/4 teaspoon salt (I always start with less since the bacon and cheese add saltiness)
Instructions
- Bring a large pot of salted water to a rolling boil over high heat.
- Add spaghetti and cook for 8-10 minutes until al dente, stirring occasionally to prevent sticking.
- While pasta cooks, heat a large skillet over medium heat and add chopped bacon.
- Cook bacon for 6-8 minutes until crispy and fat has rendered, stirring occasionally.
- Remove bacon with a slotted spoon, leaving 2 tablespoons of bacon fat in the skillet.
- Add minced garlic to the skillet and cook for 1 minute until fragrant but not browned.
- In a medium bowl, whisk together eggs, both cheeses, black pepper, and salt until smooth.
- Drain cooked pasta, reserving 1/2 cup of pasta water.
- Immediately add hot pasta to the egg mixture while constantly whisking to temper the eggs.
- Pour pasta and egg mixture into the skillet with garlic and bacon fat.
- Add 1/4 cup of reserved pasta water and toss continuously over low heat for 2 minutes until sauce thickens.
- Stir in cooked bacon and serve immediately.
Zesty with sharp cheese and smoky bacon, this carbonara delivers the creamiest texture without any actual cream—the magic happens when the hot pasta cooks the eggs just enough to create that silky sauce. I love serving it in warm bowls with an extra sprinkle of black pepper on top, and it pairs beautifully with a simple arugula salad to cut through the richness.
Bacon-Wrapped Asparagus Bundles
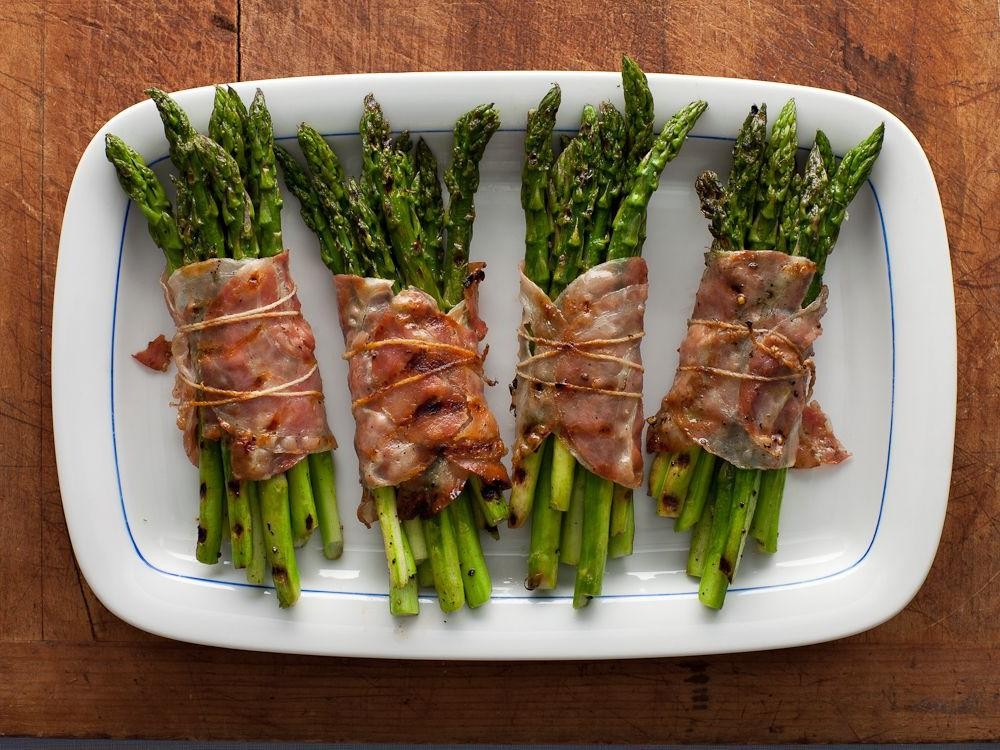
Here’s a side dish that never fails to impress at my dinner parties—it’s elegant yet so simple to pull together. I first tried these bacon-wrapped asparagus bundles at a friend’s potluck years ago, and now they’re my go-to when I want something that feels fancy without the fuss.
8
bundles15
minutes22
minutesIngredients
- 1 pound fresh asparagus spears (I look for medium thickness—they hold up better to wrapping)
- 8 slices thick-cut bacon (the smoky flavor really shines here)
- 2 tablespoons extra virgin olive oil (my kitchen staple for roasting)
- 1 teaspoon garlic powder (I keep this handy for quick seasoning)
- ½ teaspoon black pepper (freshly cracked adds a nice bite)
- ¼ teaspoon salt (I use fine sea salt for even distribution)
Instructions
- Preheat your oven to 400°F and line a baking sheet with parchment paper.
- Rinse 1 pound of asparagus spears under cold water and pat them completely dry with paper towels.
- Trim the tough, woody ends off the asparagus by snapping each spear where it naturally breaks.
- Drizzle 2 tablespoons of olive oil over the asparagus and toss to coat evenly.
- Sprinkle 1 teaspoon of garlic powder, ½ teaspoon black pepper, and ¼ teaspoon salt over the asparagus, tossing again.
- Divide the asparagus into 8 equal bundles, each with 4-5 spears depending on size.
- Wrap one slice of bacon snugly around the middle of each asparagus bundle, slightly overlapping the ends.
- Place the bundles seam-side down on the prepared baking sheet, spacing them about 1 inch apart.
- Bake for 18-22 minutes, or until the bacon is crispy and the asparagus is tender when pierced with a fork.
- Transfer the bundles to a serving plate using tongs and let them rest for 2 minutes before serving.
That irresistible crisp-tender texture with the salty bacon hugging each bundle makes these disappear fast. They’re fantastic alongside grilled chicken or as an appetizer with a creamy dip—sometimes I even chop leftovers into tomorrow’s omelet for a flavor boost.
Cheesy Bacon End Frittata

Tired of wasting those leftover pasta ends and bacon bits? This cheesy bacon end frittata has become my go-to weekend brunch solution when I’m cleaning out the fridge. Just last Sunday, I whipped this up while my coffee brewed, and it disappeared before I could even set the table!
2
servings10
minutes21
minutesIngredients
– 8 large eggs (I prefer room temperature eggs here—they incorporate more smoothly)- 1/2 cup heavy cream (this makes it extra fluffy, trust me)- 1 cup cooked bacon pieces (I save these from breakfast all week in a jar)- 1 cup pasta ends or small pasta shapes (those leftover bits from various boxes work perfectly)- 1 cup shredded cheddar cheese (I always grab the sharp variety for better flavor)- 2 tablespoons unsalted butter (my grandma swore by butter over oil for frittatas)- 1/4 cup chopped fresh chives (from my windowsill herb garden)- 1/2 teaspoon kosher salt (I find this distributes more evenly than table salt)- 1/4 teaspoon black pepper (freshly ground makes all the difference)
Instructions
1. Preheat your oven to 375°F and position the rack in the center.2. Crack all 8 eggs into a medium mixing bowl.3. Pour in the heavy cream and whisk vigorously for 45 seconds until fully combined and slightly frothy.4. Stir in the kosher salt and black pepper until evenly distributed.5. Melt the unsalted butter in a 10-inch oven-safe skillet over medium heat, swirling to coat the bottom and sides.6. Add the pasta ends to the skillet and toast for 3 minutes, stirring occasionally, until they develop light golden spots.7. Sprinkle the cooked bacon pieces evenly across the toasted pasta.8. Carefully pour the egg mixture over the pasta and bacon, ensuring even coverage.9. Cook undisturbed on the stovetop for 4 minutes until the edges begin to set.10. Sprinkle the shredded cheddar cheese evenly across the entire surface.11. Transfer the skillet to the preheated oven and bake for 14 minutes until the center is fully set and doesn’t jiggle.12. Remove from oven and immediately sprinkle with fresh chives.13. Let rest for 3 minutes before slicing into wedges. Just yesterday, my neighbor texted asking for the recipe after smelling it through our open windows! The texture is wonderfully creamy with crispy bacon surprises, while the pasta ends add delightful chewiness. I love serving this with a simple arugula salad for contrast, or packing cold slices for weekday lunches—it travels surprisingly well.
Bacon-Scented Fried Rice

Ever since I discovered the magic of using bacon fat instead of regular oil, my fried rice game has reached new heights. There’s something about that smoky, savory aroma that fills my tiny apartment kitchen and makes even my picky roommate come sniffing around asking what’s for dinner. I perfected this recipe during a lazy Sunday when I had leftover rice and a serious bacon craving.
2
servings10
minutes14
minutesIngredients
- 4 slices thick-cut bacon (I always go for the applewood-smoked variety – the flavor is just better)
- 2 cups cold cooked white rice (day-old rice from my Chinese takeout container works perfectly)
- 2 large eggs (I let them sit on the counter for 15 minutes to come to room temperature)
- 1/2 cup frozen peas (the little green gems I keep stocked for emergencies)
- 3 tablespoons soy sauce (my favorite brand has just the right saltiness)
- 2 green onions (I use both the white and green parts for maximum flavor)
- 1 tablespoon vegetable oil (for that initial crisp on the bacon)
Instructions
- Heat 1 tablespoon vegetable oil in a large skillet over medium-high heat until it shimmers, about 2 minutes.
- Add 4 slices thick-cut bacon to the hot skillet and cook for 4-5 minutes per side until crispy and browned.
- Transfer the cooked bacon to a paper towel-lined plate, leaving the rendered bacon fat in the skillet.
- While the bacon cools, crack 2 large eggs directly into the hot bacon fat and scramble them for 1-2 minutes until just set but still slightly runny.
- Add 2 cups cold cooked white rice to the skillet and break up any clumps with your spatula, cooking for 3 minutes until the rice starts to crisp around the edges.
- Pour in 3 tablespoons soy sauce and stir continuously for 1 minute to coat every grain of rice evenly.
- Mix in 1/2 cup frozen peas and cook for another 2 minutes until the peas are heated through and bright green.
- Chop the cooled bacon into small pieces and add them back to the skillet along with sliced green onions, stirring everything together for 1 final minute.
Versatile enough for breakfast or dinner, this fried rice delivers that perfect contrast of crispy rice bits against tender peas and chewy bacon. The smoky bacon scent will have your neighbors wondering what restaurant you ordered from, and I love serving it in a bowl topped with an extra fried egg for that glorious runny yolk moment.
Crispy Bacon End and Cheese Sandwich
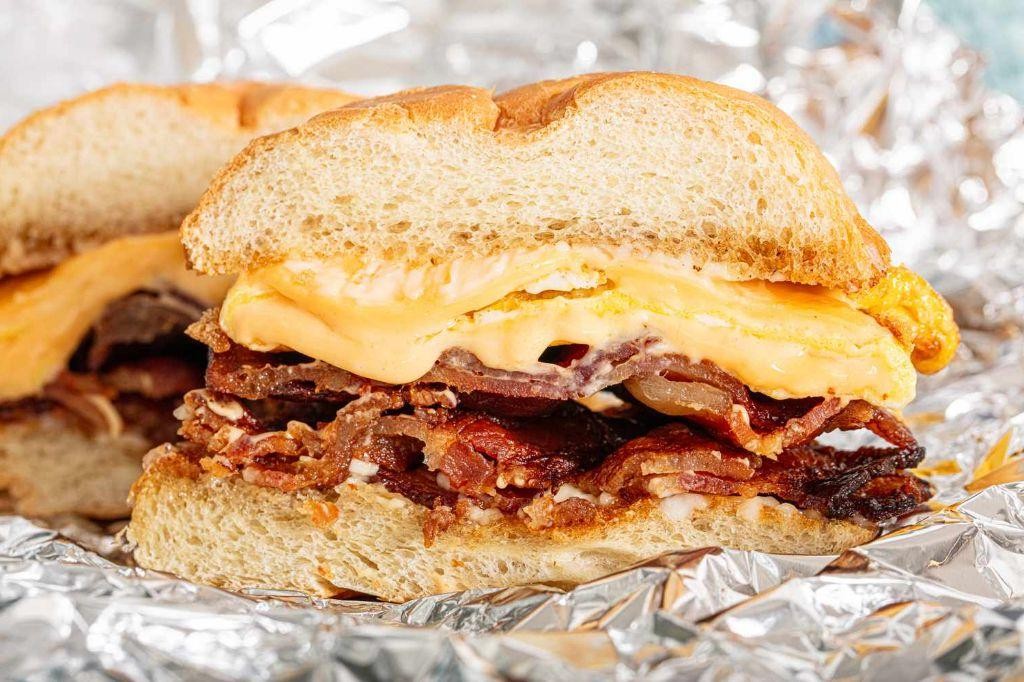
Years ago, while cleaning out my fridge, I discovered a forgotten package of bacon ends and decided to transform them into what’s now my ultimate comfort food. This crispy bacon end and cheese sandwich has become my go-to lazy Sunday lunch, perfect for those days when you want something indulgent but don’t feel like putting in too much effort. There’s something magical about how the crispy bacon bits mingle with melted cheese between two perfectly toasted slices of bread.
2
sandwiches10
minutes26
minutesIngredients
– 6 ounces bacon ends (I love the meaty chunks mixed with fatty bits for maximum flavor)
– 4 slices sourdough bread (my local bakery’s thick-cut version works best)
– 1 cup shredded sharp cheddar cheese (I always shred my own—it melts so much better than pre-shredded)
– 2 tablespoons mayonnaise (Duke’s is my secret weapon for the perfect tang)
– 1 tablespoon unsalted butter (room temperature spreads more evenly)
– 1 teaspoon Dijon mustard (just enough to add a subtle kick without overpowering)
Instructions
1. Cut bacon ends into ½-inch pieces using kitchen shears for easier handling.
2. Cook bacon pieces in a cold skillet over medium heat for 12-15 minutes, stirring occasionally until crispy and browned.
3. Transfer cooked bacon to a paper towel-lined plate using a slotted spoon, reserving 1 tablespoon of bacon fat in the skillet.
4. Spread mayonnaise evenly on one side of each bread slice while bacon cools slightly.
5. Heat the skillet with reserved bacon fat over medium heat and place two bread slices mayonnaise-side down.
6. Sprinkle ¼ cup shredded cheddar cheese evenly over each bread slice in the skillet.
7. Divide crispy bacon pieces evenly over the cheese layer on both sandwiches.
8. Spread Dijon mustard thinly over the remaining two bread slices and place them mustard-side down on top of the bacon.
9. Spread butter evenly on the top outer sides of both sandwiches.
10. Cook for 3-4 minutes until the bottom bread is golden brown and crispy.
11. Carefully flip both sandwiches using a spatula and cook for another 3-4 minutes until the second side is golden brown and cheese is fully melted.
12. Remove sandwiches from skillet and let rest for 1 minute before cutting diagonally. Crispy, cheesy, and utterly satisfying, this sandwich delivers the perfect crunch with every bite thanks to that double-toasting method. Consider serving it with pickles on the side to cut through the richness, or try dipping it in tomato soup for the ultimate cozy meal experience.
Hearty Bacon Chili with Beans
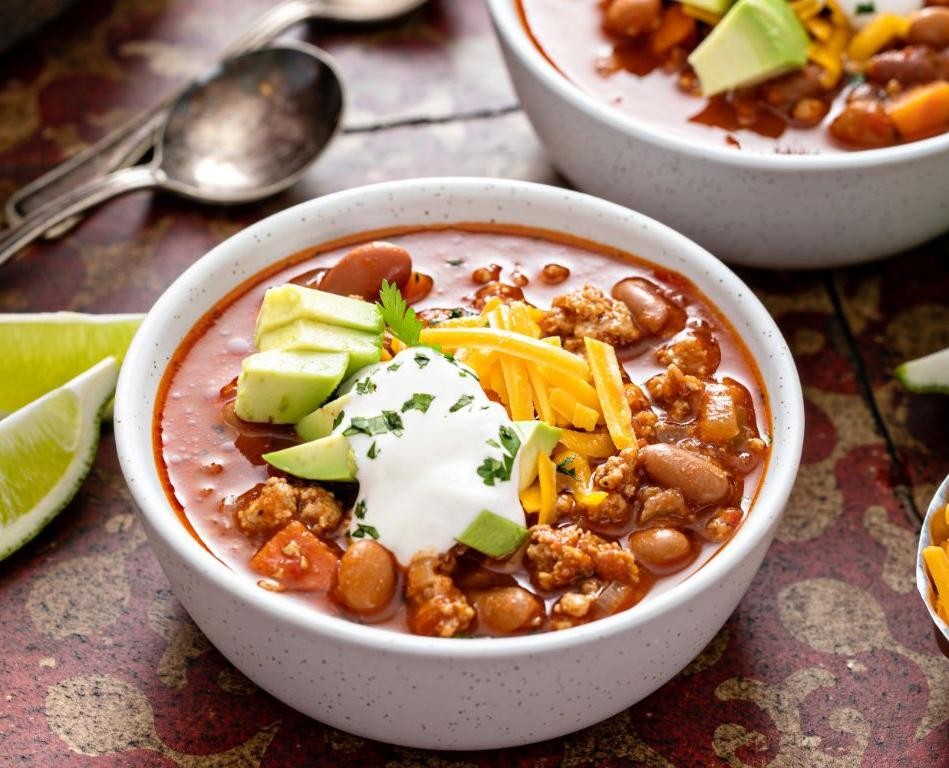
Oof, there’s nothing quite like coming home to a simmering pot of chili on a crisp fall evening. I actually developed this recipe after my husband declared store-bought chili “just okay”—challenge accepted! Now this bacon-spiked version has become our go-to football Sunday comfort food.
6
servings20
minutes70
minutesIngredients
– 1 lb thick-cut bacon, chopped (I save the rendered fat for cooking—waste not, want not!)
– 1 large yellow onion, diced (my grandma always said this is the flavor foundation)
– 3 cloves garlic, minced (fresh only—the jarred stuff just doesn’t compare)
– 1 lb ground beef, 80/20 blend (the extra fat means extra flavor)
– 2 tbsp chili powder (I use a medium-spice blend from my local spice shop)
– 1 tsp cumin (toasted whole seeds I grind myself for maximum aroma)
– 1 (28 oz) can crushed tomatoes (San Marzano are worth the splurge)
– 2 (15 oz) cans kidney beans, drained and rinsed (this helps reduce that “canned” taste)
– 1 cup beef broth (low-sodium so I can control the salt level)
– 1 tbsp brown sugar (just enough to balance the acidity)
Instructions
1. Place a large Dutch oven over medium heat and cook chopped bacon for 8-10 minutes until crispy, stirring occasionally.
2. Remove bacon with a slotted spoon, leaving 2 tablespoons of bacon fat in the pot—this golden liquid is flavor gold!
3. Add diced onion to the hot bacon fat and cook for 5 minutes until translucent, scraping up any browned bits from the bottom.
4. Stir in minced garlic and cook for 1 minute until fragrant—be careful not to burn it.
5. Add ground beef, breaking it up with a wooden spoon, and cook for 6-8 minutes until no pink remains.
6. Sprinkle chili powder and cumin over the meat mixture, stirring constantly for 1 minute to toast the spices.
7. Pour in crushed tomatoes, scraping the bottom thoroughly to incorporate all the flavorful bits.
8. Add drained kidney beans, beef broth, brown sugar, and reserved cooked bacon, stirring to combine.
9. Bring chili to a boil, then reduce heat to low and simmer uncovered for 45 minutes, stirring every 15 minutes.
10. After simmering, check consistency—if too thick, add ¼ cup more broth; if too thin, simmer 10 more minutes.
The finished chili has this incredible thick, almost stew-like texture where the beans stay perfectly intact while the meat practically melts. That smoky bacon flavor weaves through every bite without overpowering the spices. I love serving it over crispy tater tots with a dollop of cool sour cream—the contrast of temperatures and textures is absolutely magical.
Maple-Glazed Bacon Ends Brussels Sprouts
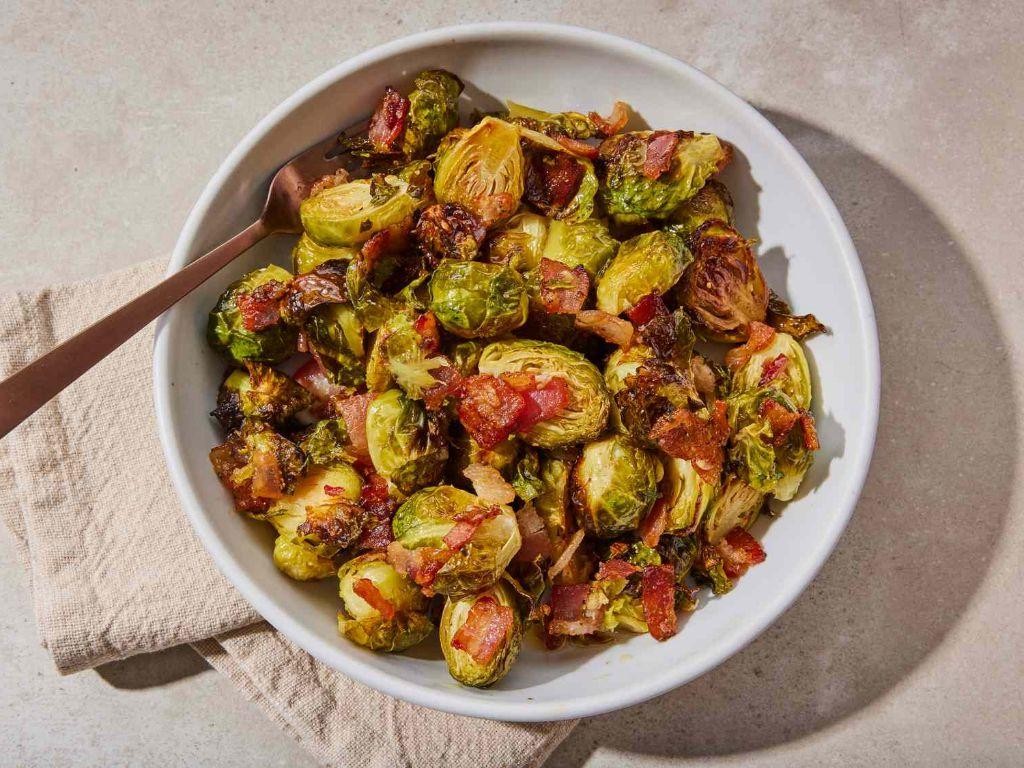
Oh my goodness, if you’re looking for that perfect side dish that makes everyone forget they ever disliked Brussels sprouts, you’ve found it. I first made these for a skeptical friend who now requests them at every gathering—the sweet maple and salty bacon work magic on those little green gems. It’s become my go-to for holiday dinners and weeknight treats alike.
3
servings10
minutes35
minutesIngredients
– 1 pound Brussels sprouts, trimmed and halved (I look for the smaller ones—they’re sweeter and more tender)
– 8 ounces bacon ends, chopped into ½-inch pieces (the fatty bits create the most incredible crispy texture)
– 3 tablespoons pure maple syrup (the real stuff makes all the difference—none of that pancake syrup here)
– 2 tablespoons olive oil (my trusty extra virgin is always within reach)
– ½ teaspoon black pepper (freshly ground if you have it)
– ¼ teaspoon salt (I use kosher salt for better distribution)
Instructions
1. Preheat your oven to 400°F and line a baking sheet with parchment paper.
2. Place the chopped bacon ends in a single layer on the baking sheet.
3. Bake the bacon for 12 minutes at 400°F until it starts rendering fat and turning golden.
4. Remove the baking sheet from the oven and carefully drain off about half the bacon fat (saving it for another use—it’s liquid gold for cooking eggs!).
5. Add the halved Brussels sprouts to the baking sheet with the partially cooked bacon.
6. Drizzle the olive oil over the Brussels sprouts and bacon mixture.
7. Sprinkle the salt and black pepper evenly across everything.
8. Toss everything together thoroughly with tongs until well coated.
9. Spread the mixture in a single layer to ensure even cooking.
10. Return the baking sheet to the oven and bake for 15 minutes at 400°F.
11. Remove from oven and drizzle the maple syrup evenly over everything.
12. Toss again to coat all pieces with the maple syrup.
13. Return to oven and bake for another 8-10 minutes at 400°F until the Brussels sprouts are tender with crispy edges and the bacon is fully crispy.
14. Serve immediately while hot and crispy.
Deliciously caramelized and perfectly balanced, these sprouts emerge from the oven with crispy edges and tender centers that soak up all that maple-bacon goodness. The bacon ends provide these wonderful chewy-crispy bits throughout that make every bite interesting. I love serving these alongside roasted chicken or even topping them with a fried egg for a complete meal—the runny yolk mixed with the sweet-salty flavors is absolute perfection.
Conclusion
Zesty, versatile, and budget-friendly—these bacon ends and pieces recipes prove that delicious meals don’t have to be complicated or expensive. We hope this collection inspires your next kitchen creation! Try a recipe, leave a comment with your favorite, and share your bacon love by pinning this article on Pinterest.


