Buckle up, chicken lovers, because we’re about to transform your weeknight dinners forever! Beyond just being ridiculously delicious, this baked chicken recipe is so foolproof that even your kitchen-phobic cousin could nail it on the first try. Best of all, it requires minimal effort for maximum flavor payoff—perfect for busy folks who still want to eat like royalty.
Why This Recipe Works
- The combination of high heat baking followed by a brief rest ensures the chicken develops a beautifully crispy, golden-brown exterior while locking in all those precious juices inside—no more dry, sad chicken here!
- Using a simple but powerful spice rub means every bite packs a punch of flavor without needing complicated marinades or hard-to-find ingredients that would make your grocery store trip feel like a scavenger hunt.
- Patting the chicken completely dry before seasoning might seem like a small step, but it’s the secret weapon that prevents steaming and guarantees that satisfying crunch we all crave in perfectly baked chicken.
- Arranging the pieces in a single layer with plenty of breathing room transforms your ordinary baking sheet into a magic crisping machine that delivers restaurant-quality results right from your home oven.
Ingredients
- 4 bone-in, skin-on chicken thighs (about 2 pounds total)
- 2 tablespoons olive oil
- 1 tablespoon paprika
- 2 teaspoons garlic powder
- 1 teaspoon onion powder
- 1 teaspoon dried thyme
- 1 teaspoon salt
- ½ teaspoon black pepper
- ¼ teaspoon cayenne pepper (optional for heat)
- Fresh parsley, chopped (for garnish)
Equipment Needed
- Rimmed baking sheet
- Wire rack (that fits inside baking sheet)
- Mixing bowls
- Measuring spoons
- Tongs
- Paper towels
- Meat thermometer
Instructions
Prep Your Chicken and Oven
Position your oven rack in the center position and preheat that bad boy to 425°F—this high temperature is crucial for creating that beautiful crispy skin we’re after. While the oven heats up, take your chicken thighs and pat them completely dry with paper towels, paying special attention to the skin side. Seriously, get them as dry as the desert because any moisture left on the surface will steam instead of crisp up. Place the dried chicken on a wire rack set inside your rimmed baking sheet; this setup allows hot air to circulate around all sides of the chicken for even cooking and maximum crispiness. Pro tip: Let the chicken sit at room temperature for about 15 minutes after patting dry—this helps it cook more evenly throughout.
Create the Flavor Bomb Spice Rub
In a small bowl, combine 1 tablespoon of paprika, 2 teaspoons of garlic powder, 1 teaspoon of onion powder, 1 teaspoon of dried thyme, 1 teaspoon of salt, ½ teaspoon of black pepper, and if you’re feeling spicy, ¼ teaspoon of cayenne pepper. Whisk these spices together until they’re fully incorporated and looking like a beautiful rusty-red color that promises big flavor. Drizzle 2 tablespoons of olive oil over your dried chicken thighs, using your hands to rub it evenly over all surfaces—this oil will help the spices stick and promote browning. Now generously sprinkle your spice mixture over both sides of each thigh, really massaging it into every nook and cranny for maximum flavor penetration.
Arrange and Bake to Perfection
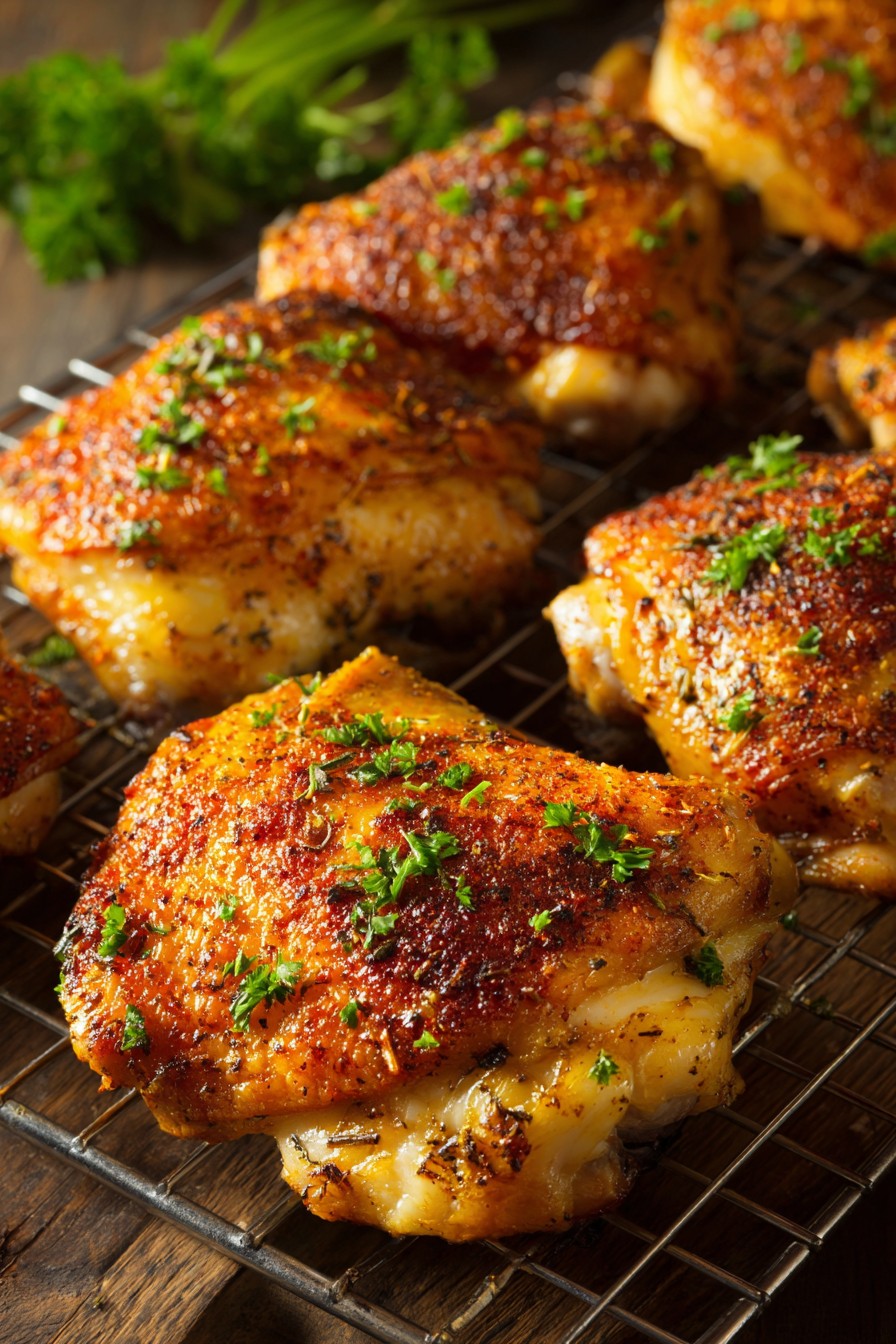
Arrange your seasoned chicken thighs skin-side up on the wire rack, making sure they aren’t touching each other—give them about an inch of space between each piece for proper air circulation. Slide the baking sheet into your preheated 425°F oven and set your timer for 25 minutes. Resist the temptation to open the oven door during this time because we need to maintain that high, consistent heat for optimal crisping. After 25 minutes, rotate the baking sheet 180 degrees to ensure even cooking (ovens often have hot spots!) and continue baking for another 15-20 minutes. The chicken is ready when the skin is deep golden brown and crispy, and a meat thermometer inserted into the thickest part (without touching bone) reads 165°F.
Rest and Serve Like a Pro
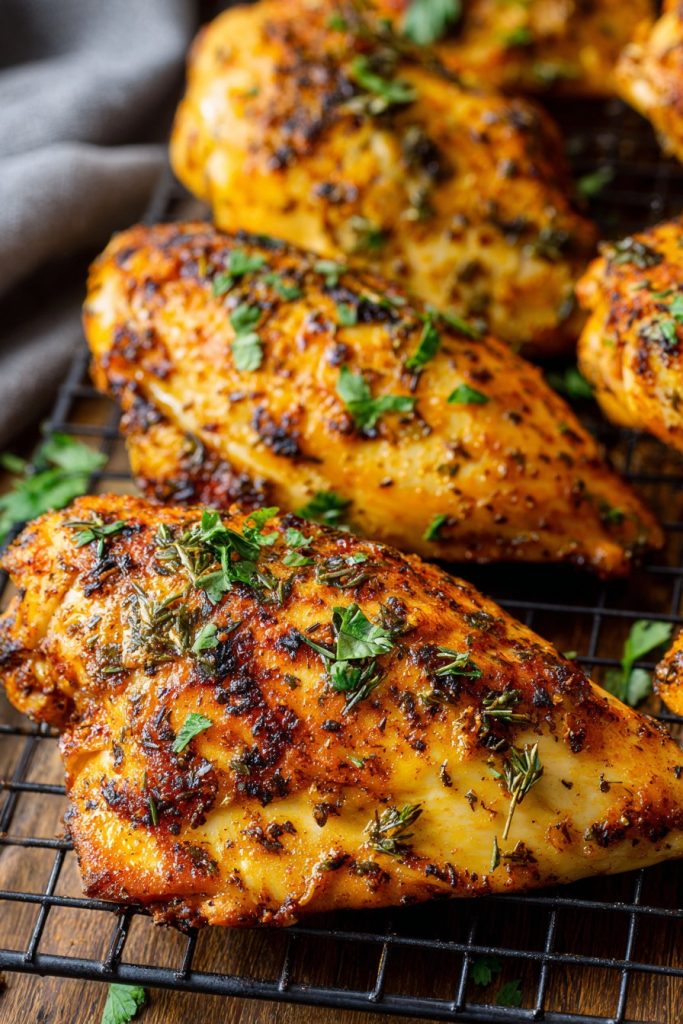
Once your chicken reaches that perfect 165°F internal temperature, carefully remove the baking sheet from the oven using oven mitts—remember, that pan is crazy hot! Transfer the chicken to a clean plate or cutting board, but whatever you do, don’t cut into it immediately. Let the chicken rest for at least 5-7 minutes; this allows the juices to redistribute throughout the meat instead of running out onto your cutting board when you slice into it. While it rests, the internal temperature will continue to rise another 5-10 degrees, ensuring perfectly cooked chicken every single time. Pro tip: Sprinkle with freshly chopped parsley right before serving for a pop of color and fresh flavor.
Storage and Reheating Magic
If you somehow have leftovers (which is rare with this recipe!), let the chicken cool completely to room temperature before storing—this prevents condensation that would make your crispy skin soggy. Place the cooled chicken in an airtight container or wrap tightly in aluminum foil; it will keep in the refrigerator for up to 3-4 days. To reheat while maintaining that glorious crispiness, avoid the microwave at all costs! Instead, place the chicken on a wire rack set over a baking sheet and warm it in a 375°F oven for 10-15 minutes until heated through. The skin will re-crisp beautifully while the interior stays juicy—almost as good as fresh out of the oven!
Tips and Tricks
For the ultimate crispy skin, try this chef’s secret: after patting your chicken dry, place it uncovered in the refrigerator for 1-2 hours before seasoning and baking. This extended drying time helps evaporate even more surface moisture, resulting in skin that shatters like glass when you bite into it. If you’re really serious about crispiness, you can even do this step up to 24 hours in advance—just place the dried chicken on a wire rack set over a baking sheet and let it hang out in the fridge uncovered.
Don’t have a wire rack? No worries! You can create a makeshift rack by lining your baking sheet with aluminum foil and placing sliced onions, celery stalks, or even thick carrot coins underneath the chicken. These vegetables will lift the chicken slightly off the pan surface while also adding incredible flavor to the drippings (which you can use to make an amazing pan sauce later). Just be aware that the bottom might not get quite as crispy as with a proper wire rack.
The spice blend is completely customizable based on what you have in your pantry. Out of paprika? Use smoked paprika for a deeper flavor or chili powder for more heat. Not a thyme fan? Rosemary, oregano, or even herbes de Provence would work beautifully. For an Asian twist, replace the spices with five-spice powder and add a tablespoon of soy sauce to the olive oil. The basic formula is oil + salt + your favorite spices = endless possibilities!
If you want to take your chicken to the next level, try brining it before baking. Dissolve ¼ cup of salt and 2 tablespoons of sugar in 4 cups of warm water, then submerge your chicken thighs and refrigerate for 1-4 hours. Rinse and pat thoroughly dry before proceeding with the recipe. This extra step ensures incredibly juicy meat that stays moist even if you accidentally overcook it slightly—perfect for nervous beginner cooks!
For those who love extra crispy skin, during the last 5 minutes of baking, switch your oven to broil and keep a very close eye on the chicken. The intense direct heat will blister and bubble the skin into something truly spectacular. Just don’t walk away—it can go from perfectly crispy to completely burnt in under a minute! If your oven has convection capabilities, use it! The circulating air will help evaporate moisture faster and create even crispier results all around.
Recipe Variations
- Lemon Herb Delight: Add the zest of one lemon to your spice rub and arrange thin lemon slices underneath the chicken on the baking sheet. The lemon will caramelize and infuse the chicken with bright, citrusy notes that cut through the richness perfectly. Fresh herbs like rosemary sprigs or thyme branches placed under the chicken will also perfume the meat beautifully as they cook.
- Spicy Buffalo Style: Replace the spice rub with 2 tablespoons of your favorite buffalo sauce mixed with 1 tablespoon of melted butter. Bake as directed, then during the last 5 minutes, brush with additional buffalo sauce and broil until sticky and caramelized. Serve with celery sticks and blue cheese dressing for the ultimate game-day treat that’s way better than wings!
- Honey Mustard Glaze: Whisk together 3 tablespoons of Dijon mustard, 2 tablespoons of honey, 1 tablespoon of olive oil, and 1 minced garlic clove. Brush this mixture over the chicken during the last 10 minutes of baking, returning it to the oven to create a sweet, tangy, slightly caramelized crust that will have everyone fighting for the last piece.
- Mediterranean Twist: Replace the spice rub with a mixture of 2 teaspoons dried oregano, 1 teaspoon garlic powder, 1 teaspoon onion powder, 1 teaspoon lemon pepper, and ½ teaspoon sumac (if you have it). Scatter kalamata olives and cherry tomatoes around the chicken during the last 15 minutes of baking for a complete sheet pan meal that tastes like a vacation to Greece.
Frequently Asked Questions
Can I use boneless, skinless chicken breasts instead?
Absolutely, but you’ll need to adjust the cooking time significantly since boneless, skinless breasts cook much faster. Reduce the oven temperature to 400°F and check for doneness after 15-20 minutes—they’re ready when they reach 165°F internally. Without the skin and bone, they won’t get as crispy, but they’ll still be deliciously flavorful. I recommend pounding the breasts to an even thickness first so they cook uniformly, and consider adding an extra tablespoon of olive oil to keep them moist.
Why is my chicken skin not getting crispy?
The number one reason for soggy skin is not patting the chicken completely dry before seasoning—any moisture on the surface will steam instead of crisp up. Also ensure your oven is fully preheated to 425°F before the chicken goes in, and don’t overcrowd the pan (give each piece space for air circulation). If your skin still isn’t crispy enough, try placing the dried chicken uncovered in the refrigerator for an hour before baking to remove even more moisture from the skin.
How do I know when the chicken is done without a thermometer?
While I highly recommend using a meat thermometer for perfect results every time, you can check doneness by piercing the thickest part of the thigh with a knife—the juices should run completely clear with no pinkness. The meat should also feel firm to the touch and pull away easily from the bone. Remember that chicken continues to cook after removal from the oven, so it’s better to slightly undercook than overcook! When in doubt, cut into one piece to check—it’s better to be safe than sorry.
Can I make this recipe ahead of time?
You can absolutely prep components ahead of time! The spice rub can be mixed days in advance and stored in an airtight container. You can also pat the chicken dry and store it uncovered on a wire rack in the refrigerator for up to 24 hours before seasoning and baking—this actually improves crispiness! Fully cooked chicken reheats surprisingly well using the oven method described earlier. I don’t recommend freezing after cooking as the texture changes, but raw chicken can be frozen with the spice rub applied, then thawed overnight in the refrigerator before baking.
Summary
This awesome baked chicken recipe delivers incredibly crispy skin and juicy meat every time with minimal effort. The simple spice rub creates big flavor while the high-heat method ensures perfect texture. Customizable, foolproof, and always delicious!
Awesome Baked Chicken Recipe
4
servings10
minutes40
minutesIngredients
Instructions
- 1 Preheat oven to 425°F. Pat chicken completely dry with paper towels.
- 2 Mix all spices in a small bowl. Rub chicken with olive oil, then spice mixture.
- 3 Arrange chicken skin-side up on a wire rack set over a baking sheet.
- 4 Bake for 25 minutes, rotate pan, then bake 15-20 more minutes until 165°F internally.
- 5 Rest for 5-7 minutes before serving. Garnish with fresh parsley.


