Travel back in time with your taste buds! Ancient Egyptian cuisine offers surprisingly delicious and accessible flavors that any home cook can recreate. From aromatic breads to hearty stews, these authentic recipes bring 5,000 years of culinary history right to your modern kitchen. Ready to explore these timeless dishes? Let’s dive into these 30 ancient treasures you’ll love cooking today.
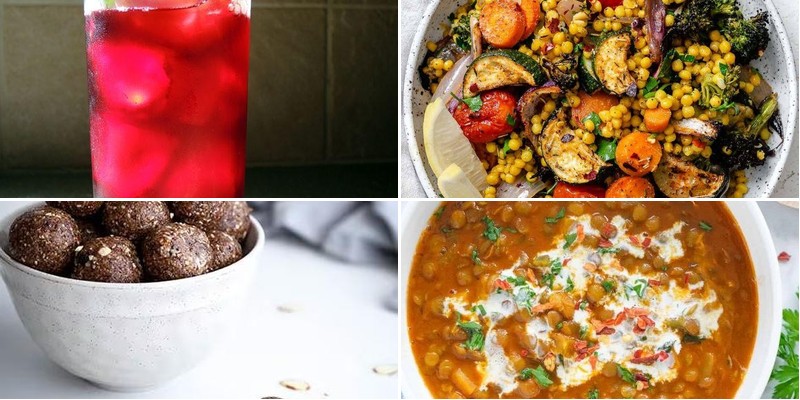
Kushari with Spicy Tomato Sauce
Ready to rock your taste buds with a street food superstar that’s basically a carb-loaded party in a bowl? Meet Kushari, Egypt’s ultimate comfort food mash-up, where rice, lentils, and pasta cozy up under a zesty, spicy tomato sauce that’s got just enough kick to make things interesting. Trust me, this dish is so good, you’ll forget all about your usual weeknight dinner rut.
5
servings20
minutes53
minutesIngredients
For the Kushari Base:
– 1 cup long-grain white rice
– 1 cup brown lentils
– 1 cup elbow macaroni
– 4 cups water
– 1 teaspoon salt
For the Spicy Tomato Sauce:
– 2 tablespoons olive oil
– 1 small onion, finely chopped
– 2 cloves garlic, minced
– 1 (15-ounce) can crushed tomatoes
– 1 teaspoon cumin
– 1/2 teaspoon cayenne pepper
– 1/2 teaspoon salt
For Garnish:
– 1 large onion, thinly sliced
– 2 tablespoons vegetable oil
Instructions
1. Rinse 1 cup of brown lentils under cold water until the water runs clear.
2. In a medium pot, combine the rinsed lentils with 4 cups of water and 1 teaspoon of salt.
3. Bring the lentil mixture to a boil over high heat, then reduce the heat to low and simmer for 20 minutes until the lentils are tender but not mushy.
4. Drain the cooked lentils and set them aside.
5. In the same pot, add 1 cup of long-grain white rice and 2 cups of water.
6. Bring the rice to a boil, then cover and simmer on low heat for 15 minutes until the water is absorbed and the rice is fluffy.
7. Cook 1 cup of elbow macaroni according to package directions in a separate pot of salted boiling water for 8 minutes until al dente.
8. Drain the macaroni and rinse it briefly with cool water to prevent sticking.
9. Heat 2 tablespoons of olive oil in a saucepan over medium heat.
10. Sauté 1 finely chopped small onion for 5 minutes until translucent.
11. Add 2 minced garlic cloves and cook for 1 minute until fragrant.
12. Stir in 1 can of crushed tomatoes, 1 teaspoon of cumin, 1/2 teaspoon of cayenne pepper, and 1/2 teaspoon of salt.
13. Simmer the sauce for 10 minutes, stirring occasionally, until it thickens slightly.
14. Heat 2 tablespoons of vegetable oil in a skillet over medium-high heat.
15. Fry 1 thinly sliced large onion for 7-10 minutes, stirring frequently, until crispy and golden brown.
16. Combine the cooked rice, lentils, and macaroni in a large bowl.
17. Top the Kushari base with the spicy tomato sauce and garnish with the crispy fried onions.
A symphony of textures awaits—fluffy rice, tender lentils, and springy pasta all tangled together under that bold, spicy tomato sauce. Serve it up with extra crispy onions for crunch, or go wild and add a dollop of yogurt to cool down the heat while keeping every bite exciting.
Slow-Cooked Lamb with Flatbread

Craving something that’ll make your taste buds do a happy dance while your oven does all the heavy lifting? This slow-cooked lamb with flatbread is basically culinary magic—tender meat that falls apart if you look at it too hard, wrapped in warm, pillowy bread that’s perfect for sopping up every last drop of savory goodness. Consider it your new secret weapon for impressing guests (or just treating yourself to a ridiculously delicious Tuesday).
6
portions25
minutes195
minutesIngredients
For the Lamb:
– 2 lbs lamb shoulder, cut into 2-inch cubes
– 2 tbsp olive oil
– 1 large onion, chopped
– 4 garlic cloves, minced
– 1 cup beef broth
– 1 tbsp tomato paste
– 1 tsp dried rosemary
– 1 tsp dried thyme
– 1/2 tsp salt
– 1/4 tsp black pepper
For the Flatbread:
– 2 cups all-purpose flour
– 3/4 cup warm water (110°F)
– 1 tsp active dry yeast
– 1 tsp sugar
– 1/2 tsp salt
– 2 tbsp olive oil
Instructions
1. Preheat your oven to 325°F.
2. Heat 2 tbsp olive oil in a large oven-safe Dutch oven over medium-high heat until shimmering.
3. Pat the 2 lbs lamb cubes completely dry with paper towels—this ensures a beautiful sear without steaming.
4. Sear lamb in batches for 3-4 minutes per side until deeply browned, transferring to a plate when done.
5. Add 1 chopped onion to the pot and cook for 5 minutes until softened.
6. Stir in 4 minced garlic cloves and cook for 1 minute until fragrant.
7. Mix in 1 tbsp tomato paste and cook for 1 minute to deepen its flavor.
8. Pour in 1 cup beef broth, scraping the bottom to release any browned bits.
9. Return lamb to the pot along with 1 tsp dried rosemary, 1 tsp dried thyme, 1/2 tsp salt, and 1/4 tsp black pepper.
10. Cover the pot and transfer to the preheated oven for 3 hours until the lamb is fork-tender.
11. While the lamb cooks, activate 1 tsp yeast by combining it with 3/4 cup warm water (110°F) and 1 tsp sugar in a small bowl; let sit for 5 minutes until foamy.
12. In a large bowl, whisk together 2 cups all-purpose flour and 1/2 tsp salt.
13. Pour the yeast mixture and 2 tbsp olive oil into the flour, stirring until a shaggy dough forms.
14. Knead the dough on a floured surface for 5 minutes until smooth and elastic—don’t rush this step, as proper kneading creates that perfect flatbread chew.
15. Place dough in a greased bowl, cover with a damp cloth, and let rise in a warm spot for 1 hour until doubled in size.
16. Divide dough into 6 equal pieces and roll each into a 1/4-inch thick circle.
17. Heat a dry skillet over medium-high heat and cook each flatbread for 2 minutes per side until puffed and lightly charred.
18. Shred the cooked lamb directly in the pot using two forks.
19. Serve the shredded lamb with warm flatbread.
Oh, the glorious payoff—the lamb melts into succulent strands that soak up the rich, herb-infused juices, while the flatbread offers a chewy, slightly charred contrast. Tear off a piece of bread, pile it high with lamb, and maybe drizzle with a little extra broth for a messy, soul-warming bite that’s basically a hug from the inside.
Falafel Patties with Tahini Dip
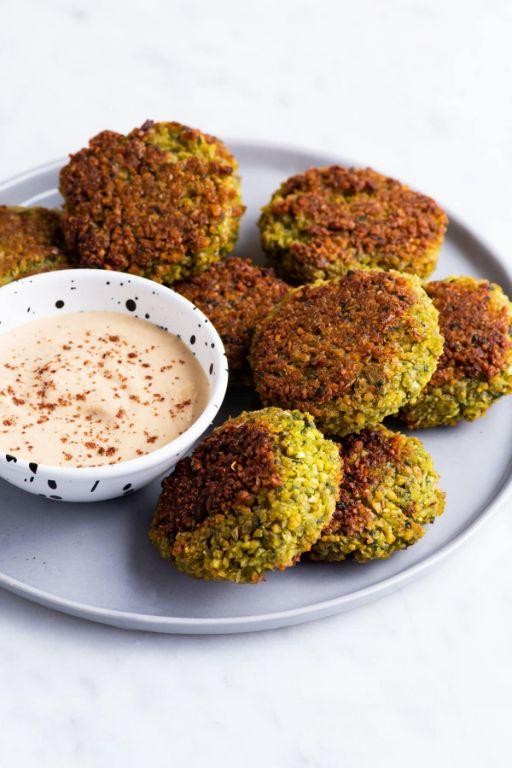
Tired of the same old veggie burgers that taste like cardboard with commitment issues? These falafel patties are here to rescue your taste buds from boredom and dunk them straight into flavor town—no passport required. Seriously, these crispy little flavor bombs are so good, they might just upstage your main course and demand their own spotlight.
8
patties15
minutes10
minutesIngredients
For the Falafel Patties
– 1 (15-ounce) can chickpeas, drained and rinsed
– 1/4 cup finely chopped yellow onion
– 2 cloves garlic, minced
– 1/4 cup fresh parsley, chopped
– 1 teaspoon ground cumin
– 1/2 teaspoon baking powder
– 3 tablespoons all-purpose flour
– 2 tablespoons olive oil
– 1/2 teaspoon salt
– 1/4 teaspoon black pepper
For the Tahini Dip
– 1/4 cup tahini
– 2 tablespoons lemon juice
– 1/4 cup water
– 1/4 teaspoon salt
Instructions
1. Combine the drained chickpeas, chopped yellow onion, minced garlic, fresh parsley, ground cumin, baking powder, all-purpose flour, salt, and black pepper in a food processor.
2. Pulse the mixture for 30 seconds until it forms a coarse paste that holds together when pressed. (Tip: Don’t over-process—you want some texture, not hummus!)
3. Shape the mixture into 8 equal-sized patties, about 1/2-inch thick, using your hands.
4. Heat 2 tablespoons of olive oil in a large skillet over medium heat until it shimmers.
5. Place the patties in the skillet and cook for 4–5 minutes until the bottoms are golden brown and crispy.
6. Flip the patties carefully and cook for another 4–5 minutes until both sides are evenly browned and firm to the touch.
7. While the patties cook, whisk together the tahini, lemon juice, water, and 1/4 teaspoon salt in a small bowl until smooth. (Tip: If the dip is too thick, add water 1 tablespoon at a time until it reaches a drizzling consistency.)
8. Transfer the cooked patties to a paper towel-lined plate to drain any excess oil.
9. Serve the falafel patties immediately with the tahini dip on the side. (Tip: For extra crunch, let the shaped patties rest in the fridge for 15 minutes before cooking.)
Crispy on the outside, tender and herb-packed on the inside, these patties deliver a satisfying crunch with every bite. The creamy tahini dip adds a tangy, nutty contrast that makes them utterly addictive. Try stuffing them into pita pockets with pickled veggies or crumbling them over a salad for a quick lunch upgrade!
Rich Lentil Soup with Spices

My friends, let’s be real—sometimes you need a hug in a bowl, and this lentil soup is basically a warm, spiced embrace for your soul. Forget sad desk lunches; this rich, aromatic wonder will have you doing a happy dance with every spoonful.
2
servings15
minutes49
minutesIngredients
- For the Base:
- 2 tbsp olive oil
- 1 medium yellow onion, diced
- 2 carrots, chopped
- 2 celery stalks, chopped
- 3 garlic cloves, minced
- For the Spice Blend:
- 1 tsp ground cumin
- 1/2 tsp smoked paprika
- 1/4 tsp red pepper flakes
- For the Soup:
- 1 cup brown lentils, rinsed
- 6 cups vegetable broth
- 1 (14.5 oz) can diced tomatoes
- 1 tsp salt
- 1/2 tsp black pepper
- 2 tbsp lemon juice
- 1/4 cup chopped fresh parsley
Instructions
- Heat 2 tbsp olive oil in a large pot over medium heat until it shimmers.
- Add 1 diced onion, 2 chopped carrots, and 2 chopped celery stalks, and sauté for 8 minutes until the onions are translucent and the carrots have softened slightly.
- Stir in 3 minced garlic cloves and cook for 1 minute until fragrant—don’t let it brown, or it’ll turn bitter (tip: keep the heat medium to avoid burning).
- Add 1 tsp cumin, 1/2 tsp smoked paprika, and 1/4 tsp red pepper flakes, and toast for 30 seconds to wake up the spices.
- Pour in 1 cup rinsed brown lentils, 6 cups vegetable broth, and 1 can diced tomatoes with their juices, and bring to a boil.
- Reduce heat to low, cover the pot, and simmer for 35 minutes until the lentils are tender but not mushy (tip: check at 30 minutes—lentils should be soft but hold their shape).
- Stir in 1 tsp salt, 1/2 tsp black pepper, and 2 tbsp lemon juice, and simmer uncovered for 5 more minutes to meld the flavors.
- Remove from heat and stir in 1/4 cup chopped parsley just before serving (tip: adding herbs at the end keeps them bright and fresh).
Divinely creamy without any dairy, this soup boasts a velvety texture from the softened lentils and a kick from the smoked paprika. Serve it with a crusty baguette for dipping, or go wild and top it with a dollop of Greek yogurt for a tangy twist—it’s basically a flavor party in your mouth.
Stuffed Grape Leaves with Mint

Packed with personality and flavor, these stuffed grape leaves are the Mediterranean party starters your kitchen has been waiting for—think of them as tiny, edible gifts wrapped in nature’s own packaging, delivering a punch of herby, tangy goodness that’ll have everyone begging for the recipe.
32
rolls30
minutes45
minutesIngredients
For the filling:
– 1 cup long-grain white rice
– 1 lb ground lamb
– 1/4 cup fresh mint leaves, finely chopped
– 1/4 cup fresh parsley, finely chopped
– 1/4 cup pine nuts
– 1 tsp salt
– 1/2 tsp black pepper
– 1/4 cup lemon juice
For assembly and cooking:
– 1 jar (16 oz) grape leaves in brine
– 2 cups chicken broth
– 1/4 cup olive oil
– 2 lemons, sliced into rounds
Instructions
1. Rinse the grape leaves under cold water to remove excess brine, then pat them dry with paper towels.
2. In a large bowl, combine the rice, ground lamb, mint, parsley, pine nuts, salt, pepper, and lemon juice.
3. Place one grape leaf shiny-side down on your work surface, with the stem end facing you.
4. Spoon 1 tablespoon of the filling mixture onto the center of the leaf near the stem end.
5. Fold the stem end over the filling, then fold in the sides, and roll tightly toward the tip to form a compact cylinder.
6. Repeat with remaining leaves and filling until all filling is used.
7. Arrange the rolled grape leaves snugly in a single layer in a large pot.
8. Pour the chicken broth and olive oil over the stuffed grape leaves.
9. Place the lemon slices on top of the rolls.
10. Cover the pot with a lid and simmer over low heat for 45 minutes.
11. Remove from heat and let rest for 15 minutes before serving.
Zesty and vibrant, these little parcels offer a delightful textural contrast between the tender grape leaves and the savory, grain-filled interior. The mint provides a refreshing counterpoint to the rich lamb, making them perfect for serving as appetizers with a dollop of Greek yogurt or as part of a mezze platter alongside olives and feta cheese.
Honey-Glazed Dates with Walnuts

Unbelievably, these honey-glazed dates with walnuts are about to become your new favorite party trick—they’re the edible equivalent of finding money in last season’s coat pocket, but with way more caramelized goodness and zero lint.
20
dates15
minutes15
minutesIngredients
- For the dates:
- 20 Medjool dates, pitted
- 1 cup walnut halves
- For the glaze:
- 1/4 cup honey
- 1 tbsp unsalted butter
- 1/4 tsp flaky sea salt
Instructions
- Preheat your oven to 350°F and line a baking sheet with parchment paper.
- Stuff each pitted date with one walnut half, pressing gently to close—think of it as tucking a tiny, crunchy secret inside.
- Arrange the stuffed dates in a single layer on the prepared baking sheet, leaving a little space between each for even caramelization.
- In a small saucepan over medium heat, combine the honey and butter, stirring constantly until the butter melts and the mixture bubbles lightly, about 2–3 minutes. Tip: Don’t walk away—honey can go from golden to scorched in seconds!
- Drizzle the warm honey-butter mixture evenly over the dates, making sure each one gets a glossy coat.
- Sprinkle the flaky sea salt over the top for a salty-sweet contrast that’ll make your taste buds do a happy dance.
- Bake for 10–12 minutes, or until the dates are soft and the glaze is bubbling and lightly golden. Tip: Rotate the pan halfway through baking to avoid hot spots.
- Let the dates cool on the baking sheet for 5 minutes before serving—they’ll be molten lava hot straight out of the oven! Tip: For extra crunch, toast the walnuts in a dry skillet for 3–4 minutes before stuffing.
Ready to dive in? The dates emerge sticky and tender, with walnuts that stay satisfyingly crisp against the gooey honey glaze. Serve them warm over vanilla ice cream for a dessert that’s basically a hug in a bowl, or pile them onto a cheese board to impress your fanciest friends.
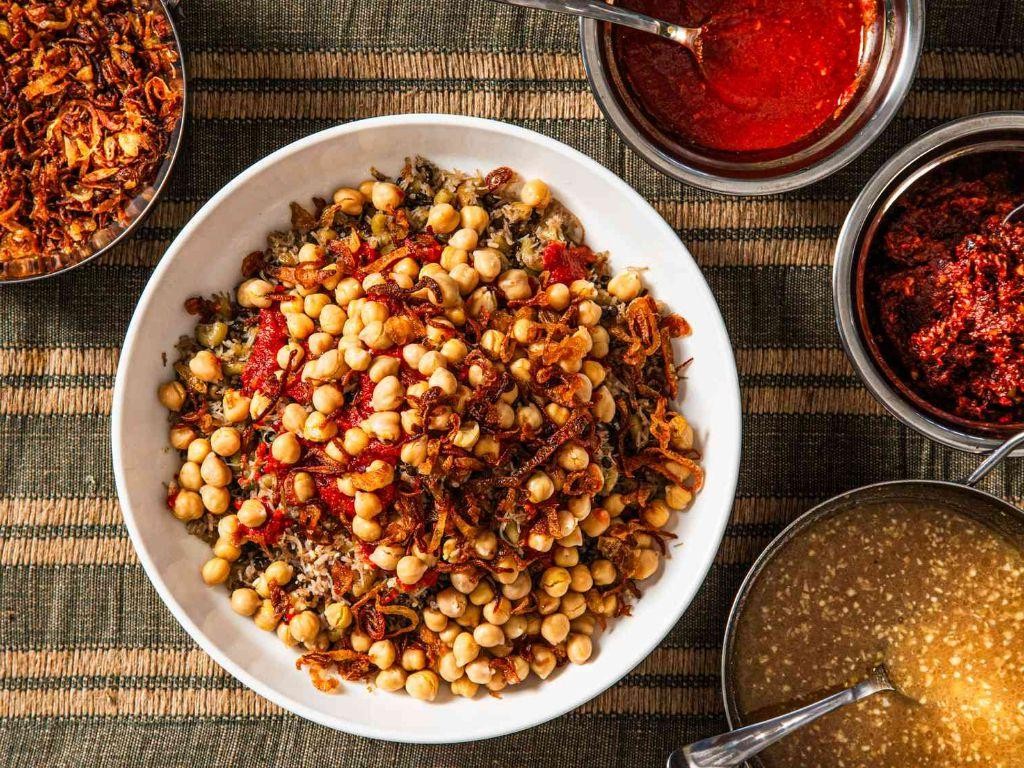
Traditional Ful Medames Breakfast

Grab your spoons, breakfast rebels! We’re diving fork-first into the Egyptian power breakfast that’s about to make your avocado toast weep with envy. This traditional ful medames is the ultimate cozy bowl of beany brilliance that’ll have you questioning why you ever settled for boring oatmeal.
5
servings10
minutes8
minutesIngredients
- For the bean base:
- 2 (15-ounce) cans fava beans, undrained
- 1/4 cup water
- 1 teaspoon ground cumin
- 1/2 teaspoon smoked paprika
- For the garlic-lemon punch:
- 3 cloves garlic, minced
- 1/4 cup fresh lemon juice
- 2 tablespoons extra virgin olive oil
- For the fresh finish:
- 1/4 cup chopped fresh parsley
- 2 hard-boiled eggs, peeled and halved
- 4 pita bread rounds, warmed
Instructions
- Combine the undrained fava beans, 1/4 cup water, 1 teaspoon ground cumin, and 1/2 teaspoon smoked paprika in a medium saucepan.
- Simmer the bean mixture over medium heat for 8 minutes, stirring occasionally with a wooden spoon until the liquid reduces by half.
- Mash about one-third of the beans directly in the pot using a potato masher while keeping the rest whole for texture variation.
- Whisk together 3 minced garlic cloves, 1/4 cup fresh lemon juice, and 2 tablespoons olive oil in a small bowl until emulsified.
- Pour the garlic-lemon dressing over the warm beans and stir thoroughly to incorporate all flavors.
- Divide the ful medames evenly among four shallow bowls using a ladle.
- Garnish each portion with 1 tablespoon of chopped fresh parsley scattered evenly over the surface.
- Place one halved hard-boiled egg beside the beans in each bowl for protein pairing.
- Serve immediately with warmed pita bread rounds for dipping and scooping.
Now that creamy, garlicky goodness is ready to rock your morning! The texture walks that perfect line between velvety mashed beans and satisfying whole bean bites, while the lemon cuts through the richness like a culinary superhero. Nothing beats tearing off a warm pita wedge to scoop up that glorious beany goodness while the yolk from your egg creates a golden sauce worthy of breakfast royalty.
Roasted Duck with Fig Sauce
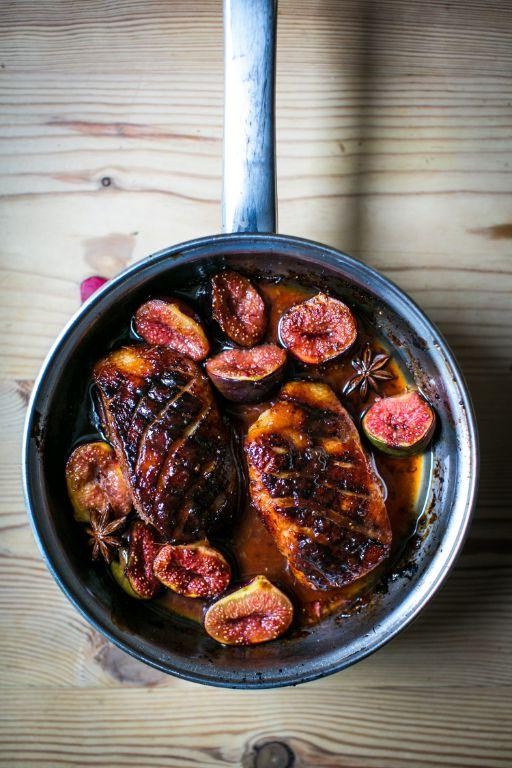
Kick your boring chicken dinners to the curb because we’re about to get fancy with a dish that’ll make you feel like a Michelin-starred chef without the student loan debt. Roasted duck with fig sauce is that dramatic friend who shows up to brunch in a sequined jacket—unapologetically luxurious, surprisingly easy to love, and guaranteed to steal the spotlight from any sad salad at the table. Get ready to impress your mother-in-law, your cat, or honestly just yourself with this showstopper.
2
servings20
minutes135
minutesIngredients
For the duck:
- 1 whole duck (5-6 lbs)
- 2 tbsp olive oil
- 1 tsp salt
- 1/2 tsp black pepper
- 4 garlic cloves, smashed
- 1 orange, quartered
For the fig sauce:
- 8 fresh figs, halved
- 1/2 cup red wine
- 1/4 cup honey
- 1 tbsp balsamic vinegar
- 1/2 cup chicken broth
- 2 tbsp butter
Instructions
- Preheat your oven to 375°F—this is not the time for lukewarm commitments.
- Pat the duck completely dry with paper towels, because crispy skin starts with a moisture-free bird.
- Rub the duck all over with olive oil, making sure to get into every nook and cranny like you’re applying sunscreen at the beach.
- Sprinkle salt and black pepper evenly over the entire duck, inside and out.
- Stuff the duck cavity with smashed garlic cloves and orange quarters—this creates steam that keeps the meat juicy while adding flavor from the inside out.
- Place the duck breast-side up on a rack in a roasting pan.
- Roast for 2 hours, or until the skin is golden brown and crispy when tapped.
- Check the internal temperature with a meat thermometer—it should read 165°F in the thickest part of the thigh.
- Remove the duck from the oven and let it rest for 15 minutes—this allows the juices to redistribute instead of ending up on your cutting board.
- While the duck rests, make the fig sauce by combining halved figs, red wine, honey, and balsamic vinegar in a saucepan.
- Bring the sauce mixture to a simmer over medium heat, stirring occasionally.
- Cook for 8-10 minutes until the figs have softened and the liquid has reduced by half.
- Add chicken broth and continue simmering for another 5 minutes.
- Remove the sauce from heat and swirl in butter until the sauce becomes glossy and slightly thickened.
- Carve the duck, serving it with the warm fig sauce drizzled over the top.
Forget everything you thought you knew about elegant dining—this duck delivers crackling-crisp skin that shatters like glass, revealing impossibly tender meat that practically falls off the bone. The fig sauce brings sweet, jammy notes that cut through the richness, creating a flavor symphony that’ll have you licking the plate. Serve it sliced over creamy polenta or alongside roasted root vegetables, and watch as your dinner guests suddenly remember all your good qualities.
Ancient Egyptian Tabbouleh Salad
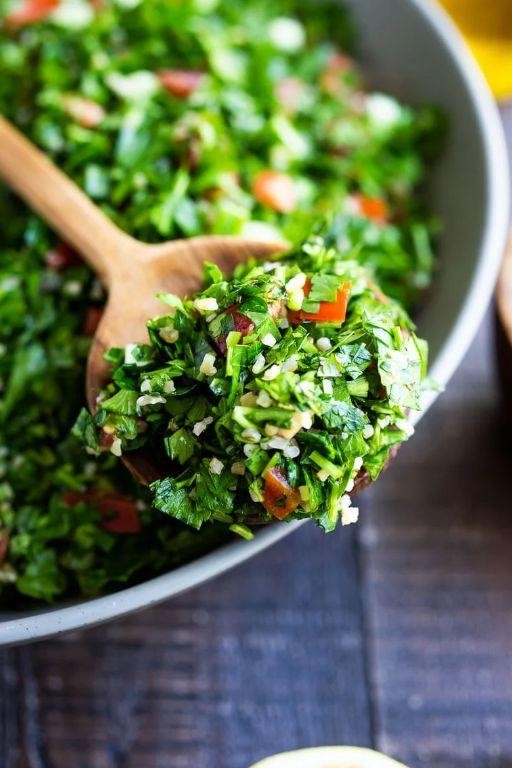
Who says ancient Egyptians didn’t know how to party? This isn’t your grandma’s tabbouleh—we’re talking about a salad so fresh, even Cleopatra would ditch her asp for a second helping. Get ready to time-travel with your taste buds to the Nile Delta, where parsley reigns supreme and bulgur wheat was basically ancient Egyptian quinoa.
2
servings30
minutesIngredients
For the Grain Base
- 1 cup fine bulgur wheat
- 1 ½ cups boiling water
For the Chopped Vegetables
- 2 cups finely chopped fresh parsley
- ½ cup finely chopped fresh mint
- 1 cup diced English cucumber
- 1 cup chopped cherry tomatoes
- ¼ cup finely chopped red onion
For the Dressing
- ¼ cup extra virgin olive oil
- 3 tablespoons fresh lemon juice
- ½ teaspoon salt
- ¼ teaspoon black pepper
Instructions
- Place 1 cup fine bulgur wheat in a medium heatproof bowl.
- Pour 1 ½ cups boiling water over the bulgur wheat.
- Cover the bowl tightly with plastic wrap and let sit for 25 minutes until the bulgur is tender and has absorbed all the liquid.
- While the bulgur rests, finely chop 2 cups fresh parsley until it resembles confetti.
- Finely chop ½ cup fresh mint leaves, being careful not to bruise them too much to preserve their bright flavor.
- Dice 1 cup English cucumber into ¼-inch pieces.
- Chop 1 cup cherry tomatoes into quarters.
- Finely chop ¼ cup red onion.
- In a small bowl, whisk together ¼ cup extra virgin olive oil, 3 tablespoons fresh lemon juice, ½ teaspoon salt, and ¼ teaspoon black pepper until emulsified.
- Fluff the soaked bulgur wheat with a fork to separate the grains.
- Combine the bulgur wheat, chopped parsley, mint, cucumber, tomatoes, and red onion in a large mixing bowl.
- Pour the dressing over the salad mixture.
- Toss everything together gently but thoroughly until evenly coated.
- Chill the salad in the refrigerator for at least 30 minutes before serving to allow the flavors to meld.
This salad delivers a satisfying crunch from the fresh vegetables against the tender bulgur base, while the lemon dressing provides a zesty kick that cuts through the earthy herbs. Try serving it in lettuce cups for a low-carb option or alongside grilled chicken for a complete meal that would make even the Sphinx smile.
Sesame Crusted Fish with Herbs

Tired of fish that’s about as exciting as watching paint dry? This sesame-crusted wonder is here to rescue your taste buds from culinary boredom with a crunch that’ll make you forget all about those sad, plain fillets of yore.
5
servings10
minutes15
minutesIngredients
For the Fish
– 4 (6-ounce) white fish fillets (such as cod or tilapia)
– 2 tablespoons olive oil
– 1 teaspoon salt
– ½ teaspoon black pepper
For the Sesame Crust
– ½ cup white sesame seeds
– ¼ cup black sesame seeds
– 2 tablespoons fresh parsley, finely chopped
– 1 tablespoon fresh dill, finely chopped
– 1 teaspoon garlic powder
Instructions
1. Preheat your oven to 400°F and line a baking sheet with parchment paper.
2. Pat the fish fillets completely dry with paper towels—this ensures maximum crispiness.
3. Brush both sides of each fillet with olive oil using a pastry brush.
4. Sprinkle salt and black pepper evenly over both sides of the fillets.
5. Combine white sesame seeds, black sesame seeds, parsley, dill, and garlic powder in a shallow dish.
6. Press the top of each fillet firmly into the sesame mixture, coating one side completely.
7. Place the fillets crust-side up on the prepared baking sheet.
8. Bake for 12-15 minutes until the crust is golden brown and the fish flakes easily with a fork.
9. Check for doneness by inserting a fork at the thickest part—the flesh should be opaque and separate easily.
10. Let the fish rest for 2 minutes before serving to allow juices to redistribute.
Outrageously crunchy on the outside and tender within, this fish delivers a nutty sesame punch that pairs beautifully with citrus-dressed greens or atop a bed of coconut rice. The black and white seeds create visual drama that’ll make your dinner guests think you graduated from culinary school!
Savory Spinach and Chickpea Stew

Gather ’round, hungry humans, because this isn’t just another stew—it’s a cozy hug in a bowl that’ll make your taste buds do a happy dance while your spinach-phobic cousin finally admits greens can be glorious. Seriously, this savory spinach and chickpea stew is so effortlessly delicious, you’ll wonder why you ever settled for sad, soupy imitations.
5
servings10
minutes25
minutesIngredients
For the base:
– 2 tbsp olive oil
– 1 large yellow onion, diced
– 3 garlic cloves, minced
– 1 tsp ground cumin
– 1/2 tsp smoked paprika
For the stew:
– 2 (15 oz) cans chickpeas, drained and rinsed
– 1 (28 oz) can crushed tomatoes
– 2 cups vegetable broth
– 8 oz fresh spinach
– 1 tbsp lemon juice
– 1/2 tsp salt
– 1/4 tsp black pepper
Instructions
1. Heat 2 tbsp olive oil in a large pot over medium heat for 1 minute until shimmering.
2. Add 1 diced yellow onion and cook for 5 minutes, stirring occasionally, until translucent.
3. Stir in 3 minced garlic cloves and cook for 30 seconds until fragrant.
4. Add 1 tsp ground cumin and 1/2 tsp smoked paprika, toasting the spices for 30 seconds to deepen their flavor.
5. Pour in 2 cans of drained chickpeas, stirring to coat them in the spiced onion mixture.
6. Add 1 can crushed tomatoes and 2 cups vegetable broth, scraping any browned bits from the pot bottom.
7. Bring the stew to a boil, then reduce heat to low and simmer uncovered for 15 minutes.
8. Stir in 8 oz fresh spinach in two batches, waiting until the first wilts before adding the second.
9. Cook for 3 more minutes until all spinach is wilted and bright green.
10. Remove from heat and stir in 1 tbsp lemon juice, 1/2 tsp salt, and 1/4 tsp black pepper.
Who knew something so simple could deliver such complex comfort? The chickpeas stay wonderfully firm against the silky spinach, while the smoked paprika adds a subtle smokiness that plays beautifully with the bright lemon finish. Try serving it over creamy polenta or with crusty bread for maximum stew-sopping satisfaction—your bowl will thank you.
Whole Wheat Pita with Olive Oil

Ditch those store-bought cardboard discs masquerading as pita bread, because today we’re making the real deal—fluffy, warm whole wheat pita that’s basically a hug for your taste buds, with a generous drizzle of olive oil that’ll make you wonder why you ever settled for less.
8
pitas20
minutes16
minutesIngredients
- For the dough:
- 2 cups whole wheat flour
- 1 cup all-purpose flour
- 1 packet (2 ¼ tsp) active dry yeast
- 1 tsp granulated sugar
- 1 ¼ cups warm water (110°F)
- 1 tsp salt
- 2 tbsp olive oil
- For finishing:
- 2 tbsp olive oil (for brushing)
- 1 tsp flaky sea salt
Instructions
- Combine 1 cup warm water (110°F), 1 packet active dry yeast, and 1 tsp granulated sugar in a large bowl.
- Let the mixture sit for 5 minutes until frothy—this means your yeast is alive and ready to party.
- Add 2 cups whole wheat flour, 1 cup all-purpose flour, 1 tsp salt, and 2 tbsp olive oil to the bowl.
- Mix with a wooden spoon until a shaggy dough forms.
- Knead the dough on a floured surface for 8 minutes until smooth and elastic—don’t skimp here, or your pitas will be tough!
- Place the dough in a lightly oiled bowl, cover with a damp towel, and let it rise in a warm spot for 1 hour until doubled in size.
- Punch down the dough to release any air bubbles.
- Divide the dough into 8 equal pieces and roll each into a ball.
- Cover the balls with the damp towel and let them rest for 10 minutes.
- Roll each ball into a ¼-inch thick circle using a rolling pin.
- Heat a dry cast-iron skillet over medium-high heat until a drop of water sizzles immediately.
- Cook one pita at a time for 1 minute until bubbles form and the bottom has golden spots.
- Flip the pita and cook for another 1 minute until puffed and lightly charred—if it doesn’t puff, your skillet might not be hot enough, so crank it up!
- Brush the warm pitas with 2 tbsp olive oil and sprinkle with 1 tsp flaky sea salt.
Outrageously fluffy with a nutty whole wheat flavor, these pitas have a tender crumb and crisp edges that are perfect for tearing and dipping into hummus or stuffing with grilled veggies for a handheld feast.
Sweet Hibiscus Drink (Karkade)

Tired of the same old boring beverages? Let’s shake things up with this vibrant Sweet Hibiscus Drink, also known as Karkade—a tart, floral, and refreshingly sweet concoction that’s basically a tropical vacation in a glass, minus the sunburn and questionable souvenir t-shirts.
2
servings15
minutes10
minutesIngredients
For the hibiscus base:
– 1 cup dried hibiscus flowers
– 4 cups cold water
For sweetening and serving:
– 1/2 cup granulated sugar
– 1/4 cup fresh lime juice
– Ice cubes
– Fresh mint sprigs (for garnish)
Instructions
1. Place 1 cup dried hibiscus flowers in a medium saucepan.
2. Pour 4 cups cold water over the hibiscus flowers.
3. Bring the mixture to a boil over high heat, then immediately reduce to a simmer.
4. Simmer for exactly 10 minutes—this extracts maximum flavor without bitterness.
5. Strain the liquid through a fine-mesh sieve into a heatproof pitcher, pressing gently on the flowers to extract all their ruby-red goodness.
6. Discard the spent hibiscus flowers.
7. Add 1/2 cup granulated sugar to the hot hibiscus liquid and stir continuously until completely dissolved.
8. Stir in 1/4 cup fresh lime juice until well combined.
9. Refrigerate the mixture for at least 2 hours, or until thoroughly chilled—patience rewards you with optimal refreshment.
10. Fill glasses with ice cubes to the brim.
11. Pour the chilled hibiscus drink over the ice.
12. Garnish each glass with fresh mint sprigs for an aromatic flourish.
This stunning crimson elixir delivers a perfect balance of tart hibiscus tang and bright citrus sweetness, with a smooth, refreshing finish that dances across your palate. Serve it over plenty of ice with extra lime wedges for squeezing, or get fancy by rimming glasses with sugar and chili powder for a sweet-spicy kick that’ll make your taste buds do a happy dance.
Baked Couscous with Vegetables

Gather ’round, hungry humans, because we’re about to transform your average Tuesday into a flavor fiesta with this baked couscous situation that’s so good, it might just make your oven jealous. Get ready for a veggie-packed party in a pan that requires minimal effort but delivers maximum deliciousness—because who has time for complicated when hungry is knocking?
4
servings15
minutes32
minutesIngredients
For the Vegetable Base
– 1 tbsp olive oil
– 1 medium yellow onion, diced
– 2 cloves garlic, minced
– 1 red bell pepper, diced
– 1 zucchini, diced
– 1 cup cherry tomatoes, halved
For the Couscous Mixture
– 1 cup couscous
– 1 ½ cups vegetable broth
– 1 tsp dried oregano
– ½ tsp salt
– ¼ tsp black pepper
For Topping
– ½ cup crumbled feta cheese
– 2 tbsp chopped fresh parsley
Instructions
1. Preheat your oven to 375°F and grab a 9×13 inch baking dish.
2. Heat 1 tbsp olive oil in a large skillet over medium heat until it shimmers.
3. Add 1 diced yellow onion and cook for 4-5 minutes until translucent.
4. Stir in 2 minced garlic cloves and cook for 30 seconds until fragrant.
5. Add 1 diced red bell pepper and 1 diced zucchini, cooking for 5 minutes until slightly softened.
6. Toss in 1 cup halved cherry tomatoes and cook for 2 more minutes.
7. Transfer the vegetable mixture to your prepared baking dish and spread evenly.
8. Sprinkle 1 cup couscous evenly over the vegetables.
9. Pour 1 ½ cups vegetable broth over the couscous, making sure all grains are moistened.
10. Season with 1 tsp dried oregano, ½ tsp salt, and ¼ tsp black pepper, stirring gently to combine.
11. Cover the baking dish tightly with aluminum foil.
12. Bake at 375°F for 20 minutes until the couscous has absorbed all the liquid.
13. Remove from oven and let sit covered for 5 minutes—this allows the couscous to steam to perfection.
14. Fluff the baked couscous with a fork to separate the grains.
15. Top with ½ cup crumbled feta cheese and 2 tbsp chopped fresh parsley.
Seriously, this dish emerges from the oven with couscous that’s miraculously fluffy and vegetables that maintain just enough crunch. The feta adds a salty punch that plays beautifully against the sweet roasted tomatoes, making it equally fabulous as a main event or a spectacular sidekick to grilled chicken.
Nut and Date Energy Balls

Oh, the eternal struggle between wanting something delicious and not wanting to actually cook—we feel you. That’s why these no-bake nut and date energy balls are basically edible superheroes, here to save your snack time from the clutches of boring and complicated.
24
balls20
minutesIngredients
For the Base:
– 1 cup pitted Medjool dates
– 1 cup raw almonds
– 1/2 cup raw walnuts
– 1/4 cup unsweetened shredded coconut
For Binding & Flavor:
– 2 tablespoons almond butter
– 1 tablespoon chia seeds
– 1 teaspoon vanilla extract
– 1/4 teaspoon sea salt
Instructions
1. Place 1 cup pitted Medjool dates in a medium heatproof bowl.
2. Pour boiling water over the dates until they are just covered.
3. Let the dates soak for exactly 10 minutes to soften them.
4. Drain the dates completely, pressing out any excess water with the back of a spoon.
5. Add 1 cup raw almonds and 1/2 cup raw walnuts to a food processor.
6. Pulse the nuts for 15-20 seconds until they form coarse crumbs.
7. Add the softened dates, 1/4 cup unsweetened shredded coconut, 2 tablespoons almond butter, 1 tablespoon chia seeds, 1 teaspoon vanilla extract, and 1/4 teaspoon sea salt to the food processor.
8. Process the mixture on high speed for 45-60 seconds until it forms a sticky, uniform dough that pulls away from the sides.
9. Scoop 1 tablespoon of the mixture and roll it between your palms to form a tight 1-inch ball.
10. Repeat with the remaining mixture, placing the balls on a parchment-lined baking sheet.
11. Refrigerate the energy balls for at least 30 minutes, or until firm to the touch.
12. Transfer the chilled balls to an airtight container.
Just imagine biting into these chewy, nutty wonders—they’re like little flavor explosions that somehow manage to be both decadent and virtuous. Try rolling the finished balls in extra coconut or cacao powder for a fancy-pants presentation, or just eat them straight from the fridge while standing in that glorious snack-time limbo between meals.
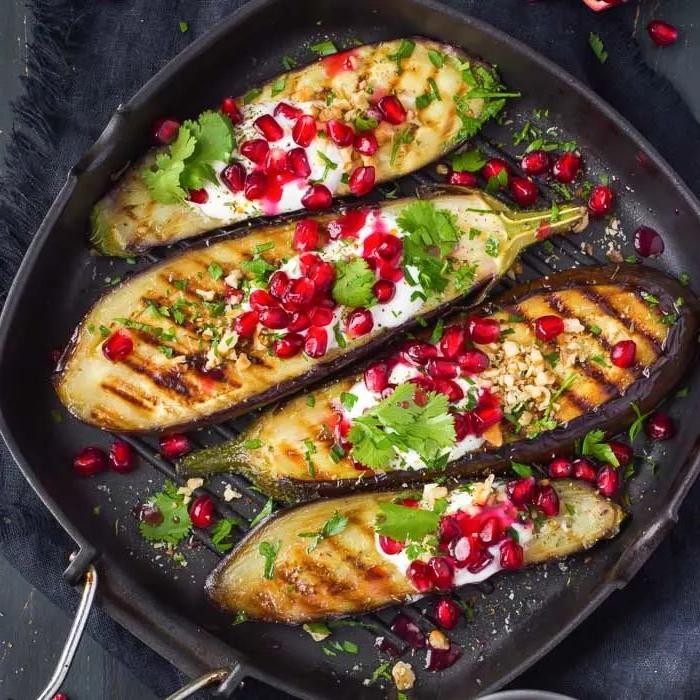
Grilled Eggplant with Garlic Yogurt
Tired of the same old veggie sides that make your taste buds yawn louder than a napping cat? This grilled eggplant with garlic yogurt is here to rescue your dinner from flavor boredom, transforming humble ingredients into a smoky, creamy masterpiece that’ll have you doing a happy dance by the grill. Trust me, it’s so good even the meat-lovers at your table will be begging for seconds!
3
servings15
minutes10
minutesIngredients
For the eggplant:
– 2 medium eggplants, sliced into 1/2-inch thick rounds
– 3 tablespoons olive oil
– 1 teaspoon kosher salt
– 1/2 teaspoon black pepper
For the garlic yogurt sauce:
– 1 cup plain Greek yogurt
– 2 cloves garlic, minced
– 2 tablespoons fresh lemon juice
– 1/4 teaspoon salt
For garnish:
– 2 tablespoons chopped fresh mint
– 1 tablespoon toasted pine nuts
Instructions
1. Preheat your grill to medium-high heat (about 400°F).
2. Brush both sides of each eggplant slice with olive oil using a pastry brush.
3. Sprinkle salt and black pepper evenly over both sides of the eggplant slices.
4. Place eggplant slices directly on the grill grates and cook for 4-5 minutes.
5. Flip each slice using tongs when grill marks appear and the bottom is tender.
6. Cook for another 4-5 minutes until the eggplant is soft and lightly charred.
7. Remove eggplant from grill and arrange on a serving platter.
8. Combine Greek yogurt, minced garlic, lemon juice, and salt in a small bowl.
9. Whisk the yogurt mixture vigorously for 30 seconds until smooth and creamy.
10. Spoon the garlic yogurt sauce over the warm grilled eggplant.
11. Sprinkle chopped mint and toasted pine nuts evenly over the top.
12. Let the dish rest for 2 minutes before serving to allow flavors to meld.
Lusciously creamy yogurt meets smoky, tender eggplant in a texture party that’s both sophisticated and downright addictive. The charred edges give way to silky interiors while the cool garlic sauce provides the perfect zesty contrast. Try stacking these beauties on crusty bread for an open-faced sandwich, or serve them alongside grilled chicken for a meal that’ll make your ordinary Tuesday feel like a fancy restaurant night!
Royal Honey Cake with Almonds

Every time I bake this majestic masterpiece, I feel like I should be wearing a crown and speaking with a British accent—it’s that regal. This honey cake with almonds is basically the dessert equivalent of finding out you’re secretly royalty, except you get to eat the evidence instead of dealing with paparazzi.
8
servings20
minutes28
minutesIngredients
For the Cake Layers:
– 2 cups all-purpose flour
– 1 tsp baking soda
– 1/2 tsp salt
– 3/4 cup honey
– 1/2 cup unsalted butter, softened
– 2 large eggs
– 1/2 cup buttermilk
For the Frosting & Assembly:
– 8 oz cream cheese, softened
– 1/4 cup honey
– 1 cup sliced almonds, toasted
Instructions
1. Preheat your oven to 350°F and grease two 8-inch round cake pans.
2. Whisk together 2 cups all-purpose flour, 1 tsp baking soda, and 1/2 tsp salt in a medium bowl.
3. Beat 3/4 cup honey and 1/2 cup softened unsalted butter with an electric mixer on medium speed for 3 minutes until fluffy.
4. Add 2 large eggs one at a time, beating for 30 seconds after each addition.
5. Alternate adding the flour mixture and 1/2 cup buttermilk to the butter mixture, beginning and ending with flour, mixing just until combined after each addition.
6. Divide the batter evenly between the prepared pans and smooth the tops with a spatula.
7. Bake for 25–28 minutes until a toothpick inserted into the center comes out clean.
8. Cool the cakes in the pans on a wire rack for 10 minutes, then turn them out onto the rack to cool completely.
9. Toast 1 cup sliced almonds in a dry skillet over medium heat for 4–5 minutes, stirring constantly, until golden and fragrant.
10. Beat 8 oz softened cream cheese and 1/4 cup honey with an electric mixer on medium speed for 2 minutes until smooth.
11. Place one cake layer on a serving plate and spread half of the cream cheese frosting over the top.
12. Top with the second cake layer and spread the remaining frosting over the top and sides.
13. Press the toasted sliced almonds onto the sides of the cake, covering them completely.
14. Refrigerate the cake for at least 1 hour before slicing to allow the frosting to set.
15. Slice with a sharp knife dipped in hot water for clean cuts.
Just imagine slicing into this beauty: the tender, honey-kissed layers give way to a tangy cream cheese hug, while the crunchy almonds add a nutty encore that’ll have you bowing to your own baking skills. Serve it with a dollop of whipped cream and a drizzle of extra honey for a truly sovereign dessert experience.
Conclusion
Zesty flavors await in these 30 authentic Ancient Egyptian recipes! From honey-drenched breads to savory stews, each dish offers a delicious taste of history. I hope you’ll try these ancient treasures in your modern kitchen—they’re surprisingly accessible and wonderfully flavorful. Share your favorite recipe in the comments below, and don’t forget to pin this article to your Pinterest boards for future culinary adventures!


