Just because you’re managing diabetes doesn’t mean you have to sacrifice flavor or fun in the kitchen! We’ve gathered 32 delicious, diabetic-friendly meals that prove healthy eating can be exciting and satisfying. From quick weeknight dinners to comforting classics, these recipes are designed to keep your taste buds happy and your blood sugar steady. Dive in and discover your new favorite dishes!
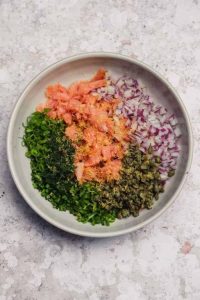
Savory Herb-Crusted Salmon
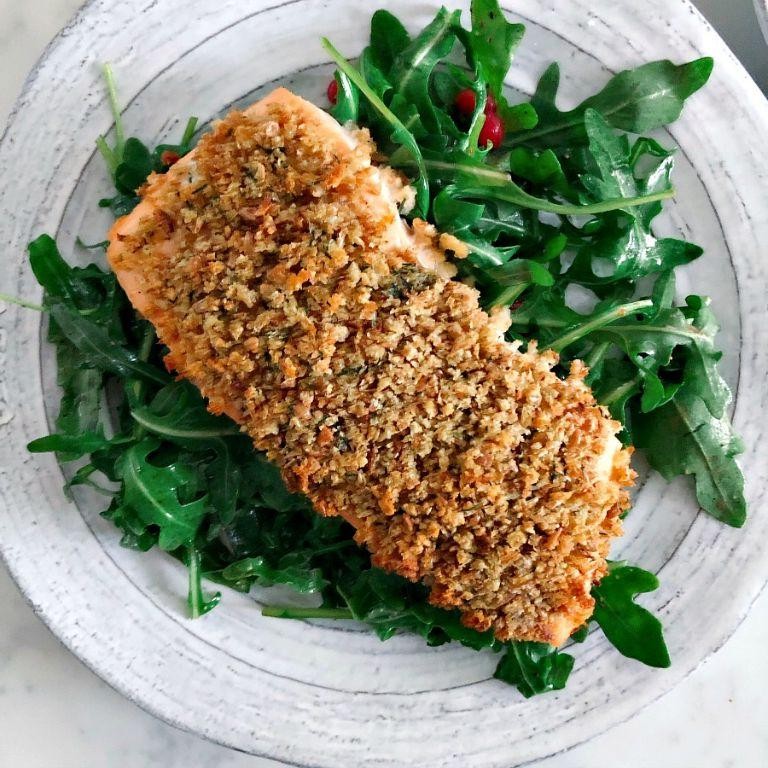
Gosh, I still remember the first time I tried this salmon at a friend’s potluck—it was so flavorful and tender that I begged for the recipe! Now it’s my go-to for easy weeknight dinners or when I want to impress guests without spending hours in the kitchen. Honestly, it’s become such a staple that I’ve tweaked the herb mix over the years to suit my taste, and I think you’ll love this version too.
Serving: 4 | Pre Time: 15 minutes | Cooking Time: 12 minutes
Ingredients
– 4 salmon fillets (about 6 oz each, skin-on or skinless—I prefer skin-on for extra crispiness)
– 1/4 cup extra virgin olive oil (my go-to for its fruity flavor)
– 1/4 cup panko breadcrumbs (they give a lighter crunch than regular breadcrumbs)
– 2 tbsp fresh parsley, finely chopped (I always grab a bunch from my little herb garden)
– 1 tbsp fresh dill, finely chopped (dried works in a pinch, but fresh makes all the difference)
– 1 tsp garlic powder (I use this instead of fresh garlic to avoid burning)
– 1/2 tsp salt (I like sea salt for its clean taste)
– 1/4 tsp black pepper (freshly ground if possible)
– 1 lemon, cut into wedges (for serving—it brightens up the whole dish)
Instructions
1. Preheat your oven to 400°F and line a baking sheet with parchment paper—this prevents sticking and makes cleanup a breeze.
2. Pat the salmon fillets dry with paper towels to ensure the crust adheres well; place them skin-side down on the prepared baking sheet.
3. In a small bowl, combine the panko breadcrumbs, parsley, dill, garlic powder, salt, and pepper, mixing thoroughly with a fork.
4. Drizzle the olive oil evenly over the top of each salmon fillet, using about 1 tbsp per fillet.
5. Press the herb-breadcrumb mixture firmly onto the oiled tops of the salmon, coating them completely in a thick layer.
6. Bake the salmon in the preheated oven for 10–12 minutes, until the crust is golden brown and the internal temperature reaches 145°F on an instant-read thermometer.
7. Remove the baking sheet from the oven and let the salmon rest for 2–3 minutes to allow the juices to redistribute.
8. Serve the salmon immediately with lemon wedges on the side for squeezing over the top.
Finally, this salmon comes out with a wonderfully crispy herb crust that gives way to flaky, moist flesh inside—the garlic and dill really shine through without overpowering the fish. I love pairing it with a simple arugula salad or roasted veggies for a complete meal that feels both elegant and effortless.
Grilled Lemon Garlic Chicken
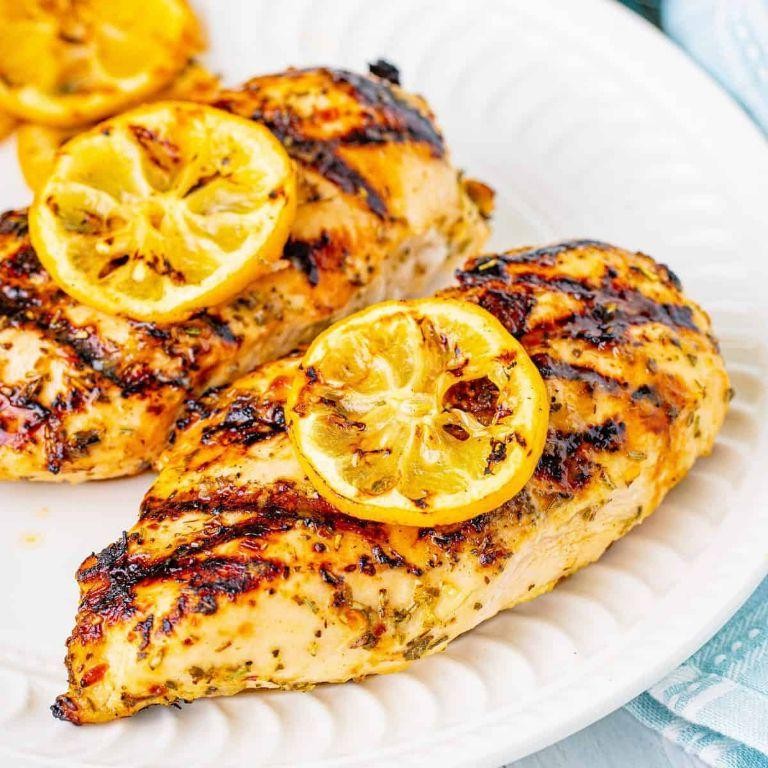
Remember those summer evenings when the grill is fired up and you just want something simple yet bursting with flavor? That’s exactly where this Grilled Lemon Garlic Chicken comes in—it’s my go-to for a quick, satisfying meal that always impresses, whether I’m feeding my family or hosting a casual backyard get-together.
Serving: 4 | Pre Time: 15 minutes | Cooking Time: 20 minutes
Ingredients
– 4 boneless, skinless chicken breasts (I like to buy them from my local butcher for better quality)
– 1/4 cup extra virgin olive oil (my go-to for its rich flavor)
– 3 tbsp fresh lemon juice (about 1 large lemon, squeezed right before using for maximum zest)
– 4 cloves garlic, minced (I always use fresh—it makes all the difference)
– 1 tsp dried oregano
– 1/2 tsp salt (I prefer sea salt for a cleaner taste)
– 1/4 tsp black pepper, freshly ground
– 1 lemon, sliced into rounds (for garnish and extra citrus punch)
Instructions
1. In a medium bowl, whisk together 1/4 cup extra virgin olive oil, 3 tbsp fresh lemon juice, 4 cloves minced garlic, 1 tsp dried oregano, 1/2 tsp salt, and 1/4 tsp black pepper until well combined.
2. Place 4 boneless, skinless chicken breasts in a large resealable plastic bag or shallow dish, then pour the marinade over them, ensuring each piece is fully coated. Tip: Let the chicken marinate in the refrigerator for at least 30 minutes—or up to 4 hours for deeper flavor—but don’t overdo it, as the acid can start to toughen the meat.
3. Preheat your grill to medium-high heat, about 400°F, and lightly oil the grates to prevent sticking.
4. Remove the chicken from the marinade, shaking off any excess, and discard the leftover marinade for food safety.
5. Place the chicken breasts on the preheated grill and cook for 6-8 minutes per side, or until the internal temperature reaches 165°F when checked with a meat thermometer. Tip: Avoid flipping the chicken more than once to get those perfect grill marks and keep it juicy.
6. During the last 2 minutes of grilling, add 1 lemon sliced into rounds to the grill and cook until lightly charred, about 1-2 minutes per side, for a smoky garnish. Tip: Let the chicken rest for 5 minutes after grilling—this allows the juices to redistribute, making each bite tender and moist.
7. Serve the grilled chicken immediately, topped with the charred lemon slices. Lightly charred and infused with zesty garlic, this chicken boasts a tender, juicy interior that pairs beautifully with a fresh salad or roasted veggies—I love slicing it over a bed of quinoa for a complete, wholesome meal that’s as versatile as it is delicious.
Zesty Quinoa Salad with Avocado
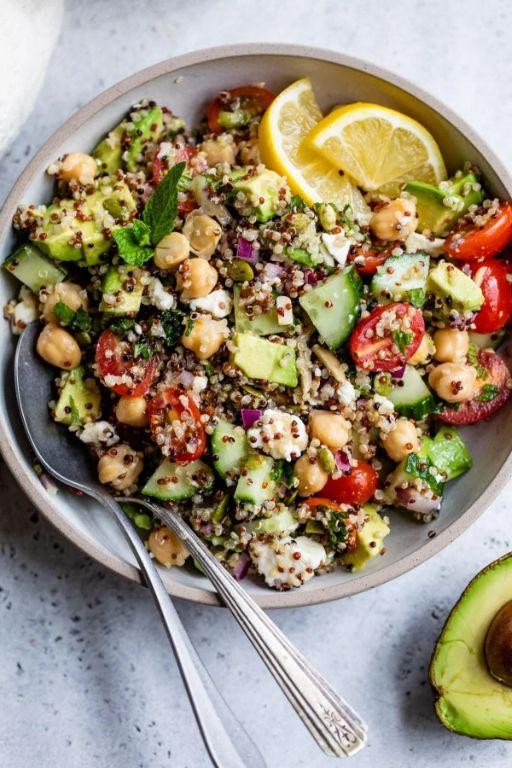
Ooh, this quinoa salad has become my go-to lunch prep hero—it’s bright, filling, and holds up beautifully in the fridge. I first whipped it up during a busy week when I needed something quick yet satisfying, and now it’s a staple in my kitchen. The combination of zesty lime and creamy avocado just hits the spot every time.
Serving: 4 | Pre Time: 15 minutes | Cooking Time: 15 minutes
Ingredients
– 1 cup quinoa, rinsed well (I always rinse to remove any bitterness)
– 2 cups water
– 2 ripe avocados, diced (I like them just soft enough to hold their shape)
– 1 cup cherry tomatoes, halved (they add a sweet pop)
– 1/4 cup fresh cilantro, chopped (my favorite herb for a fresh kick)
– 1/4 cup extra virgin olive oil (my go-to for dressings)
– 3 tbsp fresh lime juice (from about 2 limes, squeezed right before using)
– 1/2 tsp salt
– 1/4 tsp black pepper
Instructions
1. In a medium saucepan, combine 1 cup rinsed quinoa and 2 cups water. Bring to a boil over high heat.
2. Reduce heat to low, cover the saucepan, and simmer for 15 minutes until the quinoa is tender and the water is absorbed. Tip: Let it sit covered off the heat for 5 minutes to fluff up perfectly.
3. While the quinoa cooks, dice 2 ripe avocados and halve 1 cup cherry tomatoes, placing them in a large bowl.
4. Chop 1/4 cup fresh cilantro and add it to the bowl with the avocados and tomatoes.
5. In a small bowl, whisk together 1/4 cup extra virgin olive oil, 3 tbsp fresh lime juice, 1/2 tsp salt, and 1/4 tsp black pepper until well combined. Tip: Whisk vigorously to emulsify the dressing for a smoother texture.
6. Once the quinoa is cooked and slightly cooled, transfer it to the large bowl with the avocado mixture.
7. Pour the dressing over the quinoa and vegetables, then gently toss everything together until evenly coated. Tip: Fold gently to keep the avocado pieces intact for a nicer presentation.
8. Serve immediately or chill in the refrigerator for up to 30 minutes to let the flavors meld.
Enjoy this salad fresh—the fluffy quinoa contrasts wonderfully with the creamy avocado, and the lime dressing adds a zesty brightness that’s irresistible. It’s fantastic on its own or paired with grilled chicken for a heartier meal.
Turkey and Spinach Stuffed Peppers

Unbelievably easy yet impressive, these Turkey and Spinach Stuffed Peppers have become my go-to weeknight dinner—they’re the kind of meal that feels special without keeping me in the kitchen for hours. I first whipped them up during a busy holiday season when I needed something hearty and healthy, and now they’re a regular in my rotation, perfect for using up leftover turkey or just craving a cozy, veggie-packed dish.
Serving: 4 | Pre Time: 15 minutes | Cooking Time: 30 minutes
Ingredients
– 4 large bell peppers (I like a mix of red and green for color, but any will do—just make sure they can stand upright!)
– 1 lb ground turkey (I opt for lean ground turkey here to keep it light, but regular works too)
– 1 cup fresh spinach, roughly chopped (baby spinach is my favorite because it’s tender and quick to wilt)
– 1 cup cooked rice (I use white rice for fluffiness, but brown rice adds a nice nutty twist)
– 1/2 cup shredded mozzarella cheese (I always grab part-skim mozzarella for that melty goodness without too much fat)
– 1/4 cup diced onion (yellow onion is my go-to for its mild sweetness)
– 2 cloves garlic, minced (fresh garlic makes all the difference—I mince it finely to avoid any bitter bites)
– 1 tbsp extra virgin olive oil (this is my kitchen staple for sautéing; it adds a subtle fruity note)
– 1 tsp dried oregano (I keep a jar in my pantry for that classic herb flavor)
– Salt and black pepper (I season in layers, so don’t be shy with the pepper!)
Instructions
1. Preheat your oven to 375°F (190°C) to ensure it’s ready for baking.
2. Slice the tops off the bell peppers and remove the seeds and membranes, then place them upright in a baking dish. (Tip: Save the pepper tops—you can chop them and add to the filling for extra flavor!)
3. In a large skillet, heat the extra virgin olive oil over medium heat until it shimmers, about 1 minute.
4. Add the diced onion to the skillet and sauté for 3–4 minutes until it becomes translucent and soft.
5. Stir in the minced garlic and cook for 1 minute until fragrant, being careful not to let it burn.
6. Add the ground turkey to the skillet, breaking it up with a spoon, and cook for 5–7 minutes until it’s no longer pink and fully browned.
7. Mix in the chopped spinach and cook for 2 minutes until it wilts down and blends with the turkey. (Tip: Wilt the spinach quickly to retain its vibrant green color and nutrients.)
8. Remove the skillet from heat and stir in the cooked rice, dried oregano, salt, and black pepper until everything is well combined.
9. Spoon the turkey and spinach mixture evenly into the prepared bell peppers, packing it down lightly.
10. Top each stuffed pepper with shredded mozzarella cheese, dividing it equally among them.
11. Cover the baking dish with aluminum foil and bake in the preheated oven for 20 minutes. (Tip: Covering with foil helps steam the peppers so they become tender without drying out.)
12. Remove the foil and bake for an additional 10 minutes until the cheese is melted and bubbly and the peppers are fork-tender.
13. Let the stuffed peppers cool for 5 minutes before serving to allow the flavors to settle.
Mouthwatering and satisfying, these peppers come out with a tender-crisp texture that holds up to the savory filling, while the melted cheese adds a creamy finish. I love serving them with a simple side salad or over a bed of quinoa for an extra protein boost—they’re versatile enough to shine at any dinner table!
Hearty Lentil and Vegetable Soup
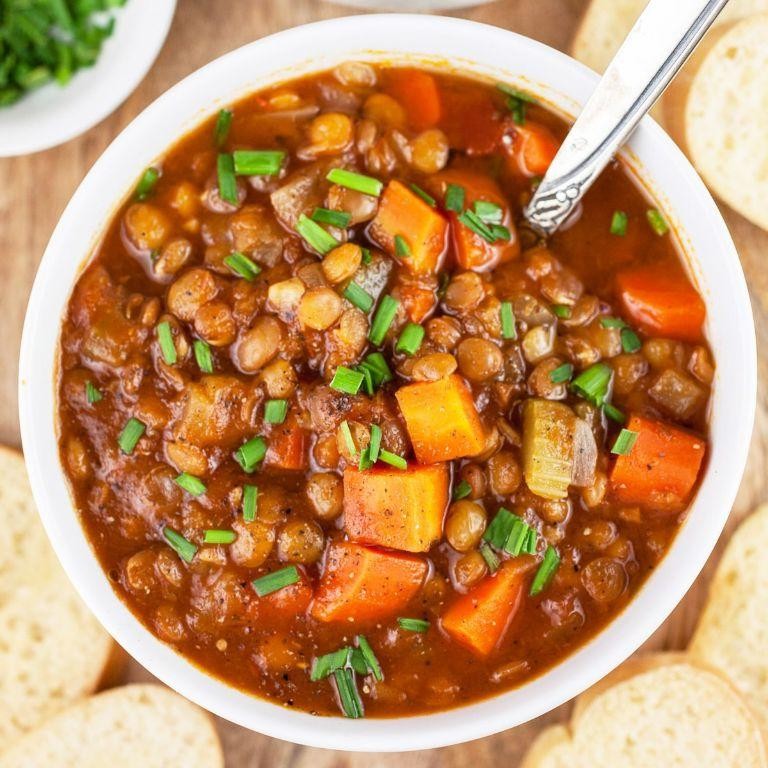
Just when the winter chill starts to creep in, I find myself craving a bowl of something deeply nourishing and simple to make. This Hearty Lentil and Vegetable Soup is my go-to for those cozy nights in, and it always reminds me of the big pot my grandma used to keep simmering on her stove all afternoon.
Serving: 6 | Pre Time: 15 minutes | Cooking Time: 45 minutes
Ingredients
– 2 tablespoons of extra virgin olive oil (my go-to for its rich flavor)
– 1 large yellow onion, diced (I find a sweet yellow onion works best here)
– 3 cloves of garlic, minced (freshly minced makes all the difference)
– 2 large carrots, peeled and diced into 1/2-inch pieces
– 2 celery stalks, diced (I like to include the leaves for extra herbiness)
– 1 cup of dried brown lentils, rinsed and picked over (rinsing removes any debris)
– 6 cups of low-sodium vegetable broth (I prefer low-sodium to control the salt level myself)
– 1 (14.5-ounce) can of diced tomatoes, undrained
– 1 teaspoon of dried thyme
– 1 bay leaf
– Salt and freshly ground black pepper (I always grind my pepper fresh for more aroma)
Instructions
1. Heat 2 tablespoons of extra virgin olive oil in a large Dutch oven or heavy-bottomed pot over medium heat for 1 minute until shimmering.
2. Add 1 large diced yellow onion and cook, stirring occasionally, for 5 minutes until softened and translucent.
3. Add 3 minced garlic cloves and cook, stirring constantly, for 1 minute until fragrant to prevent burning.
4. Stir in 2 diced carrots and 2 diced celery stalks, and cook for 5 minutes, stirring occasionally, until they begin to soften.
5. Pour in 1 cup of rinsed brown lentils, 6 cups of low-sodium vegetable broth, 1 can of undrained diced tomatoes, 1 teaspoon of dried thyme, and 1 bay leaf.
6. Increase the heat to high and bring the mixture to a boil, which should take about 5-7 minutes.
7. Once boiling, reduce the heat to low, cover the pot with a lid, and simmer for 30 minutes, stirring halfway through to prevent sticking.
8. After 30 minutes, remove the lid and check if the lentils are tender by tasting a few; they should be soft but not mushy.
9. Discard the bay leaf, then season the soup with salt and freshly ground black pepper to your preference, starting with 1/2 teaspoon of salt and adjusting as needed.
10. Ladle the hot soup into bowls and serve immediately.
Warm and comforting, this soup has a thick, stew-like texture with tender lentils and vegetables that meld together beautifully. The flavors are earthy and savory, perfect for dunking a crusty piece of bread or topping with a dollop of Greek yogurt for a creamy contrast.
Spicy Black Bean Tacos with Mango Salsa

Now, I’ll be honest—I used to think tacos were strictly a summer thing, but these Spicy Black Bean Tacos with Mango Salsa changed my mind. They’re my go-to for a quick, vibrant meal that feels like a fiesta, even on a chilly evening like today, and I love how the sweet mango balances the heat. Trust me, once you try them, you’ll be making them year-round too!
Serving: 4 | Pre Time: 15 minutes | Cooking Time: 10 minutes
Ingredients
– 1 tablespoon extra virgin olive oil (my go-to for sautéing—it adds a lovely fruity note)
– 1 small yellow onion, diced (I always keep these on hand for a savory base)
– 2 cloves garlic, minced (fresh is best here for that punchy flavor)
– 1 (15-ounce) can black beans, drained and rinsed (I prefer low-sodium to control the salt)
– 1 teaspoon ground cumin (toasted cumin seeds ground fresh if I’m feeling fancy)
– 1/2 teaspoon chili powder (adjust based on your heat tolerance—I like it spicy!)
– 1/4 teaspoon salt (I use sea salt for a clean taste)
– 8 small corn tortillas (warmed up—they just taste better that way)
– 1 ripe mango, diced (pick one that gives slightly when pressed)
– 1/4 cup red onion, finely chopped (for a crisp bite in the salsa)
– 1 jalapeño, seeded and minced (remove the seeds to tame the heat if needed)
– 2 tablespoons fresh lime juice (about 1 lime, squeezed fresh—bottled just isn’t the same)
– 2 tablespoons fresh cilantro, chopped (I add it last to keep it bright and herbaceous)
Instructions
1. Heat 1 tablespoon extra virgin olive oil in a large skillet over medium heat until it shimmers, about 1 minute.
2. Add 1 small yellow onion, diced, and cook, stirring frequently, until softened and translucent, about 5 minutes.
3. Stir in 2 cloves garlic, minced, and cook for 30 seconds until fragrant—be careful not to burn it!
4. Tip: Toasting spices briefly enhances their flavor, so add 1 teaspoon ground cumin and 1/2 teaspoon chili powder now, stirring for 30 seconds.
5. Add 1 (15-ounce) can black beans, drained and rinsed, and 1/4 teaspoon salt, mixing well to coat the beans in the spices.
6. Cook the bean mixture, stirring occasionally, until heated through and slightly thickened, about 3-4 minutes; remove from heat and set aside.
7. In a medium bowl, combine 1 ripe mango, diced, 1/4 cup red onion, finely chopped, 1 jalapeño, seeded and minced, and 2 tablespoons fresh lime juice, tossing gently.
8. Tip: Let the salsa sit for 5 minutes to allow the flavors to meld—it makes a big difference!
9. Warm 8 small corn tortillas in a dry skillet over medium heat for 30 seconds per side until pliable and lightly toasted.
10. Tip: Keep tortillas warm by wrapping them in a clean kitchen towel while you assemble.
11. Fold 2 tablespoons fresh cilantro, chopped, into the mango salsa just before serving to maintain its vibrant color.
12. To assemble, spoon the black bean mixture into each warm tortilla, top with a generous scoop of mango salsa, and serve immediately.
The creamy beans paired with the juicy, sweet-tart salsa create a delightful contrast in every bite, and I love how the corn tortillas add a slight crunch. For a fun twist, try serving these tacos with a dollop of creamy avocado or a sprinkle of cotija cheese—they’re perfect for a casual dinner or even as appetizers at a gathering!
Almond-Crusted Asparagus with Lemon
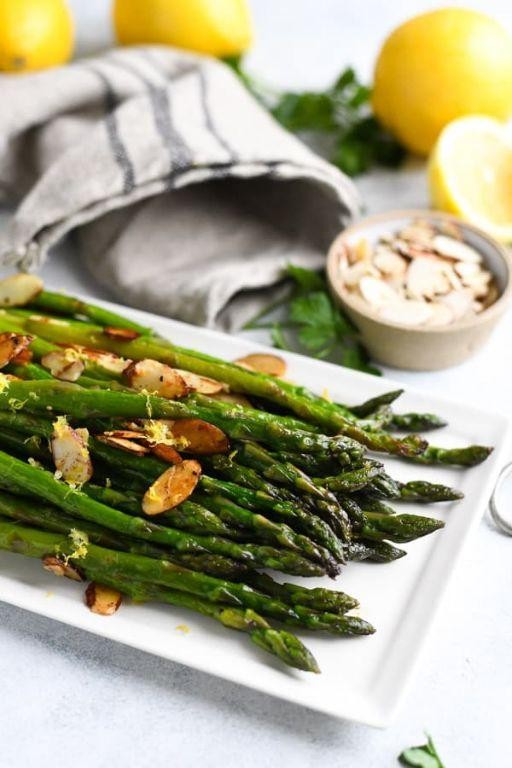
This crispy, elegant side dish has become my go-to for impressing guests without spending hours in the kitchen. There’s something magical about how the nutty crunch of almonds pairs with the bright pop of lemon against tender asparagus. I first made it for a last-minute dinner party and now it’s a requested staple.
Serving: 4 | Pre Time: 15 minutes | Cooking Time: 12 minutes
Ingredients
– 1 pound fresh asparagus, ends trimmed (look for firm, bright green stalks—I avoid any that are limp)
– 1/2 cup finely chopped almonds (I pulse raw almonds in my food processor for 30 seconds for perfect crumbs)
– 1/4 cup all-purpose flour (I spoon it into the measuring cup to avoid packing it down)
– 2 large eggs, lightly beaten (room temperature eggs blend more smoothly with the flour)
– 1/4 cup extra virgin olive oil (my go-to for its fruity flavor)
– 1 lemon, zested and juiced (about 2 tablespoons juice—I zest it first to avoid the bitter pith)
– 1/2 teaspoon kosher salt (I prefer it over table salt for its clean taste)
– 1/4 teaspoon freshly ground black pepper
Instructions
1. Preheat your oven to 425°F and line a large baking sheet with parchment paper.
2. In a shallow bowl, whisk together the all-purpose flour, kosher salt, and black pepper.
3. Place the lightly beaten eggs in a second shallow bowl.
4. Spread the finely chopped almonds in a third shallow bowl or plate.
5. Working with one asparagus spear at a time, dredge it fully in the flour mixture, shaking off any excess. Tip: Use one hand for dry ingredients and one for wet to keep your fingers cleaner.
6. Dip the floured asparagus into the beaten eggs, letting any extra drip back into the bowl.
7. Roll the asparagus in the chopped almonds, pressing gently so the crumbs adhere evenly to all sides.
8. Place the coated asparagus in a single layer on the prepared baking sheet, leaving a little space between each spear.
9. Drizzle the extra virgin olive oil evenly over the asparagus.
10. Bake in the preheated oven for 10–12 minutes, until the almonds are golden brown and the asparagus is tender when pierced with a fork. Tip: Rotate the pan halfway through for even browning.
11. While the asparagus bakes, zest the lemon directly into a small bowl, then juice it to get about 2 tablespoons of fresh lemon juice.
12. Immediately after removing the asparagus from the oven, sprinkle the lemon zest and drizzle the lemon juice over the top. Tip: Adding the lemon while hot helps the flavors soak in.
13. Serve warm.
Unbelievably, each bite delivers a satisfying crunch that gives way to the asparagus’s tender interior, all brightened by that zesty lemon finish. I love serving these spears alongside grilled salmon or as a standout appetizer with a creamy dip—they’re so good, they rarely make it to the table without a few being snacked on straight from the pan!
Slow Cooker Beef and Vegetable Stew
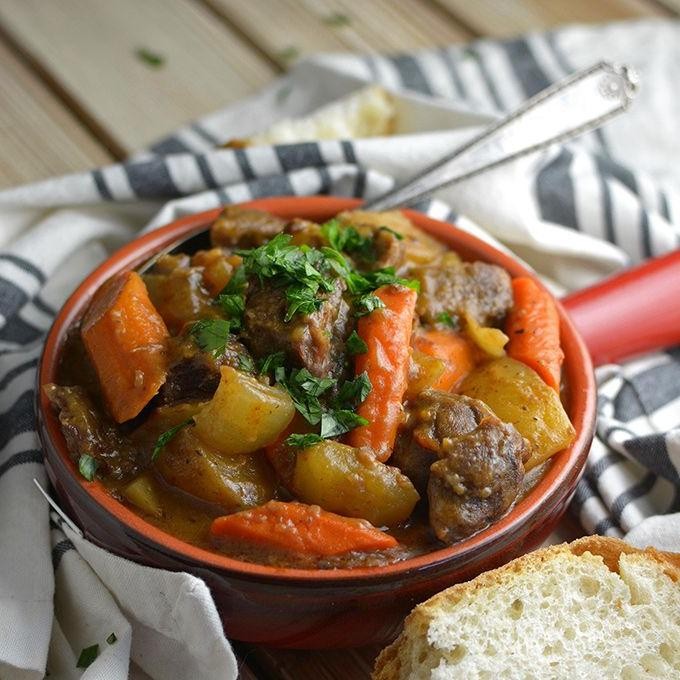
Sometimes, when the weather turns chilly and I’m craving something hearty and comforting, nothing hits the spot quite like a slow cooker stew. It’s the kind of meal that fills the house with an incredible aroma all day, making the wait absolutely worth it. I love how hands-off it is—just a bit of prep in the morning, and by dinnertime, you have a rich, savory dish that feels like a warm hug.
Serving: 6 | Pre Time: 20 minutes | Cooking Time: 8 hours
Ingredients
– 2 lbs beef chuck roast, cut into 1-inch cubes (I trim off any large pieces of fat, but a little marbling is key for flavor)
– 1 large yellow onion, diced (I always have these on hand—they’re a stew staple)
– 3 carrots, peeled and cut into 1-inch chunks (I prefer thicker cuts so they don’t turn mushy)
– 2 celery stalks, sliced (these add a nice subtle crunch)
– 1 lb baby potatoes, halved (I use Yukon Gold for their creamy texture)
– 4 cloves garlic, minced (fresh is best here for that aromatic punch)
– 4 cups beef broth (I use low-sodium so I can control the salt)
– 1 cup red wine (a dry Cabernet Sauvignon is my go-to for depth)
– 2 tbsp tomato paste (I keep a tube in the fridge for easy measuring)
– 2 tbsp all-purpose flour (this helps thicken the stew nicely)
– 2 tbsp extra virgin olive oil (my favorite for sautéing)
– 1 tsp dried thyme (rubbed between my fingers to release the oils)
– 1 bay leaf (don’t forget to remove it later!)
– 1 tsp salt (I start with this and adjust at the end)
– ½ tsp black pepper (freshly ground adds a nice kick)
Instructions
1. Pat the beef cubes dry with paper towels to ensure a good sear.
2. In a large skillet over medium-high heat, heat 1 tbsp of olive oil until shimmering, about 1 minute.
3. Add half the beef cubes in a single layer, searing for 3-4 minutes per side until browned, then transfer to the slow cooker. Repeat with remaining beef and oil.
4. In the same skillet, add the diced onion and cook over medium heat for 5 minutes until softened, stirring occasionally.
5. Add the minced garlic and cook for 1 minute until fragrant.
6. Sprinkle the flour over the onion mixture and stir constantly for 1 minute to cook off the raw taste.
7. Pour in the red wine, scraping up any browned bits from the skillet, and simmer for 2 minutes to reduce slightly.
8. Stir in the tomato paste and cook for 1 minute until incorporated.
9. Transfer the skillet mixture to the slow cooker with the beef.
10. Add the carrots, celery, potatoes, beef broth, thyme, bay leaf, salt, and pepper to the slow cooker.
11. Stir everything gently to combine, ensuring the ingredients are submerged.
12. Cover and cook on low for 8 hours, until the beef is fork-tender and the vegetables are soft.
13. Discard the bay leaf and taste the stew, adjusting seasoning if needed.
14. Ladle the stew into bowls and serve hot.
Ladle this stew into deep bowls for a cozy meal—the beef melts in your mouth, and the vegetables soak up all that rich, wine-infused broth. I love serving it with a crusty loaf of bread for dipping, or over a bed of mashed potatoes for an extra indulgent twist. Leftovers taste even better the next day, making it perfect for meal prep!
Eggplant Parmesan with Marinara Sauce
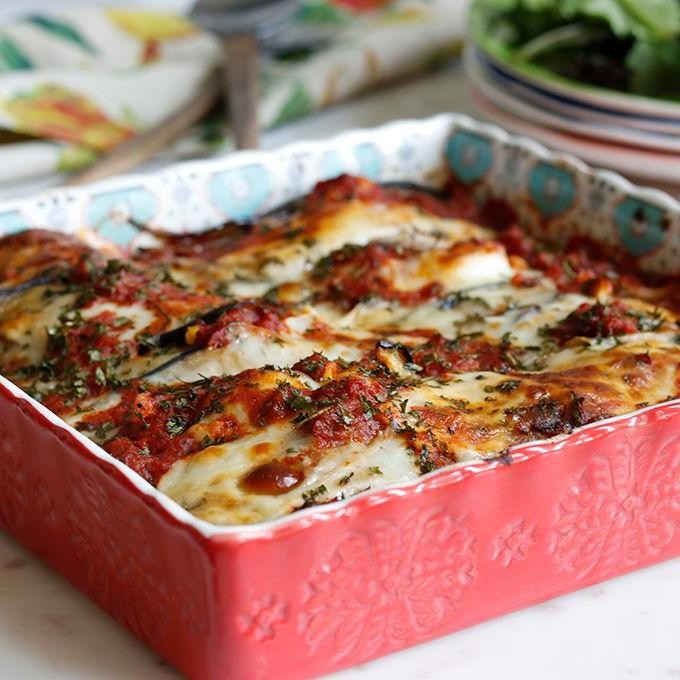
Whenever I’m craving something cozy and satisfying, I turn to this classic—it’s the ultimate comfort food that never disappoints, and I love how the crispy eggplant soaks up all that rich marinara. My family always requests it for Sunday dinners, and honestly, it’s become my go-to for impressing guests without too much fuss.
Serving: 4 | Pre Time: 20 minutes | Cooking Time: 40 minutes
Ingredients
– 2 medium eggplants, sliced into ½-inch rounds (I always pick firm ones for less bitterness)
– 1 cup all-purpose flour (I keep mine in a shallow bowl for easy dredging)
– 3 large eggs, beaten (room temp eggs here help the coating stick better)
– 2 cups Italian-style breadcrumbs (I like the seasoned kind for extra flavor)
– 1 cup grated Parmesan cheese (freshly grated melts so much nicer)
– 3 cups marinara sauce (homemade or your favorite jarred brand—I swear by Rao’s)
– 2 cups shredded mozzarella cheese (I use whole-milk for that perfect stretch)
– ½ cup extra virgin olive oil (my go-to for frying—it adds a lovely fruity note)
– Salt and black pepper to taste (I’m generous with the pepper for a little kick)
Instructions
1. Preheat your oven to 375°F and lightly grease a 9×13-inch baking dish.
2. Sprinkle the eggplant slices with salt on both sides and let them sit for 10 minutes to draw out moisture, then pat them dry with paper towels—this tip prevents sogginess.
3. Set up a dredging station: place the flour in one shallow bowl, the beaten eggs in another, and mix the breadcrumbs with ½ cup of the Parmesan cheese in a third bowl.
4. Heat the olive oil in a large skillet over medium-high heat until it shimmers, about 350°F.
5. Dredge each eggplant slice first in the flour, shaking off excess, then dip in the eggs, and finally coat evenly in the breadcrumb mixture.
6. Fry the coated slices in the hot oil for 2-3 minutes per side until golden brown and crispy, working in batches to avoid overcrowding—this ensures even cooking.
7. Transfer the fried eggplant to a paper towel-lined plate to drain any excess oil.
8. Spread 1 cup of the marinara sauce evenly on the bottom of the prepared baking dish.
9. Arrange a single layer of fried eggplant over the sauce, then top with another cup of sauce and half of the mozzarella cheese.
10. Repeat with another layer of eggplant, the remaining sauce, and the rest of the mozzarella and Parmesan cheeses.
11. Bake uncovered for 25-30 minutes, until the cheese is bubbly and lightly browned—I always peek at the 25-minute mark to check.
12. Let it cool for 5-10 minutes before serving; this resting time helps the layers set so it slices neatly.
My favorite part is that first bite—the crispy exterior gives way to tender eggplant, all smothered in that tangy, herby marinara. Serve it over a bed of spaghetti for a hearty meal, or pair it with a simple green salad to balance the richness.
Garlic and Herb Roasted Cauliflower
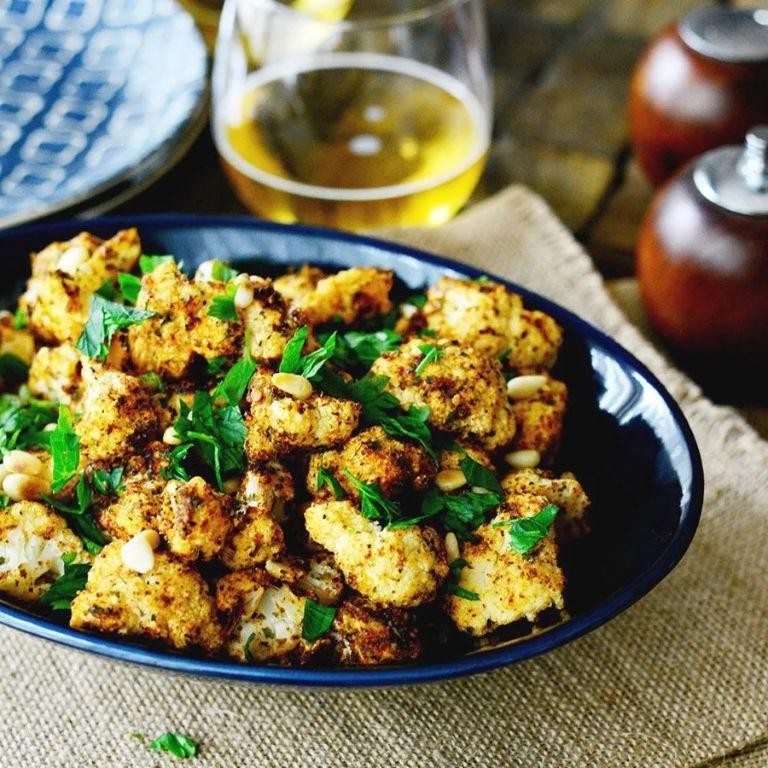
There’s something magical about transforming a humble head of cauliflower into a show-stopping side dish that even veggie skeptics will devour. I first fell in love with this garlic and herb version at a cozy potluck, and now it’s my go-to for busy weeknights when I crave something healthy yet deeply satisfying. It’s simple, versatile, and fills your kitchen with the most incredible aroma.
Serving: 4 | Pre Time: 10 minutes | Cooking Time: 25 minutes
Ingredients
– 1 large head of cauliflower, cut into florets (I look for one that feels heavy for its size)
– 3 tablespoons extra virgin olive oil, my go-to for roasting
– 4 cloves garlic, minced (fresh is best, but I’ve been known to use the pre-minced jar in a pinch)
– 1 tablespoon fresh rosemary, finely chopped (dried works too, but use just 1 teaspoon)
– 1 tablespoon fresh thyme leaves
– 1 teaspoon kosher salt
– ½ teaspoon freshly ground black pepper
– ¼ teaspoon red pepper flakes, optional for a subtle kick
Instructions
1. Preheat your oven to 425°F (218°C) and line a large, rimmed baking sheet with parchment paper for easy cleanup.
2. In a large mixing bowl, combine the 3 tablespoons of extra virgin olive oil, 4 cloves of minced garlic, 1 tablespoon of chopped rosemary, 1 tablespoon of thyme leaves, 1 teaspoon of kosher salt, ½ teaspoon of black pepper, and ¼ teaspoon of red pepper flakes (if using).
3. Add the cauliflower florets to the bowl and toss thoroughly until every piece is evenly coated with the oil and herb mixture. Tip: Don’t overcrowd the bowl—toss in batches if needed to ensure an even coat.
4. Spread the coated cauliflower in a single layer on your prepared baking sheet, making sure the pieces aren’t touching. Tip: This space allows for proper caramelization instead of steaming.
5. Roast in the preheated oven for 20-25 minutes. At the 15-minute mark, use a spatula to flip the florets for even browning.
6. Check for doneness at 20 minutes—the cauliflower should be tender when pierced with a fork and have deep golden-brown edges. Tip: If you prefer it extra crispy, roast for the full 25 minutes.
7. Remove the baking sheet from the oven and let the cauliflower rest for 2-3 minutes before serving.
My mouth waters just thinking about the crispy, caramelized edges giving way to a tender, almost creamy interior. The garlic and herbs meld into a savory, fragrant crust that’s utterly addictive. I love serving this piled high on a platter, maybe with a squeeze of lemon or a sprinkle of Parmesan, but honestly, it’s perfect straight from the pan.
Quinoa and Black Bean Stuffed Portobello Mushrooms
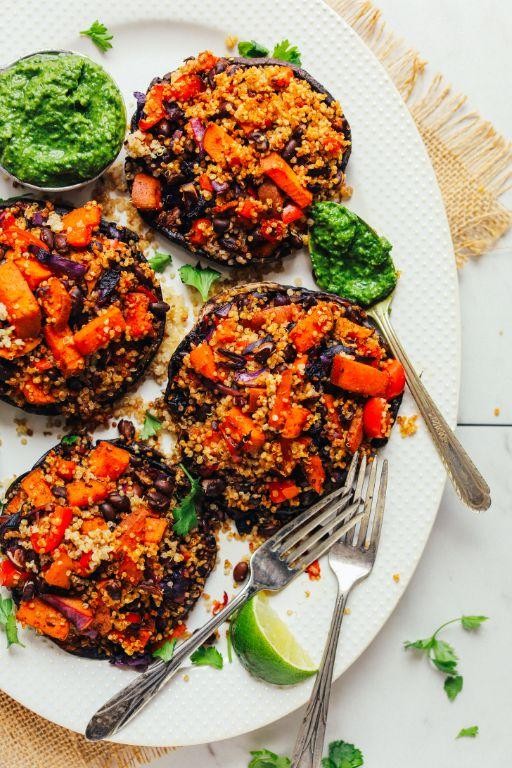
Trying to find a satisfying vegetarian main dish that feels hearty and flavorful can be a challenge, but these stuffed mushrooms have become my absolute favorite weeknight solution. I first made them for a casual dinner with friends who were skeptical about ‘healthy’ food, and they were completely won over—now it’s my most requested recipe!
Serving: 4 | Pre Time: 15 minutes | Cooking Time: 25 minutes
Ingredients
– 4 large portobello mushroom caps, stems and gills carefully scooped out (I find a small spoon works best for this messy but satisfying task)
– 1 cup cooked quinoa, cooled (I always cook a big batch on Sundays to have on hand)
– 1 (15 oz) can black beans, rinsed and drained well (I give them a good shake in a colander to remove excess liquid)
– 1/2 cup shredded Monterey Jack cheese (sharp cheddar works great too if that’s what you have)
– 1/4 cup finely diced red bell pepper (for a pop of color and sweetness)
– 2 tbsp extra virgin olive oil, my go-to for roasting
– 1 tbsp fresh lime juice (bottled works in a pinch, but fresh makes a noticeable difference)
– 1 tsp ground cumin
– 1/2 tsp smoked paprika
– 1/4 tsp garlic powder
– Salt and black pepper
Instructions
1. Preheat your oven to 400°F and line a baking sheet with parchment paper.
2. Place the cleaned mushroom caps gill-side up on the prepared sheet and brush them lightly all over with 1 tablespoon of the olive oil.
3. Roast the mushrooms in the preheated oven for exactly 10 minutes; this step helps them release moisture so they don’t get soggy later.
4. While the mushrooms roast, combine the cooked quinoa, black beans, diced bell pepper, cumin, smoked paprika, garlic powder, the remaining 1 tablespoon of olive oil, and the lime juice in a medium mixing bowl.
5. Season the quinoa mixture generously with salt and black pepper, then stir until everything is evenly coated.
6. Remove the par-baked mushrooms from the oven—they should look slightly softened and darker in color.
7. Carefully divide the quinoa filling evenly among the four mushroom caps, pressing it gently into the cavities.
8. Top each stuffed mushroom with an equal amount of the shredded Monterey Jack cheese.
9. Return the baking sheet to the oven and bake for 15 minutes, or until the cheese is fully melted and bubbly and the mushroom edges are tender.
10. Let the mushrooms rest on the sheet for 5 minutes before serving to allow the filling to set slightly.
Let these rest for a few minutes after baking, and you’ll be rewarded with a fantastic contrast: the mushroom becomes meaty and juicy, while the quinoa filling stays fluffy and the cheese forms a perfectly golden, crispy top. I love serving them over a simple arugula salad for a complete meal, or slicing them up as a hearty appetizer that always disappears first at parties.
Lemon Herb Shrimp with Zucchini Noodles
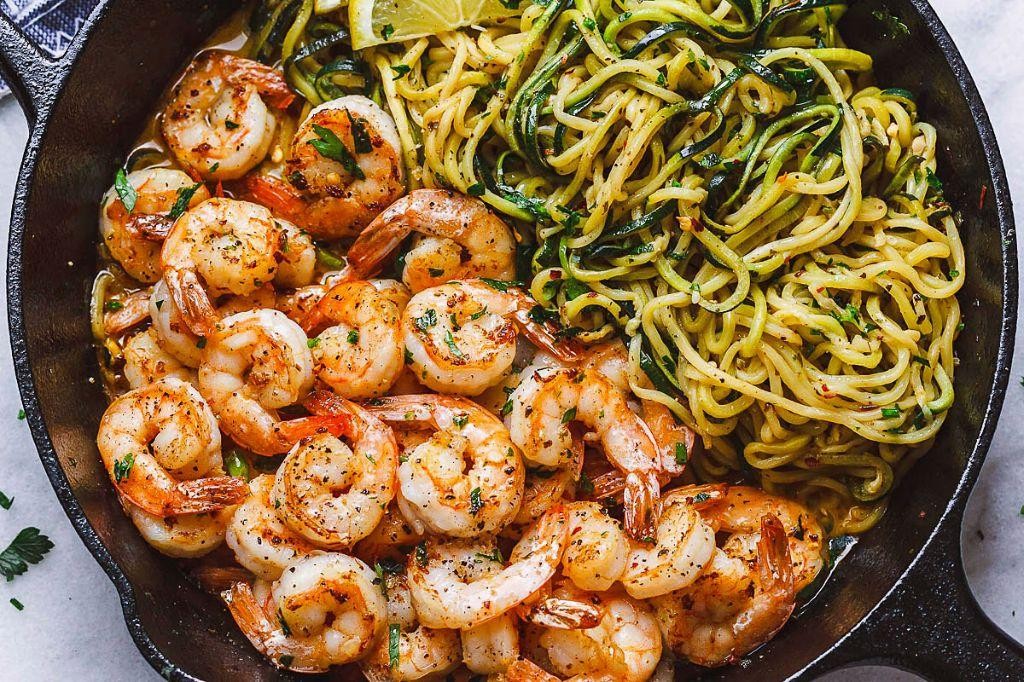
Just last week, I was craving something light yet satisfying after a busy day, and this Lemon Herb Shrimp with Zucchini Noodles came to the rescue—it’s become my go-to for a quick, healthy dinner that feels indulgent without the guilt.
Serving: 4 | Pre Time: 15 minutes | Cooking Time: 10 minutes
Ingredients
- 1 lb large shrimp, peeled and deveined (I like to buy them frozen and thaw overnight in the fridge for convenience)
- 4 medium zucchinis, spiralized into noodles (a handheld spiralizer is my kitchen hero for this!)
- 3 tbsp extra virgin olive oil (my go-to for its fruity flavor)
- 2 cloves garlic, minced (freshly minced makes all the difference here)
- 1 lemon, zested and juiced (I prefer organic lemons to avoid any wax coating)
- 2 tbsp fresh parsley, chopped (dried just doesn’t compare in this dish)
- 1 tsp dried oregano
- 1/2 tsp red pepper flakes (adjust if you’re sensitive to heat)
- Salt and black pepper
Instructions
- Pat the shrimp dry with paper towels to ensure they sear nicely instead of steaming.
- Season the shrimp evenly with salt, black pepper, and dried oregano.
- Heat 2 tbsp of olive oil in a large skillet over medium-high heat until it shimmers, about 1-2 minutes.
- Add the shrimp to the skillet in a single layer, cooking for 2-3 minutes per side until they turn pink and opaque.
- Transfer the cooked shrimp to a plate and set aside, covering loosely to keep warm.
- In the same skillet, reduce heat to medium and add the remaining 1 tbsp of olive oil.
- Sauté the minced garlic for 30 seconds until fragrant, being careful not to burn it.
- Add the zucchini noodles to the skillet, tossing to coat with the garlic oil, and cook for 2-3 minutes until just tender but still crisp.
- Tip: Avoid overcooking the zucchini noodles to prevent them from becoming mushy.
- Return the shrimp to the skillet with the zucchini noodles.
- Stir in the lemon zest, lemon juice, chopped parsley, and red pepper flakes, tossing everything together for 1 minute to combine.
- Tip: Add the lemon juice off the heat to preserve its bright flavor.
- Taste and adjust seasoning with more salt or pepper if needed, then remove from heat.
- Tip: Let the dish rest for a minute before serving to allow the flavors to meld.
Delightfully fresh, this dish boasts tender shrimp with a zesty lemon kick against the crisp zucchini noodles. I love serving it straight from the skillet for a cozy meal, or you can top it with a sprinkle of Parmesan for an extra savory twist—it’s versatile enough for a weeknight dinner or a light lunch.
Chili-Lime Grilled Chicken Skewers
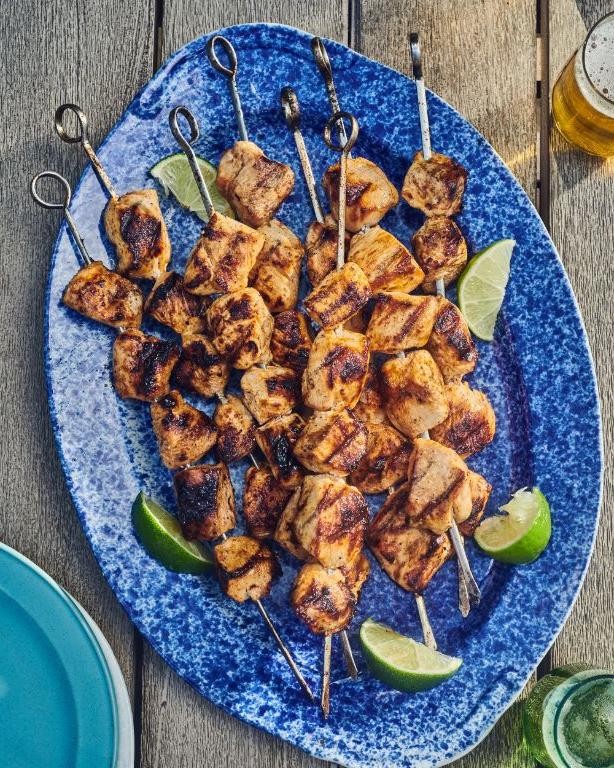
Warm summer evenings always make me crave something zesty and grilled, and these Chili-Lime Grilled Chicken Skewers are my go-to for a quick, flavorful meal that feels like a fiesta. I first whipped these up during a backyard barbecue last year when I wanted to impress friends without spending hours in the kitchen—they were an instant hit, and now they’re a staple in my weekly rotation. Trust me, the tangy marinade and smoky char will have everyone asking for seconds!
Serving: 4 | Pre Time: 20 minutes | Cooking Time: 10 minutes
Ingredients
– 1.5 lbs boneless, skinless chicken breasts, cut into 1-inch cubes (I always use fresh chicken for juicier results)
– 1/4 cup fresh lime juice (about 2 limes squeezed—I love the bright acidity)
– 2 tbsp olive oil (extra virgin olive oil is my go-to for a richer flavor)
– 2 tbsp honey (it balances the heat perfectly)
– 2 tsp chili powder (adjust based on your spice tolerance)
– 1 tsp ground cumin (adds a warm, earthy note)
– 1/2 tsp garlic powder (for that savory kick)
– 1/2 tsp salt (I prefer fine sea salt here)
– Wooden skewers, soaked in water for 30 minutes (this prevents burning on the grill)
Instructions
1. In a medium bowl, whisk together 1/4 cup fresh lime juice, 2 tbsp olive oil, 2 tbsp honey, 2 tsp chili powder, 1 tsp ground cumin, 1/2 tsp garlic powder, and 1/2 tsp salt until fully combined.
2. Add 1.5 lbs cubed chicken breasts to the bowl, tossing to coat evenly in the marinade.
3. Cover the bowl with plastic wrap and refrigerate for at least 15 minutes, or up to 2 hours for deeper flavor (tip: marinating longer enhances the taste).
4. While the chicken marinates, soak wooden skewers in water for 30 minutes to prevent them from charring on the grill.
5. Preheat an outdoor grill or grill pan to medium-high heat, about 400°F, ensuring it’s hot before cooking.
6. Thread the marinated chicken cubes onto the soaked skewers, leaving small gaps between pieces for even cooking.
7. Place the skewers on the preheated grill and cook for 4-5 minutes per side, flipping once, until the chicken reaches an internal temperature of 165°F and has visible grill marks (tip: use a meat thermometer for accuracy).
8. Remove the skewers from the grill and let them rest for 3 minutes before serving to keep the juices locked in (tip: resting prevents dryness).
As you bite into these skewers, you’ll notice the tender, juicy chicken with a perfect charred exterior, complemented by the zesty lime and subtle heat from the chili. I love serving them over a bed of cilantro-lime rice or with a side of grilled veggies for a complete meal that’s both vibrant and satisfying.
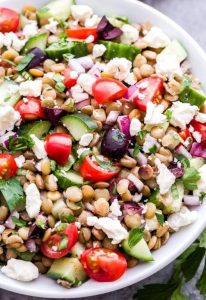
Mediterranean Lentil Salad with Feta

Keeping my kitchen cool in the summer heat is always a challenge, but this Mediterranean Lentil Salad with Feta is my go-to solution—it’s hearty, refreshing, and packed with flavors that remind me of a sunny Greek taverna. I first fell in love with it during a beach trip, and now I whip it up weekly, often doubling the batch for easy lunches.
Serving: 4 | Pre Time: 15 minutes | Cooking Time: 25 minutes
Ingredients
- 1 cup dried green lentils, rinsed (I find these hold their shape better than red lentils)
- 4 cups water
- 1 teaspoon salt, plus more for seasoning
- 1/4 cup extra virgin olive oil (my go-to for its fruity notes)
- 2 tablespoons fresh lemon juice
- 1 clove garlic, minced (I always use fresh—it makes a difference!)
- 1/2 teaspoon dried oregano
- 1/4 teaspoon black pepper
- 1 cup cherry tomatoes, halved
- 1/2 cup cucumber, diced
- 1/4 cup red onion, finely chopped
- 1/4 cup Kalamata olives, pitted and sliced
- 1/2 cup crumbled feta cheese (I prefer the block kind for better texture)
- 2 tablespoons fresh parsley, chopped
Instructions
- In a medium saucepan, combine 1 cup rinsed green lentils, 4 cups water, and 1 teaspoon salt.
- Bring the mixture to a boil over high heat, then reduce the heat to low, cover, and simmer for 20–25 minutes until the lentils are tender but not mushy. Tip: Check at 20 minutes to avoid overcooking—they should be firm yet easy to bite.
- While the lentils cook, whisk together 1/4 cup extra virgin olive oil, 2 tablespoons fresh lemon juice, 1 minced garlic clove, 1/2 teaspoon dried oregano, and 1/4 teaspoon black pepper in a large bowl to make the dressing.
- Drain the cooked lentils in a fine-mesh strainer and rinse under cold water for 1 minute to stop the cooking process and cool them down. Tip: This helps keep the salad crisp and prevents sogginess.
- Add the cooled lentils to the bowl with the dressing and toss gently to coat evenly.
- Fold in 1 cup halved cherry tomatoes, 1/2 cup diced cucumber, 1/4 cup chopped red onion, 1/4 cup sliced Kalamata olives, 1/2 cup crumbled feta cheese, and 2 tablespoons chopped fresh parsley until well combined. Tip: Let it sit for 10 minutes before serving to allow the flavors to meld—it tastes even better!
- Season with additional salt if needed, based on personal preference.
Perfectly balanced, this salad offers a delightful mix of creamy feta, tangy lemon, and earthy lentils, with a satisfying crunch from the veggies. I love serving it over a bed of greens for a fuller meal or stuffing it into pita pockets for a quick grab-and-go lunch—it’s versatile enough to shine on its own or as a side at barbecues.
Conclusion
Nourishing your body with delicious food is a joy, and these 32 diabetic-friendly recipes prove it’s entirely possible. We hope this collection inspires your next kitchen adventure. Give a recipe a try, then pop back to let us know your favorite! If you found this roundup helpful, we’d be so grateful if you’d share it on Pinterest to help other home cooks discover these tasty ideas.