Unbelievably crispy, cheesy, and downright delicious—this air fryer chicken parmesan will revolutionize your weeknight dinner game. Using your trusty air fryer means less oil, less mess, and more time to enjoy that golden, bubbly goodness without sacrificing an ounce of flavor. Get ready to impress your family with a restaurant-quality meal that’s ready in a flash!
Why This Recipe Works
- The air fryer creates an incredibly crispy, golden-brown crust without the need for deep frying, cutting down on oil and calories while delivering that satisfying crunch we all crave.
- Preheating the air fryer ensures that the chicken starts cooking immediately, locking in juices and preventing a soggy coating—resulting in perfectly tender meat with a crackly exterior every time.
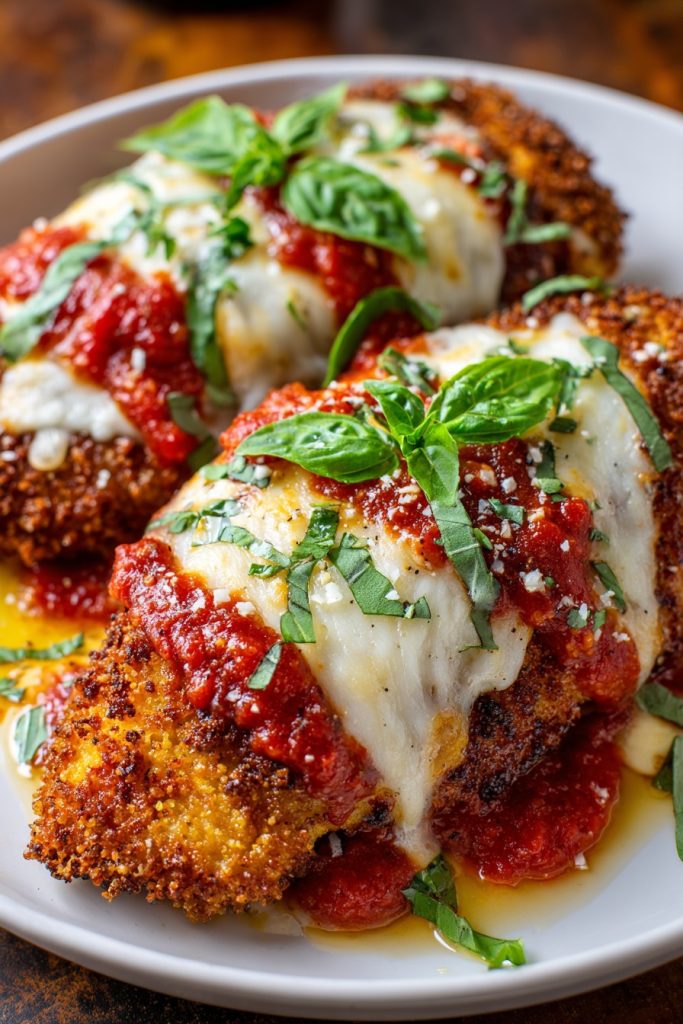
- Layering marinara sauce and mozzarella cheese halfway through cooking allows the cheese to melt beautifully without making the breading soggy, giving you that ideal gooey, cheesy top with a crisp base.
- Using panko breadcrumbs mixed with grated parmesan adds extra texture and flavor, creating a light, airy coating that adheres well and doesn’t become heavy or greasy like traditional breading can.
- The quick cook time (just 12-15 minutes!) means you can have a hearty, comforting meal on the table faster than ordering takeout, making it perfect for busy weeknights or last-minute dinners.
Ingredients
- 2 large boneless, skinless chicken breasts (about 1.5 pounds), pounded to ½-inch thickness
- 1 cup all-purpose flour
- 2 large eggs, beaten
- 1 cup panko breadcrumbs
- ½ cup grated parmesan cheese
- 1 teaspoon garlic powder
- 1 teaspoon dried oregano
- ½ teaspoon salt
- ¼ teaspoon black pepper
- 1 cup marinara sauce
- 1 cup shredded mozzarella cheese
- 2 tablespoons olive oil
- Fresh basil or parsley for garnish (optional)
Equipment Needed
- Air fryer
- Meat mallet or rolling pin (for pounding chicken)
- Three shallow bowls (for dredging station)
- Whisk
- Measuring cups and spoons
- Tongs
- Instant-read thermometer
Instructions

Step 1: Prepare the Chicken and Dredging Station
Place the chicken breasts between two pieces of plastic wrap or in a large zip-top bag. Using a meat mallet or rolling pin, pound them evenly to about ½-inch thickness—this ensures they cook quickly and uniformly without drying out. In three separate shallow bowls, set up your dredging station: one with the all-purpose flour, one with the beaten eggs (whisked until smooth), and one with a mixture of panko breadcrumbs, grated parmesan cheese, garlic powder, dried oregano, salt, and black pepper, stirred well to combine. This organization is key for a efficient, mess-free coating process. Tip: For extra flavor, you can add a pinch of red pepper flakes to the breadcrumb mixture if you like a little heat.
Step 2: Coat the Chicken Thoroughly
Take one pounded chicken breast and dredge it first in the flour, shaking off any excess. Next, dip it into the beaten eggs, making sure it’s fully coated and allowing any excess to drip off. Finally, press it firmly into the breadcrumb mixture, ensuring an even, thick layer adheres to all sides. Place the coated chicken on a plate and repeat with the second breast. For the crispiest results, let the coated chicken sit for 5-10 minutes before cooking—this helps the coating set and stick better during air frying. Lightly spray or brush both sides of the chicken with olive oil; this promotes browning and adds a lovely crunch.
Step 3: Preheat and Arrange in the Air Fryer
Preheat your air fryer to 375°F for about 3 minutes. This step is crucial because it ensures the chicken starts cooking immediately upon contact, leading to a crispier exterior. Once preheated, lightly spray the air fryer basket with cooking spray or brush with a bit of oil to prevent sticking. Place the coated chicken breasts in the basket in a single layer, making sure they aren’t overlapping—air circulation is essential for even cooking. If your air fryer is small, you may need to cook them in batches. Cook at 375°F for 8 minutes, then carefully flip the chicken using tongs. Tip: Avoid overcrowding the basket, as this can lead to steaming instead of crisping.
Step 4: Add Sauce and Cheese, Then Finish Cooking
After flipping, spread ½ cup of marinara sauce evenly over each chicken breast, leaving a small border around the edges to keep the coating crisp. Sprinkle ½ cup of shredded mozzarella cheese on top of the sauce. Return the basket to the air fryer and cook for an additional 4-7 minutes at 375°F, or until the cheese is melted and bubbly and the internal temperature of the chicken reaches 165°F when checked with an instant-read thermometer. The total cook time should be around 12-15 minutes, but always rely on temperature for accuracy. The chicken should be golden brown and the cheese beautifully melted.
Step 5: Rest and Serve Immediately
Carefully remove the chicken parmesan from the air fryer using tongs and let it rest on a cutting board or plate for 2-3 minutes before serving. This allows the juices to redistribute, ensuring moist, tender chicken. Garnish with fresh basil or parsley if desired. Serve hot alongside your favorite sides, such as pasta, zucchini noodles, or a crisp salad. Tip: For extra cheesy goodness, sprinkle a little more grated parmesan on top right after cooking while the cheese is still warm and gooey.
Tips and Tricks
For the absolute best results, consider pounding the chicken to an even thickness—this is non-negotiable for uniform cooking. If you don’t have a meat mallet, use a heavy skillet or rolling pin, but aim for that ½-inch mark to avoid undercooked or dry spots. When coating, really press the breadcrumbs into the chicken to ensure they adhere well; you can even do a double dip in the egg and breadcrumbs for an extra-thick, crunchy crust. If you’re making a larger batch, keep cooked chicken parmesan warm in a 200°F oven while you finish air frying the rest, but note that it’s best served immediately for maximum crispiness. For a lighter version, you can use cooking spray instead of brushing with oil, but a light coating of oil does enhance browning and flavor. If your air fryer tends to run hot, check the chicken a minute or two early to prevent burning—all models vary slightly. To avoid a soggy bottom, make sure not to add the sauce too early; waiting until after the first flip is key. For meal prep, you can coat the chicken ahead of time and refrigerate it for up to 24 hours before cooking, but bring it to room temperature for 10-15 minutes before air frying to ensure even cooking. If you’re using homemade marinara, opt for a thicker sauce to prevent excess moisture. Lastly, clean your air fryer basket immediately after use while it’s still warm for easier cleanup—those baked-on bits can be stubborn once cooled!
Recipe Variations
- Spicy Kick: Add ½ teaspoon of crushed red pepper flakes to the breadcrumb mixture and use a spicy marinara sauce for those who love heat. You can also mix a tablespoon of hot sauce into the beaten eggs for an extra layer of spice that permeates the coating.
- Gluten-Free Option: Substitute the all-purpose flour with almond flour or a gluten-free blend, and use gluten-free panko breadcrumbs. Ensure all other ingredients, like the marinara sauce, are certified gluten-free to make this dish celiac-friendly without sacrificing crunch.
- Eggplant Parmesan Twist: Replace the chicken with two medium eggplants sliced into ½-inch rounds. Follow the same coating and cooking process, but increase the cook time by 2-3 minutes per side since eggplant releases more moisture—perfect for a vegetarian version that’s just as satisfying.
- Extra Cheesy Delight: Add a layer of provolone or fontina cheese under the mozzarella for a richer, more complex flavor. You can also mix a tablespoon of grated parmesan into the marinara sauce before spreading it on the chicken for an even cheesier experience.
- Herb-Infused Upgrade: Incorporate fresh herbs like chopped basil or parsley into the breadcrumb mixture, or use an Italian seasoning blend in place of dried oregano for a brighter, more aromatic flavor profile that elevates the dish.
Frequently Asked Questions
Can I use frozen chicken for this recipe?
It’s not recommended to use frozen chicken directly, as it will release too much moisture and result in a soggy coating. Instead, thaw the chicken completely in the refrigerator overnight, then pound and coat as directed. If you’re in a pinch, you can use the defrost setting on your microwave, but pat the chicken very dry with paper towels before coating to ensure the breading sticks properly and crisps up in the air fryer.
How do I prevent the breading from falling off during cooking?
To prevent the breading from falling off, make sure to shake off excess flour and egg before moving to the next step, and press the breadcrumbs firmly onto the chicken. Letting the coated chicken rest for 5-10 minutes before cooking helps the coating set. Also, avoid overcrowding the air fryer basket and flipping too early—wait until the first side is golden and crisp before turning. Using panko breadcrumbs, which are lighter and crispier, also helps adhesion compared to finer breadcrumbs.
Can I make this recipe ahead of time?
You can prepare the coated chicken up to 24 hours in advance; store it covered in the refrigerator, but bring it to room temperature for 10-15 minutes before air frying. However, for the best texture, it’s ideal to cook it fresh. If you have leftovers, reheat them in the air fryer at 350°F for 3-4 minutes to restore crispiness, as microwaving can make the coating soft. Fully cooked chicken parmesan can be refrigerated for up to 3 days.
What can I serve with air fryer chicken parmesan?
This dish pairs wonderfully with a variety of sides! Classic options include spaghetti or linguine with marinara sauce, a light salad with Italian dressing, or garlic bread. For a low-carb alternative, try zucchini noodles, roasted vegetables, or a cauliflower mash. The crispy chicken also works great in a sandwich or sliced over a bed of greens for a hearty salad—get creative with your favorites!
Why did my chicken come out dry?
Dry chicken usually results from overcooking or uneven pounding. Ensure the chicken is pounded to a consistent ½-inch thickness so it cooks uniformly. Always use an instant-read thermometer to check for doneness at 165°F, and avoid overcooking—remember, it will continue to cook slightly while resting. If your air fryer runs hot, reduce the temperature by 25°F or check a few minutes early. Brushing with oil before cooking also helps retain moisture.
Summary
This air fryer chicken parmesan delivers crispy, cheesy perfection in under 30 minutes—a healthier twist on a classic that doesn’t skimp on flavor. Perfect for busy weeknights or impressing guests with minimal effort!
Air Fryer Chicken Parmesan
4
servings15
minutes15
minutesIngredients
Instructions
- 1 Pound chicken to ½-inch thickness. Set up dredging stations: flour, beaten eggs, and breadcrumb mixture (panko, parmesan, garlic powder, oregano, salt, pepper).
- 2 Coat chicken in flour, then egg, then breadcrumbs, pressing firmly. Let sit 5-10 minutes, then brush with oil.
- 3 Preheat air fryer to 375°F. Place chicken in basket and cook for 8 minutes, then flip.
- 4 Spread marinara sauce and mozzarella on chicken. Cook 4-7 minutes more until internal temperature reaches 165°F.
- 5 Rest for 2-3 minutes, garnish, and serve immediately.