
Get ready to revolutionize your weeknight dinners with this game-changing air fryer chicken cutlet recipe that delivers restaurant-quality results without the deep-fryer guilt. Gone are the days of greasy kitchens and soggy breading—this method creates the most incredibly crispy, golden-brown cutlets you’ve ever tasted, all while keeping things light and hassle-free.
Why This Recipe Works
- The air fryer’s rapid hot air circulation creates an incredibly crispy exterior without submerging the chicken in oil, resulting in cutlets that are 70% less fatty than traditional frying methods while maintaining that satisfying crunch we all crave.
- Using panko breadcrumbs instead of traditional breadcrumbs provides a lighter, crispier texture that doesn’t get soggy, while the combination of garlic powder, paprika, and Parmesan cheese creates layers of flavor that penetrate every bite.
- The three-step dredging process (flour, egg wash, breadcrumb mixture) ensures maximum coating adhesion, preventing the breading from falling off during cooking and creating that perfect golden crust that stays intact from first bite to last.
- Preheating the air fryer ensures immediate crisping action the moment the chicken hits the basket, while flipping halfway through cooking guarantees even browning on both sides without any burnt or undercooked spots.
- Resting the cooked cutlets for five minutes allows the juices to redistribute throughout the meat, resulting in incredibly moist, tender chicken that cuts cleanly without tearing the beautiful crispy coating you worked so hard to achieve.
Ingredients
- 4 boneless, skinless chicken breasts (about 1.5 pounds), pounded to ½-inch thickness
- 1 cup all-purpose flour
- 2 large eggs, beaten
- 1.5 cups panko breadcrumbs
- ½ cup grated Parmesan cheese
- 1 teaspoon garlic powder
- 1 teaspoon paprika
- 1 teaspoon salt
- ½ teaspoon black pepper
- 2 tablespoons olive oil or avocado oil spray
- Fresh parsley, chopped (for garnish)
- Lemon wedges (for serving)
Equipment Needed
- Air fryer (basket or oven style)
- Meat mallet or rolling pin
- Three shallow bowls or plates
- Whisk
- Measuring cups and spoons
- Tongs
- Cutting board
- Instant-read thermometer
Instructions
Prepare Your Chicken and Station
Begin by placing your chicken breasts between two pieces of plastic wrap or in a large zip-top bag. Using a meat mallet or heavy rolling pin, gently pound the chicken until it reaches an even ½-inch thickness throughout—this crucial step ensures uniform cooking and prevents the dreaded scenario where the edges are overcooked while the center remains underdone. While your chicken rests, set up your dredging station with three shallow bowls: one with flour seasoned with half the salt and pepper, another with beaten eggs whisked until smooth and pale yellow, and the third with panko breadcrumbs mixed with Parmesan cheese, garlic powder, paprika, and remaining seasonings. This organized setup makes the coating process efficient and mess-free, allowing you to keep one hand for dry ingredients and the other for wet to avoid clumpy fingers.
Dredge and Coat Thoroughly
Working with one chicken cutlet at a time, dredge it thoroughly in the seasoned flour, shaking off any excess to create a dry surface that will help the egg wash adhere properly. Next, dip the floured cutlet into the beaten eggs, making sure to coat every surface and allowing any excess to drip off back into the bowl—this prevents the egg from pooling and creating soggy spots in your final breading. Finally, press the cutlet firmly into the panko-Parmesan mixture, ensuring an even, generous coating on all sides by gently pressing the breadcrumbs into the chicken to help them adhere. Pro tip: For extra crispy results, place the breaded cutlets on a wire rack for 5-10 minutes before cooking to allow the coating to set, which prevents the breading from falling off during the air frying process.
Preheat and Arrange in Air Fryer
Preheat your air fryer to 400°F for 3 minutes—this crucial step ensures immediate crisping action when the chicken enters the basket, rather than steaming as it would in a cold appliance. Lightly spray the air fryer basket with oil to prevent sticking, then arrange the breaded cutlets in a single layer without overlapping, leaving at least ½ inch between each piece for proper air circulation. If your air fryer is small, cook in batches rather than overcrowding, as overlapping cutlets will steam rather than crisp and cook unevenly. Lightly spray the tops of the cutlets with oil—this helps achieve that beautiful golden-brown color and enhances crispiness without adding significant calories.
Cook to Perfect Doneness
Air fry at 400°F for 10-12 minutes, then using tongs, carefully flip each cutlet when the top appears golden brown and the edges look crispy. Continue cooking for another 6-8 minutes until the internal temperature reaches 165°F when measured with an instant-read thermometer inserted into the thickest part of the chicken—never rely solely on visual cues as breading can brown before the chicken is fully cooked. The total cooking time may vary slightly depending on your air fryer model and the thickness of your cutlets, but the thermometer reading is your guaranteed ticket to perfectly cooked, juicy chicken every single time.
Rest and Serve Immediately
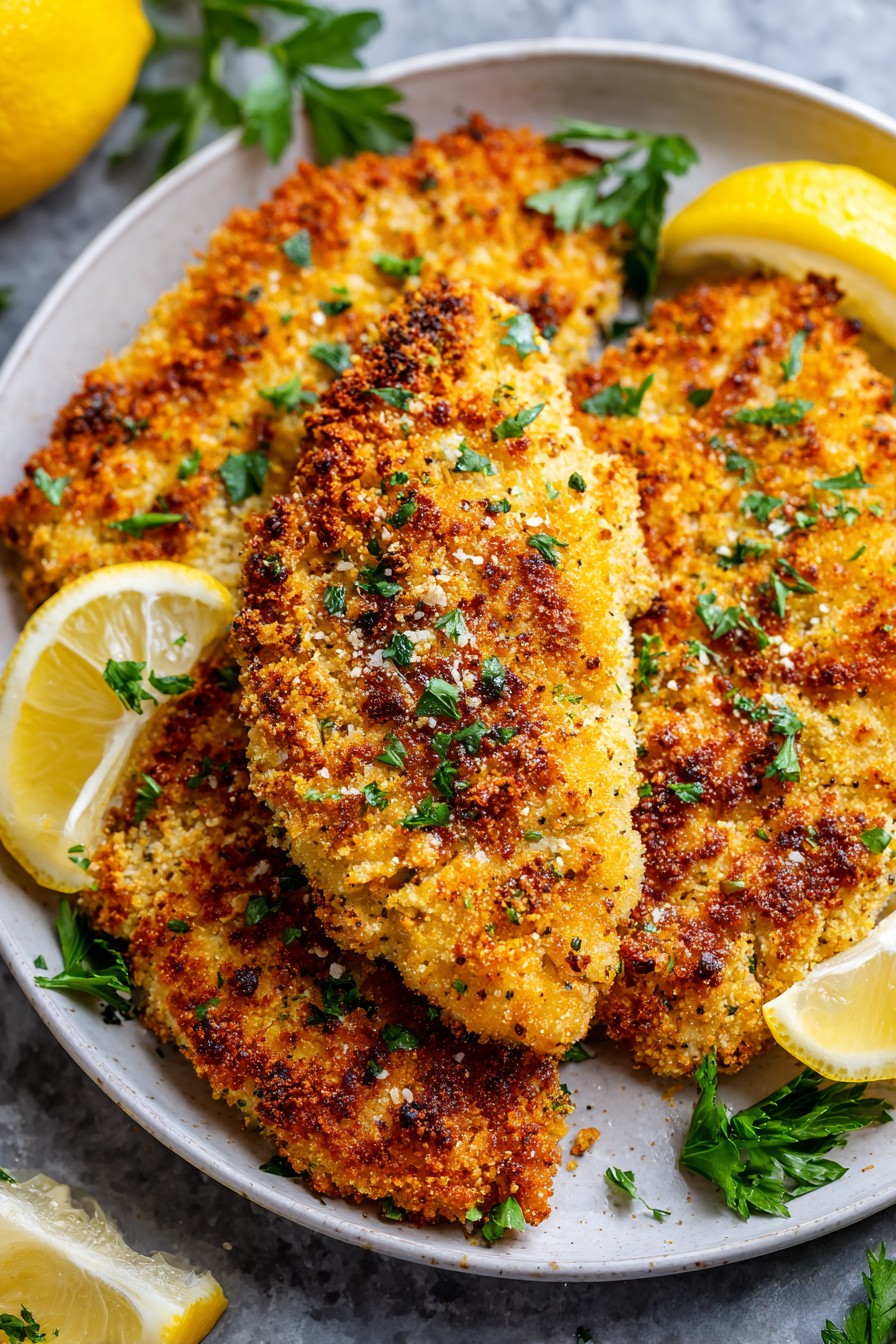
Once the chicken reaches 165°F, transfer the cutlets to a clean wire rack rather than a plate—this allows air to circulate underneath, preventing the bottom from becoming soggy from trapped steam. Let the cutlets rest for 5 minutes before serving; this allows the juices to redistribute throughout the meat, resulting in incredibly tender chicken that doesn’t dry out when cut. Garnish with freshly chopped parsley and serve immediately with lemon wedges for squeezing over the top—the bright acidity cuts through the richness beautifully. Pro tip: For maximum crispiness, avoid covering the chicken as it rests, as trapped steam will soften that perfect crust you worked so hard to achieve.
Tips and Tricks
For those looking to elevate their air fryer chicken cutlet game beyond the basics, here are some professional-level tips that will take your results from good to extraordinary. First, consider brining your chicken before breading—dissolve ¼ cup salt and 2 tablespoons sugar in 4 cups warm water, submerge the pounded cutlets for 30-60 minutes, then pat thoroughly dry before dredging. This brining process ensures incredibly juicy, flavorful chicken that stays moist even if slightly overcooked, acting as an insurance policy against dryness. Second, experiment with your breadcrumb mixture—try combining panko with crushed cornflakes for extra crunch, or add 2 tablespoons of everything bagel seasoning for fantastic flavor complexity. For cheese lovers, mix in ¼ cup of finely grated Asiago or Romano cheese along with the Parmesan for a more robust cheesy flavor that really stands out.
Third, master the art of oil spraying—instead of generic cooking spray, use a high-quality olive oil or avocado oil in a misting bottle for better flavor and more controlled application. Spray the breaded chicken lightly but evenly right before cooking, and consider giving another quick spritz after flipping for maximum overall crispiness. Fourth, if you’re cooking for a crowd or meal prepping, you can bread the cutlets up to 4 hours in advance and store them in a single layer on a wire rack set over a baking sheet in the refrigerator—the cold air actually helps the coating set even better. Fifth, don’t discard your leftover dredging ingredients—the flour, egg, and breadcrumb mixtures can be combined with a little milk or water to make delicious hush puppies or fritters that cook beautifully in the air fryer alongside your chicken.
Sixth, for those watching sodium intake, you can reduce the salt in the seasoning mix and instead serve with a flavorful sauce or chutney on the side—mango salsa, yogurt herb sauce, or roasted red pepper dip all complement the chicken beautifully without adding excess salt. Seventh, if your air fryer has multiple functions, try using the “air crisp” setting if available, or if it has temperature ranges rather than specific degrees, aim for the highest heat setting your model offers for the crispiest results. Finally, always keep your air fryer basket clean between batches—any accumulated crumbs or debris can burn and create smoke, affecting the flavor of subsequent batches. A quick wipe with a damp paper towel between batches keeps everything cooking cleanly and efficiently.
Recipe Variations
- For an Italian-inspired version, add 2 teaspoons of dried Italian seasoning, 1 teaspoon of lemon zest, and ¼ cup of grated Pecorino Romano to the breadcrumb mixture. Serve with marinara sauce and melted mozzarella for chicken Parmesan-style cutlets, or slice over a bed of arugula with shaved Parmesan and lemon vinaigrette for a light meal. The herbal notes from the Italian seasoning pair beautifully with the crispiness of the coating, while the lemon zest adds brightness that cuts through the richness.
- Create a spicy kick by adding 1-2 teaspoons of cayenne pepper, smoked paprika, or chili powder to the breadcrumb mixture, along with ½ teaspoon of black pepper for extra heat. For those who really love spice, incorporate 1-2 tablespoons of hot sauce into the egg wash before dipping. Serve with cooling accompaniments like ranch dressing, blue cheese dip, or cucumber yogurt sauce to balance the heat, or use the spicy cutlets in sandwiches with pepper jack cheese and chipotle mayo.
- For a gluten-free alternative, replace the all-purpose flour with almond flour or gluten-free all-purpose flour blend, and use gluten-free panko breadcrumbs. Ensure your baking powder and spices are certified gluten-free if necessary. The cooking time may need slight adjustment as gluten-free coatings can brown differently, so keep a close eye after flipping and rely on your thermometer for doneness. These work beautifully as a base for various dietary needs without sacrificing any of the crispy texture.
- Try an Asian-inspired twist by replacing the Parmesan with ¼ cup of finely crushed crispy fried onions or shallots, and add 1 teaspoon of five-spice powder to the breadcrumb mixture. Substitute the egg wash with a mixture of 2 eggs beaten with 1 tablespoon of soy sauce and 1 teaspoon of sesame oil for deeper flavor penetration. Serve with sweet chili sauce, peanut dipping sauce, or over rice with stir-fried vegetables for a complete fusion meal that brings exciting new flavors to the classic cutlet.
Frequently Asked Questions
Can I use frozen chicken for this recipe?
While you can use frozen chicken, I strongly recommend thawing it completely first for the best results. Frozen chicken will release moisture during cooking, which can prevent proper browning and make the coating soggy. If you must use frozen, thaw in the refrigerator overnight, then pat extremely dry with paper towels before pounding and breading. The cooking time may need to be increased by 3-5 minutes, but always use a thermometer to ensure doneness rather than relying on time alone. Never bread partially frozen chicken as the ice crystals will prevent proper adhesion and create a patchy coating.
Why did my breading fall off during cooking?
Breading detachment usually happens for three main reasons: insufficient drying of the chicken before dredging, not shaking off excess flour after the first step, or overcrowding in the air fryer causing steaming instead of crisping. To prevent this, always pat your chicken thoroughly dry with paper towels, shake off excess flour vigorously, and ensure your cutlets aren’t touching in the air fryer basket. Letting the breaded cutlets rest for 5-10 minutes before cooking also helps the coating set and adhere better. If your breading still falls off, try pressing more firmly when applying the breadcrumb mixture to ensure good contact.
Can I make these ahead of time for meal prep?
Absolutely! These cutlets are fantastic for meal prep. After cooking and cooling completely, store in an airtight container in the refrigerator for up to 4 days. To reheat, place them in the air fryer at 375°F for 3-5 minutes until hot and crispy again—avoid microwaving as it will make the coating soft and soggy. You can also freeze the cooked cutlets for up to 3 months; place parchment between layers in an airtight container, then reheat from frozen in the air fryer at 375°F for 8-10 minutes until heated through. The texture holds up remarkably well to freezing and reheating.
What’s the best way to pound chicken to even thickness?
Place the chicken between two pieces of plastic wrap or in a large zip-top bag to contain mess and prevent tearing. Using the flat side of a meat mallet or a heavy rolling pin, start from the center and work outward with firm, even pressure, rotating the chicken occasionally to ensure uniform thickness. Aim for ½-inch thickness throughout—this is thin enough to cook quickly but thick enough to remain juicy. If you don’t have a mallet, a heavy skillet or even a canned good can work in a pinch. Even thickness is crucial for preventing uneven cooking where edges overcook before the center is done.
How do I prevent the coating from burning before the chicken cooks through?
If your coating is browning too quickly, reduce the temperature to 375°F after the initial crisping phase. The high heat at the beginning helps create that beautiful golden color, but lowering it slightly allows the interior to cook through without over-browning the exterior. Also ensure your chicken is pounded to an even ½-inch thickness—thicker areas will take longer to cook, risking burnt coating. If you notice excessive browning, you can tent the cutlets with foil during the last few minutes of cooking. Using an instant-read thermometer is your best defense against this issue, as it tells you exactly when the chicken is done regardless of color.
Summary
This air fryer chicken cutlet recipe delivers incredibly crispy, golden-brown perfection with significantly less oil than traditional frying. The combination of proper dredging technique, high heat, and careful flipping creates restaurant-quality results right in your kitchen. Perfect for weeknights, meal prep, or impressing guests with minimal effort and maximum flavor.
Air Fryer Chicken Cutlets
5
servings15
minutes18
minutesIngredients
Instructions
- 1 Preheat air fryer to 400°F for 3 minutes.
- 2 Set up three shallow bowls: one with flour mixed with half the salt and pepper, one with beaten eggs, and one with panko, Parmesan, garlic powder, paprika, and remaining seasonings.
- 3 Dredge each chicken cutlet in flour, then egg, then breadcrumb mixture, pressing firmly to adhere coating.
- 4 Arrange in single layer in air fryer basket, spray lightly with oil, and cook at 400°F for 10-12 minutes.
- 5 Flip cutlets, spray lightly again, and cook another 6-8 minutes until internal temperature reaches 165°F.
- 6 Transfer to wire rack, rest 5 minutes, garnish with parsley, and serve with lemon wedges.


