Feeling overwhelmed by dinner prep? You’re not alone! We’ve gathered 33 delicious, healthy recipes that require just five ingredients each—perfect for busy weeknights. From quick stir-fries to simple sheet-pan meals, these fuss-free dishes prove that eating well doesn’t have to be complicated. Get ready to save time and savor every bite as you explore our roundup of easy, nutritious solutions for your busiest days.
Avocado and Egg Breakfast Toast
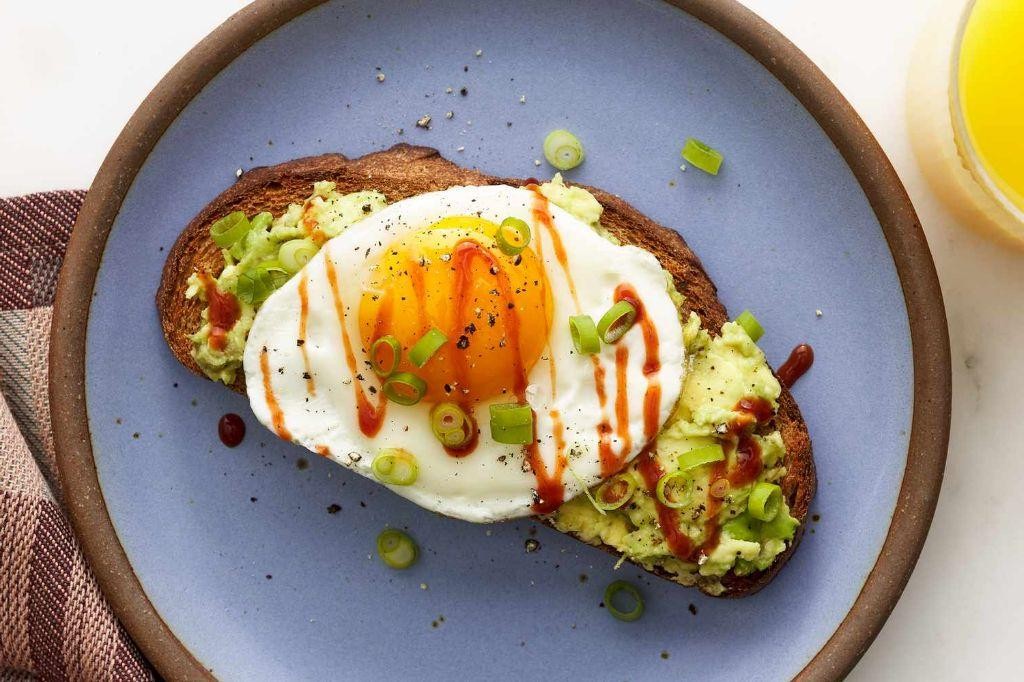
Yielded from the simplest of ingredients yet delivering profound satisfaction, this Avocado and Egg Breakfast Toast transforms humble morning staples into an elegant, nourishing ritual. With creamy avocado, perfectly cooked eggs, and artisanal bread as its foundation, this dish balances richness with brightness in every bite—a testament to how thoughtful preparation elevates everyday eating.
Serving: 2 | Pre Time: 5 minutes | Cooking Time: 10 minutes
Ingredients
– 2 slices of rustic, thick-cut sourdough bread
– 1 ripe Hass avocado, flesh scooped
– 2 large farm-fresh eggs
– 1 tablespoon of rich extra-virgin olive oil
– 1 tablespoon of freshly squeezed lemon juice
– ½ teaspoon of flaky sea salt
– ¼ teaspoon of finely ground black pepper
– 2 tablespoons of finely chopped fresh chives
Instructions
1. Preheat a non-stick skillet over medium heat for 2 minutes until evenly warm.
2. Drizzle 1 teaspoon of rich extra-virgin olive oil onto the skillet, swirling to coat the surface.
3. Crack 2 large farm-fresh eggs into the skillet, spacing them apart to prevent sticking.
4. Cook the eggs for 3–4 minutes until the whites are fully set and the yolks remain runny, covering the skillet briefly to steam the tops if needed.
5. While the eggs cook, toast 2 slices of rustic, thick-cut sourdough bread in a toaster or oven until golden-brown and crisp, about 2–3 minutes.
6. In a small bowl, mash 1 ripe Hass avocado with 1 tablespoon of freshly squeezed lemon juice until smooth but slightly chunky.
7. Season the avocado mash with ½ teaspoon of flaky sea salt and ¼ teaspoon of finely ground black pepper, stirring to incorporate evenly.
8. Spread the seasoned avocado mash generously onto the toasted sourdough slices, dividing it equally.
9. Gently place one cooked egg atop each avocado-covered toast.
10. Garnish each toast with 1 tablespoon of finely chopped fresh chives for a pop of color and fresh flavor.
Offering a delightful contrast, the crisp sourdough yields to the velvety avocado and silky egg yolk, creating a harmonious blend of textures. For a creative twist, sprinkle with red pepper flakes or serve alongside a simple arugula salad dressed with lemon vinaigrette to complement the dish’s creamy richness.
Lemon Herb Grilled Chicken

Unveiling the perfect centerpiece for any summer gathering, this Lemon Herb Grilled Chicken transforms simple ingredients into a dish of remarkable elegance. The bright zest of citrus and the earthy fragrance of fresh herbs meld together over the flame, creating a succulent main course that is both refreshing and deeply satisfying. It’s a testament to how a few quality components can yield extraordinary results on the grill.
Serving: 4 | Pre Time: 20 minutes | Cooking Time: 15 minutes
Ingredients
– 4 boneless, skinless chicken breasts, patted dry with paper towels
– 1/4 cup of rich extra virgin olive oil
– 3 tablespoons of freshly squeezed lemon juice
– 2 tablespoons of finely chopped fresh rosemary
– 2 tablespoons of finely chopped fresh thyme
– 4 cloves of garlic, minced into a fragrant paste
– 1 teaspoon of finely ground sea salt
– 1/2 teaspoon of coarsely cracked black pepper
– 1 lemon, thinly sliced into delicate rounds
Instructions
1. In a medium glass bowl, whisk together the rich extra virgin olive oil, freshly squeezed lemon juice, finely chopped fresh rosemary, finely chopped fresh thyme, minced garlic paste, finely ground sea salt, and coarsely cracked black pepper until fully emulsified.
2. Place the patted-dry chicken breasts in a large resealable plastic bag and pour the marinade over them, ensuring each piece is thoroughly coated. Tip: For maximum flavor penetration, gently massage the bag for 30 seconds.
3. Seal the bag tightly, removing as much air as possible, and refrigerate for at least 30 minutes or up to 4 hours. Tip: Marinating beyond 4 hours can break down the chicken’s texture due to the lemon juice’s acidity.
4. Preheat a gas or charcoal grill to medium-high heat, approximately 400°F, and lightly oil the grates with a high-heat oil using a folded paper towel and tongs.
5. Remove the chicken from the marinade, letting any excess drip off, and discard the used marinade.
6. Place the chicken breasts and the delicate lemon rounds directly on the preheated grill grates.
7. Grill the chicken for 6 to 7 minutes on the first side, until you see prominent grill marks and the edges turn opaque.
8. Using tongs, flip each chicken breast and continue grilling for another 6 to 7 minutes. Tip: The chicken is fully cooked when an instant-read thermometer inserted into the thickest part registers 165°F and the juices run clear.
9. Simultaneously, grill the lemon rounds for 2 to 3 minutes per side until lightly charred and caramelized.
10. Transfer the grilled chicken to a clean cutting board and let it rest, undisturbed, for 5 minutes to allow the juices to redistribute.
Beyond its juicy, tender interior, the chicken boasts a beautifully caramelized crust infused with smoky, herbal notes. Serve it sliced atop a bed of arugula with the charred lemon rounds for a burst of tangy brightness, or alongside grilled asparagus for a complete, elegant meal.
Zucchini Noodles with Pesto
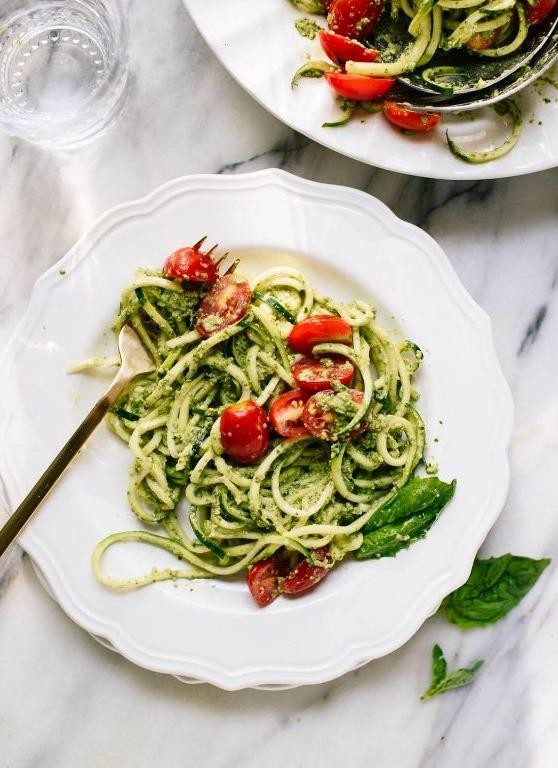
Zesty yet delicate, zucchini noodles with pesto offer a vibrant, garden-fresh twist on classic pasta, transforming humble summer squash into elegant, gluten-free ribbons that cradle a lush, herbaceous sauce. This light yet satisfying dish celebrates peak-season produce with a refined simplicity, perfect for a quick weeknight dinner or an impressive al fresco lunch.
Serving: 4 | Pre Time: 15 minutes | Cooking Time: 5 minutes
Ingredients
– 4 medium firm, fresh zucchini
– 2 cups packed fragrant fresh basil leaves
– 1/2 cup rich extra virgin olive oil
– 1/3 cup finely grated nutty Parmesan cheese
– 1/4 cup toasted pine nuts
– 2 cloves aromatic garlic, peeled
– 1/2 teaspoon flaky sea salt
– 1/4 teaspoon freshly cracked black pepper
Instructions
1. Wash and trim the ends from 4 medium firm, fresh zucchini.
2. Use a spiralizer to create long, thin zucchini noodles, placing them in a large bowl. Tip: For best texture, spiralize the zucchini just before cooking to prevent excess moisture.
3. In a food processor, combine 2 cups packed fragrant fresh basil leaves, 1/3 cup finely grated nutty Parmesan cheese, 1/4 cup toasted pine nuts, and 2 cloves aromatic garlic, peeled.
4. Pulse the mixture 5-7 times until coarsely chopped.
5. With the processor running on low, slowly drizzle in 1/2 cup rich extra virgin olive oil through the feed tube until the pesto is smooth and emulsified, about 30 seconds.
6. Season the pesto with 1/2 teaspoon flaky sea salt and 1/4 teaspoon freshly cracked black pepper, then pulse once more to combine. Tip: Taste and adjust seasoning if needed, but avoid over-processing to maintain the pesto’s vibrant green color.
7. Heat a large skillet over medium-high heat for 1 minute until hot.
8. Add the zucchini noodles to the dry skillet and sauté for 2-3 minutes, tossing frequently with tongs, until just tender but still al dente. Tip: Do not overcrowd the skillet; cook in batches if necessary to ensure even cooking without steaming.
9. Remove the skillet from heat and immediately fold in the prepared pesto, tossing gently to coat the noodles evenly.
10. Divide the zucchini noodles among 4 plates and serve immediately.
Elegantly al dente, the zucchini noodles offer a satisfying bite that contrasts beautifully with the creamy, garlicky pesto, while the toasted pine nuts add a delightful crunch. For a creative twist, top with grilled shrimp or cherry tomatoes, or serve chilled as a refreshing pasta salad.
Sweet Potato and Black Bean Tacos
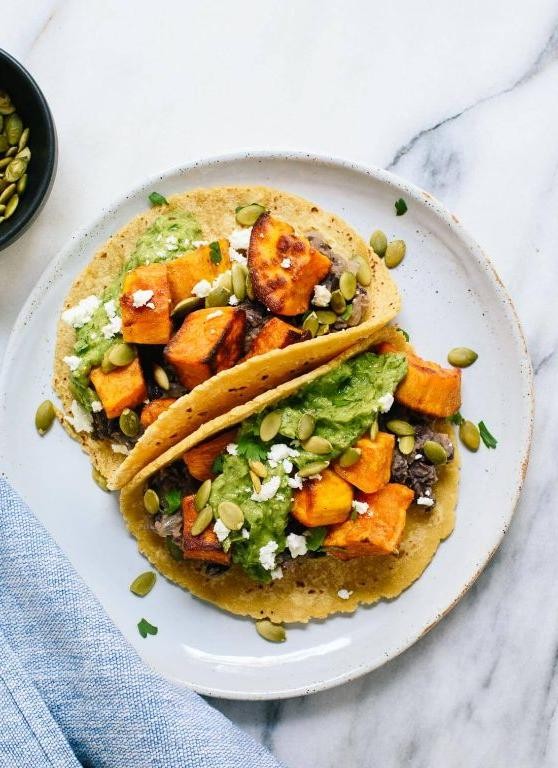
Just when you thought tacos couldn’t get more comforting, these sweet potato and black bean creations arrive to redefine the genre. Their vibrant, earthy filling, wrapped in warm tortillas, offers a satisfying vegetarian twist that feels both nourishing and indulgent. This recipe transforms humble ingredients into a colorful, flavor-packed meal perfect for a quick weeknight dinner or a casual gathering.
Serving: 4 | Pre Time: 15 minutes | Cooking Time: 25 minutes
Ingredients
– 2 medium sweet potatoes, peeled and diced into ½-inch cubes
– 1 tablespoon rich extra virgin olive oil
– 1 teaspoon fragrant ground cumin
– ½ teaspoon smoky paprika
– ¼ teaspoon fine sea salt
– 1 (15-ounce) can of plump black beans, rinsed and drained
– 8 small (6-inch) soft corn tortillas
– ½ cup fresh cilantro leaves, roughly chopped
– ½ cup creamy crumbled cotija cheese
– 1 ripe avocado, sliced
– ¼ cup tangy lime crema (mix ¼ cup sour cream with 1 tablespoon fresh lime juice)
Instructions
1. Preheat your oven to 425°F and line a large baking sheet with parchment paper.
2. In a large bowl, toss the diced sweet potatoes with the extra virgin olive oil, ground cumin, paprika, and sea salt until evenly coated.
3. Spread the seasoned sweet potatoes in a single layer on the prepared baking sheet.
4. Roast for 20-25 minutes, flipping halfway through, until the potatoes are tender and caramelized at the edges.
5. While the potatoes roast, warm the corn tortillas by heating a dry skillet over medium heat for 30 seconds per side, keeping them wrapped in a clean kitchen towel to stay pliable.
6. In a small saucepan over low heat, gently warm the rinsed black beans for 5 minutes, stirring occasionally, until heated through.
7. To assemble, place two warm tortillas on each plate and divide the roasted sweet potatoes and warm black beans evenly among them.
8. Top each taco with sliced avocado, a sprinkle of crumbled cotija cheese, and a generous pinch of fresh cilantro.
9. Drizzle each taco lightly with the prepared lime crema just before serving.
Each bite delivers a delightful contrast: the creamy avocado and tangy crema balance the earthy sweetness of the potatoes and the hearty beans. For a vibrant presentation, serve these tacos on a large platter with extra lime wedges and a quick-pickled red onion garnish to add a bright, acidic crunch.
Balsamic Glazed Salmon
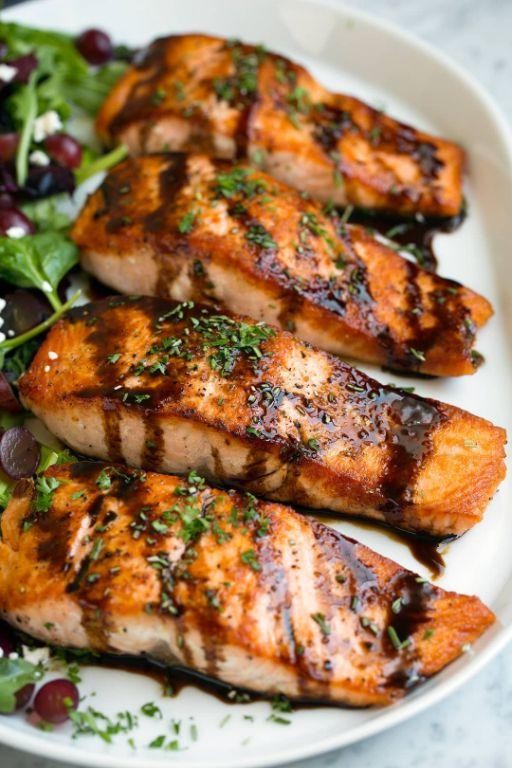
Venture into a culinary masterpiece where tender, flaky salmon meets a glossy, tangy-sweet balsamic reduction, creating an elegant yet approachable dish perfect for both weeknight dinners and special occasions. This balsamic glazed salmon balances rich, buttery fish with the complex acidity of aged balsamic vinegar, resulting in a restaurant-quality meal that comes together effortlessly in your own kitchen. With its caramelized exterior and moist interior, it’s a surefire way to impress with minimal fuss.
Serving: 4 | Pre Time: 10 minutes | Cooking Time: 15 minutes
Ingredients
– 4 (6-ounce) skin-on salmon fillets, patted dry with paper towels
– 2 tablespoons rich extra virgin olive oil
– 1/2 cup aged balsamic vinegar
– 2 tablespoons pure maple syrup
– 2 cloves fresh garlic, minced
– 1 teaspoon finely ground black pepper
– 1/2 teaspoon flaky sea salt
– 1 tablespoon unsalted butter
– 2 sprigs fresh rosemary
Instructions
1. Preheat your oven to 400°F and line a baking sheet with parchment paper.
2. In a small saucepan over medium heat, combine the aged balsamic vinegar, pure maple syrup, minced fresh garlic, and fresh rosemary sprigs.
3. Bring the mixture to a gentle simmer, then reduce the heat to low and cook for 8–10 minutes, stirring occasionally, until it thickens to a syrup-like consistency that coats the back of a spoon.
4. Remove the saucepan from the heat, discard the rosemary sprigs, and stir in the unsalted butter until fully melted and incorporated.
5. While the glaze reduces, season the patted-dry salmon fillets evenly on both sides with flaky sea salt and finely ground black pepper.
6. Heat the rich extra virgin olive oil in a large oven-safe skillet over medium-high heat until shimmering, about 2 minutes.
7. Place the salmon fillets skin-side down in the skillet and sear for 3–4 minutes until the skin is crispy and golden brown.
8. Brush the top of each fillet generously with the balsamic glaze, reserving about 2 tablespoons for later.
9. Transfer the skillet to the preheated oven and bake for 6–8 minutes, or until the salmon flakes easily with a fork and reaches an internal temperature of 145°F.
10. Remove the skillet from the oven and let the salmon rest for 3 minutes before serving.
11. Drizzle the reserved balsamic glaze over the plated salmon fillets as a finishing touch.
Nothing compares to the contrast of the crispy, caramelized glaze against the tender, moist salmon that melts in your mouth. The tangy-sweet balsamic reduction beautifully cuts through the richness of the fish, while the hint of garlic and rosemary adds aromatic depth. For a creative twist, serve it over a bed of creamy polenta or alongside roasted asparagus to soak up every last drop of the glossy sauce.
Spinach and Feta Stuffed Peppers
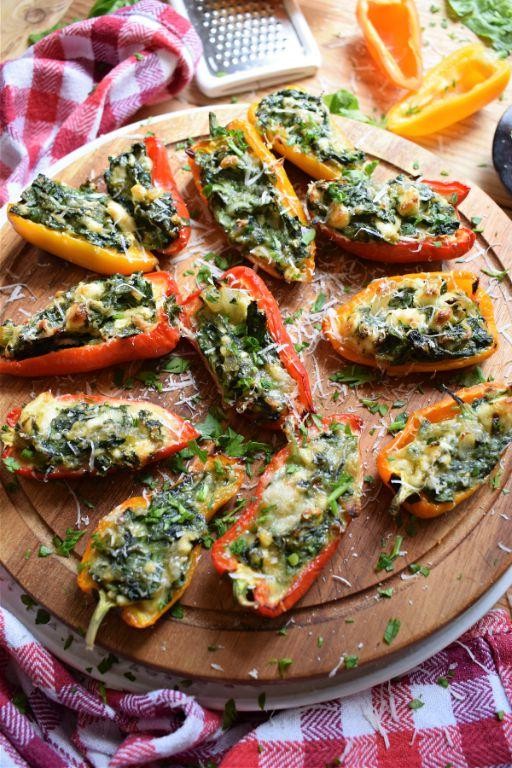
Savor the vibrant fusion of Mediterranean flavors with these elegant Spinach and Feta Stuffed Peppers, a dish that transforms humble ingredients into a stunning, wholesome centerpiece. Each pepper becomes a vessel for a savory filling of wilted spinach and creamy feta, baked until tender and golden. This recipe offers a delightful balance of textures and tastes, perfect for a sophisticated weeknight dinner or an impressive gathering.
Serving: 4 | Pre Time: 15 minutes | Cooking Time: 30 minutes
Ingredients
– 4 large, firm bell peppers (red or yellow)
– 2 tablespoons rich extra virgin olive oil
– 1 medium yellow onion, finely diced
– 2 cloves fresh garlic, minced
– 5 ounces fresh baby spinach leaves
– 1 cup crumbled creamy feta cheese
– 1/2 cup cooked quinoa or long-grain white rice
– 1 teaspoon dried oregano
– 1/2 teaspoon finely ground black pepper
– 1/4 teaspoon sea salt
Instructions
1. Preheat your oven to 375°F (190°C) and lightly grease a baking dish with a drizzle of olive oil.
2. Slice the tops off the bell peppers and carefully remove the seeds and membranes, creating hollow vessels; set aside.
3. In a large skillet, heat the extra virgin olive oil over medium heat until shimmering, about 1 minute.
4. Add the finely diced yellow onion and sauté until translucent and soft, approximately 5 minutes, stirring occasionally.
5. Stir in the minced fresh garlic and cook for 1 minute until fragrant, being careful not to let it burn.
6. Add the fresh baby spinach leaves to the skillet and cook until fully wilted, about 3-4 minutes, then remove from heat.
7. Transfer the spinach mixture to a mixing bowl and let it cool slightly for 2-3 minutes to prevent melting the cheese.
8. Fold in the crumbled creamy feta cheese, cooked quinoa or rice, dried oregano, finely ground black pepper, and sea salt until well combined.
9. Evenly divide the filling among the hollowed bell peppers, packing it gently to avoid air pockets.
10. Place the stuffed peppers upright in the prepared baking dish and cover loosely with aluminum foil.
11. Bake at 375°F (190°C) for 20 minutes, then remove the foil and bake for an additional 10 minutes until the peppers are tender and the tops are lightly golden.
12. Let the peppers rest for 5 minutes before serving to allow the flavors to meld and the filling to set.
These peppers emerge from the oven with a tender-crisp exterior that gives way to a warm, creamy filling bursting with savory notes. The feta adds a tangy richness that beautifully complements the earthy spinach, while a sprinkle of fresh herbs like parsley or dill just before serving can elevate the presentation. Try pairing them with a simple arugula salad dressed in lemon vinaigrette for a complete, elegant meal that delights both the eyes and palate.
Mango Coconut Chia Pudding
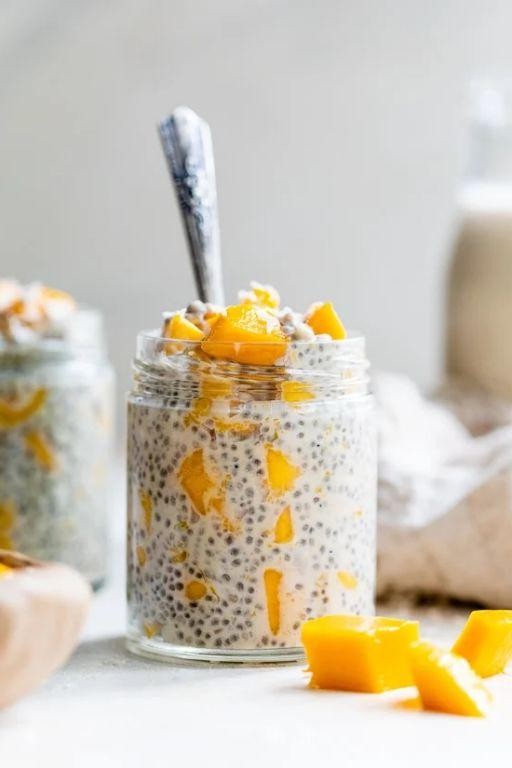
Vividly capturing the essence of a tropical sunrise, this Mango Coconut Chia Pudding is an effortlessly elegant dessert that marries the lush sweetness of ripe mango with the creamy, subtle nuttiness of coconut. It’s a no-cook marvel that transforms simple, wholesome ingredients into a stunning, layered treat perfect for a sophisticated brunch or a light, satisfying end to any meal. The result is a visually striking and refreshingly cool pudding that feels both indulgent and nourishing.
Serving: 4 | Pre Time: 15 minutes | Cooking Time: 0 minutes
Ingredients
– 1 ½ cups of chilled, full-fat coconut milk
– ½ cup of pure, golden chia seeds
– ¼ cup of fragrant, raw honey
– 1 teaspoon of pure vanilla extract
– A pinch of fine, flaky sea salt
– 2 large, perfectly ripe mangoes
– ¼ cup of toasted, unsweetened coconut flakes
Instructions
1. In a medium mixing bowl, vigorously whisk together 1 ½ cups of chilled, full-fat coconut milk, ¼ cup of fragrant, raw honey, 1 teaspoon of pure vanilla extract, and a pinch of fine, flaky sea salt until the honey is fully dissolved and the mixture is smooth.
2. Gently stir in ½ cup of pure, golden chia seeds until they are evenly distributed throughout the liquid, ensuring no clumps form. Tip: Whisking the chia seeds in immediately helps prevent them from sticking together.
3. Cover the bowl tightly with plastic wrap and refrigerate the mixture for a minimum of 4 hours, or ideally overnight, until the chia seeds have fully absorbed the liquid and the pudding has thickened to a spoonable, gel-like consistency.
4. While the pudding sets, peel 2 large, perfectly ripe mangoes and carefully slice the flesh away from the pit. Dice half of the mango flesh into ¼-inch cubes and reserve the remaining half for blending.
5. Place the reserved mango half into a high-speed blender and purée on high for 30-45 seconds until completely smooth and silky, scraping down the sides as needed to achieve a uniform texture.
6. To assemble, divide the set chia pudding evenly among four serving glasses or bowls. Tip: For clean layers, spoon the pudding gently against the side of the glass.
7. Layer an equal amount of the vibrant mango purée over the chia pudding in each glass.
8. Top each serving with the diced mango cubes and a generous sprinkle of ¼ cup of toasted, unsweetened coconut flakes. Tip: Toasting the coconut flakes in a dry skillet over medium-low heat for 2-3 minutes until golden brown enhances their nutty aroma and adds a delightful crunch.
9. Serve immediately, or cover and refrigerate for up to 1 hour before serving to allow the flavors to meld further.
Captivating in its simplicity, the pudding offers a delightful contrast between the creamy, tapioca-like texture of the chia seeds and the lush, smooth mango purée. Each spoonful delivers a bright, tropical sweetness balanced by the subtle richness of coconut, while the toasted flakes provide a satisfying crunch. For a creative twist, serve it in hollowed-out coconut shells or garnish with a sprig of fresh mint and a drizzle of lime zest to elevate its vibrant, sun-kissed flavors.
Tomato Basil Quinoa Salad
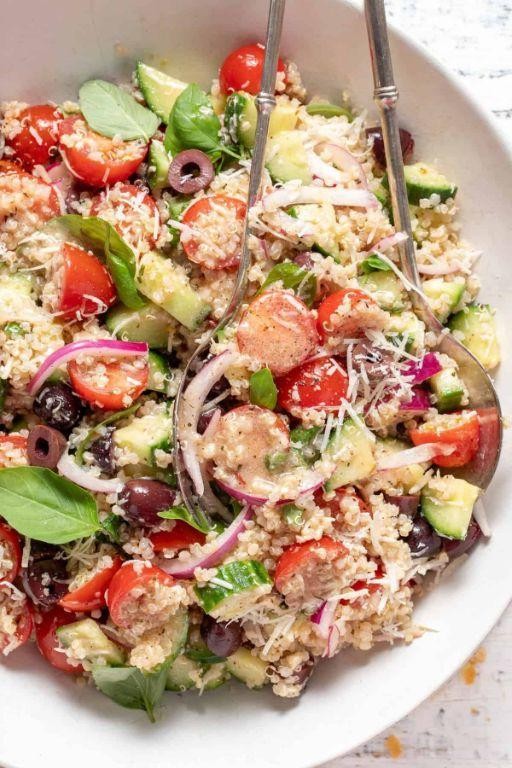
Nourishing and vibrant, this Tomato Basil Quinoa Salad is a celebration of summer’s bounty, where nutty quinoa meets the sweet acidity of ripe tomatoes and the aromatic freshness of basil. It’s a dish that balances wholesome grains with bright, herbaceous flavors, creating a satisfying yet light meal perfect for warm-weather gatherings. With its colorful presentation and harmonious blend of textures, this salad is as delightful to behold as it is to savor.
Serving: 4 | Pre Time: 15 minutes | Cooking Time: 20 minutes
Ingredients
– 1 cup of uncooked quinoa, rinsed thoroughly
– 2 cups of water
– 1 pint of cherry tomatoes, halved to reveal their juicy interiors
– 1/2 cup of fresh basil leaves, thinly sliced into fragrant ribbons
– 1/4 cup of rich extra virgin olive oil
– 2 tablespoons of freshly squeezed lemon juice, for a zesty brightness
– 1/4 teaspoon of finely ground black pepper
– 1/2 teaspoon of sea salt, to enhance the natural flavors
Instructions
1. In a medium saucepan, combine the rinsed quinoa and water, then bring to a boil over high heat.
2. Reduce the heat to low, cover the saucepan, and simmer the quinoa for 15 minutes, or until all the water is absorbed and the grains are tender with a slight bite.
3. Remove the saucepan from the heat, fluff the quinoa with a fork, and let it cool to room temperature for about 10 minutes to prevent the salad from becoming soggy.
4. In a large mixing bowl, whisk together the extra virgin olive oil, lemon juice, sea salt, and black pepper until emulsified into a smooth dressing.
5. Add the cooled quinoa, halved cherry tomatoes, and sliced basil to the bowl with the dressing.
6. Gently toss all ingredients together until evenly coated, being careful not to crush the tomatoes to maintain their texture.
7. Let the salad rest for 5 minutes to allow the flavors to meld, then taste and adjust seasoning if needed, though the measured amounts should provide a balanced profile.
8. Transfer the salad to a serving dish or individual plates for immediate enjoyment.
Buttery quinoa grains contrast beautifully with the burst of juicy tomatoes, while the basil infuses each bite with a garden-fresh aroma. Serve it as a standalone lunch, pair it with grilled chicken for a heartier meal, or pack it for a picnic where its flavors deepen over time.
Garlic Roasted Brussels Sprouts
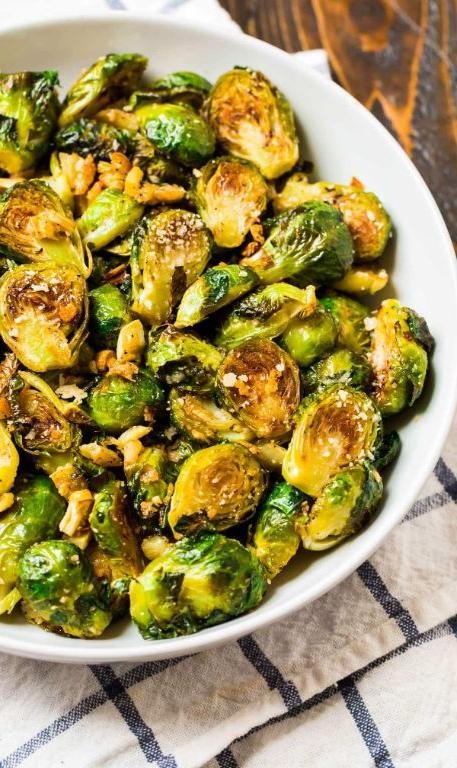
Beneath the crisp winter air, few dishes offer the comforting warmth and sophisticated simplicity of roasted Brussels sprouts, transformed into a caramelized masterpiece with the aromatic kiss of garlic. This elegant preparation elevates the humble sprout to a side dish worthy of any holiday table or weeknight dinner, achieving a perfect balance of savory depth and tender-crisp texture. With just a handful of quality ingredients, you can create a vegetable-centric showstopper that delights both the palate and the eye.
Serving: 4 | Pre Time: 10 minutes | Cooking Time: 25 minutes
Ingredients
- 1 ½ pounds fresh Brussels sprouts, trimmed and halved
- 3 tablespoons rich extra virgin olive oil
- 6 cloves fresh garlic, minced
- 1 teaspoon coarse kosher salt
- ½ teaspoon freshly cracked black pepper
- 2 tablespoons aged balsamic vinegar
- ¼ cup finely grated Parmesan cheese
Instructions
- Preheat your oven to 425°F (218°C) and position a rack in the center.
- Place the trimmed and halved Brussels sprouts in a large mixing bowl.
- Drizzle the rich extra virgin olive oil over the sprouts, ensuring all pieces are lightly coated.
- Add the minced fresh garlic, coarse kosher salt, and freshly cracked black pepper to the bowl.
- Toss everything together thoroughly until the sprouts are evenly seasoned. Tip: For maximum flavor, let the seasoned sprouts sit for 5 minutes before roasting to allow the salt to draw out moisture.
- Spread the sprouts in a single layer on a large, rimmed baking sheet, placing them cut-side down. Tip: Arranging them cut-side down promotes better caramelization on the flat surface.
- Roast in the preheated oven for 20-25 minutes, or until the sprouts are deeply golden brown and tender when pierced with a fork, shaking the pan halfway through.
- Remove the baking sheet from the oven and immediately drizzle the aged balsamic vinegar over the hot sprouts, tossing gently to coat.
- Transfer the roasted sprouts to a serving dish and sprinkle the finely grated Parmesan cheese over the top while still warm. Tip: The residual heat will slightly melt the cheese, creating a deliciously savory finish.
Unveiling a dish of contrasting textures, the caramelized, almost crispy outer leaves give way to a tender, almost creamy interior, all harmonized by the sweet-sharp punch of garlic and balsamic. The nutty Parmesan adds a final layer of umami richness, making these sprouts a versatile companion to roasted meats or a stunning standalone vegetarian option. For a creative twist, scatter with toasted pine nuts or a drizzle of truffle oil just before serving.
Peanut Butter Banana Smoothie
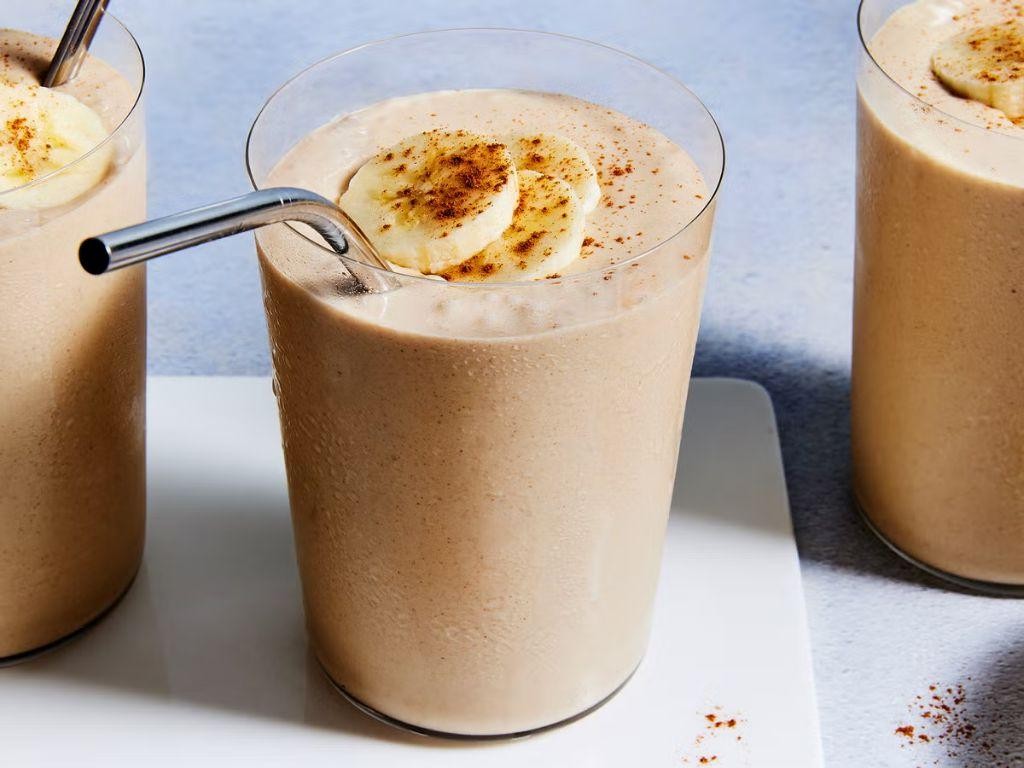
Just as the morning sun begins to warm the kitchen, there’s a particular craving that calls for something both nourishing and indulgent—a creamy, dreamy blend that feels like a hug in a glass. This peanut butter banana smoothie is that very elixir, a harmonious union of wholesome ingredients that transforms into a velvety, satisfying sip, perfect for a quick breakfast or a revitalizing afternoon treat.
Serving: 2 | Pre Time: 5 minutes | Cooking Time: 0 minutes
Ingredients
- 2 large, perfectly ripe bananas, peeled and sliced
- 1/2 cup of creamy, all-natural peanut butter
- 1 1/2 cups of cold, creamy whole milk
- 1 cup of plain, thick Greek yogurt
- 2 tablespoons of golden, raw honey
- 1 teaspoon of pure vanilla extract
- A generous pinch of flaky sea salt
- 1 cup of ice cubes
Instructions
- Place the sliced, perfectly ripe bananas into the base of a high-powered blender.
- Add the 1/2 cup of creamy, all-natural peanut butter to the blender. Tip: For the smoothest texture, ensure your peanut butter is well-stirred if using a natural variety that separates.
- Pour in the 1 1/2 cups of cold, creamy whole milk.
- Spoon the 1 cup of plain, thick Greek yogurt into the blender.
- Drizzle the 2 tablespoons of golden, raw honey over the other ingredients.
- Add the 1 teaspoon of pure vanilla extract and the generous pinch of flaky sea salt.
- Finally, add the 1 cup of ice cubes to the blender.
- Securely fasten the lid on the blender.
- Blend the mixture on high speed for 45 to 60 seconds, or until the contents are completely smooth, with no visible chunks of ice or banana. Tip: If the mixture seems too thick, pause blending and add an additional 1/4 cup of milk, then blend again for 15 seconds.
- Stop the blender and remove the lid.
- Pour the smoothie evenly into two tall, chilled glasses. Tip: For a professional presentation, use a spatula to scrape down the sides of the blender pitcher to ensure you get every last drop.
Rich and luxuriously thick, this smoothie boasts a decadent mouthfeel from the peanut butter and yogurt, balanced by the natural sweetness of banana and honey. Reminiscent of a melted milkshake yet far more wholesome, its flavor profile is deeply nutty with bright vanilla notes. For a creative twist, consider garnishing with a drizzle of extra honey, a sprinkle of crushed peanuts, or even a few cacao nibs for a hint of sophisticated bitterness.
Caprese Skewers with Balsamic Reduction
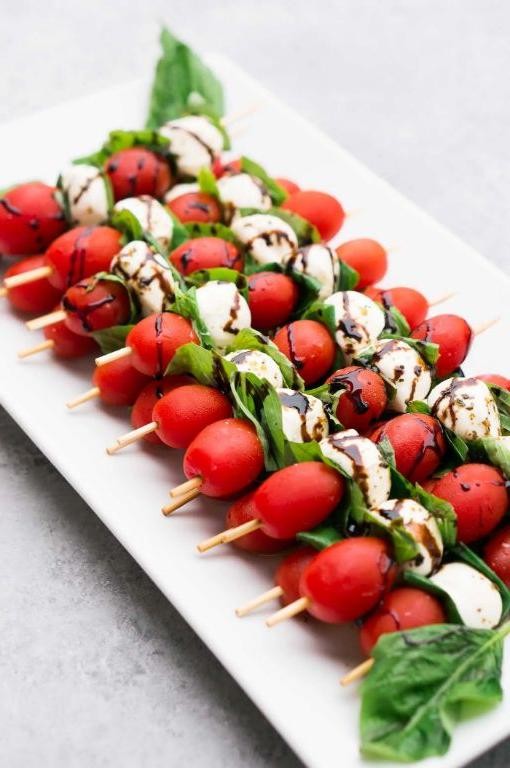
Offering a sophisticated yet effortless appetizer, these Caprese Skewers with Balsamic Reduction transform the classic Italian salad into elegant, bite-sized delights. Perfect for entertaining or a light summer meal, they combine vibrant colors and fresh flavors in a stunning presentation that belies their simplicity. The drizzle of sweet-tart balsamic reduction adds a luxurious finish that elevates each skewer to gourmet status.
Serving: 8 | Pre Time: 15 minutes | Cooking Time: 10 minutes
Ingredients
– 1 pint ripe cherry tomatoes, halved
– 8 ounces fresh mozzarella balls (ciliegine size), drained
– 1/2 cup fresh basil leaves, plus extra for garnish
– 1 cup high-quality balsamic vinegar
– 2 tablespoons pure maple syrup
– 1 tablespoon rich extra virgin olive oil
– 1/2 teaspoon flaky sea salt
– 1/4 teaspoon freshly cracked black pepper
Instructions
1. In a small saucepan over medium heat, combine 1 cup high-quality balsamic vinegar and 2 tablespoons pure maple syrup.
2. Bring the mixture to a gentle simmer, then reduce heat to low and cook for 8-10 minutes until reduced by half and thickened to a syrup consistency. (Tip: Stir occasionally to prevent burning and watch for bubbles that indicate proper reduction.)
3. Remove the balsamic reduction from heat and let cool completely to room temperature, about 15 minutes.
4. While the reduction cools, assemble skewers by threading one halved ripe cherry tomato, one fresh mozzarella ball, and one fresh basil leaf onto each 6-inch wooden skewer.
5. Arrange all assembled skewers on a serving platter in a single layer.
6. Drizzle 1 tablespoon rich extra virgin olive oil evenly over the skewers.
7. Sprinkle 1/2 teaspoon flaky sea salt and 1/4 teaspoon freshly cracked black pepper over the skewers.
8. Just before serving, drizzle the cooled balsamic reduction over the skewers in a zigzag pattern. (Tip: Use a spoon for better control and create artistic drizzle patterns.)
9. Garnish the platter with additional fresh basil leaves for visual appeal.
10. Serve immediately at room temperature for optimal flavor. (Tip: If preparing ahead, store components separately and assemble within 30 minutes of serving to maintain texture.)
For a delightful contrast, the creamy mozzarella yields to the juicy burst of tomatoes, while the basil adds a fragrant herbal note. These skewers shine as passed appetizers at cocktail parties or arranged artfully on a charcuterie board alongside cured meats and crusty bread.
Honey Mustard Baked Tofu
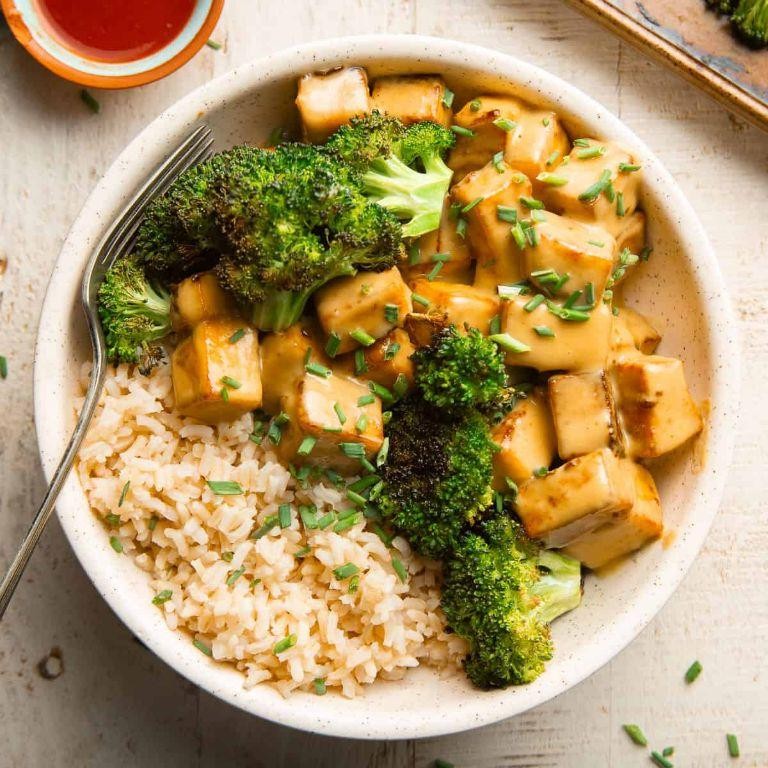
Luminous in its simplicity yet profound in flavor, this honey mustard baked tofu transforms humble ingredients into a dish of remarkable elegance. The sweet-tangy glaze caramelizes into a glossy, irresistible coating that makes each bite a celebration of texture and taste.
Serving: 4 | Pre Time: 15 minutes | Cooking Time: 25 minutes
Ingredients
– 1 block (14 oz) extra-firm tofu, pressed to remove excess moisture
– ¼ cup smooth Dijon mustard
– 2 tablespoons raw, golden honey
– 1 tablespoon rich extra virgin olive oil
– 1 teaspoon aromatic smoked paprika
– ½ teaspoon finely ground sea salt
– ¼ teaspoon freshly cracked black pepper
– 1 tablespoon fresh lemon juice, squeezed from a bright, ripe lemon
– 1 tablespoon finely chopped fresh parsley for garnish
Instructions
1. Preheat your oven to 400°F (204°C) and line a rimmed baking sheet with parchment paper.
2. Slice the pressed extra-firm tofu into ½-inch thick slabs, then cut each slab into 1-inch cubes for even cooking.
3. In a medium mixing bowl, whisk together the smooth Dijon mustard, raw golden honey, rich extra virgin olive oil, aromatic smoked paprika, finely ground sea salt, and freshly cracked black pepper until fully combined and glossy.
4. Add the tofu cubes to the bowl and gently toss with a silicone spatula until each piece is evenly coated with the honey mustard mixture.
5. Arrange the coated tofu cubes in a single layer on the prepared baking sheet, ensuring they do not touch to allow for proper caramelization.
6. Bake at 400°F for 20 minutes, then remove the sheet from the oven and carefully flip each tofu cube using tongs.
7. Return the baking sheet to the oven and bake for an additional 5 minutes, or until the tofu edges are golden brown and the glaze is bubbly and slightly sticky.
8. Transfer the baked tofu to a serving dish and immediately drizzle with the bright, fresh lemon juice, then sprinkle with the finely chopped fresh parsley.
9. Let the tofu rest for 5 minutes before serving to allow the flavors to meld and the glaze to set slightly.
Velvety on the inside with a delightfully crisp exterior, this tofu offers a perfect balance of sweet honey and tangy mustard, elevated by a hint of smokiness. Serve it warm over a bed of fluffy quinoa or tucked into a whole-grain wrap with crisp greens for a satisfying meal that feels both nourishing and indulgent.
Conclusion
You’ve just discovered a treasure trove of kitchen magic! These 33 delicious 5-ingredient recipes prove that healthy, satisfying meals are totally achievable, even on your busiest days. We’d love to hear which recipes become your new go-tos—drop a comment below with your favorites! If this roundup made your meal planning easier, please share it on Pinterest to help other busy cooks.


