
Craving something different in your kitchen routine? We’ve gathered 23 delicious recipes with clever twists that will transform your everyday meals into extraordinary culinary adventures. From reinvented comfort classics to globally-inspired dishes with surprising ingredients, these creative recipes are perfect for home cooks looking to add excitement to their dinner table. Get ready to discover your new favorite dishes—let’s dive into these mouthwatering creations!
Spicy Garlic Shrimp Tacos

Sizzling with flavor and ready in minutes, these spicy garlic shrimp tacos bring restaurant-quality excitement to your weeknight dinner routine. Simply follow these methodical steps to create perfectly seasoned shrimp with a garlicky kick that pairs beautifully with fresh toppings. You’ll be amazed at how quickly this impressive meal comes together.
2
servings15
minutes10
minutesIngredients
For the Shrimp Marinade:
- 1 lb raw medium shrimp, peeled and deveined
- 2 tbsp olive oil
- 4 cloves garlic, minced
- 1 tsp chili powder
- 1/2 tsp smoked paprika
- 1/4 tsp cayenne pepper
- 1/2 tsp salt
For Assembly:
- 8 small corn tortillas
- 1 cup shredded purple cabbage
- 1/2 cup chopped fresh cilantro
- 1 lime, cut into wedges
- 1/4 cup sour cream
Instructions
- Pat the 1 lb raw shrimp completely dry with paper towels to ensure proper searing.
- Combine the 2 tbsp olive oil, 4 minced garlic cloves, 1 tsp chili powder, 1/2 tsp smoked paprika, 1/4 tsp cayenne pepper, and 1/2 tsp salt in a medium bowl.
- Toss the dried shrimp in the spice mixture until evenly coated, then let marinate for 10 minutes at room temperature.
- Heat a large skillet over medium-high heat until a drop of water sizzles immediately upon contact.
- Arrange the marinated shrimp in a single layer in the hot skillet, being careful not to overcrowd the pan.
- Cook the shrimp for 2 minutes without moving them to develop a golden-brown crust on one side.
- Flip each shrimp using tongs and cook for another 1-2 minutes until opaque throughout and slightly curled.
- Remove the cooked shrimp from the skillet and transfer to a clean plate.
- Warm the 8 corn tortillas directly over a gas flame for 15-20 seconds per side until lightly charred, or heat in a dry skillet for 30 seconds per side.
- Place two warmed tortillas on each serving plate as your base.
- Divide the cooked shrimp evenly among the tortillas, arranging them in the center of each.
- Top each taco with 2 tbsp shredded purple cabbage for crunch and color contrast.
- Sprinkle 1 tbsp chopped fresh cilantro over the cabbage on each taco.
- Drizzle 1/2 tbsp sour cream over each assembled taco in a zigzag pattern.
- Serve immediately with lime wedges for squeezing over the top.
Mouthwatering and satisfying, these tacos offer a delightful contrast between the tender, garlicky shrimp and the crisp cabbage. The spicy kick from the marinade balances beautifully with the cool sour cream, while the charred tortillas provide subtle smokiness. For an extra flavor boost, try serving them with quick-pickled red onions or a drizzle of chipotle crema to customize the heat level to your preference.
Lemon Herb Grilled Chicken
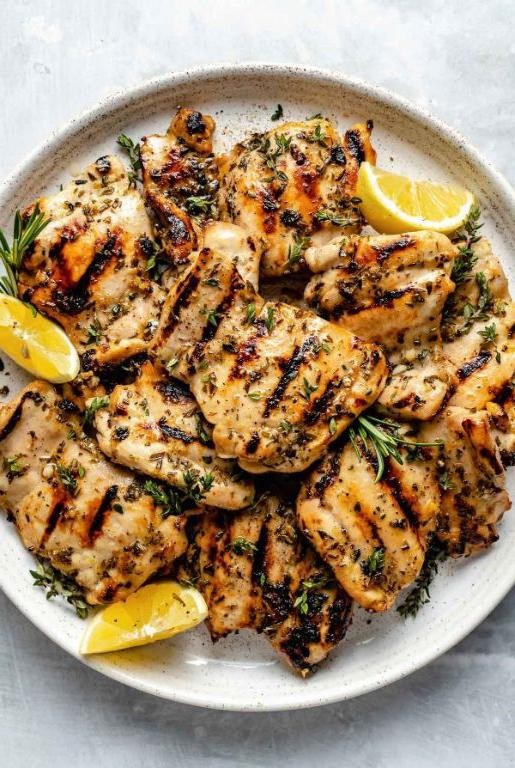
Perfectly grilled chicken doesn’t require fancy techniques—just fresh ingredients and careful timing. Preparing this lemon herb grilled chicken involves simple steps that build layers of flavor, starting with a bright marinade and finishing with a juicy, char-kissed result.
3
servings35
minutes12
minutesIngredients
- For the marinade:
- 1/4 cup olive oil
- 1/4 cup fresh lemon juice
- 2 tbsp chopped fresh rosemary
- 2 tbsp chopped fresh thyme
- 3 minced garlic cloves
- 1 tsp salt
- 1/2 tsp black pepper
- For grilling:
- 4 boneless, skinless chicken breasts (6 oz each)
Instructions
- Whisk together 1/4 cup olive oil, 1/4 cup fresh lemon juice, 2 tbsp chopped rosemary, 2 tbsp chopped thyme, 3 minced garlic cloves, 1 tsp salt, and 1/2 tsp black pepper in a bowl.
- Place 4 chicken breasts in a resealable plastic bag and pour the marinade over them.
- Press out excess air, seal the bag, and refrigerate for 30 minutes—no longer, as the acid can toughen the chicken.
- Preheat a gas or charcoal grill to medium-high heat (400°F), brushing the grates with oil to prevent sticking.
- Remove chicken from the marinade, letting excess drip off, and discard the used marinade.
- Place chicken on the grill and cook for 6 minutes without moving to develop grill marks.
- Flip the chicken using tongs and cook for another 6 minutes, or until the internal temperature reaches 165°F when checked with a meat thermometer.
- Transfer the chicken to a clean plate and let it rest for 5 minutes to redistribute juices.
Lemon herb grilled chicken emerges tender with a zesty, aromatic crust from the herbs. Serve it sliced over a crisp salad or alongside grilled vegetables for a vibrant, satisfying meal that highlights summer freshness.
Creamy Pesto Pasta Primavera

Ready to create a vibrant pasta dish that celebrates spring vegetables? Creamy pesto pasta primavera combines fresh seasonal produce with a rich, herbaceous sauce for a meal that feels both comforting and refreshing. Let’s walk through each step together to ensure perfect results every time.
2
servings15
minutes15
minutesIngredients
For the pasta and vegetables:
– 12 oz linguine pasta
– 1 tbsp salt
– 2 cups broccoli florets
– 1 cup sliced carrots
– 1 cup cherry tomatoes
– 1 cup sliced zucchini
For the creamy pesto sauce:
– 1 cup fresh basil leaves
– 1/2 cup grated Parmesan cheese
– 1/3 cup pine nuts
– 2 garlic cloves
– 1/2 cup olive oil
– 1/2 cup heavy cream
– 1/4 tsp black pepper
Instructions
1. Fill a large pot with 4 quarts of water and bring to a rolling boil over high heat.
2. Add 1 tablespoon of salt to the boiling water.
3. Carefully add 12 ounces of linguine pasta to the boiling water.
4. Cook the pasta for 9 minutes, stirring occasionally to prevent sticking.
5. While pasta cooks, prepare an ice bath by filling a large bowl with cold water and ice cubes.
6. Add 2 cups of broccoli florets and 1 cup of sliced carrots to the pasta pot during the final 3 minutes of cooking.
7. Drain the pasta and vegetables together in a colander.
8. Immediately transfer the drained pasta and vegetables to the ice bath to stop the cooking process.
9. In a food processor, combine 1 cup of fresh basil leaves, 1/2 cup of grated Parmesan cheese, 1/3 cup of pine nuts, and 2 garlic cloves.
10. Pulse the mixture 5 times until coarsely chopped.
11. With the food processor running, slowly drizzle in 1/2 cup of olive oil until the pesto becomes smooth.
12. Heat a large skillet over medium heat for 2 minutes.
13. Add the pesto sauce to the skillet and cook for 1 minute, stirring constantly.
14. Pour 1/2 cup of heavy cream into the skillet and whisk to combine with the pesto.
15. Add the blanched pasta and vegetables to the skillet.
16. Include 1 cup of cherry tomatoes and 1 cup of sliced zucchini to the skillet.
17. Sprinkle 1/4 teaspoon of black pepper over the mixture.
18. Toss everything together gently until all ingredients are coated in sauce and heated through, about 3 minutes.
Gorgeous in both appearance and taste, this pasta delivers a delightful contrast between the al dente linguine and crisp-tender vegetables. The creamy pesto sauce clings beautifully to every component, creating a harmonious blend of fresh basil and rich Parmesan flavors. For an elegant presentation, serve it family-style in a large serving bowl garnished with extra basil leaves and a sprinkle of pine nuts.
Smoky Barbecue Pulled Pork
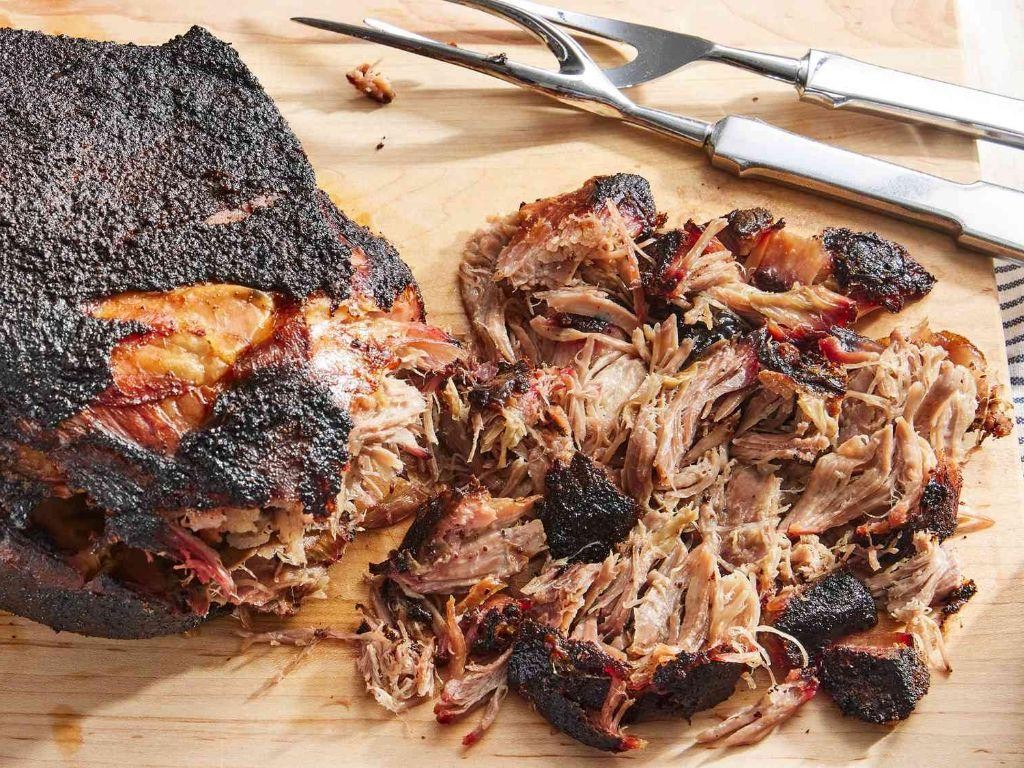
Zesty and deeply satisfying, this smoky barbecue pulled pork transforms a humble pork shoulder into tender, flavorful strands perfect for sandwiches, tacos, or bowls. We’ll walk through each stage methodically, from creating a savory spice rub to slow-cooking the meat until it falls apart effortlessly. Follow these steps closely for foolproof results every time.
8
sandwiches15
minutes245
minutesIngredients
– For the spice rub: 2 tbsp brown sugar, 1 tbsp smoked paprika, 1 tsp garlic powder, 1 tsp onion powder, 1 tsp salt, 1/2 tsp black pepper
– For cooking: 3 lb pork shoulder (Boston butt), 1 cup chicken broth, 1/4 cup apple cider vinegar
– For the sauce: 1 cup ketchup, 2 tbsp Worcestershire sauce, 1 tbsp Dijon mustard
Instructions
1. Preheat your oven to 300°F.
2. Pat the 3 lb pork shoulder completely dry with paper towels.
3. Combine 2 tbsp brown sugar, 1 tbsp smoked paprika, 1 tsp garlic powder, 1 tsp onion powder, 1 tsp salt, and 1/2 tsp black pepper in a small bowl.
4. Rub the spice mixture evenly over all surfaces of the pork shoulder.
5. Place the seasoned pork shoulder in a Dutch oven or oven-safe pot with a lid.
6. Pour 1 cup chicken broth and 1/4 cup apple cider vinegar around the pork.
7. Cover the pot tightly with its lid.
8. Cook in the preheated 300°F oven for 4 hours.
9. Remove the pot from the oven after 4 hours.
10. Check if the pork shreds easily with two forks; if not, return to oven for 30 more minutes.
11. Transfer the cooked pork to a large bowl, reserving 1/2 cup of the cooking liquid.
12. Shred the pork completely using two forks.
13. Combine 1 cup ketchup, 2 tbsp Worcestershire sauce, and 1 tbsp Dijon mustard in a saucepan.
14. Stir in the reserved 1/2 cup cooking liquid.
15. Simmer the sauce over medium heat for 5 minutes until slightly thickened.
16. Pour the finished sauce over the shredded pork and mix thoroughly.
This pulled pork emerges incredibly tender with a perfect balance of smoky, sweet, and tangy flavors. The meat should pull apart in moist, juicy strands that hold the sauce beautifully. Try serving it piled high on toasted brioche buns with crunchy coleslaw, or use it as a filling for loaded nachos or breakfast hash.
Rich Dark Chocolate Lava Cake
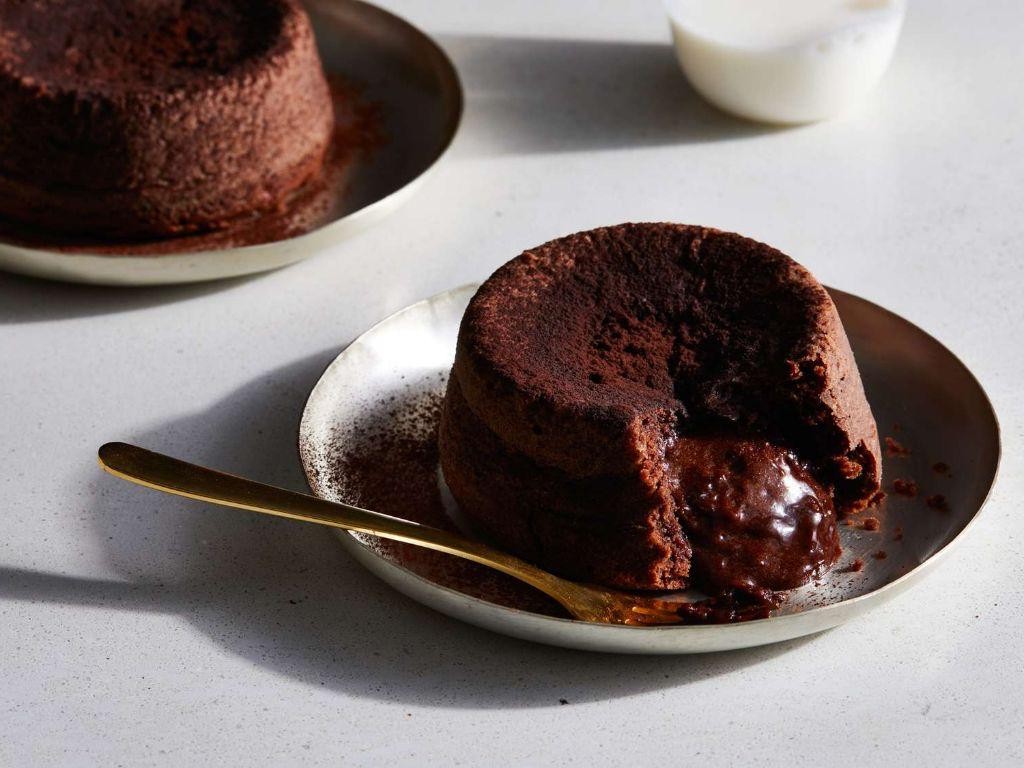
Baking a perfect dark chocolate lava cake requires precise timing and temperature control, but the reward is well worth the careful attention. By following these methodical steps, you’ll create individual desserts with molten centers that flow dramatically when served. This recipe guides you through each stage with clear instructions to ensure success even for first-time bakers.
5
portions15
minutes12
minutesIngredients
For the batter:
- 4 ounces high-quality dark chocolate (70% cacao), chopped
- 1/2 cup unsalted butter
- 2 large eggs
- 2 large egg yolks
- 1/4 cup granulated sugar
- 2 tablespoons all-purpose flour
- 1/4 teaspoon salt
For preparation:
- 2 tablespoons unsalted butter, softened
- 2 tablespoons granulated sugar
Instructions
- Preheat your oven to 425°F and position a rack in the center.
- Brush four 6-ounce ramekins thoroughly with the 2 tablespoons of softened butter.
- Dust the buttered ramekins with the 2 tablespoons of granulated sugar, tapping out any excess.
- Place the 4 ounces of chopped dark chocolate and 1/2 cup butter in a heatproof bowl.
- Set the bowl over a saucepan of gently simmering water, making sure the bottom doesn’t touch the water.
- Stir the chocolate and butter mixture continuously until completely melted and smooth, about 3-4 minutes.
- Remove the bowl from heat and let the chocolate mixture cool for 5 minutes.
- In a separate bowl, whisk together the 2 whole eggs, 2 egg yolks, and 1/4 cup sugar until pale and slightly thickened.
- Gradually pour the cooled chocolate mixture into the egg mixture while whisking constantly.
- Sift the 2 tablespoons of flour and 1/4 teaspoon salt directly into the batter.
- Fold the dry ingredients gently into the wet ingredients until just combined, being careful not to overmix.
- Divide the batter evenly among the four prepared ramekins.
- Place the filled ramekins on a baking sheet and bake at 425°F for exactly 12 minutes.
- Remove the cakes from the oven when the edges look set but the centers still jiggle slightly.
- Let the cakes rest in the ramekins for exactly 1 minute before serving.
- Run a knife around the edge of each ramekin to loosen the cakes.
- Invert each ramekin onto individual serving plates and carefully lift to release the cakes.
Each cake reveals a warm, flowing chocolate center that contrasts beautifully with the delicate outer cake. The intense dark chocolate flavor pairs wonderfully with vanilla ice cream or fresh berries, creating both temperature and texture contrasts that elevate this classic dessert to something truly special.
Savory Stuffed Bell Peppers
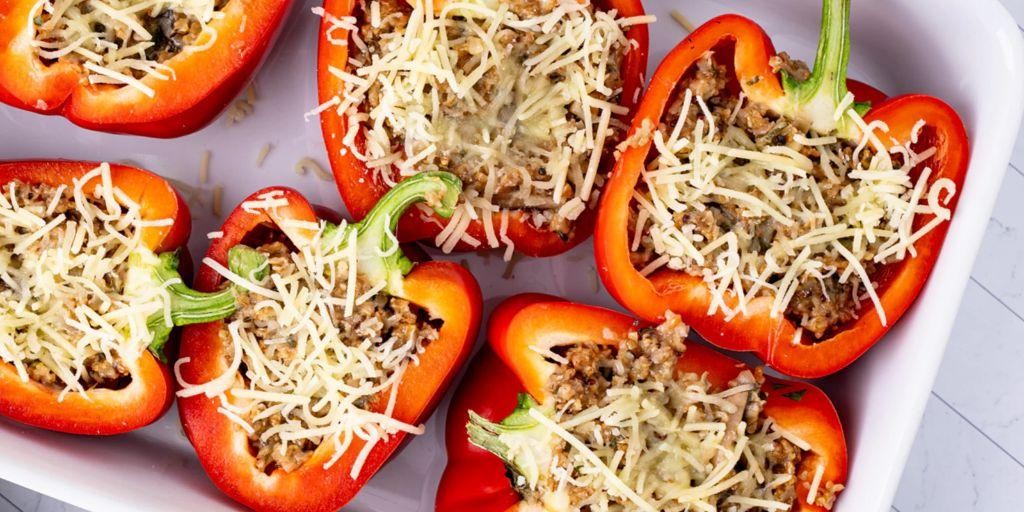
Often overlooked as merely decorative vegetables, bell peppers transform into complete, satisfying meals when stuffed with savory fillings. Our methodical approach ensures even beginners can create perfectly cooked peppers with balanced flavors every single time. Let’s walk through each step together to build these colorful edible containers from the ground up.
4
servings20
minutes49
minutesIngredients
For the pepper preparation:
– 4 large bell peppers (any color)
– 1 tablespoon olive oil
– 1/2 teaspoon salt
For the filling:
– 1 pound ground beef (85% lean)
– 1 medium yellow onion, diced
– 2 cloves garlic, minced
– 1 cup cooked white rice
– 1 can (15 ounces) tomato sauce
– 1 teaspoon dried oregano
– 1/2 teaspoon black pepper
– 1 cup shredded mozzarella cheese
Instructions
1. Preheat your oven to 375°F and position the rack in the center of the oven.
2. Cut the tops off all 4 bell peppers and remove the seeds and white membranes from inside each pepper.
3. Brush the outside of each pepper with 1 tablespoon olive oil and sprinkle with 1/2 teaspoon salt.
4. Place the peppers cut-side up in a baking dish just large enough to hold them snugly.
5. Heat a large skillet over medium-high heat and cook 1 pound ground beef until browned, breaking it into small pieces with a wooden spoon.
6. Add the diced onion and minced garlic to the skillet and cook for 4 minutes until the onion becomes translucent.
7. Stir in 1 cup cooked rice, the entire can of tomato sauce, 1 teaspoon dried oregano, and 1/2 teaspoon black pepper until fully combined.
8. Spoon the filling mixture evenly into the prepared bell peppers, pressing down gently to pack it in.
9. Cover the baking dish tightly with aluminum foil and bake at 375°F for 30 minutes.
10. Remove the foil and sprinkle 1 cup shredded mozzarella cheese evenly over the top of each stuffed pepper.
11. Return the peppers to the oven uncovered and bake for 15 minutes until the cheese is melted and bubbly with golden spots.
12. Carefully remove the baking dish from the oven and let the peppers rest for 5 minutes before serving.
Because the peppers soften during baking while the filling maintains its texture, you get a wonderful contrast between the tender vegetable shell and the hearty interior. Brighten your presentation by using different colored peppers in the same meal, or try serving them over a bed of fresh greens for added crunch. The melted cheese forms a golden crust that seals in all the savory flavors until that first satisfying bite.
Zesty Lemon Blueberry Muffins

Whether you’re new to baking or simply craving a bright, fruity treat, these lemon blueberry muffins offer a perfect balance of tart and sweet flavors that come together with straightforward techniques. We’ll walk through each stage methodically, from mixing the batter to achieving that perfect golden dome. Working with fresh ingredients and precise measurements will ensure your muffins turn out tender and beautifully risen every time.
12
muffins15
minutes22
minutesIngredients
For the Dry Ingredients
- 2 cups all-purpose flour
- 1 cup granulated sugar
- 2 tsp baking powder
- 1/2 tsp salt
For the Wet Ingredients
- 1 cup buttermilk
- 1/2 cup unsalted butter, melted
- 2 large eggs
- 1 tbsp lemon zest
- 2 tbsp fresh lemon juice
For Folding and Topping
- 1 cup fresh blueberries
- 1 tbsp turbinado sugar
Instructions
- Preheat your oven to 375°F and line a 12-cup muffin tin with paper liners.
- Whisk together 2 cups all-purpose flour, 1 cup granulated sugar, 2 tsp baking powder, and 1/2 tsp salt in a large bowl until fully combined.
- In a separate medium bowl, whisk 1 cup buttermilk, 1/2 cup melted unsalted butter, 2 large eggs, 1 tbsp lemon zest, and 2 tbsp fresh lemon juice until smooth.
- Pour the wet ingredients into the dry ingredients and stir gently with a spatula until just combined—do not overmix, as this keeps the muffins tender.
- Gently fold in 1 cup fresh blueberries, being careful not to crush them to avoid streaking the batter.
- Divide the batter evenly among the 12 muffin cups, filling each about 3/4 full.
- Sprinkle 1 tbsp turbinado sugar evenly over the tops of the muffins for a crunchy finish.
- Bake at 375°F for 20–22 minutes, or until the tops are golden and a toothpick inserted into the center comes out clean.
- Let the muffins cool in the pan for 5 minutes before transferring them to a wire rack.
Fluffy and moist, these muffins boast a tender crumb dotted with juicy blueberries and a zesty lemon undertone. For a special touch, serve them warm with a dollop of lemon curd or alongside a cup of herbal tea to highlight their bright, comforting flavors.
Sweet and Tangy Orange Chicken
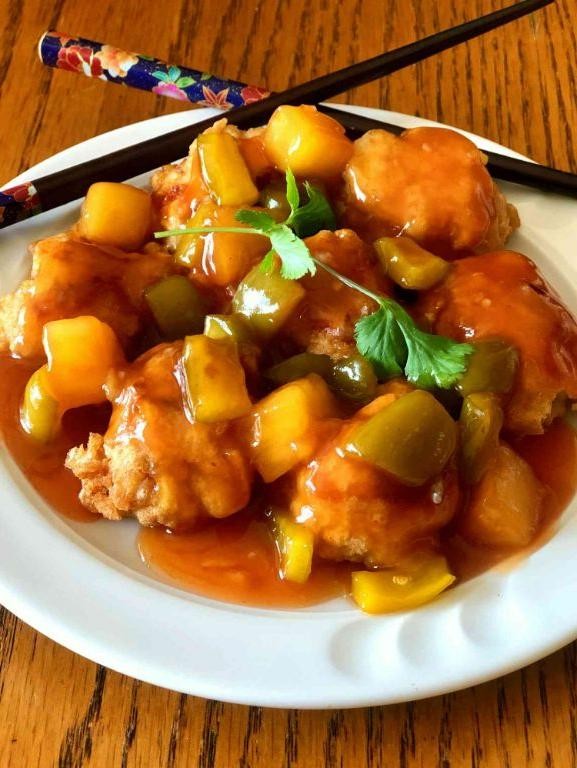
Now, let’s create a restaurant-quality sweet and tangy orange chicken right in your own kitchen. This methodical approach will guide you through each stage, ensuring crispy chicken coated in a vibrant, glossy sauce that balances sweetness with bright citrus notes. Follow these steps precisely for perfect results every time.
4
servings20
minutes25
minutesIngredients
For the chicken:
– 1.5 lbs boneless, skinless chicken thighs, cut into 1-inch pieces
– 1 cup cornstarch
– 2 large eggs, beaten
– 1/2 tsp salt
– 1/4 tsp black pepper
– 4 cups vegetable oil for frying
For the sauce:
– 1 cup freshly squeezed orange juice
– 1/4 cup brown sugar
– 3 tbsp soy sauce
– 2 tbsp rice vinegar
– 1 tbsp orange zest
– 2 garlic cloves, minced
– 1 tsp grated fresh ginger
– 1 tbsp cornstarch mixed with 2 tbsp water
Instructions
1. Pat the chicken pieces completely dry with paper towels to ensure proper coating adhesion.
2. Season the chicken pieces evenly with salt and black pepper.
3. Dredge each chicken piece first in cornstarch, then dip thoroughly in beaten eggs, and finally coat again in cornstarch until fully covered.
4. Heat vegetable oil in a heavy-bottomed pot to 350°F, using a deep-fry thermometer to monitor temperature accurately.
5. Carefully lower coated chicken pieces into the hot oil using tongs, working in batches to avoid overcrowding.
6. Fry chicken for 4-5 minutes until golden brown and internal temperature reaches 165°F when checked with an instant-read thermometer.
7. Transfer cooked chicken to a wire rack set over a baking sheet to drain excess oil while maintaining crispiness.
8. Combine orange juice, brown sugar, soy sauce, rice vinegar, orange zest, minced garlic, and grated ginger in a saucepan.
9. Bring the sauce mixture to a gentle boil over medium heat, stirring constantly until sugar fully dissolves.
10. Whisk the cornstarch slurry into the simmering sauce and continue cooking for 2 minutes until thickened to a glossy, coating consistency.
11. Toss the fried chicken pieces in the prepared orange sauce until evenly coated, working quickly to preserve crispness.
Let this orange chicken rest for 2 minutes before serving to allow the sauce to set properly. The contrast between the crispy exterior and tender chicken creates wonderful texture, while the bright citrus notes cut through the richness beautifully. Consider serving over jasmine rice with steamed broccoli for a complete meal that highlights the sauce’s sweet-tangy balance.
Traditional Beef Stroganoff

Remember those chilly evenings when only something rich and comforting will do? Traditional Beef Stroganoff delivers exactly that with tender beef and a creamy sauce that feels like a warm hug. Let’s walk through this classic recipe step by step so you can create restaurant-quality results right in your own kitchen.
2
servings15
minutes25
minutesIngredients
For the beef:
- 1.5 lbs sirloin steak, sliced into thin strips
- 2 tbsp olive oil
- 1 tsp salt
- 1/2 tsp black pepper
- 1 tbsp all-purpose flour
For the sauce base:
- 1 medium yellow onion, thinly sliced
- 8 oz cremini mushrooms, sliced
- 3 cloves garlic, minced
- 2 tbsp unsalted butter
For finishing:
- 1 cup beef broth
- 1 cup sour cream
- 1 tbsp Dijon mustard
- 2 tbsp fresh parsley, chopped
- 12 oz egg noodles
Instructions
- Bring a large pot of salted water to a rolling boil for the egg noodles.
- Pat the sirloin strips completely dry with paper towels.
- Toss the beef strips with flour, salt, and pepper until evenly coated.
- Heat olive oil in a large skillet over medium-high heat until shimmering.
- Sear the beef in a single layer for 2 minutes per side until browned.
- Transfer the beef to a clean plate, leaving any drippings in the skillet.
- Add butter to the same skillet and melt over medium heat.
- Sauté onions for 4 minutes until translucent.
- Add mushrooms and cook for 6 minutes until they release their liquid and brown.
- Stir in minced garlic and cook for 1 minute until fragrant.
- Pour in beef broth, scraping up any browned bits from the skillet bottom.
- Simmer the mixture for 5 minutes until the liquid reduces by half.
- Reduce heat to low and stir in sour cream and Dijon mustard.
- Return the seared beef and any accumulated juices to the skillet.
- Cook egg noodles according to package directions until al dente.
- Drain the noodles thoroughly and divide among serving bowls.
- Ladle the beef stroganoff over the hot noodles.
- Garnish with fresh parsley and serve immediately.
The finished stroganoff boasts tender beef strips that melt in your mouth, complemented by earthy mushrooms and the silkiest sour cream sauce. For a creative twist, serve it over crispy roasted potatoes instead of noodles, or pack the leftovers into a baked potato for tomorrow’s lunch—the flavors deepen beautifully overnight.
Hearty Vegetable Lentil Soup

During these crisp autumn evenings, nothing satisfies quite like a warm bowl of homemade soup. Developing this hearty vegetable lentil soup requires just a few simple steps that build flavor gradually, making it perfect for beginner cooks to master.
2
servings15
minutes52
minutesIngredients
- For the base:
- 2 tablespoons olive oil
- 1 medium yellow onion, diced
- 2 medium carrots, chopped into 1/2-inch pieces
- 2 celery stalks, chopped into 1/2-inch pieces
- 3 garlic cloves, minced
- For the soup:
- 1 cup brown lentils, rinsed
- 6 cups vegetable broth
- 1 (14.5-ounce) can diced tomatoes
- 1 teaspoon dried thyme
- 1 bay leaf
- For finishing:
- 4 cups fresh spinach
- 1 tablespoon lemon juice
Instructions
- Heat 2 tablespoons olive oil in a large pot over medium heat for 2 minutes until shimmering.
- Add diced onion, chopped carrots, and chopped celery to the pot.
- Cook vegetables for 8-10 minutes, stirring occasionally, until onions are translucent and carrots begin to soften.
- Add minced garlic and cook for 1 minute until fragrant, being careful not to burn it.
- Tip: Rinse lentils thoroughly in a fine-mesh strainer to remove any debris before using.
- Stir in 1 cup rinsed brown lentils, 6 cups vegetable broth, canned diced tomatoes with their juices, 1 teaspoon dried thyme, and 1 bay leaf.
- Bring the soup to a boil over high heat, then reduce to a simmer.
- Cover the pot and simmer for 30 minutes until lentils are tender but not mushy.
- Tip: Skim off any foam that rises to the surface during the first 10 minutes of cooking for clearer broth.
- Remove the bay leaf and discard it.
- Stir in 4 cups fresh spinach and cook for 2 minutes until wilted.
- Turn off the heat and stir in 1 tablespoon lemon juice.
- Tip: Add the lemon juice at the end to brighten the flavors without making the soup bitter.
Hearty and satisfying, this soup develops a rich, earthy flavor from the tender lentils that pairs beautifully with the bright acidity of tomatoes and lemon. The spinach adds vibrant color and delicate texture that contrasts nicely with the heartier vegetables. For a creative twist, serve it over cooked quinoa or with a dollop of pesto swirled into each bowl.
Cheesy Spinach Artichoke Dip
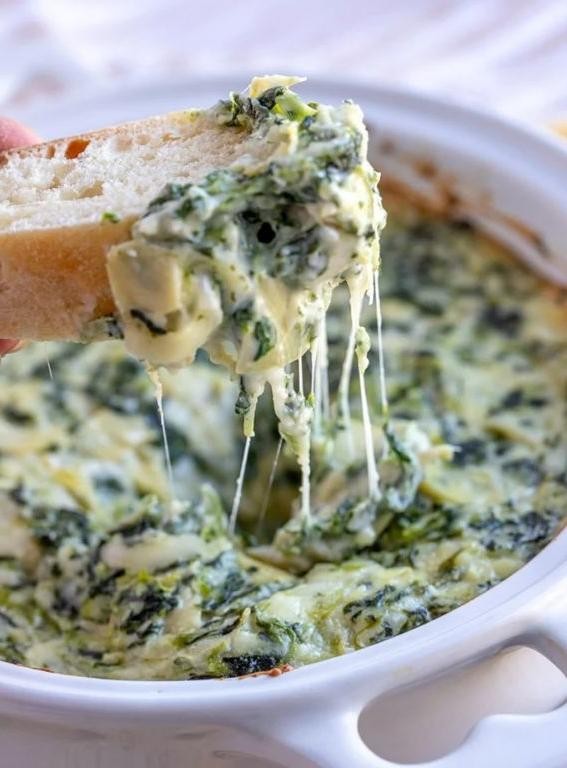
A perfectly creamy, crowd-pleasing dip starts with quality ingredients and careful preparation. Let’s walk through creating this classic appetizer that combines rich cheese with earthy spinach and tangy artichokes. Follow each step precisely for the best results.
8
servings15
minutes25
minutesIngredients
For the base mixture:
- 1 (10 oz) package frozen chopped spinach, thawed
- 1 (14 oz) can artichoke hearts, drained and chopped
- 8 oz cream cheese, softened
- 1/2 cup sour cream
- 1/4 cup mayonnaise
For the cheese blend:
- 1 cup shredded mozzarella cheese
- 1/2 cup grated Parmesan cheese
- 2 cloves garlic, minced
For baking:
- 1 tablespoon olive oil
Instructions
- Preheat your oven to 375°F.
- Squeeze all excess water from the thawed spinach using your hands or a clean kitchen towel.
- Chop the drained artichoke hearts into 1/4-inch pieces.
- Combine the softened cream cheese, sour cream, and mayonnaise in a large mixing bowl.
- Mix the cream cheese mixture with a hand mixer on medium speed for 2 minutes until completely smooth.
- Add the minced garlic to the cream cheese mixture.
- Fold in the squeezed spinach and chopped artichokes using a rubber spatula.
- Add 3/4 cup of the mozzarella cheese and all of the Parmesan cheese to the mixture.
- Stir the cheese into the spinach-artichoke mixture until evenly distributed.
- Grease a 9-inch baking dish with the olive oil.
- Transfer the dip mixture to the prepared baking dish.
- Sprinkle the remaining 1/4 cup mozzarella cheese evenly over the top.
- Bake at 375°F for 25 minutes until the edges are bubbling and the top is golden brown.
- Remove the dip from the oven and let it rest for 5 minutes before serving.
Remember to squeeze the spinach thoroughly—this prevents a watery dip. Mixing the cream cheese while softened ensures a smooth texture without lumps. The final rest time allows the dip to set properly for ideal scooping. Resulting in a luxuriously creamy interior with subtle tanginess from the artichokes, this dip develops a beautifully browned, cheesy crust that provides wonderful textural contrast. Serve it alongside crispy pita chips or fresh vegetable crudités for a satisfying appetizer that balances richness with bright, savory notes.
Classic Margherita Pizza

Very few dishes capture the essence of Italian cooking like a perfectly executed Classic Margherita Pizza. Versatile enough for a weeknight dinner yet impressive for guests, this recipe breaks down the process into manageable steps. Let’s begin by preparing our dough, the foundation of any great pizza.
2
pizzas85
minutes28
minutesIngredients
For the Crust
- 3 ½ cups all-purpose flour
- 1 ½ cups warm water (110°F)
- 2 ¼ tsp active dry yeast
- 2 tbsp olive oil
- 1 tsp salt
- 1 tsp sugar
For the Sauce
- 1 can (28 oz) crushed tomatoes
- 2 cloves garlic, minced
- 1 tbsp olive oil
- 1 tsp dried oregano
- ½ tsp salt
For Assembly
- 8 oz fresh mozzarella cheese, sliced ¼-inch thick
- ¼ cup fresh basil leaves
- 2 tbsp olive oil
Instructions
- Combine 1 ½ cups warm water (110°F), 2 ¼ tsp active dry yeast, and 1 tsp sugar in a large bowl.
- Let the mixture sit for 5 minutes until foamy.
- Add 3 ½ cups all-purpose flour, 2 tbsp olive oil, and 1 tsp salt to the yeast mixture.
- Mix until a shaggy dough forms.
- Knead the dough on a floured surface for 8 minutes until smooth and elastic.
- Place the dough in an oiled bowl and cover with plastic wrap.
- Let the dough rise in a warm place for 1 hour until doubled in size.
- Heat 1 tbsp olive oil in a saucepan over medium heat.
- Add 2 cloves minced garlic and cook for 1 minute until fragrant.
- Pour in 28 oz crushed tomatoes, 1 tsp dried oregano, and ½ tsp salt.
- Simmer the sauce for 15 minutes, stirring occasionally.
- Preheat your oven to 475°F with a pizza stone or baking sheet inside.
- Punch down the risen dough and divide it in half.
- Roll each portion into a 12-inch circle on a floured surface.
- Brush each crust with 1 tbsp olive oil.
- Spread ½ cup sauce evenly over each crust, leaving a 1-inch border.
- Arrange 4 oz fresh mozzarella slices over each pizza.
- Transfer the pizzas to the preheated pizza stone using a pizza peel.
- Bake for 12-15 minutes until the crust is golden and cheese is bubbly.
- Remove the pizzas from the oven and immediately top with ¼ cup fresh basil leaves.
Fresh from the oven, this pizza boasts a crisp, chewy crust that supports the bright, tangy tomato sauce. For an extra flavor boost, drizzle with high-quality olive oil just before serving. Finally, consider pairing it with a simple arugula salad dressed in lemon vinaigrette to cut through the richness.
Fluffy Buttermilk Pancakes

Getting perfect pancakes is easier than you think when you follow these simple, methodical steps. Good buttermilk pancakes should be light, fluffy, and golden brown with just the right amount of sweetness. Let me walk you through each step carefully so you can achieve pancake perfection every single time.
12
pancakes15
minutes25
minutesIngredients
For the dry ingredients:
– 2 cups all-purpose flour
– 2 tablespoons granulated sugar
– 2 teaspoons baking powder
– 1 teaspoon baking soda
– 1/2 teaspoon salt
For the wet ingredients:
– 2 cups buttermilk
– 2 large eggs
– 1/4 cup melted butter
– 1 teaspoon vanilla extract
For cooking:
– 2 tablespoons vegetable oil
– 2 tablespoons butter
Instructions
1. Whisk together 2 cups all-purpose flour, 2 tablespoons granulated sugar, 2 teaspoons baking powder, 1 teaspoon baking soda, and 1/2 teaspoon salt in a large bowl until thoroughly combined.
2. In a separate medium bowl, beat 2 large eggs until light and frothy, about 1 minute.
3. Add 2 cups buttermilk, 1/4 cup melted butter, and 1 teaspoon vanilla extract to the beaten eggs and whisk until fully incorporated.
4. Pour the wet ingredients into the dry ingredients and gently fold together with a spatula until just combined, leaving some small lumps in the batter.
5. Let the batter rest undisturbed for 10 minutes to allow the baking powder and soda to activate.
6. Heat a non-stick skillet or griddle over medium heat (350°F) and add 1 tablespoon vegetable oil and 1 tablespoon butter, swirling to coat the surface.
7. Use a 1/4-cup measuring cup to portion batter onto the hot surface, leaving 2 inches between pancakes.
8. Cook until bubbles form across the entire surface and edges look set, about 2-3 minutes.
9. Flip each pancake carefully using a thin spatula and cook for another 1-2 minutes until golden brown on both sides.
10. Transfer cooked pancakes to a wire rack set over a baking sheet to prevent steaming.
11. Repeat steps 6-10 with remaining batter, adding more oil and butter as needed.
Achieving that perfect fluffy texture comes from not overmixing the batter and letting it rest before cooking. Absolutely delightful when served warm with maple syrup and fresh berries, these pancakes have a tender crumb and subtle tang from the buttermilk that balances the sweetness beautifully. Try stacking them with sliced bananas and a dollop of whipped cream for an extra special breakfast treat.
Fresh Strawberry Spinach Salad
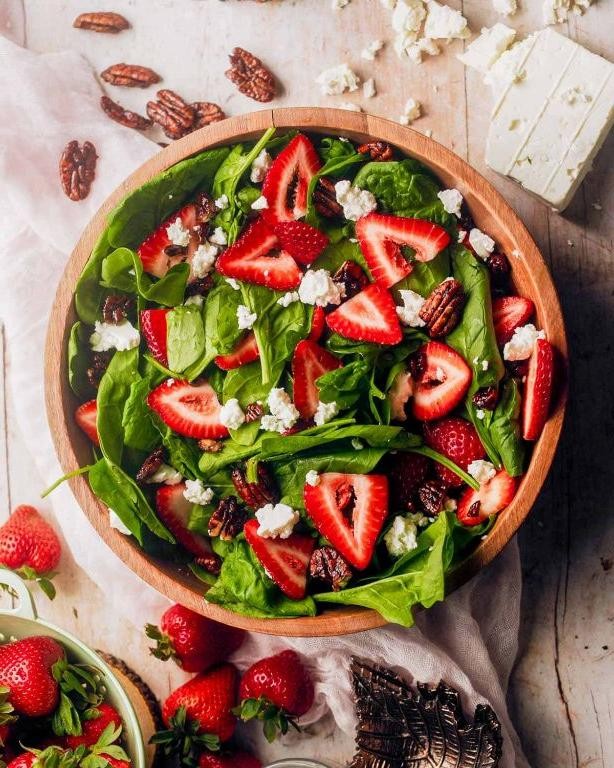
Many home cooks overlook how simple yet elegant a well-made salad can be, but this fresh strawberry spinach salad changes that perception completely. Making this vibrant dish requires just a few quality ingredients and careful preparation to achieve the perfect balance of sweet and savory flavors. Mastering each step ensures you’ll create a salad that’s both beautiful and delicious.
4
servings15
minutes4
minutesIngredients
For the salad base:
– 6 cups fresh baby spinach
– 1 pound fresh strawberries
– 1/2 cup sliced almonds
– 1/4 cup crumbled feta cheese
For the dressing:
– 1/4 cup olive oil
– 2 tablespoons balsamic vinegar
– 1 tablespoon honey
– 1/4 teaspoon salt
– 1/8 teaspoon black pepper
Instructions
1. Rinse 6 cups of fresh baby spinach under cold running water for 30 seconds to remove any dirt or debris.
2. Gently pat the spinach dry using paper towels or a clean kitchen towel to prevent the dressing from becoming watery.
3. Hull 1 pound of fresh strawberries by removing the green tops and stems with a paring knife.
4. Slice the strawberries into uniform 1/4-inch thick pieces to ensure even distribution throughout the salad.
5. Toast 1/2 cup of sliced almonds in a dry skillet over medium heat for 3-4 minutes, stirring constantly until golden brown and fragrant.
6. Whisk together 1/4 cup olive oil, 2 tablespoons balsamic vinegar, 1 tablespoon honey, 1/4 teaspoon salt, and 1/8 teaspoon black pepper in a small bowl until fully emulsified.
7. Combine the dried spinach, sliced strawberries, and toasted almonds in a large salad bowl.
8. Drizzle the dressing over the salad ingredients, starting with half the amount and adding more as needed.
9. Toss the salad gently with salad tongs or two large spoons to coat all ingredients evenly without bruising the spinach.
10. Sprinkle 1/4 cup of crumbled feta cheese over the top of the dressed salad just before serving.
Each bite delivers a wonderful contrast between the tender spinach leaves and crisp strawberry slices, while the toasted almonds provide satisfying crunch. The sweet-tangy dressing beautifully complements the salty feta, creating layers of flavor that make this salad substantial enough to serve as a light main course. Experiment with adding grilled chicken or serving it alongside crusty bread for a more complete meal.
Perfectly Roasted Brussels Sprouts
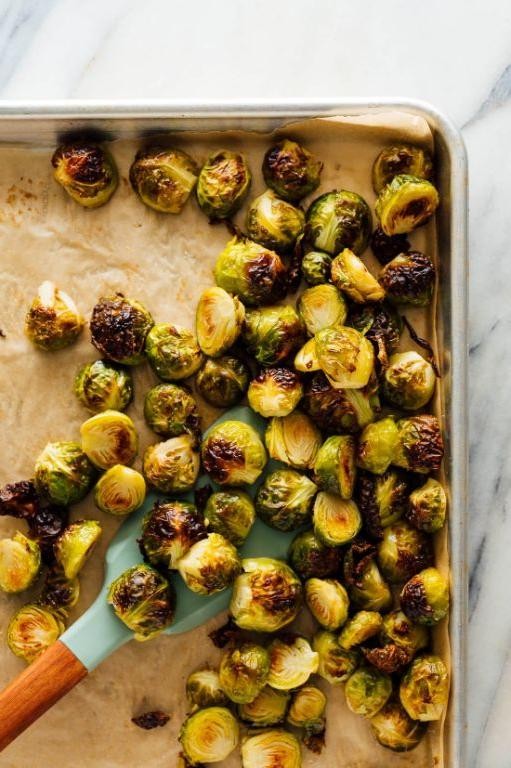
Tender, caramelized, and utterly irresistible—these perfectly roasted Brussels sprouts transform the humble vegetable into a show-stopping side dish that even skeptics will love. Today, we’ll walk through each step methodically, ensuring your sprouts emerge from the oven with crispy edges and a sweet, nutty flavor. Follow along closely, and you’ll master this simple yet impressive technique in no time.
3
servings10
minutes25
minutesIngredients
– For the sprouts: 1 lb Brussels sprouts, trimmed and halved
– For coating: 2 tbsp olive oil
– For seasoning: 1 tsp kosher salt, ½ tsp black pepper, 2 cloves garlic, minced
Instructions
1. Preheat your oven to 400°F and line a baking sheet with parchment paper.
2. Trim the stem ends of the Brussels sprouts and slice each sprout in half lengthwise.
3. Place the halved sprouts in a large mixing bowl.
4. Drizzle 2 tbsp olive oil over the sprouts and toss to coat evenly.
5. Sprinkle 1 tsp kosher salt and ½ tsp black pepper over the sprouts, then toss again.
6. Add 2 cloves minced garlic to the bowl and toss gently to distribute.
7. Arrange the sprouts in a single layer on the prepared baking sheet, cut-side down.
8. Roast at 400°F for 20-25 minutes, until the cut sides are deeply browned and the outer leaves are crisp.
9. Remove from the oven and let rest for 2 minutes before serving.
Crispy on the outside and tender within, these Brussels sprouts boast a savory-sweet balance that pairs wonderfully with roasted meats or grains. For a creative twist, toss them with a drizzle of balsamic glaze or sprinkle with grated Parmesan cheese right after baking—their warmth will help the flavors meld beautifully.
Homemade Vanilla Bean Ice Cream
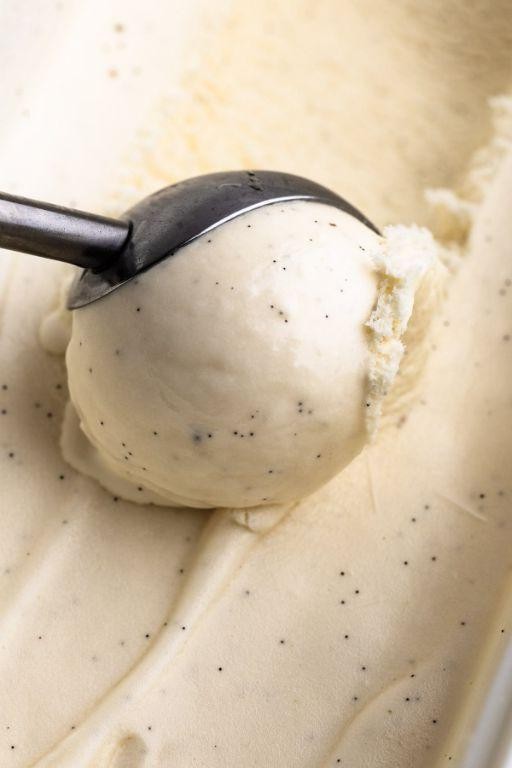
Wondering how to create truly exceptional homemade ice cream? This vanilla bean ice cream recipe walks you through each precise step, ensuring creamy, professional-quality results right from your own kitchen. We’ll use real vanilla beans for that authentic flavor that store-bought versions simply can’t match.
8
servings20
minutes25
minutesIngredients
For the custard base:
- 2 cups heavy cream
- 1 cup whole milk
- 3/4 cup granulated sugar
- 6 large egg yolks
- 1/4 teaspoon kosher salt
For flavoring:
- 1 vanilla bean
- 1 teaspoon pure vanilla extract
Instructions
- Split the vanilla bean lengthwise using a sharp paring knife and scrape out the seeds with the back of the knife.
- Combine the heavy cream, whole milk, vanilla bean seeds, and empty pod in a medium saucepan.
- Heat the cream mixture over medium heat until it reaches 170°F on an instant-read thermometer, stirring occasionally with a wooden spoon.
- While the cream heats, whisk together the egg yolks, granulated sugar, and kosher salt in a separate bowl until pale yellow and slightly thickened.
- Slowly pour about 1 cup of the hot cream mixture into the egg yolk mixture while whisking constantly to temper the eggs.
- Pour the tempered egg mixture back into the saucepan with the remaining cream.
- Cook the custard over medium-low heat, stirring constantly with a wooden spoon, until it thickens enough to coat the back of the spoon and reaches 175°F.
- Immediately strain the custard through a fine-mesh sieve into a clean bowl to remove any cooked egg bits and the vanilla bean pod.
- Stir in the pure vanilla extract until fully incorporated.
- Cover the custard directly with plastic wrap pressed against the surface to prevent a skin from forming.
- Refrigerate the custard for at least 4 hours or until completely chilled to 40°F.
- Pour the chilled custard into your ice cream maker and churn according to manufacturer’s instructions until it reaches a soft-serve consistency.
- Transfer the churned ice cream to an airtight container and freeze for 4-6 hours until firm.
Velvety smooth with tiny black vanilla bean specks throughout, this ice cream has an incredibly rich mouthfeel that melts luxuriously on the tongue. The deep, aromatic vanilla flavor shines beautifully when served alongside warm apple pie or simply scooped into a waffle cone for pure indulgence.
Crispy Baked Buffalo Wings

Baking crispy buffalo wings at home is simpler than you might think, and this method delivers that perfect crunch without deep frying. By following these careful steps, you’ll achieve wings with golden-brown skin and tender meat every single time. Let’s walk through the process together from preparation to serving.
2
servings15
minutes60
minutesIngredients
For the Wings
– 2 pounds chicken wings, split at joints
– 1 tablespoon baking powder
– 1 teaspoon kosher salt
– 1/2 teaspoon garlic powder
– 1/2 teaspoon black pepper
For the Buffalo Sauce
– 1/2 cup Frank’s RedHot sauce
– 1/4 cup unsalted butter
– 1 tablespoon white vinegar
– 1/2 teaspoon Worcestershire sauce
Instructions
1. Preheat your oven to 400°F and place a wire rack on a baking sheet.
2. Pat the chicken wings completely dry with paper towels to remove surface moisture.
3. In a large bowl, combine baking powder, kosher salt, garlic powder, and black pepper.
4. Add the dried wings to the seasoning mixture and toss until evenly coated.
5. Arrange the wings in a single layer on the wire rack, ensuring they don’t touch each other.
6. Bake at 400°F for 30 minutes, then flip each wing using tongs.
7. Continue baking for another 25-30 minutes until the skin is deep golden brown and crispy.
8. While the wings bake, melt the unsalted butter in a small saucepan over medium heat.
9. Add Frank’s RedHot sauce, white vinegar, and Worcestershire sauce to the melted butter.
10. Whisk the sauce constantly for 2 minutes until fully combined and slightly thickened.
11. Transfer the baked wings to a clean large bowl while still hot from the oven.
12. Pour the prepared buffalo sauce over the hot wings and toss gently to coat evenly.
13. Serve immediately while the wings are still warm and the sauce is glossy.
Zesty and satisfying, these wings feature a shatteringly crisp exterior that gives way to juicy, tender chicken inside. The tangy buffalo sauce clings perfectly to every nook and cranny of the baked wings. For a fun twist, serve them alongside crisp celery sticks and blue cheese dressing for dipping, or pile them high on a platter for game day entertaining.
Conclusion
Ready to transform your cooking routine? These 23 delicious recipes with unique twists offer exciting new flavors and creative techniques that will delight your family and friends. We’d love to hear which recipes become your favorites—leave a comment below and share this article on Pinterest to inspire fellow home cooks!