
Are you ready to transform your weeknight dinners? As a 2-quart air fryer owner, you already know the magic of quick, crispy meals. From golden chicken tenders to perfectly roasted veggies, this collection of 34 delicious recipes brings effortless cooking right to your kitchen. Let’s dive into these mouthwatering ideas that promise to save you time and delight your taste buds—no fuss, all flavor!
Crispy Air Fryer Chicken Wings

Tuesdays are my wing night, and after years of testing methods, I’ve found the air fryer gives me that perfect crunch without the mess of deep frying—plus, it frees up my oven for a batch of loaded fries. These crispy air fryer chicken wings are my go-to for game day or a quick weeknight treat, and they’re so simple, even my teenager can whip them up without a hitch. Trust me, once you try this method, you’ll never go back to soggy baked wings again.
2
servings10
minutes24
minutesIngredients
– 2 lbs chicken wings, split into drumettes and flats (pat them dry with paper towels for extra crispiness)
– 1 tbsp olive oil (or any neutral oil like avocado oil)
– 1 tsp baking powder (not baking soda—this is key for browning)
– 1 tsp garlic powder
– 1 tsp paprika (smoked paprika adds a nice depth)
– 1/2 tsp salt (adjust to taste, but don’t skimp for flavor)
– 1/4 tsp black pepper (freshly ground works best)
Instructions
1. Pat the chicken wings completely dry with paper towels to remove excess moisture.
2. In a large bowl, toss the dried wings with olive oil until evenly coated.
3. Sprinkle baking powder, garlic powder, paprika, salt, and black pepper over the wings.
4. Toss the wings thoroughly to ensure every piece is coated with the seasoning mixture.
5. Arrange the wings in a single layer in the air fryer basket, leaving space between them for air circulation.
6. Air fry the wings at 400°F for 12 minutes, then flip each wing using tongs.
7. Continue air frying at 400°F for another 10–12 minutes until the skin is golden brown and crispy.
8. Check for doneness by ensuring the internal temperature reaches 165°F with a meat thermometer.
9. Transfer the wings to a serving plate and let them rest for 2–3 minutes before serving.
Finally, these wings come out with a shatteringly crisp exterior and juicy, tender meat inside—toss them in buffalo sauce or serve with a cool ranch dip for that classic combo. I love piling them high on a platter with celery sticks and extra napkins, because let’s be real, things are about to get deliciously messy.
Easy Air Fryer French Fries

Wondering if you could make crispy French fries without deep frying? I was skeptical too until my air fryer proved me wrong during a busy weeknight when my kids were begging for fries but I didn’t want the mess or guilt of traditional frying.
2
servings40
minutes20
minutesIngredients
– 2 large russet potatoes (about 1 pound total), scrubbed clean
– 1 tablespoon olive oil (or any neutral oil like avocado or canola)
– 1 teaspoon kosher salt (adjust to taste)
– ½ teaspoon garlic powder (optional, for extra flavor)
– ¼ teaspoon black pepper (freshly ground works best)
Instructions
1. Cut each potato lengthwise into ¼-inch thick slices using a sharp chef’s knife.
2. Stack the slices and cut them into ¼-inch thick fry-shaped sticks.
3. Place the cut potatoes in a large bowl and cover with cold water for 30 minutes to remove excess starch.
4. Drain the potatoes thoroughly and pat them completely dry with clean kitchen towels.
5. Return the dried potatoes to the bowl and drizzle with 1 tablespoon olive oil.
6. Sprinkle 1 teaspoon kosher salt, ½ teaspoon garlic powder, and ¼ teaspoon black pepper over the potatoes.
7. Toss everything together until all fries are evenly coated with oil and seasonings.
8. Preheat your air fryer to 380°F for 3 minutes.
9. Arrange the seasoned fries in a single layer in the air fryer basket, ensuring they don’t overlap.
10. Air fry at 380°F for 15 minutes, shaking the basket halfway through cooking time.
11. Increase temperature to 400°F and cook for 3-5 more minutes until golden brown and crispy.
12. Transfer the fries to a serving bowl immediately to maintain crispiness.
Beyond just being a healthier alternative, these fries achieve that perfect balance of crispy exterior and fluffy interior that makes them dangerously addictive. I love serving them alongside burgers or dipping them in garlic aioli for an extra flavor boost that always disappears faster than I can make another batch.
Air Fryer Stuffed Mini Peppers

Recently, I discovered these adorable mini peppers at my local farmer’s market and knew I had to create something special with them. As someone who relies heavily on my air fryer for quick weeknight dinners, I decided to stuff them with a creamy, savory filling that would cook up perfectly crispy. Now this recipe has become my go-to appetizer for last-minute gatherings or when I want to feel fancy without the effort.
20
peppers15
minutes10
minutesIngredients
– 1 pound mini sweet peppers (about 20 peppers, look for uniform size for even cooking)
– 8 ounces cream cheese, softened (leave at room temperature for 30 minutes for easier mixing)
– 1 cup shredded mozzarella cheese (pre-shredded works fine, but freshly shredded melts better)
– 1/4 cup grated Parmesan cheese (the finely grated kind that comes in containers)
– 2 cloves garlic, minced (about 2 teaspoons, or use 1/2 teaspoon garlic powder if preferred)
– 1 teaspoon Italian seasoning (or mix your own with dried basil, oregano, and thyme)
– 1/2 teaspoon salt (I use kosher salt for better distribution)
– 1/4 teaspoon black pepper (freshly ground gives the best flavor)
– 2 tablespoons olive oil (or any neutral oil like avocado or canola)
– 2 tablespoons chopped fresh parsley (optional garnish, but adds nice color and freshness)
Instructions
1. Preheat your air fryer to 375°F for 3 minutes while you prepare the peppers.
2. Wash the mini peppers thoroughly under cold running water and pat them completely dry with paper towels.
3. Carefully slice each pepper lengthwise from stem to tip, keeping the stem intact if possible.
4. Use a small spoon to scrape out all the seeds and white membranes from inside each pepper half.
5. In a medium mixing bowl, combine the softened cream cheese, mozzarella, Parmesan, minced garlic, Italian seasoning, salt, and black pepper.
6. Mix the filling ingredients with a spatula until fully combined and smooth, about 1-2 minutes of stirring.
7. Spoon approximately 1 tablespoon of the cheese mixture into each pepper half, mounding it slightly but not overflowing.
8. Lightly brush the outside of each stuffed pepper with olive oil using a pastry brush or your fingers.
9. Arrange the stuffed peppers in a single layer in your air fryer basket, leaving some space between them for air circulation.
10. Air fry at 375°F for 8-10 minutes until the peppers are tender and the filling is golden brown and bubbly.
11. Carefully remove the peppers from the air fryer using tongs and transfer them to a serving plate.
12. Sprinkle the hot peppers with chopped fresh parsley for garnish if desired.
My favorite thing about these peppers is how the sweet, tender pepper contrasts with the creamy, savory filling that gets beautifully browned in the air fryer. They’re fantastic served immediately while the cheese is still stretchy and molten, but I’ve also enjoyed them cooled down as part of a packed lunch. For parties, I sometimes drizzle them with balsamic glaze or serve with marinara sauce for dipping, though they’re delicious enough to stand completely on their own.
Garlic Parmesan Air Fryer Brussel Sprouts
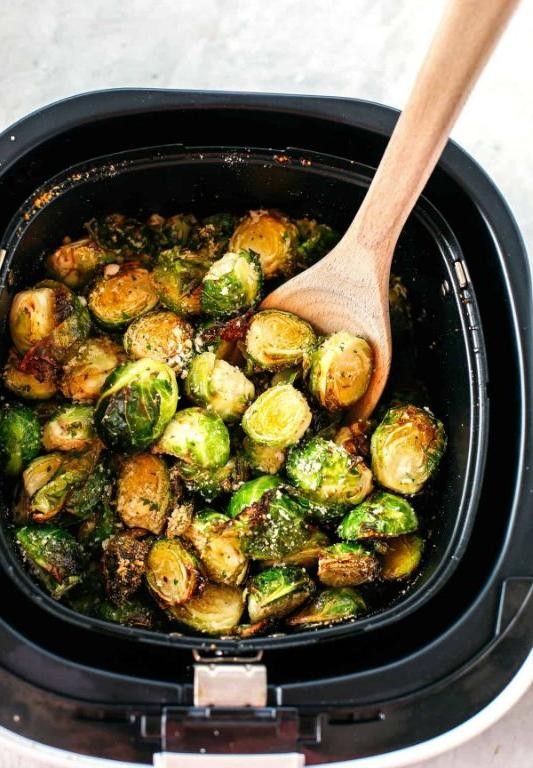
Every time I make these garlic parmesan Brussels sprouts in my air fryer, I’m reminded of that first bite that completely changed my mind about this humble vegetable. I used to be one of those people who turned up their nose at Brussels sprouts until my friend Sarah convinced me to try them roasted with garlic – now they’re a weekly staple in my kitchen that even my picky eaters devour.
3
servings10
minutes15
minutesIngredients
- 1 pound Brussels sprouts, trimmed and halved (look for similar-sized sprouts for even cooking)
- 2 tablespoons olive oil (or avocado oil for higher smoke point)
- 3 cloves garlic, minced (fresh garlic works best here)
- 1/4 cup grated Parmesan cheese (the kind you grate yourself melts better)
- 1/2 teaspoon salt (I prefer fine sea salt for even distribution)
- 1/4 teaspoon black pepper (freshly cracked adds more flavor)
- 1/4 teaspoon paprika (optional, for a subtle smoky note)
Instructions
- Preheat your air fryer to 375°F for 3 minutes while you prepare the Brussels sprouts.
- Trim the stem ends of Brussels sprouts and cut each one in half lengthwise through the core.
- Place halved Brussels sprouts in a medium mixing bowl and drizzle with olive oil.
- Toss the Brussels sprouts thoroughly until every piece is lightly coated with oil.
- Add minced garlic, salt, black pepper, and paprika to the bowl and toss again to distribute evenly.
- Transfer the seasoned Brussels sprouts to the air fryer basket in a single layer, making sure they don’t overlap.
- Air fry at 375°F for 12 minutes, shaking the basket halfway through cooking time.
- Sprinkle grated Parmesan cheese over the Brussels sprouts during the last 2 minutes of cooking.
- Check that Brussels sprouts are fork-tender with crispy, browned edges before removing from air fryer.
- Transfer the finished Brussels sprouts to a serving dish immediately to prevent further cooking.
Unbelievably crispy on the outside while remaining tender inside, these garlic parmesan Brussels sprouts develop this incredible nutty-sweet flavor that pairs perfectly with the savory cheese coating. I love serving them alongside grilled chicken or stirring them into pasta dishes for an extra vegetable boost – they’re so good that my kids actually fight over the last few pieces!
Quick Air Fryer Fish Tacos

These quick air fryer fish tacos have become my go-to weeknight dinner when I want something delicious without the fuss. The other night, my kids actually asked for seconds—and that’s saying something for a household that usually debates everything from broccoli to bedtime.
8
tacos15
minutes13
minutesIngredients
- 1 lb white fish fillets (like cod or tilapia), cut into 1-inch strips
- 1 cup panko breadcrumbs (for extra crunch)
- 1/4 cup all-purpose flour
- 2 large eggs, beaten
- 1 tsp chili powder (adjust to spice preference)
- 1/2 tsp garlic powder
- 1/2 tsp cumin
- 1/4 tsp salt
- 8 small corn tortillas
- 1 cup shredded cabbage (red or green both work)
- 1/2 cup sour cream (or Greek yogurt for a lighter option)
- 1 lime, cut into wedges
- 1/4 cup chopped cilantro (omit if you’re not a fan)
- Cooking spray (or any neutral oil)
Instructions
- Preheat your air fryer to 400°F for 3 minutes.
- Pat the fish strips completely dry with paper towels to ensure the coating sticks well.
- In a shallow bowl, mix the panko breadcrumbs, chili powder, garlic powder, cumin, and salt until evenly combined.
- Place the flour in a separate shallow bowl and the beaten eggs in a third bowl.
- Dredge each fish strip first in the flour, shaking off any excess.
- Dip the floured fish into the beaten eggs, letting any extra drip off.
- Coat the fish thoroughly in the panko mixture, pressing gently to help the crumbs adhere.
- Lightly spray the air fryer basket with cooking spray to prevent sticking.
- Arrange the coated fish strips in a single layer in the air fryer basket, leaving space between them for even cooking.
- Spray the tops of the fish with cooking spray for a golden finish.
- Air fry at 400°F for 8–10 minutes, flipping halfway through, until the coating is crispy and the fish flakes easily with a fork.
- While the fish cooks, warm the corn tortillas in a dry skillet over medium heat for 30 seconds per side or until pliable.
- Assemble each taco by placing a few fish strips on a warm tortilla.
- Top with shredded cabbage, a dollop of sour cream, a sprinkle of cilantro, and a squeeze of lime juice.
Perfectly crispy on the outside and tender inside, these tacos burst with zesty lime and warm spices. I love serving them with extra lime wedges and a side of black beans for a complete meal that feels like a mini vacation on a busy night.
Air Fryer Honey Glazed Salmon
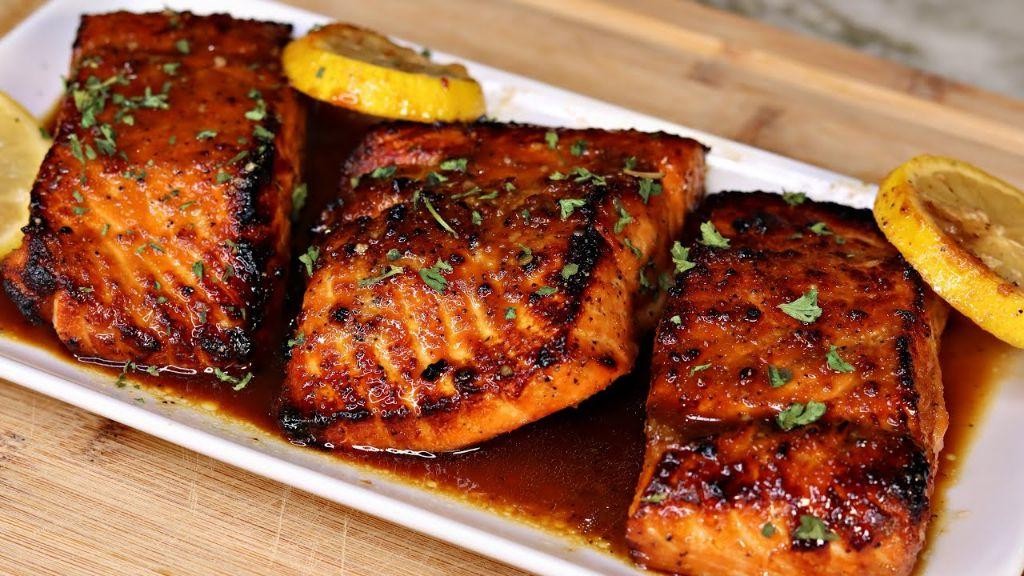
Last week, I was rushing to get dinner on the table after a long day when I remembered this honey glazed salmon recipe that never fails to impress. It’s become my go-to for busy weeknights because it comes together so quickly, and the air fryer gives it the most perfect crispy edges without heating up my entire kitchen.
2
servings10
minutes14
minutesIngredients
- 1 lb salmon filet, skin-on (helps keep it moist)
- 2 tbsp olive oil (or any neutral oil)
- 3 tbsp honey
- 2 tbsp soy sauce (low sodium works too)
- 2 cloves garlic, minced (fresh is best)
- 1 tsp ginger, grated
- 1/2 tsp black pepper
- 1/4 tsp red pepper flakes (optional, for heat)
- 1 tbsp fresh lemon juice
- 1 tbsp chopped parsley for garnish
Instructions
- Pat the salmon filet completely dry with paper towels to ensure crispy skin.
- In a small bowl, whisk together olive oil, honey, soy sauce, minced garlic, grated ginger, black pepper, and red pepper flakes until fully combined.
- Brush half of the honey glaze evenly over the top of the salmon filet, reserving the remaining glaze.
- Preheat your air fryer to 400°F for 3 minutes.
- Place the salmon skin-side down in the air fryer basket, making sure pieces aren’t touching.
- Air fry at 400°F for 8 minutes.
- Open the air fryer and carefully brush the remaining glaze over the salmon.
- Continue air frying for another 2-4 minutes until the internal temperature reaches 145°F and the edges are caramelized.
- Remove the salmon from the air fryer and immediately drizzle with fresh lemon juice.
- Sprinkle with chopped parsley before serving.
Nothing beats that glossy, sticky-sweet crust giving way to tender, flaky salmon underneath. I love serving this over a bed of quinoa with roasted asparagus, but it’s equally fantastic flaked into tacos or tossed with pasta for a quick upgrade.
Vegetarian Air Fryer Stuffed Mushrooms

Oh my goodness, these vegetarian air fryer stuffed mushrooms have become my go-to appetizer for everything from casual game nights to last-minute dinner parties. I first experimented with this recipe when my herb garden was overflowing with parsley, and now I make them almost weekly because they’re so ridiculously easy and always impress guests.
16
mushrooms15
minutes18
minutesIngredients
– 16 large cremini mushrooms (about 1 pound), stems removed and reserved
– 1 tablespoon olive oil (or avocado oil for higher smoke point)
– 1/2 cup panko breadcrumbs
– 1/4 cup grated Parmesan cheese
– 2 tablespoons chopped fresh parsley
– 1/4 cup cream cheese, softened
– 1 garlic clove, minced
– 1/4 teaspoon salt
– 1/8 teaspoon black pepper
Instructions
1. Preheat your air fryer to 375°F for 3 minutes.
2. Gently wipe mushroom caps with a damp paper towel to clean them.
3. Finely chop the reserved mushroom stems.
4. Heat olive oil in a skillet over medium heat for 1 minute.
5. Add chopped mushroom stems and cook for 4-5 minutes until softened.
6. Add minced garlic and cook for 30 seconds until fragrant.
7. Transfer the mushroom stem mixture to a medium bowl.
8. Add panko breadcrumbs, Parmesan cheese, parsley, cream cheese, salt, and pepper to the bowl.
9. Mix all ingredients thoroughly until well combined.
10. Spoon the filling mixture evenly into each mushroom cap.
11. Arrange stuffed mushrooms in a single layer in the air fryer basket.
12. Air fry at 375°F for 10-12 minutes until the tops are golden brown and mushrooms are tender.
13. Let mushrooms rest for 2 minutes before serving.
Last night I served these to friends who couldn’t believe they were vegetarian – the crispy panko topping gives way to creamy, garlicky filling while the mushroom caps stay perfectly juicy. They’re fantastic dipped in marinara sauce or served alongside a crisp green salad for a light meal.
Simple Air Fryer Buffalo Cauliflower

Getting crispy, flavorful wings without the guilt has been my latest kitchen obsession, and this air fryer buffalo cauliflower has become my go-to game day snack. I actually stumbled upon this recipe when my vegetarian friend came over for football Sunday, and now it’s become a regular in my rotation—even my meat-loving husband can’t get enough of these spicy little florets.
2
servings15
minutes25
minutesIngredients
– 1 large head cauliflower, cut into bite-sized florets (about 4 cups)
– 1/2 cup all-purpose flour (or gluten-free flour blend)
– 1/2 cup water
– 1 tsp garlic powder
– 1/2 tsp smoked paprika
– 1/4 tsp salt
– 1/2 cup buffalo sauce (I prefer Frank’s RedHot)
– 2 tbsp melted butter or olive oil (for richer flavor)
– Cooking spray (avocado oil works best for high heat)
Instructions
1. Preheat your air fryer to 375°F for 3 minutes while you prepare the cauliflower batter.
2. Whisk together flour, water, garlic powder, smoked paprika, and salt in a large bowl until smooth—the consistency should be like pancake batter.
3. Toss cauliflower florets in the batter mixture until evenly coated, letting excess drip off before placing in the air fryer basket.
4. Arrange battered cauliflower in a single layer in the air fryer basket, making sure pieces don’t touch for maximum crispiness.
5. Lightly spray cauliflower with cooking spray and air fry at 375°F for 15 minutes, flipping halfway through when edges turn golden brown.
6. While cauliflower cooks, whisk together buffalo sauce and melted butter in a separate bowl until fully combined.
7. Transfer partially cooked cauliflower to the buffalo sauce mixture and toss gently until every piece is coated.
8. Return sauced cauliflower to the air fryer basket and cook for another 5-7 minutes at 375°F until sauce is sticky and edges are crispy.
9. Remove cauliflower from air fryer and let rest for 2 minutes before serving—this helps the sauce set properly. What makes these cauliflower bites so irresistible is that perfect crispy-on-the-outside, tender-on-the-inside texture with that classic buffalo kick. I love serving them piled high with celery sticks and blue cheese dressing for dipping, though they’re equally amazing tucked into wraps with cool ranch slaw.
Air Fryer Coconut Shrimp

Finally, after years of avoiding deep-frying because of the mess and oil splatters, I discovered this game-changing air fryer method for coconut shrimp that satisfies that crispy craving without the guilt. I first tried these at a beachside restaurant in Florida last summer and have been perfecting my homemade version ever since—they’re now my go-to appetizer for casual gatherings.
5
servings15
minutes13
minutesIngredients
- 1 pound large raw shrimp, peeled and deveined (thaw if frozen)
- 1/2 cup all-purpose flour
- 2 large eggs, beaten
- 1 cup panko breadcrumbs
- 1 cup sweetened shredded coconut
- 1/2 teaspoon garlic powder
- 1/2 teaspoon paprika
- 1/4 teaspoon salt
- Cooking spray (avocado or coconut oil spray works well)
- 1/4 cup sweet chili sauce (for dipping, or substitute with mango salsa)
Instructions
- Pat the shrimp completely dry with paper towels to ensure the coating sticks properly.
- Set up three shallow bowls: place flour in the first, beaten eggs in the second, and combine panko, shredded coconut, garlic powder, paprika, and salt in the third.
- Dredge each shrimp in flour, shaking off any excess.
- Dip the floured shrimp into the beaten eggs, allowing excess to drip off.
- Press the shrimp firmly into the coconut-panko mixture, coating evenly on all sides.
- Preheat your air fryer to 375°F for 3 minutes.
- Arrange shrimp in a single layer in the air fryer basket, leaving space between each piece.
- Lightly spray the shrimp with cooking spray to help them crisp up and turn golden.
- Air fry at 375°F for 6 minutes, then flip each shrimp using tongs.
- Spray the flipped side with cooking spray and continue air frying for another 4-6 minutes until golden brown and crispy.
- Check that the internal temperature of the shrimp reaches 120°F using an instant-read thermometer for food safety.
- Remove the shrimp from the air fryer and let them rest for 2 minutes before serving.
Perfectly golden and delightfully crunchy, these shrimp have a sweet coconut flavor that pairs wonderfully with the tangy kick of sweet chili sauce. I love serving them over a bed of greens for a light meal or stacking them high on a platter with lemon wedges—they always disappear faster than I can make them!
Spicy Air Fryer Chickpeas
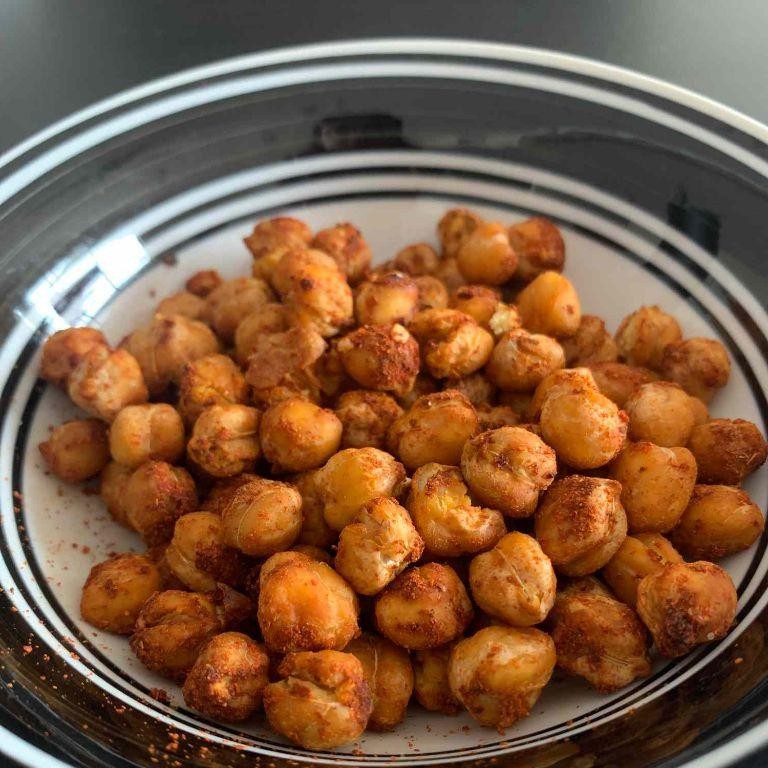
Sometimes the best snacks come from the simplest ingredients, and these spicy air fryer chickpeas are my latest obsession. I discovered this recipe during a pantry clean-out when I needed a quick, healthy alternative to chips, and now I make them weekly for movie nights or as salad toppers. They’re so addictive that my husband has started hiding the finished batch from me!
5
servings10
minutes15
minutesIngredients
– 2 (15 oz) cans chickpeas, drained and rinsed (pat them very dry for maximum crispiness)
– 1 tablespoon olive oil (or any neutral oil like avocado oil)
– 1 teaspoon smoked paprika (this adds that smoky depth I love)
– ½ teaspoon garlic powder
– ¼ teaspoon cayenne pepper (use ⅛ teaspoon for milder heat)
– ½ teaspoon salt (I prefer fine sea salt for even coating)
Instructions
1. Preheat your air fryer to 400°F for 3 minutes while you prepare the chickpeas.
2. Spread the dried chickpeas on a clean kitchen towel and gently rub them to remove any loose skins—this helps them get extra crispy.
3. Transfer the chickpeas to a medium bowl and drizzle with olive oil, tossing until evenly coated.
4. Sprinkle the smoked paprika, garlic powder, cayenne pepper, and salt over the chickpeas, then toss again to ensure every chickpea is seasoned.
5. Arrange the chickpeas in a single layer in the air fryer basket, making sure they aren’t crowded for optimal air circulation.
6. Air fry at 400°F for 12 minutes, shaking the basket halfway through to promote even cooking.
7. Check for doneness—the chickpeas should be golden brown and crispy when tapped—then air fry for 2-3 more minutes if needed.
8. Remove the chickpeas from the air fryer and let them cool completely on the counter, which helps them crisp up further.
You’ll love the satisfying crunch these chickpeas develop, with just enough heat from the cayenne to keep you reaching for more. I often sprinkle them over Greek yogurt with fresh herbs for a quick lunch, or pack them in small bags for hiking snacks—they never last long!
Air Fryer BBQ Chicken Skewers
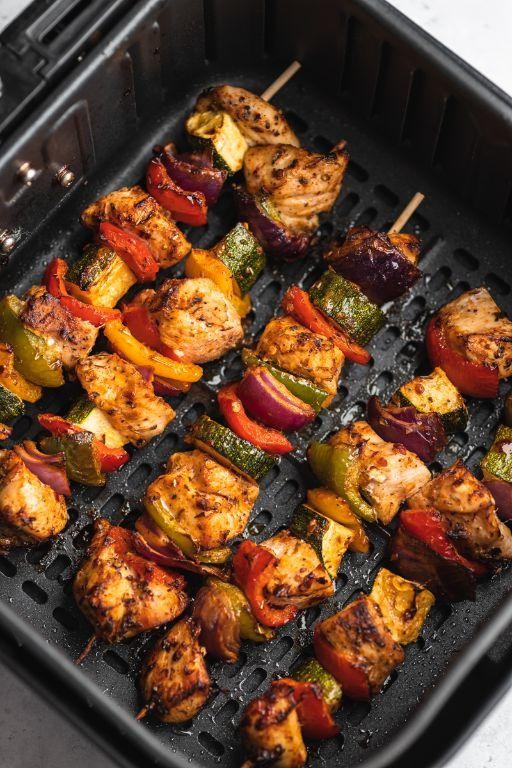
My family used to reserve BBQ skewers for summer grilling season, but ever since I discovered how perfectly they cook in the air fryer, we enjoy these tender, smoky bites year-round—even on busy weeknights like tonight when I’m craving that grilled flavor without firing up the outdoor grill.
5
skewers15
minutes17
minutesIngredients
– 1.5 lbs boneless, skinless chicken breasts, cut into 1-inch cubes (thighs work too for juicier results)
– 1/2 cup BBQ sauce, divided (I prefer smoky-sweet varieties)
– 2 tbsp olive oil (or any neutral oil)
– 1 tbsp smoked paprika
– 1 tsp garlic powder
– 1/2 tsp salt
– 1/4 tsp black pepper
– 8 wooden skewers, soaked in water for 30 minutes (prevents burning)
Instructions
1. Soak 8 wooden skewers in water for 30 minutes to prevent burning in the air fryer.
2. Cut 1.5 lbs chicken breasts into uniform 1-inch cubes for even cooking.
3. In a medium bowl, whisk together 2 tbsp olive oil, 1 tbsp smoked paprika, 1 tsp garlic powder, 1/2 tsp salt, and 1/4 tsp black pepper.
4. Add chicken cubes to the bowl and toss until thoroughly coated with the spice mixture.
5. Thread marinated chicken cubes onto soaked skewers, leaving small gaps between pieces.
6. Preheat air fryer to 375°F for 3 minutes.
7. Arrange skewers in a single layer in the air fryer basket, not touching.
8. Air fry at 375°F for 10 minutes, flipping skewers halfway through cooking time.
9. Brush skewers with 1/4 cup BBQ sauce using a pastry brush.
10. Return to air fryer and cook at 375°F for 3-4 minutes until sauce is caramelized and chicken reaches 165°F internally.
11. Remove skewers from air fryer and let rest for 3 minutes before serving.
12. Drizzle with remaining 1/4 cup BBQ sauce just before serving. Our favorite way to serve these is over cilantro-lime rice with extra sauce for dipping—the chicken stays incredibly juicy inside while the edges get slightly charred and sticky-sweet from the caramelized BBQ glaze.
Air Fryer Chocolate Lava Cakes

My air fryer has become my go-to kitchen gadget for everything from crispy veggies to quick desserts, but these chocolate lava cakes are what really made me fall in love with it. There’s something magical about having warm, gooey chocolate dessert ready in under 15 minutes that feels like cheating at life in the best way possible.
5
portions10
minutes9
minutesIngredients
– 1/2 cup semi-sweet chocolate chips (high quality melts better)
– 1/4 cup unsalted butter (plus extra for greasing)
– 2 large eggs (room temperature blends smoother)
– 1/4 cup granulated sugar
– 2 tbsp all-purpose flour
– 1/4 tsp vanilla extract
– Pinch of salt (enhances chocolate flavor)
– Cooking spray or butter for ramekins
Instructions
1. Generously grease four 6-ounce ramekins with butter or cooking spray, making sure to coat the bottoms and sides completely.
2. In a microwave-safe bowl, combine chocolate chips and butter, then microwave for 45 seconds at high power.
3. Stir the chocolate-butter mixture until completely smooth and glossy, using the residual heat to melt any remaining chunks.
4. In a separate medium bowl, whisk eggs and sugar together vigorously for 2 minutes until pale and slightly thickened.
5. Slowly pour the warm chocolate mixture into the egg mixture while continuously whisking to prevent curdling.
6. Add flour, vanilla extract, and salt to the combined wet ingredients, then fold gently until no dry streaks remain.
7. Divide the batter evenly among the four prepared ramekins, filling each about 3/4 full.
8. Place two ramekins in your air fryer basket, ensuring they don’t touch each other or the sides.
9. Air fry at 375°F for exactly 9 minutes – the tops should look set with slight cracks but still jiggle when shaken.
10. Carefully remove the hot ramekins using oven mitts and let them rest for 1 minute before serving.
11. Run a knife around the edges of each ramekin to loosen the cakes.
12. Invert each ramekin onto a serving plate and gently lift to release the cake.
But that first spoonful breaking through the delicate cake exterior into the molten chocolate center is pure bliss. The contrast between the warm, flowing chocolate and the tender cake creates an experience that feels both elegant and comforting. I love serving these with a dusting of powdered sugar and fresh raspberries, but a scoop of vanilla ice cream melting into the warm chocolate is absolutely divine.
Zesty Air Fryer Zucchini Fries

Zesty Air Fryer Zucchini Fries have become my go-to snack ever since I discovered how perfectly crispy they get without all the oil of traditional frying—my air fryer has honestly changed my weeknight cooking game!
2
servings15
minutes15
minutesIngredients
– 2 medium zucchinis, cut into ½-inch thick fry-shaped sticks (choose firm ones for less moisture)
– ½ cup all-purpose flour (or gluten-free flour blend if needed)
– 2 large eggs, lightly beaten (room temperature helps coating stick better)
– 1 cup panko breadcrumbs (or regular breadcrumbs for finer texture)
– ¼ cup grated Parmesan cheese (the powdery kind works best)
– 1 tsp garlic powder
– ½ tsp paprika
– ½ tsp salt (adjust if Parmesan is salty)
– Cooking spray (or any neutral oil in a spray bottle)
– ½ cup marinara sauce for dipping (warm it up for extra coziness)
Instructions
1. Preheat your air fryer to 400°F for 3 minutes.
2. Slice the zucchinis into ½-inch thick sticks, about 3 inches long.
3. Pat the zucchini sticks completely dry with paper towels to remove excess moisture.
4. Place the flour in a shallow bowl.
5. Add the beaten eggs to a second shallow bowl.
6. In a third bowl, mix the panko, Parmesan, garlic powder, paprika, and salt until combined.
7. Dredge each zucchini stick in the flour, shaking off any excess.
8. Dip the floured zucchini into the eggs, letting any drips fall back into the bowl.
9. Press the zucchini firmly into the panko mixture, coating all sides evenly.
10. Arrange the coated zucchini in a single layer in the air fryer basket, leaving space between each piece.
11. Lightly spray the zucchini with cooking spray.
12. Air fry at 400°F for 10–12 minutes, flipping halfway through, until golden brown and crispy.
13. Check for doneness—the coating should be firm and not soggy.
14. Repeat with any remaining zucchini in batches if needed.
15. Serve immediately with warmed marinara sauce for dipping. Seriously crispy on the outside with a tender zucchini center, these fries are irresistible straight from the air fryer—I love sprinkling them with extra Parmesan and serving alongside a cool ranch dip for a fun twist.
Air Fryer Roasted Garlic Potatoes

Aren’t roasted potatoes just the ultimate comfort food? I find myself making them almost weekly, especially since discovering how perfectly crispy they get in the air fryer. As a busy parent, I love that this method cuts cooking time in half while delivering that golden-brown exterior we all crave.
2
servings10
minutes20
minutesIngredients
– 2 pounds Yukon Gold potatoes, cut into 1-inch cubes (or russet potatoes)
– 3 tablespoons olive oil (or any neutral oil)
– 1 teaspoon garlic powder
– 1 teaspoon smoked paprika
– ½ teaspoon salt (adjust to taste)
– ¼ teaspoon black pepper (freshly ground works best)
– 2 tablespoons fresh parsley, chopped (optional for garnish)
Instructions
1. Preheat your air fryer to 400°F for 3 minutes.
2. Place potato cubes in a large mixing bowl.
3. Drizzle olive oil over potatoes and toss to coat evenly.
4. Sprinkle garlic powder, smoked paprika, salt, and black pepper over potatoes.
5. Toss potatoes vigorously for 1 minute to ensure even seasoning distribution.
6. Transfer seasoned potatoes to air fryer basket in a single layer, leaving space between pieces.
7. Air fry at 400°F for 15 minutes, shaking basket halfway through cooking time.
8. Check potatoes for doneness by piercing with a fork – they should be tender inside.
9. Continue cooking for 3-5 additional minutes if potatoes need more browning.
10. Remove potatoes from air fryer and transfer to serving bowl.
11. Sprinkle with fresh parsley if using.
Crazy how these potatoes achieve that perfect restaurant-quality crispness without deep frying. The smoky paprika and garlic create this incredible savory crust while the insides stay wonderfully fluffy. I love serving these alongside grilled chicken or crumbling them over breakfast hash the next morning – they reheat beautifully for meal prep too.
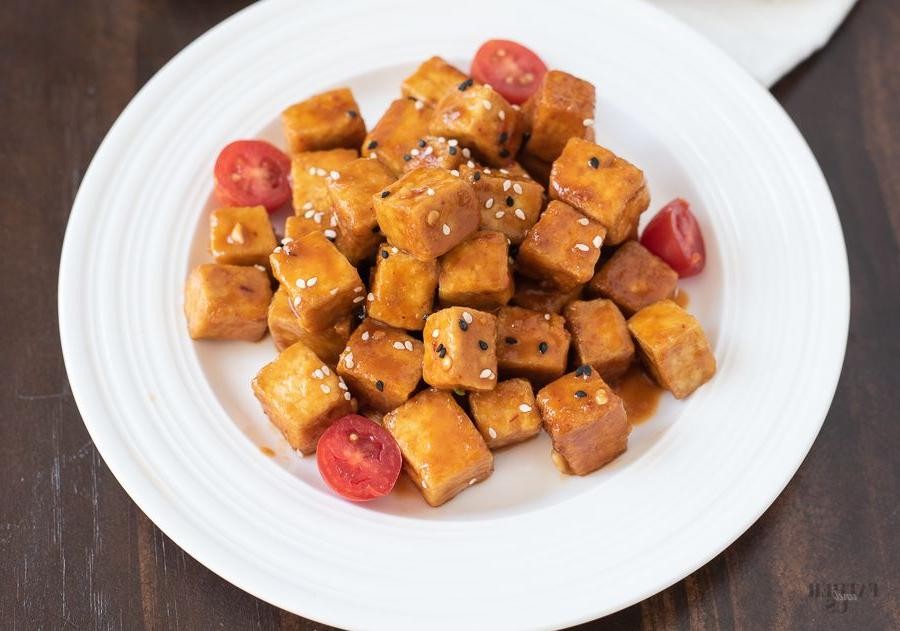
Sweet and Spicy Air Fryer Tofu
Oh my goodness, you guys—I’ve been on such an air fryer kick lately, and this Sweet and Spicy Air Fryer Tofu is my newest obsession. It’s the kind of recipe that makes even tofu skeptics in my house ask for seconds, and it’s so simple I can throw it together after a long day. Honestly, it’s become my go-to for busy weeknights when I want something flavorful without a lot of fuss.
4
servings25
minutes20
minutesIngredients
– 1 block (14 oz) extra-firm tofu, pressed and cubed (pressing removes excess water for crispiness)
– 2 tbsp cornstarch (helps create a crispy coating)
– 1 tbsp avocado oil, or any neutral oil (avocado oil has a high smoke point)
– 2 tbsp soy sauce, or tamari for gluten-free
– 1 tbsp maple syrup (adds sweetness; adjust for preference)
– 1 tsp sriracha, or more for extra heat
– 1 tsp rice vinegar (balances sweetness with tang)
– 1/2 tsp garlic powder
– 1/4 tsp red pepper flakes (optional, for added spice)
Instructions
1. Press the tofu for 15–20 minutes using a tofu press or by wrapping it in paper towels and placing a heavy pan on top to remove excess moisture.
2. Cut the pressed tofu into 1-inch cubes and place them in a medium bowl.
3. Sprinkle the cornstarch over the tofu cubes and toss gently until evenly coated.
4. Drizzle the avocado oil over the coated tofu and toss again to coat lightly.
5. Preheat the air fryer to 375°F for 3 minutes.
6. Arrange the tofu in a single layer in the air fryer basket, ensuring pieces don’t touch for even cooking.
7. Air fry the tofu at 375°F for 12–15 minutes, shaking the basket halfway through, until golden and crispy.
8. While the tofu cooks, whisk together the soy sauce, maple syrup, sriracha, rice vinegar, garlic powder, and red pepper flakes in a small bowl.
9. Transfer the cooked tofu to a clean bowl and pour the sauce mixture over it, tossing to coat evenly.
10. Return the sauced tofu to the air fryer and cook at 375°F for 2–3 more minutes until the sauce glazes and caramelizes slightly.
Now, this tofu comes out with a perfect crisp outside and a tender inside, and that sweet-spicy glaze clings to every bite. I love tossing it into grain bowls with veggies or serving it over rice for a quick, satisfying meal—it’s so versatile, you might just make it weekly like I do.
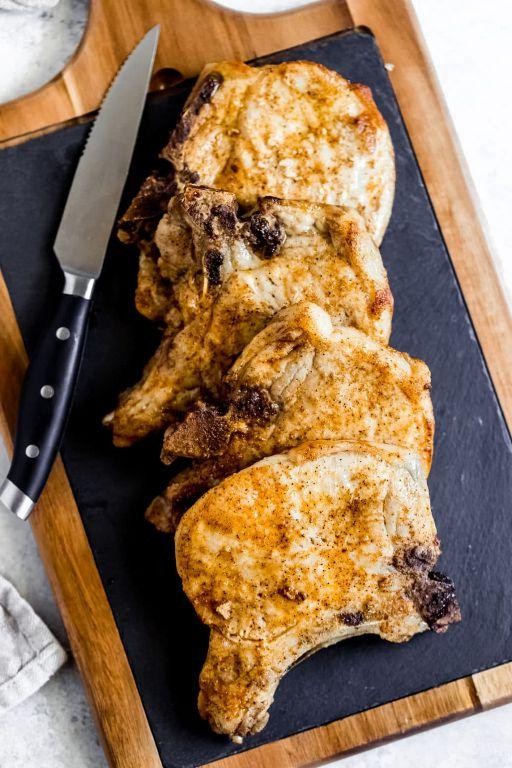
Cajun Air Fryer Pork Chops
Just last Tuesday, I was staring at some pork chops in my fridge, wondering how to make them exciting without turning on my oven in this lingering summer heat. My trusty air fryer came to the rescue, and a quick Cajun spice mix transformed a simple weeknight dinner into something my whole family begged me to make again. It’s become my new go-to for a fast, flavorful meal that feels anything but rushed.
2
servings10
minutes19
minutesIngredients
- 2 (1-inch thick) boneless pork chops (for even cooking)
- 1 tbsp olive oil (or any neutral oil)
- 1 tsp paprika (smoked paprika adds great depth)
- 1/2 tsp garlic powder
- 1/2 tsp onion powder
- 1/4 tsp dried oregano
- 1/4 tsp cayenne pepper (adjust for more or less heat)
- 1/4 tsp salt
- 1/4 tsp black pepper
Instructions
- Pat the pork chops completely dry with paper towels to ensure a good sear.
- Drizzle the olive oil over both sides of the pork chops, rubbing it in to coat evenly.
- In a small bowl, combine the paprika, garlic powder, onion powder, oregano, cayenne pepper, salt, and black pepper to create the Cajun seasoning blend.
- Sprinkle the seasoning mix generously over both sides of the pork chops, pressing gently to help it adhere.
- Preheat your air fryer to 400°F for 3 minutes for optimal cooking temperature.
- Place the seasoned pork chops in the air fryer basket in a single layer, ensuring they do not touch.
- Air fry at 400°F for 10 minutes, then flip the chops using tongs.
- Continue air frying for another 6-8 minutes, or until the internal temperature reaches 145°F when checked with an instant-read thermometer.
- Transfer the pork chops to a clean cutting board and let them rest for 5 minutes to allow juices to redistribute.
Resting is crucial for juicy pork chops, and you’ll notice the beautiful crust from the air fryer gives way to incredibly tender meat inside. I love serving these chops sliced over creamy grits to soak up all the spicy, smoky juices, or chopping them for a killer salad the next day.
Herb-Crusted Air Fryer Chicken Breasts

Biting into a perfectly cooked chicken breast shouldn’t feel like a chore, but let’s be real—dry, bland chicken is the worst! I’ve made more overcooked chicken than I care to admit, until my air fryer became my weeknight hero. This herb-crusted version is now my go-to for juicy, flavorful chicken in under 20 minutes.
2
servings10
minutes20
minutesIngredients
– 2 large boneless, skinless chicken breasts (about 1.5 lbs total)
– 1/4 cup panko breadcrumbs (or gluten-free breadcrumbs)
– 2 tbsp grated Parmesan cheese (the powdery kind works best)
– 1 tsp dried Italian seasoning (or 1 tbsp fresh chopped herbs)
– 1/2 tsp garlic powder
– 1/2 tsp paprika (smoked paprika adds nice depth)
– 1/4 tsp black pepper
– 1/4 tsp salt (adjust to your preference)
– 2 tbsp olive oil (or any neutral oil)
– 1 large egg
Instructions
1. Pat the chicken breasts completely dry with paper towels.
2. In a shallow bowl, whisk the egg until smooth and frothy.
3. In a separate shallow bowl, combine panko breadcrumbs, Parmesan cheese, Italian seasoning, garlic powder, paprika, black pepper, and salt.
4. Brush both sides of each chicken breast lightly with olive oil.
5. Dip each oiled chicken breast into the beaten egg, coating both sides evenly.
6. Press the egg-coated chicken firmly into the breadcrumb mixture, ensuring full coverage on all sides.
7. Preheat your air fryer to 375°F for 3 minutes.
8. Place the coated chicken breasts in a single layer in the air fryer basket, leaving space between them.
9. Air fry at 375°F for 12 minutes.
10. Flip the chicken breasts carefully using tongs.
11. Continue air frying for another 3-5 minutes until the internal temperature reaches 165°F when checked with a meat thermometer.
12. Remove the chicken from the air fryer and let it rest on a cutting board for 5 minutes before slicing.
Unbelievably crispy on the outside while staying incredibly moist inside, this chicken has completely changed my weeknight dinner game. The herb crust creates this wonderful savory crunch that pairs perfectly with everything from simple roasted vegetables to being sliced over a fresh salad—my personal favorite is serving it alongside garlic mashed potatoes with the crispy breadcrumbs adding fantastic texture contrast.
Conclusion
Savor the convenience of these 34 delicious 2-quart air fryer recipes perfect for quick, tasty meals! Whether you’re new to air frying or a seasoned pro, there’s something here for everyone. We’d love to hear which recipes become your favorites—drop us a comment below and don’t forget to share this roundup on Pinterest so other home cooks can enjoy these easy dishes too!


